Leaderboard
-
Mike W
Free Member3Points453Posts -
Namerow
Free Member3Points1,551Posts -

siteunseen
Free Member2Points15,115Posts -
2377kN
Free Member2Points32Posts


Popular Content
Showing content with the highest reputation on 01/27/2018 in all areas
-
3 pointsWhat were we talking about? I've forgotten. 'Fumes'? Yes, I remember those. Lots of them, in fact.3 points
-
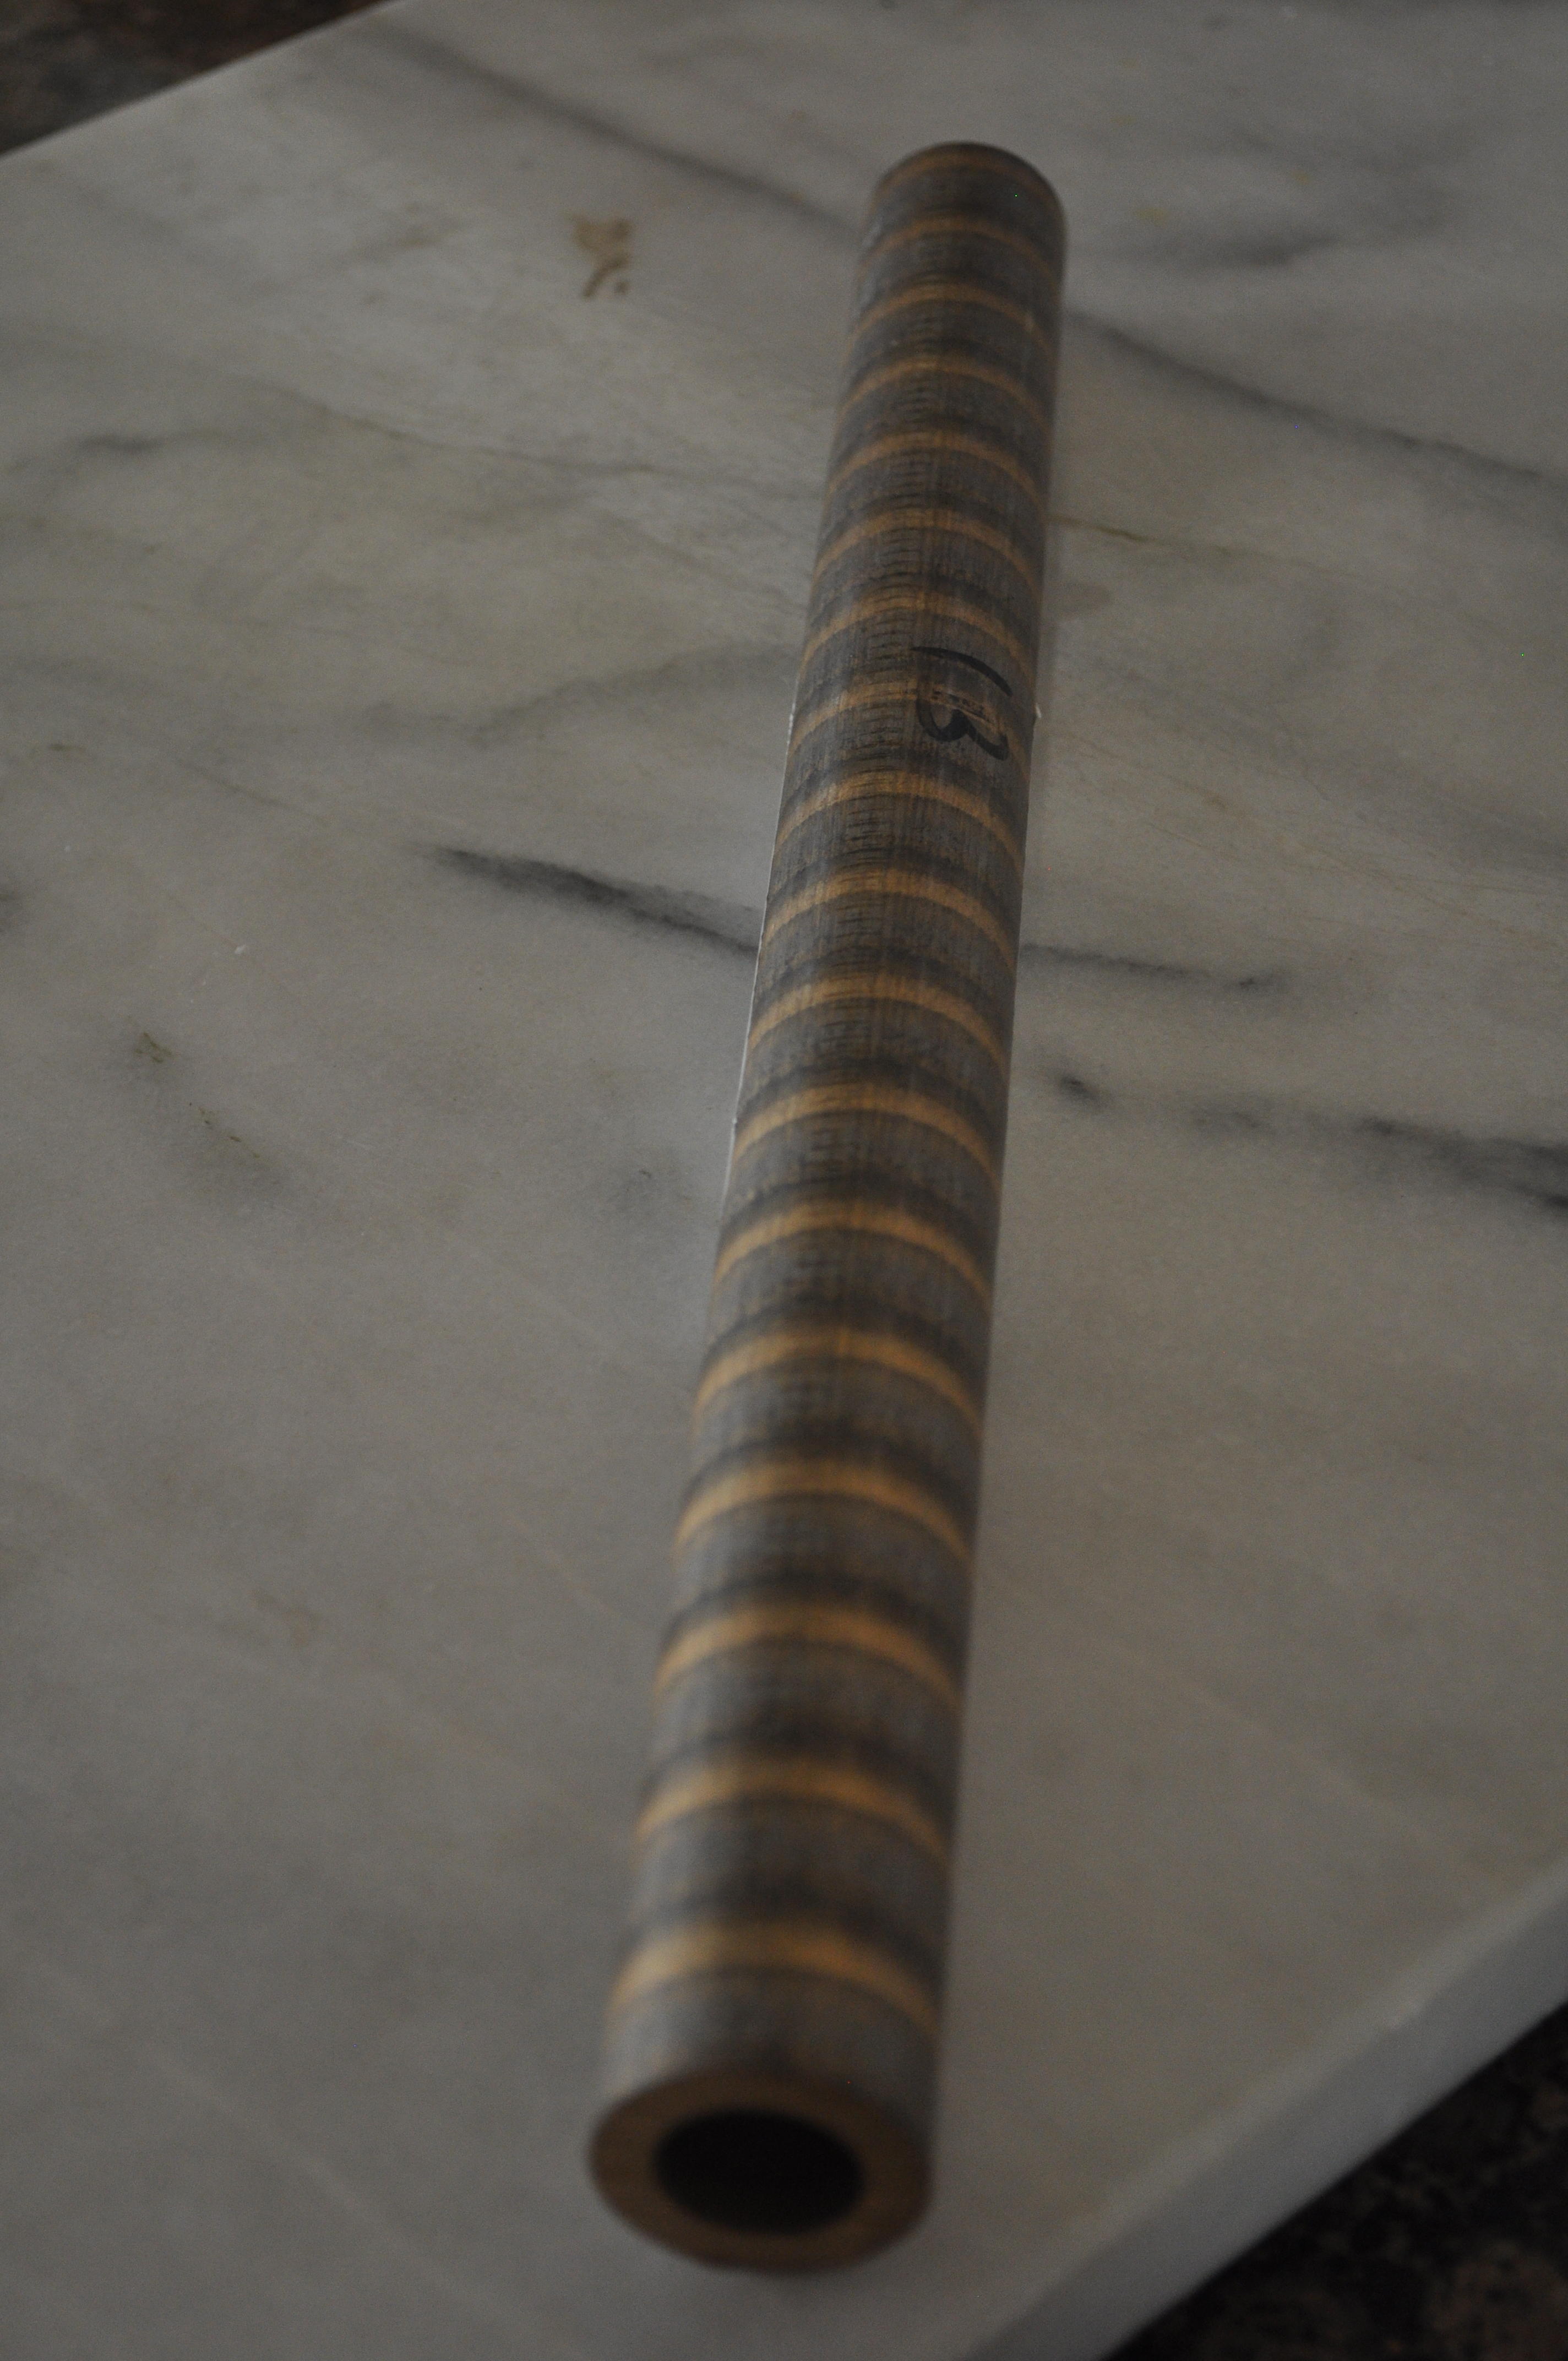
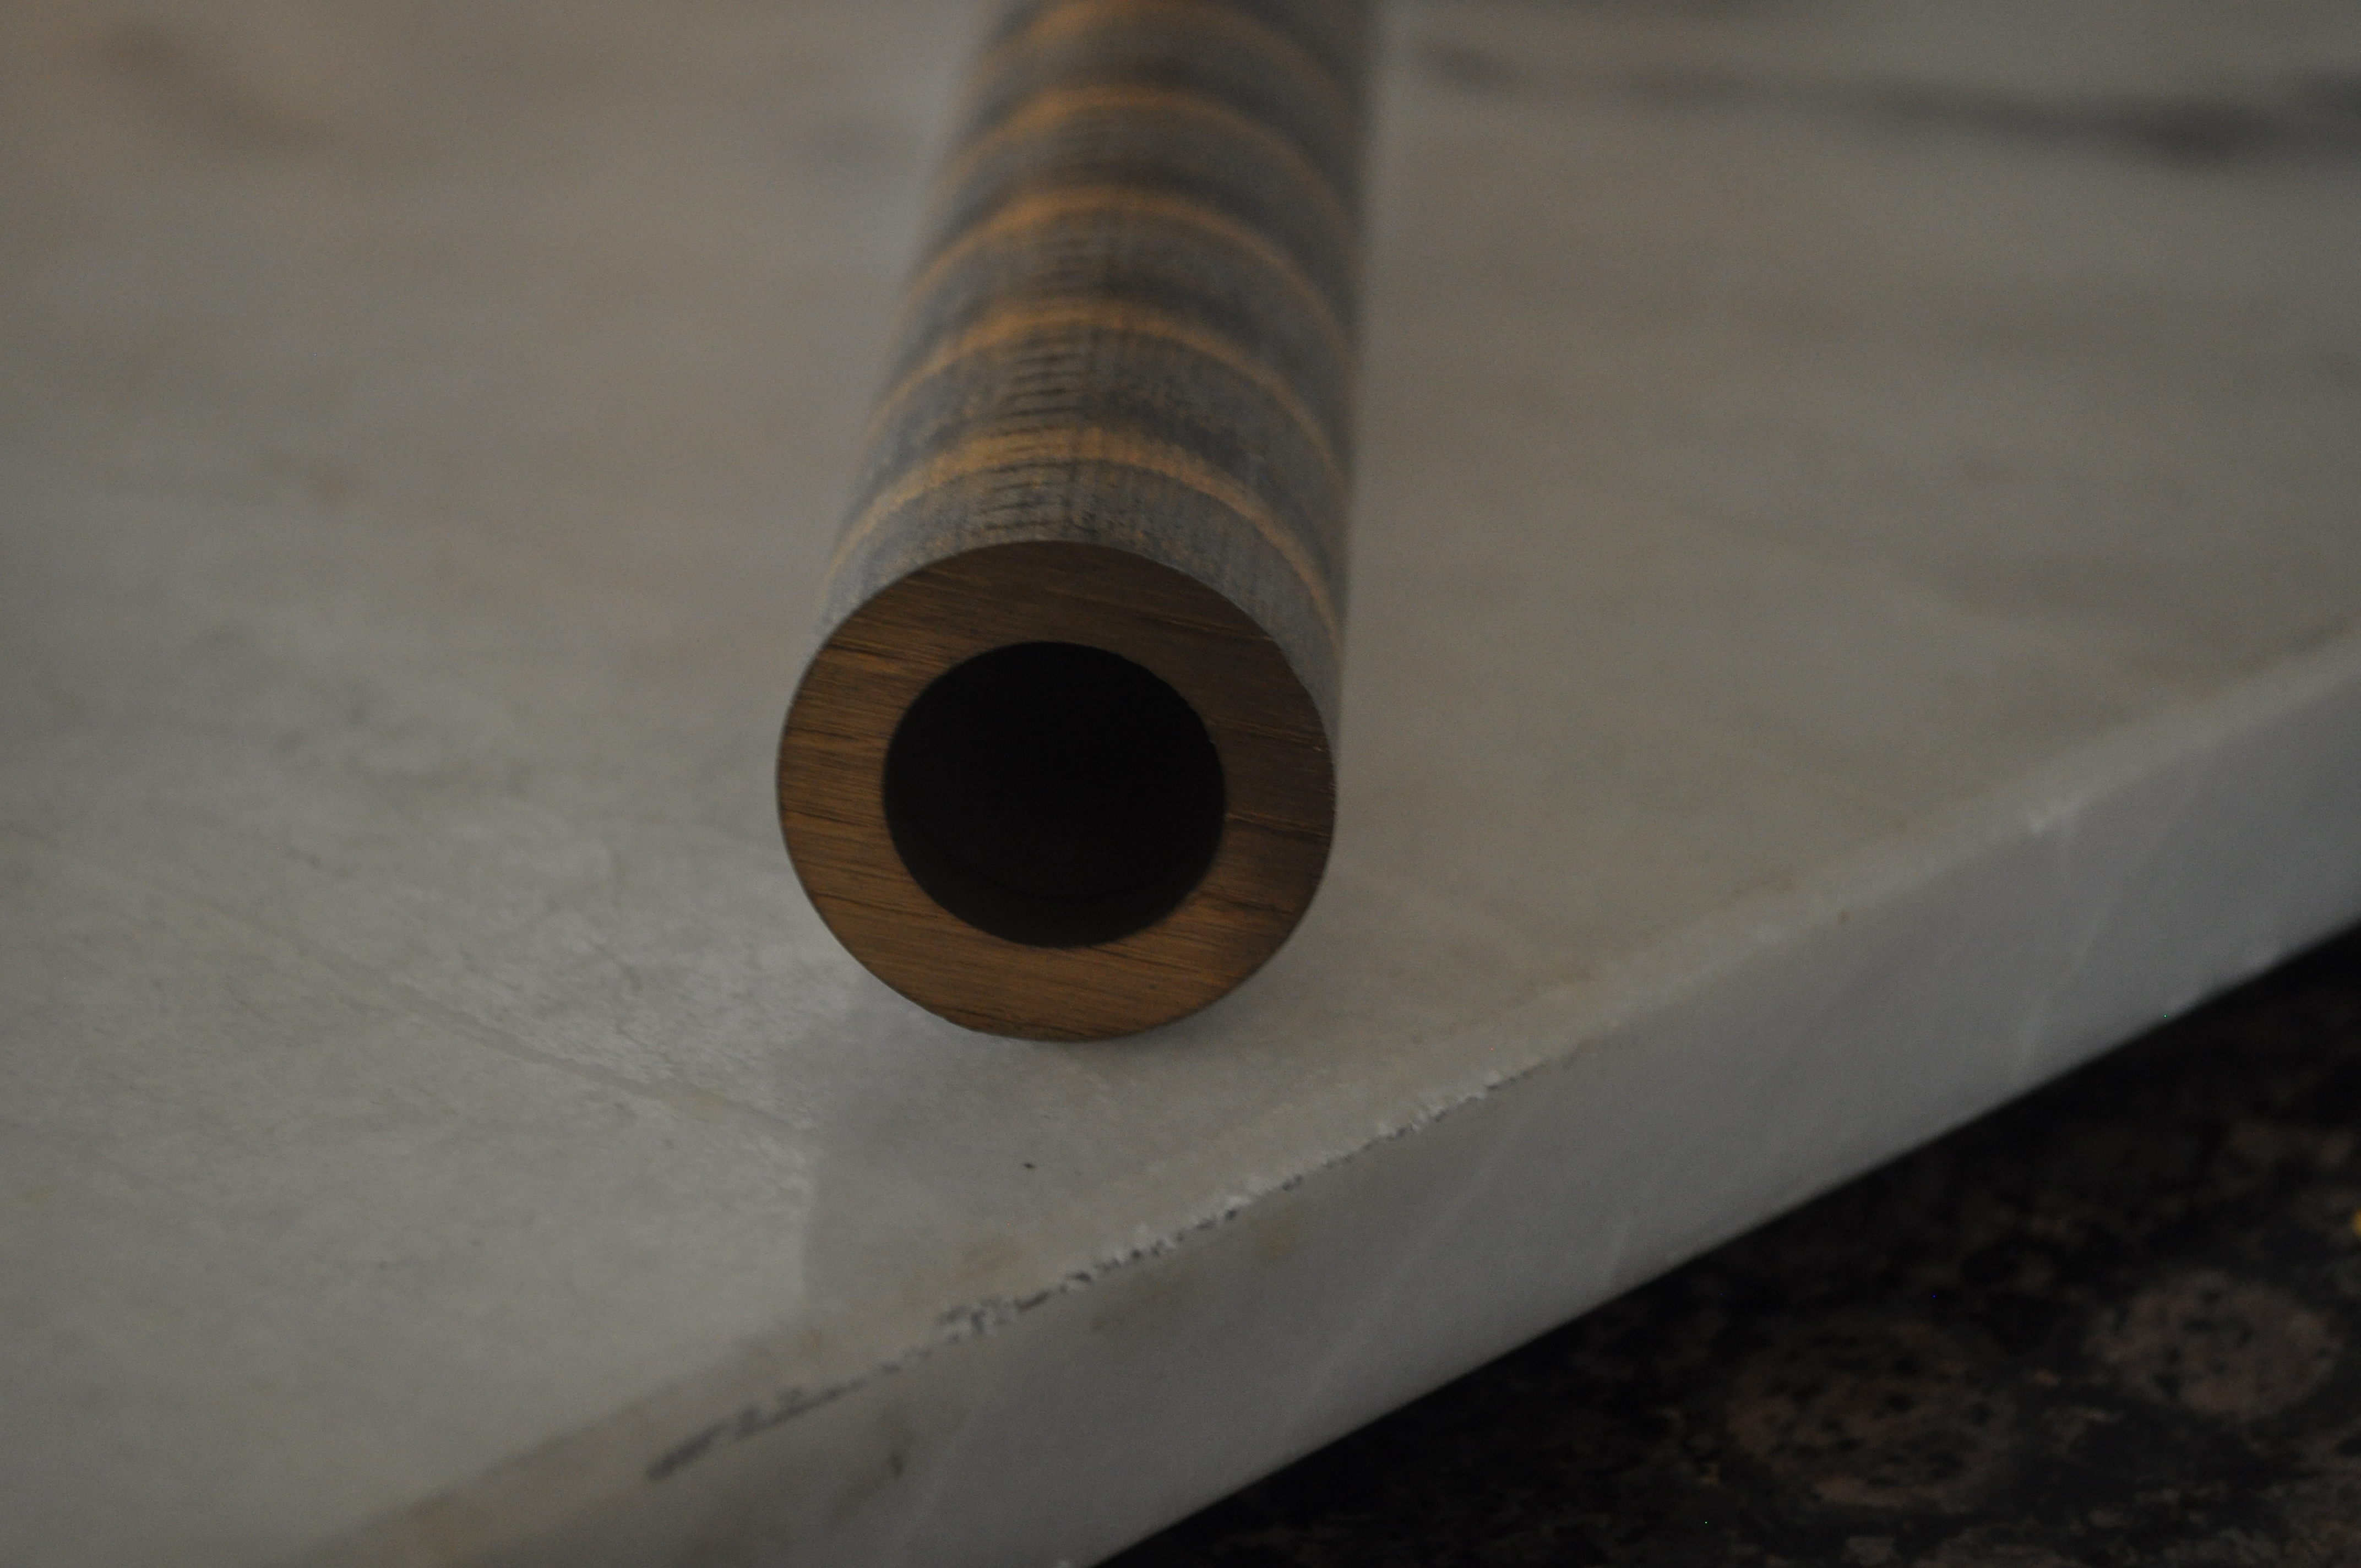
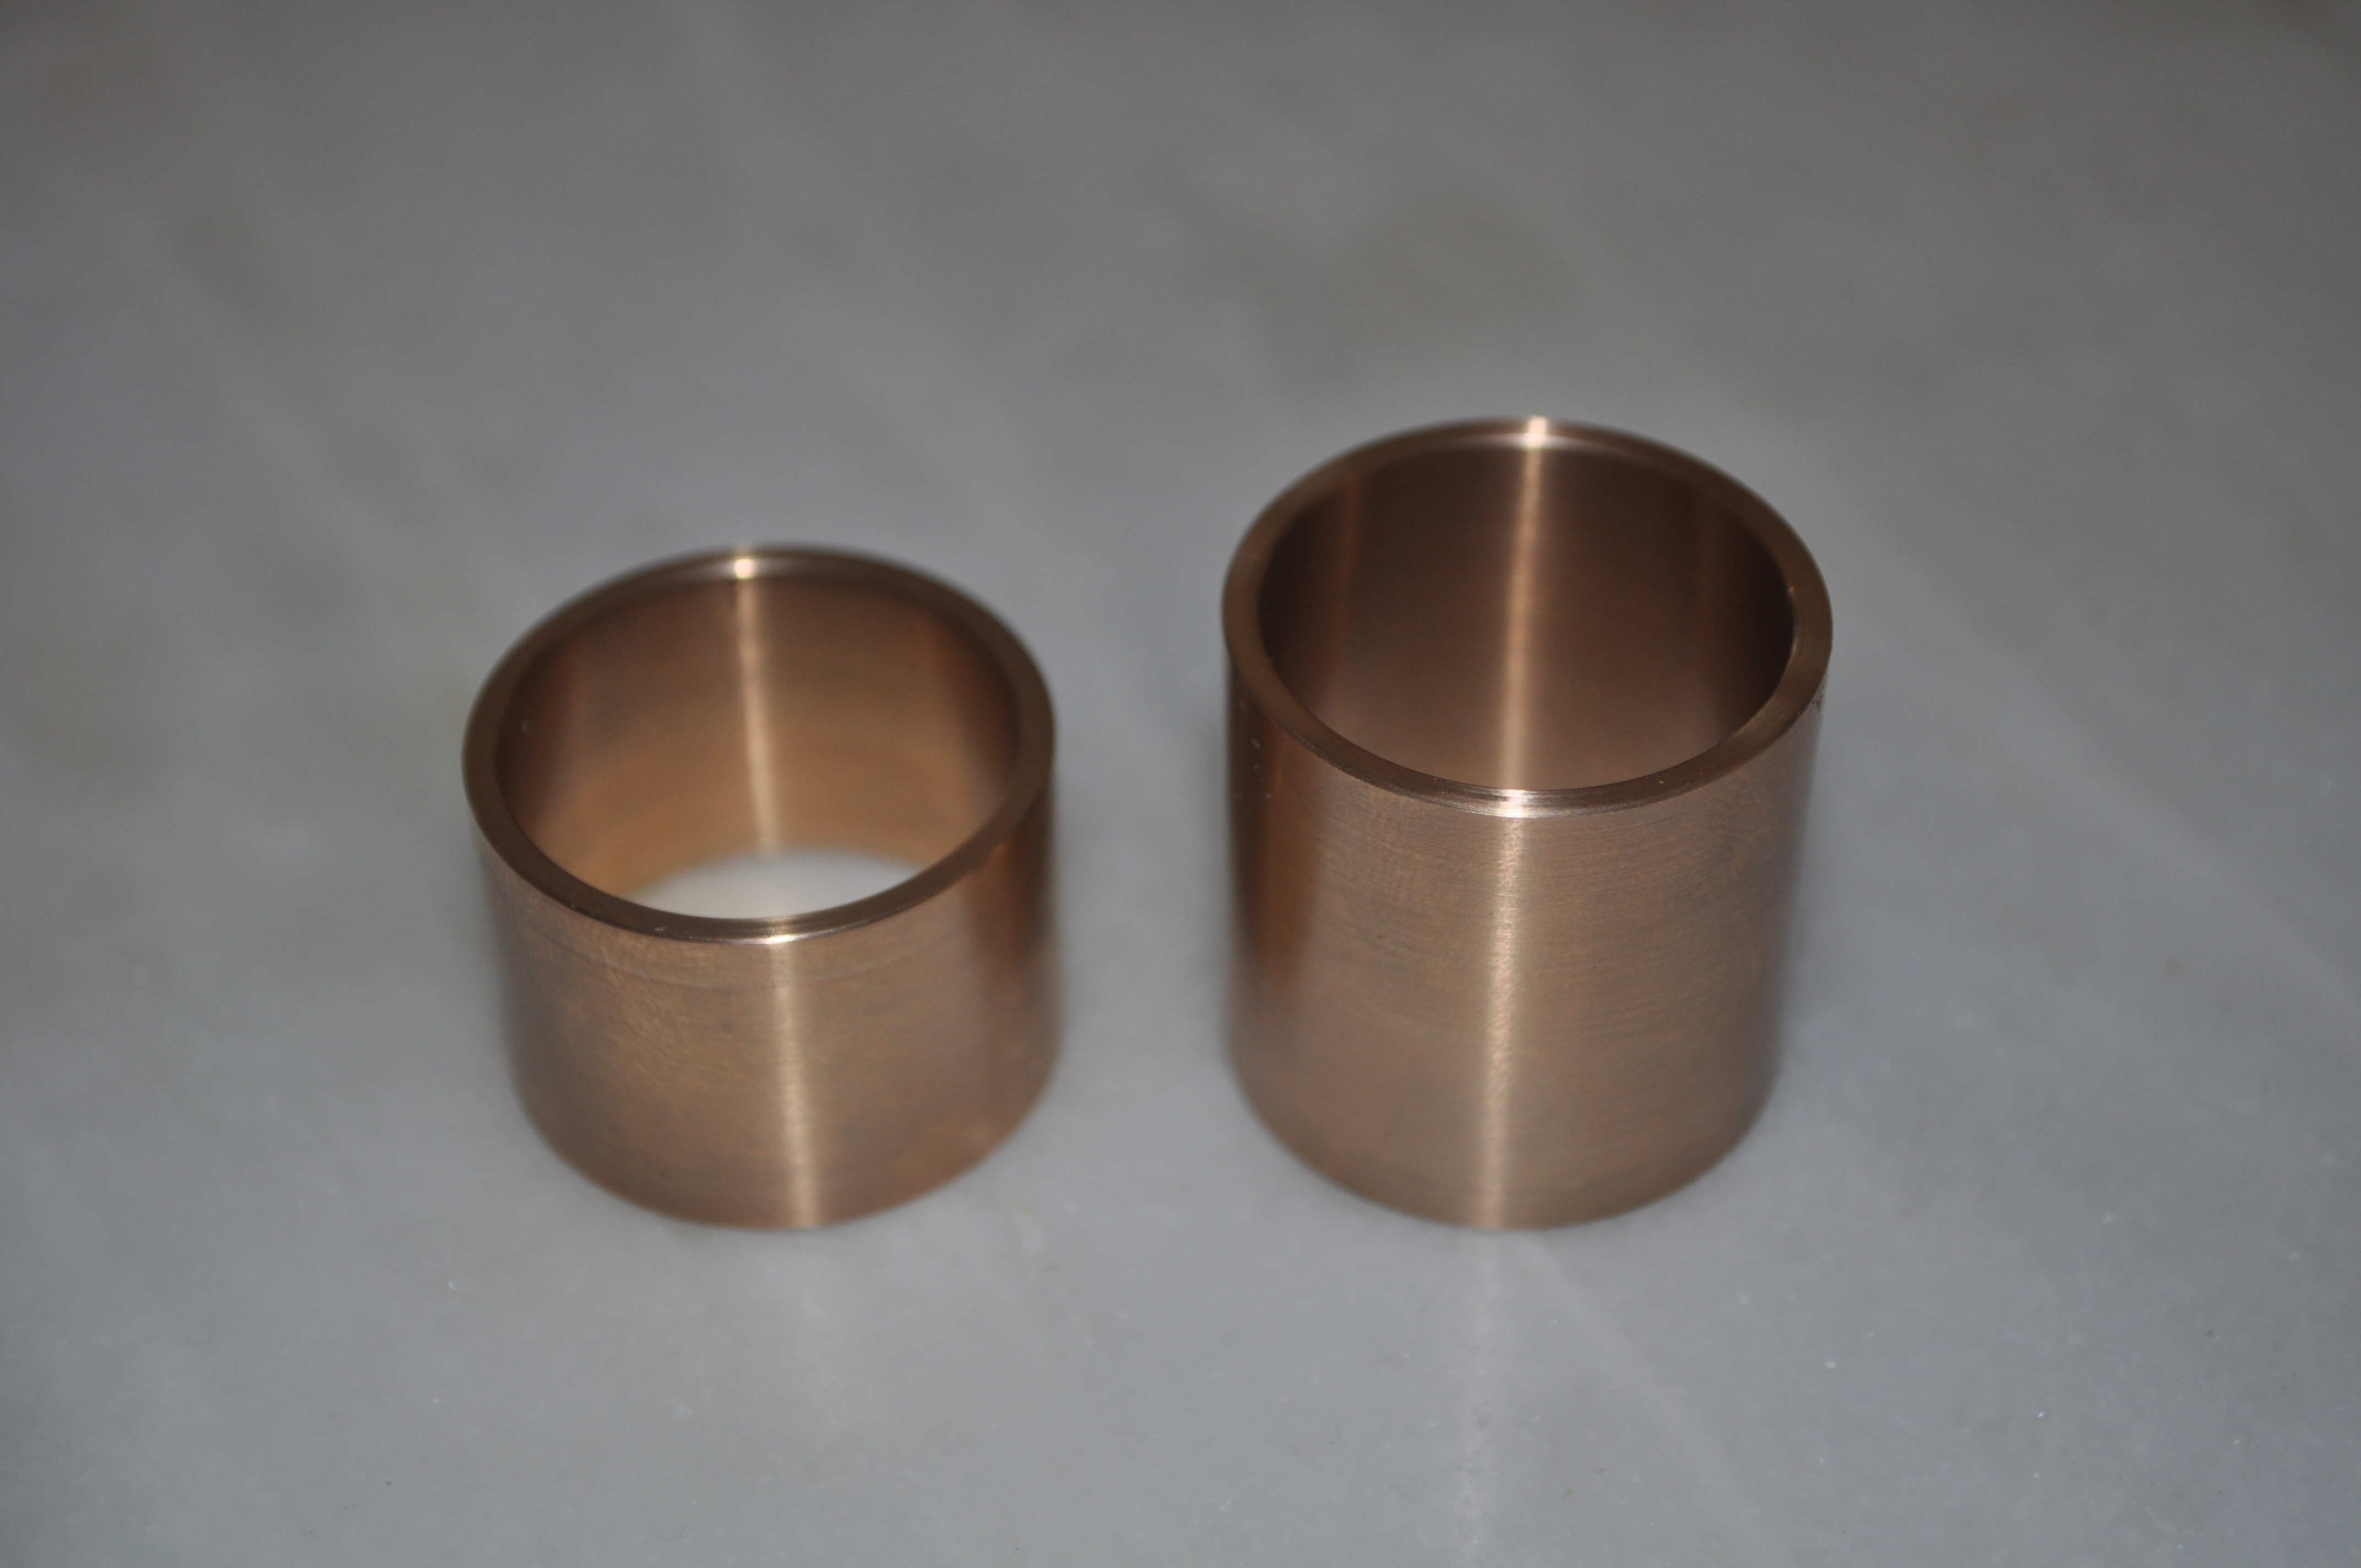
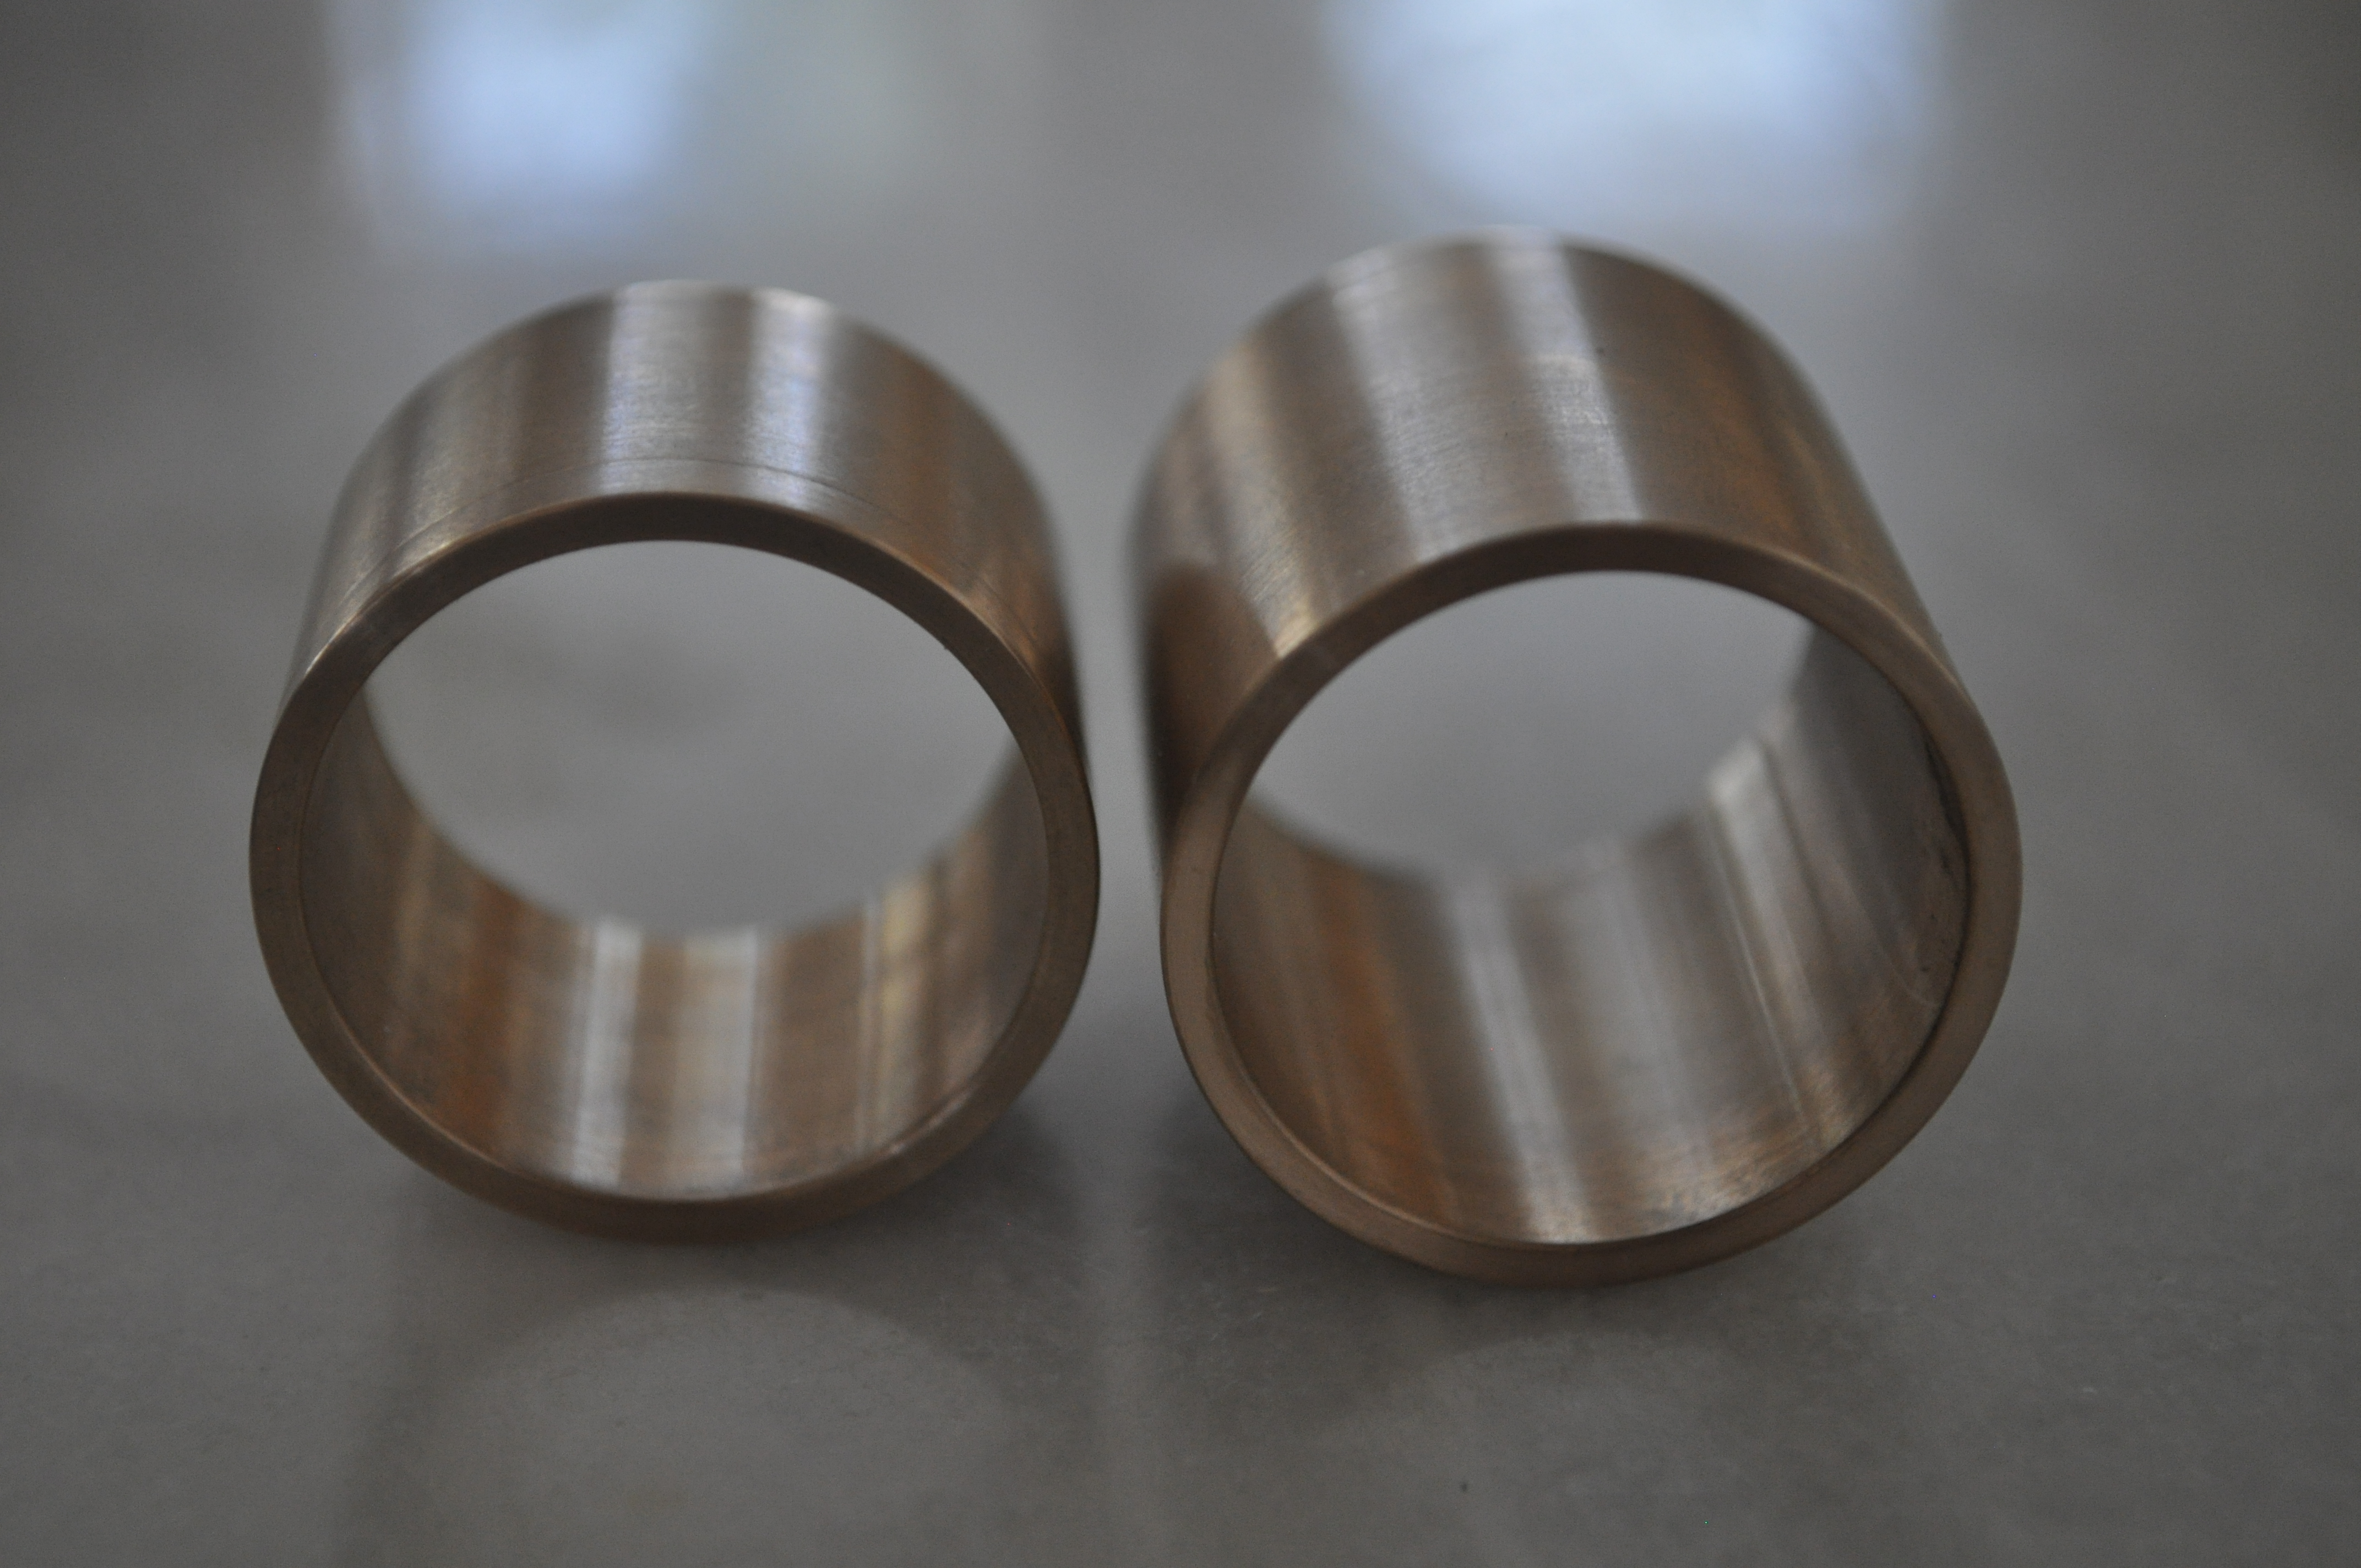
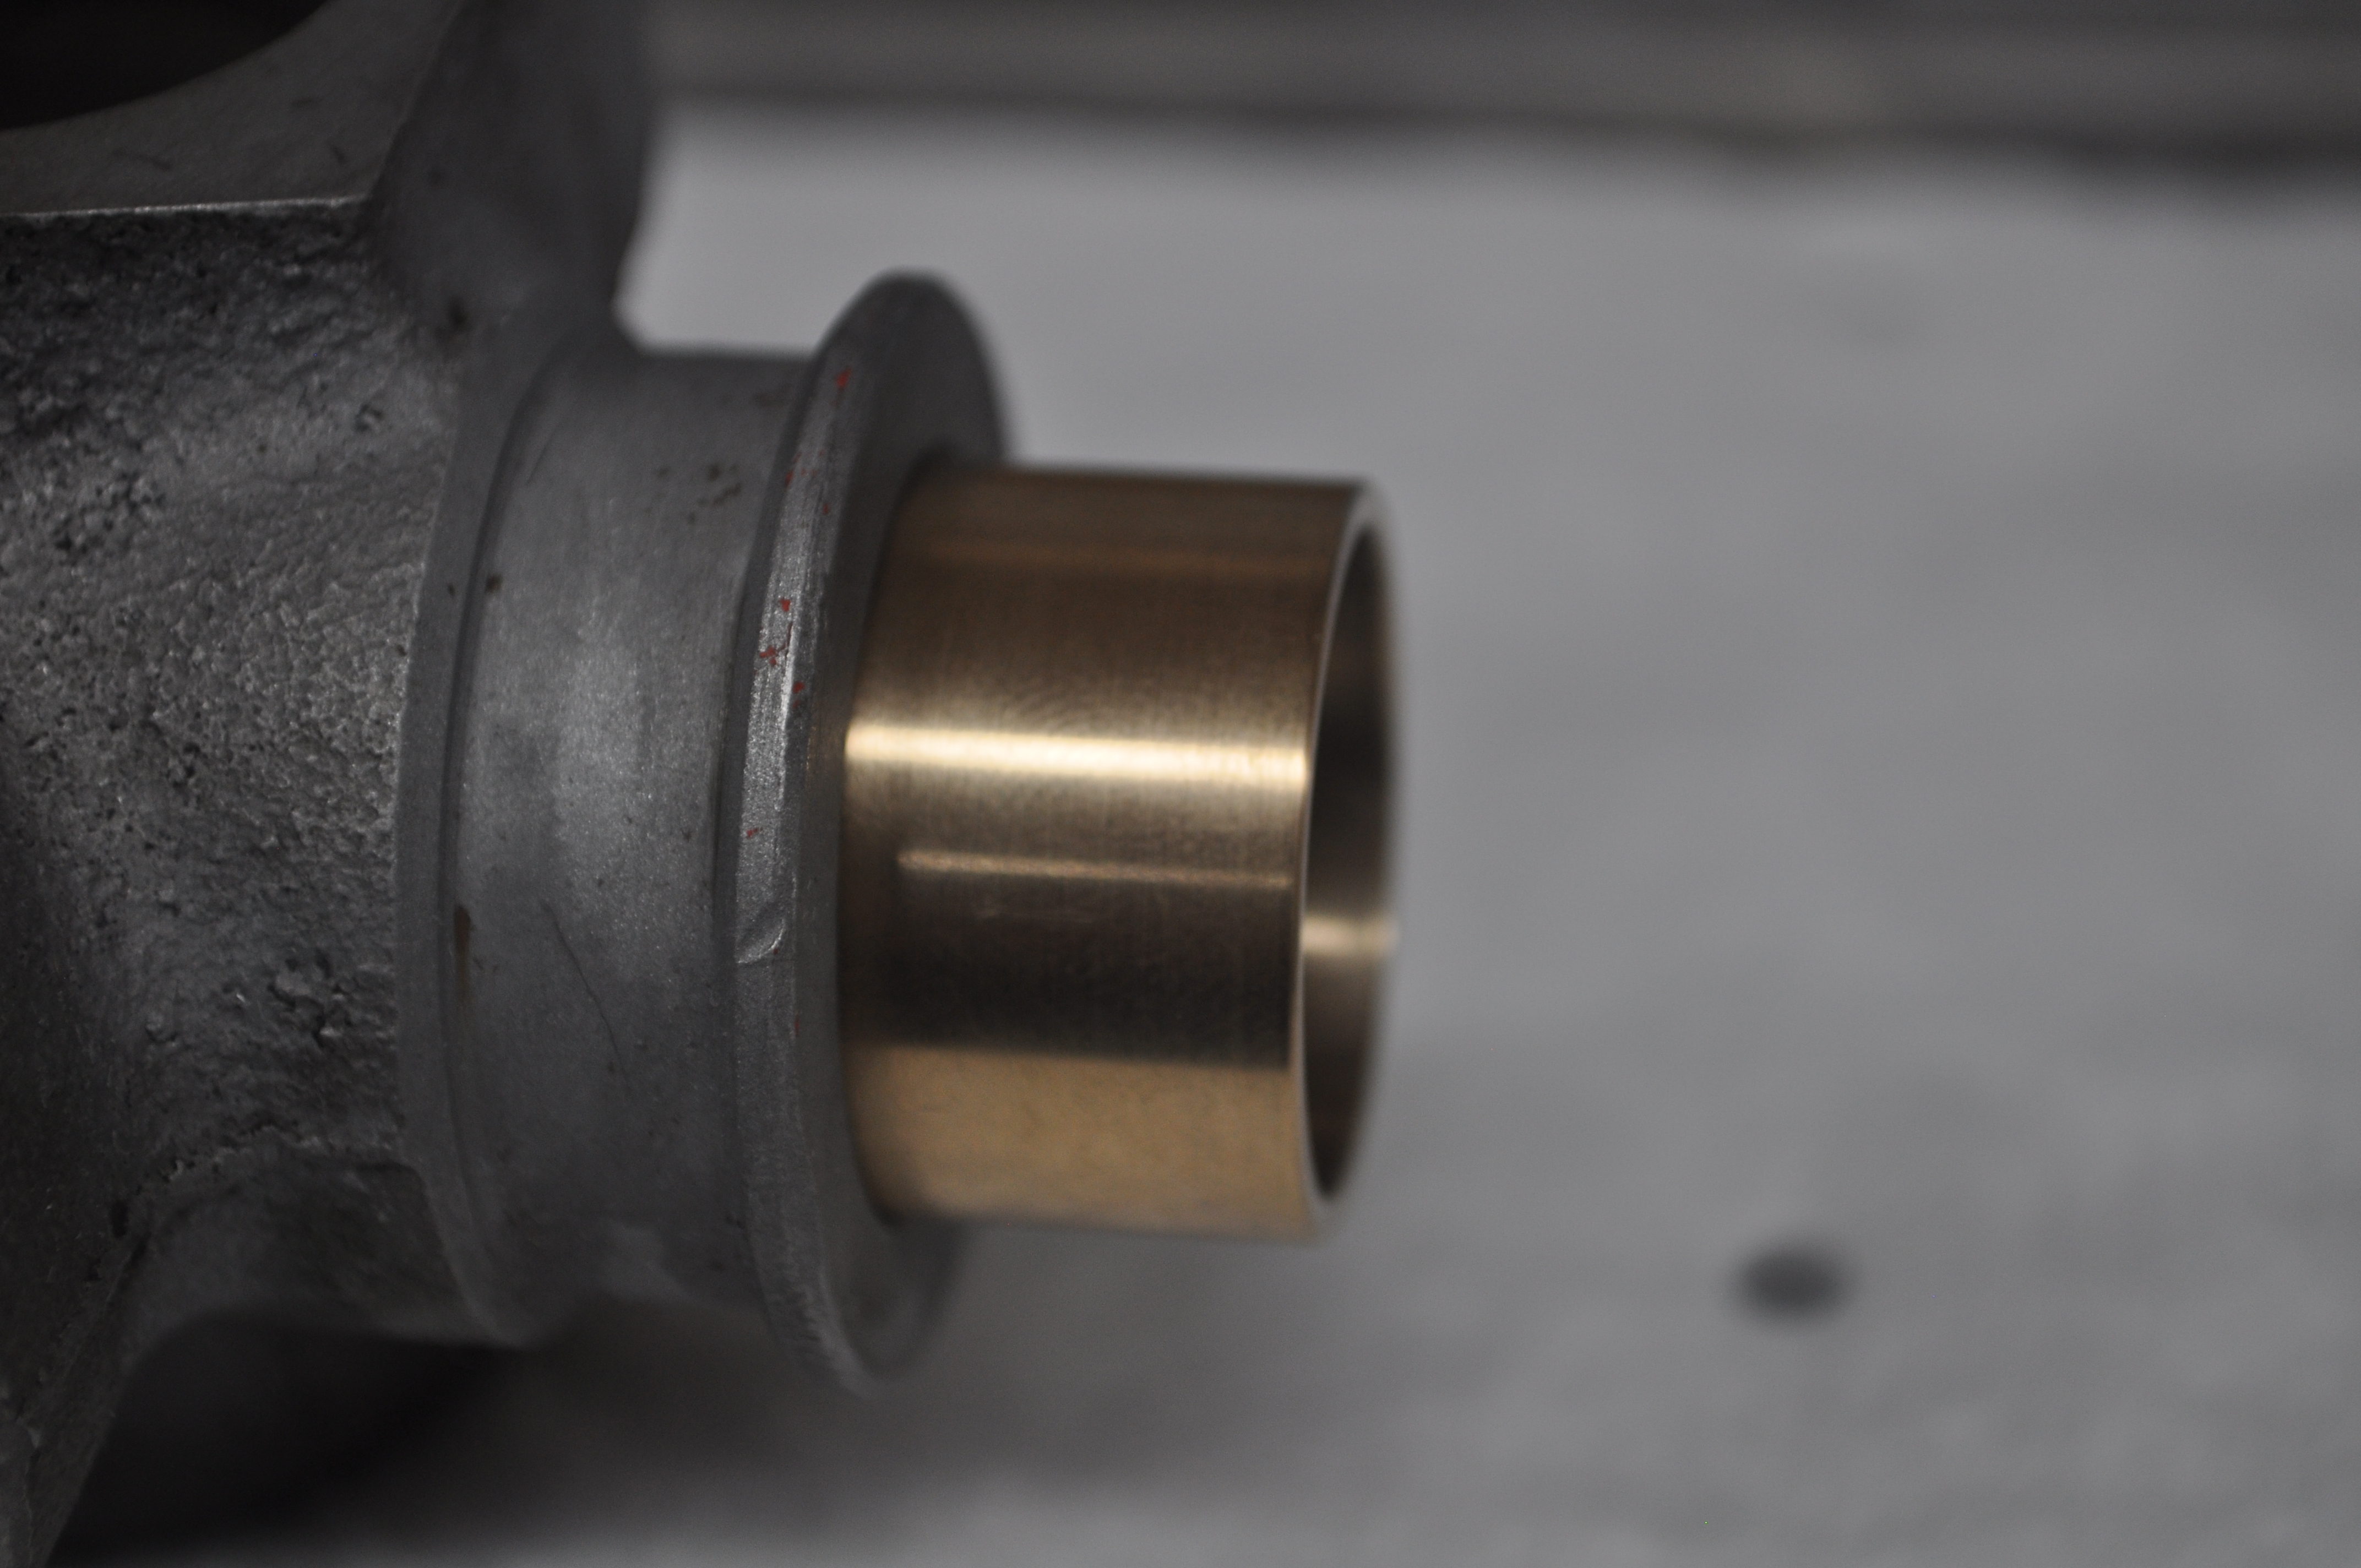
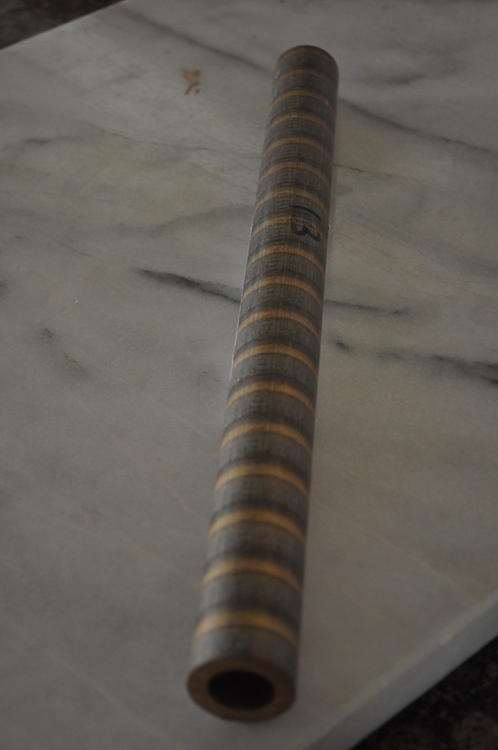
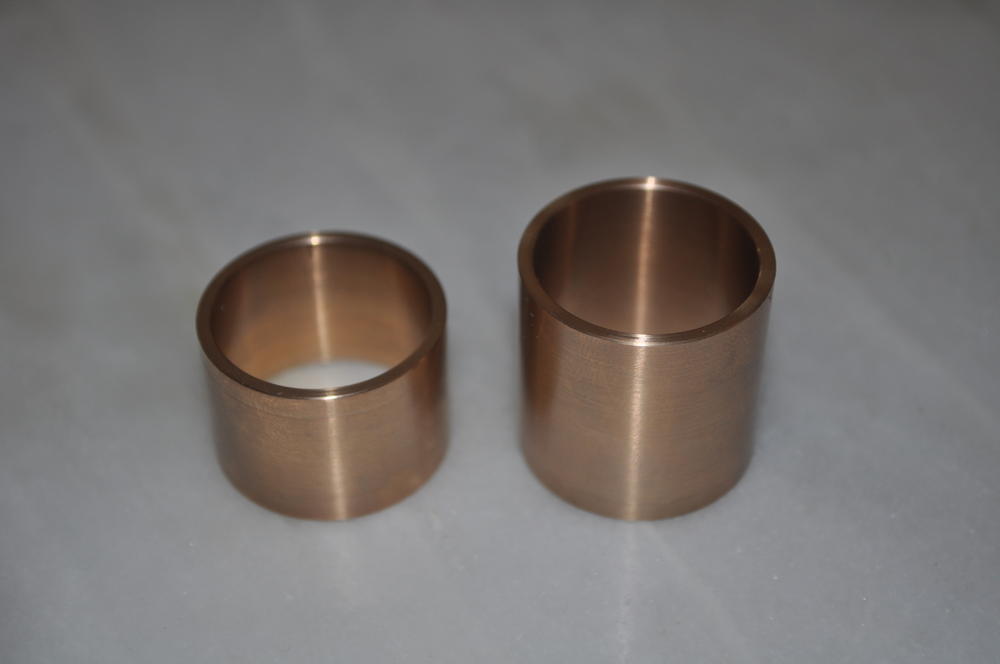
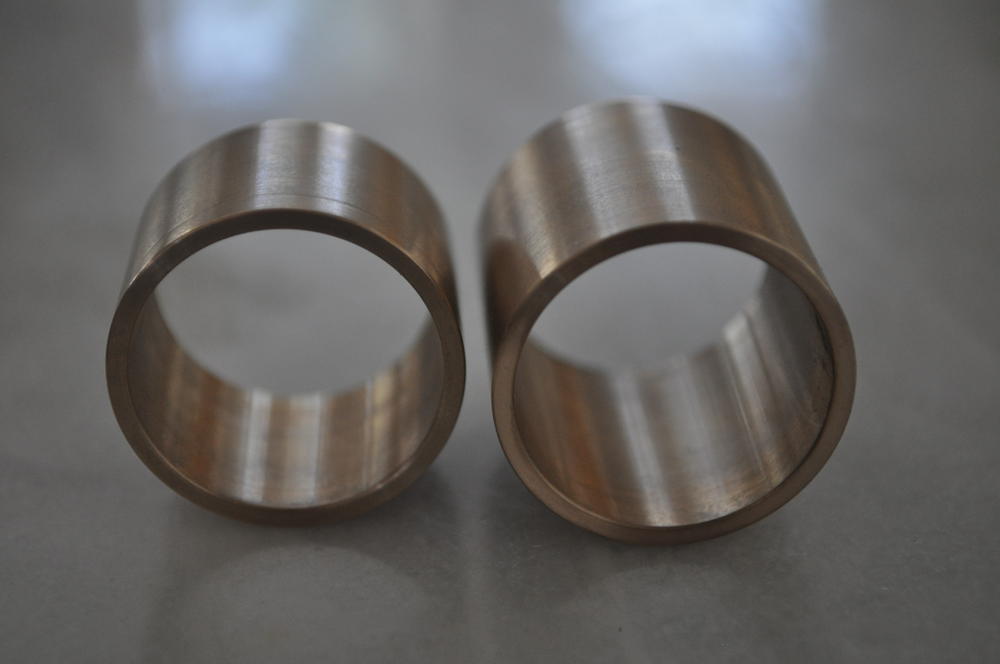
3 pointsOK. I promised to post the dimensions of the end bushings and so here you go. Before I do, some general info about the bushings first: 1. The bushings are different lengths. The shorter one goes into the end closest to the pinion. 2. The dimensions are extremely strange. There seems to be a strange mix of both SAE and metric. The machinist that made the ones I had machined locally did not believe the measurements that I provided and would only do the job if he could measure both the rack as well as the housing. In the end my measurements were correct. 3. These are kind of a PITA to remove from the housing. I tried using a modified blind puller and was successful in getting the shorter ones out on a couple of different racks. However, I had to cut the other ends out to remove them. Not difficult, just tedious. 4. My local machinist cut the ID of the bushings so they were very slightly undersized (from the diameter of the rack itself). This way I was able to hone out the ID to try and match the diameter of the rack and make up for any weaR. Now to dimensions: ID - 24.98mm (diameter of rack overall is 25mm) OD - 1.125 " ( 1 1/8") or 28.55mm Shorter length - 20mm Longer length - 28mm Finally, I will tell you that I looked high and low for these and to no avail. If you feel compelled to try and find them do not even waste your time at McMaster, ASB (American Sleeve Bearing) or any of the other online sources. I spent over $100 trying to find these off the shelf and it was a waste. I did have ASB provide me a quote for a custom one (with the inner grease channel) but it was prohibitively expensive at almost $100 each. If there was enough interest I'm sure I could have my local machinist fabricate a a bunch of these at a more reasonable cost, assuming there was enough volume demand. I've included some pictures of the new bushings. Let me know if you need anything else. Mike.


 3 points
 -
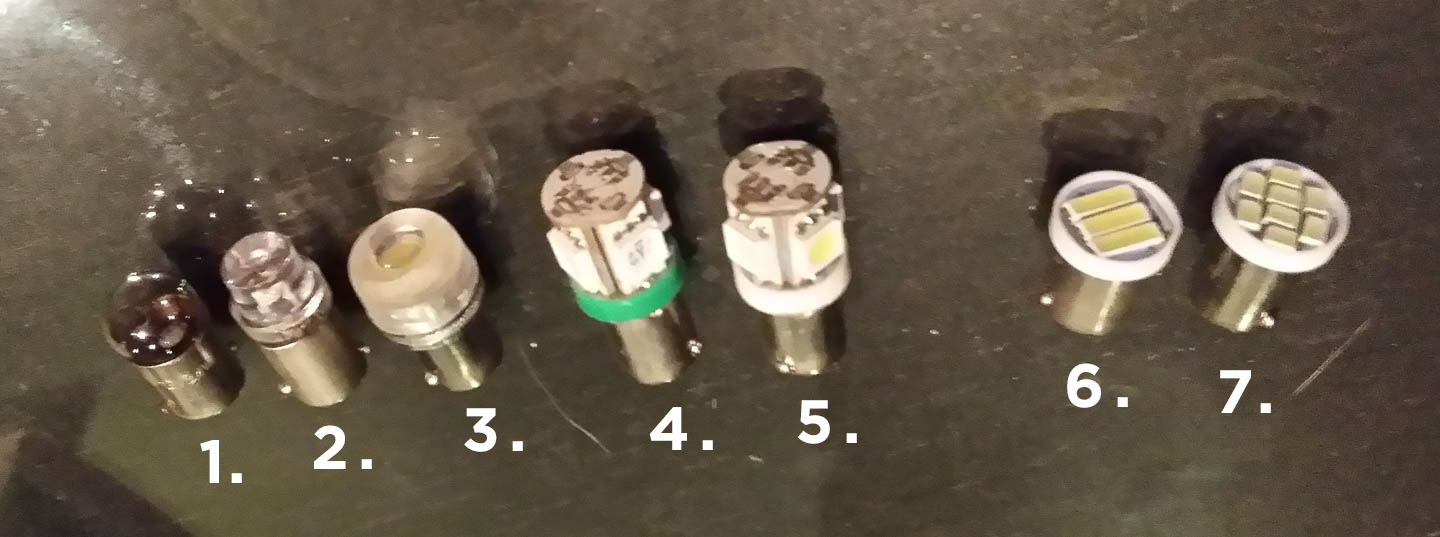
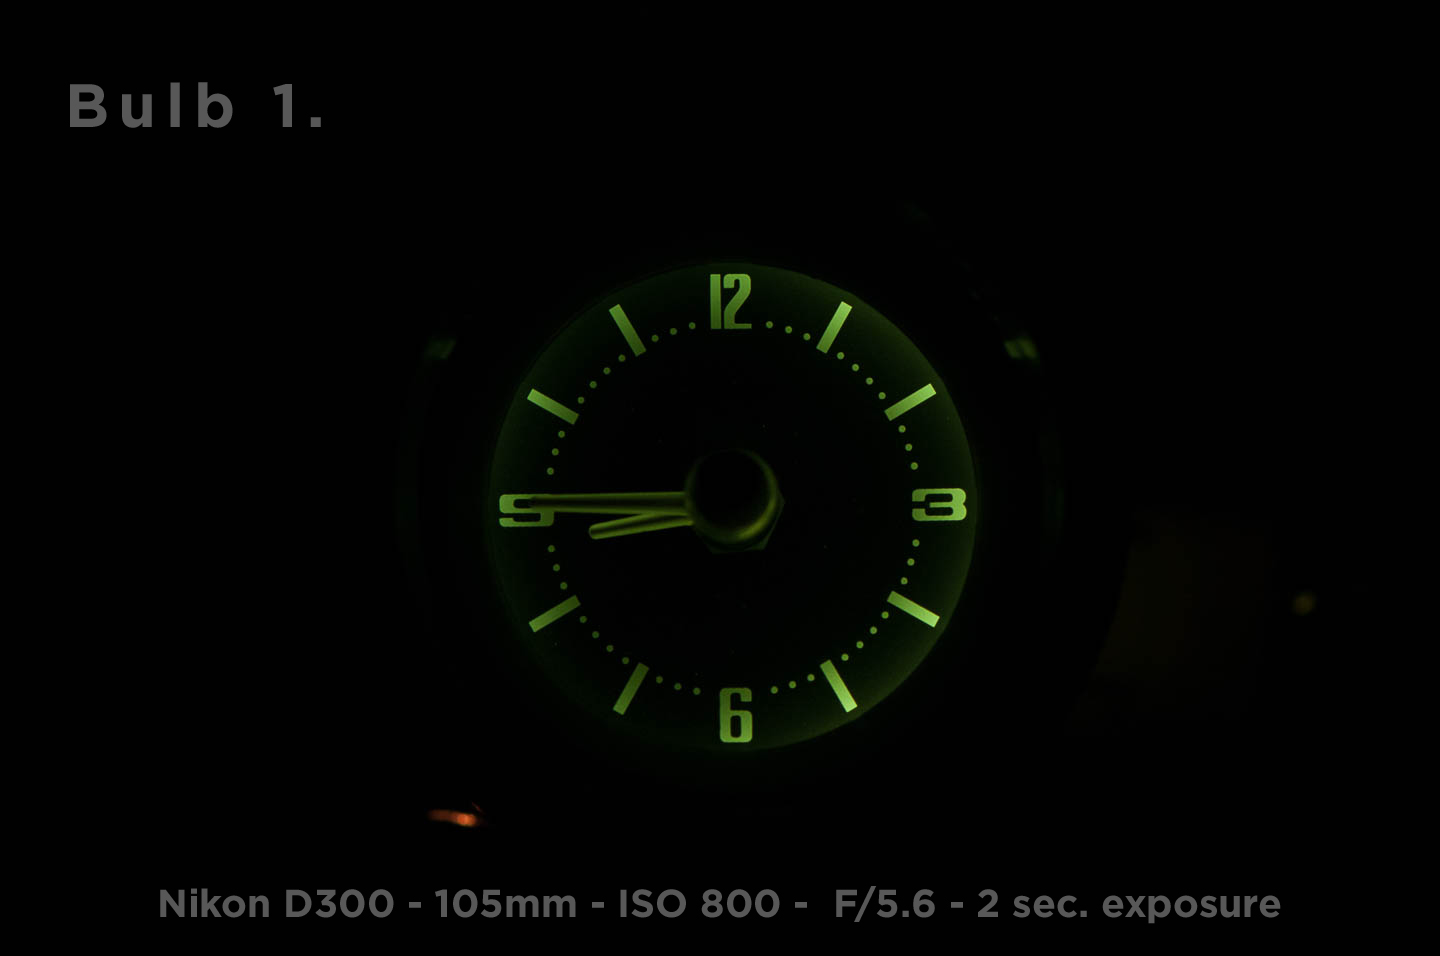
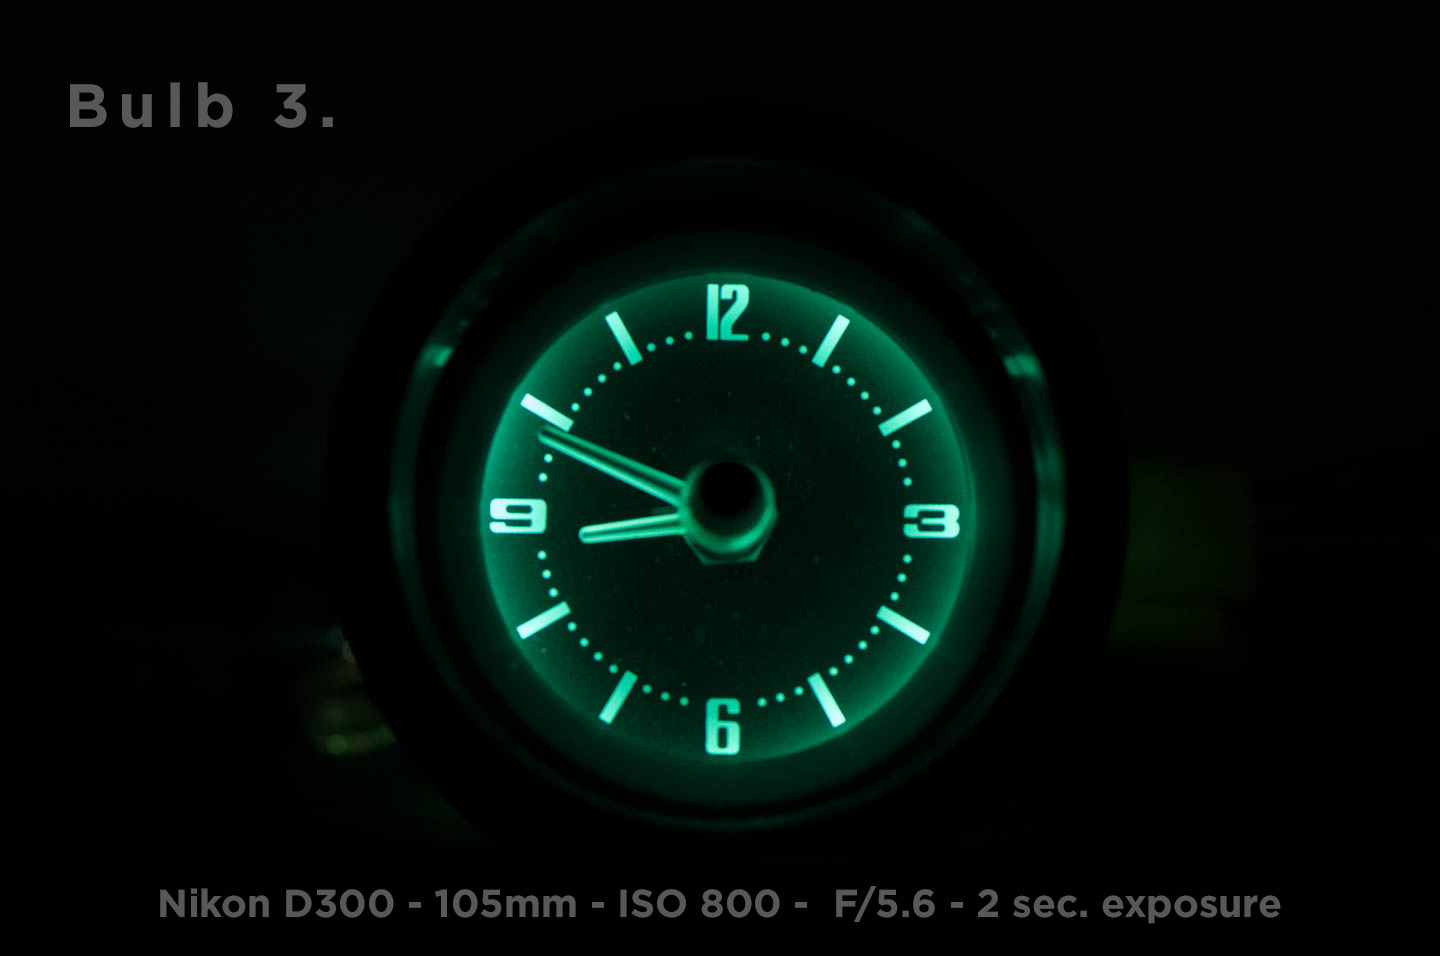
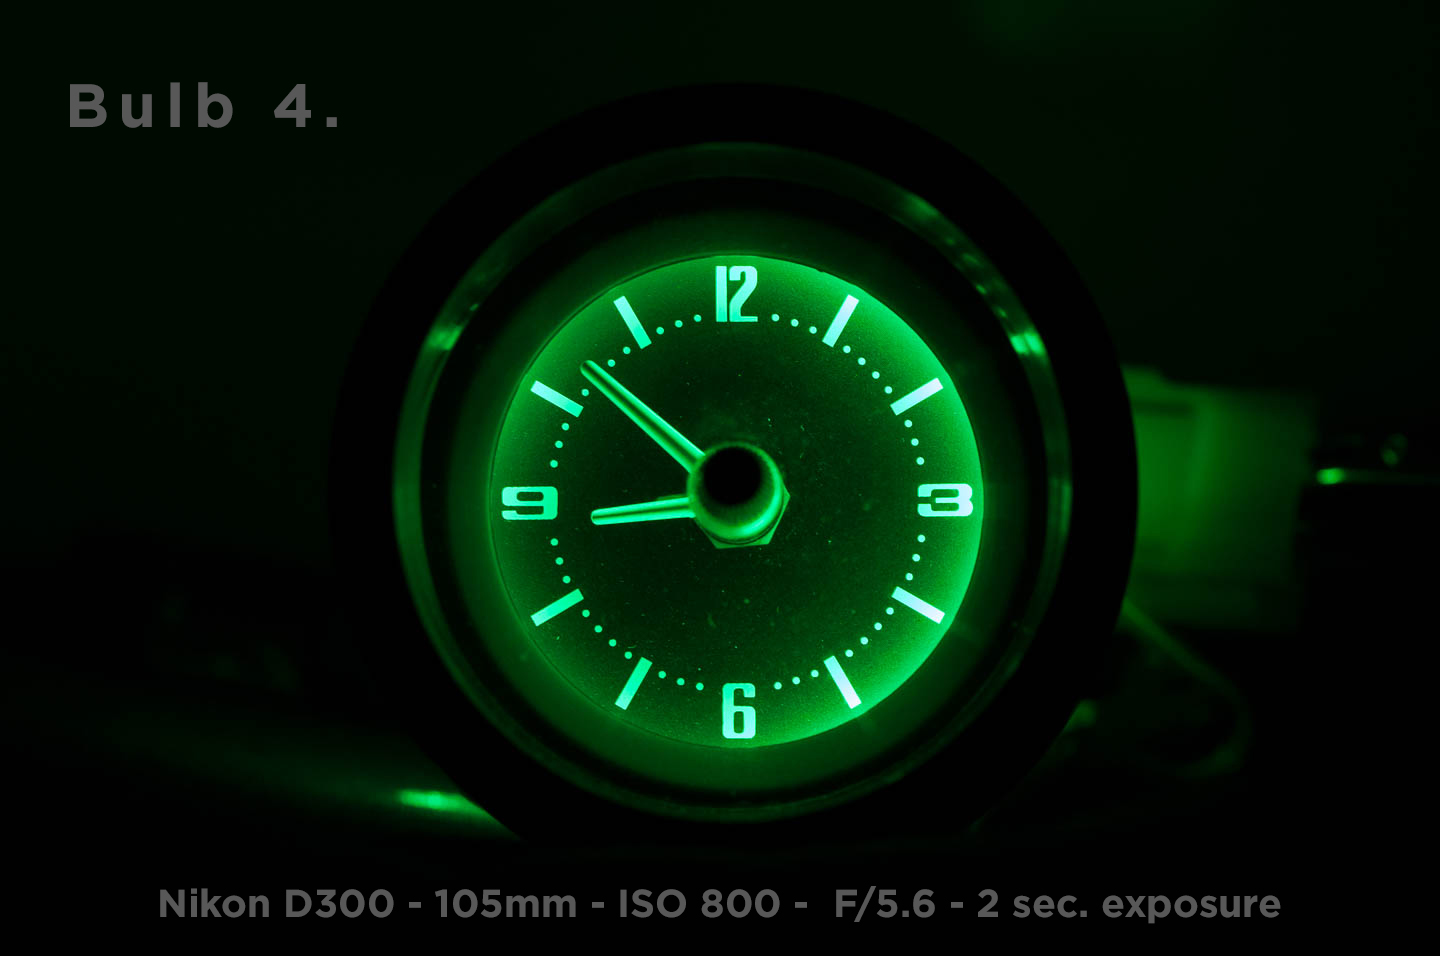
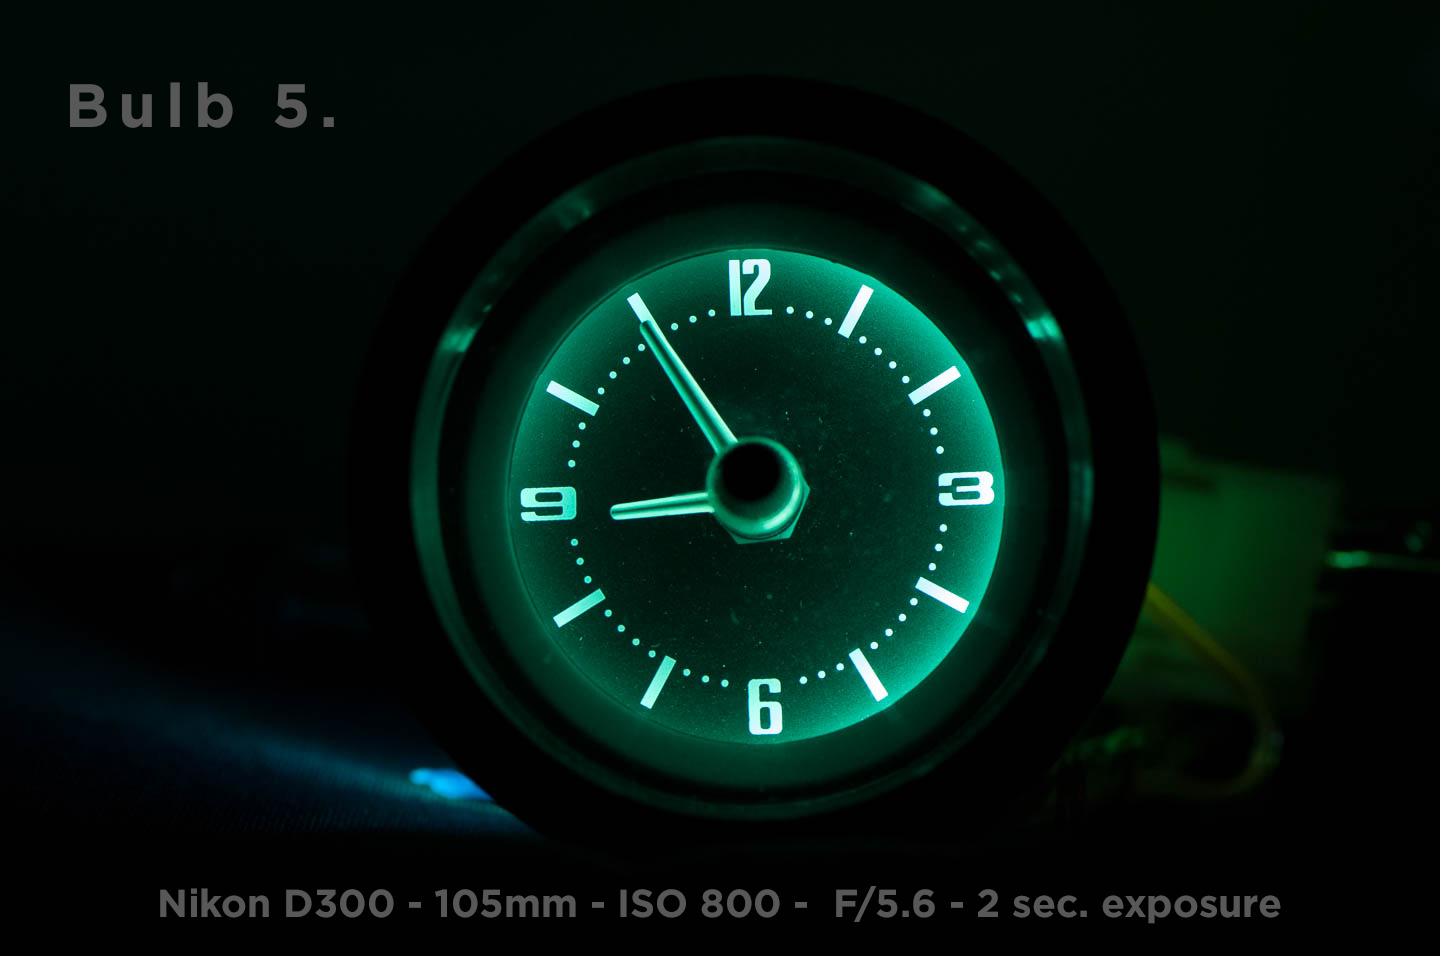
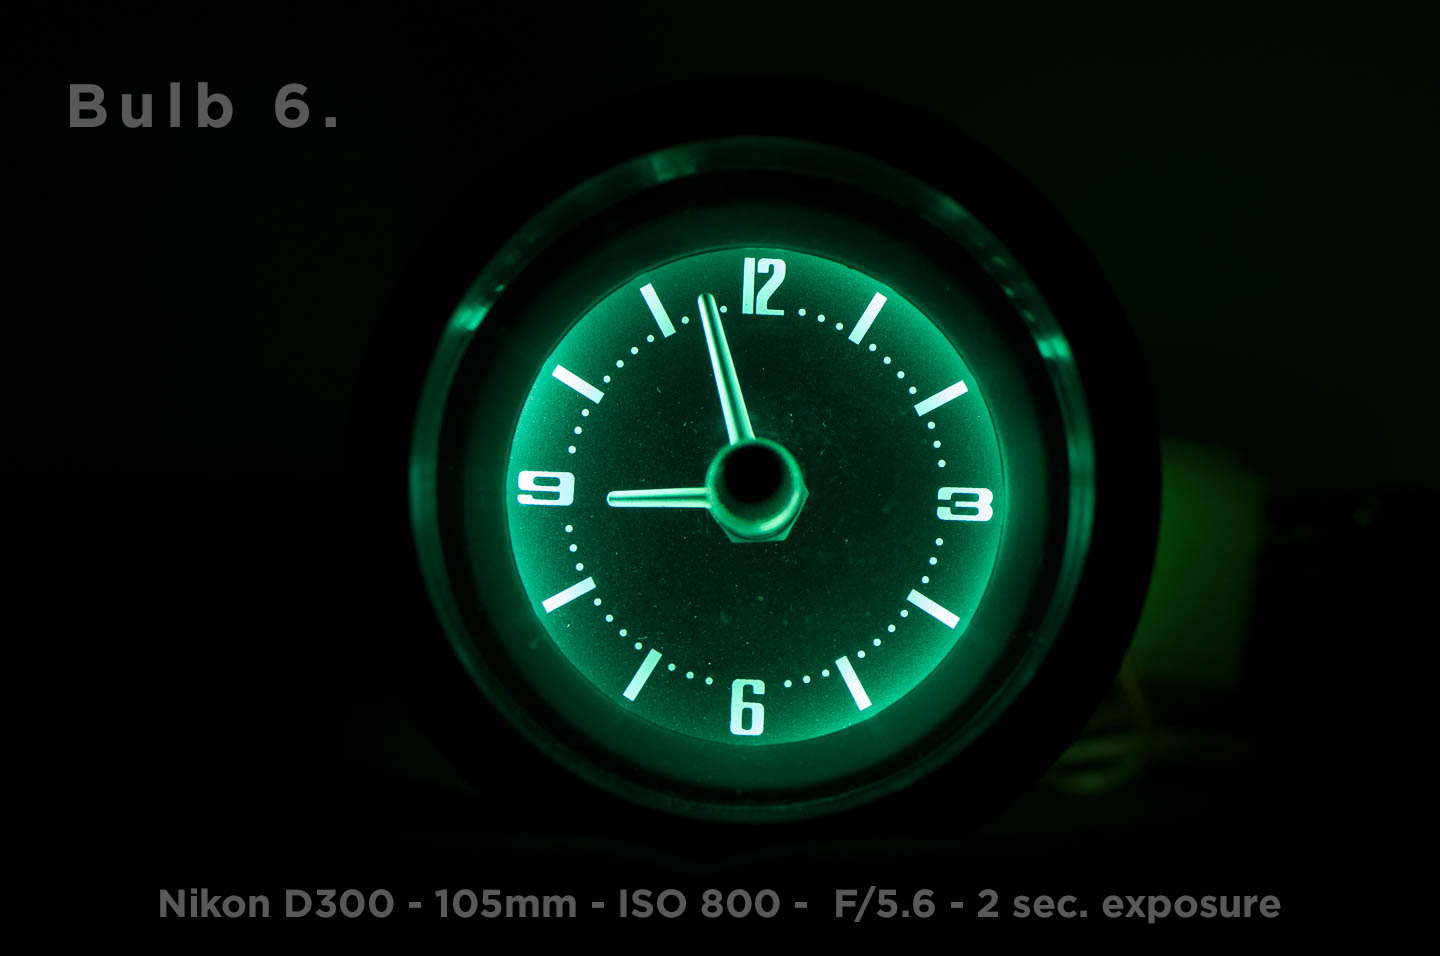
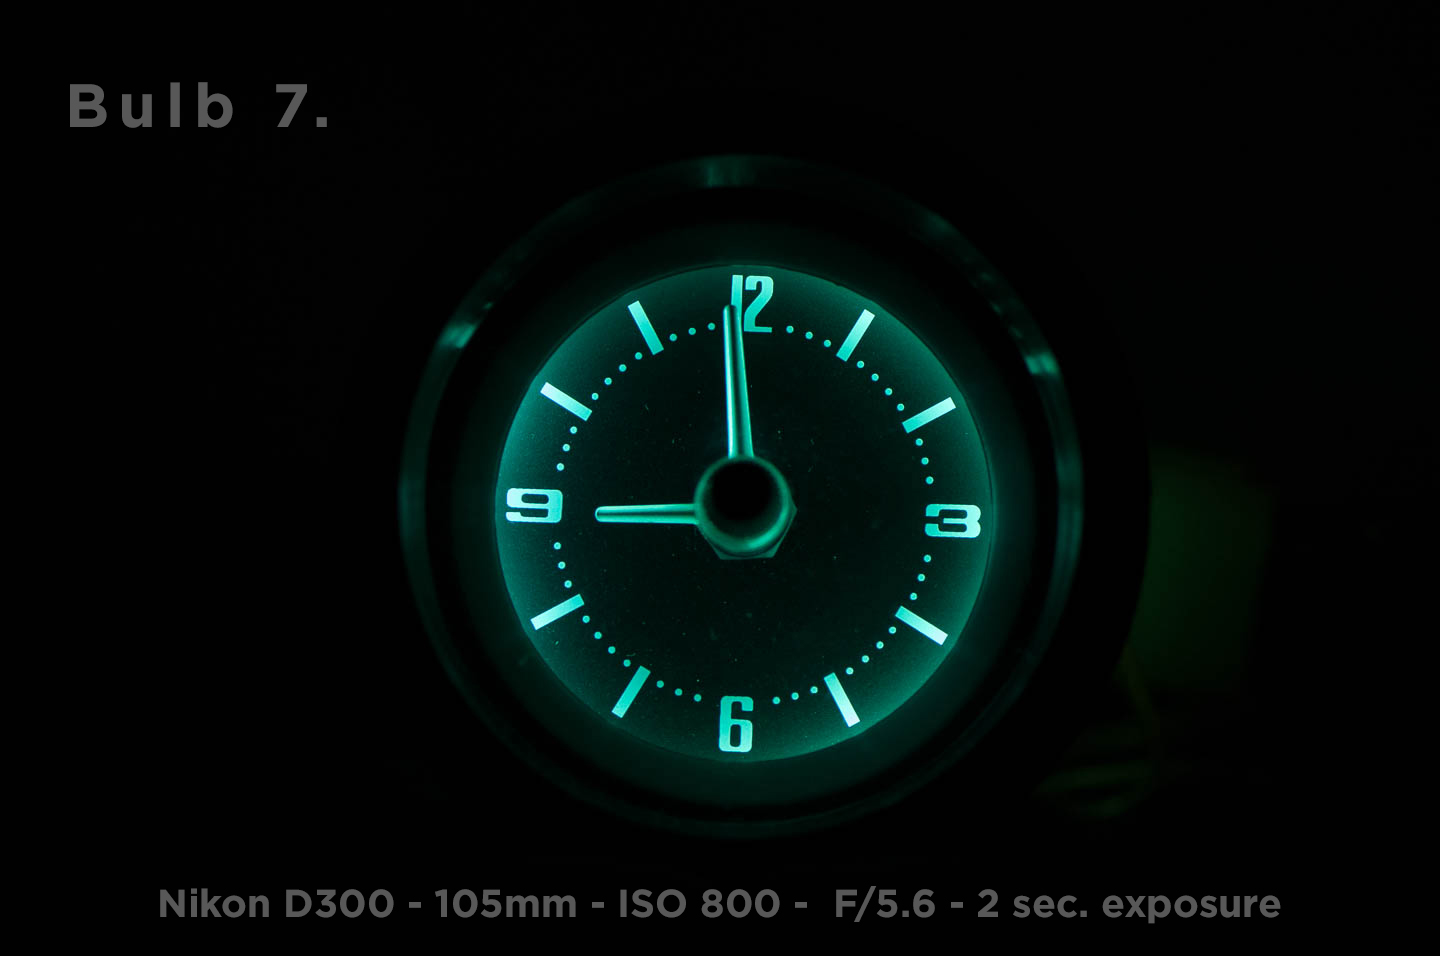
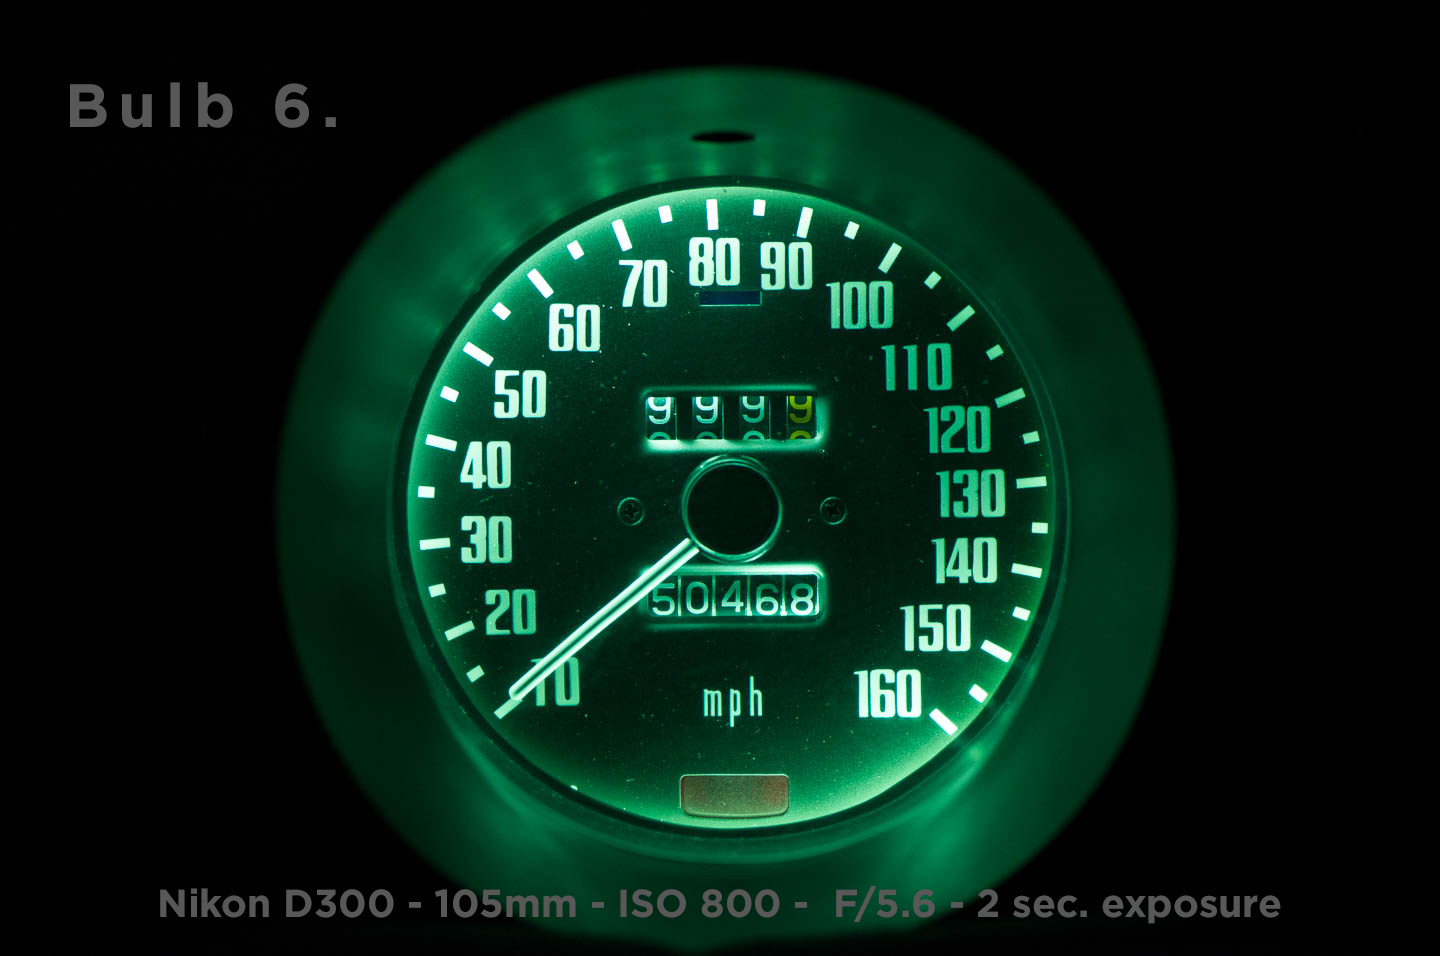
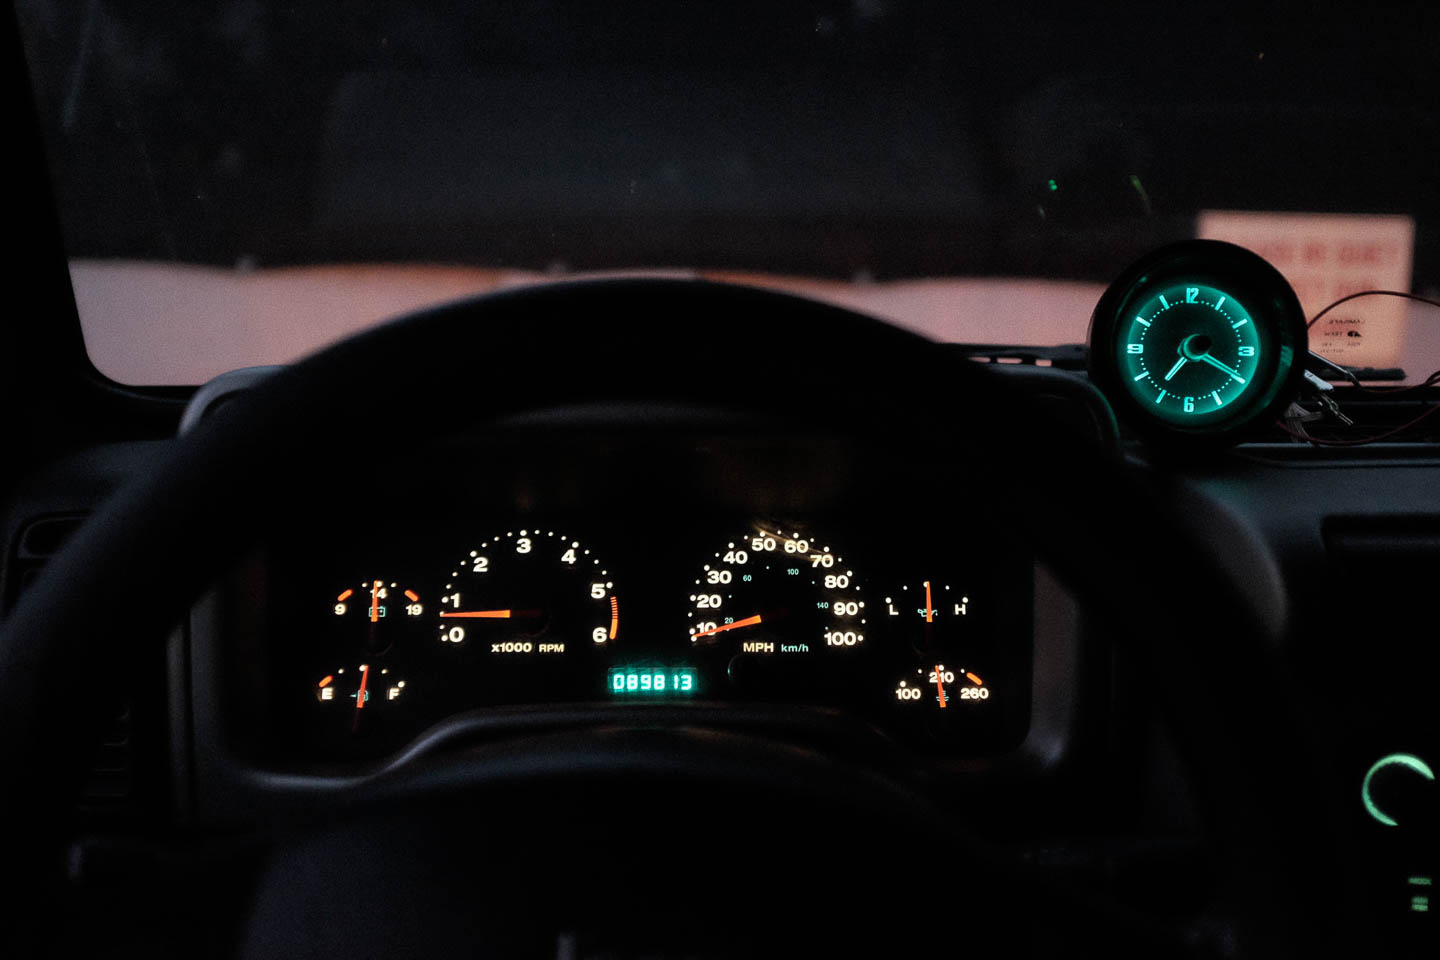
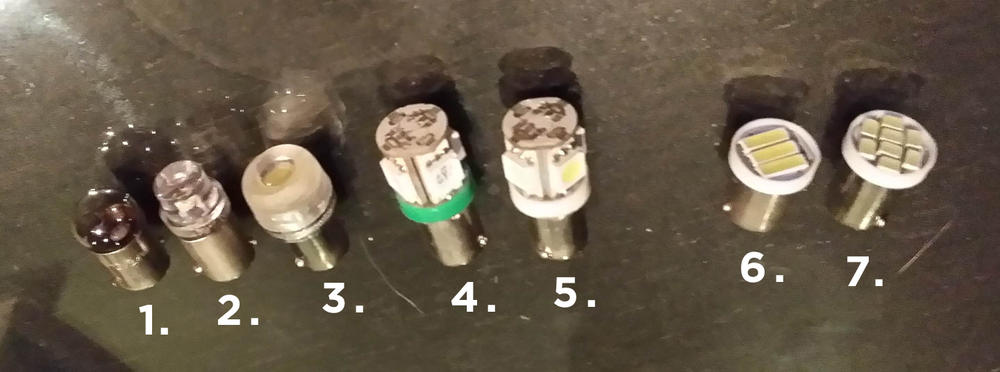
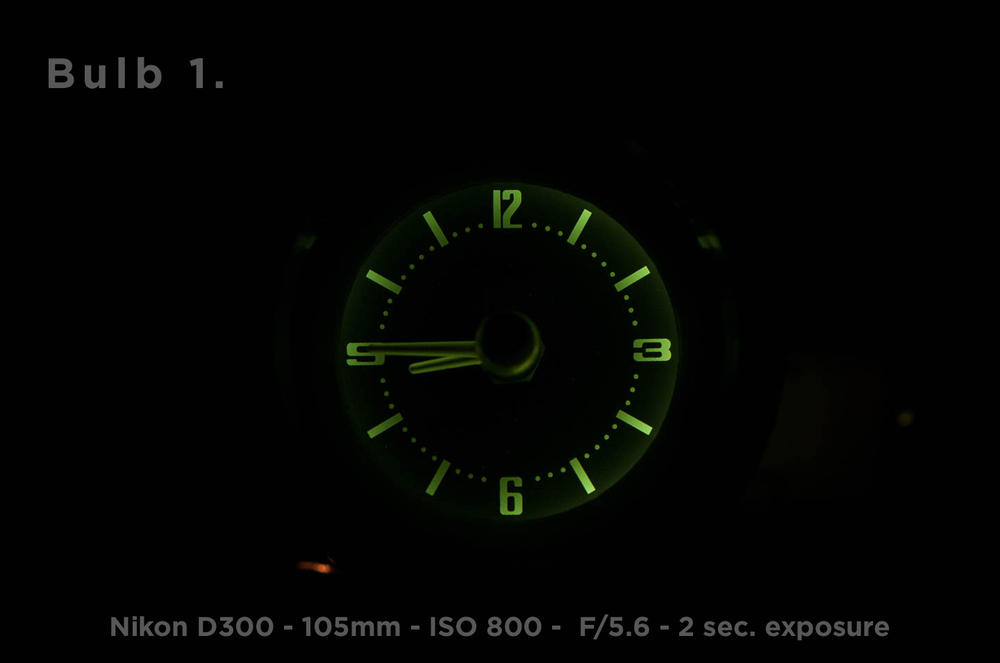
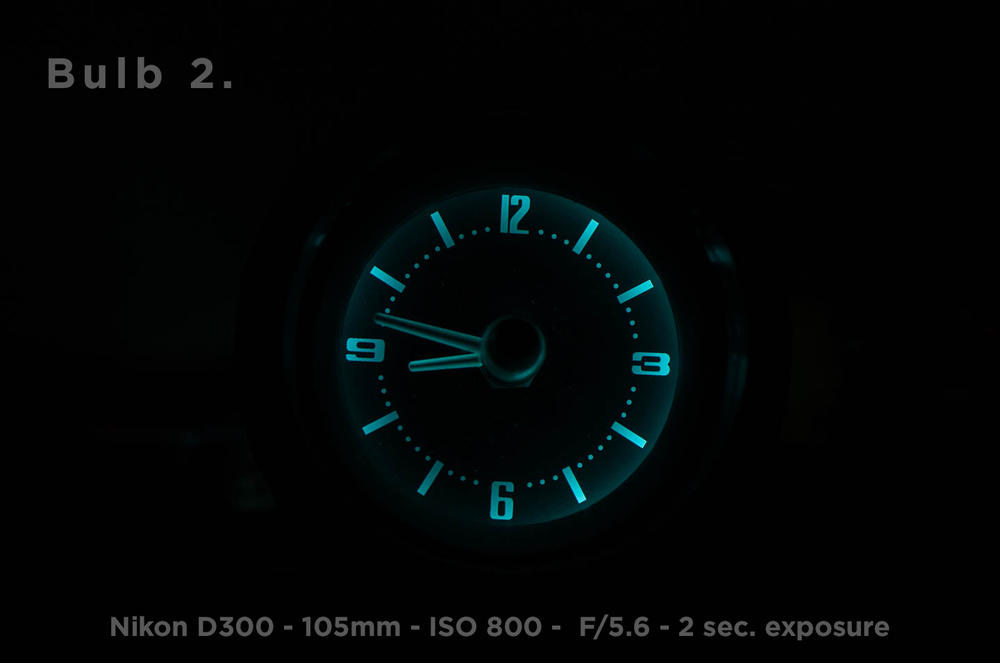
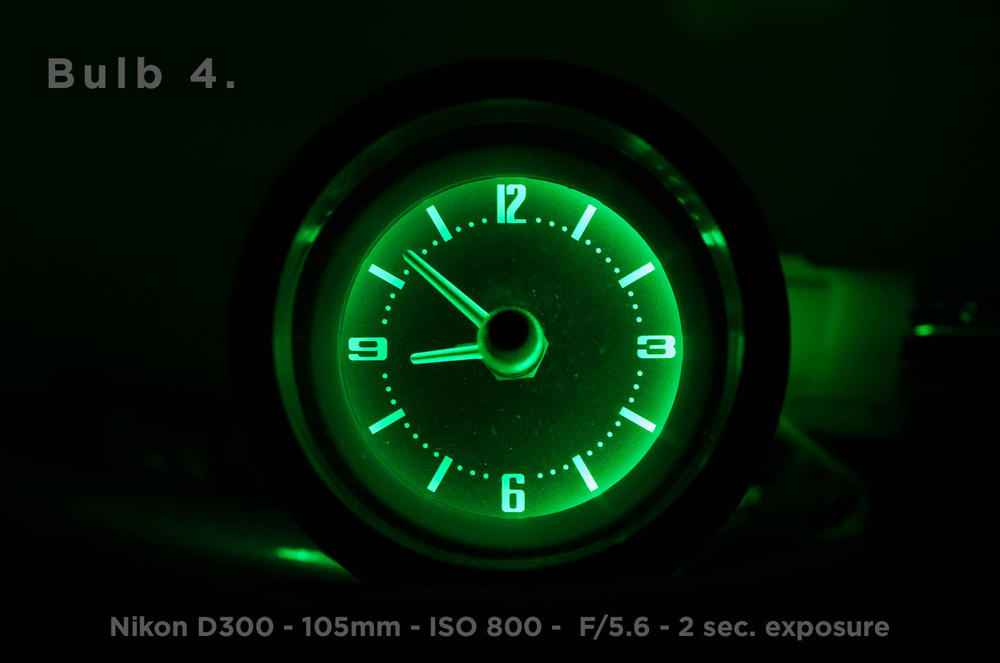
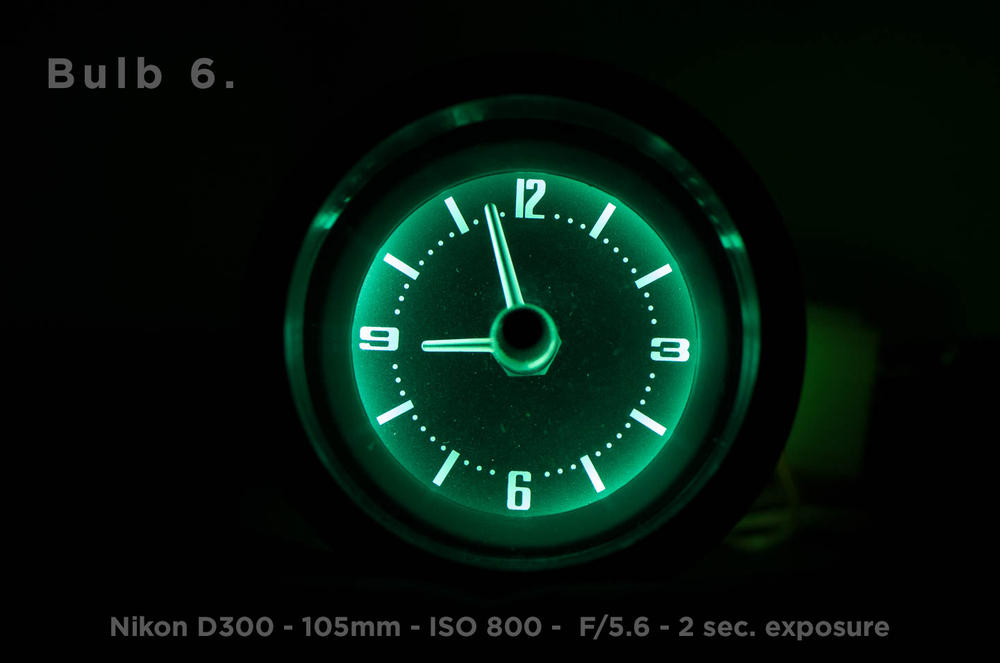
2 pointsI’ve read all the threads on LED lights for the interior, and here’s what I ended up doing. I got a bunch of different LEDs and tested them out with the clock. To keep it simple so I did not remove the green domes, or alter the inside of the gauges in any way. I set up the camera on a tripod and used an 8AA battery pack to power the light bulbs. I shot in RAW, the color temp is 5000K. I used the same exposure values for every shot. Here’s a picture of all the bulbs I ended up testing. Bulb 1 This picture is the bulb that was in the clock. Regular stock tungsten filament bulb. It might even be original. It’s pretty dim. The surprising thing is how hot the base of the bulb got when powered up for a short time. Bulb 2 The second picture shows a bulb from superbrightleds.com. Cool 7000K 120° 4 Lumens. BA9s https://www.superbrightleds.com/moreinfo/ba9s-ba7s/ba9s-led-bulb-1-led-ba9s-retrofit-car/3/ It’s noticeably brighter than the stock bulb. Bulb 3 The third picture shows a bulb from superbrightleds.com. Cool 5500K 270° 40 Lumens. BA9s https://www.superbrightleds.com/moreinfo/ba9s-ba7s/ba9s-led-bulb-1-led-ba9s-retrofit-car/958/2359/ I shaved the plastic end down with a Dremel so the bulb would fit inside the green dome. Looks pretty good. Bulb 4 The fourth picture shows a bulb from superbrightleds.com. Green 40 Lumens. BA9s https://www.superbrightleds.com/moreinfo/ba9s-ba7s/ba9s-led-bulb-5-smd-led-tower-ba9s-retrofit-car/2077/ This bulb did not fit inside the green plastic dome. To take the picture I taped it in place with as much of the bulb in the dome as possible. The color was too green for my taste. Bulb 5 The fifth picture shows a bulb from superbrightleds.com. Cool 6100K 96 Lumens. BA9s https://www.superbrightleds.com/moreinfo/ba9s-ba7s/ba9s-led-bulb-5-smd-led-tower-ba9s-retrofit-car/2077/#/attributes/10855 This bulb is the same as the previous bulb, but cool white instead of green. To take the picture I taped it in place with as much of the bulb in the dome as possible. Bulb 6 The sixth picture shows a bulb from amazon.com White. BA9s https://www.amazon.com/64111-3-7020-Lights-Extremely-Bright/dp/B01MEFGAAI/ref=sr_1_3?ie=UTF8&qid=1505518231&sr=8-3&keywords=ba9s+LED This bulb came in a four pack. I decided to try this bulb since it was cheap. It’s nice and bright. Close to the same brightness as the 96 Lumen white bulb from superbrightleds.com. It surprised me how evenly this style of bulb illuminated the clock. I like this one the best so far. Bulb 7 The seventh picture shows a bulb from amazon.com White. BA9s https://www.amazon.com/gp/product/B01MQOXU74/ref=oh_aui_detailpage_o01_s01?ie=UTF8&psc=1 This bulb came in a 10 pack. It is bright but not as bright as the bulb in the sixth picture. Bulb 6 in the speedometer Overall I went with bulb number six. Here’s a picture of my speedometer with that bulb. It lights up nice and bright. Here’s a picture of the clock powered up and resting on the dash of my jeep. Overall it’s about the same brightness feel to the jeep gauges on full brightness setting. The dimmer in my 280z did not dim the LED bulbs at all. It’s either full brightness or off. I also put LED bulbs in the turn signal indicators, high beam indicator, and brake warning light in the gauges. I tried a couple different bulbs but forgot to take pictures. I don’t have everything put back together yet, but when I do I’ll update with a pic of all the gauges lit up in the car.


 2 points
 -
1 point
-
1 point
-
1 pointHi Kats, Before I found my NOS shift boot shown below, I too was trying to find the correct grommet in order to make a good reproduction boot. You may want to contact Nix at www.240zrubberparts.com to see if he could make this grommet. I would think that a well reproduced early shift boot would be very popular. Dan

 1 point
 -
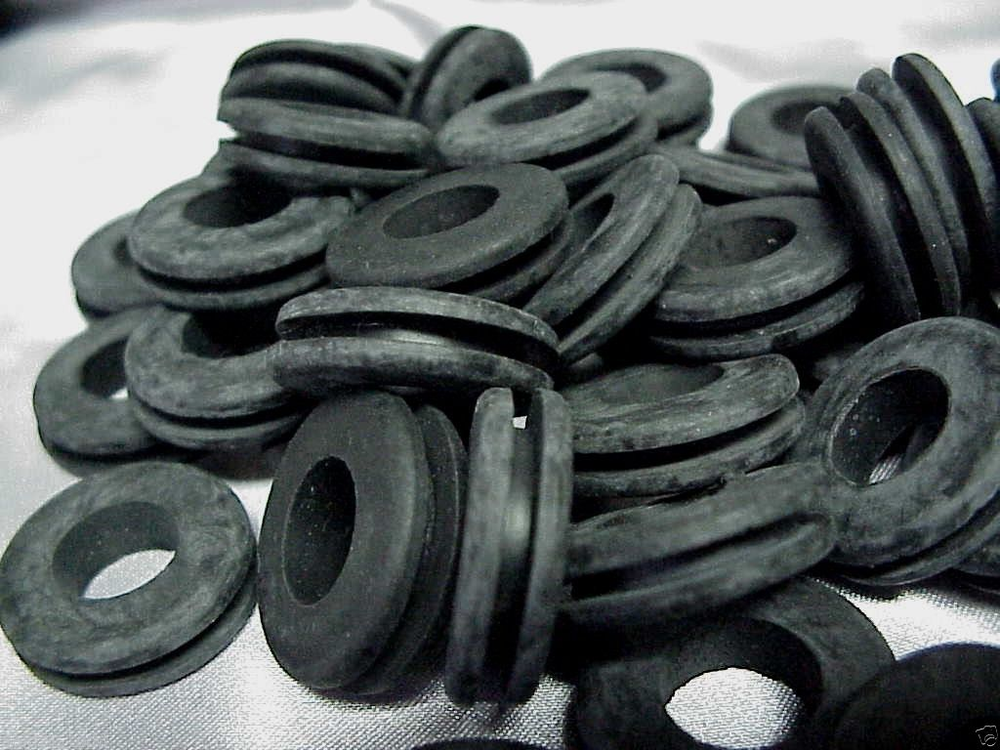
1 pointHere is a rubber grommet that looks like it will work: 25mm diameter 12.5mm hole Some car rubber detailer fluid will make it black and shiny. https://www.ebay.com/itm/30-Rubber-Grommets-1-O-D-x-1-2-I-D-Hole-plus-or-minus/272214549916?hash=item3f6140659c:g:LJMAAOSwiylXBQk2
 1 point
 -
1 pointKats, There are similar shaped parts that are used on floor carpets on modern cars. Not sure if you can find one similar but here is a Toyota example: I'll keep an eye out in hardware stores here. 1" top diameter and 1/2" shaft diameter.1 point
-
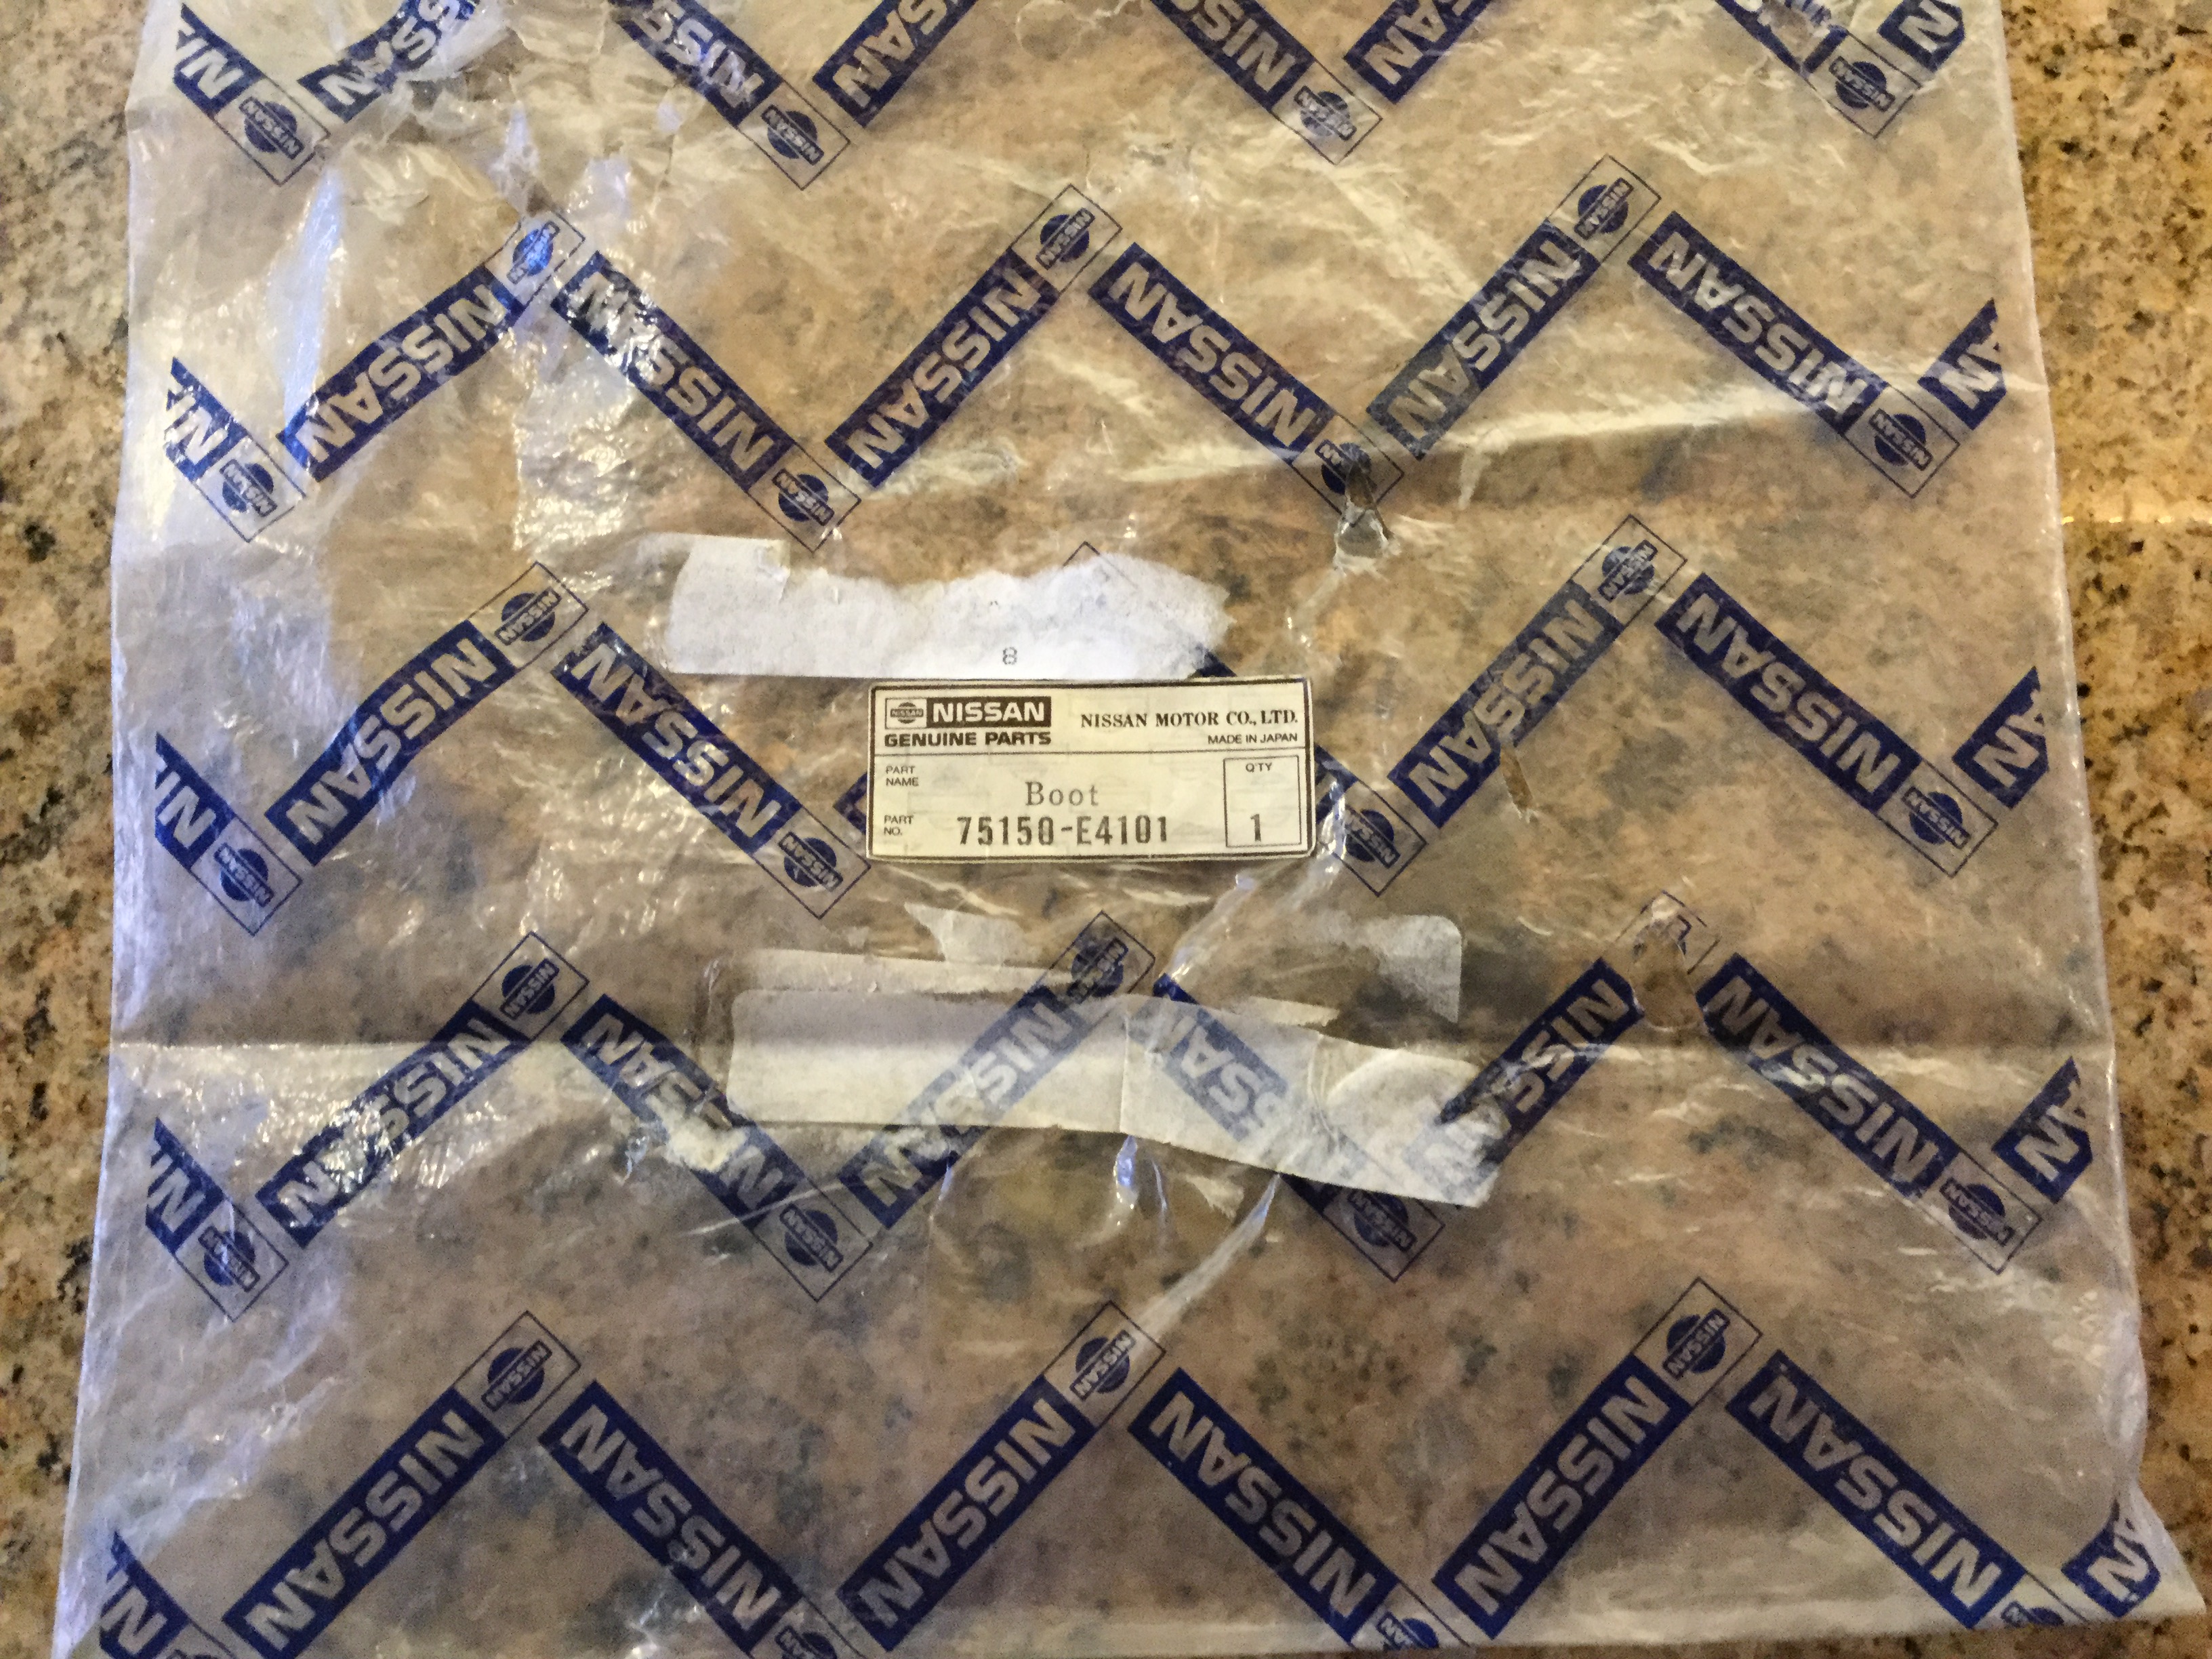
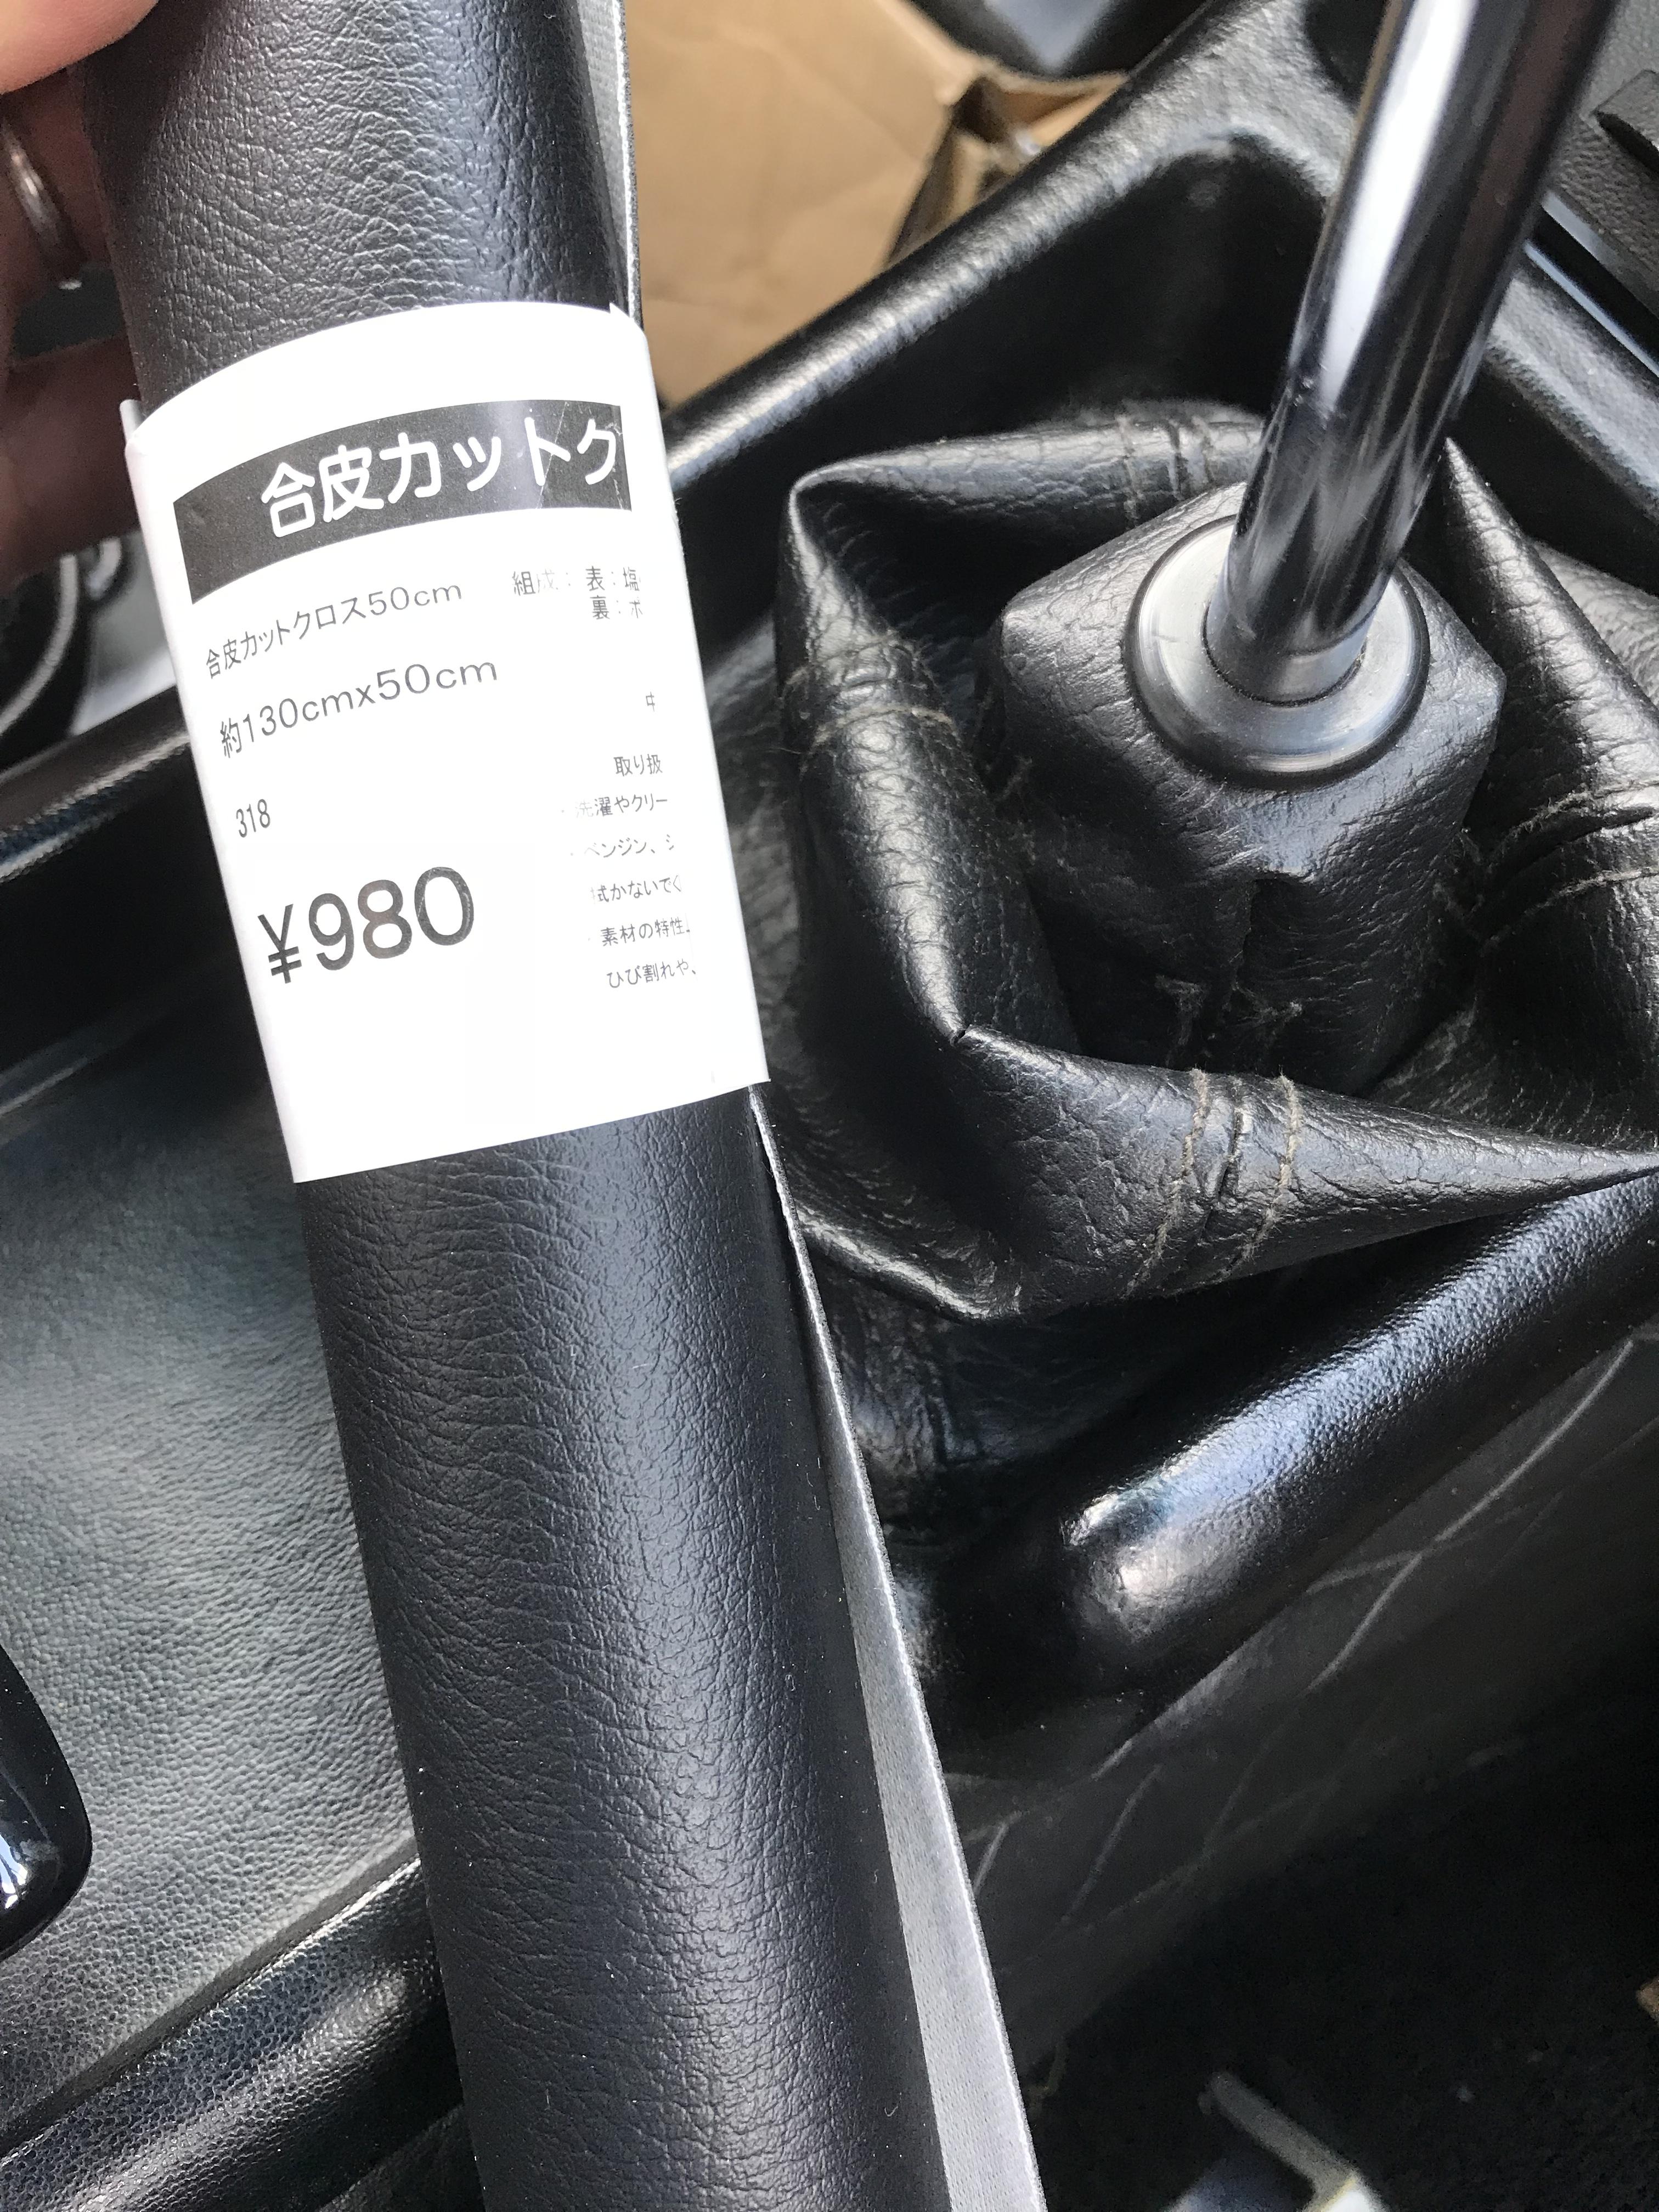
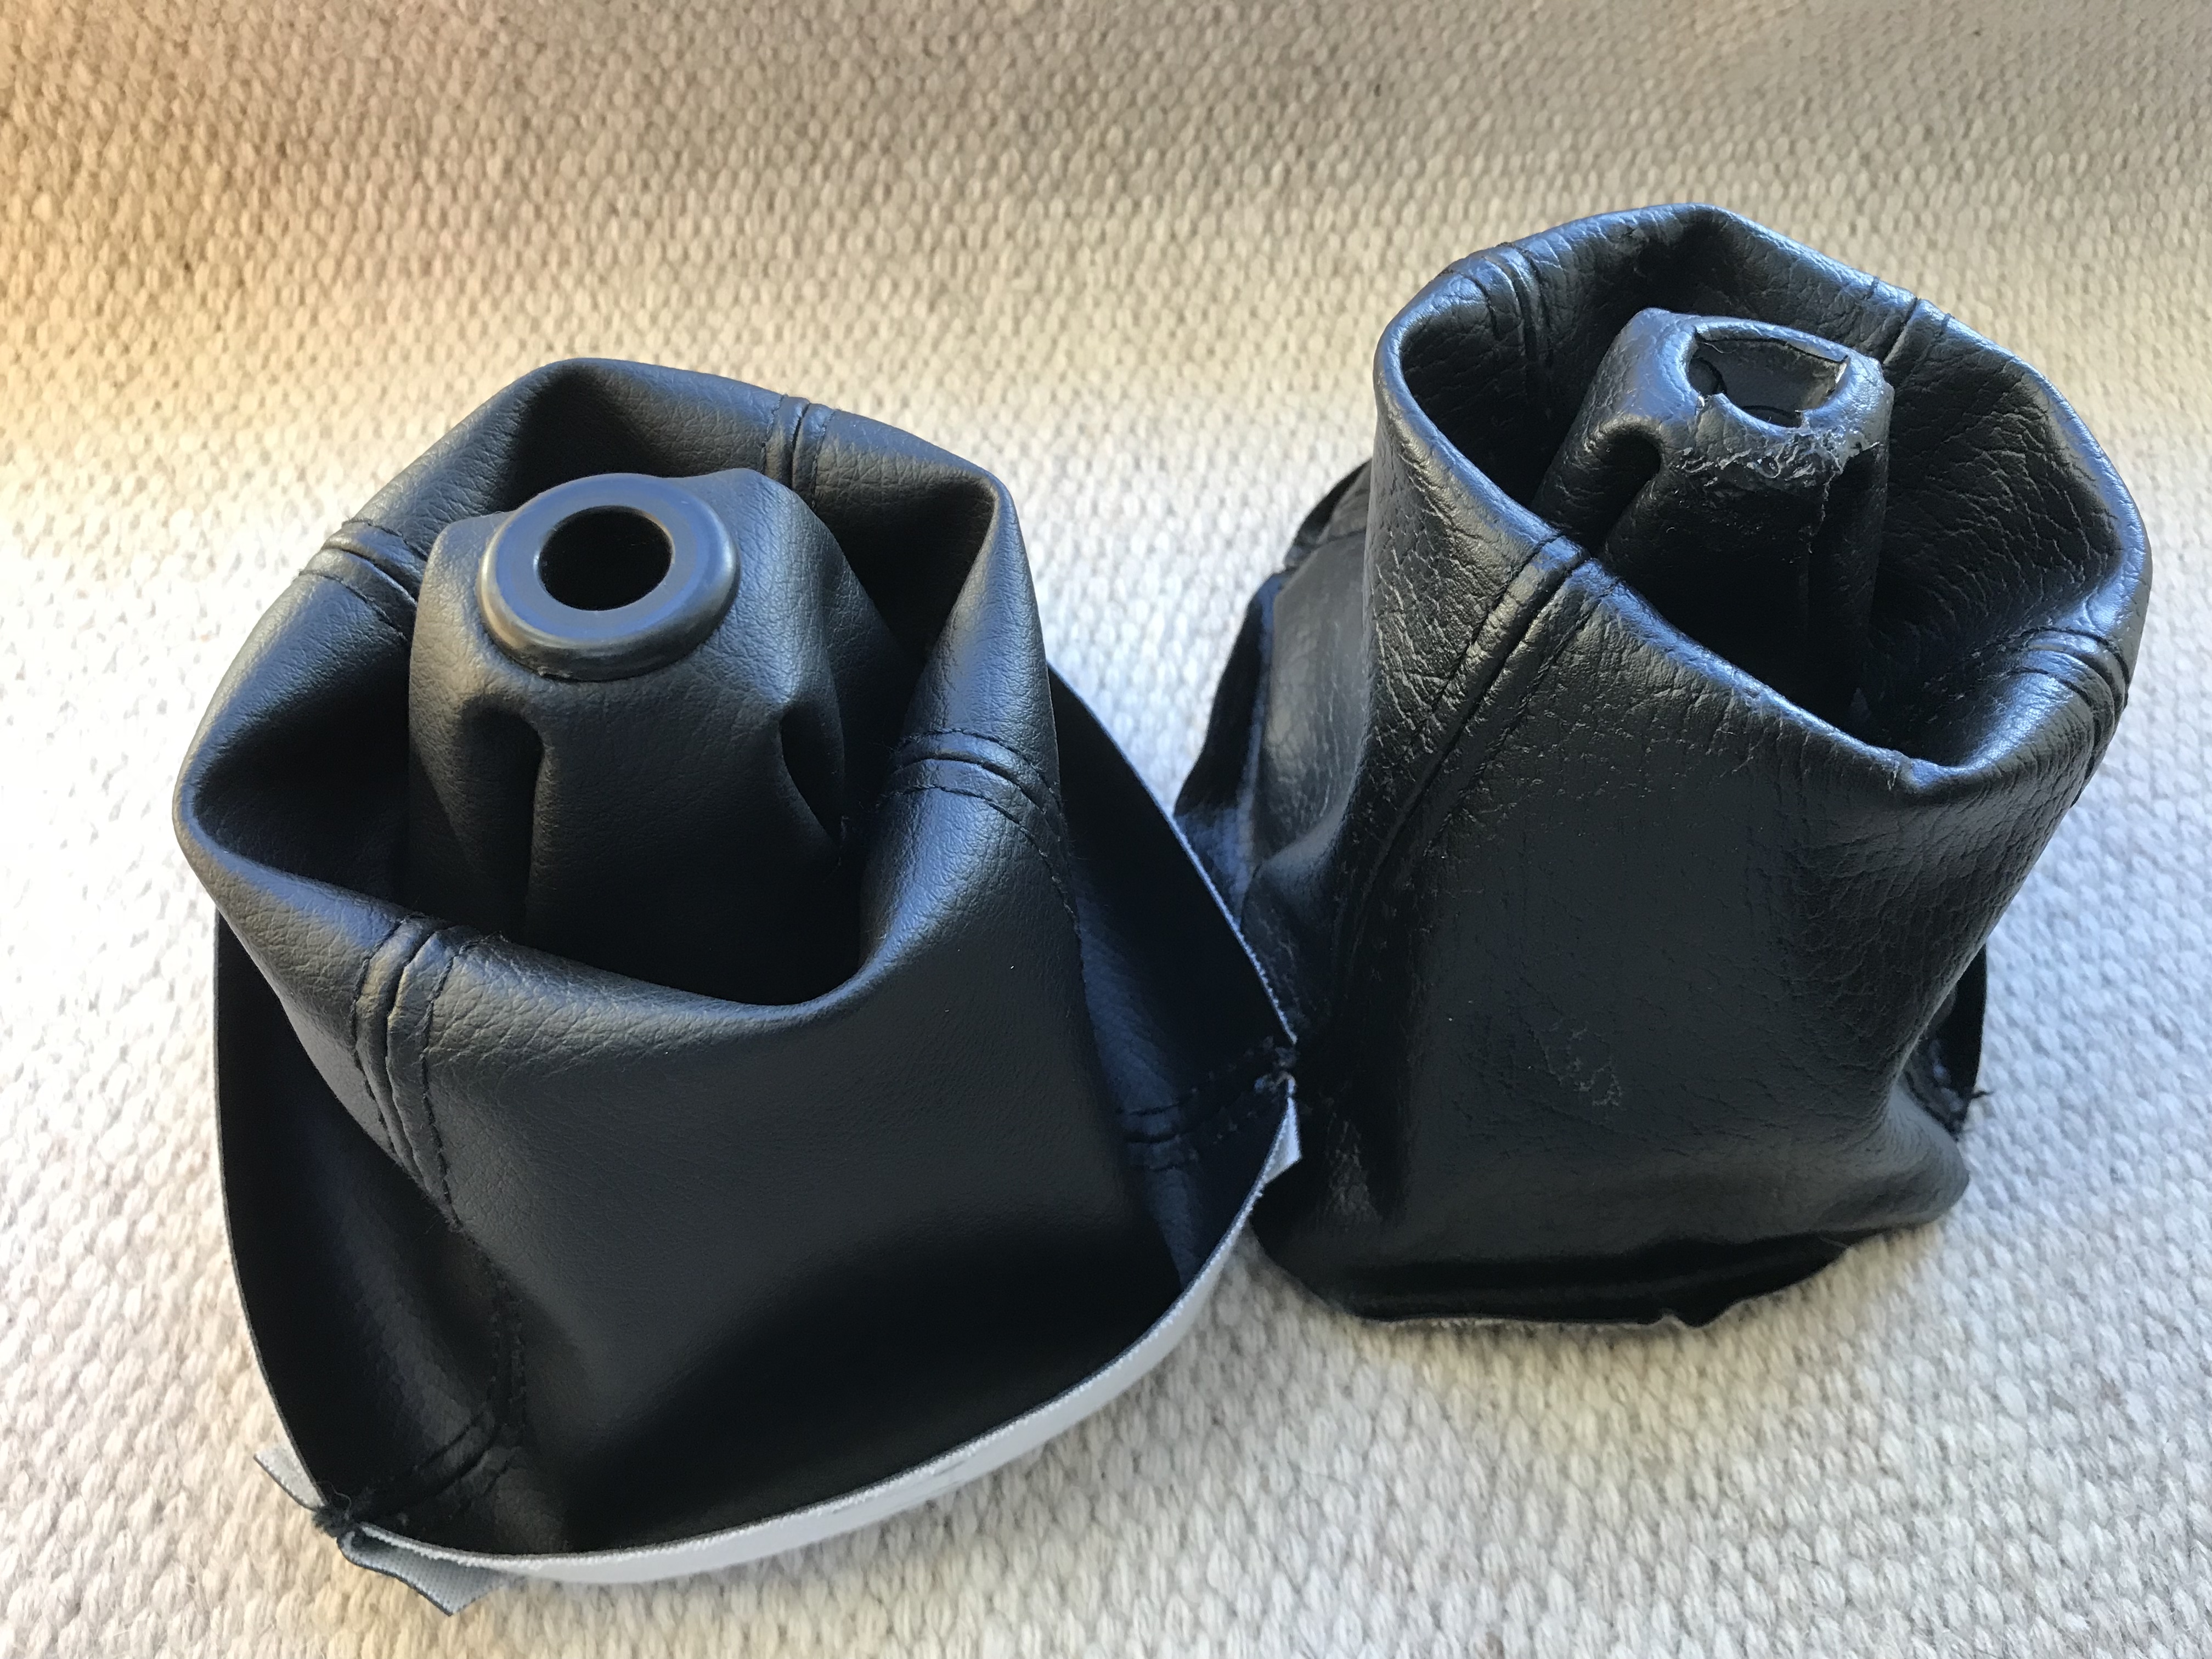
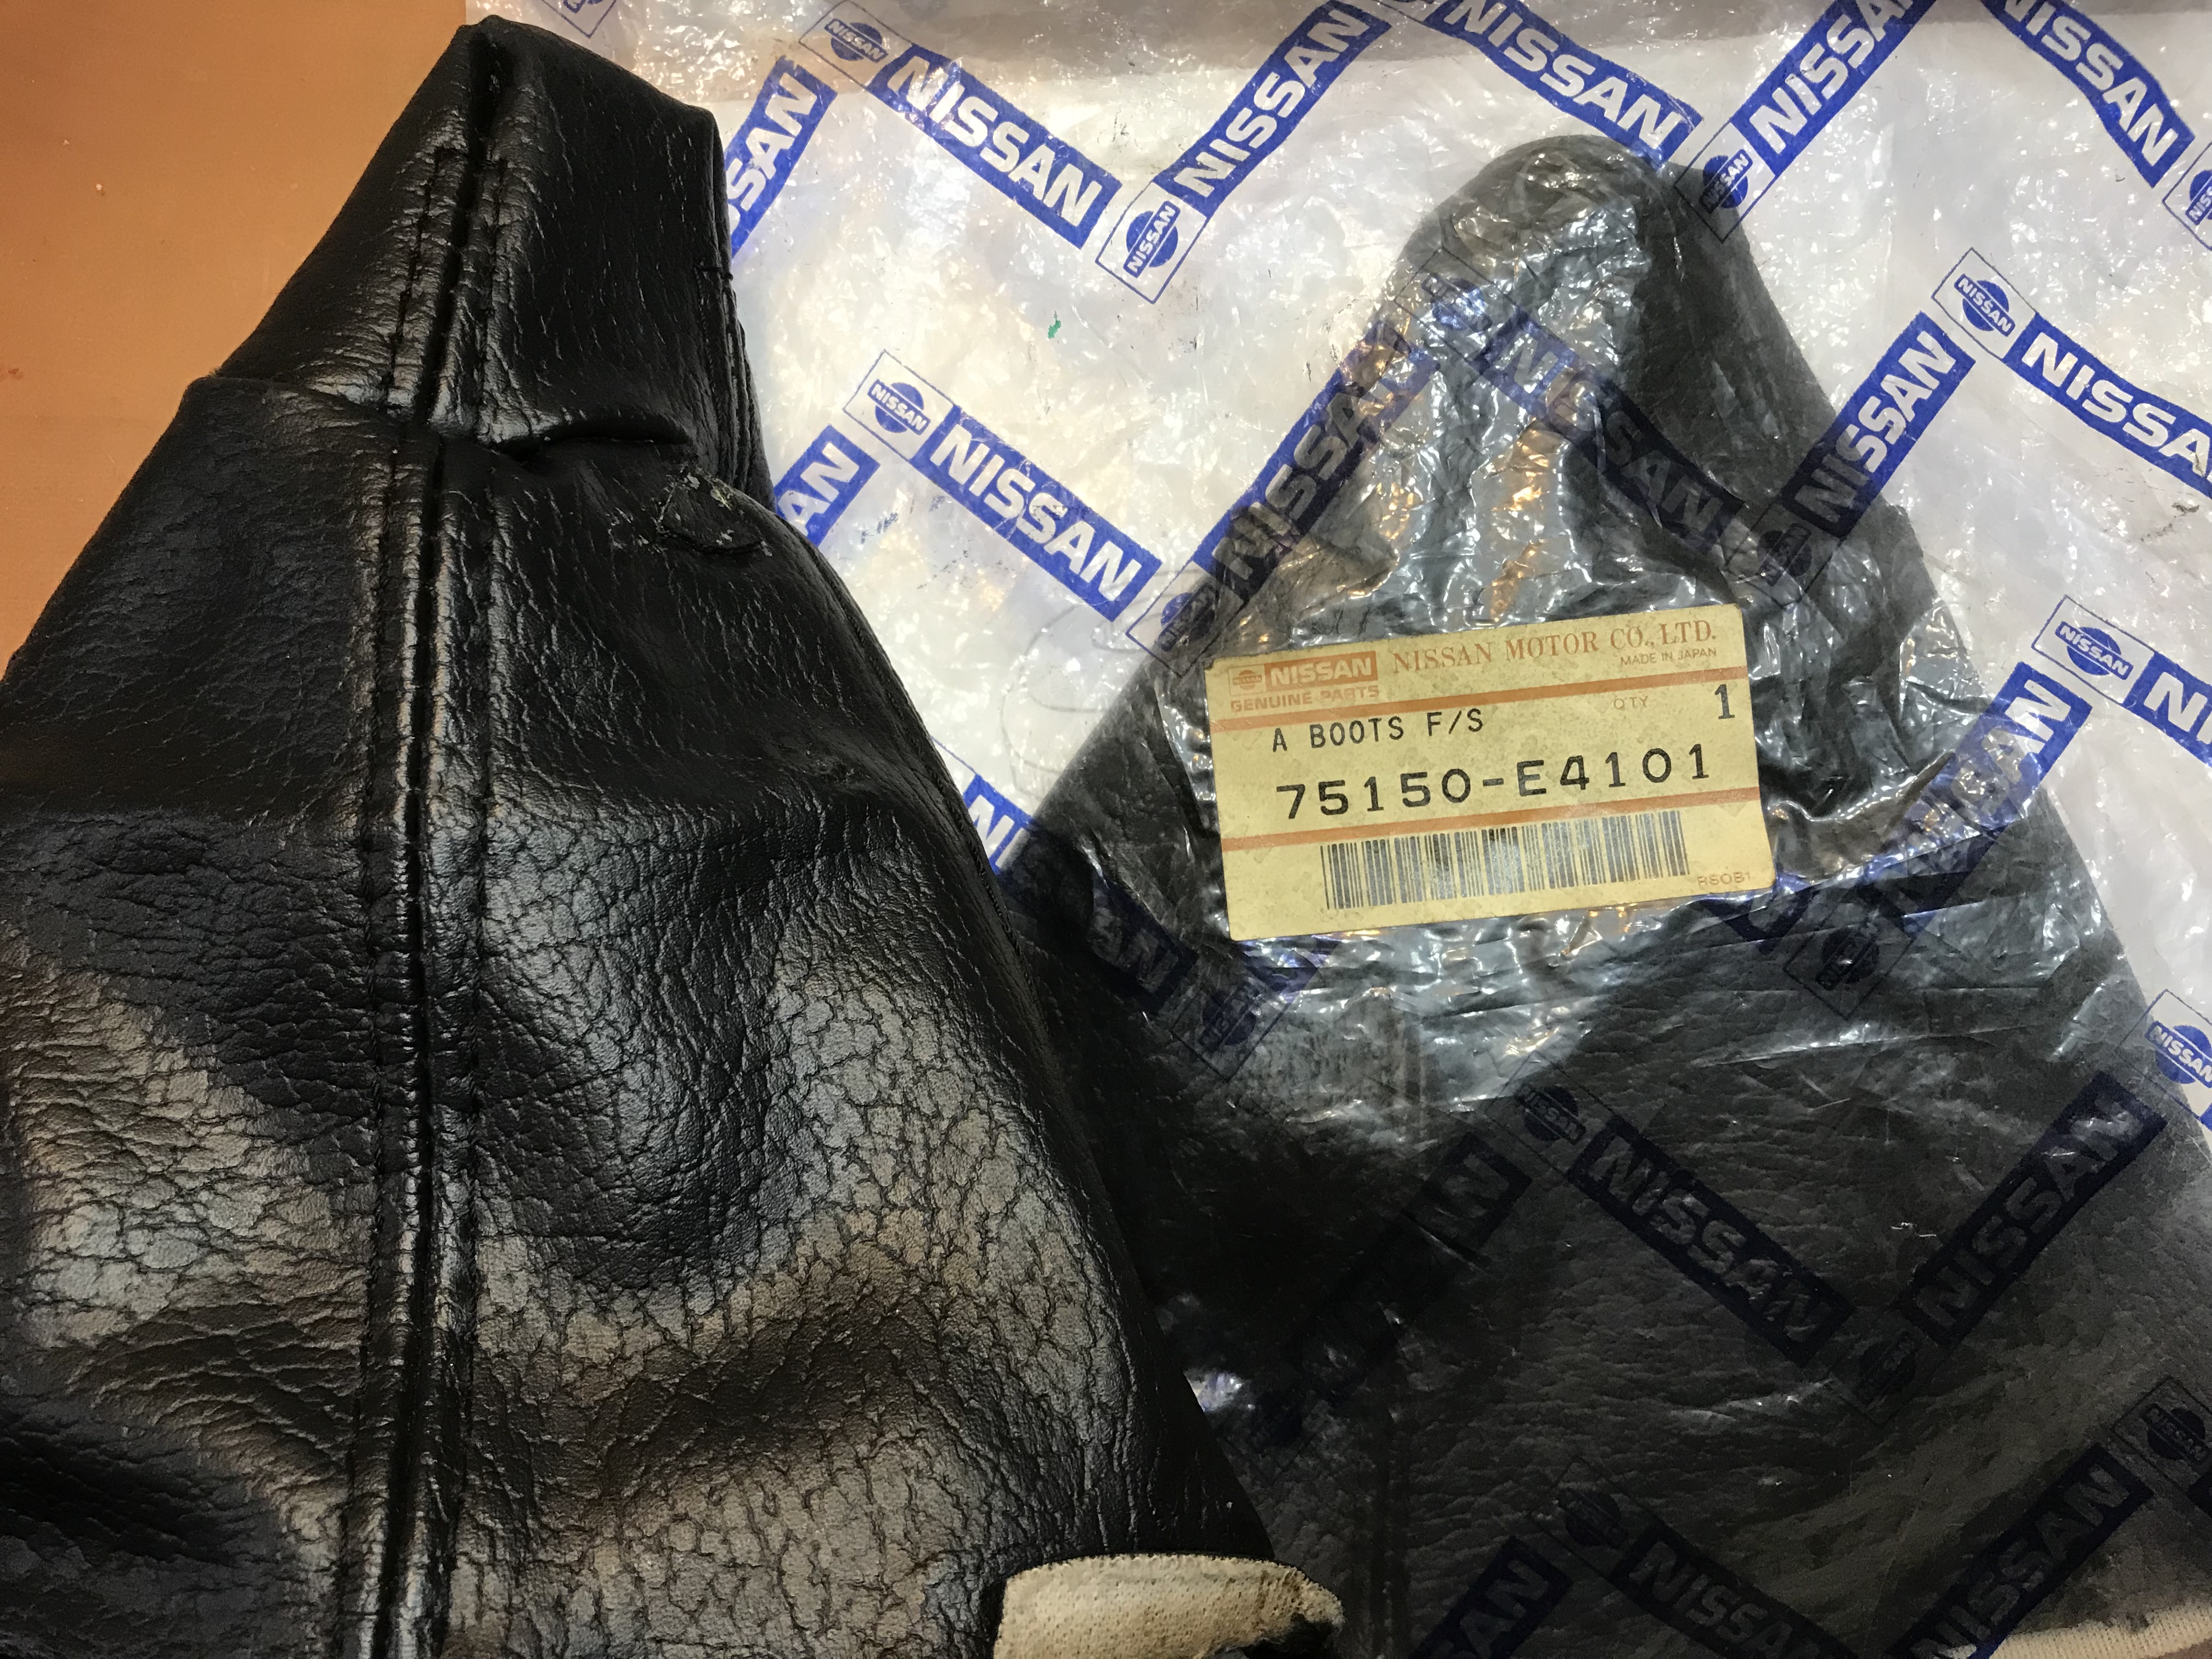
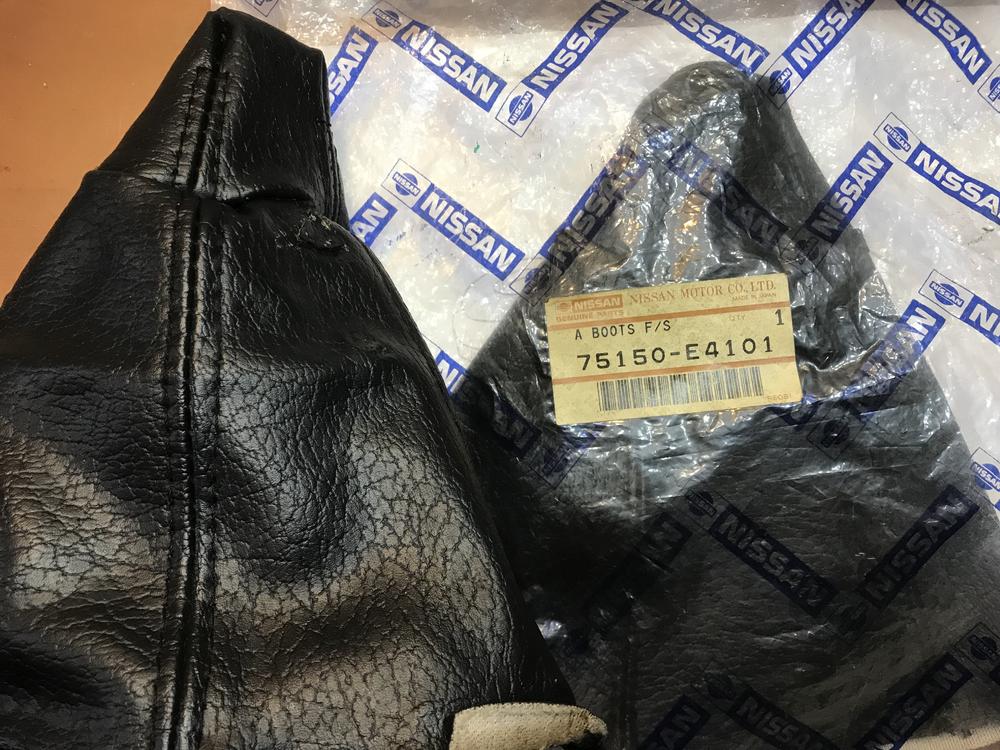
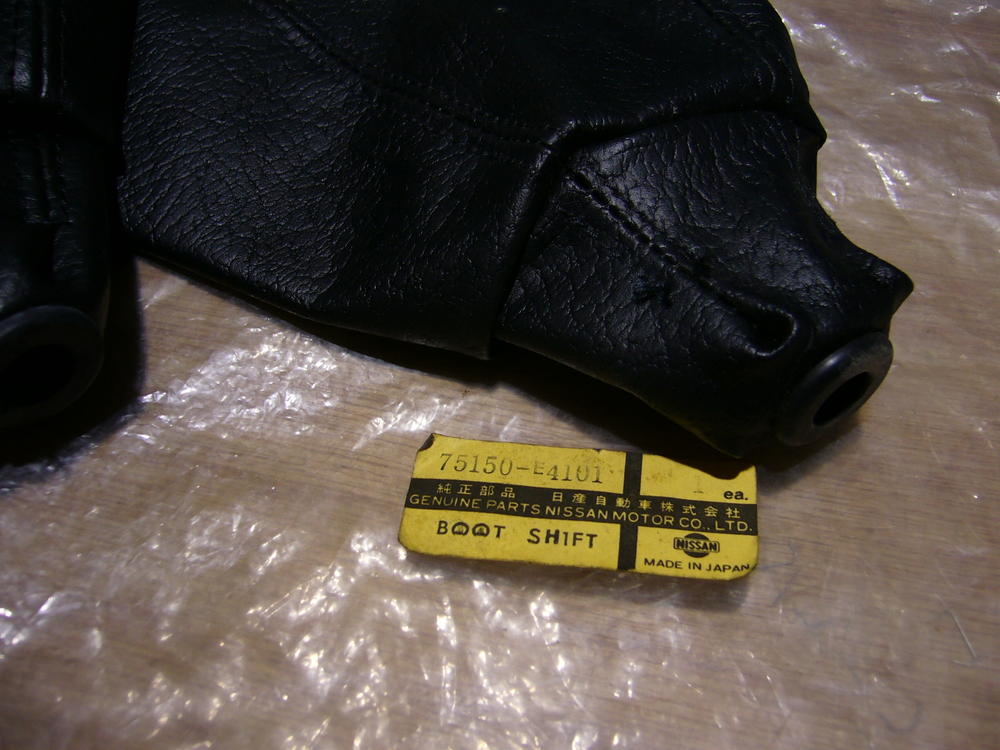
1 pointEarly shift boot, My blue 240Z had a late shift boot (1972 model type) when I first saw it in the shop . I bought a stock early type 75150-E4101 in 2000 as a new , installed it and enjoyed. This boot had a not so early Nissan part number sticker on it , so I guess this boot was made in some 80’s to 90’s . This time I replaced it to a replica boot which has done by upholstery shop specializing for commuter bus in my town. I took off the boot from my car and bought a closest textured vinyl sheet (980yen!) then I went to the shop and they did a great job. Not perfect but I am very happy with the results. I have a NOS early boot in my shelf but this is not so flexible. I think it is not because of aging but for the thickness.This spare boot also has a not so early parts number sticker . My Blue 240Z ‘s former boot is the same , thick and not so flexible . Sometimes it became very difficult to follow the shift lever when in the cold winter morning. While my Z432 has installed a NOS early boot in 2007 , this is very soft , and still is . This soft boot had an old Nissan part number sticker, so it was made in 70’s probably. Texture is exactly the same for both soft early and thick late. So I rather want to go with replica ‘soft vinyl ‘ than stock thick boot . Kats


 1 point
 -
1 pointI try and rotate my tires with each oil change. Blue, is she off at school? I like the username change, when it's important I call him P...... When it's a forum question, 240260280. When I'm kidding around, Blue. Cliff, siteunseen, soon to be KliphhasaZ.1 point
-
1 point@siteunseen @Namerow Thanks Guys, That appears to be the correct thread. It's about 3 years old and I posted a couple of times in it, but don't even remember it. I am glad someone else here has some semblance of a memory.1 point
-
1 point240260280 I followed a Rav 4 from gulf shores all the way to Birmingham Tuesday. Girl never got below 90, 100mph was the top though. Must have a shut down speed? I thought about you. Those are some tough cars. 8^)1 point
-
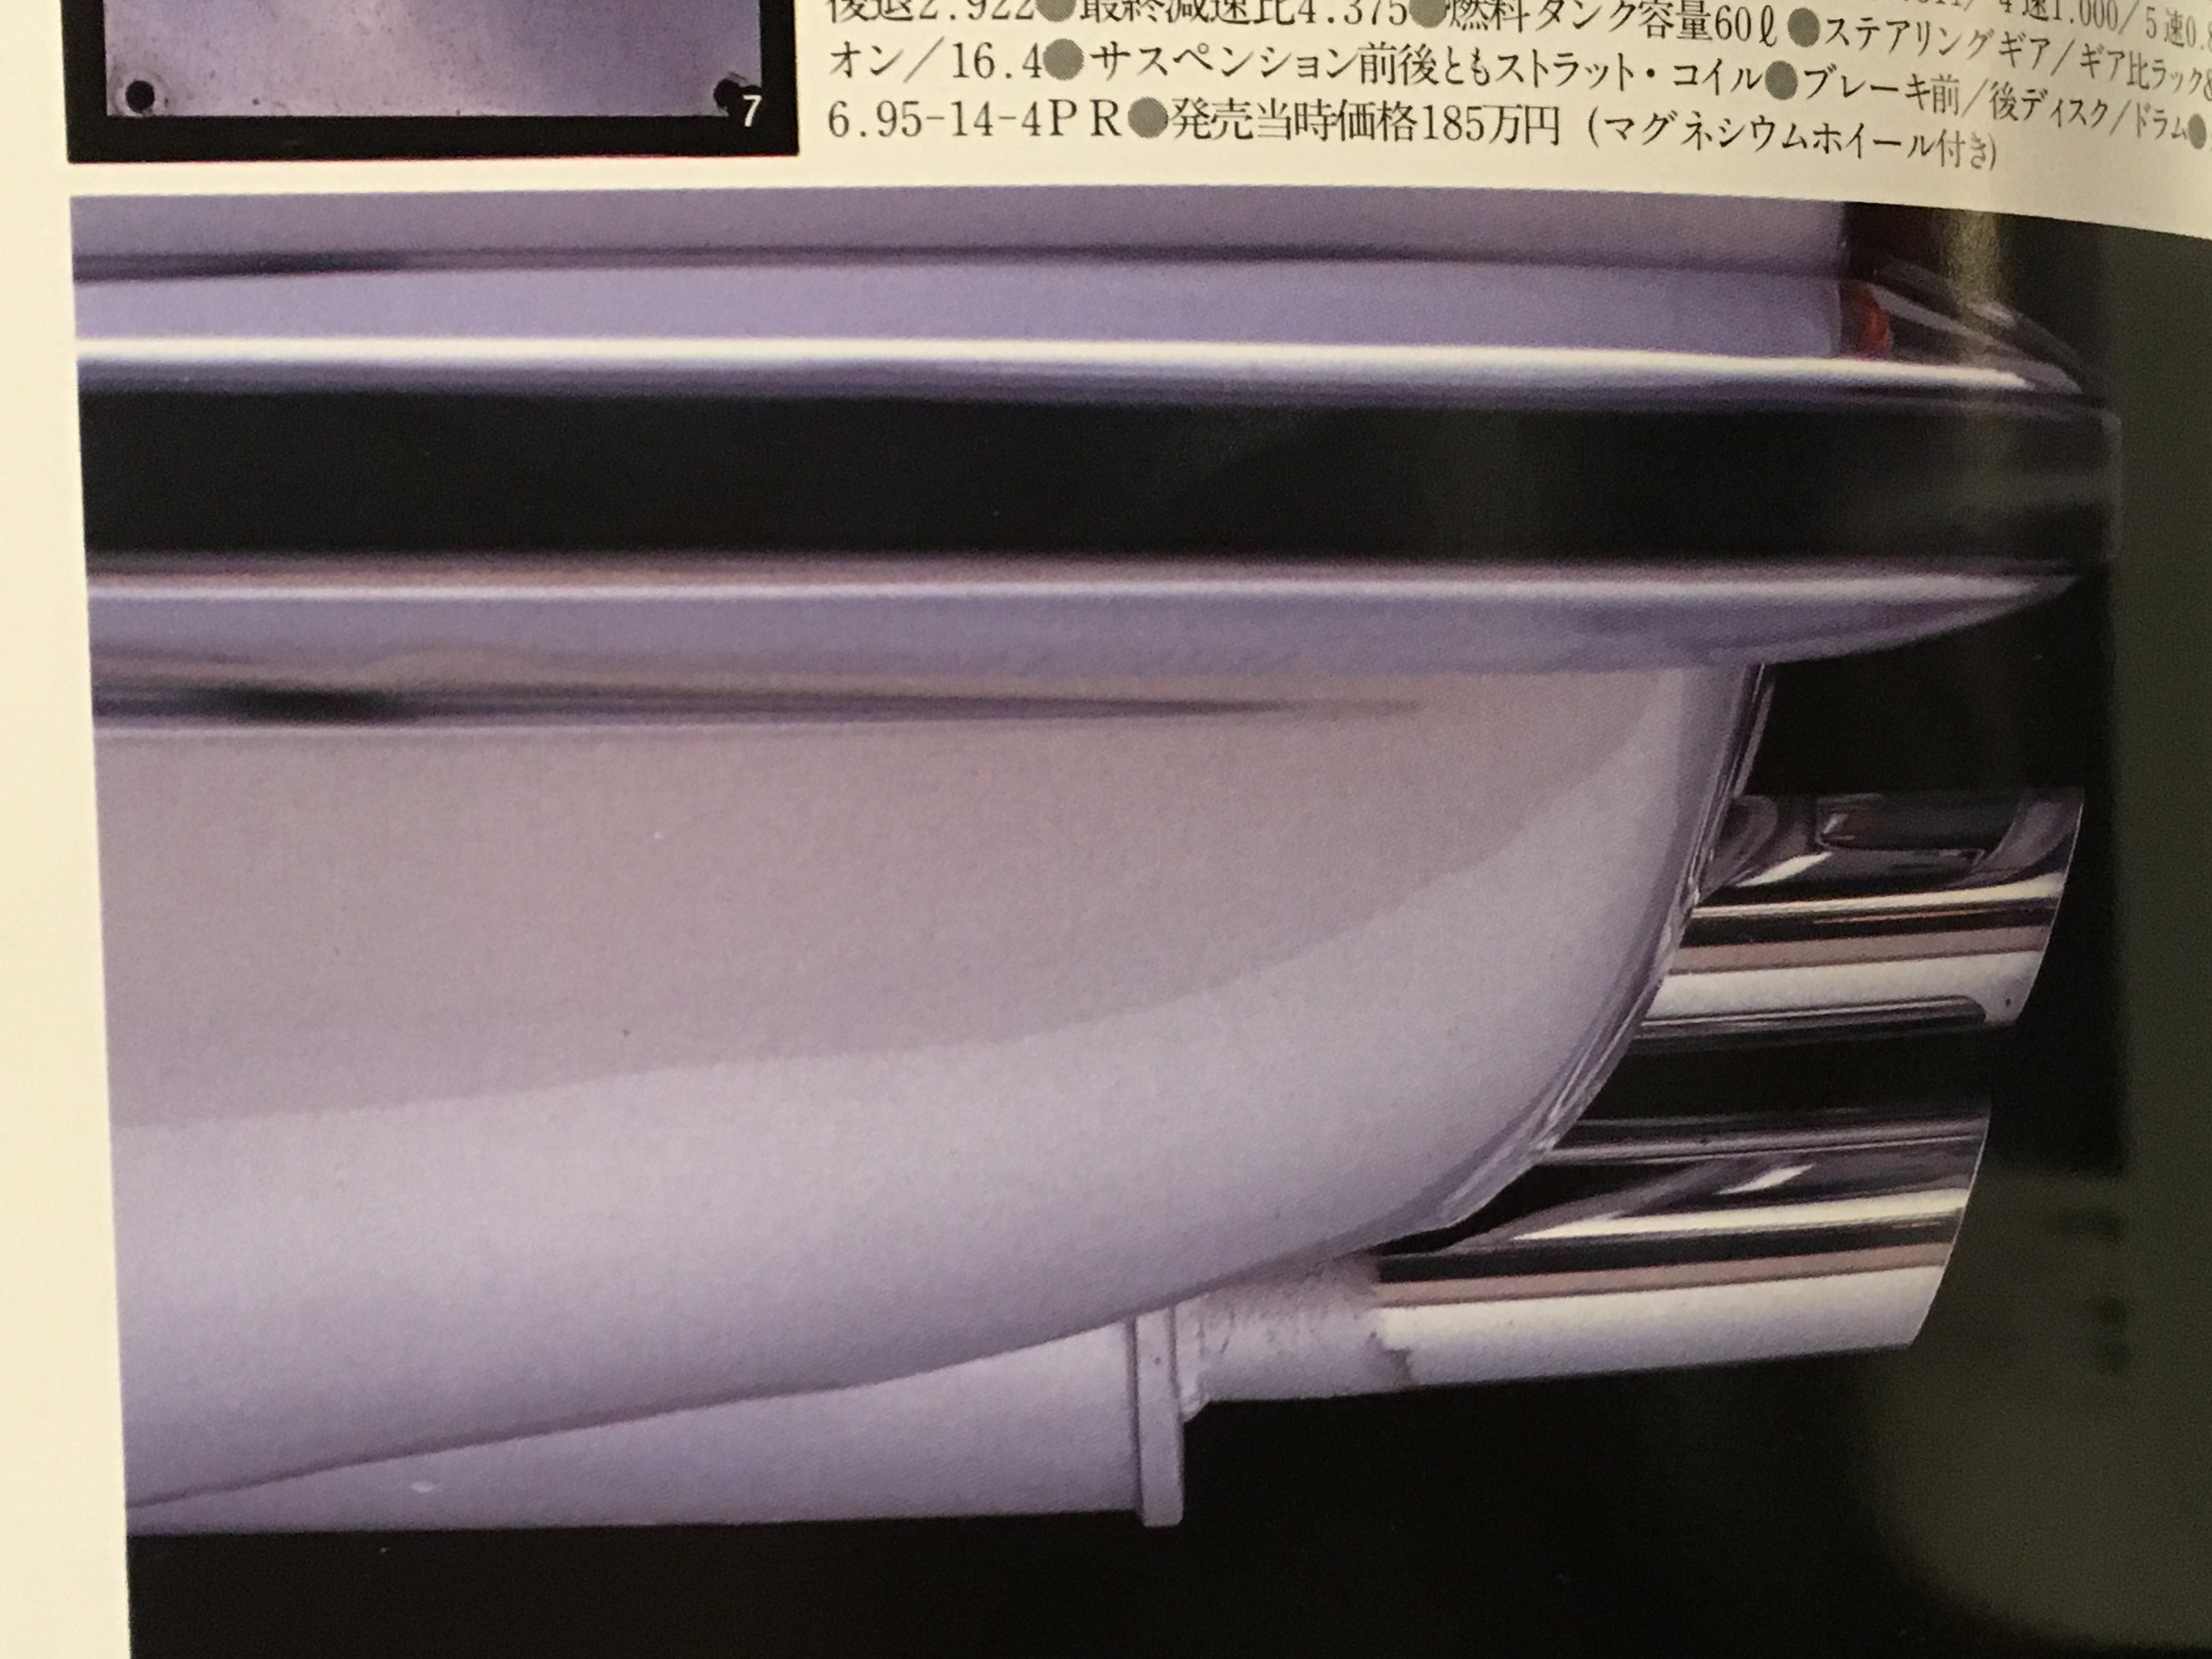
1 pointThe exhaust system I went with is the new Fujitsubo legalis R. It was so hard for me to paint the rear muffler as the polished unit looked so good, but I really wanted the car to appear as vintage as possible. I scoured Japanese magazines and I found a few photos to show my mechanic what I was going for. Rob told me that he would have never done this, but after he did he likes the exhaust even more. My only concern with the exhaust is the length of the tips as the car is an early 260z and the bumpers do overhang more than on a 240z. I hope they are not too far sunken beneath the bumper. Here are the photos I took from a few Nostalgic Hero magazines of Z432's with the original Nissan twin pipe system for reference. The car is going to be finished in one to two weeks. Ben
 1 point
 -
1 pointPersonally I would not use high strength loctite because it will require heat to release the bolts. All I do is clean all the threads, lightly oil the threads and use a tension wrench to tighten them to spec. Dry threads have more resistance and will not tighten down as far ss lightly oiled threads.1 point
-
1 pointWhere you going with this? Did I rub a sore spot Because you like them and I don’t? Blondes or brunettes right ? My opinion is the fender mirrrors are in the way compared to US mounted door mirrors. If it’s not to you great. I have zero issues if you like them on the fender.1 point
-
1 pointI never cared for the look and most importantly their location on the fender is one more thing to have to work around.1 point