


Leaderboard
-
Grubb240Z
Free Member4Points85Posts -

240260280
Free Member3Points4,442Posts -
Home Built by Jeff
Free Member2Points262Posts -

wheee!
Free Member2Points4,607Posts


Popular Content
Showing content with the highest reputation on 01/05/2018 in all areas
-
You asked for it - here it is! 6 min. long but worth every second https://youtu.be/j1Or4N_O-3A Always fun to see a kid get a wish fulfilled -- even if the kid is taller than you. The first video was shot at around 2:00am - trying to sneak the car into the driveway from a couple blocks away.4 points
-
2 pointsHappy New year guys. I have finally got stuck back into the Z. Continuing to work on the roll cage this week.2 points
-
1 pointIt will be the first place I go this morning, after it warms up a little. Could have got 4 240Z's working in the time this ZX is taking.1 point
-
1 pointYep, big mistake to wash down the engine bay equip'd with EFI. Ask me how I know . Many years ago when it was the thing to do, did it and still to this day am regretting it. It's easier to remove the TVS from the throttle body to access the interior of it, unless it's already been opened. Just mark the throttle body before removing it. Mine had some light corrosion in it. I used the striker area from a book of matches to clean my contacts. Worked well.1 point
-
1 point
-
So does this Z have a name yet? Maybe---- Pegasus1 point
-
1 pointFlog the horse Enjoy this deeper dive: http://www.classiczcars.com/forums/topic/40718-tach-bounces-while-shifting/?tab=comments#comment-3659731 point
-
1 point
-
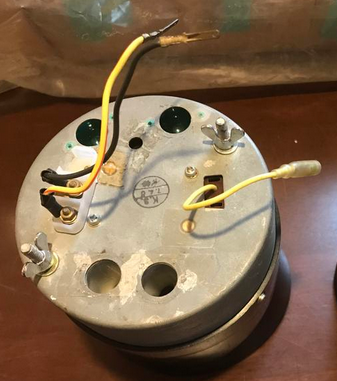
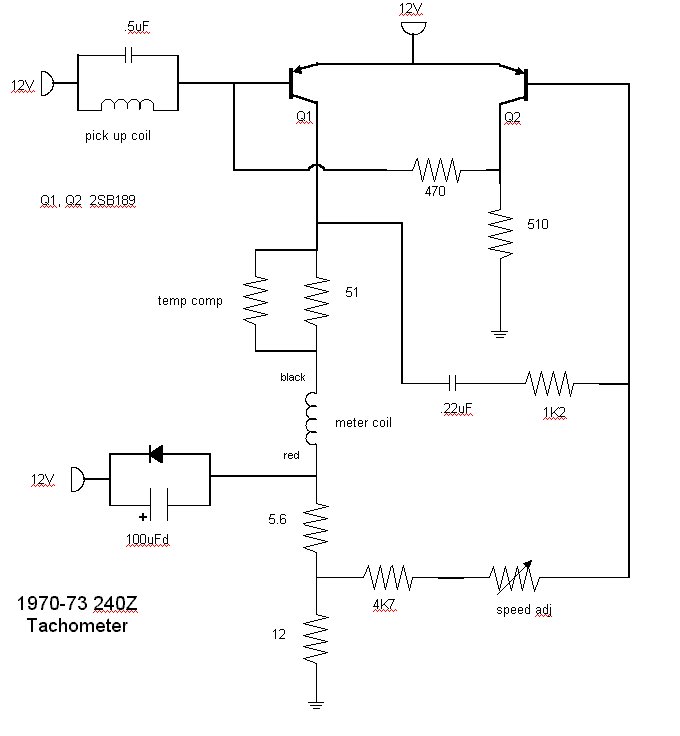
1 pointHi Kats, I swapped a 280z tach into a 240z housing in this thread. The 240z signal was picked up through induction at the tach. The 280z signal was a direct voltage. Here is the 280z primary connections.... looks very familiar You may be able to use 280z parts in the 432R tach
 1 point
 -
1 pointBy the sound the starter made, go to the vid and listen...that hiccup is a due to too much timing. That btw is how we used to set timing without a gun, keep advancing a little at a time Until it sounds like that...then retard it a notch and its set. (I know it's not the "proper" way....but in a pinch it works.) for example....changing a cam on a SBC in the auto parts store parking lot (Barstow CA circa 1988) with a tool kit that can fit in a woman's purse..1 point
-
1 point1 point1 pointPaint: 1. I use the Eastwood dual voltage gun with the setting on high for most of the work I do. 2. I used the Eastwood gloss black for the cross member. I choose gloss for this part because it is such large item and will be easier to clean in gloss. I like the result and am glad I went that way. The satin will attract more dust I think. 3. This part used maybe an ounce and a half? not sure. The bottle was only a quarter full. 4. Nooks and crannies can be a challenge if you have the charge electrode too close to the piece as it will create a dead zone. I hooked the electrode up about 10" away from the part on welding wire for good conductivity. After that, keeping the voltage high and a high flow rate of powder allows it to get it into most areas. There will always be a few dead spots inside the pieces that just don't get heavy coverage. I can usually touch those hidden areas up with a rattle can to protect the metal. Nothing noticeable. Also, make sure you keep the round dispersion cap on at the end of the gun. It allows the powder to disperse rather than "shoot" out. 5. The lamp was placed in about five position around the piece at each level for about 15 minutes each position. Then raised each time for a total of three heights. (15 total positions) This is a slow way to do powder coat, BUT it allows me to coat almost any size object! Paint prep: 1. I used Black Beauty Copper Slag. It cuts well and doesn't contain any sand. 2 & 3. I had about 2 gallons of the media in a bucket and ended up wasting about half with the siphon feed gun. Normally I use a cabinet and have no waste, but this was done outside in an open box.... (and it was +2 degrees celsius yesterday when I did it, so I didn't suffer too much! 4. It took about an hour to clean off the part properly, including all the nooks and crannies. I didn't want old oil and grease melting and catching fire, ruining the paint job! 5. I did nothing more than blast the piece off with an air gun before powder coating. The results are phenomenal and I don't think I could have gotten better results with an additional cleaning process. The copper slag does not adhere to the piece and blows away clean.1 pointScrews are out, more adhesive goo stuffed into the holes. Clearly welding the holds shut is silly. I will be entrusting the roof shaping to a real body man. That thing is no place to learn sanding technique. I dont do my own drywall either....1 pointI know it's been a while since this article was written and it's very good. Including the photos makes it a lot easier to understand. I've made this conversion several times without problems. The one comment I have is the 280z unit that was used is from a 77 or 78 280z. The 75-76 280z has the same font and face plate as the 240 including the 6500 red line. If you use a 75 or 76 280z tach for this swap you don't have to touch the face plate or needle. Makes things a lot easier. Zclocks1 point1 pointWhile trying to adjust my passenger door, which wouldn't shut without slamming, I can across this thread. It seems to indicate the latch is missing a piece of rubber on one of the lobes (the larger one). The suggested fix was to cut a piece of rubber tubing and glue it onto that lobe. The other fix was to carefully remove some material from the catch so the locking lobe (the smaller one) doesn't hit before coming down into locking position. When the rubber is there I assume it worked great since the first lobe starts to rotate sooner to drop the second lobe into postion quicker. I'm thinking, why in the heck did they decide to use rubber in this area! No wonder they are missing! I thought of making one out of plastic (Delrin) but I think it would eventually fail also. So, here's what I came up with. I fabricated a metal "C" shaped clip that I could pinch onto the lobe to replace the missing rubber. It's made of 16 gauge (.062") steel, about 17/32" wide. Easier to tightly install when latch is off the car, in a vice, and tapping the piece around the other side of the lobe. But probably doable while on the car with a good size set of channel locks. After a little adjusting of the latch and catch, a little spray of lithium grease, door closes perfect! Hopefully this will last for awhile. Ken1 point


Important Information
By using this site, you agree to our Privacy Policy and Guidelines. We have placed cookies on your device to help make this website better. You can adjust your cookie settings, otherwise we'll assume you're okay to continue.