Leaderboard
-
Chickenman
Free Member2Points1,210Posts -
EuroDat
Free Member2Points3,309Posts -

siteunseen
Free Member1Points15,114Posts -
Kurbycar32
Free Member1Points581Posts


Popular Content
Showing content with the highest reputation on 12/04/2014 in all areas
-
2 pointsThat transmission never came out in the US or Canada. You could try a PM to Alan T. He might have one in a PDF version. You are probably goinv to run into trouble getting parts for the synchros. The C transmissions had the porche type steel servo. The W type was with the bronze alloy warner type. Japan would be the best bet for parts otherthan bearings and seals which you can source locally. I think they started using the B (two piece housing) version from 1972 onwards until they changed to the W type. The A type was the 3 piece housing. Chas2 points
-
Be brave. There is at least one good write up here. I bet there are people close to you with spare hog rings. If not, I have a bunch. I used slip joint pliers and tongue & groove pliers to squeeze down the hog rings. I only lost one finger during the process, so it can't be THAT dangerous.1 point
-
Today i got an early christmas surprise I decided to change my plan regarding the bolts and take the easiest possible way. Finding all the approximately 300 Different nuts, bolts, washers and springs in the correct size, threads, coating, lenght, strength etc at a hardware supplier is a pain in the arse. Specially because some of them are custom made only for Nissan. So i thought the simplest way is just print all the part numbers out of the nissan E-Fast tool, and place a big order at the local nissan dealer... Well it wasn't that easy. But this is what i got today: In fact i had to find replacement partnumbers for the original obsolete parts and at the end this are all the original parts still available from nissan europe. Also checked with nissan japan. they only had one nut more So At the end i have at least 60% of all the steering rack and front subframe assembly / Suspension bits together. All the standard pieces will be bought from a big hardware store and the custom made bolts like the transaxle mounting bolts will be cleaned and recoated / zinc plated because they still look nice! Yesterday i also visited My Bodyguy Yves from M.U.C who is working on my chassis. Not much changed since he last sent me an update but talked a lot to him and had a closer look at his work: So much better than before: This is the current state of the car. As you can see on the floor i dropped of the NOS Frame-rails i got a while ago so he can replace the rusty and patched up ones. So happy to have these items even if they cost me a kidney Prepare for another big update coming this weekend1 point
-
1 point
-
Geez Siteunseen, I think your 77 could sense bad thoughts from you and gave you a pre-emptive strike. That's what mine does to me anyways….. .1 point
-
Going back to Jason Gray's excellent distributor article, many people skip over the part on Vacuum advance. Don't do that. Read it carefully and then read it again. http://newprotest.org/projects/510/jasonGrayDistributor.pl Here is a very important part pertaining to the Datsun Electronic Distributors, as others have mentioned: So what does that tell us? Well lets say you want a total mechanical advance of 32 degrees ( Depends on fuel quality and other factors ) at 3,500 to 4,000 rpm. Full mechanical advance is usually all in by 3,500 rpm. Some people prefer it coming in faster, some later. It all depends on the engine, fuel quality and drive-train setup. You should check the distributor plate and calculate the numbers. IE: a 10 stamp on the dizzy plate = 20 crank degrees. Add 12 degrees initial timing and you're bang on at 32 degrees total. Now lets look at the D6K82-01. This has an 8.5 dizzy plate = 17 degrees crank advance. A fairly common number. Add 15 degrees initial timing and you have you 32 degrees total mechanical advance. Always double check the figures with a Dial-back timing light. Notice that we have not discussed vacuum advance at all. That's because when setting total mechanical advance, you musty always have the vacuum hose disconnected from the distributor ( and open end plugged of course ). So lets address that. You have your D6K82-01 dizzy dialed in to 32 degrees total advance so lets see what your total mechanical and vacuum advance will be under cruise ( light load with maximum vacuum ) . Lets see... the D6K 82-01 is a low compression emissions engine, so Nissan equipped it with a 30 degree vacuum can and low static timing ( 6 degree BTDC ). Then you came along and bumped the initial timing from 6 degrees to 15 degrees because = HP!! . Your mechanical advance curve is now good for maximizing fuel efficiency and HP, but lets see what happens when we add in the Vacuum advance. 15 initial + 17 mechanical + 30 vacuum = 62 degrees!!! Houston we have a problem!! What vacuum canister am I going to use? Simple...the original one the dizzy came with. No need to buy a different canister, just reset the limit stop on the present one. Edit: Remember that you want the total mechanical and vacuum advance at cruise RPM to equal approx 50 degrees BTDC . You can adjust that down a bit if you get pinging under light throttle application at cruise. Remove the Epoxy blob with a thin flat plate screwdriver. Just chip it away. After 35+ years I've found that the epoxy has usually gone all brittle and flaky. Re-seal with an RTV blob. Then adjust the inner limiting screw to limit the maximum travel to achieve 18 degrees vacuum advance. 15 initial + 17 mechanical + 18 Vacuum = 50 . There should be enough adjustment to handle all situations. I make a rough estimate and then do a final check with my Dial-back timing light and a Mighty-Vac. Jason Gray's article even tells you how much each mm of adjustment affects timing advance. You can also adjust how quickly the vacuum advance comes in by adjusting the outer threaded sleeve. This can come in very handy on motors with big cams. I'll post some info o that later. These vacuum canister adjustments can be made on any Datsun EFI dizzy. If it has a putty/epoxy blob on the end of the vacuum can, that's a fully adjustable vacuum canister. Lucky us.1 point
-
Just to further comment on Blue's link to Jason Gray's page. All Nissan Electronic distributors have a vacuum advance that is FULLY adjustable for both travel amount and for the spring pre-load tension. Understanding how this works can really open your eyes to tuning possibilities. http://newprotest.org/projects/510/jasonGrayDistributor.pl Vacuum advance pays huge benefits on any street driven car. It is particularly important at cruising speeds where a Vacuum advance will increase engine efficiency and MPG. If you're not running a Vacuum advance on the street you are just throwing money away from wasted fuel mileage. That is a proven fact. On Race Cars a vacuum advance doesn't matter because you are nearly always at WOT. It does matter on a DD though. At cruise speed and RPM's, the engine is at very light loads and with very little throttle opening. The low throttle opening reduces the Volumetric Efficiency of the engine and the air/fuel mixture density is very low. The low mixture density with a VE of 60% ( example ) takes much longer to burn than when the cylinder is filled at maximum density ( VE 100% ) . This requires lighting off the mixture much earlier in the combustion cycle so that Peak cylinder pressures occur at the proper time ATDC. This maximizes torque and fuel efficiency. It is important to note that the reduction of VE at cruise RPM's and low throttle opening also reduces what is called " Dynamic Compression " ratio. Static compression ratio is the mathematical calculated compression ratio of cylinder volume. It is calculated using 100% VE. Dynamic Compression ratio is what the engine actually sees in a running condition and VE is a variable. This is why when you do a standard compression test, the instructions always tell you to jam the throttle wide open. If the throttle is closed when taking a compression test, very little air can enter the combustion chamber and you get a false reading. It is also why engines with big cams require more ignition timing advance at low rpm's and mid-range than a stock cammed engine. The big cams overlap period reduces the Dynamic Compression ratio at idle and low rpms' ( below approx 2,500 rpm ) and you also get exhaust dilution at idle from the over lap. Additional advance at idle is required by bigger cammed motors. Getting back to stock engines. At cruise RPM and light loads, it is not uncommon for Petrol engines to require a total ignition advance of 50 degrees BTDC. Even engines with high static compression ratios ( IE: 10 to 1 ) require this to operate at Peak efficiency. Continued....1 point
-
1 point
-
I have had three different engines build by Dave and had issues with every single one. The dyno sheets are suspect but the lash of 0.007 is correct though I got 0.006 for the 3.2L. I had to cut a feeler down to fit into the smaller opening. The 3.2L or should I say 3.1L based on the measurements taken after we took the motor apart 2 weeks ago dyno'ed at 358hp by Dave but only 273rwhp on a chassis dyno. That much hp loss would equal enough heat to fry my tranny and/or diff, so we just threw his dyno sheet away. All three engines were broken in and Dave recommended Penn oil. I normally run 100 or more octane gas so when it started to make detonation like noises I was on the phone with Dave a few minutes after turning off the engine. Another dyno day. All good. Four 30 minute sessions over two days at The Glen and all but the rings on piston #6 were toast. What caused this to happen, no one knows. What are we going to do to prevent it from happening again you might ask. We've installed a cockpit fuel pressure gauge, a second O2 sensor, reconfigured the fuel delivery lines and filters, and installed EGT sensors. Next up is a different dizzy. We will replace the N42 head Dave did and the Mikunis he supplied with the E33 head and Solex carbs from the original #33 Bob Sharp car. I'm waiting to see if the sonic test shows we can go out another thousandth to accommodate the coating we'll apply to the existing JP pistons (no Dave didn't coat them). We'll rebuild it as I don't want to wait 6 plus months for it to return nor pay Dave to do something we can do ourselves at this point. Once this is done we'll take it to Williams Racing and have it tuned on the engine dyno. It will be set up to run middle of the pack times but made to last a full season. I can only hope those in front of me have engines that fail.1 point
-
Francis, let me tell you a tale.. I'm 32 now, but when I was 14 I picked up a used Mustang and intended on rebuilding it for 2 years before my 16th birthday. Technically my first car was a 5.0 convertible Mustang with leather and premium everything, which sounds awesome but it was an enormous PITA. I did get the car rebuilt and running in time for me to start driving but like any old car the little stuff would break almost daily. Things like turn signal switches, window regulators, rear end (16 year old in a stick shift 5.0..), oil pumps, alternators, catalytic converters etc. and being a broke teenager I couldn't keep up with the dozens or sometimes hundreds of dollars in costs. Ultimately I hated that car because it was a bad daily driver and I couldn't afford to keep up with the expenses. My best advice is to go buy a super reliable car to get to school/work in, then buy a Z that you aren't forced to rely on. Also at 16 you are almost guaranteed to hit a drive through window or trash can and jack up your car so make sure its a disposable econobox when that happens. I'm a big fan of Ford Rangers, they are dirt cheap and pretty much invincible plus the truck will be extremely useful for the next 10 years of your life (or forever)1 point
-
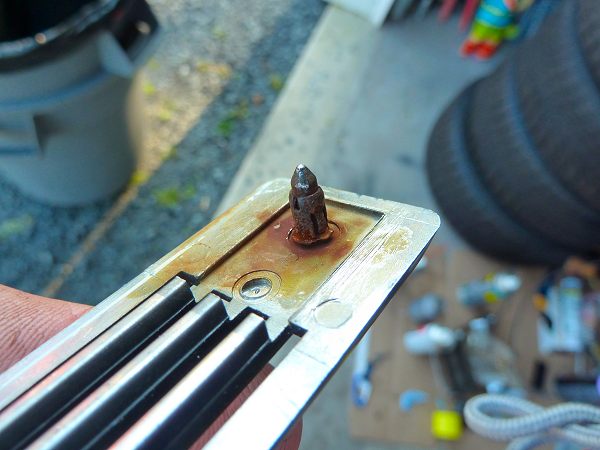
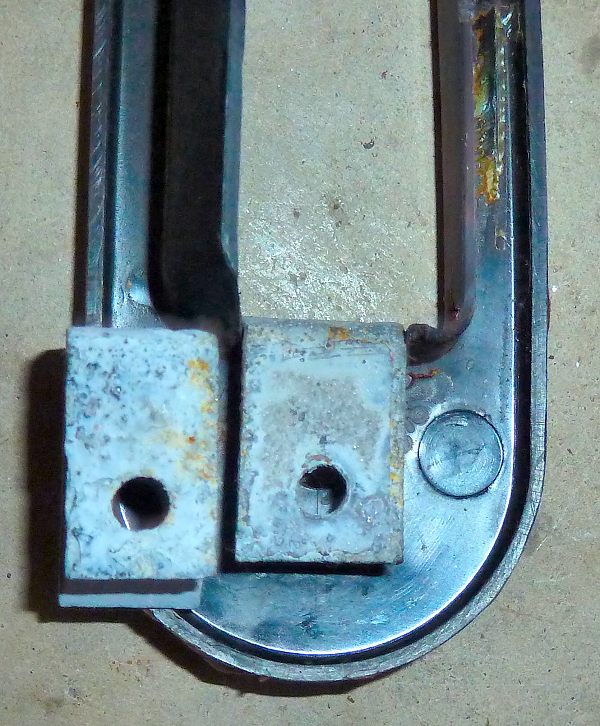
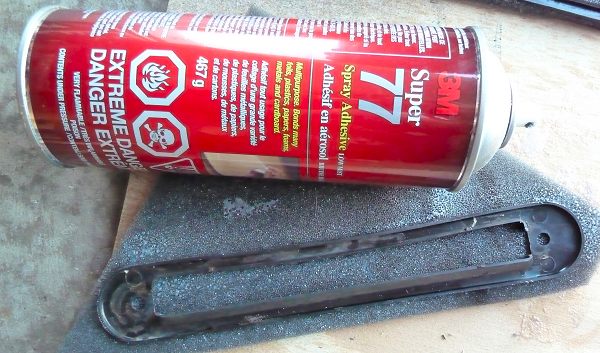
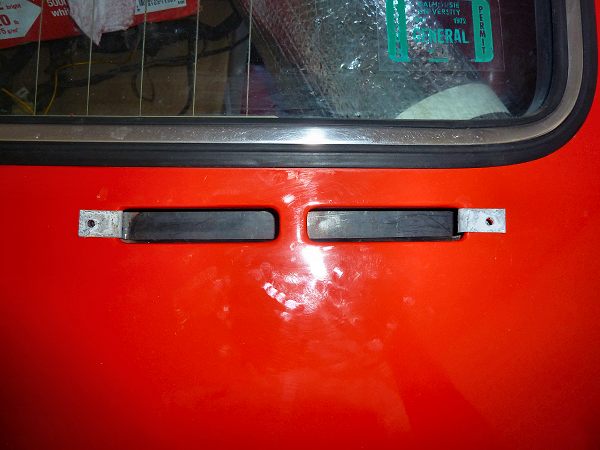
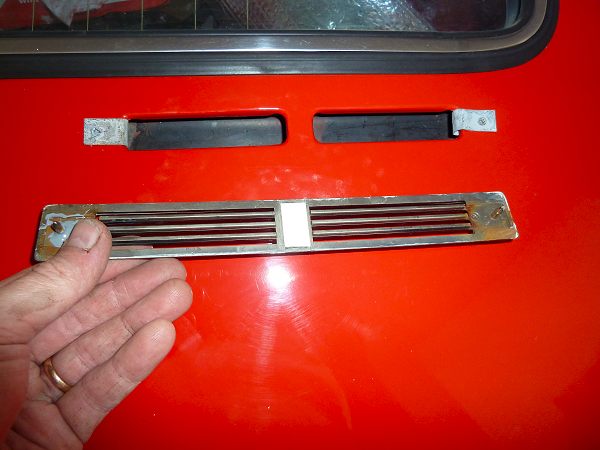
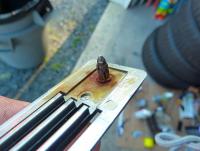
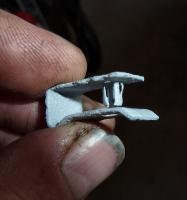
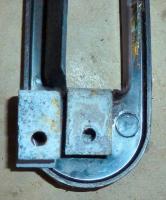
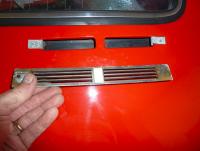
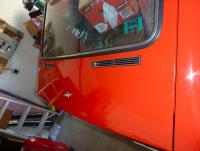
1 pointThe plastic trim has a barrel-shaped retaining clip that rusts. This fastens into a speed-nut like clip on the body Here is the body clip with the retaining clip installed. Both were acid dipped and primed. On this 240z, there were two different width body clips. One hatch vent used wide and one used narrower. I seem to have misplaced the photos of the door interior parts of the vent system. Here is one that I have. It shows the plastic part that attaches to the inside of the vent hole. It originally had a foam seal that has long since decayed so I replaced it by gluing on new foam then cutting out the shape. To install the body clips and not damage the paint, I used a waxy paper to help the clip slide into place. Note there is also the plastic part underneath that the clip fastens. Once the clips are in place, the barrel retainers can be inserted. The clips are in place and top finishing chrome vent is ready to go on Note the new 2-way tape installed in the centre as well as the epoxied plastic pin that had broken off. Job done


 1 point