


All Activity
- Past hour
-
 Yes, I set mine as tight as possible end of the slot. My slot is on the top side pivots from the bottom. My original bolt had a flat washer to cover the slot. The oil Slinger is sitting in position same as your picture. I'm going to attempt to put the cover on today without removing the oil pan. Not sure if that's possible but I'm going to give it a whirl.
 -
 I made mine as tight as I could on the slack side, the one that curves. I pushed the tensioner in all the way and put a zip-tye on it then pushed the curved guide as tight as I could and tightened it down. For some reason I'm thinking there's a white plastic washer that goes on the tensioner between the housing and the pad but it's not visible in my picture. Maybe you can confirm that and don't forget the oil slinger that goes on the crank nose.
- Today
-
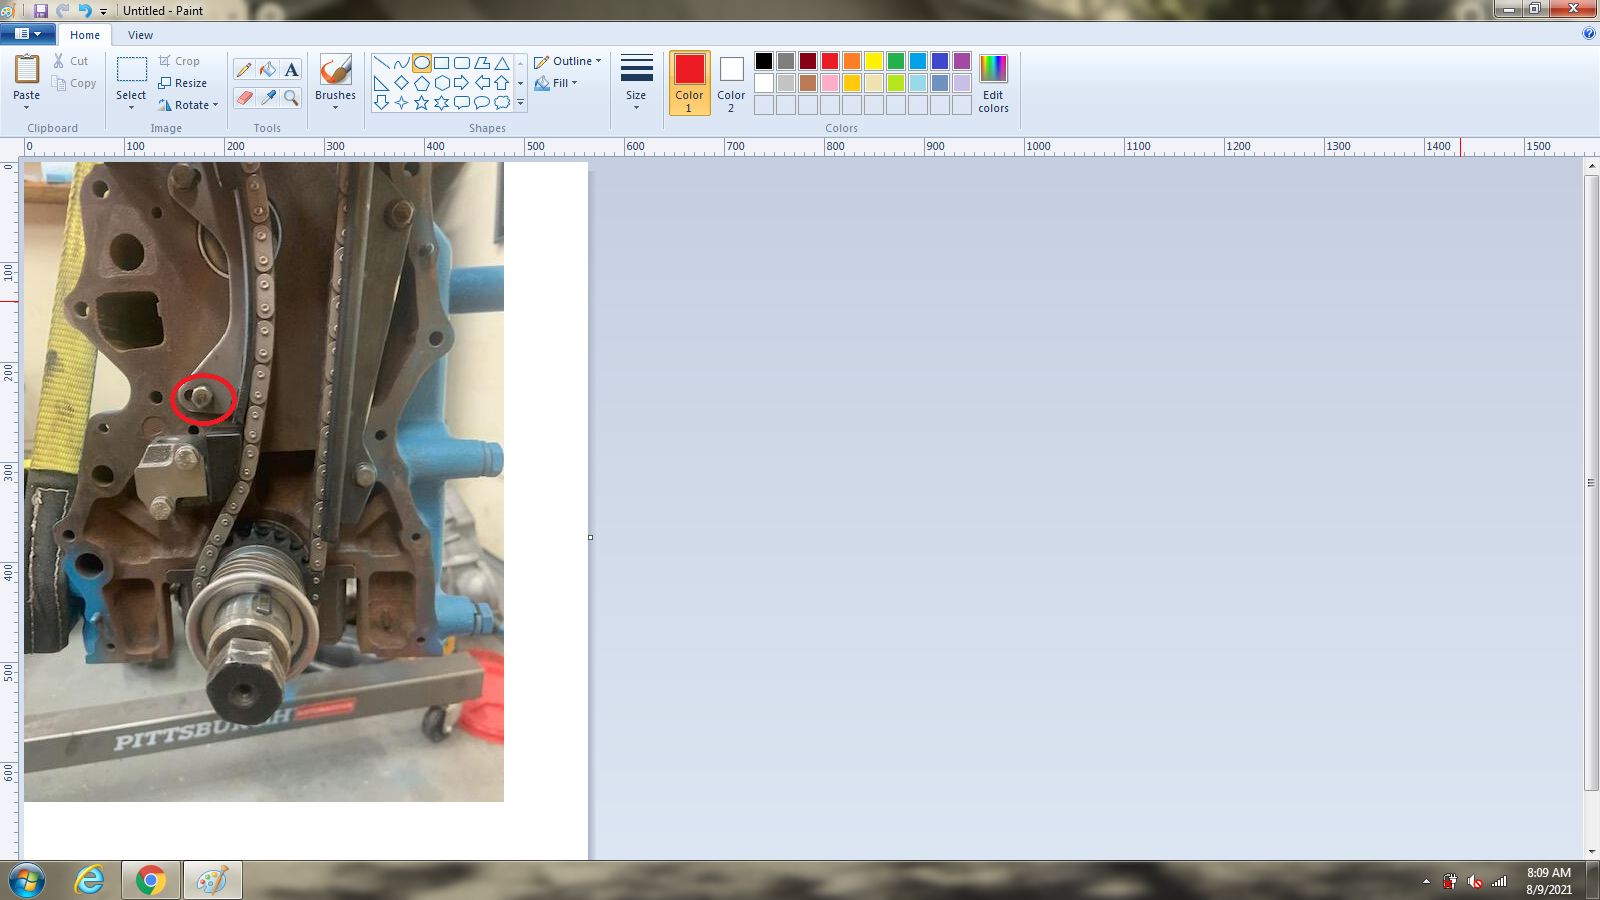
The timing chain Guide bar has a slot for adjusting tension. Is there an ideal tension to Set the guide at?
-
 Tobym joined the community
 Sly joined the community
 I completely agree that the quality of stainless steel makes a big difference, especially when it comes to durability. I’ve been researching different types of stainless steel for car parts, and I wanted to share a helpful resource. If you're interested in learning more about stainless steel, its types, and how it can affect the longevity of car parts, feel free to check out my website: [Stainless Steel ].
asanthosh joined the community
I completely agree that the quality of stainless steel makes a big difference, especially when it comes to durability. I’ve been researching different types of stainless steel for car parts, and I wanted to share a helpful resource. If you're interested in learning more about stainless steel, its types, and how it can affect the longevity of car parts, feel free to check out my website: [Stainless Steel ].
asanthosh joined the community Seek and ye shall find! I was able to find it and jumper the connection. It was really burried at the back. For others coming to this thread, when looking at the two wire bundles from the passenger side it's connected to the one on the right. It splits off from that. (see pic with finger pointing to it) Just grab the smaller taped up bit coming off it and start pulling. The Nismo pump is a bit noisier than I'd like but I'm really happy none the less. Initial pressure on start up is around 6psi and then once it warmed up it dropped to 4 to 4.5psi. I've moved the red wire from the + side of the coil to the ballast and it runs. But, I've currently got a intermittent misfire on two cylinders. Number 2 and 5. I found them by attaching the timing light plug wire connector to them and the light flash wasn't consistent. I've ordered new NGK plug wires, plugs, cap and rotor. I'm not sure of the cap and rotor though. I went ahead and assumed they're for an L28 though I could be wrong. How can I identify the difference between a L24 distributor and one for an L28? I'm guessing they're not identical. I know the 240Z had points and the 280Z didn't. As the car has a L28 from 2000 I'm assuming they also threw in a later distributor with the Pertronix. I pulled the plugs and they were really sooty. I cleaned them with a wire brush and that didn't really help. I'm wondering if it's my ignition or if I'm just running super rich. Both of those are on the most direct line from the carbs and I'm assuming would be getting a more fuel than the other cylinders to their sides. Brakes also need to be fully bled as I've installed the 8.5" booster upgrade from JDM-Car-Parts and new master cylinder as well. So it drives and stops and can be driven around a parking lot or paint shop if need be.


 OK. Just got the last of the plugs in. I like the M16 x 1.5 low headed plugs to fill the inside ports of the intake when one has removed the water heating. Purchased them from Belmetric.
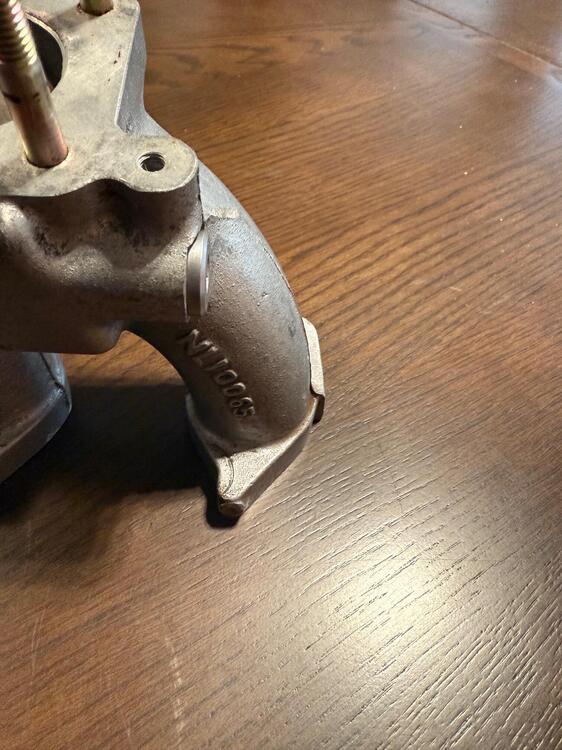

 I was thinking on buying that msa kit but now you are mentioning a problem with the molded seat!
I really appreciate that thank you. I was certain I did everything right I just didn't get to number (11) eleven. I saw your 2019 post and your mathematical computations Cheers
I was thinking on buying that msa kit but now you are mentioning a problem with the molded seat!
I really appreciate that thank you. I was certain I did everything right I just didn't get to number (11) eleven. I saw your 2019 post and your mathematical computations Cheers Now get some sleep. 🙂
And the magic number is 11 rotations of the cam, or 22 rotations of the crank. https://www.classiczcars.com/forums/topic/62752-bright-links-on-timing-chain-line-up-every-11-rotations/
The timing chain has the two-silver links and the top sprocket & the bottom of sprocket has little marks on them, and they need to line up, and I believe there's 42 links in between those two points. I did that & was 100 percent certain I was on top dead center # 1 and the crank wood drift key was pointing up; I assembled the new Sprockets guides and tensioner. One of the books I read said to rotate the motor two times making sure nothing's hitting which I rotated it multiple times got it back to top dead center, but I never did get my two-silver chain links to line up the way it did when I set it up originally. My guess is that's normal, but my intuition is confusing my thought process at the moment. Anybody can help me out so I can sleep tonight that would be appreciated.
Well, Here I am, a year late, but better late than never! I paid $3,000.00 for my all original, 100,000 mile, 12/70, 1971 240Z in 2006.
Now get some sleep. 🙂
And the magic number is 11 rotations of the cam, or 22 rotations of the crank. https://www.classiczcars.com/forums/topic/62752-bright-links-on-timing-chain-line-up-every-11-rotations/
The timing chain has the two-silver links and the top sprocket & the bottom of sprocket has little marks on them, and they need to line up, and I believe there's 42 links in between those two points. I did that & was 100 percent certain I was on top dead center # 1 and the crank wood drift key was pointing up; I assembled the new Sprockets guides and tensioner. One of the books I read said to rotate the motor two times making sure nothing's hitting which I rotated it multiple times got it back to top dead center, but I never did get my two-silver chain links to line up the way it did when I set it up originally. My guess is that's normal, but my intuition is confusing my thought process at the moment. Anybody can help me out so I can sleep tonight that would be appreciated.
Well, Here I am, a year late, but better late than never! I paid $3,000.00 for my all original, 100,000 mile, 12/70, 1971 240Z in 2006.- Yesterday
 NECROPOST ALERT!!!!!!!!! A broken hi- lo beam switch housing circuit board CAN be repaired so it will work correctly without the switch butterfly moving out of position between switch plunger detents. One just needs a steady hand and more importantly, a command of various epoxies and repairing compounds available retail to ascertain what is most apropos for your situation. Also, depending on the severity of the circuit board damage, the repair may necessitate making the circuit board unremovable from the housing. It's a Datsun. there is always a way...
 Between Iran and Saudi Arabia
.thumb.jpg.d7b7b40110afeede456205d737cbdc11.jpg) gdoug changed their profile photo
gdoug changed their profile photo Nice looking car colinc! Where is Bahrain located?
Sold my white on red 72 240 last year to a buyer who shipped it to Bahrain. Here is a video he sent me of the car at a show (strange venue). I definitely miss her. c6a4b54a-a199-4edd-9f10-7b558fc292eb.mov
Nice looking car colinc! Where is Bahrain located?
Sold my white on red 72 240 last year to a buyer who shipped it to Bahrain. Here is a video he sent me of the car at a show (strange venue). I definitely miss her. c6a4b54a-a199-4edd-9f10-7b558fc292eb.mov Cunifer! Found reference to it. Will see if it is something he'd make for me. If I do go this route opinions? From what i saw it was easy to work with, could be polished to a nice finish, but not sure how close that would be to "original cad type plated look".
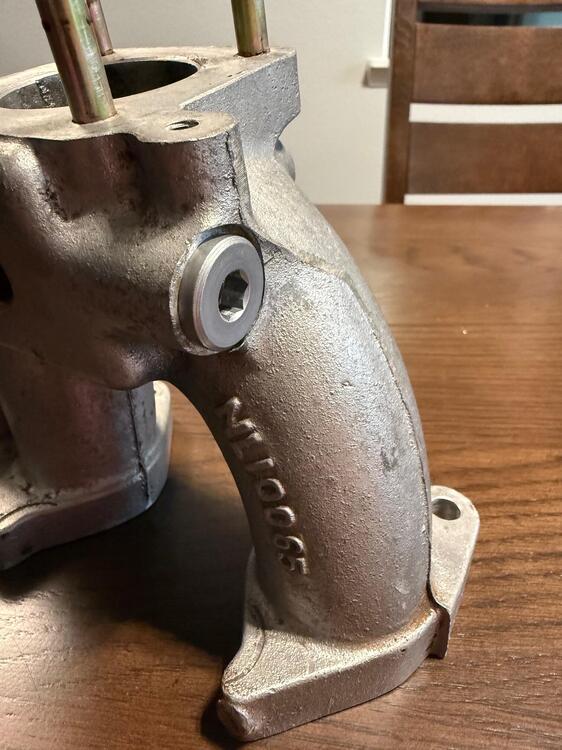
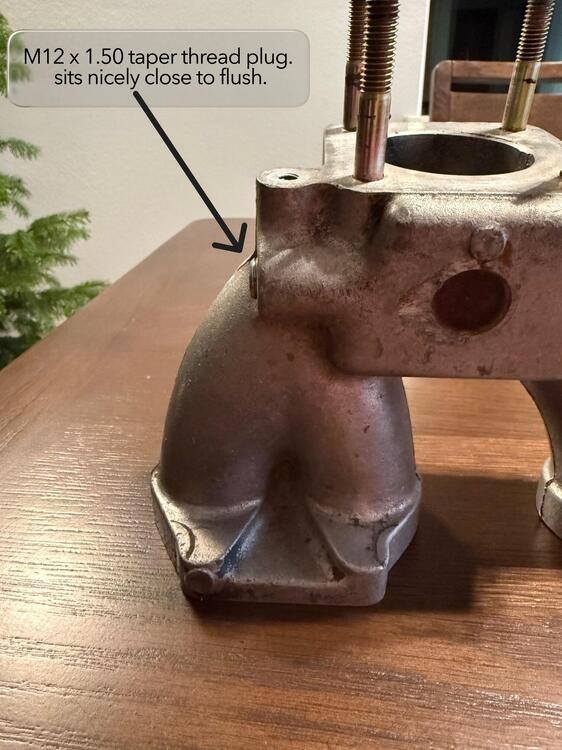
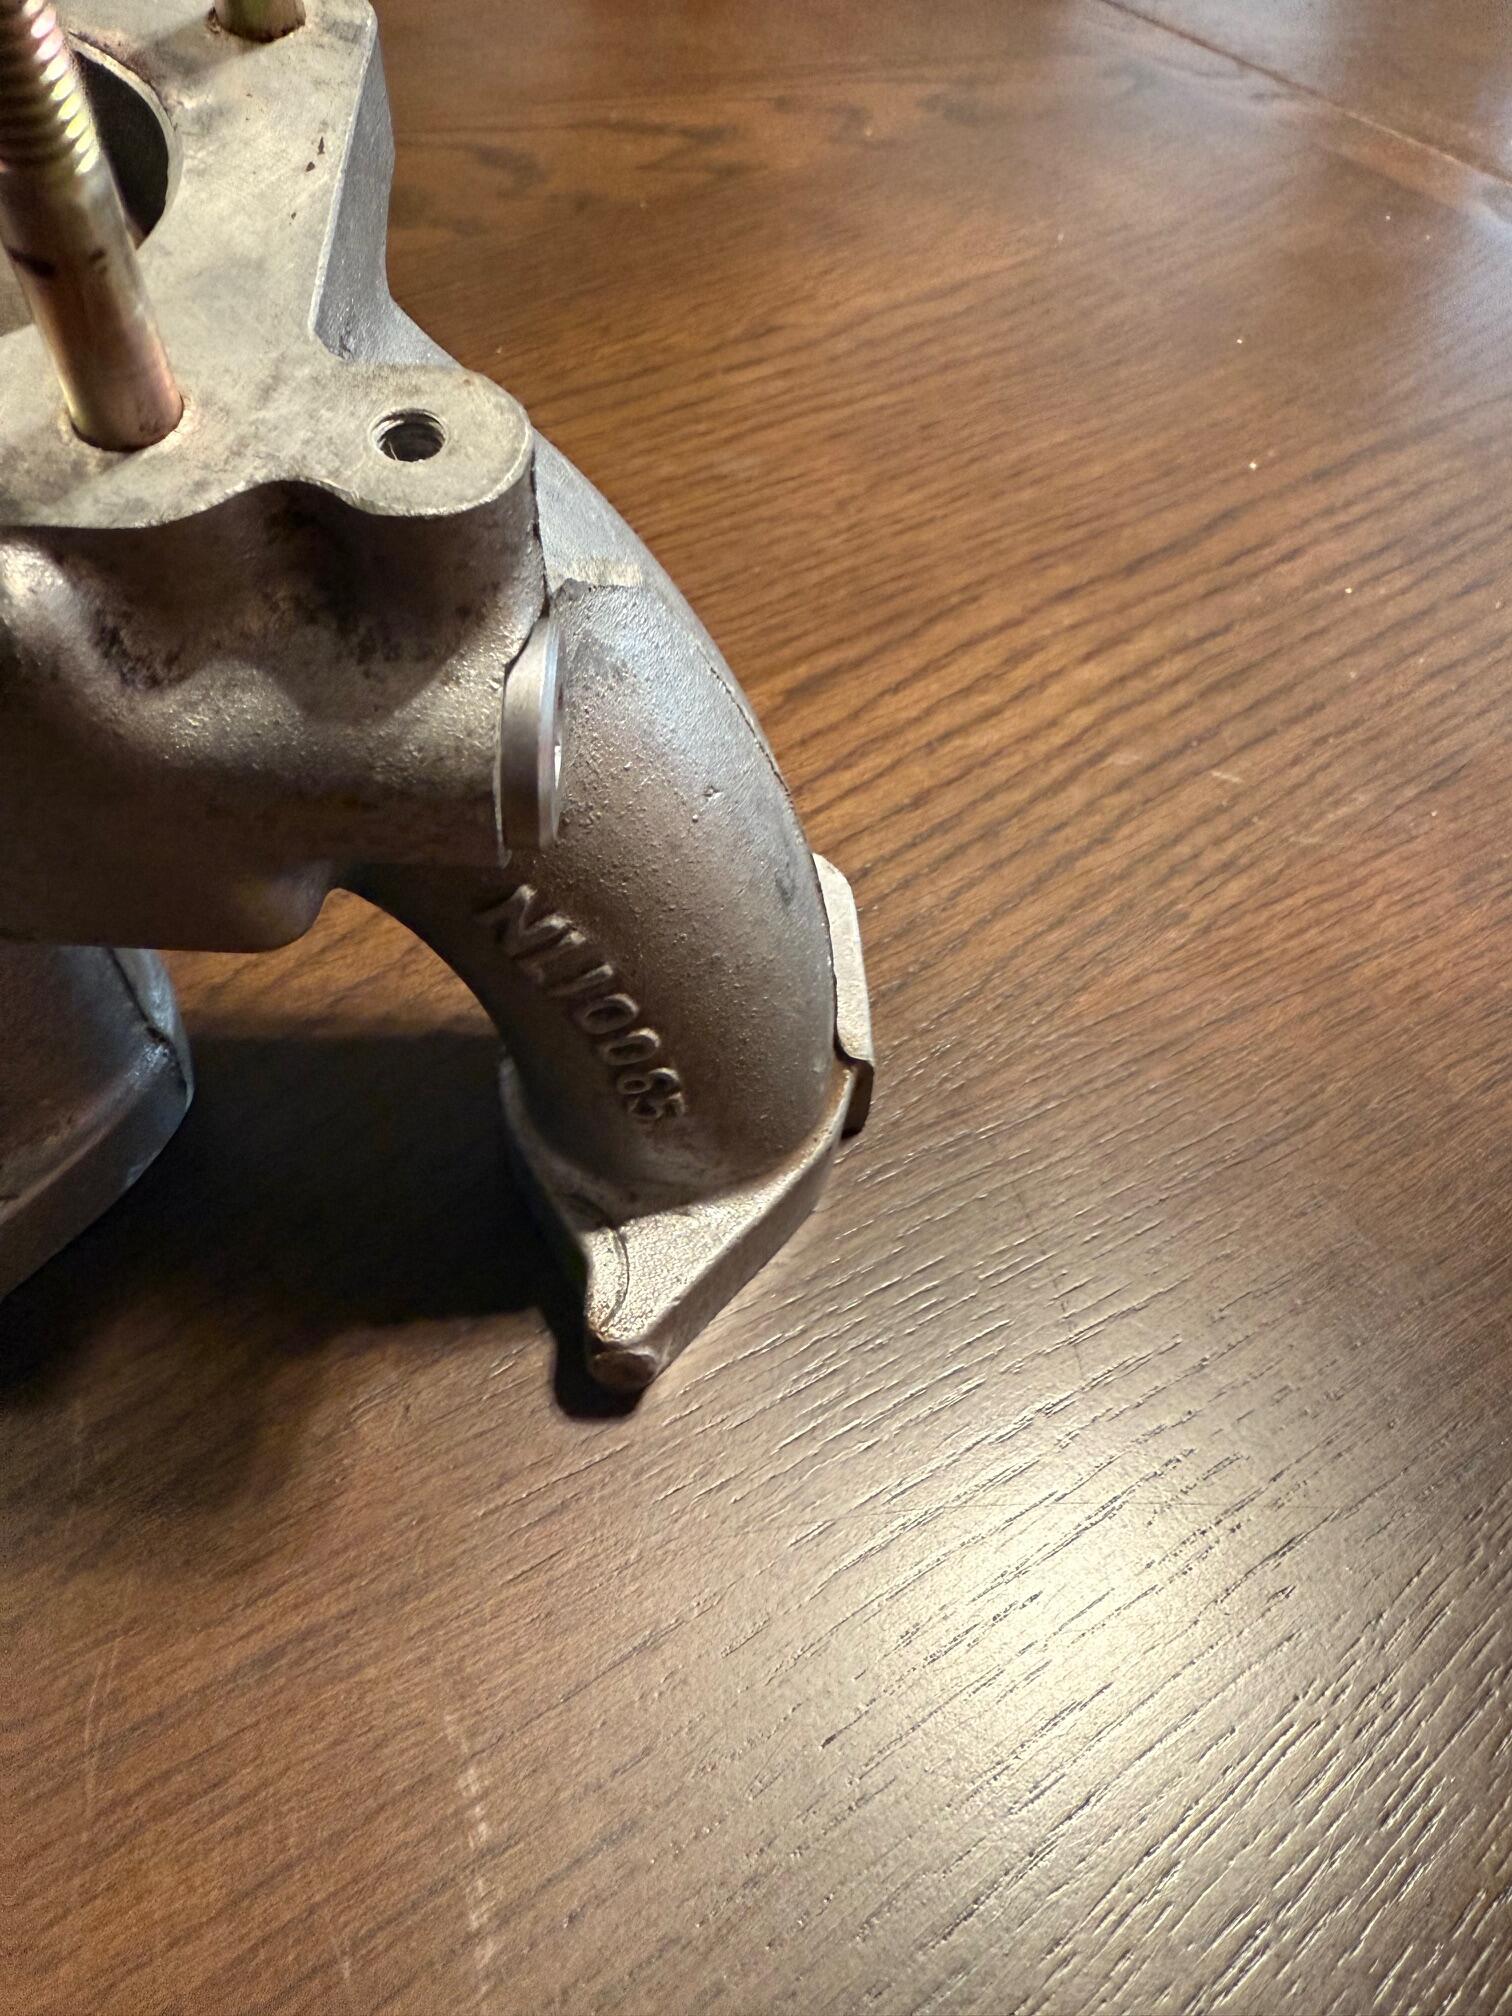
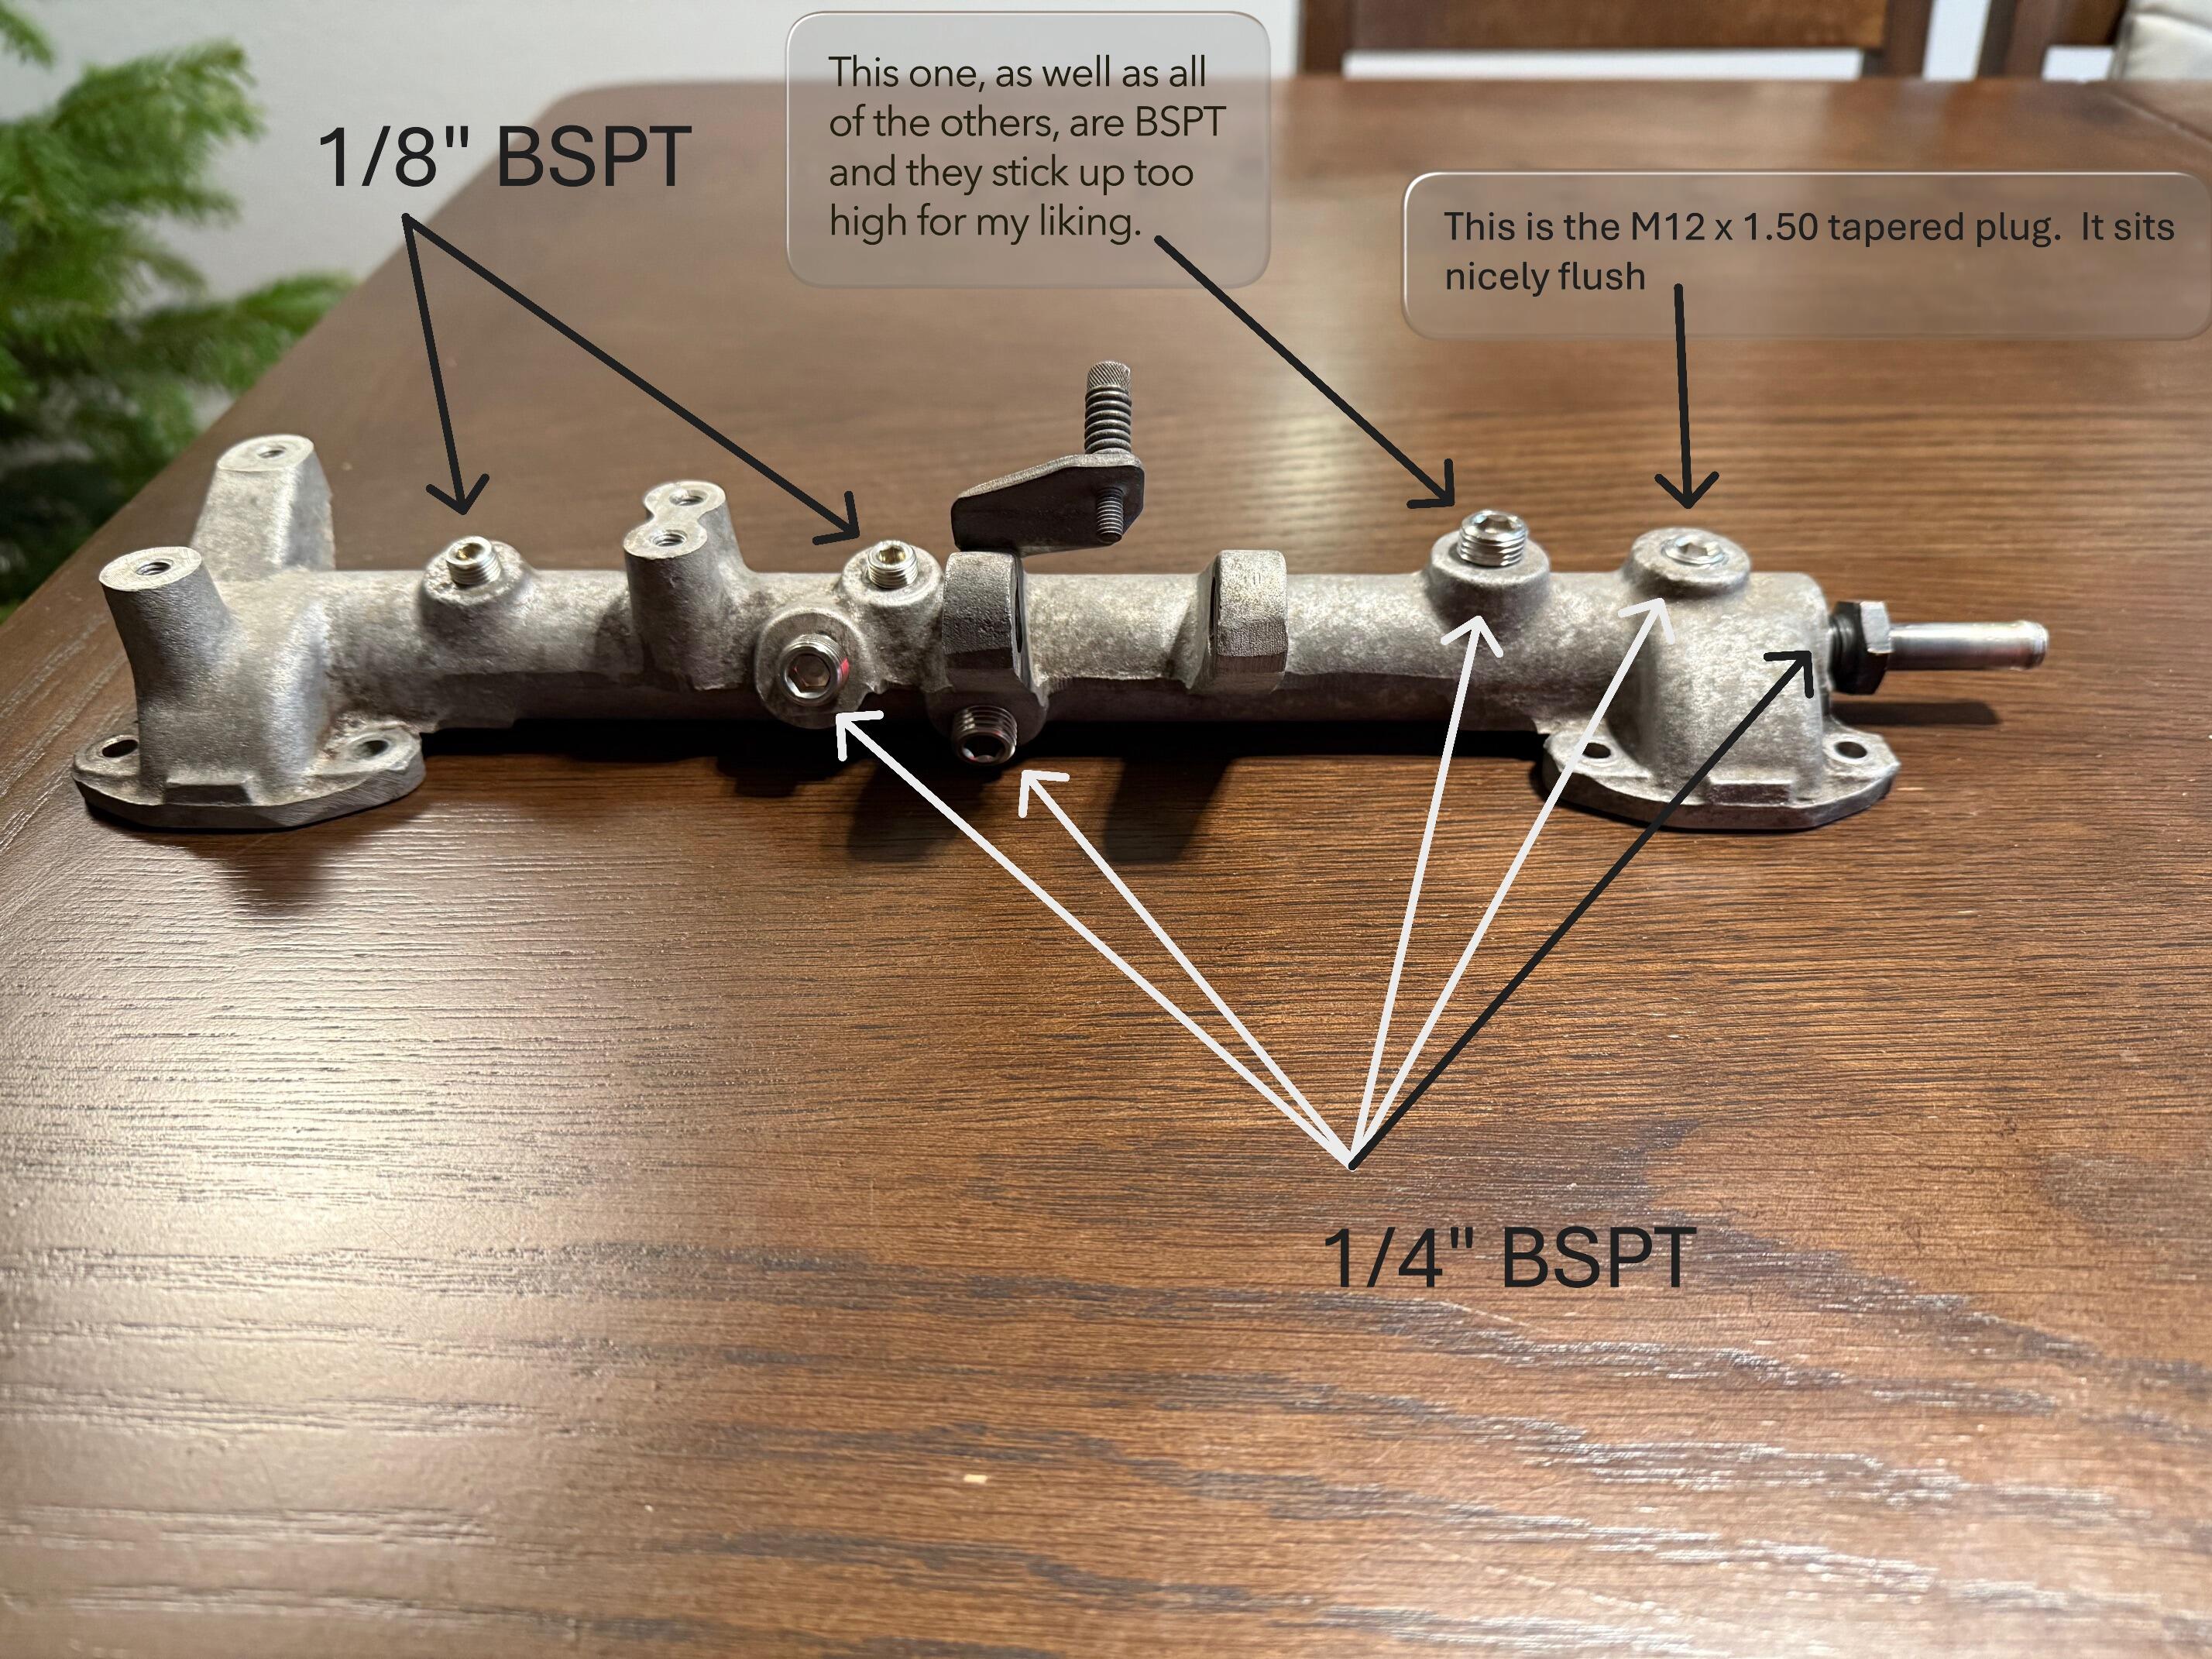
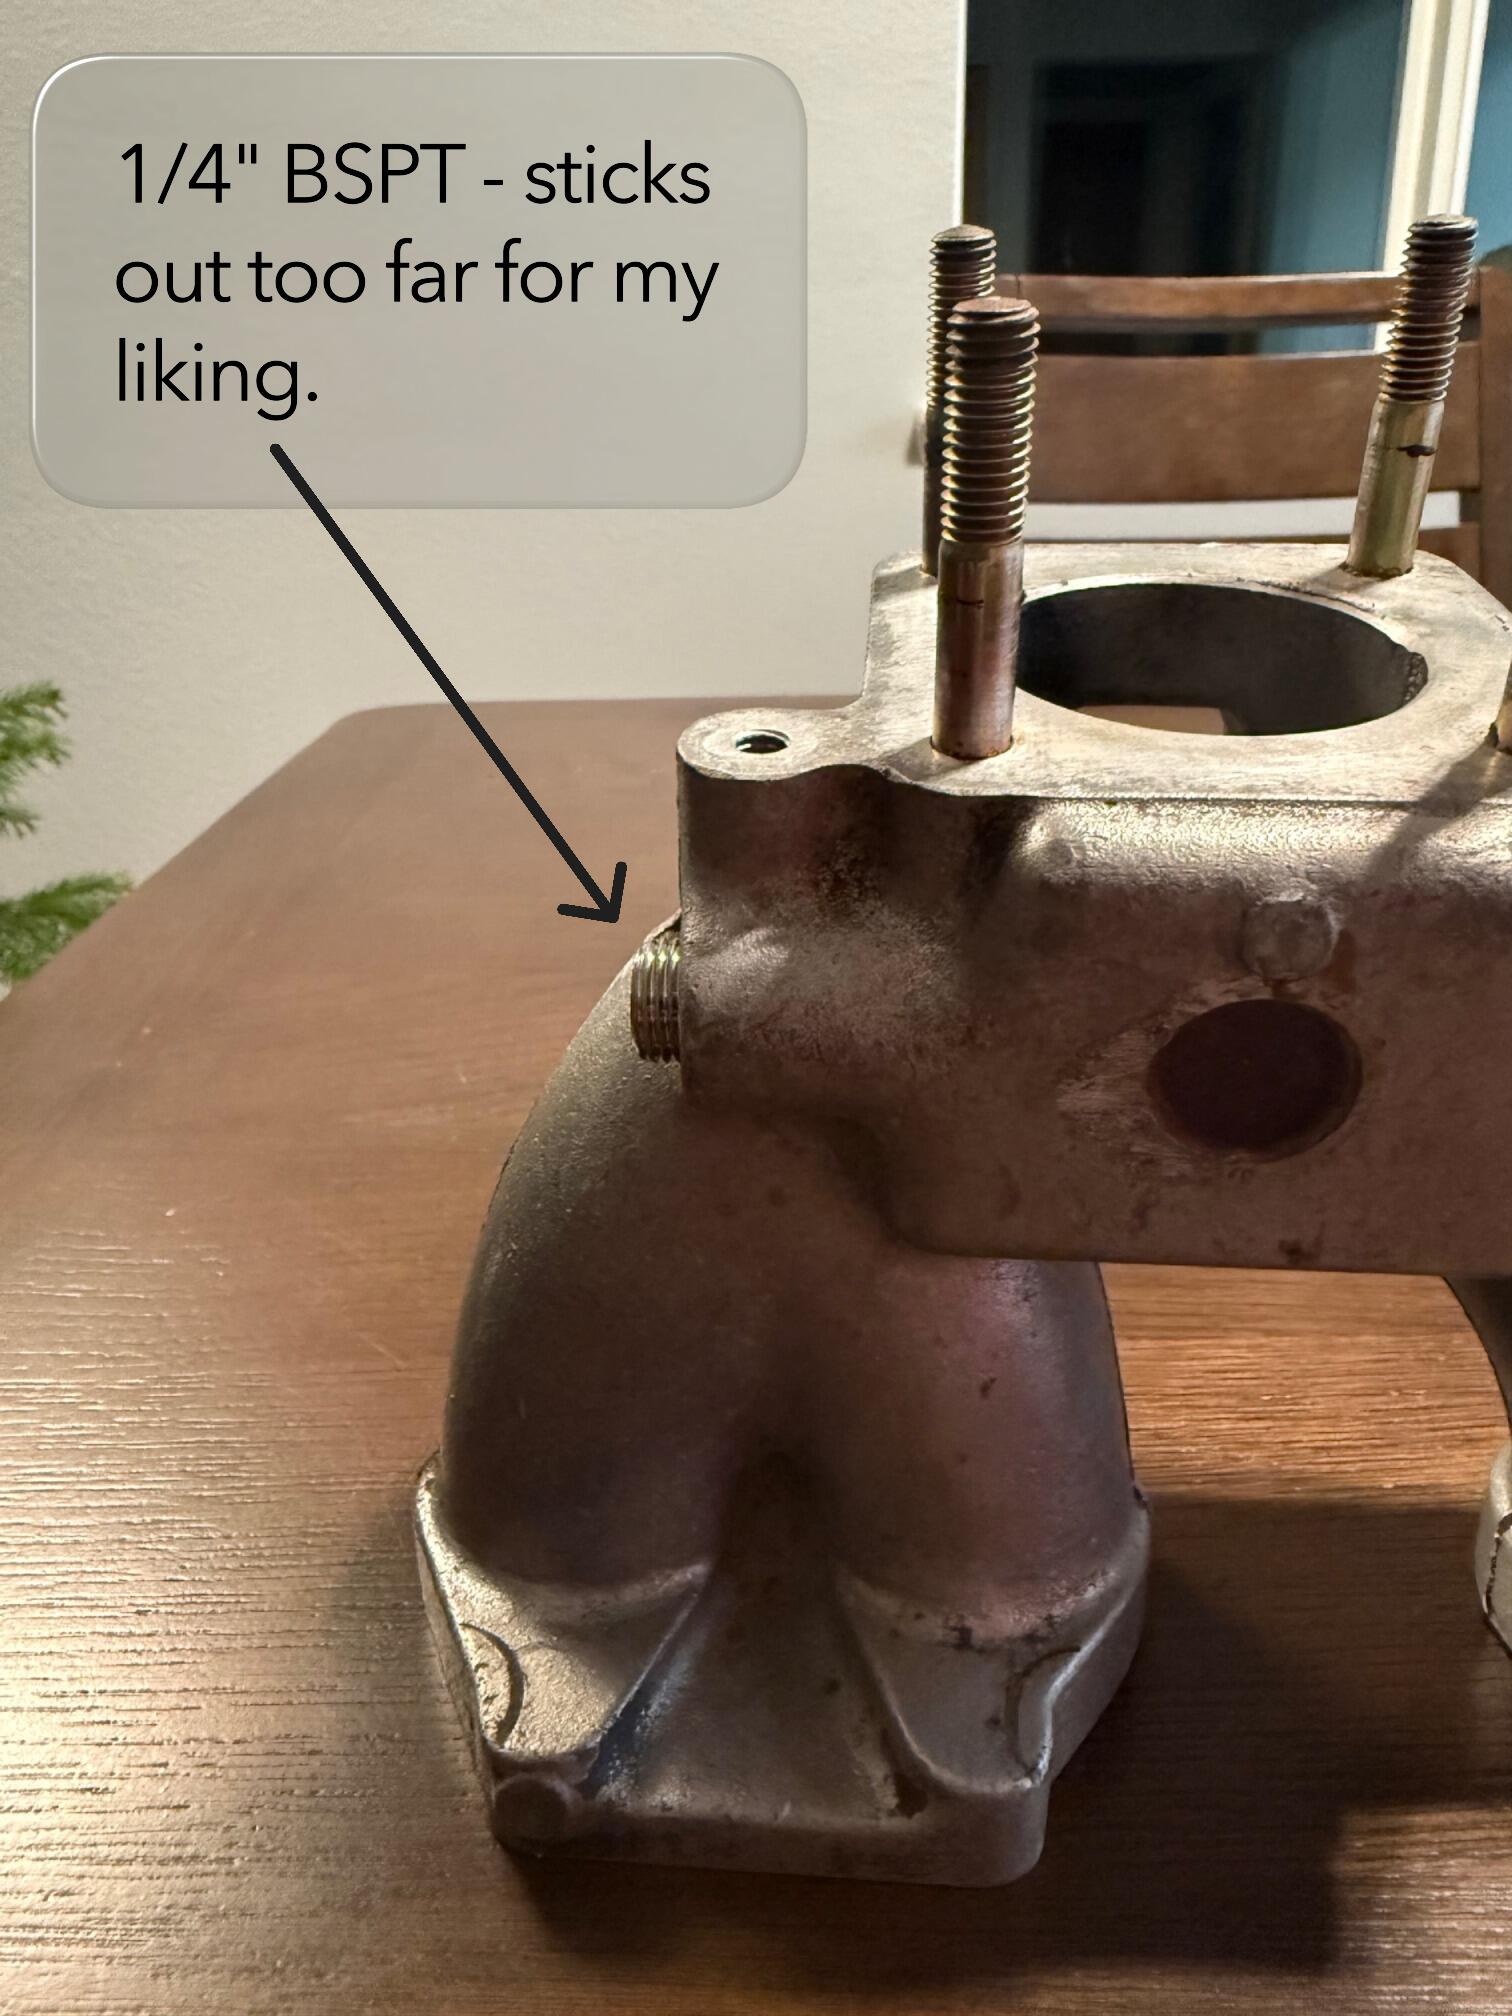
Okay, so I've received various plugs and set screws from both McMaster and Bel-Metric. I ordered 1/8 and 1/4 NPT, 1/8 and 1/4 BSPT, M12 x 1.50 straight thread and M12 x 1.50 tapered thread, and I am still a bit confused! I won't hold you hostage until the end, I'll give you what I THINK the holes were from factory, and then I'll provide some pictures and notes from my "testing". I think the factory balance tube (US market 240Z) came with 2 ea. - 1/8" BSPT and 5 ea. - 1/4" BSPT holes BALANCE TUBE 1/4" BSPT HOLES it was clear to me that 1/4" NPT is too big, couldn't really even get a thread to start, so it makes sense that, 1) One COULD force 1/4" NPT into the holes in the soft aluminum and create some sort of "seal", and 2) a hole that had been "buggered by a previous (or current!) owner could likely be salvaged by tapping to 1/4" NPT. The 1/4" BSPT plugs I have encounter resistance at 1-1/2 turns and are fairly tight at 1-3/4 - 2 turns. This leaves them sticking out farther than I would like for a clean, plugged look as I would like them to be as close to flush as possible. The M12 x 1.50 straight thread, socket set screw I tried fit very loose initially, and threaded quite a ways in (farthest of the three options I tried) before finally hitting resistance. I feel like it MIGHT have finally created a "seal", but not ideal in my opinion. The M12 x 1.50 TAPERED plug encountered resistance at about 3-1/4 turns and was fairly tight at 3-1/2 turns in. This left it pretty close to flush to the surface and provided a good seal and I think this is what I will be using to plug 1/4" BSPT holes. (see pictures below) BALANCE TUBE 1/8" BSPT HOLES it was clear to me that 1/8" NPT is too big, couldn't really even get a thread to start, so it makes sense that, 1) One COULD force 1/8" NPT into the holes in the soft aluminum and create some sort of "seal", and, 2) a hole that had been "buggered" by a previous (or current!) owner could likely be salvaged by tapping to 1/8" NPT. The 1/8" BSPT plugs I have, encounter resistance at 1-1/2 turns and are fairly tight at 2 turns in. This leaves them sticking out more than I would like for a clean look (see pictures below) now I want to experiment with M10 fine thread (both straight and tapered) in the 1/8 BSPT holes INTAKE MANIFOLD WATER HEATING HOLES The outside (inlet and outlet) holes come from the factory with 1/4" BSPT holes Again, the 1/4" BSPT plugs don't thread in very far and sit proud. The M12 x 1.50 TAPER thread plugs thread in farther and sit pretty flush for a clean look. the inner holes (two holes on the inside of each part of the two-part manifold that connects the manifold halves with "bushings" and metal tubing) come from the factory with M16 x 1.50 STRAIGHT thread. I have some M16 x 1.50 straight AND taper plugs coming to try in those holes. I'm now thinking that a straight-threaded plug with a low head and Loctited, may be the ideal ticket for this hole since there is a machined spot to accommodate a bolt head. Heck, any old M16 x 1.50 bolt will work here! Keep in mind that these holes, if not being used (not connected to water lines), can stay open, they do not need to be sealed/plugged, as they will not affect anything other than keeping the intakes warm on initial start-up in cooler weather/climates. I just want to plug them for aesthetic purposes. Here's some pictures to clarify my rambling!
Cunifer! Found reference to it. Will see if it is something he'd make for me. If I do go this route opinions? From what i saw it was easy to work with, could be polished to a nice finish, but not sure how close that would be to "original cad type plated look".
Okay, so I've received various plugs and set screws from both McMaster and Bel-Metric. I ordered 1/8 and 1/4 NPT, 1/8 and 1/4 BSPT, M12 x 1.50 straight thread and M12 x 1.50 tapered thread, and I am still a bit confused! I won't hold you hostage until the end, I'll give you what I THINK the holes were from factory, and then I'll provide some pictures and notes from my "testing". I think the factory balance tube (US market 240Z) came with 2 ea. - 1/8" BSPT and 5 ea. - 1/4" BSPT holes BALANCE TUBE 1/4" BSPT HOLES it was clear to me that 1/4" NPT is too big, couldn't really even get a thread to start, so it makes sense that, 1) One COULD force 1/4" NPT into the holes in the soft aluminum and create some sort of "seal", and 2) a hole that had been "buggered by a previous (or current!) owner could likely be salvaged by tapping to 1/4" NPT. The 1/4" BSPT plugs I have encounter resistance at 1-1/2 turns and are fairly tight at 1-3/4 - 2 turns. This leaves them sticking out farther than I would like for a clean, plugged look as I would like them to be as close to flush as possible. The M12 x 1.50 straight thread, socket set screw I tried fit very loose initially, and threaded quite a ways in (farthest of the three options I tried) before finally hitting resistance. I feel like it MIGHT have finally created a "seal", but not ideal in my opinion. The M12 x 1.50 TAPERED plug encountered resistance at about 3-1/4 turns and was fairly tight at 3-1/2 turns in. This left it pretty close to flush to the surface and provided a good seal and I think this is what I will be using to plug 1/4" BSPT holes. (see pictures below) BALANCE TUBE 1/8" BSPT HOLES it was clear to me that 1/8" NPT is too big, couldn't really even get a thread to start, so it makes sense that, 1) One COULD force 1/8" NPT into the holes in the soft aluminum and create some sort of "seal", and, 2) a hole that had been "buggered" by a previous (or current!) owner could likely be salvaged by tapping to 1/8" NPT. The 1/8" BSPT plugs I have, encounter resistance at 1-1/2 turns and are fairly tight at 2 turns in. This leaves them sticking out more than I would like for a clean look (see pictures below) now I want to experiment with M10 fine thread (both straight and tapered) in the 1/8 BSPT holes INTAKE MANIFOLD WATER HEATING HOLES The outside (inlet and outlet) holes come from the factory with 1/4" BSPT holes Again, the 1/4" BSPT plugs don't thread in very far and sit proud. The M12 x 1.50 TAPER thread plugs thread in farther and sit pretty flush for a clean look. the inner holes (two holes on the inside of each part of the two-part manifold that connects the manifold halves with "bushings" and metal tubing) come from the factory with M16 x 1.50 STRAIGHT thread. I have some M16 x 1.50 straight AND taper plugs coming to try in those holes. I'm now thinking that a straight-threaded plug with a low head and Loctited, may be the ideal ticket for this hole since there is a machined spot to accommodate a bolt head. Heck, any old M16 x 1.50 bolt will work here! Keep in mind that these holes, if not being used (not connected to water lines), can stay open, they do not need to be sealed/plugged, as they will not affect anything other than keeping the intakes warm on initial start-up in cooler weather/climates. I just want to plug them for aesthetic purposes. Here's some pictures to clarify my rambling!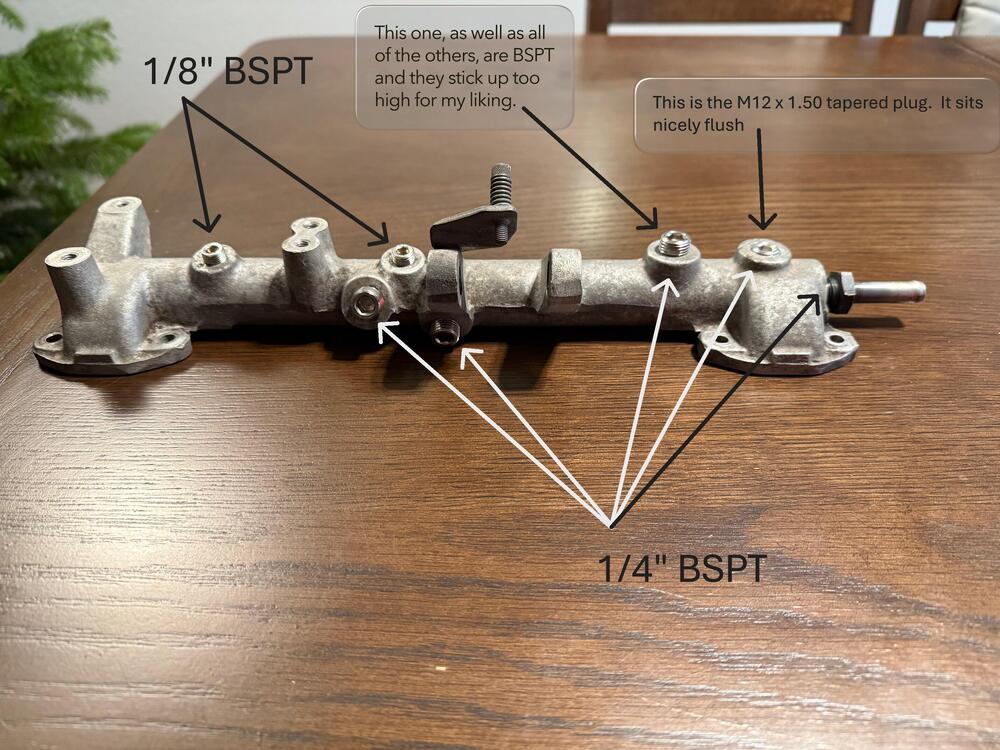

 Yes, with the parking lights dead, I still have the back feed
 ANOBODY joined the community
I really wish I still had my '71 White 240Z with the rare blue interior. The car was shipped overseas to Italy, then shortly after that, the purchaser divorced his wife and sold the car. The gentleman in Australia purchased the car and had it shipped to Australia. I have stayed in touch with him on Instagram. The thing is that it is a lefthand drive car and in Australia and everyone there drives a righthand drive cars. I was hoping that I could purchase the car back from him someday.
ANOBODY joined the community
I really wish I still had my '71 White 240Z with the rare blue interior. The car was shipped overseas to Italy, then shortly after that, the purchaser divorced his wife and sold the car. The gentleman in Australia purchased the car and had it shipped to Australia. I have stayed in touch with him on Instagram. The thing is that it is a lefthand drive car and in Australia and everyone there drives a righthand drive cars. I was hoping that I could purchase the car back from him someday.- Last week
A little snag in my plan. I was talking to classic tubes and apparently what they call "OE" isn't going to come with a yellow plating to match what I would have expected to be "OE". That might be my mistake. His description of OE was low carbon steel galvanized and top coated with an aluminum epoxy that couldn't be plated after wards. He mentioned he had previous requests for plated material but couldn't ever find any in coils for them to use. Anyone know of any I could offer? I know i stumbled upon a material I think it was on this thread that seems to be what folks use nowadays. It was an alloy that had that look but was more pliable and easy to use. The heck if I can recall its name though so I'll keep searching if no one here has it at their fingertips. z.z joined the community
 What year is your 280Z? Is it a bot also?


Important Information
By using this site, you agree to our Privacy Policy and Guidelines. We have placed cookies on your device to help make this website better. You can adjust your cookie settings, otherwise we'll assume you're okay to continue.