EuroDat
Free Member
-
Joined
-
Last visited
Everything posted by EuroDat
-
 Hi Jim, I know what you mean. Been there done that as well. I ended up making them first out of 50x2mm aluminium strip from a local hardware store and then out of stainless steel. The aluminium made it easy to drill and shape. You could do that and take them to a shop to duplicate in Stainless steel or coated/zinc plated steel. Chas
 -
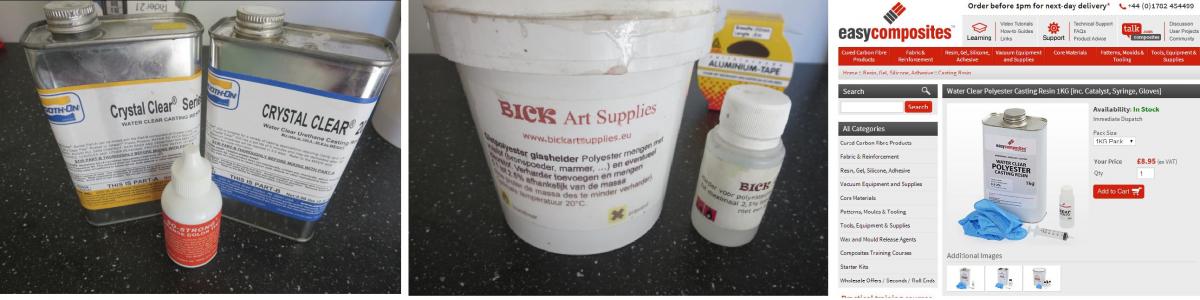
Hi Mike, I experimented with an old lens first and found Polyester resin had attached better to the old arcrylic and gave the best holding power. The Polyurethane let go easier. You can find the polyester resin at hobby shops for around $10.00/kg. I found it at a local arts supplier for €8.00. The polyurethane is a lot more expensive at around €35.00 a liter. I didn't use any coloring in the resin and its hard to notice on the outside. The releasing agent costs around €15.00, but you can use silicone or teflon spray on the screw. I have tried both and they work just as good. Just a quick spray, let it dry and wipe away any excess. Otherwise it can fill the threads in the small screw. That black stuff was the most expensive . Playdoe for the local toy store at €1.50 a pot. I fashioned it into shape with a paddle pop stick and when it cured removed the playdoe and washed away any leftovers. Then filed it into shape and finished it with 500 and 800 emery paper. Don't forget to rough up the surface wear the resin bonds to. I used the Bick ArtSupplies resin in the centre photo. Goodluck Chas

-
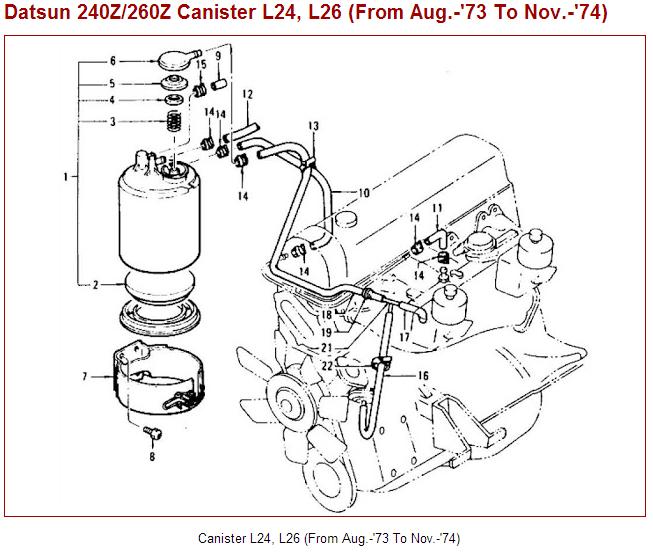
Hi Rossi, The carbon canistor doesn't have anything to do with the EFI. It is part of the emmision control system introduced introduced in the 260Z. Maybe the late 240Z's with the flat top carbs had them as well, I not sure. If you want to see how to plumb it for carbs. Download the 260Z manual from XenonS30.com and check it out. It is simple. The canister has a purge valve with two tubes going to the inlet manifold. The tube coming out the top of the purge valve goes to a Tee piece in the line to the distributor vacuum advance. The second tube (slightly larger diameter) coming out the side of the purge valve goes to manifold vacuum. I don't know what the government regulations say in your area, but it wouldn't hurt the enviroment if you left in on. You will need to consider venting the tank if you remove it. Fuel line: Im an EFI man. I have heard of people going for a return line and others just dead heading the system. If I did it, I think I would go for a return line to keep the fuel fresh, cool and reduce the risk of vapour lock. Have you thought about how to run the pump? The fuel injection pump relay has some wiring to the ECU system for safety reasons. Chas

-
I was wondering if it was original because it look modified and I couldn't remember one being there before this car. The PO probably mounted it for the speaker. I didn't refit it because the speaker was stuffed and missing its cover. Its laying around somewhere in one of the boxes of parts. I look for it and post some photo's of it. Thanks for the tip. Ill do that and remove the tekst about the kick panel. How are you going with your TIU. Having any luck finding a replacement? Chas
-
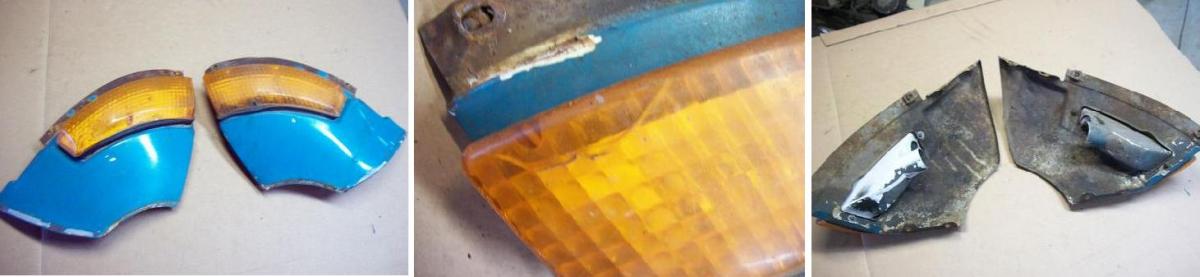
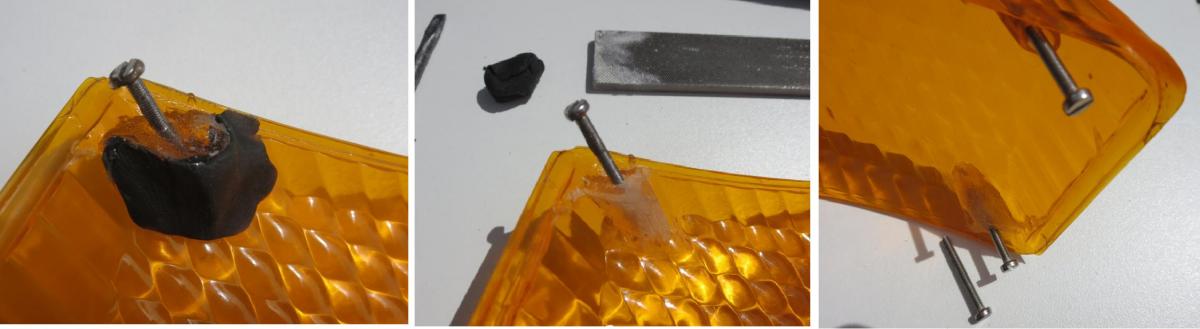
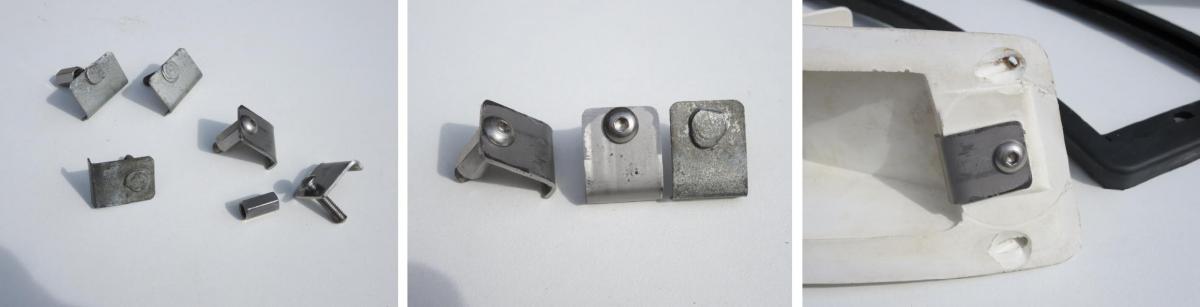
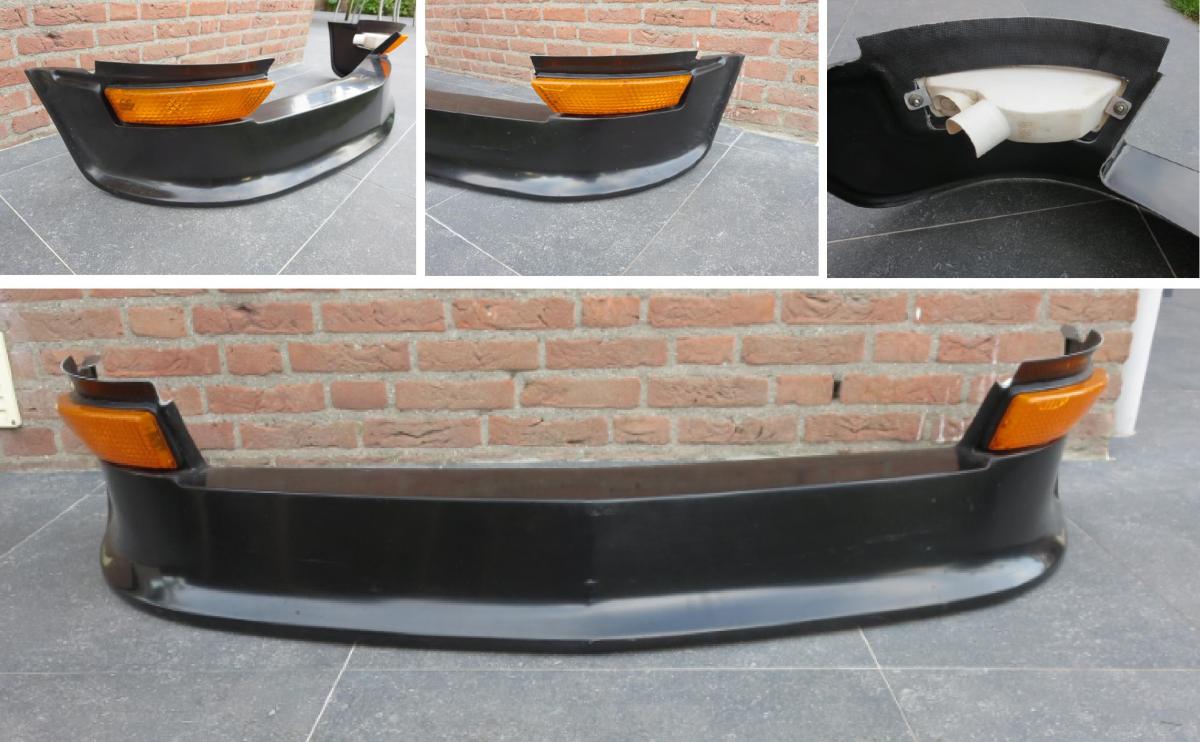
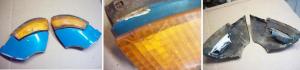
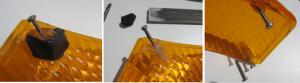
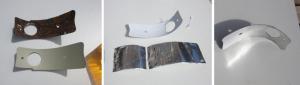
Its been a while, but Im back at my 240Z bumper and airdam. I decided to leave the 280Z valance panel until I found all the parts needed to fit the air dam. The biggest challenge was finding a 240Z grill that had not been run over by a truck. Now I have one thats really straight, but very grotty. It will be dismantled and the top runner will be changed to the 280Z so it will mount on the existing 280Z mounts. Thanks to HaZmat for that tip. Now for the indicators and air dam. The indicators are not the best, but with some repairs they will do for now. If it all works well I may buy a set from Zcardepot. This is what I started with. The left lense was in pretty bad shape. The PO used a self tapping screw and broke the plastic. It also has a crack in the top section. I used some resin to repair the broken off section. Sprayed the screw with releasing agent so I could screw it out after the resin set. Next was the bolts that hold the indicator unit in the body panel. One bolt was missing so I had to fabricate a new plate and get a bolt tack welded to it. (No photo of the two small tack welds on the bolt head). The reflectors were in bad shape. The chrome foil was non existant and the steel back plate was badly rusted. I cleaned them up as best I could and gave the a couple of coats of primer. I was debating on using chrome spray paint of aluminium reflecting tape. Ended up trying the tape first and if it worked ok leave it at that. It reflects good enough for these old indicator units. The indicators are now mounted in the airdam. The result is better than I expect from the old indicators. I not impressed about the holes they cut for the indicators. The holes are too big and tapered to one end. The rubber gasket only just reaches it in some places. I also had to make L brackets so I could fit the lenses without pulling everthing out of shape. Now to fit the air dam.


-
Made a threw improvement to the instructions. Removed some typos en mistakes. Edit: Rev C - Abdreviations move to beginning and reference to kick panel removed. Thanks Tomo. Instruction - Fitting a 4-pin HEI module to 280Z 1977 RevC.pdf
-
Looks great. Love the lowered look on a Zed. Now for some action photos or a video. I would like to drop mine some more, but the speed bumps (traffic calming devices) would reek havoc on the undercarriage and exhaust system. It scapes now and then atm. Did the welder use short stitch welding to prevent heat getting into the rear bearings. I remember you mentioned you didn't want to remove them if possable. Im on small tablet and can't see much detail on the photo. Great work. Job well done. Hats off to you
-
Its looking like they won't go to waste after all.....
-
Thats interesting. I thought the 280Z only had one red colour (110). The 240Z had 110 and 905. The PO painted mine 280Z red. Don't know what code it is, but its neither 110 or 905.
-
-
Looks neats and the prices are competative if I compare the bumpers and spoilers to others selling these fibreglass parts. Chas
-
I try to do that with my two boys as well😂. I given up trying getting them to help me, their attention span is too short with smartphones and all the stuff to distract them.I know what you were refering, but couldn't resist. Chas
-
I have a spare 77 TIU I was planning to rebuild with a HEI module and make available as an exchange unit. That would make it a plug an play mod for people not confident doing the mod themselves, but its not economically viable with the shipping and the import duties I have to pay for parts. If I had to do any changes to the wiring to use one of the alternatives, I think I would choose the 280ZX distributor. You are right about Nissan not giving any details on the leter units they seem to have changes the way of informing technicians and choosing the Test and Replace black box method. Chas
-
I have photos of a L26 blocked that notched only for the exhaust. Its a european engine. That makes sense because the inlets were still the same (42mm) size as the L24. In the L26 theg enlarged the exhaust valve. Ill try to post them later. They are on a backup drive. Chas
-
-
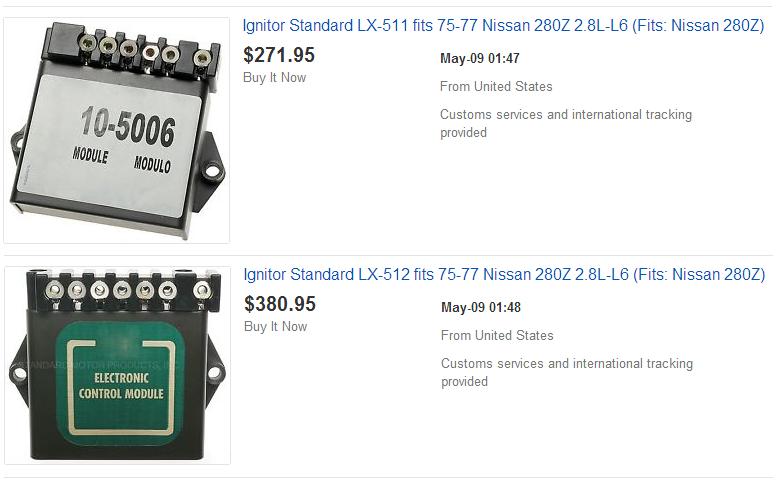
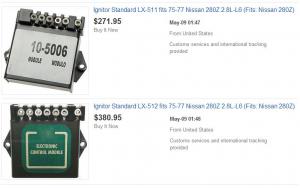
The GM 4-pin HEI module is also an option, but its not plug and play. Some basic knowledge of the systems and the possibility to fabricated mounting plates etc. Changing over to a 280ZX distributor is also an option. Amazon sell remanufactired units for around $120. http://www.amazon.com/Cardone-31-619-Remanufactured-Import-Distributor/dp/B000C46L52 It would need alterations to the wiring, but it is possible. Edit: Found these two on E-bay. Not cheap, but it is plug and play so to speak. http://www.ebay.com/itm/Ignitor-Standard-LX-512-fits-75-77-Nissan-280Z-2-8L-L6-/151675480353?fits=Make%3ANissan%7CModel%3A280Z&hash=item2350902921&vxp=mtr http://www.ebay.com/itm/Ignitor-Standard-LX-511-fits-75-77-Nissan-280Z-2-8L-L6-/161699689867?fits=Make%3ANissan%7CModel%3A280Z&hash=item25a60d758b&vxp=mtr The LX-511 is basically the Californian model for the 76-77 280Z The LX-512 is the FED model for the 76-77 280Z with the dual pickup. Chas
-
Tomohawk, Here is a link explaining the main differences in the HEI 4, 7 and 8 pin modules. http://www.megamanual.com/ms2/GM_7pinHEI.htm The 7 and 8 basically have timing control features. Chas
-
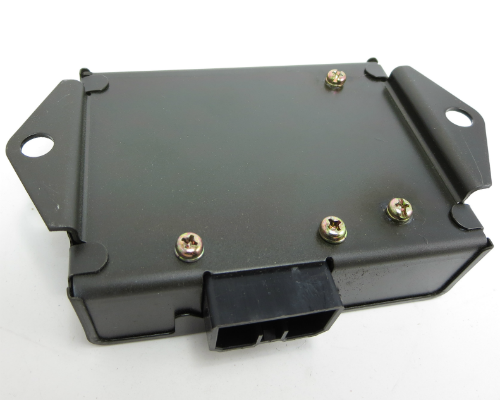
If you do decide to change the module to a HEI, you will need to design your own baseplate. My drawing won't work on the E12-27. You will need to cut the connector pins off the board. Give yourself enough room to solder new wires to them. You will understand when you open it. The baseplate will be held in place by the 6 pin connector. The connector will also serve as a spacer. The other side of the baseplate will mount on the original screw point and the back mouting point of the heat sink (with a spacer tube). Hope that makes sence. Should of made a drawing and photos when I made one for a 1978 280Z over here in January. Chas Edit: Found this photo on the net. It shows the way the connector is secured to the housing. The circuit board is mounted on the other side of the connector. The othe two screws you can see are the heat sink mounting screws.
-
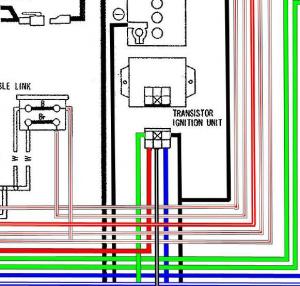
Hi Tomohawk, It doesn't make any difference. The terminal block is differant but inside is almost the same. I don't understand what you mean by the "6th" wire? The terminal block is a 6 plug connector, but only 5 are used. The middel section on the side where you push the lock is free IIRC. Connector wires: Red - Pick-up wire Green - Pick-up wire Black - Ground Black/White - 12V Blue - Coil (-) Chas GM_HEI_Mod_Rev2.pdf
-
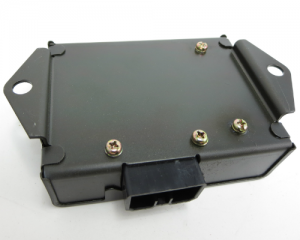
Sarah, I think his 260Z still has the original TIU. Well I believe it is, havn't seen any photo's to confirm it. The manuals used the E12-05 and the automatics used the E12-06. The differance being in the automatic version with the dual pick-up in the distributor for the advanced timing in cold condition. A thermoswitch switches it over at a certain temperature, can't remember what... I think clomolina has a manual, but Im assuming again....and that generally gets me into more trouble than good. Chas
-
Found the thread on starting an engine after a long storage period. http://www.classiczcars.com/topic/21063-waking-the-sleeping-beast/ Read through Carl Becks instructions in post nr. 8. Chas
-
It sounds like this car has been sitting for a while. NOT a good idea to try and start it without doing some prep work first. Over a period of time the oil will slowly drain down to the sump leaving everything above the sump dry. Startibg it in this dry condition could destroy the cam and damage a lot more before the oil pump picks up the oil and moves it around. Thers is a good thread on this site about doing this step by step. Ill try to find it and post a link here. As for your spark problem. How ars you testibg that? An easy way is to remove the High Tension lead from the centre of the distributor and then follow Fastwomens instructions to test for spark. Chas
-
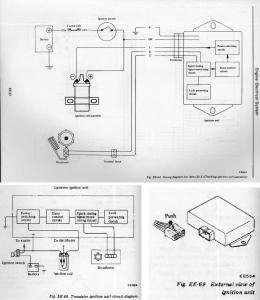
Sounds like you are not too familiar with the ignition system. Those "two little screws on the side" are the (+) and (-) terminals for the coils primary circuit. You are reading full voltage on both sides because the TIU (Transistorized ignition unit) is open circuit when the engine is not running. I would suggest downloading the Factory Service Manaul (FSM) for the 260Z and reading the section EE-27 through to EE47. http://www.xenons30.com/reference.html Here is a good site for tech tips on Zeds. http://www.atlanticz.ca/index.php/tech-tips.html and some electrical testing: http://atlanticz.ca/zclub/techtips/electricalchecks/cp7678.pdf Take the time to learn more about the ignition system. Helps with testing and asking questions. Otherwise you could fall into the age old senario: Take two steps back and start throughing money at it untill you replace the part causing the problem. That works too, but generally costs a lot more. Can you describe the system a little better? Is it stock or aftermarket system, maybe a later model Z system? Photo's can also tell a lot. A lot of other things can go wrong/fail and prevent spark. I doubt a new coil would be your problem. Check the grounds. Poor grounding can be a big problem on these old cars, but thats just a starting point. Chas
-
MN47's are getting harder to find. Hope they go to a good home. Hint Hint....
-
You will need to relieve the bore for the exhaust valve. Its the same size as the E88 on the L26 260Z @35mm diameter. The inlet valves on the MN47 are 42mm, Not 44mm like the N47 on the L28 and shouldn't be any problem. If you do this with the engine bottom end intact and still in the car, Move the piston half way down the cylinder and tape the groove section so no grit will get into the top ring area. You could use something like cardboard to make disc a couple mm smaller than the bore. Lay that on top of the piston and tape it to the cylinder wall. That would seal better than a dirty piston crown. Just an idea. Cover over the other cylinders and oil passages to prevent grit entering. Chas