


Captain Obvious
Free Member
-
Joined
-
Last visited
Everything posted by Captain Obvious
-
 I would assume that all depends on where you set the temperature. I'm thinking I would want the temperature of the fan switch some token amount higher than the thermostat temp. If the system can operate in equilibrium without the fan running, then you are getting enough heat rejection from just natural airflow through the radiator. But if the temperature of the engine starts to creep above the thermostat temp, then it means the system has gone out of control and you have exceeded the heat dissipating capacity of the radiator (under the current conditions). And at that point, you need more flow. Either more water, or more air. If you are already maxed out on water flow (thermostat is all the way open), then you need more air. Turn the fan on.
 -
Nice work! I've traced most of my carb problems to one of two things... Ham fisted previous owners screwing stuff up or sitting with gas in them for long periods of times. Or both! I've found that surgically clean and actually assembled correctly goes a long way to fixing a lot of issues! Go figure!! About that flat head screw... What are the chances that someone tried to create a ported vacuum source? Is that screw hole close to the butterfly?
-
Oh, and I forgot something... The oil weight in the carbs should have nothing to do with idle speed. Lean spot in transition off idle? Yes. But steady state idle speed? No.
-
I'll be the dissenting voice and say that I believe it is completely normal for the idle speed to increase as the engine warms up. All other things held constant, I think this is normal. I have a 280, which is supposed to have a device called the AAR who's purpose is to raise the idle speed when the engine is cold. I took my AAR off, so I have nothing to raise the idle. With no device to purposely bump up my cold idle, when I first start my car it idles a little low at 500. But then over the first ten minutes of warmup, that idle gradually creeps up to 750-800 as the engine becomes warmer and happier. Engines do not want to idle. And cold engines really do not want to idle. Unless I'm missing something here, I don't see the problem! Seems completely normal to me.
-
That's a great point. And I would go one step further and say that the sensor should probably be on the engine side of the thermostat. You know... the side with all the other sensors on it?
-
Sorry, but I'm lost. I don't understand all of the distinctions being made with the terms above. Duals Duals all the way to the back Twice pipes Split pipe I understand that all of these options eventually end up with two tips sticking out the rear of the car, but how many mufflers are used, and where does the separation between the two sides start?
-
I consider that a more philosophically complicated question. You're essentially saying "Everything in the car is new with zero miles on it except the odometer. With that in mind, should the odometer read the old original mileage, or can that be changed to zero miles as well?" I think the answer is "No, it should not be changed and it should reflect original mileage".
-
Well from what I heard, this guy's cousin is a pack-rat and has a file folder containing years of annual DOT registration records, annual state safety inspection records, and annual insurance documentation that all show the steady progression of mileage from when he purchased the vehicle until now. He can also answer the following questions completely honestly with his head held high: Q - Is that the original odometer in the vehicle? A - Yes. Q - Not considering any potential discrepancies which may have occurred without your knowledge and before your ownership, is the correct mileage of the vehicle what is shown on the odometer? A - Yes. Q - Are you sure? A - Yes. Q - Are you double dog sure? A - Yes. Q - Do you have documentation to prove it? A - Yes. Haha! I think he should be OK. Here's to hoping the DOT has better things to spend tax dollars on than pursuing that dead end!
-
Thanks guys. I added some clarifying detail to my original post.
I knew a guy, who knew a guy, who knew a guy, who knew a guy's cousin who temporarily installed a spare speedo in his car because the original was jumpy. The problem turned out to be the routing of the speedo cable and not the gauge itself, but before he put in the replacement, he took it apart and adjusted the odometer to reflect close to the correct mileage. He didn't bother with the 1's or 10's digits, but he changed the others so it was within 100 miles of my actual mileage. And then when he figured out that the speedo was never the problem in the first place, he took out the test unit and put his original back in. From what I heard, it's not too hard, but fiddly with small parts and the like. If you're good working on small delicate things, its not bad. If you're all thumbs and your best tool is a breaker bar or an impact gun, I'd send it to someone else.
No. The only one that goes directly to the fuse box is the same one that goes to the alternator. The one that goes to the multi-function stalk goes to the fusebox after the switch. The two that go to the ignition relay go to the fusebox after the relay. The one that goes to the ignition switch and powers some stuff after the switch does not go to the fusebox at all (which I consider a design flaw). For example, the starter solenoid has no fuse in the line at all. Neither does the ignition module or coil. Now that we have identified the wiring harness year (probably? hopefully?) you can download that year wiring diagram and take a look. Here's a mostly finished color wiring diagram for 78: http://www.classiczcars.com/applications/core/interface/file/attachment.php?id=41454
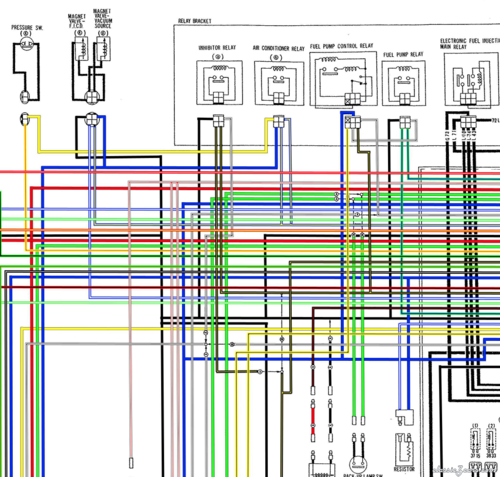 Not completely done, but better than no color at all. I didn't make it. It was already uploaded to this site, but I just added it to the wiring diagram list.Free
Can you point me towards any documentation that describes the process? Or youtube videos of parts made using the same process?
Yikes. I can see why you bailed on the project. I sure do wish there was a cheap way to get a whole new skin on the dash.
The only thing missing is one of your dash retaining bolts. There was never anything installed in that "empty spot", It's simply a recessed area for one of the mounting bolts that holds the dash in place. There is supposed to be a bolt in the threaded hole that helps hold the dash. Yours is missing. If I had to guess, they may have used that location on earlier years to attach the hood release and vent control. But then they put in the lower valence panel and I think they changed how the vent and hood release are attached. Anyway, the only thing you are missing is a bolt.
How far into this process did you get? Were you thinking you would make the molds yourself, or were you looking for a company to make it for you?
Matt, I would be surprised if the bearings really needed to be replaced as it's not a high load application. Even so, I think pulling the whole thing apart is a good idea to clean out the gummed up crusty grease and make sure everything is working as intended. As for taking it apart, I'd be glad to give you a hand if you wanted to make the trip to my place. It's not as bad as it sounds.
Yes, that is a lock nut. You thread the tie rod end onto the end of the rack and then tighten the locknut against it to lock the end in place. In that pic, the locknut had been backed off the tie rod end a turn or two. That's why there is a small gap between the tie rod end and the locknut. I think my style of tie rod end (round with the weld spots on it) is the original factory design. If yours had multiple flats on the sides and wasn't welded together, I think it was replaced at some point. No MINE is original OEM. Haha!!
There are a couple other pics I have to find, but that should get you guys started. I don't remember where I put the boot pics, but I'll find them.
Here's a pic of the whole rack exploded. Only thing you can't see is the lower pinion bearing. I pulled it out, cleaned it, and put it back in before I thought to take this shot. And I wasn't going to pull it again just for the camera: Left end parts: Right end parts:
Here's some pics of the pinion gear bearings. There are two of them, and on the later racks like mine, they are identical. I've done a little digging and I believe the earlier racks used just one roller bearing at the top, and a sleeve bearing down inside the rack housing. But I've got two roller bearings. Here's the top bearing which is pressed onto the pinion gear shaft: The bearings they used are intended to be side loaded, and because of the design, you can take them apart. Carefully pry off the grease seal, pop off the retaining ring, and the bearing falls apart. You don't HAVE to take it apart to clean it out, but you can do a more thorough job if you do. Here's the retaining ring popped out of it's groove: Take the bearing apart, clean the old grease out, put it back together, and add new grease: The most intricate part of the rack work was probably getting the lower pinion bearing out and back in. I used a "blind bearing puller" from HF. This tool uses an expanding mandrel that pushes outwards against the inner race and a slide hammer to knock the bearing up and out of the rack housing. And I used my hydraulic press to put that lower bearing back into place after cleaning and greasing. Other than that lower bearing, everything can be handled with traditional hand tools. What if you don't want to go through that much effort? You can grease the two bronze bushings at the ends of the rack housing by slathering the rack gear with grease and running it back and forth a bunch of times. You can grease the rack gear teeth (and hence the pinion gear teeth) by slathering the exposed rack teeth that poke out of the end when the steering is turned all the way to one side. The sliding faces of the tension shoe will also get grease by slathering the exposed rack gear. But what you CAN'T do is get to the bearings on the pinion gear shaft without pulling the pinion out of the housing. So you can do a decent job of getting to maybe 75% of what needs grease without taking anything off the rack at all. In fact, that 75% can be done with the rack on the car without even disconnecting the tie rods. However, that last 25% requires pulling the pinion gear. This is the type of tool I used to pull my lower pinion bearing: Here's the lower pinion bearing popped out of the housing. Note that this was not the easiest part of the job: But after seeing the old grease in there, I'm glad I went through the effort:
To get the rack gear out of the main tube, you have to take off the tension adjust shoe and the pinion gear. Most of this stuff has been handled before so I'm not going to include as many pics, but thought I would include some. To get the pinion gear out, remove the two bolts holding the retainer in place and pull the retainer off. Note that I put some masking tape over the shaft splines to protect the grease seal while it is being slid over the splines: Pull the pinion shaft, upper bearing, and gear up and out of the rack. I've heard some people have a hard time pulling this part out, but thankfully mine came out without a fight: Don't lose or bend any of the spacer shims that adjust the pinion shaft end play: After removing the pinion gear, here's what it looks like inside the housing. The rack and lower pinion bearing are still in place: To get the tension adjustment shoe out, first remove the lock ring and then unscrew the big slotted adjustment cap: After the cap is off, remove the washer and spring: Once you have the pinion gear removed and the tension shoe loose, you can silde the rack gear out the end of the housing. Obviously, if you only removed one inner tie rod end, then that's the direction you'll have to go, but if you took them both off like I did, then it will slide out either end. Once you have the rack gear out, you can reach inside the rack housing and push the tension shoe out of the housing from the inside. Sometimes the tension shoe will just fall out, but if not, it's likely that there are some small burrs on the shoe from years of use. Just push it out from the inside:
After I got the bushings sorted out, I disassembled the rest of the rack. Remove the dust bellows and you're looking at this: My PO had screwed these plug bolts into the inner tie rod grease port. More on those bolts later, but the bottom line is they should have never been there in the first place. So take the bolts out: Hold the tie rod end in a vice and use a large wrench to loosen the lock nut a little bit: After the lock nut is loose, unscrew the inner tie rod from the end of the rack: After you get the tie rod off, inside you'll find the ball seat and it's associated spring. In this pic, the seat is out laying on the paper towel, and you can see the tip of the spring poking out of the hole in the end of the rack: Ball seat and spring cleaned up: Unscrew the lock nut and rubber coated bump stop washer off the end of the rack gear and you're left with this: If you pull the other inner tie rod end as well, just be sure you don't mix up the parts from the ends and make sure you put everything back on the same end it came from originally.
Not completely done, but better than no color at all. I didn't make it. It was already uploaded to this site, but I just added it to the wiring diagram list.Free
Can you point me towards any documentation that describes the process? Or youtube videos of parts made using the same process?
Yikes. I can see why you bailed on the project. I sure do wish there was a cheap way to get a whole new skin on the dash.
The only thing missing is one of your dash retaining bolts. There was never anything installed in that "empty spot", It's simply a recessed area for one of the mounting bolts that holds the dash in place. There is supposed to be a bolt in the threaded hole that helps hold the dash. Yours is missing. If I had to guess, they may have used that location on earlier years to attach the hood release and vent control. But then they put in the lower valence panel and I think they changed how the vent and hood release are attached. Anyway, the only thing you are missing is a bolt.
How far into this process did you get? Were you thinking you would make the molds yourself, or were you looking for a company to make it for you?
Matt, I would be surprised if the bearings really needed to be replaced as it's not a high load application. Even so, I think pulling the whole thing apart is a good idea to clean out the gummed up crusty grease and make sure everything is working as intended. As for taking it apart, I'd be glad to give you a hand if you wanted to make the trip to my place. It's not as bad as it sounds.
Yes, that is a lock nut. You thread the tie rod end onto the end of the rack and then tighten the locknut against it to lock the end in place. In that pic, the locknut had been backed off the tie rod end a turn or two. That's why there is a small gap between the tie rod end and the locknut. I think my style of tie rod end (round with the weld spots on it) is the original factory design. If yours had multiple flats on the sides and wasn't welded together, I think it was replaced at some point. No MINE is original OEM. Haha!!
There are a couple other pics I have to find, but that should get you guys started. I don't remember where I put the boot pics, but I'll find them.
Here's a pic of the whole rack exploded. Only thing you can't see is the lower pinion bearing. I pulled it out, cleaned it, and put it back in before I thought to take this shot. And I wasn't going to pull it again just for the camera: Left end parts: Right end parts:
Here's some pics of the pinion gear bearings. There are two of them, and on the later racks like mine, they are identical. I've done a little digging and I believe the earlier racks used just one roller bearing at the top, and a sleeve bearing down inside the rack housing. But I've got two roller bearings. Here's the top bearing which is pressed onto the pinion gear shaft: The bearings they used are intended to be side loaded, and because of the design, you can take them apart. Carefully pry off the grease seal, pop off the retaining ring, and the bearing falls apart. You don't HAVE to take it apart to clean it out, but you can do a more thorough job if you do. Here's the retaining ring popped out of it's groove: Take the bearing apart, clean the old grease out, put it back together, and add new grease: The most intricate part of the rack work was probably getting the lower pinion bearing out and back in. I used a "blind bearing puller" from HF. This tool uses an expanding mandrel that pushes outwards against the inner race and a slide hammer to knock the bearing up and out of the rack housing. And I used my hydraulic press to put that lower bearing back into place after cleaning and greasing. Other than that lower bearing, everything can be handled with traditional hand tools. What if you don't want to go through that much effort? You can grease the two bronze bushings at the ends of the rack housing by slathering the rack gear with grease and running it back and forth a bunch of times. You can grease the rack gear teeth (and hence the pinion gear teeth) by slathering the exposed rack teeth that poke out of the end when the steering is turned all the way to one side. The sliding faces of the tension shoe will also get grease by slathering the exposed rack gear. But what you CAN'T do is get to the bearings on the pinion gear shaft without pulling the pinion out of the housing. So you can do a decent job of getting to maybe 75% of what needs grease without taking anything off the rack at all. In fact, that 75% can be done with the rack on the car without even disconnecting the tie rods. However, that last 25% requires pulling the pinion gear. This is the type of tool I used to pull my lower pinion bearing: Here's the lower pinion bearing popped out of the housing. Note that this was not the easiest part of the job: But after seeing the old grease in there, I'm glad I went through the effort:
To get the rack gear out of the main tube, you have to take off the tension adjust shoe and the pinion gear. Most of this stuff has been handled before so I'm not going to include as many pics, but thought I would include some. To get the pinion gear out, remove the two bolts holding the retainer in place and pull the retainer off. Note that I put some masking tape over the shaft splines to protect the grease seal while it is being slid over the splines: Pull the pinion shaft, upper bearing, and gear up and out of the rack. I've heard some people have a hard time pulling this part out, but thankfully mine came out without a fight: Don't lose or bend any of the spacer shims that adjust the pinion shaft end play: After removing the pinion gear, here's what it looks like inside the housing. The rack and lower pinion bearing are still in place: To get the tension adjustment shoe out, first remove the lock ring and then unscrew the big slotted adjustment cap: After the cap is off, remove the washer and spring: Once you have the pinion gear removed and the tension shoe loose, you can silde the rack gear out the end of the housing. Obviously, if you only removed one inner tie rod end, then that's the direction you'll have to go, but if you took them both off like I did, then it will slide out either end. Once you have the rack gear out, you can reach inside the rack housing and push the tension shoe out of the housing from the inside. Sometimes the tension shoe will just fall out, but if not, it's likely that there are some small burrs on the shoe from years of use. Just push it out from the inside:
After I got the bushings sorted out, I disassembled the rest of the rack. Remove the dust bellows and you're looking at this: My PO had screwed these plug bolts into the inner tie rod grease port. More on those bolts later, but the bottom line is they should have never been there in the first place. So take the bolts out: Hold the tie rod end in a vice and use a large wrench to loosen the lock nut a little bit: After the lock nut is loose, unscrew the inner tie rod from the end of the rack: After you get the tie rod off, inside you'll find the ball seat and it's associated spring. In this pic, the seat is out laying on the paper towel, and you can see the tip of the spring poking out of the hole in the end of the rack: Ball seat and spring cleaned up: Unscrew the lock nut and rubber coated bump stop washer off the end of the rack gear and you're left with this: If you pull the other inner tie rod end as well, just be sure you don't mix up the parts from the ends and make sure you put everything back on the same end it came from originally.


Important Information
By using this site, you agree to our Privacy Policy and Guidelines. We have placed cookies on your device to help make this website better. You can adjust your cookie settings, otherwise we'll assume you're okay to continue.