


Captain Obvious
Community Member
-
Joined
-
Last visited
Everything posted by Captain Obvious
-
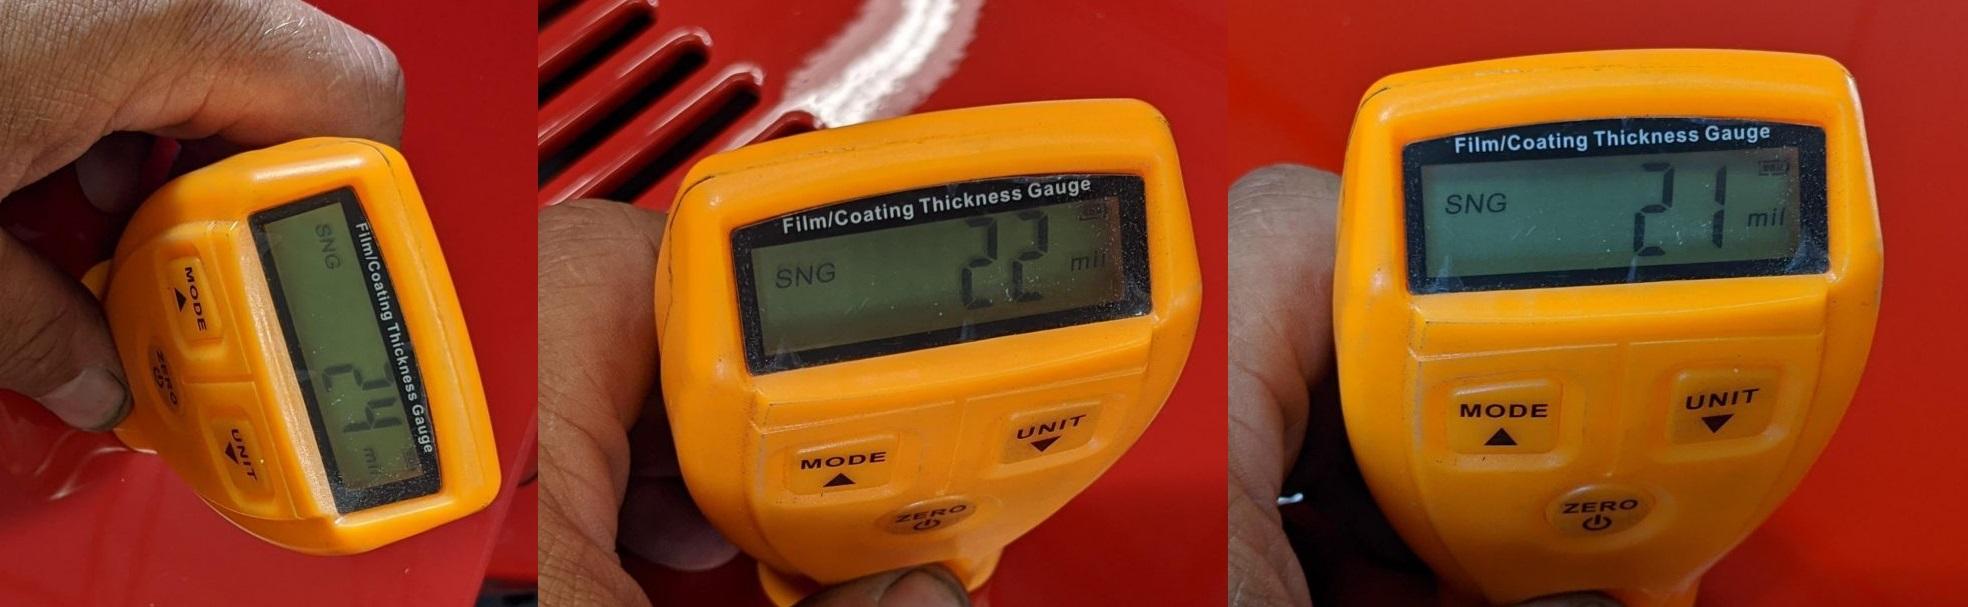
Oh well. I was just wondering if there were any conclusions to be drawn from the readings. Unfortunately, the readings don't really make much sense, so there's no conclusions to be had.
-
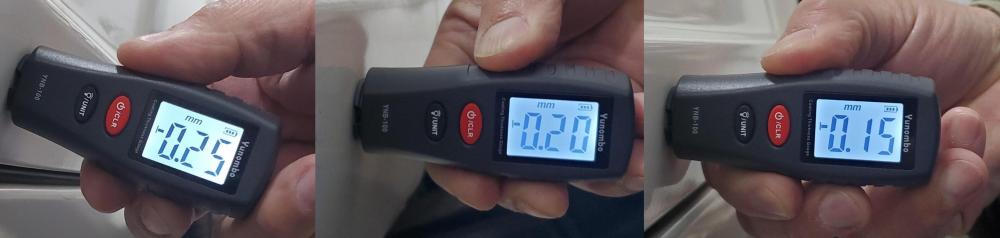
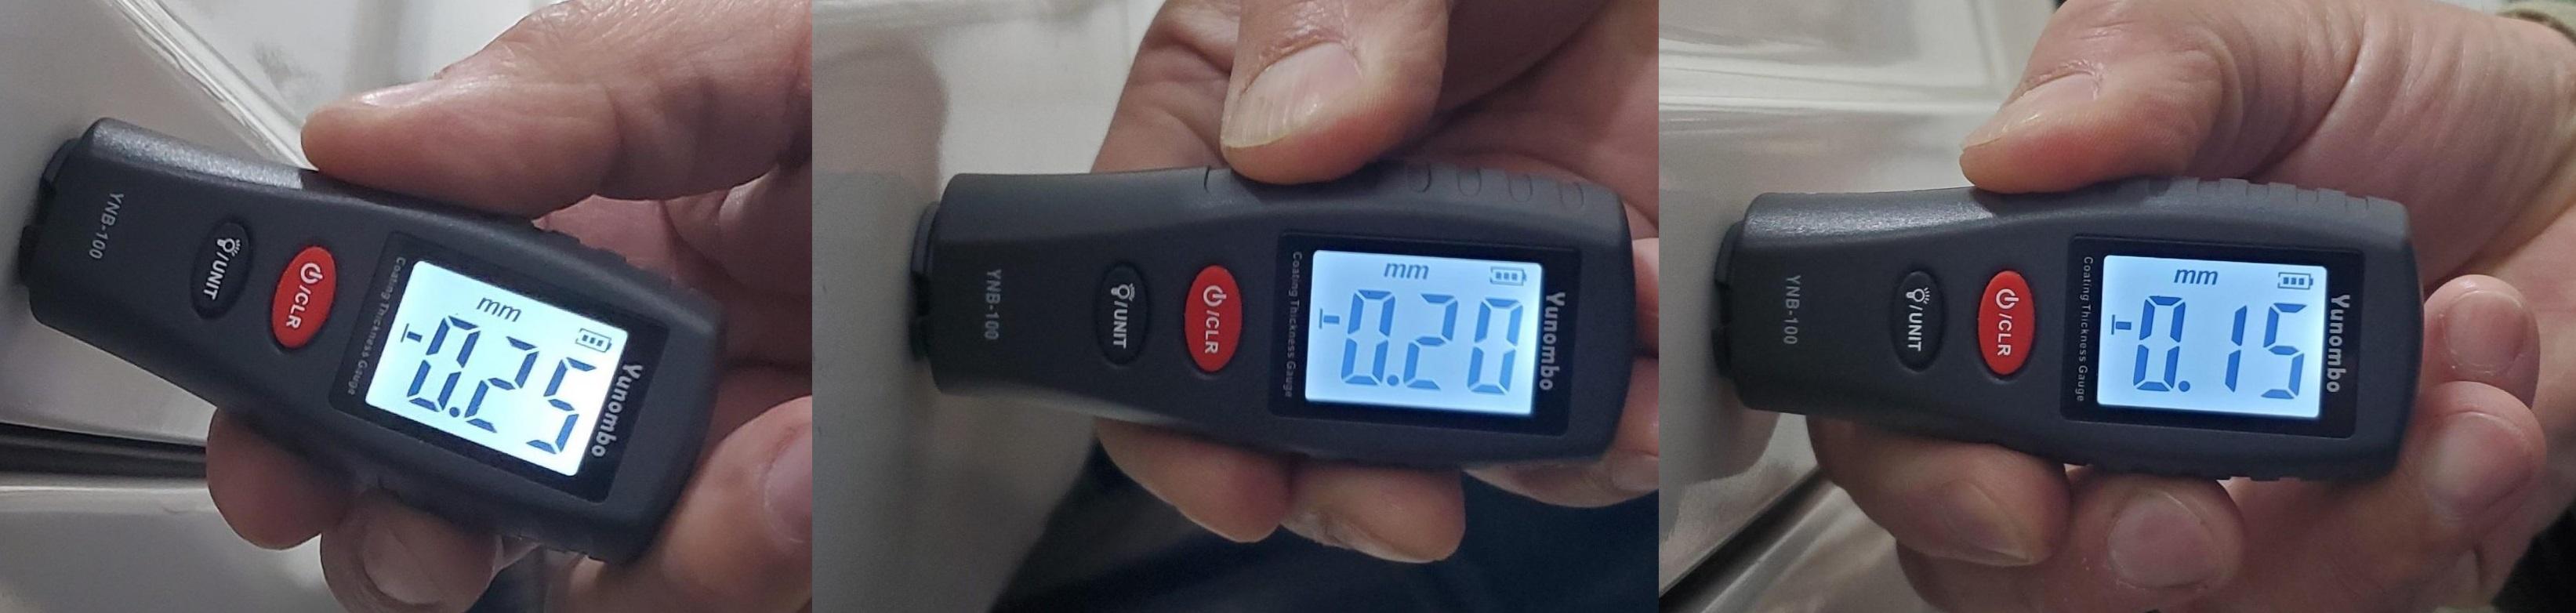
Yeah, that would make more sense and that's why I was wondering if I missed a decimal point or something. If the red car were 2.2 instead of 22, it would line up better. But I don't see any decimal point there. So I have no idea what to make of those readings then. And of course, there's all the stuff that Zed Head mentioned too. Different person using different gauge in different ways on different locations on different cars. Who knows what could happen. It all just looked too weird to me and I wanted to see if someone could put their finger on it.
-
Wait... The red car has an average reading around 22 mil which is .022 inches, right? This works out to about 0.56 mm. While the white car has an average reading of around 0.20 mm. That means the red car has almost three times as thick a coating as the white one? I must be doing a math error in there somewhere... Am I missing a decimal point or something?
-
Hmmmmmm.... So how accurate are paint thickness meters? Here's a couple spots from red one that is supposedly original paint: And here's a couple spots from the white one that was repainted: What do the paint experts make of this?

-
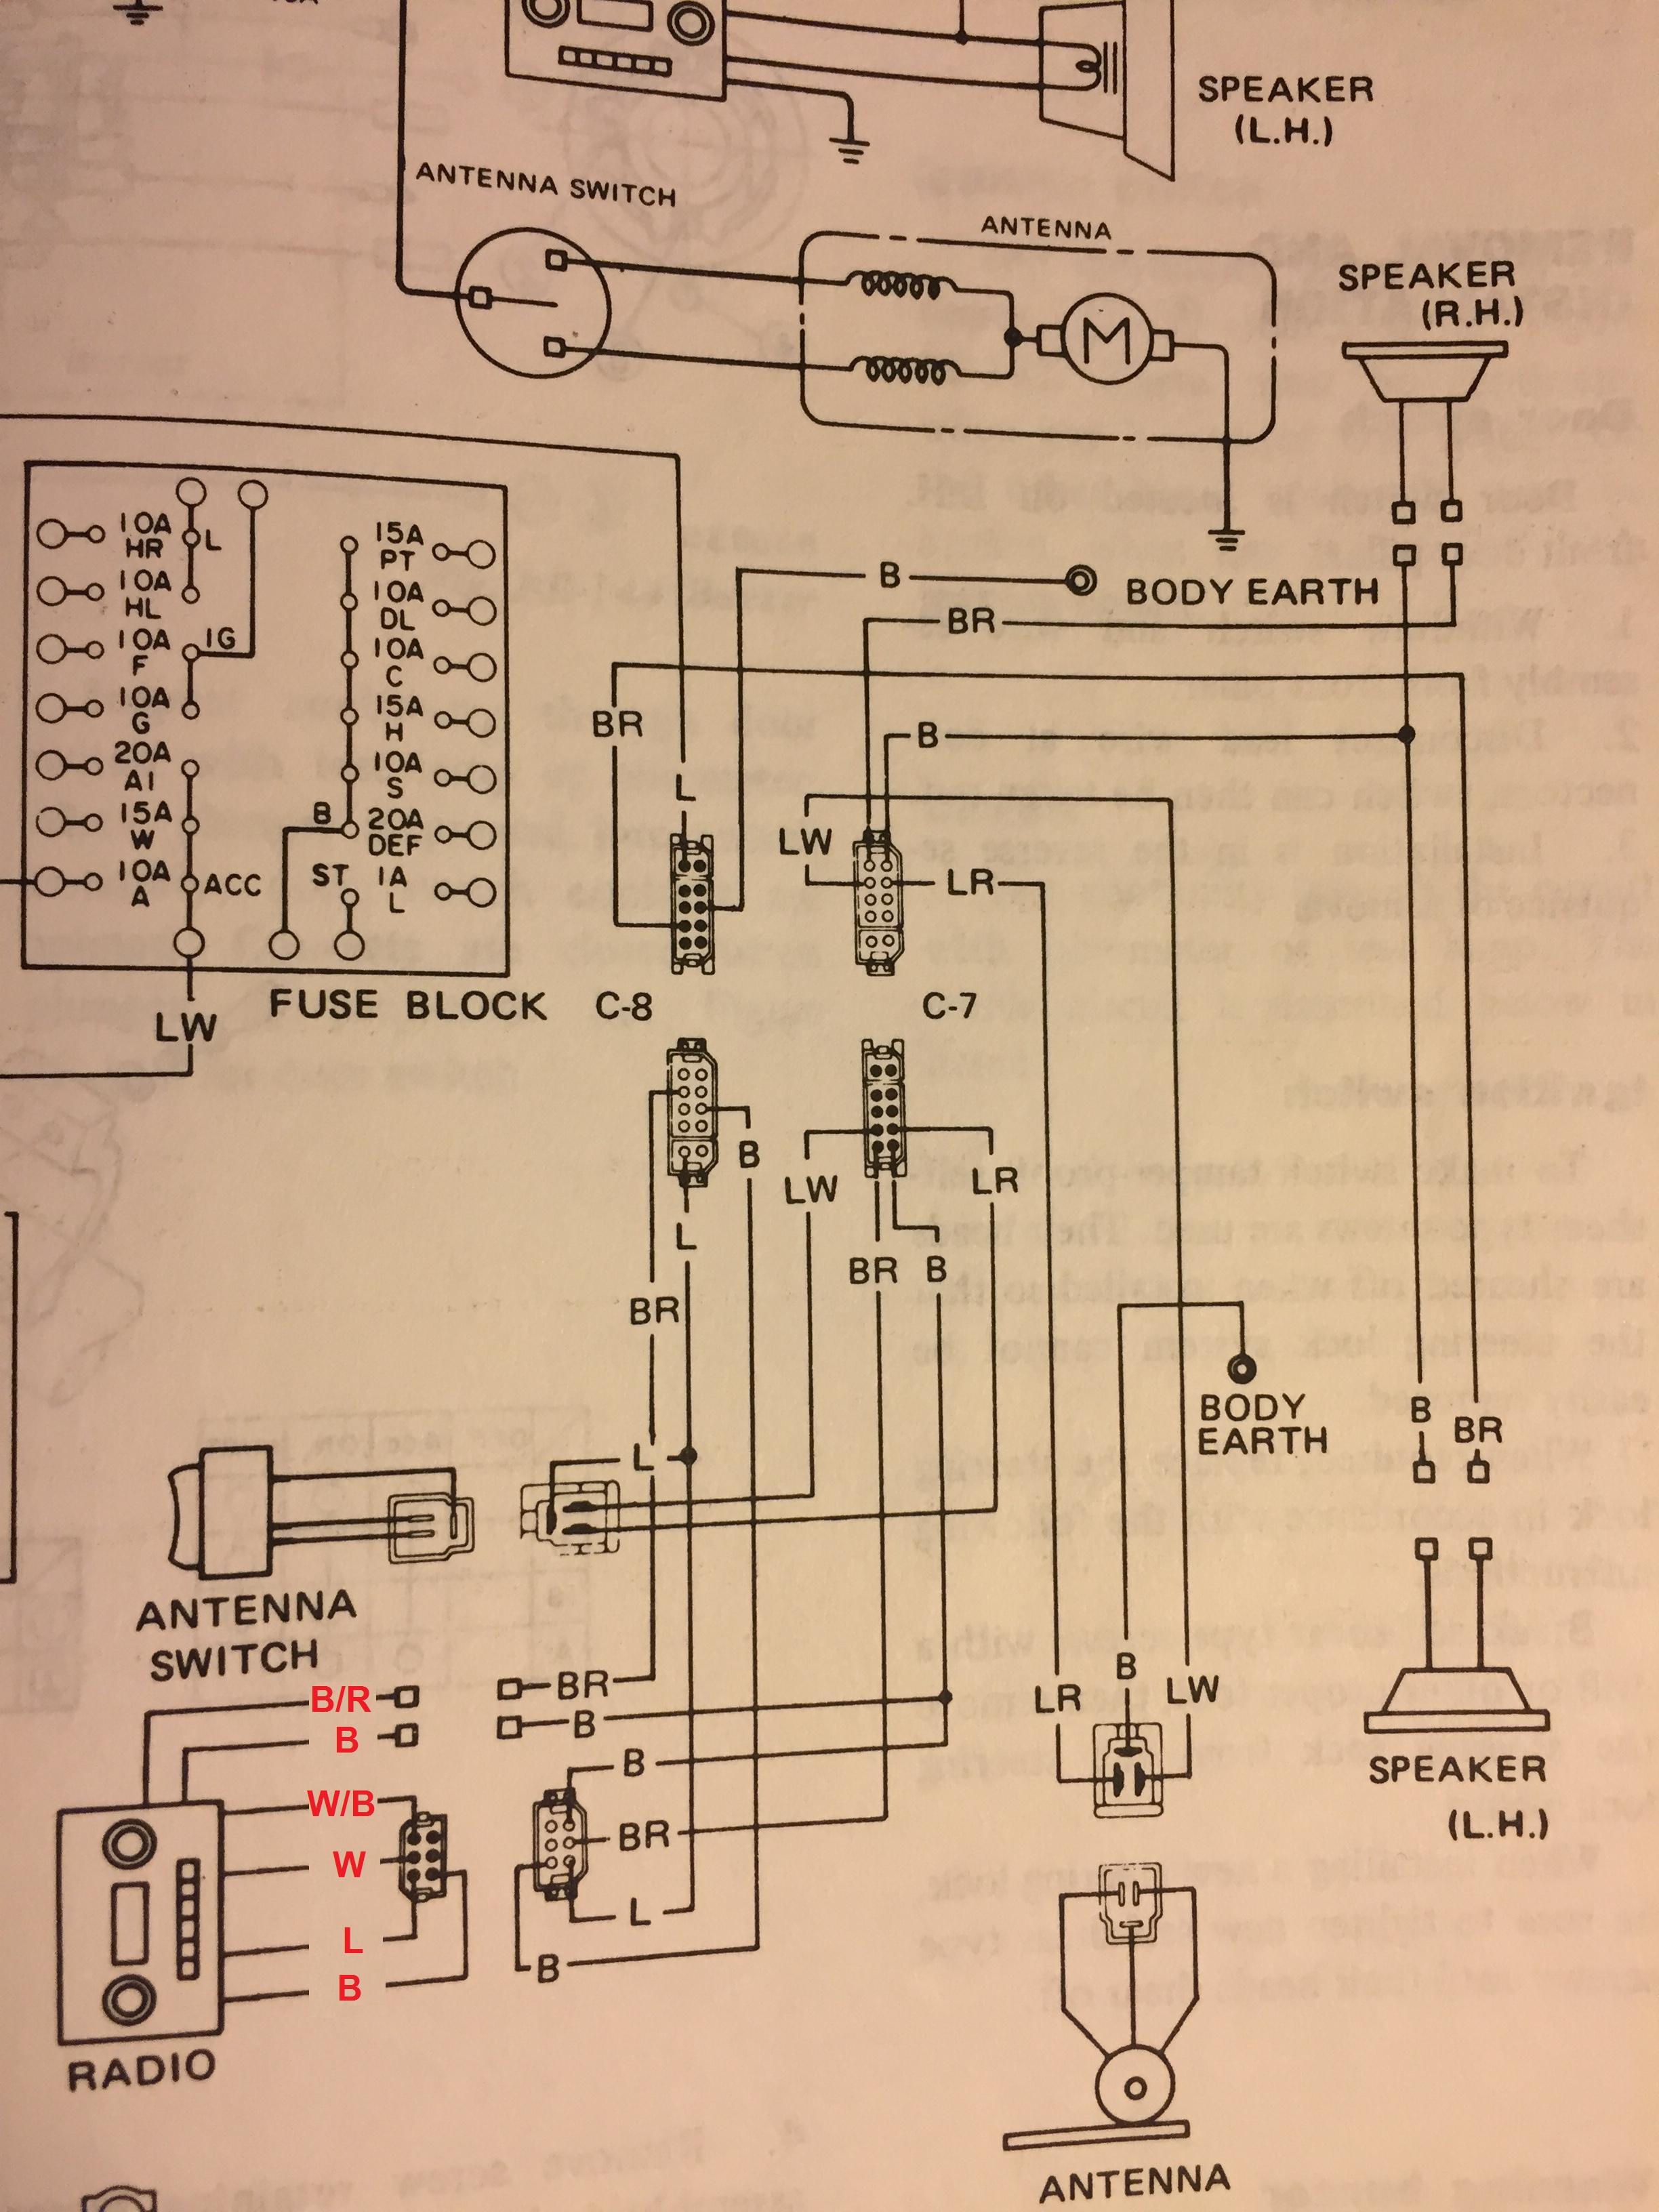
Glad to help. None of this would be so confusing if they would have just shown that sub-harness on the wiring diagram. Haha!
-
Ooops. Sorry, I gave you the wrong answer on that one. Glad @zKars was there to supply the correct answer. Thanks for the link to your other thread. I didn't look at it yet, but will when I get a chance.
-
Thanks Zup!! I appreciate the kind words. And I trust your judgment about the genuine nature of the antenna and the guy offering it!
-
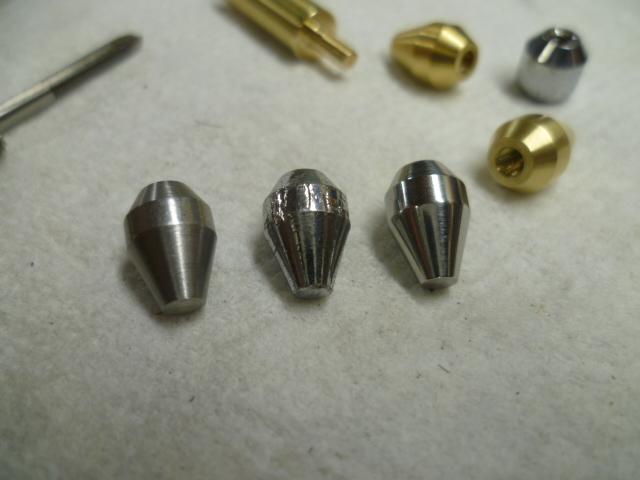
Haha!! I can't make that in my shop. But I did make these:
-
I think they're smaller than that. All of that small stuff is M6 x 1.0 . For comparison, the throttle body mounting bolts are M8. BTW - What's the link for that throttle body thread on HybridZ? I'd like to take a look.
-
Haha! But with most cars, the little canards and winglets and dips and curves are just there for show. On this car, moving at the speeds it can attain, I bet all that stuff is actually functional! They'd need to fit me with an adult diaper before getting into that thing.
-
So I'm assuming they sprayed the driver with V-gas* before the test run? *Note that I remembered the concept and the show, but couldn't dredge up the details without a little google.
-
In all his other listings for NOS parts, it always has the Nissan package or bag or box the item came in. Not so for this auction and I say show me the Nissan box it came in. The tip on his antenna doesn't look quite right to me. I've made better. @Zup LOL, or maybe my skepticism meter is just tuned a little too sensitive after that 31K mile 240Z on BAT. Haha!
-
Dang. So who help the record before they broke it?
-
Sure would! So by the way... Where did you find the info that said the 350Z uses the same mounting pattern as the 280Z throttle body? How credible was the source?
-
The problem is that the needle and/or nozzle may already be worn oval. But at this point, it sounds like you just want to get the car to run reasonably well and then deal with the finer points later. If that's the case, then you can probably use the existing needles and nozzles and move forward. The problem (if there is one) will be in getting the car tuned well. Typically if the nozzle is worn oval or if there is material worn off the side of the needle, then it'll drive fine, but your idle will be rich. BTW I took a look through my round top parts and I don't have that little linkage piece you're missing. Sorry.
-
I think the needle may have become bent because the nozzle was misaligned and binding. How bad is it? Uhhh... Yeah. He's an expert.
-
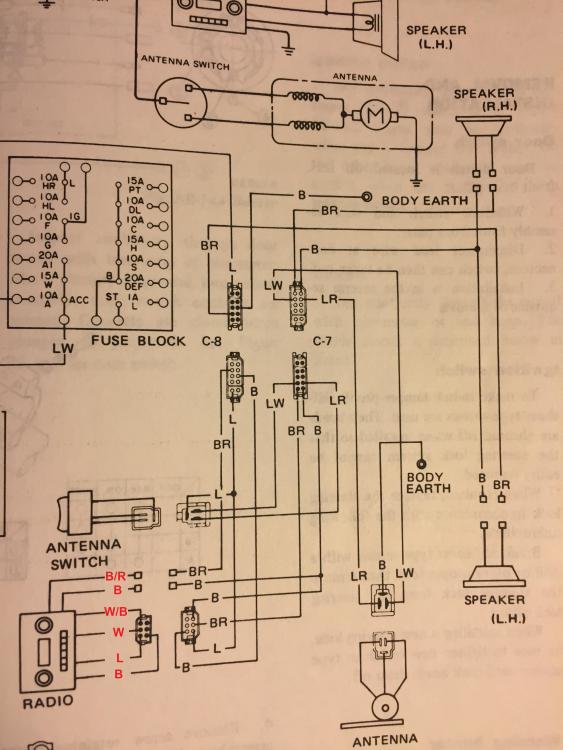
That diagram is correct. It's just more of the same issue as before where they didn't show the stub harness on the diagrams. The documentation just assumes the wires coming out of the back of the radio are hard-wired. I added the colors to your diagram to show what I'm talking about. I stand by my previous identifications of the wire colors (IN THE SUB HARNESS). They change some of the wire colors at the six position spade connector, so on the CAR SIDE of that connector the colors are different: Note that they don't show the illumination wires on this diagram because they are shown on the dash lighting page instead. But the rest of the colors all work out.
-
There was a comment after the auction ended by soquelz, who says "I guess when you get to this level of bidding you want no questions about authenticity." And that about sums it up for me too. If I'm going to pay a lot of money for a car who's "value" lies in it's low mileage and it's originality, I don't want it to come with piles of questions about either of those two things. It's a beautiful car. I'd love to own it. But it's priced way out of my range. And it's important to understand the REASON for such a high price. The REASON for the high price isn't simply because it's beautiful. It's because it's supposed to be a 31K mile car that is all original. If it wasn't being sold as a 31K mile car, or being held up as that beacon of originality, it would most likely not command such a price. Much of the VALUE is in the low mileage and the originality. It seems to me that when there are credible questions about the mileage and the originality, the value cannot be supported. I expect this car will be back sometime in the not too distant future. With the "period correct" carbs and plated hardware and "period correct" wheel covers and no overspray and the seats on the correct sides and, and, and, and........ And, a better, more conclusive story. And if we see it again, I hope it's presented as "Stock", but not "Original". For example... In order for it to be "ORIGINAL", they would have to find the ORIGINAL carbs. And the ORIGINAL wheel covers, etc. I hope they don't try to convince anyone that they magically and mysteriously found the original carbs and wheel covers and put them back on the car. After all the claims of complete originality of the car as it stands today, I would be skeptical of the legitimacy that story.
-
The reason I went to ebay looking at the 350Z throttle body was to try to confirm the mounting measurements (didn't work). You said it fits the 280 plenum (60mm square), but I've never messed with one to confirm or deny the compatibility. However, if it doesn't fit, you're only out thirty bucks. So about the cold start plate, I made one out of stainless couple years ago and thankfully did not get sidetracked by nitrous.
-
In theory... Yes. Both fuel pumps are positive displacement types and have check valves on both the input and output sides. Because of those check valves in theory, either pump will allow draw through with the pump not on operation. So, you could pull fuel through the electric with the manual, or push fuel through the manual with the electric. In theory. Problem though is the amount of pressure drop you would get across those check valves, and would the system still be able to build the required pressure in the rail. In theory. Haha!LOL. Yeah, never. Just because the adjustment method involves bending pieces of the linkage, you think it's crude or something?Yeah, there's something wrong with that whole nozzle assembly. With that little screw out, the nozzle should slip freely in and out inside the alignment nut. The get corroded and stuck sometimes, or maybe the whole thing is so badly misaligned that it's jammed up against the needle inside the carb. That bottom assembly should not spin. There's something wrong down there. So what's the history of these carbs? It sounds like someone who really didn't know what they were doing had them in pieces and didn't do a good job of putting them back together. (Sorry if that was you.....)What do the wires do? I think I can help with that: Blue is +12V power in. Hot when in ACC and ON. Blacks (two of them) are grounds The one on the 6-position connector is used as the low side power for the radio, and the bullet is used as a speaker ground. White/Black is also a speaker ground. I think it just gets connected to the black ground wires in the car harness. White is right hand speaker output. Black/Red bullet is left hand speaker output. Green/White is panel illumination high side. Goes to the headlight switch. Red/Blue is panel illumination ground side. Goes to the rheostat. Does that make sense?Sorry, but I don't understand your last post... I took a quick look on ebay and found that they ARE commonly available used. And cheap. You say they aren't available used, but then you say it's common to replace them with aftermarket? I'm not sure if that was a typo or what, but I saw lots of them on ebay.


Important Information
By using this site, you agree to our Privacy Policy and Guidelines. We have placed cookies on your device to help make this website better. You can adjust your cookie settings, otherwise we'll assume you're okay to continue.