jfa.series1
 Subscriber
-
Joined
-
Last visited
Everything posted by jfa.series1
-
 The engine bay plate shown appears to have engine # 3377 and car # 0066. The plot thickens like curdled milk.
 -
Its possible the mounting screws are contacting the metal lamp body on their way to the fender. Check that the rubber seals are carefully fitted to the lamp body and the screw holes in the seal are not close to the lamp body holes. Then carefully fit the lens and stainless trim into the seal but don't change the seal fit on the lamp body. I have this kit and love the effect on the marker lights.
-
I hope the eureka moment didn't hurt too bad! Didn't the old Model T's and others have a lever on the steering column for this purpose?
-
Hey Chris, From your slightly younger cousin, check out the Roadster belt at WESCO. I've got them in my car and very well pleased. The retractor mounts up at the quarter window in place of the OE shoulder belt with no changes and you want the 11" sleeve for the buckle side. I can't get the website link to paste so Google Wescoperformance. Jim
-
Seems like just a coincidence - no connection between the ebrake and brake lights. A possible cause is a stuck switch at the brake pedal or the adjustment nut has moved on the switch.
-
It might be that your ignition/steering lock kicked in when you moved the wheel. When engaged, it will usually prevent the ignition switch from turning unless you remove the tension on the steering column lock. Try this: insert the key and GENTLY turn it while moving the wheel a little one way or the other. By turning the wheel, you are taking pressure off the steering column lock so the key can cause it to disengage.
-
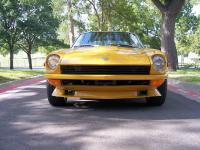
Great looking car - a very nice find and it looks to be unmolested. Welcome to the group and we'll be looking forward to your progress updates. Be sure to share your VIN and build date in a future post.
-
Welcome to the group and your next diseaZe! As long as we keep filling the owner's ranks of old cars with young owners, these classics will stay alive.
-
I suspect the folks at Blipshift got their attention very quickly! I just received their shirt and love it.
-
Crazy, stupid money being bid - now at $10,600 and the reserve not met. I guessed that the seller was looking for $10k but its clear he has his sights set on a bigger fleecing. Seven hours till its over.
-
BvtnDave - Phil provided an excellent description of Dave's harness benefits. These are really great upgrades for your car and will potentially save your combo and turn signal switches from burnout. So... DO add them to your MSA order for the fuse box, your car will thank you! Also, change out your old, tired turn signal and emergency flasher cans for electronic units similar to this one: Novita/Hazard Warning Flasher (EL12) | AutoZone.com These units are available at almost any auto supply store. No more pokey turn signals!
-
It's probably going to take a minimum of $25-30k to get this one "right", on top of the purchase price. That assumes the new owner does the work him/herself at $0 cost of labor. It's probably more if there's an attempt at "stock" or "as delivered". Costs can be reduced IF the new owner does all their own body and paint work, engine re-build, ...etc. Even though it's a 3-digit VIN, a $ break-even is going to be a tough road. Current bid is $5,300 with a reserve not met.
-
-
-
You really need to calm down before you have a stroke! Looks super great - going for that stock class win at ZCON '15 up the road in Memphis???
-
Winning bidder must have had a change of heart - did not cough up the $ required to seal the deal. Or... perhaps it did not meet expectations upon inspection.
-
I don't think the BRE spoilers ever had the flat spot - mine doesn't. I suspect that was a Nissan feature for the Fairlady series.
-
The sale closed out at $10,200. Someone is going to have a super fun project!
-
I'd suggest that this is something that was sold in the parts dept. and not ever associated with a specific vehicle.
-
Pretty much describes my physical condition!!! The (used) fuel spills can be especially embarrassing.
-
If the collar that the cap attaches to is not sealed well against the "rubber ... thingy" you can get a slosh leak even if the cap is sealed tightly. Fix: remove the collar and run a bead of silicone seal all around it, re-install. Been there, done that!
-
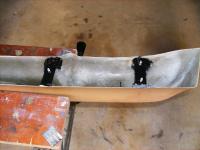
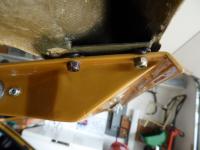
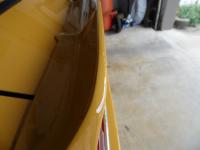
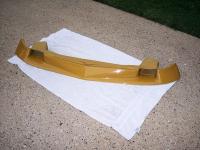
Here's a few considerations when installing a BRE rear spoiler: - Make sure to clean and paint the brackets holding the studs to prevent rust. - Use self-locking nuts when securing it to the hatch. - Consider inserting a small O-ring on each stud prior to mounting to the hatch. The O-ring will help seal the hole thru the hatch and it helps hold the stud brackets slightly above the hatch surface and reduce abrasion to the hatch paint. The O-rings can also be used to help adjust the clearance of the ends of the spoiler against the fenders. As to the rough top edge on the new series of spoilers, here is a shot of the top edge of my old one. It has a flat about 5/16" wide across the entire edge. I don't know if this flat has disappeared from the new units.
-
I can't see any excuse for the damaged finish along the entire top edge of the spoiler. That is not incidental damage, it has been ground or filed off. I suspect there is a problem with the mold and the edge is not coming out clean and this is someone's very poor "fix". This should be completely finished in gelcoat and ready for installation or paint to color of your choice. As to the mounting studs, one might presume no prior installation holes in the vehicle and therefore new holes would be drilled to the current spec. If BRE assured you that the spec was the same as original, then you have an issue to take back to them - along with the finish item. As an aside, my dealer had already installed the 1st gen BRE "Spook" and spoiler when I bought my car - and they are still with it. The BRE site shows the current "Spook" as the original but it is really the 2nd gen. design for 1971 and after. Here are a couple of pics of the 1st gen. "Spook", used only for the 1970 competition season.
-
The car appears to be a museum of some sort. It is in Madison GA, perhaps some of our eastern members will recognize the location. As Robert says, some VERY interesting company sitting around this car - an Opel GT, Ferrari Testarossa, ...etc. I especially liked the rear glass shot with the Japanese battle flag reflection.
-
I have a conventional battery with reversed posts (positive near the engine) and keep a maintainer on it most of the time. I've never had a leakage problem in all the 43+ years I've owned the car but have always had a good tray and drain tube under the battery. If a car is going to be stored/unused for a long period, pull the battery.