Jump to content

Remove Ads

Leaderboard

Popular Content

Showing content with the highest reputation on 08/14/2024 in all areas

  1. I don't mind the clear lens and it came from a friend. So it will be proudly displayed in the engine bay. 😉
  2. Is the car hard to start when it's cold?? If not, then there's not a problem!! If it's not broken, don't break it!
  3. you do not need anybody to do this!!! you need to do one carb at a time !! now disconnect the cable from the #2 screw let the choke lever on the carb drop down and then lift up that lever until it just barley starts to pull down the nozzle, then lift it back up so the nozzle is seated. now just drop the choke lever down just a touch and retighten the # 2 screw. do this on both carbs and you choke will be fine!
  4. The next episode is out. I searched on an off for days and weeks to find an undercoat that would look like the original stuff - I wish I could have known about what he used before I did my car. Anyway, read the description also - interesting info there.
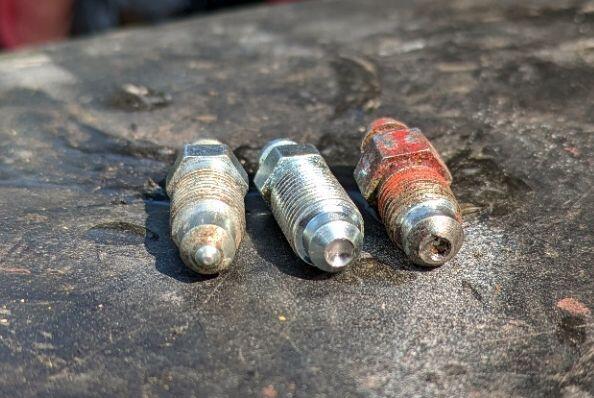
  5. HS30-H I learned of the similar Jag bleeder last night while researching the Sumitomo. It appears to have also been used in some Studebakers like the Avanti. A post on a Studebaker forum suggested just cutting off the tip of a modern bleed screw to create one. The Jag screws, at least the one I found a reference to were 3/8" 24 thread although they also used a 3/16-inch ball. Captain Obvious The treading was a little messed up on the original bleed screw, possibly from being over tightened but the caliper's threads seemed to be fine. The old screws were tightened to the point where the flat tip was deformed by the ball bearing. I just came back from the makerspace where I modified a pair of bleeder valves I had on hand. The photograph shows from left to right, an unmodified bleeder, a modified, and the original. The original likely had a flat bottom when new but was damaged as mentioned above. I decided to mill a shallow 3/16-inch diameter concaved surface to secure the ball instead of just making a flat surface. This was likely unnecessary. I then spun the 3/16 end mill by hand in the caliper where the ball seats to clean it up a little. I might try and assemble this and see if I can draw a vacuum with the valve closed to test for leaks.
  6. The 240Z / S30 Center console is in many cases broken or has been "modified" over the years, but until now there was no good replacement. At least not to my knowledge. JDM-Car-Parts had a limited run of hand made items, but they never reproduced them again. Since all of mine had a certain damage, i was always looking for a good replacement. After having being really happy with the Resurrected Classics front grille, i recently saw they now also released a Center console that fits my 1972 car, so i got myself one. The overall shape and fitment seems very good. i found some smal, hardly noticeable imperfections, but then realized you'll also find those on the OEM center consoles. On the inside they're stlightly different, mainly because the fastening points are made from reinforced, milled plastic bits, rather than small fastener-points, which often brake: They claim that the material and pattern is like OEM, but it's somewhat different. the rear one is the Resurrected Classics one and the front two are OEM. First of all the OEM are full had plastic, while the RC one seems to be some plastic, covered in some kind of vinyl. It feels soft, almost like a modern, slightly padded center console. And as you can see it's pretty glossy, got some kind of blue-ish coloue touch and feels different. The fact that it's probably the only reproduction at the moment, makes it ovciously the best one, but i'm almost sure that soon another manufacturer will come up with a reproduction closer to OEM. However overall i'm pretty happy and it will do for the time being, unless i find an OEM on ein good condition... Oh, and i got some more of those stickers. And the seller added those to the package, which are nice:
  7. Before you go to that trouble, check out your national suppliers of old Jaguar parts (mossmotors.com for one) and investigate caliper bleed screws for the Girling-Dunlop brakes used on 50s and 60s models such as the MK.1 through Mk.10, XK150 and early E-Type. The Sumitomo MK63 licensed a number of Girling-Dunlop patent designs which also used the ball-bearing type bleed screw system. Larger bored master cylinders are not required. I have used both solid rotor and vented rotor type MK63 calipers on many of my cars over the years (still use them on four current cars) and I always use the stock 7/8" master cylinder. I even use the 7/8" bore on my 432-R replica with its Master Vac delete (pedal motion ratio is modified) and they work well. Nissan's own recommendation was to use stock MC. A friend over here fitted a Wilwood 1" MC on his rally 240Z with vented rotor type MK63s and found that it gave a high and firm pedal feel but was hard to use. Switched back to a stock 7/8" MC which I supplied to him and he was MUCH happier.
  8. Revisiting progress on my list: Machine shop to remove a small amount of material from the left side flange of the differential Part has been shipped off for machining. Hoping removal of .5 mm will go without issue. Send driveshaft off for balancing, but... I have to put the differential in car and check drive shaft fit first. I may need to remove some of the shielding on either the rear of the transmission or the driveshaft. Waiting for the machined left retainer to come back so I can do final shim adjustments to get backlash into specification. Tell Snake Oyl to proceed with the restoration of the seat belts I sent them in June even if reproduction date tags cannot be sourced (they have delayed for weeks because they haven't been able to confirm that they can get the tags from "their vendor". Payment and additional webbing for the luggage straps sent and received. Work to restore the seatbelts should be in progress. Buy carpet in bulk (still have to decide which). Cut to fit the car and have local company put correct finished edging. Or, purchase Auto Custom Carpets, Inc. kit from RockAuto. I may purchase this kit for day to day use... and have a custom set of carpets for show. I received and installed the Essex pile version of the carpet set available from ACC (Auto Custom Carpets). Removal of carpet jute that came on carpets is not possible without damaging the carpets. I found that out when attempting to remove it from the under seat pieces. Get gas door lock and ash tray grill chrome plated by local company - quote received for one gas lock (two pieces) and two sets of ash tray parts was $200-$300. I shipped the parts off last week and they should arrive tomorrow. I was quoted 4 week turnaround, so they will likely not be back in time for Zcon. Horns - these have to be re-plated before I can put them back together - horn back plates and misc. other parts shipped to be re-plated - they should arrive tomorrow. Hoping for about a 3 week turnaround. I also have the following fairly large lift items: Assemble the seats - fit new support straps, foam and upholstery covers. Repair/restore center console - finished all the repairs and cosmetic work necessary for the center console. Ordered a 240SX shift boot ring which is the last piece I need to install the center console. Test gas tank for leaks - Put two gallons of gas in the tank a few days ago, and no leaks so far. Find source of the electrical short circuit in the windshield wiper circuit Found it with @SteveJ help. I pulled out all of the seat parts and made room on my work areas to get started. Interestingly, the old seat head rests are much harder than the new seat foam. I feels and sounds like there is some kind of core which is inside the foam of the original headrests. Also, originally they were separate parts from the seat back foam. I will take pics and show the differences. I've been searching for "rivets" that have large heads like the originals. I have found a couple of options on McMaster-Carr. Once I have suitable rivets in my possession, I can start on the seats.
  9. I was restoring a bunch of inspection lights and all needed new lens. I contacted 240Zrubberparts to see if I could get a quantity discount. He asked if I wanted "crystal clear" lens and without thinking I said yes instead of specifying opaque. So... I have a bunch of lights that do not look like OE and I occasionally gift them to friends.
Remove Ads

Important Information

By using this site, you agree to our Privacy Policy and Guidelines. We have placed cookies on your device to help make this website better. You can adjust your cookie settings, otherwise we'll assume you're okay to continue.

Configure browser push notifications

Chrome (Android)
  1. Tap the lock icon next to the address bar.
  2. Tap Permissions → Notifications.
  3. Adjust your preference.
Chrome (Desktop)
  1. Click the padlock icon in the address bar.
  2. Select Site settings.
  3. Find Notifications and adjust your preference.