Leaderboard
-
conedodger
Free Member7Points12,640Posts -
inline6
 Subscriber
 3Points1,301Posts
 -
grannyknot
Free Member3Points5,158Posts -
.JPG.cfcada9cf1c1b502df3f5f2f2ca3ff36.JPG)
SteveJ
Free Member2Points9,683Posts


Popular Content
Showing content with the highest reputation on 07/31/2024 in all areas
-
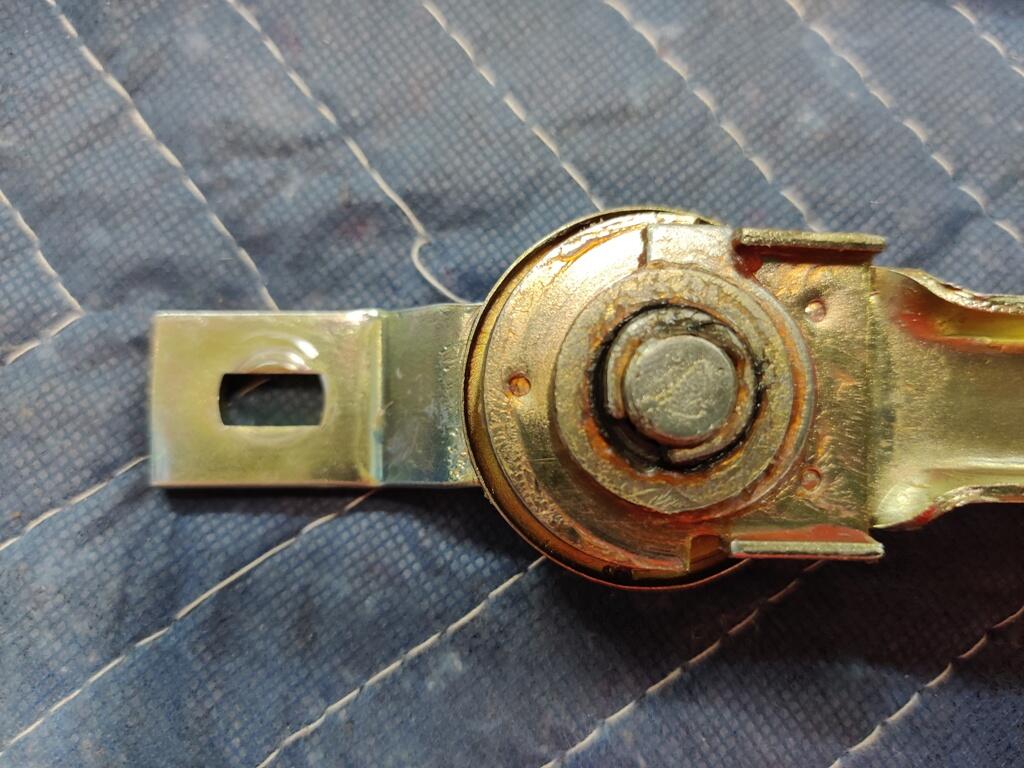
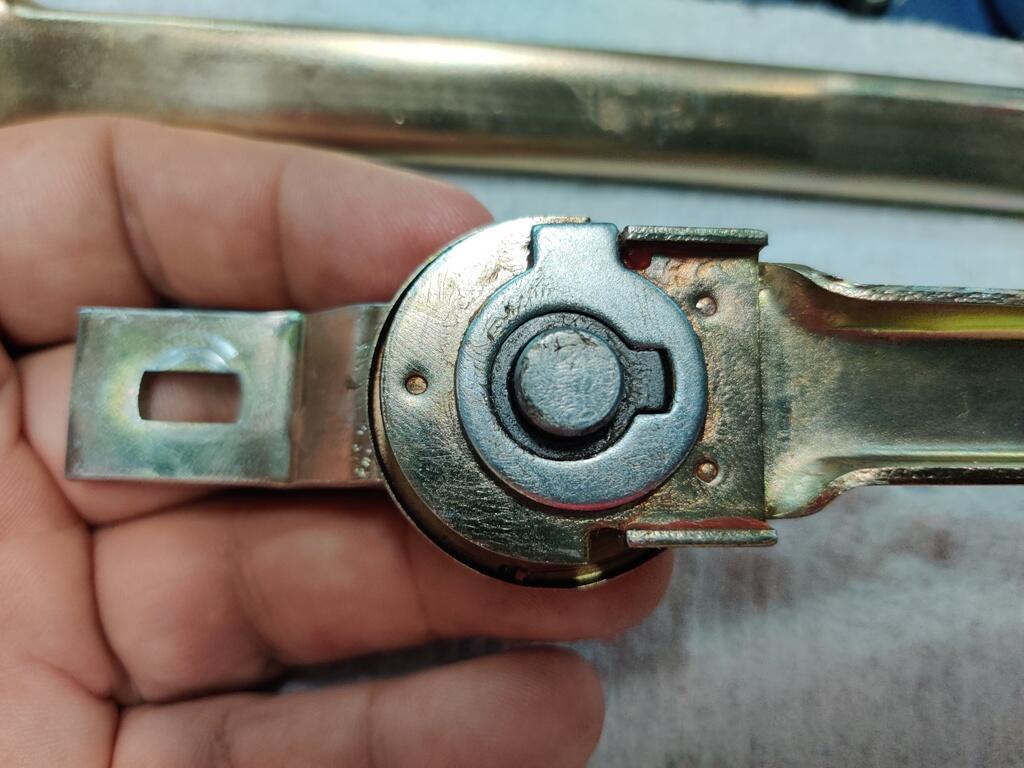
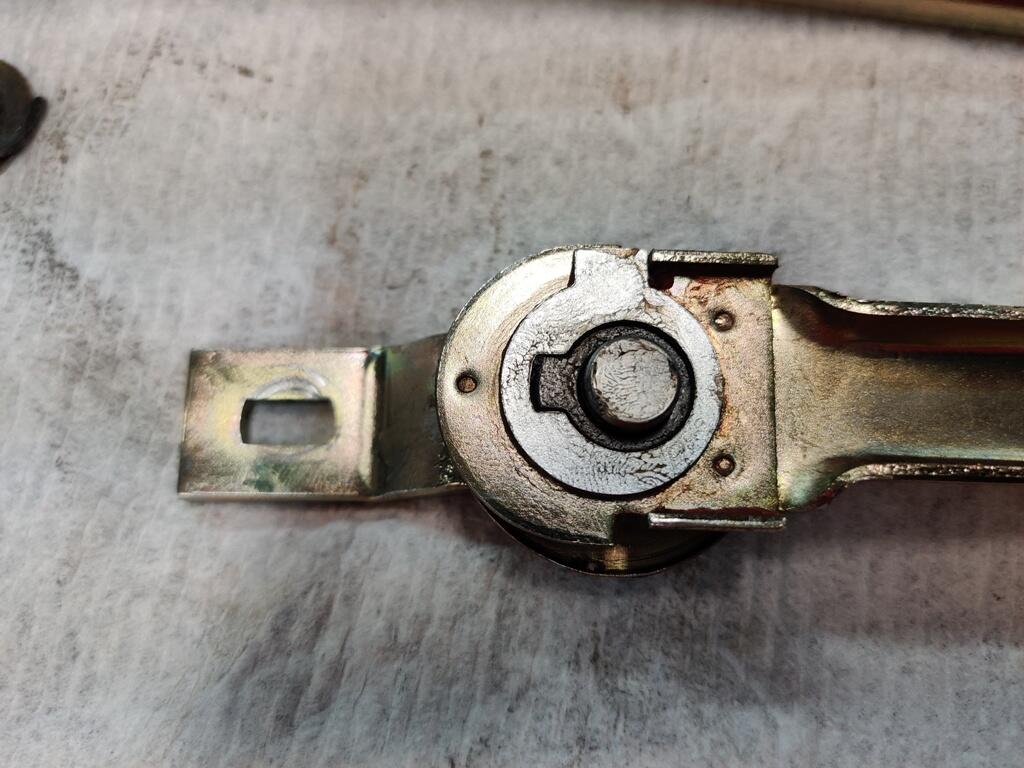
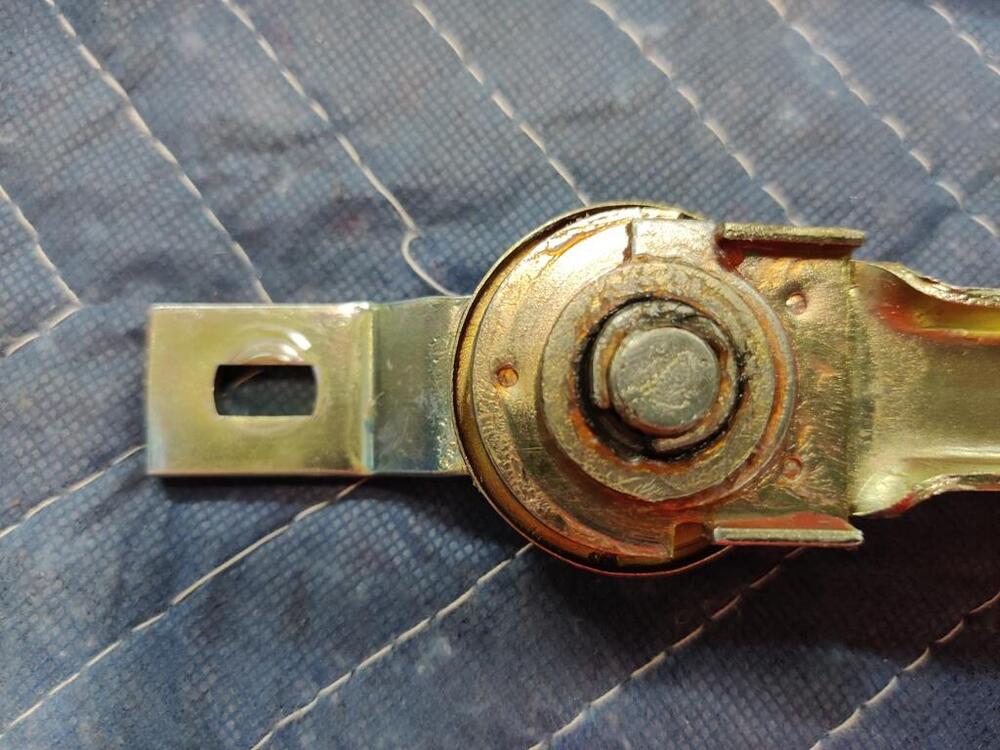
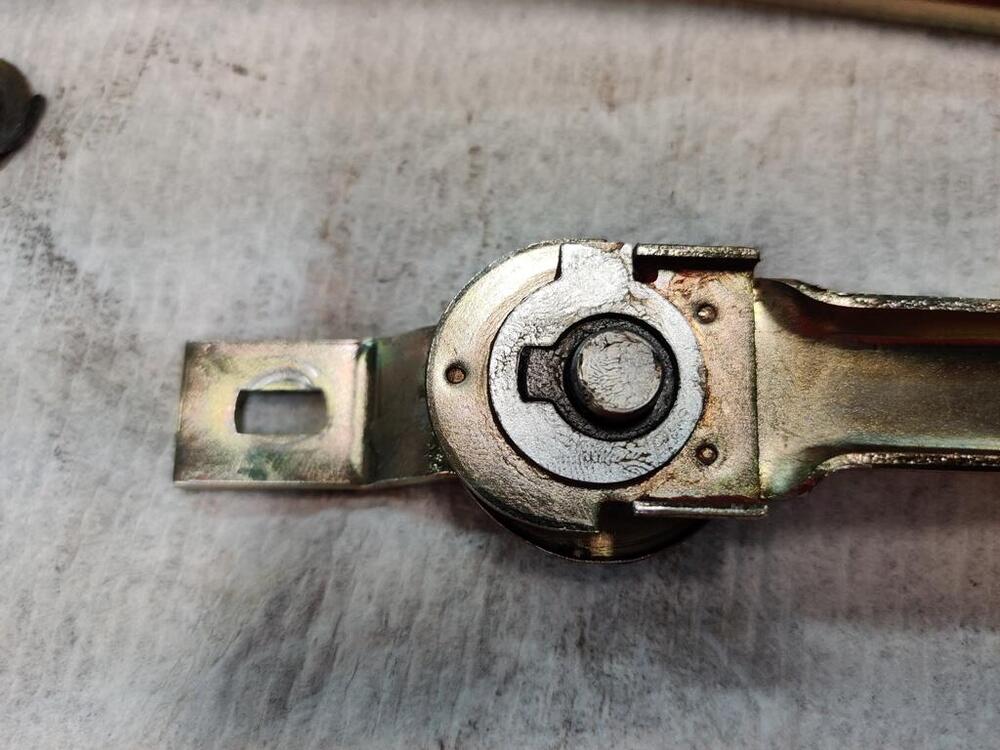
From my list: Machine shop to remove a small amount of material from the left side flange of the differential - need to put the stock pinion shim back in and then check back lash with original side shims in their respective places. Then check backlash again after moving the one left shim to the right side. Compare the difference and estimate amount to have removed from left side flange, given side shim sizes available. Send driveshaft off for balancing, but... I have to put the differential in car and check drive shaft fit first. I may need to remove some of the shielding on either the rear of the transmission or the driveshaft. Tell Snake Oyl to proceed with the restoration of the seat belts I sent them in June even if reproduction date tags cannot be sourced (they have delayed for weeks because they haven't been able to confirm that they can get the tags from "their vendor". They will be able to get the labels. Cashier's check and additional parts are going out via UPS to them tomorrow. Buy carpet in bulk (still have to decide which). Cut to fit the car and have local company put correct finished edging. Or, purchase Auto Custom Carpets, Inc. kit from RockAuto. I may purchase this kit for day to day use... and have a custom set of carpets for show. I Purchased an Essex pile version of the carpet set available from ACC (Auto Custom Carpets) https://www.rockauto.com/en/moreinfo.php?pk=6070062&cc=1209158&pt=1264&jsn=10419&optionchoice=1-A1168-0-1 Get gas door lock and ash tray grill chrome plated by local company - email with pictures of parts needing to be re-chromed sent to get quote Horns - these have to be re-plated before I can put them back together I also have the following fairly large lift items: Assemble the seats - fit new support straps, foam and upholstery covers. Repair/restore center console Test gas tank for leaks - source and install a new tank from S30 World if it leaks Find source of the electrical short circuit in the windshield wiper circuit Found it with @SteveJ help. So, some progress, but it still looks like I am going to run out of time to me. My windshield wipers were not parking as they should. They were parking higher than their range of sweep. That is not right. They are supposed to have a range of sweep that is higher than the park position. After reading related posts, I realized that I had not paid attention to the reassembly of some of the parts on the wiper linkage. In order for the linkage to park lower, the offset cam piece in the wiper linkage has to be in the position to make the linkage arm longer. Some pics: As found with the issue: cam/offset in the short position: cam/offset in the long position (note that you can see the edge of the of the back plate, and the linkage bar that attaches to the motor is extended to the left a bit more: After removing the clip and the top washer: After flipping the cam/washer piece with tang over - now with the tang at the top position, the link bar is in it's shorter length position. So the pic just above is CORRECT. This is the position of the washer with the tang when the motor is operating. When the motor reverses, the offset and tang will rotate 180 degrees. This will move the link bar to the "long" position which will extend the effective length of this arm just a touch. And it will result in a park position on the windshield where the wipers will be lower on the windshield than the normal sweep range. Also, I found that the best park position was set when the link bar (the piece that bolts to the back of the wiper motor shaft is in alignment as in these pictures. In other words, the ideal park position is achieved when the link bar is in perfect alignment with the long linkage bar it is attached to. Like this ------ -------. Not angled either up or down from the long bar, but simply a linear extension. I had to install the motor with the bag hanging off to the side so I could mess with the round cap on top of the motor that adjusts final resting location of the motor shaft. Then remove the motor again, put the bag on and reinstall the motor.


 3 points
 -
2 pointsSame here, I believe Precision changed their design on the door seals 4-5 yrs ago because I haven't seen a bad one in that time, they use to be really bad.2 points
-
1 pointSteve's website very often shows out of stock but he will make them on order. All of his parts are hand made here in the US1 point
-
1 pointSteve sells a kit for the mechanism. https://www.240zrubberparts.com/product-page/240z-lock-mechanism-set
 1 point
 -
Don't guess, remove the valve cover, install that forward bolt holding the thermo housing on, make sure there is space between the end of the bolt and the back of the chain guide. @Captain Obvious is right about the chain guide being steel, I'm mixing up BMW chain guides with Nissan guides. If the shavings you found in the pan are aluminum then they came from somewhere else and as mentioned above could have just been sitting in an oil passage and got blown out into the pan on first start up.1 point
-
1 pointI know this is contrarian here, but maybe I'm just lucky or the previous owner already compensated with the hinge and latch, but the Precision ones work great in my 71. I just put them on as part of all the work I'm doing and dont seem to have any issues with closure, lock operation, or the gaps in the seems.1 point
-
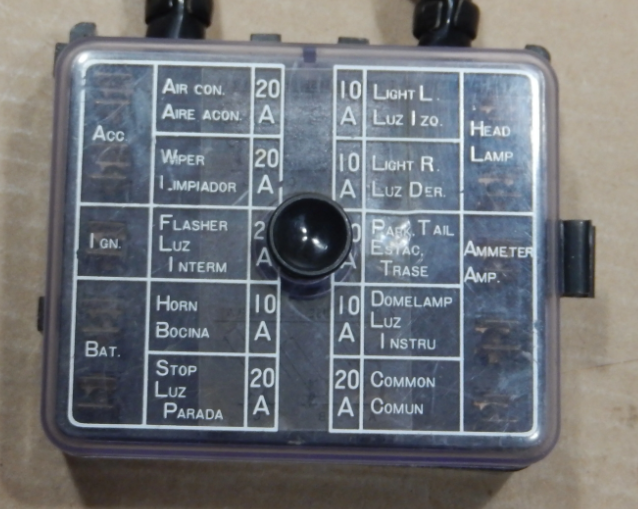
1 pointFuse box. If you don't have a cover on your fuse box, copy the picture below to your computer and consider printing it: Or this: What I see in your photo is that someone put on some butt splices to connect wires. Unfortunately some people hack into wiring harnesses like that. You could tap into another circuit, but since you don't seem to have much electrical knowledge, I suggest you don't. Most people don't know how to splice into existing circuits properly, and that causes more issues. It's kind of like the problem you have now. Amongst other problems you can create is that you could cause a fuse to blow more often if there is more of a load than the circuit was designed for. The First Rule of Holes: When you want to get out of a hole, the first thing you should do is stop digging. There are references in the downloads section that include a PDF of the factory service manual. The BE section has some good information on the electrical system. If I can remember, I'll also upload a clean scan of the wiring diagrams I did from my copy of the FSM. Diagnose the circuits. Do you know how to use an electrical meter? If not, find some Youtube videos to start learning. Today is a great day to learn something new. You don't have a bezel. Here's the bezel: https://zcardepot.com/products/map-lamp-light-bezel-240z?_pos=1&_sid=bd9927824&_ss=r My guess is that you're also missing the screws. https://zcardepot.com/products/map-light-bezel-screw-240z Keep posting photos with your questions. It does help in composing responses.
 1 point
 -
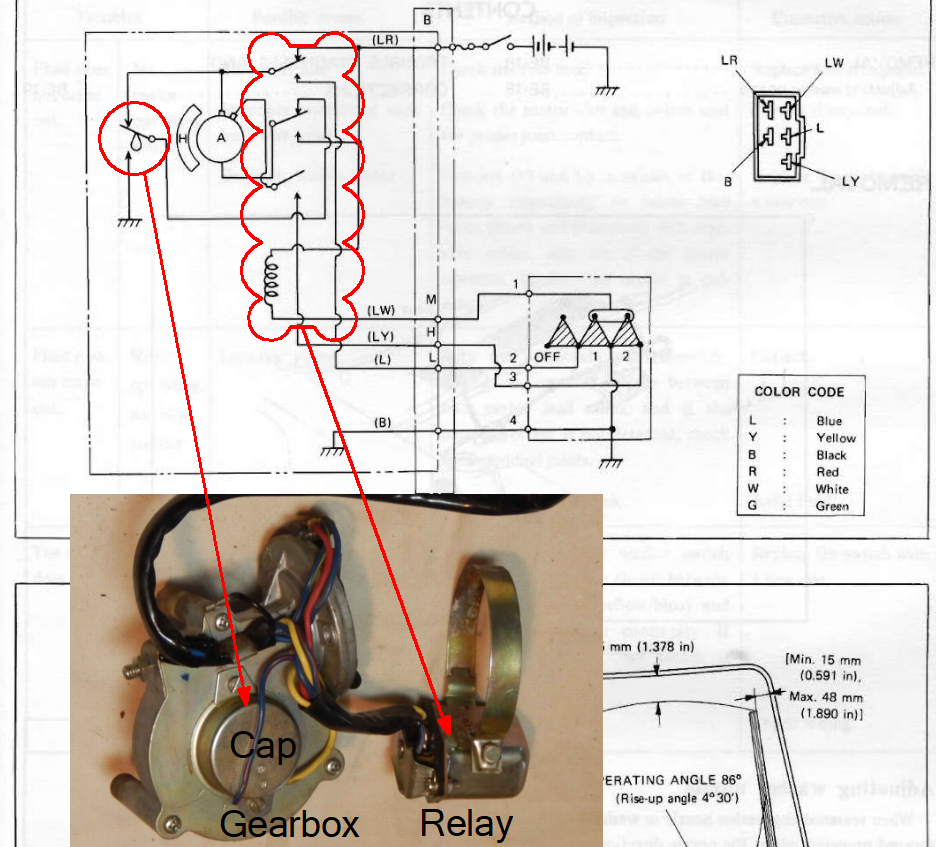
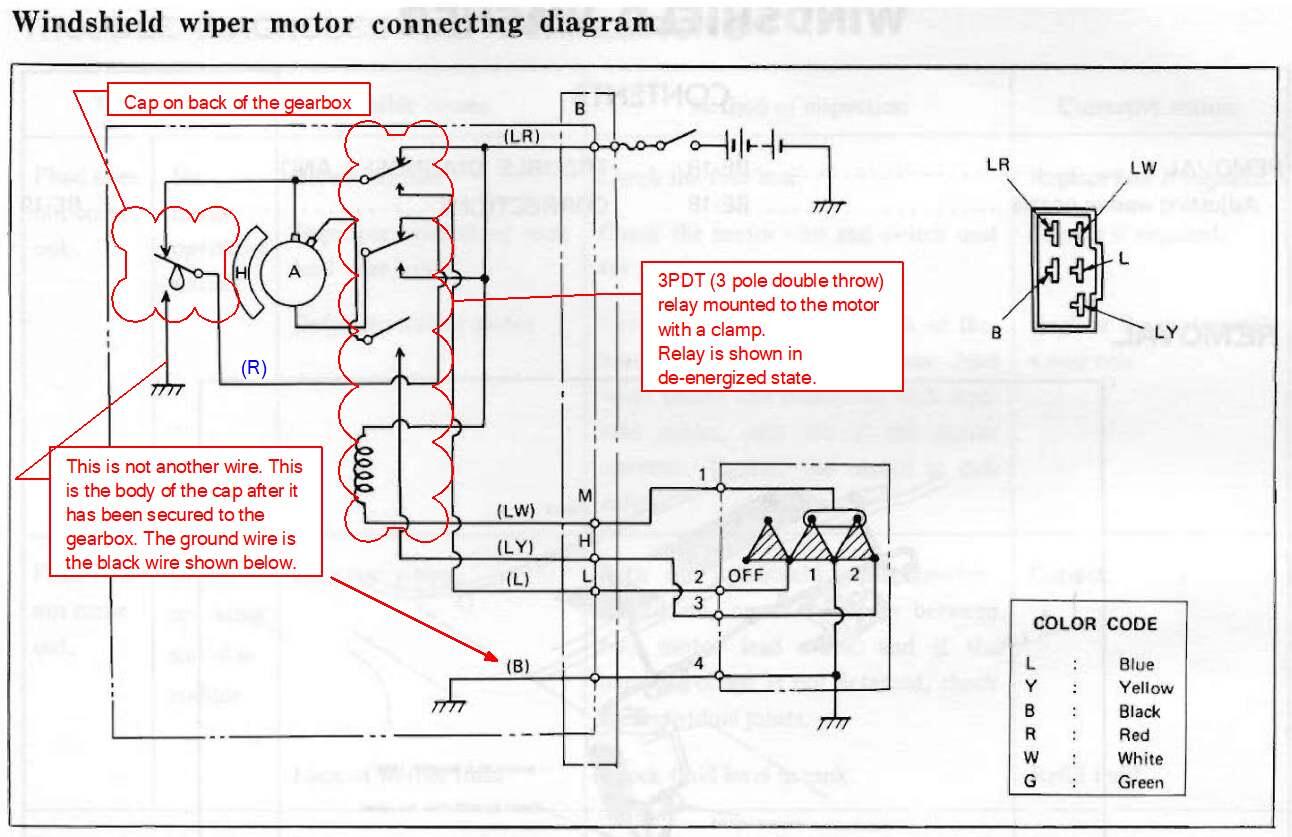
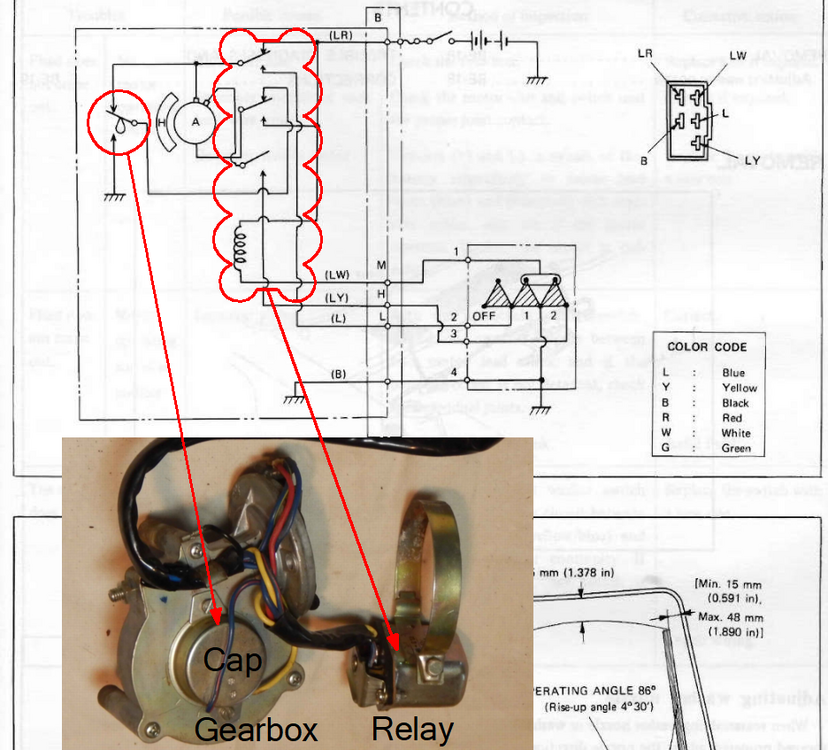
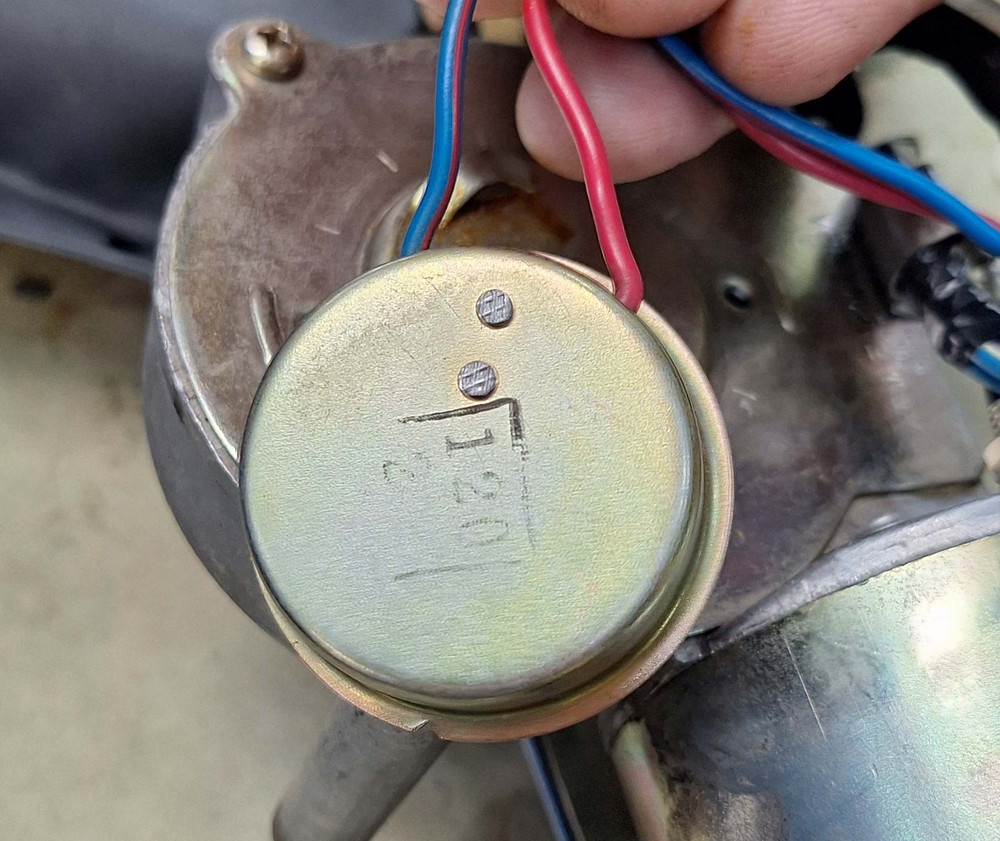
1 pointI recently visited with @inline6 to see if I could help him with an issue with his wiper motor. Though we thought we fixed it, my meter readings said we still had a problem. It turned out to be a self-inflicted issue that @Captain Obvious helped me to understand. Thanks to @inline6 finding an old thread (linked below) and @Captain Obvious getting me to focus on the diagram in the FSM, I was able to develop a better understanding of how the wiper circuit works. I hope I can convey it clearly in this thread. Anyway, here is the thread @inline6 found: Page BE-17 of the 72 FSM shows the wiper circuit, but it is confusing because it is a challenge to relate the diagram to the physical layout of the components. It also shows how the circuit is when the wipers are parked. The motor is not in the first photo, but the relay clamps to the motor, and the gearbox attaches to the motor. The relay is a 3-pole, double throw (3PDT) relay. In it's de-energized state, the contacts connect the motor to run in reverse for parking. The cap on the gearbox has a blue/red wire and red wire. The picture above is for a 73, but it was the clearest picture I could find. If you look carefully, you can see two rivets on the cap. On the other side of the cap, there is a set of contacts. These contacts allow the gearbox to break contact between the armature and ground when the wipers are parking. The gearbox has a wheel on the back with a raised area to push on the contacts. When the switch is turned on, the relay is energized. The blue arrows in the diagram below show going from the positive of the battery to the motor. The green lines show the contacts closed. The return path from the motor to ground depends upon the position of the wiper switch. If the switch is in low, follow the brown arrows. If the switch is in high, follow the red arrows. When you turn the switch off, the relay is de-energized. The contacts in the relay go back to the normally closed position. This reverses the power flow through the wiper motor. The motor keeps going until the wheel in the gearbox comes into contact with the contacts in the cap. At that point, the current return path for the motor armature is opened up. (Actually, both sides of the motor see the positive wire. This isn't an easy circuit to understand, especially if you've never taken a wiper motor apart.


 1 point