Leaderboard
-
Captain Obvious
Free Member10Points10,081Posts -
inline6
 Subscriber
 4Points1,282Posts
 -

dutchzcarguy
Free Member3Points2,677Posts -
Richard McDonel
Subscriber2Points381Posts


Popular Content
Showing content with the highest reputation on 06/28/2021 in all areas
-
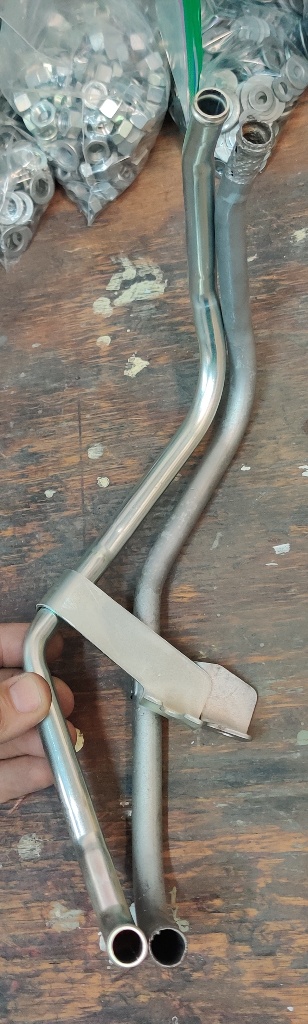
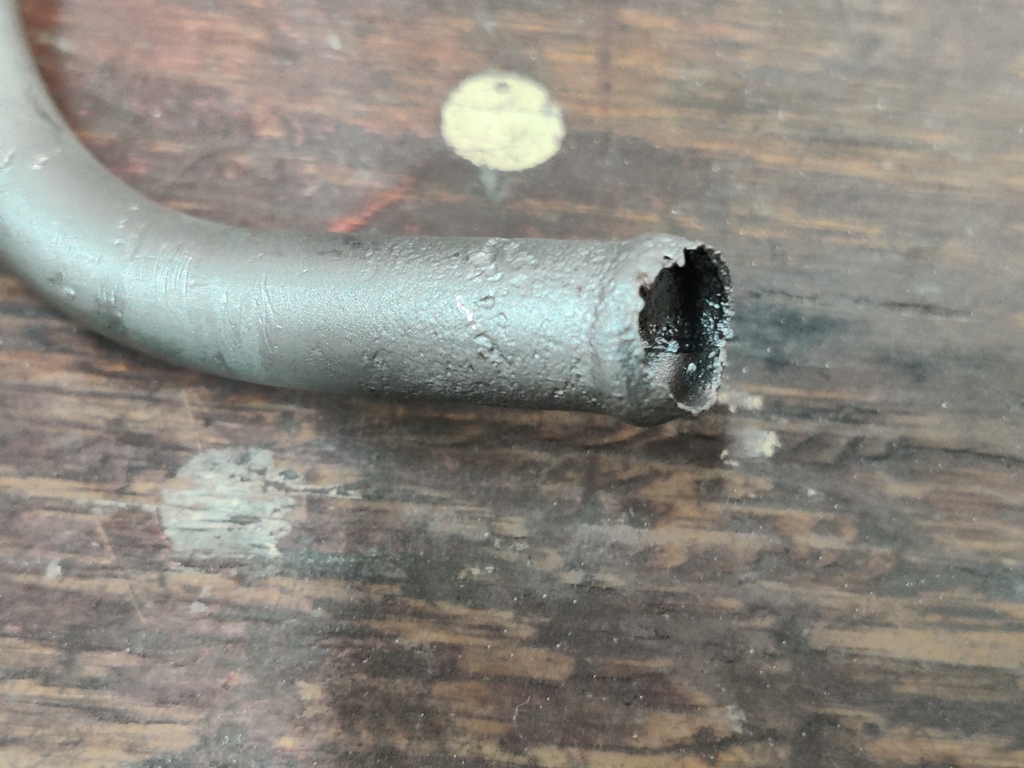
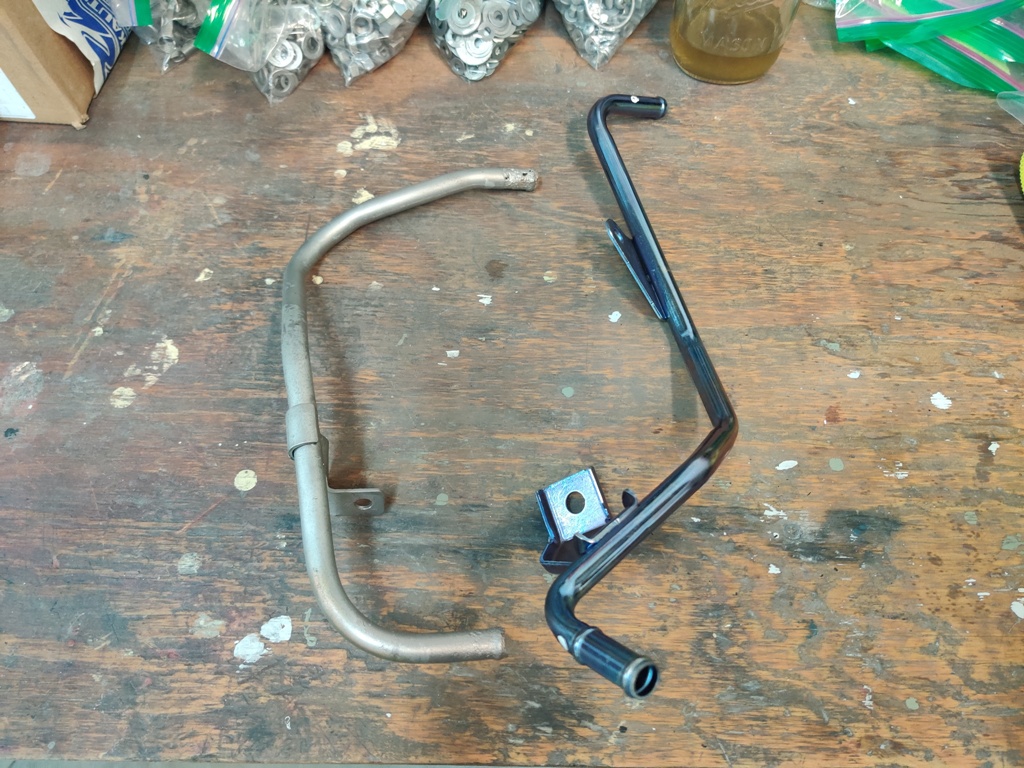
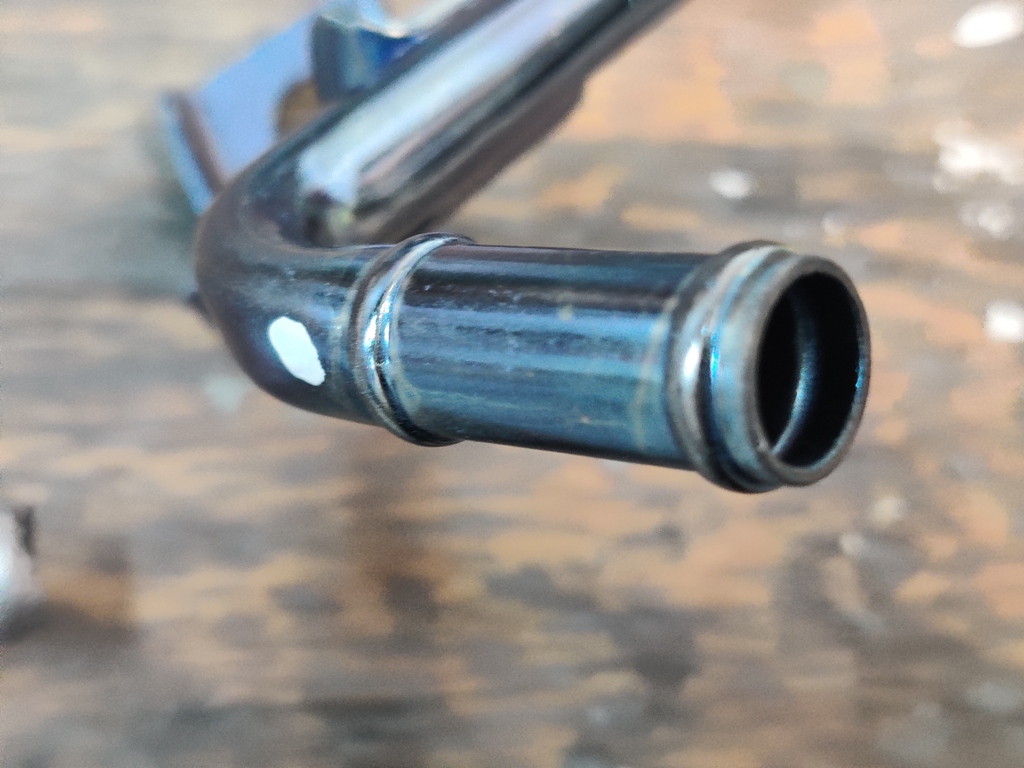
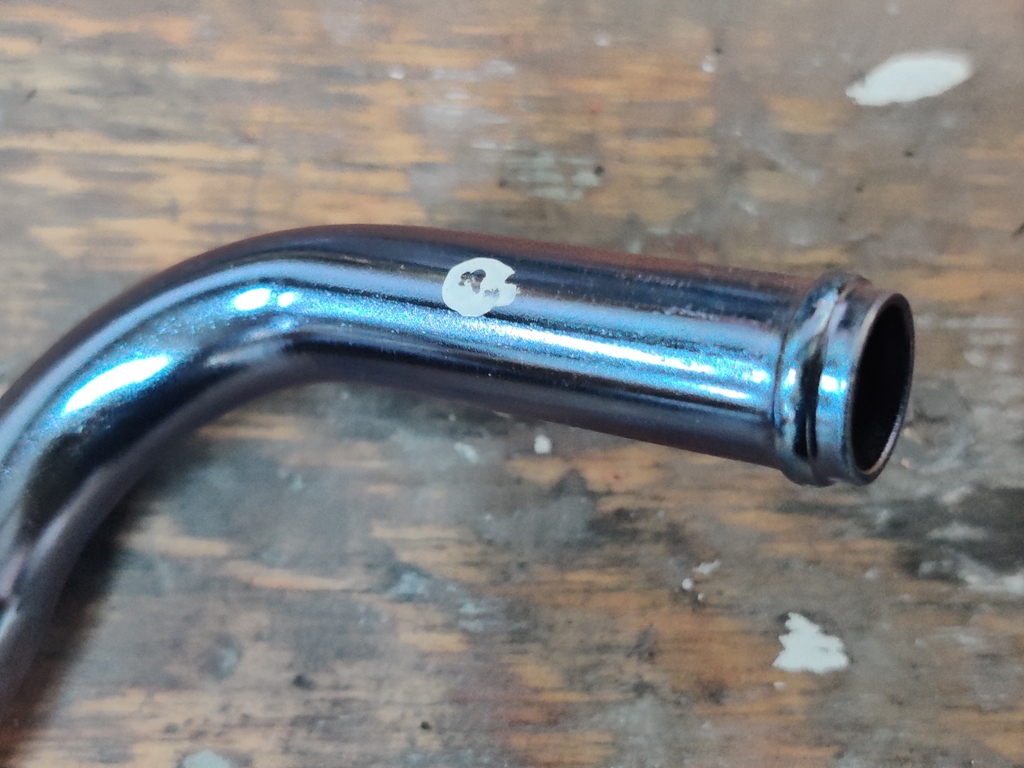
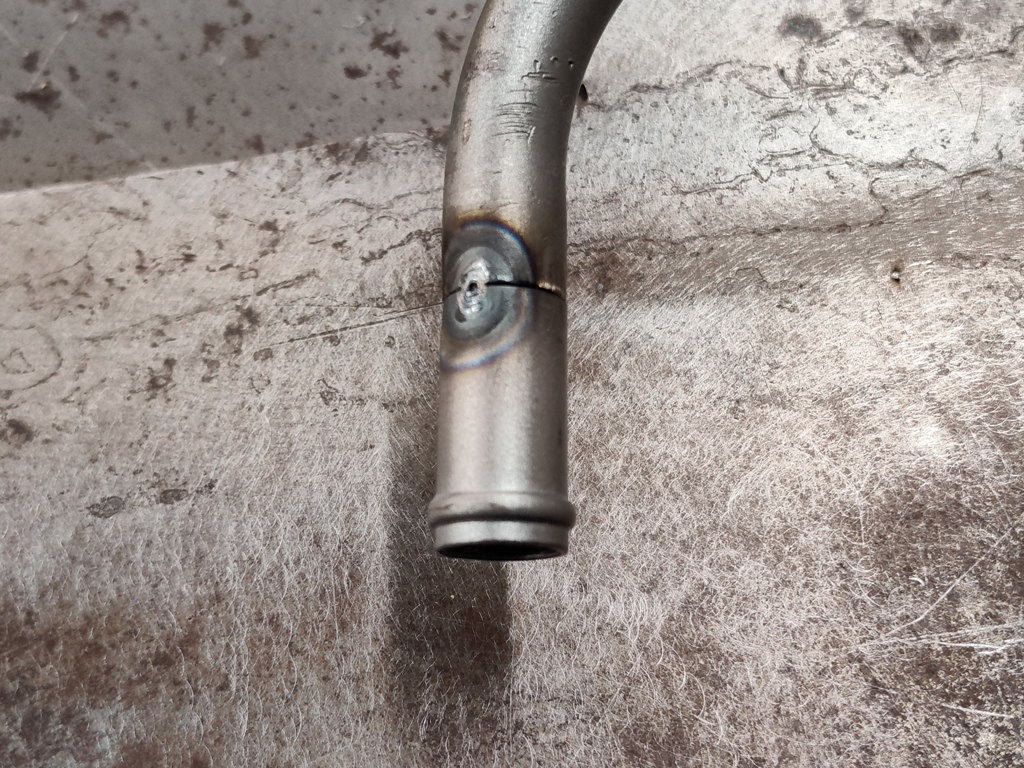
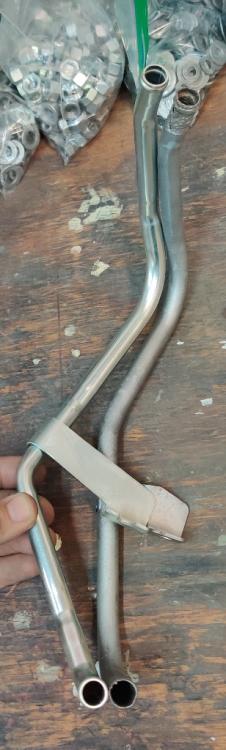
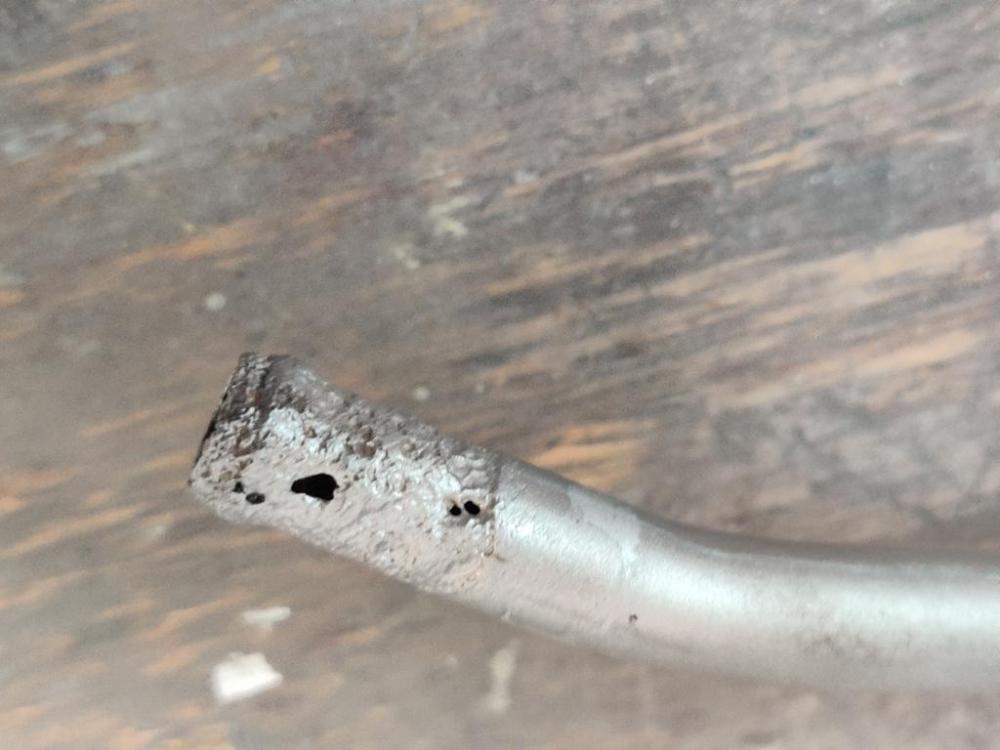
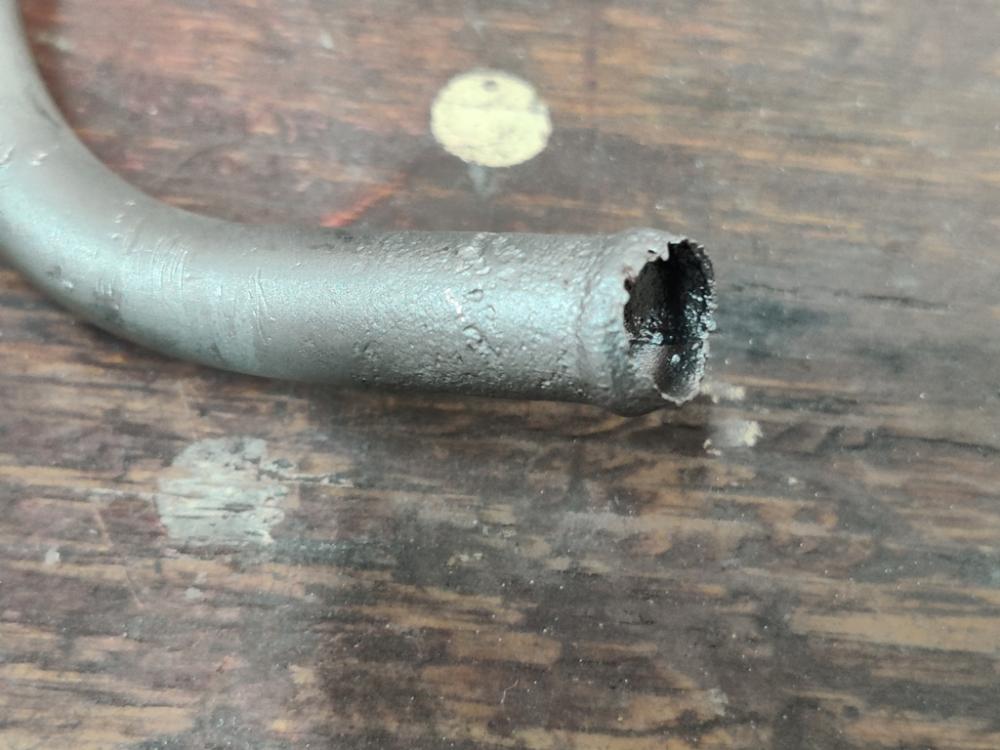
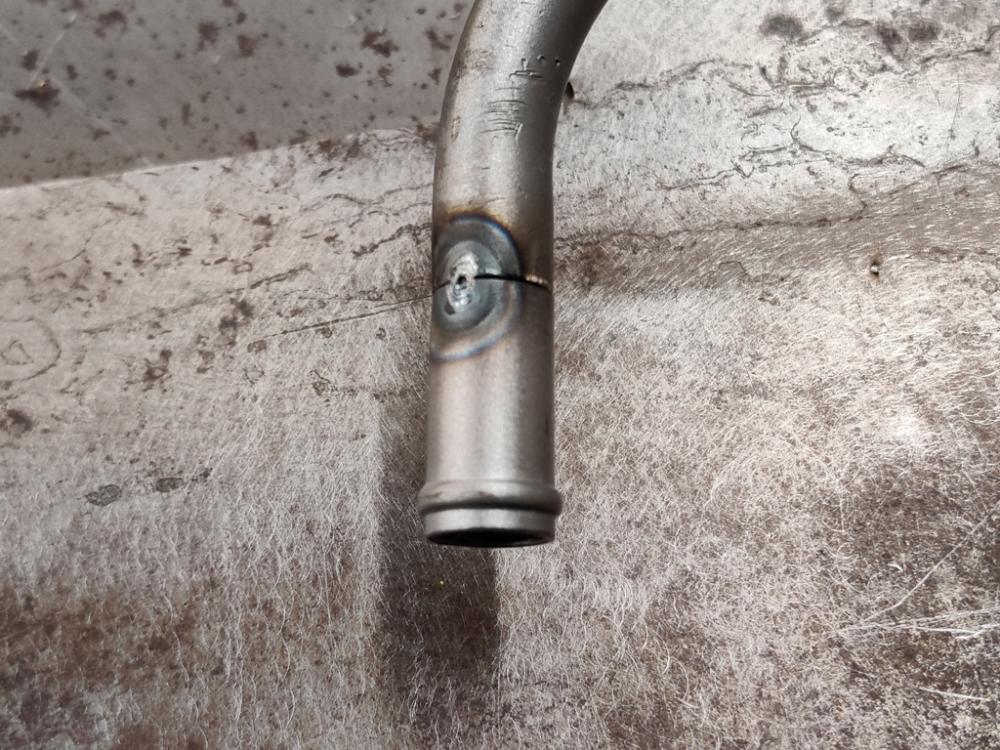
The work to prep the hardware for plating is laborious. Also, I have been trying to make sure I track down every last piece of hardware. The car was not fully assembled when I bought it, so trying to identify everything is difficult and time consuming. I am having some repeatable success with my hardware prepping process. Basically it involves bead blasting to strip, stainless media in the vibratory tumbler to remove the glass bead finish, and corn cobb metal with a metal polish in the vibratory tumbler to polish the parts followed by a Dremel tool with wire brush attachments and sometimes #0000 stainless steel wool to make the finish more consistent after the dremel wire wheels. I got a wire wheel attachment for my 8" bench grinder and gave that a shot for a few seconds. In addition to scaring me because I think it will take a body part off, it is way too aggressive for cleaning hardware. Oh well, only about $15 and will certainly come in handy for something. I thought I would share what I found out about the water pipe that goes around the back of the cylinder head. First, I bought the one that Motorsport sells. As you can see in the picture here, where I compare it to my original, it is quite different. The bracket is much taller. So the pipe is different to match. It would probably work, but I had an idea to fix my old one. Basically, the old pipe is in good condition except for the part where the hoses attached. Under the hose, the pipe corroded quite severely. Figuring that some modern Nissan would share a similar part, I went looking using image search on Google and came across a part that is not too expensive (about $25) that has what I need - good ends. It is a Nissan/INFINITI 14053-EA20B Engine Coolant Pipe (pictured on the right in the third pic here): It is the same diameter and has enough straight length for me to rob what I need off of it. I cut 25 mm off of each end and off of my old one. Then I decided to break in my Tig welder, which I bought 1 and half years ago - 😦. I know... right! Well, I finally overcame the trepidation of the learning curve and got it fired up. I practiced on the carcass of the new pipe for a bit and then managed to get two tack welds to hold one of the new ends on. I will practice some more on the sacrificed pipe before I finish weld the new ends onto my old one. I will test it for leaks of course. I think it will look really nice when I am done and have it prepped to be re-plated.


 4 points
 -
2 pointsMany months ago I posted a query on this forum. At the time I had two interior door panels in rough shape. They had been bought without door-latch holes and my attempts at cutting my own had failed - perhaps by 1/8 to 1/4 inch, but enough to make an ugly scene. My usual supplier, MSA, had new ones on back order for months, and I was becoming convinced they would ever have them. So I asked this forum for suggestions. ZKars and one or two others answered and referred me to Zcar Depot, a firm I had not previously dealt with. I called, and yes, they have them in stock; door latch openings pre-cut. Ordered a set. Have to say I was very impressed with the package. The panels were bagged in clear plastic, then perimeter-wrapped with thick straps of felt, then inserted is a form-fitting cardboard box. That box in turn was set in a slightly larger box, so four layers of protection altogether. Open it all up, and everything was good. It took me a while to get around to installing the panels - winter you understand, and my heated garage is occupied by my next project, and 1965 sprint car - but I finally did the job last month, and while the installation process is a time-consuming pain, the new panels fit perfectly and look sharp. Thanks to ZKars and others who steered me in the right direction. Richard2 points
-
2 pointsCrap. That's the wrong answer. Haha!! I was kinda hoping you re-booted it right away and it went back to normal. I think that would be easier to figure out. (Not easy, but easier? Maybe?) So I got nothing right now... I'll think about it and see what I can come up with? Or maybe someone will chime in with some uber-smart theories? Not temp related... Not vibration related... Not system voltage related......... I wonder if my thinking cap will fit under my aluminum foil deflector beanie.2 points
-
1 pointTo duplicate a post I made earlier on the UK site, I’ve been having a bit of fun doing back to back tests and learning about making YouTube videos - my kids want their own Minecraft channels, so I’m trying to learn with my version, I call it Zcraft! 😄 Ever wondered what an exhaust system would sound like on your car with different mufflers? I personally found that the internet was full small clips but very little in the way of back to back comparisons on the same car. Well, purely for your benefit, I sacrificed myself!!!! I will splice parts of these together one day when I get more time, so that the same bit is played back to back on one video. 1. Thrush / Dynamax 17715 Turbo Muffler (I had some SERIOUS hay-fever that day so forgive my lifeless voice). 2. Zstory Classic Muffler (forgive the jibe at you left-hookers) [ 3. Zstory JDM Muffler (forgive my boyish squeaking) 4. Zstory Street Muffler (forgive the camera mount that broke halfway through the clip). Let me know what you think and I hope it's helpful / fun. (To be very clear, I have no affiliation with Zstory nor is this commercial in anyway - it's just me having a bit of fun and sharing it with fellow enthusiasts!)1 point
-
1 pointOh gotcha, that makes sense. I'll give that a shot next time but this literally happens every few months so it may be a while before I'm able to test that theory.1 point
-
1 pointThe engine should already be running. Let me try again to explain. Next time the car starts and you notice this lean-boot condition. Let it run, but while it's running, pop the hood, get out of the car, and disconnect the small black/yellow wire from the starter solenoid. Then get back in the car (all with the engine still running), and turn the key to START. The engine will already be running (because you never shut it off), but the starter will not engage since you have that wire pulled off the starter. Flick the key between ON and START and see if it drops out of lean boot and into regular running mode. Does that make sense? You can drive like that with the starter wire disconnected, but just remember that when you shut the car off, you'll need to reconnect the starter wire to get the car to start again.1 point
-
1 pointI fought a balance problem in one of the three shafts some years back. Ultimately, I found that the half shafts don't spin fast enough to create a vibration. My vibration was in the prop shaft. It spins 3 - 4 time faster than the half shafts.1 point
-
1 pointOK. I had a couple goofy ideas. First thing... The original EFI systems were fully analog and there were no computers used. But then some time along the way (early eighties), they started putting embedded microprocessors in the ECU's and using software to do the control instead of analog voodoo. Why does that matter to me? Because if it's got a microprocessor doing the control, then this kind of latching behavior would be easier to explain. So I know your Z is a 78, which should be fully analog, but do you know for sure? Have you ever had the cover off the ECU? Got any pics? Second thing... There's a circuit inside the ECU that is supposed to provide a little extra richness boost immediately after starting the engine, and that extra richness gradually tapers off (30 seconds or so) after the key is released. Maybe that section of the circuit is not functioning correctly, or maybe that circuit is being fooled into thinking that the key is always in the START position. When you turn the key to START, a couple things are supposed to happen: The starter engages (duh) The floor temp lamp light is supposed to light up (lamp test for CA models only) The cold start injector gets the opportunity to spray (depends on how warm the thermotime switch is) The ECU get's the signal to begin the START enrichment boost So here's what I'm thinking... Next time the car lean boots, try this: 1) WHILE THE ENGINE IS RUNNING, pop the hood and disconnect the small Black/Yellow wire going to the starter. 2) Turn the key to START again with the engine still running in lean-boot. Don't worry... With the B/Y wire disconnected, the starter will not engage because you have removed it's signal to engage. But all the other "harmless" functions will be activated. The floor lamp should light up, the cold start injector should give a squirt (if it's cold enough), and the ECU should get a fresh "START" signal. The idea is that you can flick the key between ON and START a couple times to see what happens to your mixture readings. See if your lean boot symptom goes away without having to shut the car off completely? Maybe it'll go away with just a flick of the START signal. Like I said, I'm just throwing some stuff out there!1 point
-
3 pages about a horn not working.. Does the Horn make Horny sounds yet? 😉 Get a good battery, it uses a lot of juice!1 point
-
1 pointGotcha. I'll think about it, and the meantime, let's hope someone else knows exactly what's going on!1 point
-
That will show up on a clear tube wet test if he uses the fuel pump to fill the bowls.1 point
-
1 pointI had a customer who bought an old 4x4 Ford explorer. He took the rear driver shaft and connected it to a generator. He could run his whole house off of it. He could move it around using the front drive of the 4x4. It made a really discreet quiet generator!1 point
-
18 Jan 2012 - Epilog My former 240Z was picked up by the transport company on 31 October 2011. It was crated and staged in Long Beach, California until 30 November 2011, when it sailed for Norway. It was unloaded in Oslo on 9 January 2012, and picked up by its new owner on 11 January 2012. Congratulations, Terje! You've got a nice car, and I'm confident that it will lead a pampered life from here on.
 1 point
 -
0 points
-
0 points13 Sep 2011 - The Final Chapter? Not much more to say. The 240Z was offered for sale in September of 2011.0 points