Leaderboard
-
conedodger
Free Member6Points12,513Posts -

siteunseen
Free Member5Points15,115Posts -
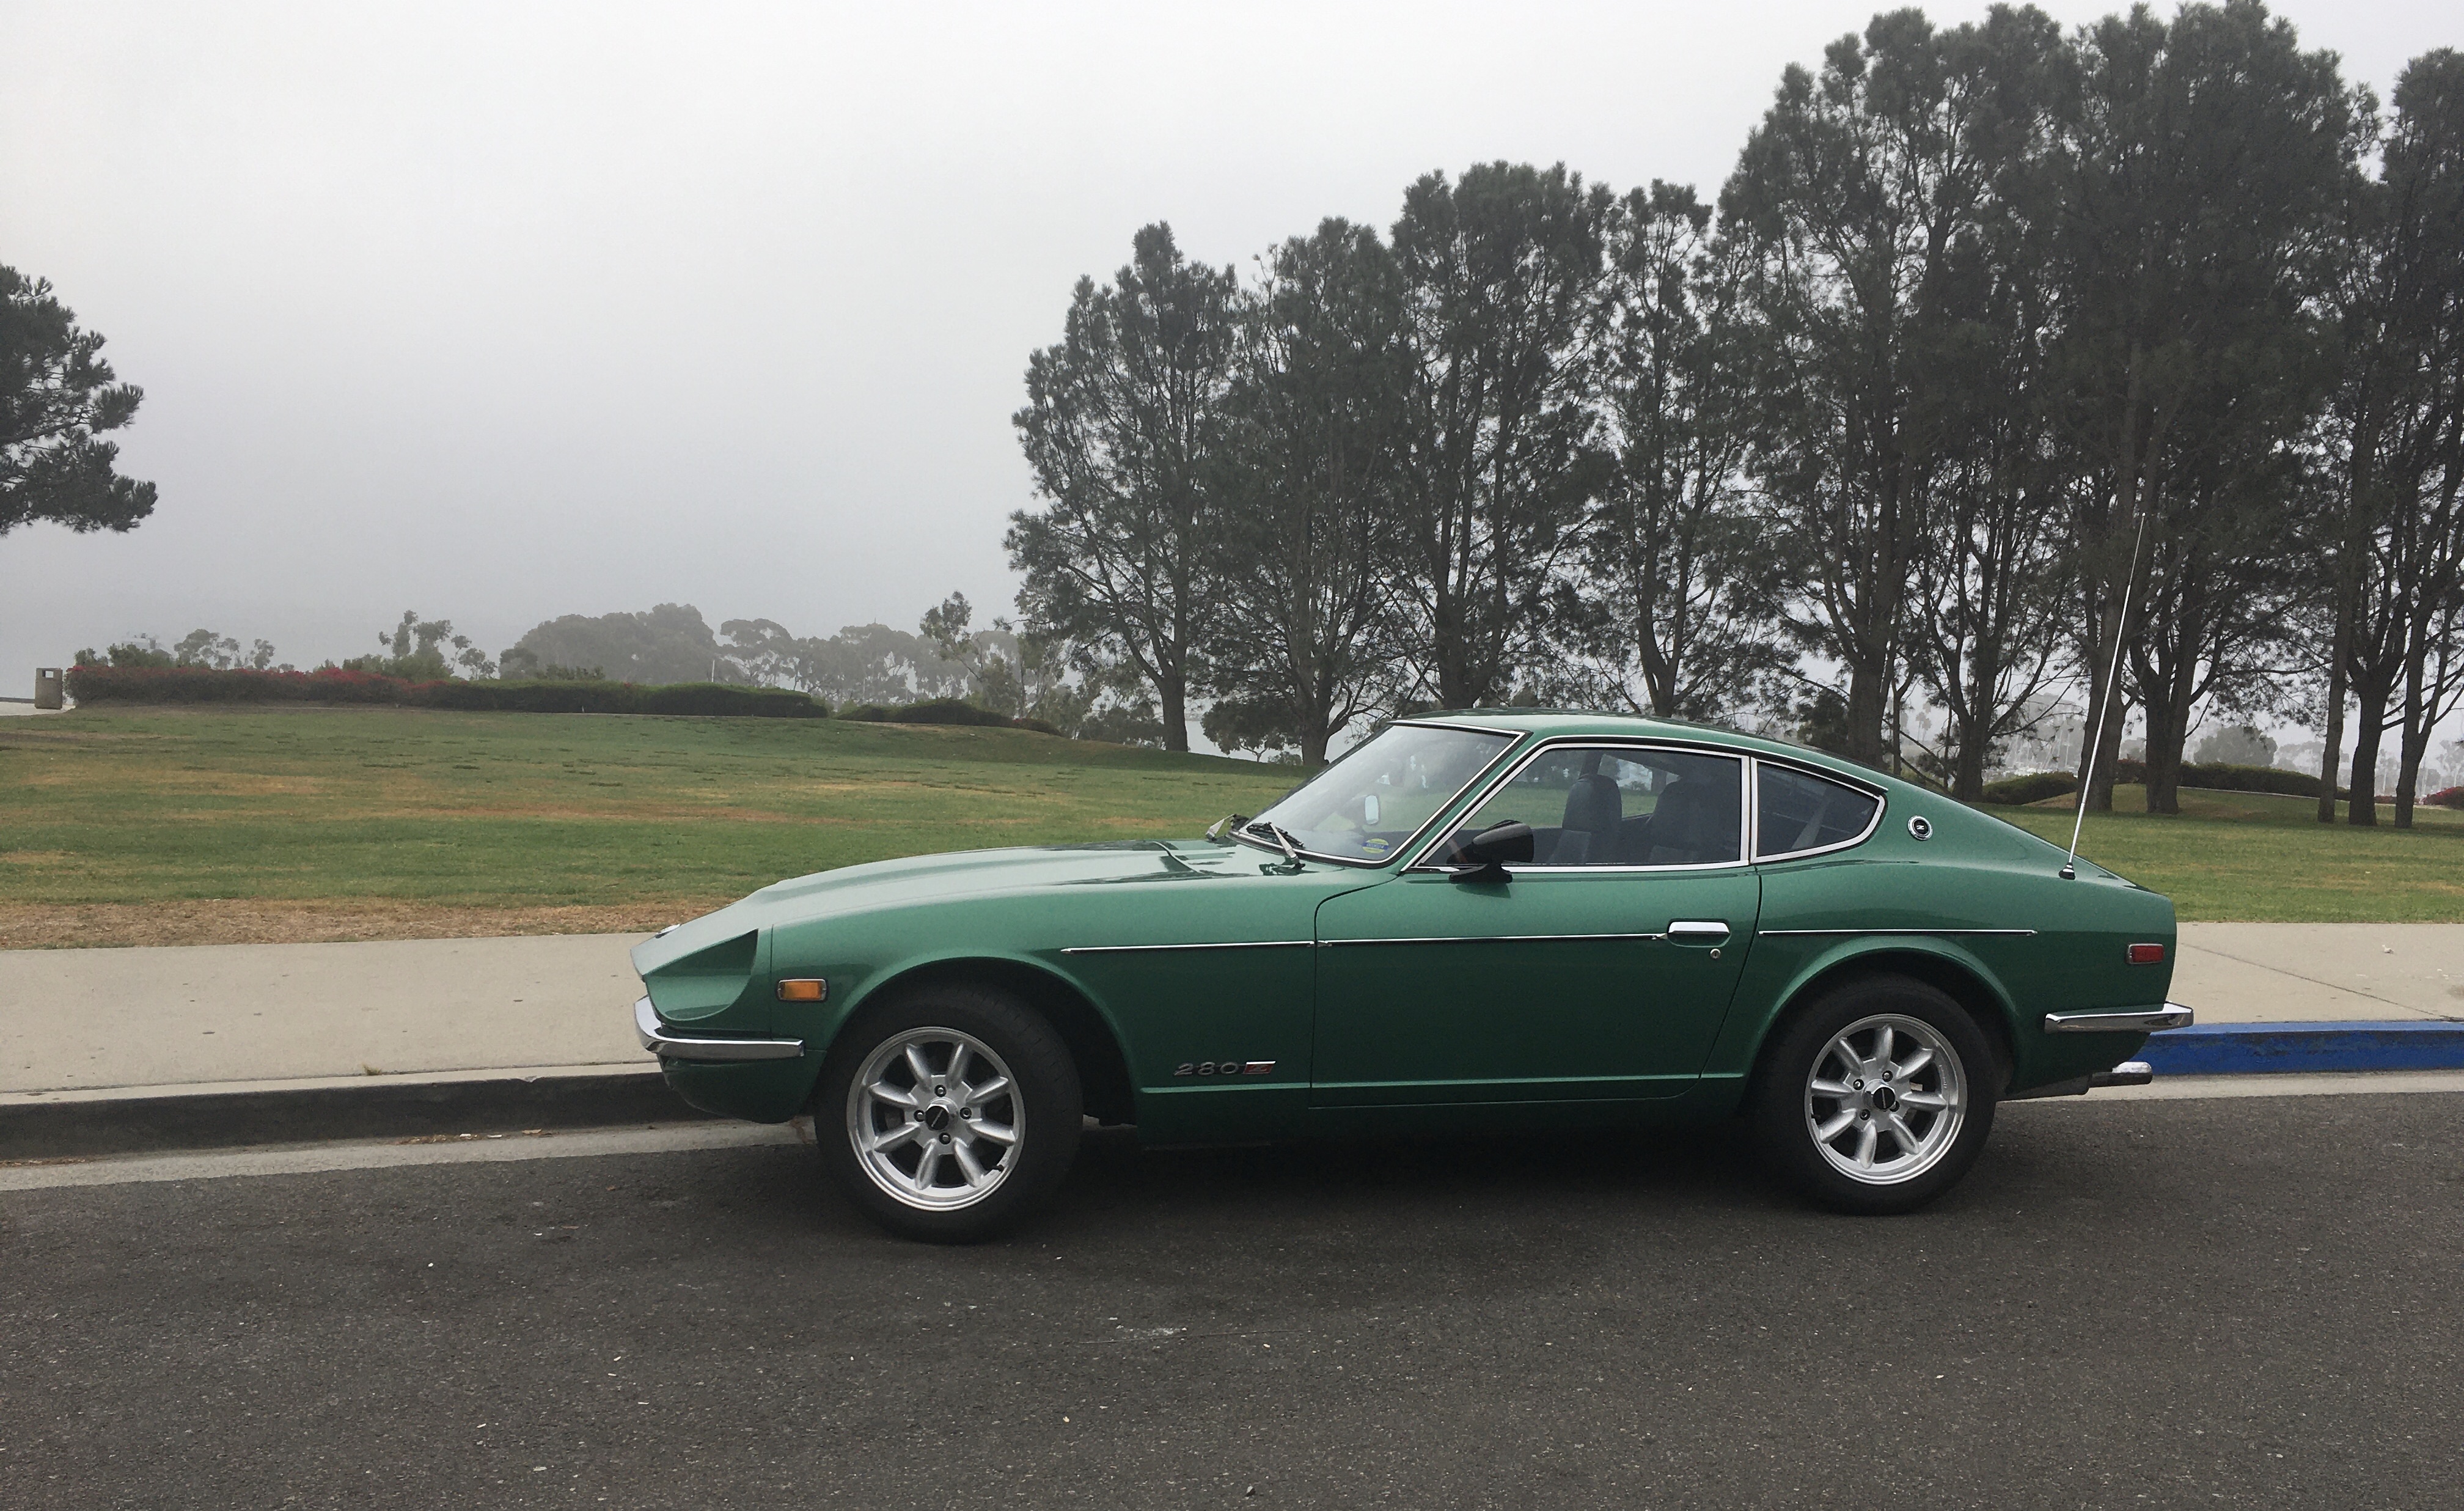
SoCalJim
Free Member4Points324Posts -
timsz
 Subscriber
 2Points293Posts


Popular Content
Showing content with the highest reputation on 07/27/2018 in Posts
-
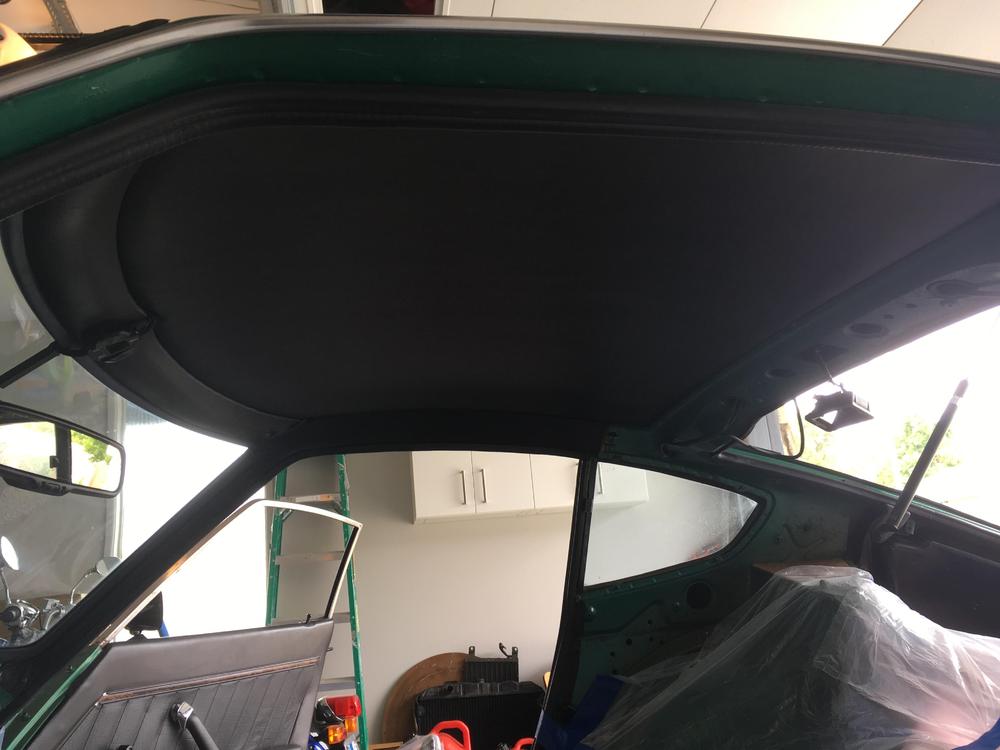
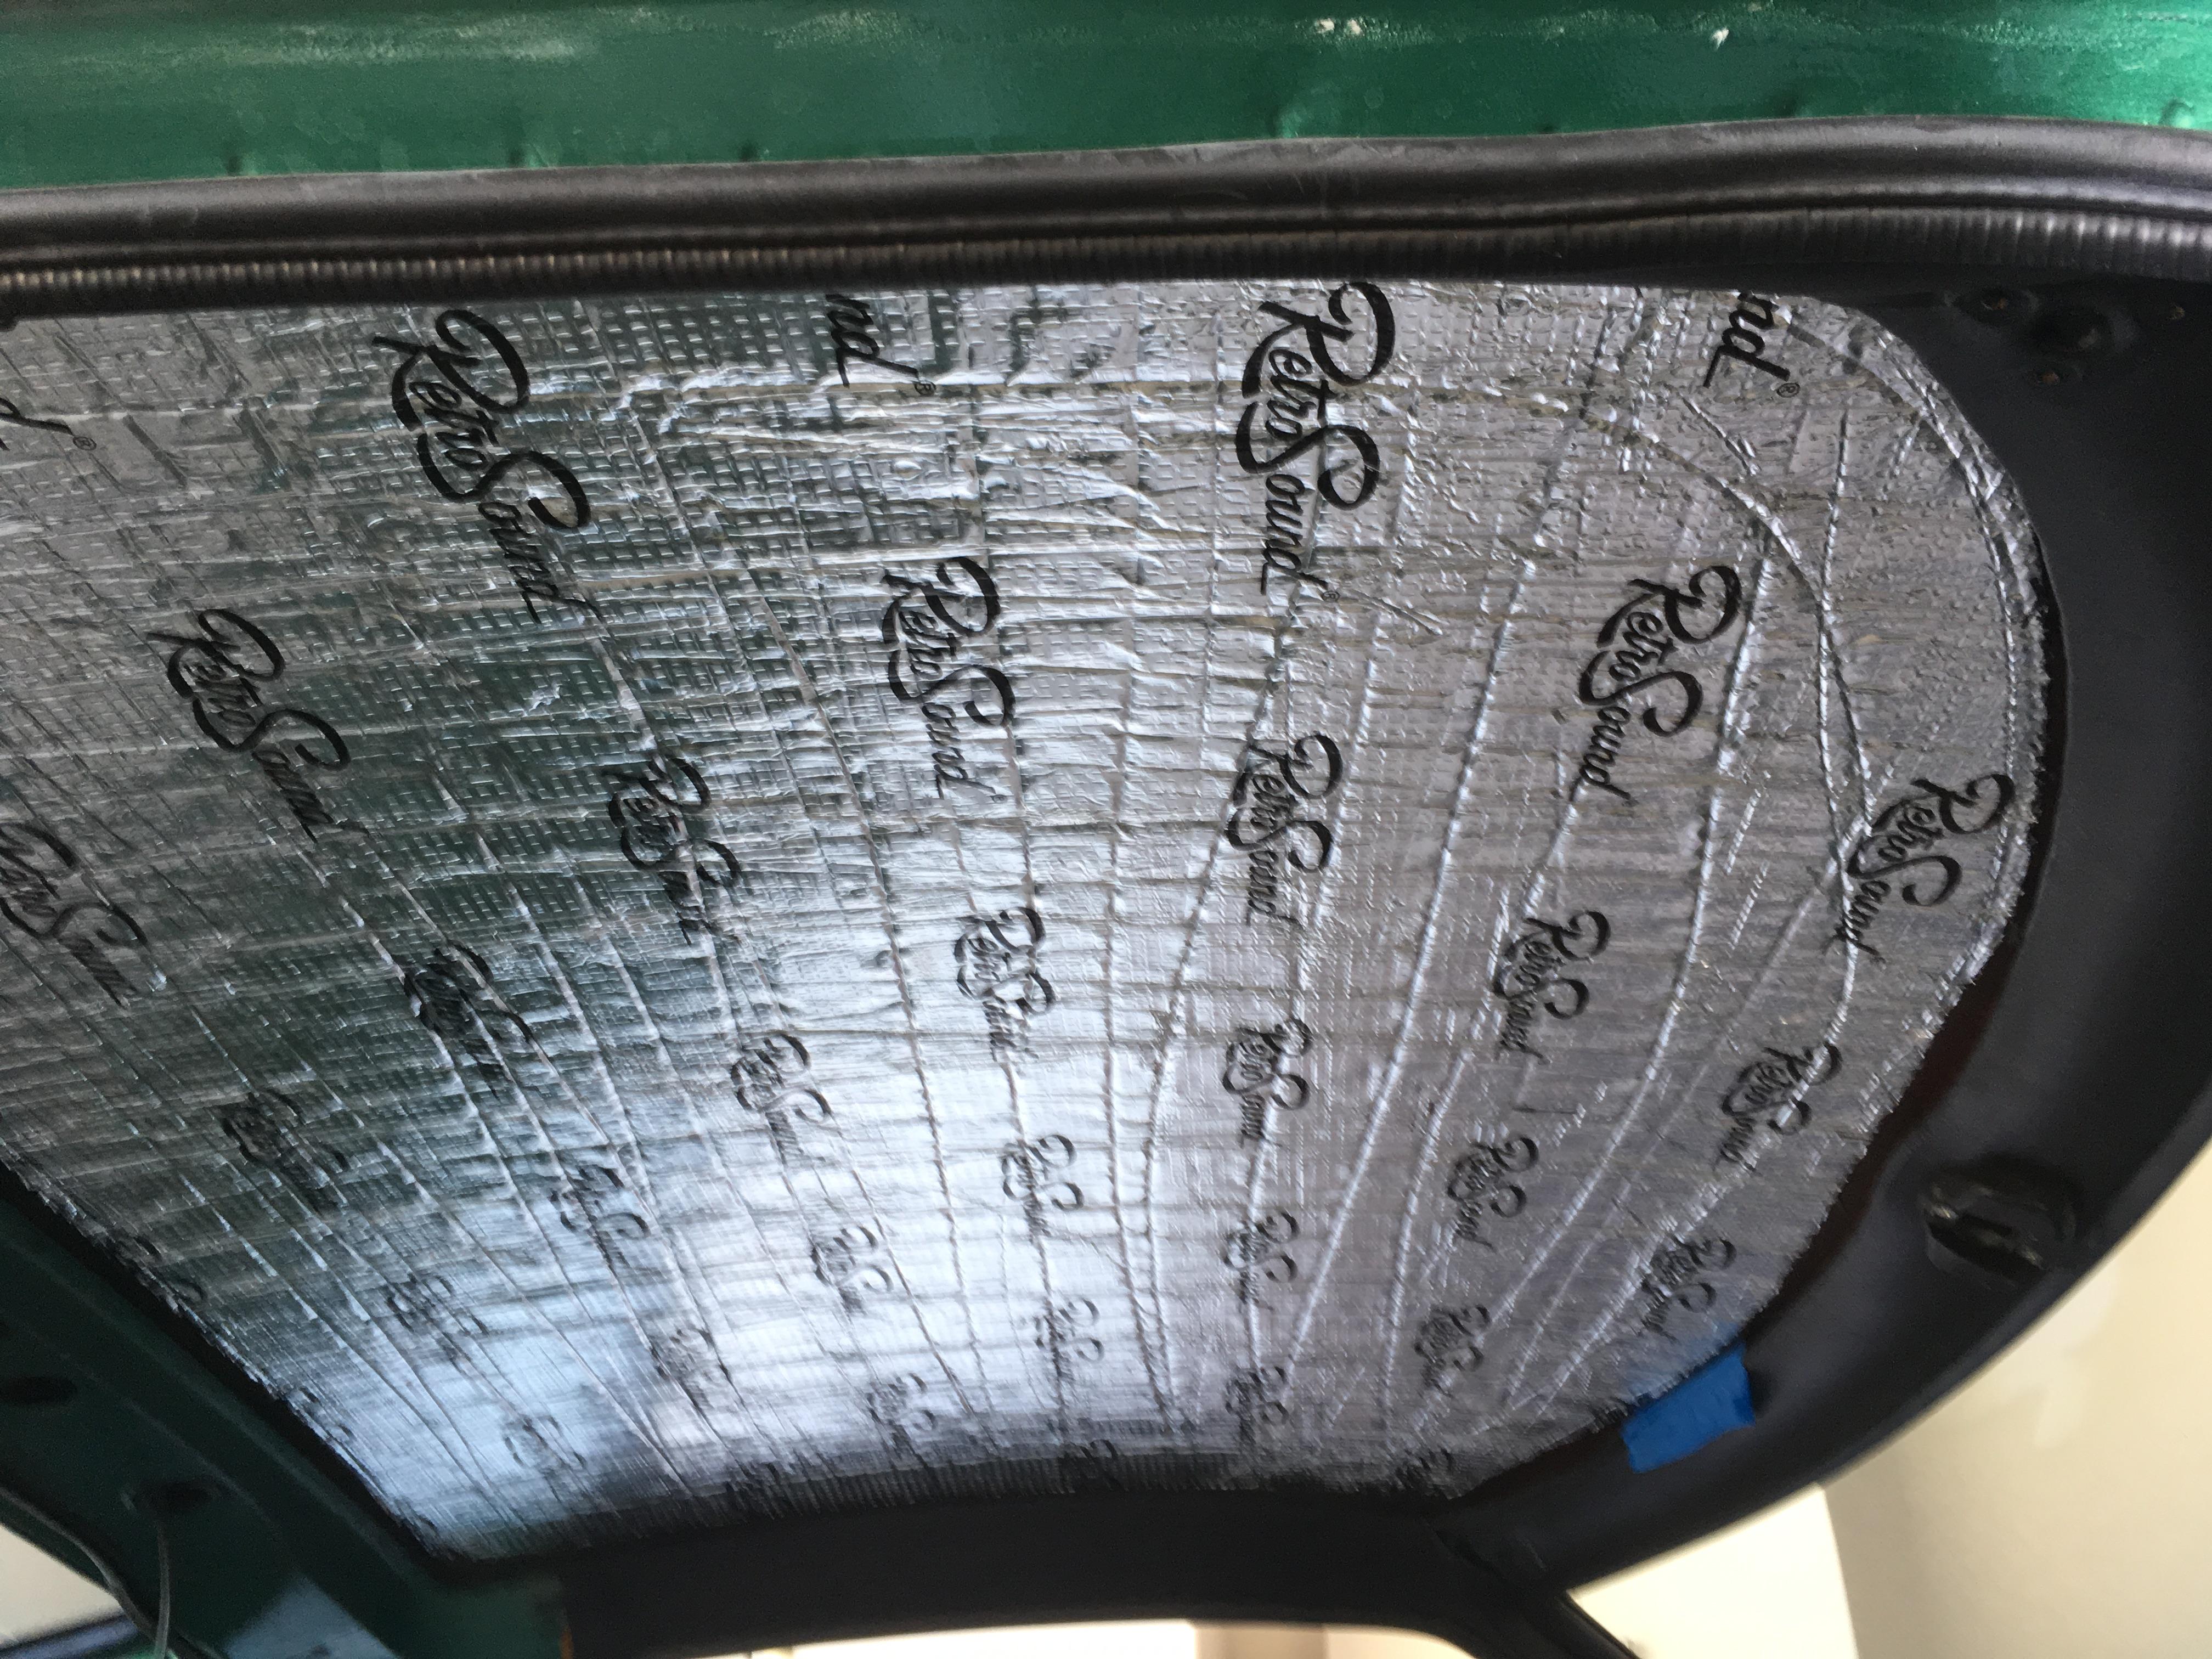
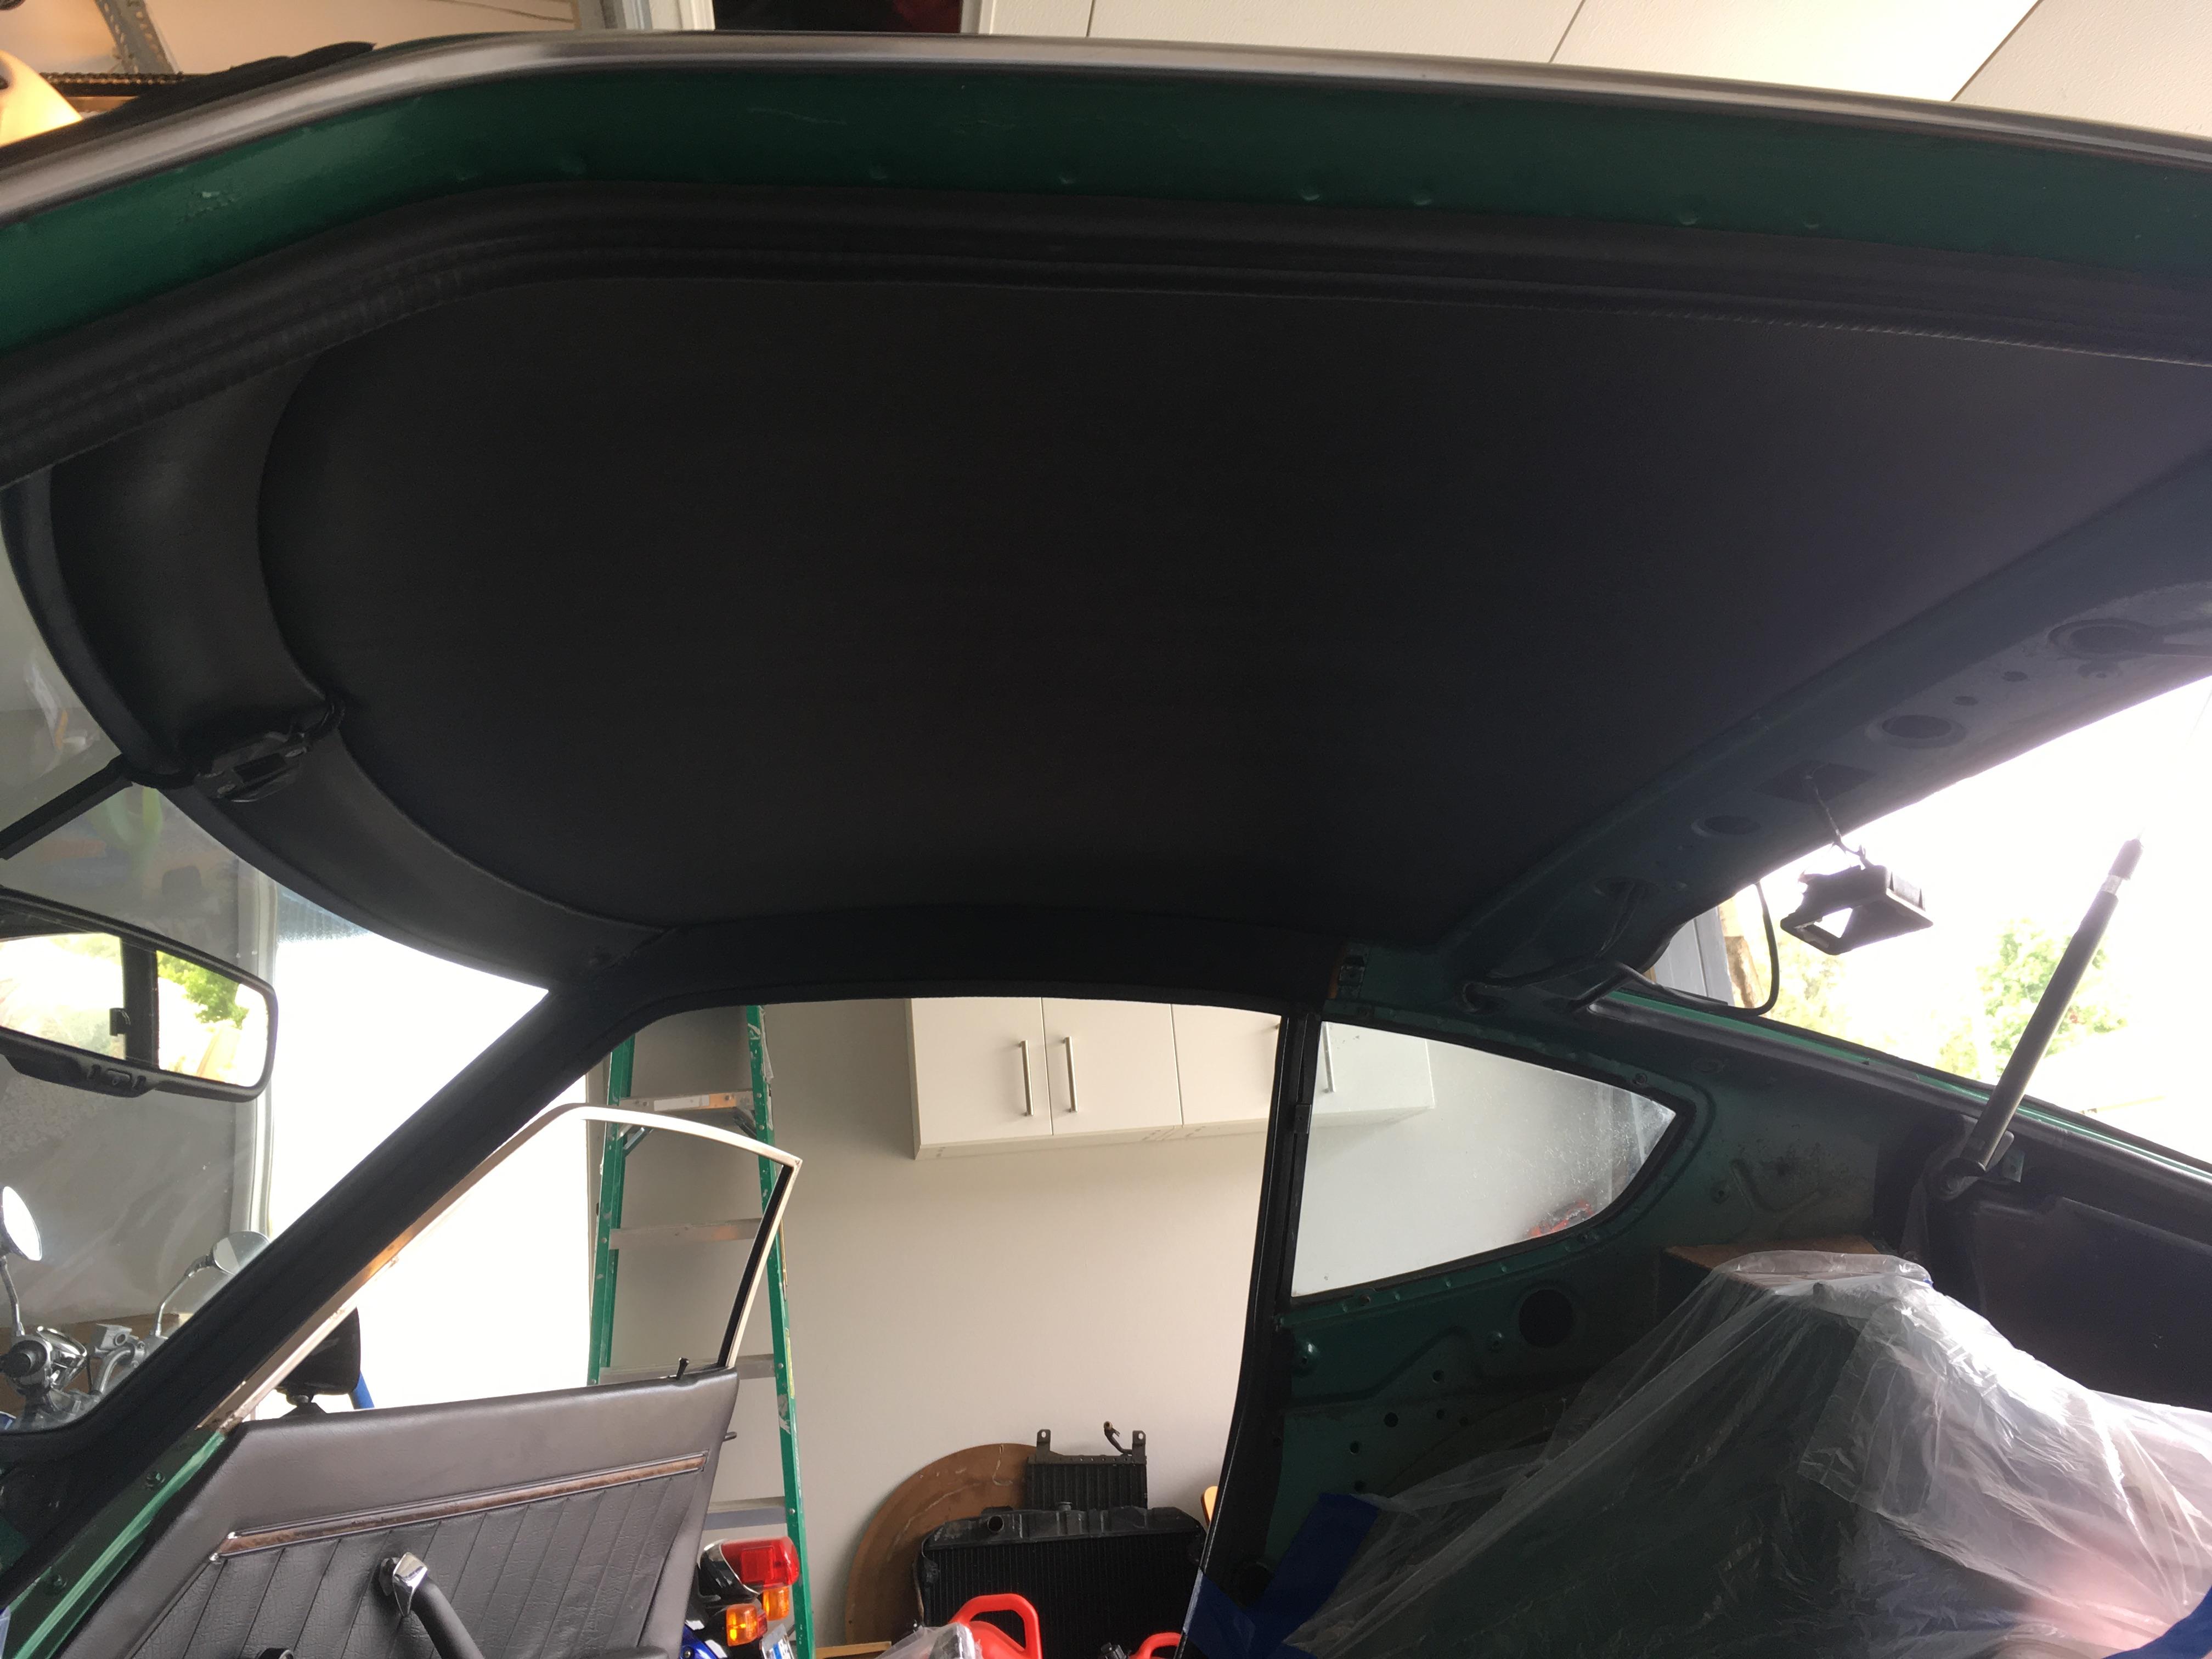
3 pointsMy wife & I installed a new Z Car Source headliner in our ‘75 Z this afternoon. It went pretty smoothly. Previously, I installed a RetroSound sound deadening mat on the inside of the roof. This mat isn’t a tar-type mat, so I hope it holds up well. It has an open cell foam inner layer between the silver outer layer and the adhesive backing. It’s 1/4” thick, which made me a bit nervous, as the headliner was 1/2” thick and I didn’t know how it would fit between the ceiling and the rails. To address my concerns, I cut the RetroSound mat so that it wouldn’t quite reach the rails. I wanted to make sure the mat didn’t take away from the room needed by the headliner edges to tuck in. I masked off the rails to protect the vinyl and about 2” of the ceiling (sound mat) all around. I masked off 2” of the mating surface of the headliner, too. I used tape to mark the front-to-back centerline of the headliner, and I also marked the front and back centerline of the roof rails. I drew a line down the middle of the sound mat with a sharpie. Then, I sprayed one side of the ceiling and one side of the headliner with the adhesive provided by Z Car Source. Next, I removed the tape used to mask the edges (the tape caught the adhesive overspray) as the edges were not to be covered with adhesive. Not sure is my description makes sense. After giving both surfaces time to get tacky, we carefully centered the headliner to the ceiling using the previously taped/marks, then my wife held the non-glued side of the headliner in place while I carefully pressed and smoothed the glued side to the ceiling. I left the edges out of the rail-ceiling gaps at this time. After pressing (not too hard) and smoothing this side of the headliner for a while, so that the headliner would stay in place on its own, my wife & I switched sides. I applied the adhesive in the same manner as the first side, and attached the second side. After both sides had more than 30 minutes to set up, I used a paint stick with the edges sanded/rounded to work the headliner edges into the gap between the roof and the rails. It looks pretty good, especially since I’ve never done this before! Here are some pictures.

 3 points
 -
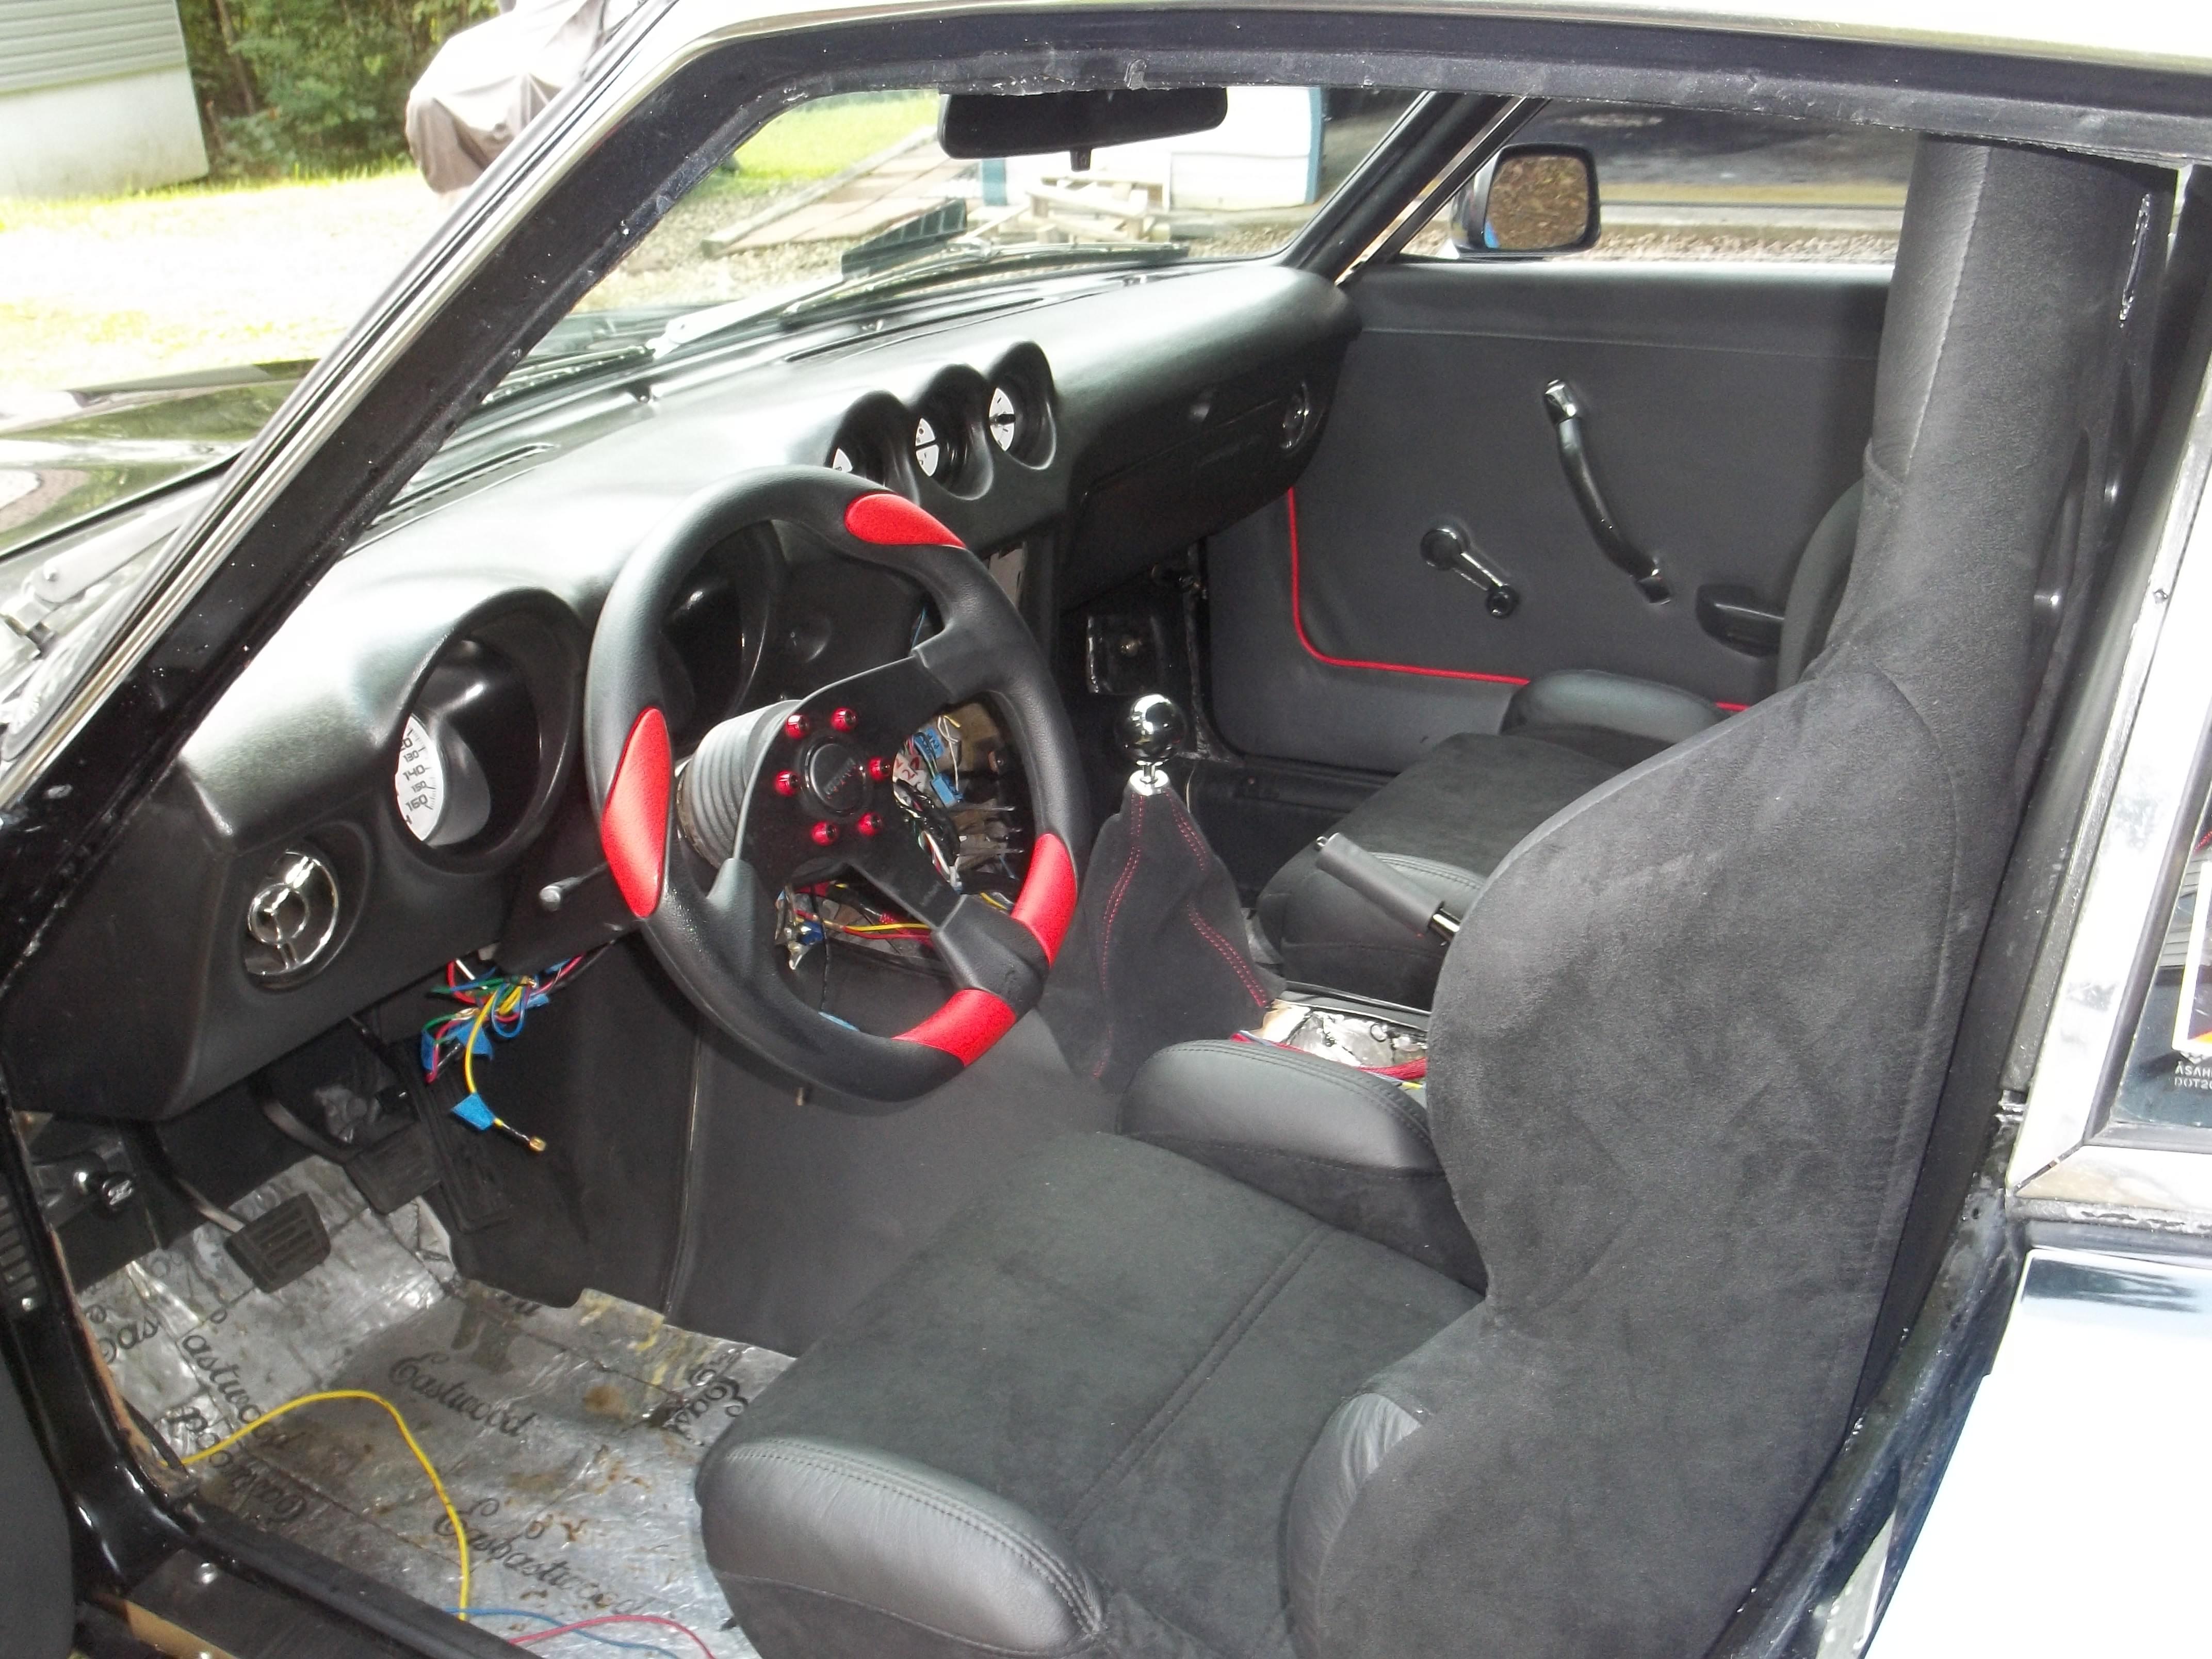
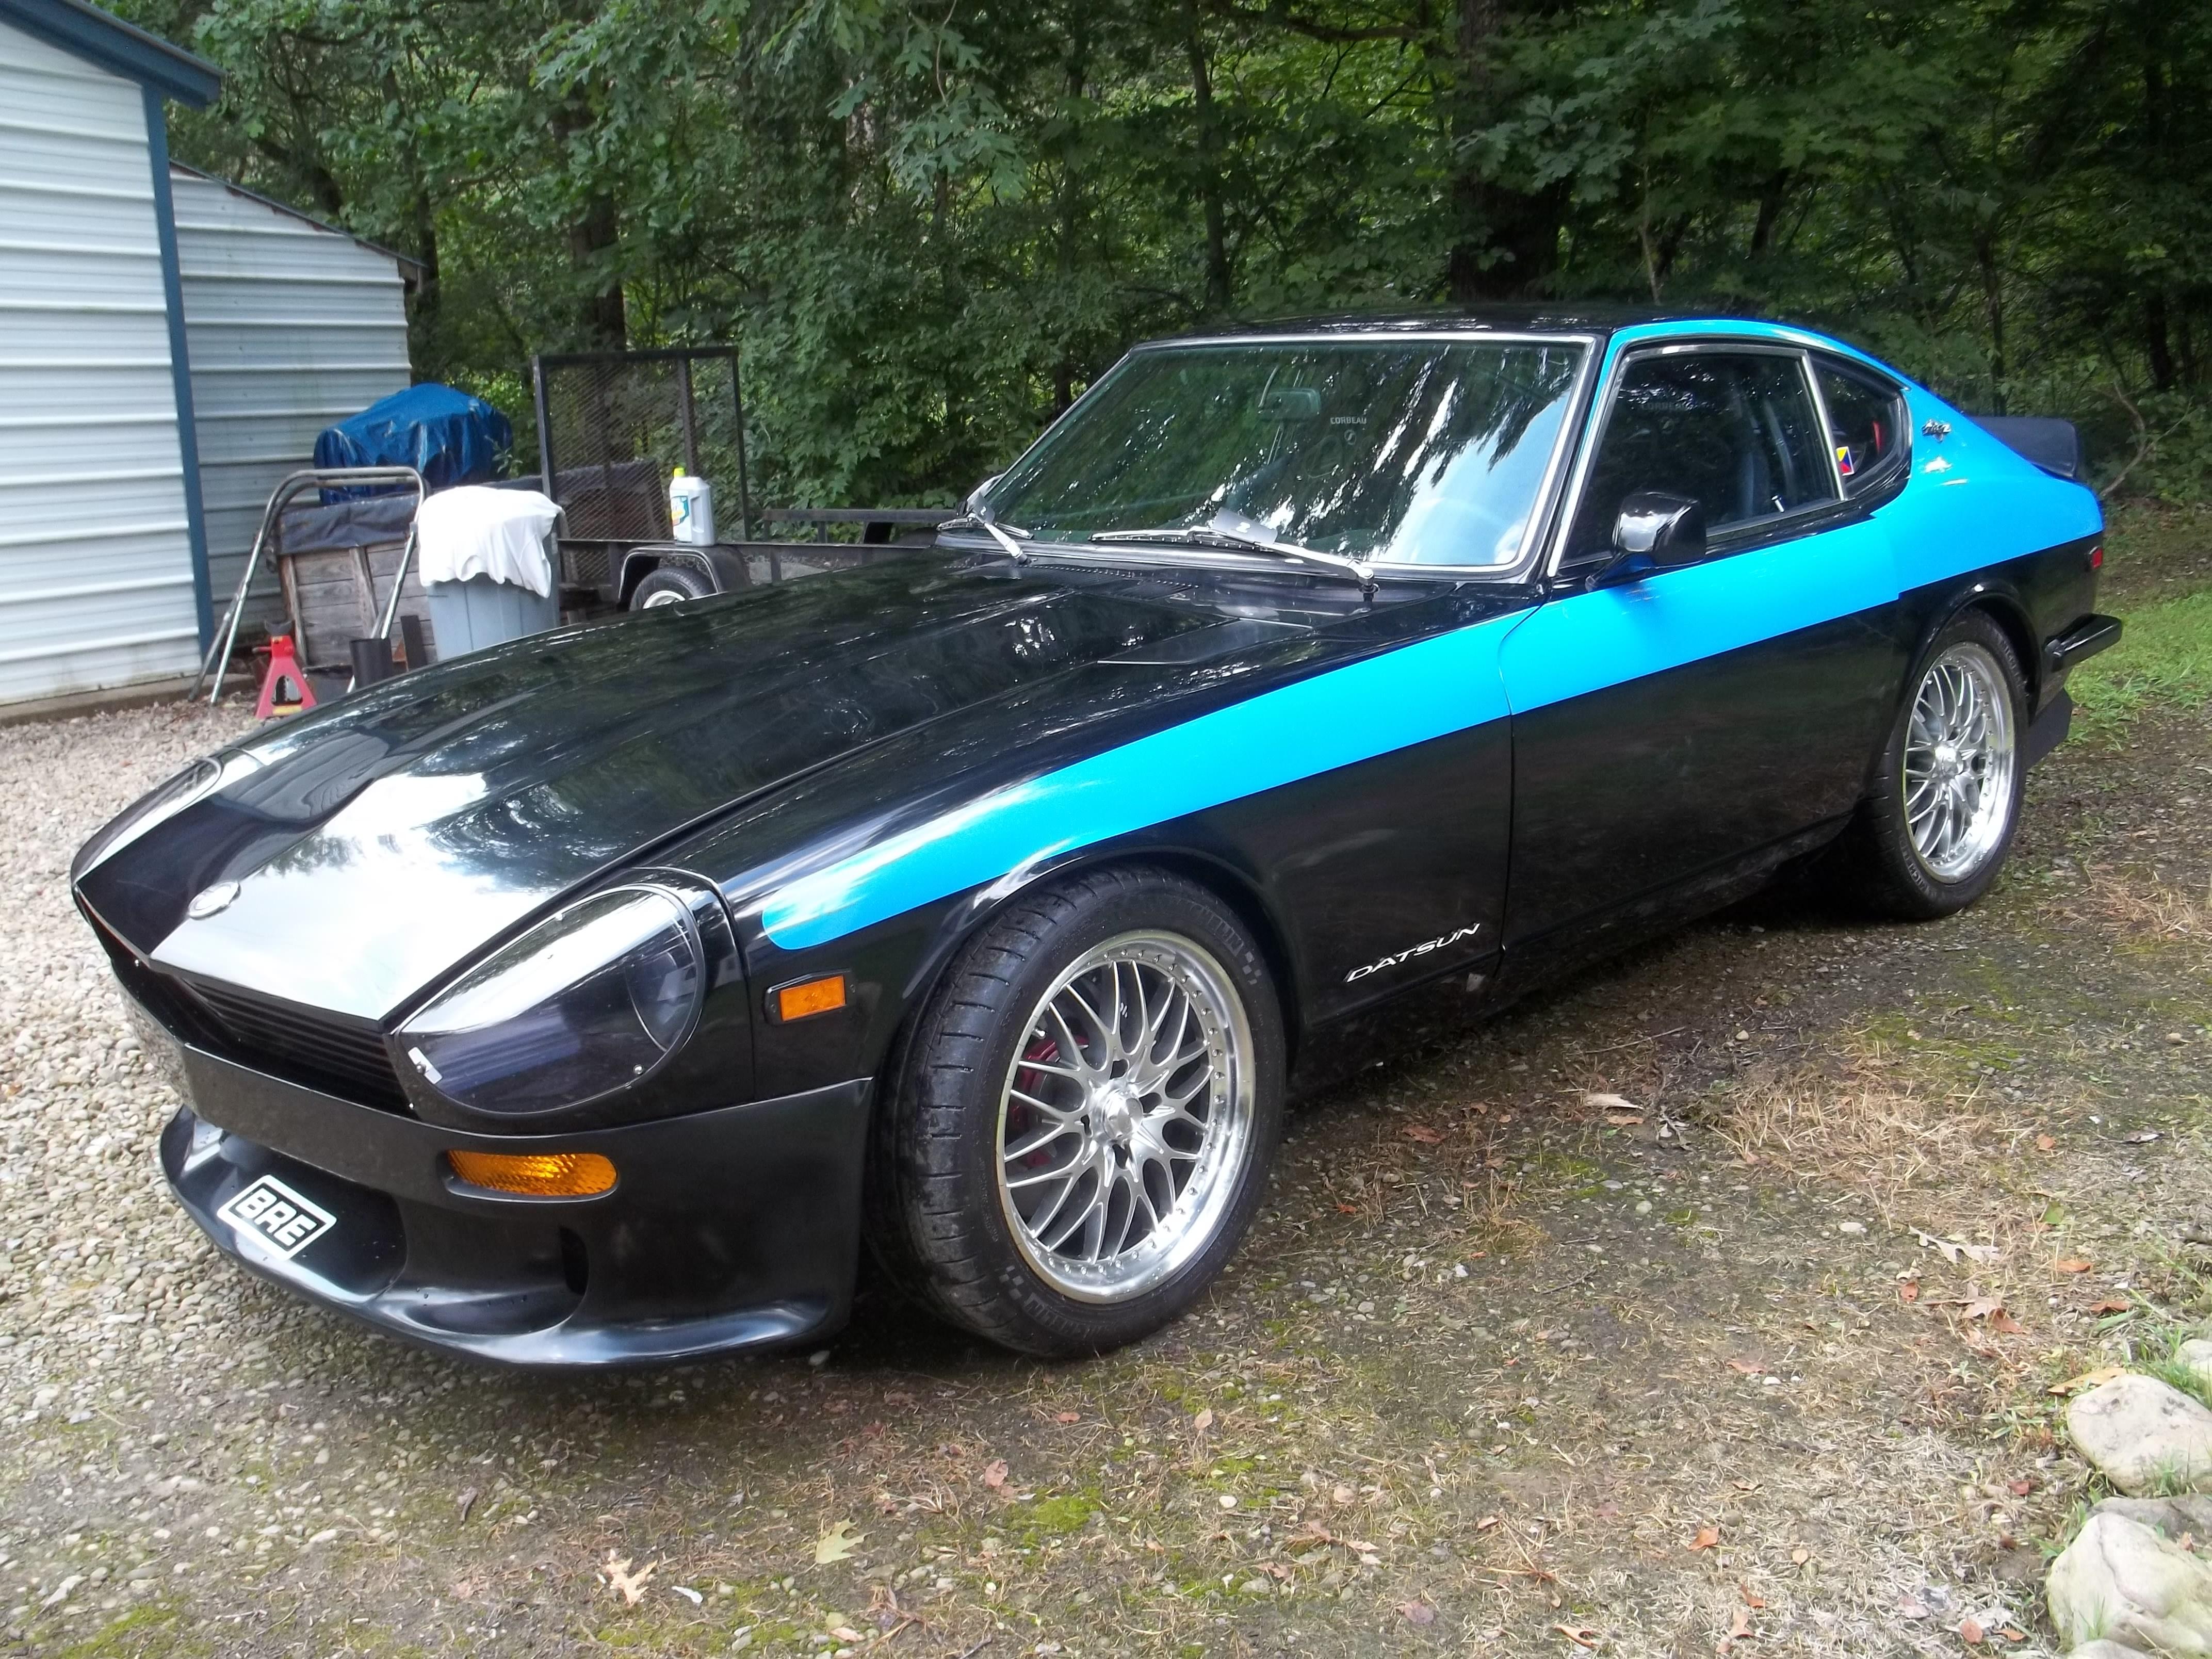
2 pointsI've been working on my favorite car ( The 240Z ) for a few years now. It's finally driveable. I knew nothing about working on cars when I started. Engine work, electric, body work, etc. I learned everything. I did probably 97, 98 % of the work myself. I never touched a spray gun before I painted this car. I painted it the same way and the same colors as the car I owned 50 years ago. I owned a 71 Z back then and this one is a 71. I'm trying to find out the vin no. of the one I owned before. The paint job turned out really nice. The whole car looks 100 times better in person. I still have all kinds of goodies to put on it. I still have some work to do to it, but I'll be doing that a lot in the future. Here's before and after pics. It made it so much easier to come onto this site when I had a problem and get answers to help. I couldn't have done it without you. I really mean that. Thank you.
.thumb.JPG.475e1ef8ce49f8511a6f1e493c622528.JPG)


 2 points
 -
2 pointsI run 15" Rewinds and love them. They're not too big like the the 16"s I bought originally that now hold my 280 off the ground. They work great on the 280 but looked way out of perspective on the lowered 240. Looked like doughnuts on a Graham cracker. Zed Head, I know zero on gearing and numbers and $^!# like that. I'm sorry. 8^( The wide 5 from a '79ZX 2+2 works great with the R180. 80mph in 5th turns under 2,500rpm. About 2,200 on flat stretch. Jalex I'm trying not to be a jack arse but "California Datsun" is your problem I honestly believe. I hope you can be happy with your 240 someday. I'll try and help but I think we've "climaxed" with your set-up.2 points
-
1 point
-
1 point
-
1 pointIn de States… imported!… yeah… but the 260z was MADE till 1978! In europe we did NOT have the 280z it was the 260z .. 1979 came out the 280zx.. and the production of 260z came at an end. Here some pic's from a beautiful 1979 euro 260Z (It was a probably a 1978 car made and was put on the road in 1979.)
.thumb.jpg.7170bb03e71593b27a9fd509d850935e.jpg)
.thumb.jpg.f09986564bdba0ff4a3130e5547cf4bb.jpg)
 1 point
 -
1 pointThis will also keep the speedometer registering the same as it was. Here's a tire size equivalent calculator; https://www.discounttire.com/learn/tire-size-calculator1 point
-
1 pointUsing sandpaper to remove even more material from needles that already have unintentional material removed from them probably isn't going to help. To be honest, I'm a little lost on exactly what problem it is that your are chasing... Can you restate the problem you are trying to fix? Maybe a fresh start will help.1 point
-
1 pointtry 30wt then 80wt oil in carb damper and stomp on it from 1st gear. See if the power changes.1 point
-
1 pointThanks I put in the wrong year and it was finished a few years ago and I have rarely driven it since Sent from my iPhone using Classic Zcar Club mobile1 point
-
1 point
-
1 pointNever heard of having to clean the needles 72 body with 71 interior, Eibach, Illumina, R180 CLSD, 83 close ratio, 3.90 gears, Zstory, SUs, BRE Libre wheels and front spoiler.1 point
-
Great read! I have a 71 in orange which looks identical to your( same bumper) although with Fenton slots on its way to me from Oregon. Should be here this coming Monday. I have a lot to learn about what to do, but no rush. Will be asking all sorts of questions as time goes by, but you have given me plenty of insights to get started on. Great job thus far. Keep at it and keep posting!1 point
-
Just read about your aluminum flywheel. That has to be the best "bang for the buck" for me. The carbureted cars scream like a motorbike, just as you say. ?1 point
-
1 pointThe misfire issue due to carbon fouled plugs was clearly because i pulled the choke knob all the way and left it running 2 mins with the choke fully on while the engine got warm.1 point
-
1 pointThanks Cap'n. I was hoping you'd respond. I had that nagging thought that it sounded too darned easy and logical. Anyone else want to chime in? @jalexquijano Ignore my last post to you. Leave the floats alone. (Everyone can breathe a sigh of relief) If you want to lean it out a bit (1/4 -1/2 turn) to see how it runs, try it. Most of learned by trial and error. Remember, your plugs looked nice and clean at the current settings and it runs good.1 point
-
1 pointWell the car is sold. Well SOME of the car is sold. I have sold the shell and basic suspension to a new friend in Edmonton. The other goodies will grace other cars in the region, or maybe 3798 will stay closer to home a wear a few goodies until that original patina. Or how do I get that stroker into a certain 510 I know? Hmmmm1 point
-
1 pointHere's good picture Zkars or Jarvo put up showing a way to measure the fuel level 23mm down from the underside of the lid. It's the easiest way I found to get in the ballpark. Another thing I would suggest while you are getting the levels set is to stick the cork gaskets onto the lids with fuel proof black RTV. A thin layer on the lids then lay the gaskets down and then lightly screw them back down to the float chambers while the RTV sets up. You'll be able to remove them without damaging the cork gaskets. Makes getting them back on a heck of a lot easier too. ?
 1 point
 -
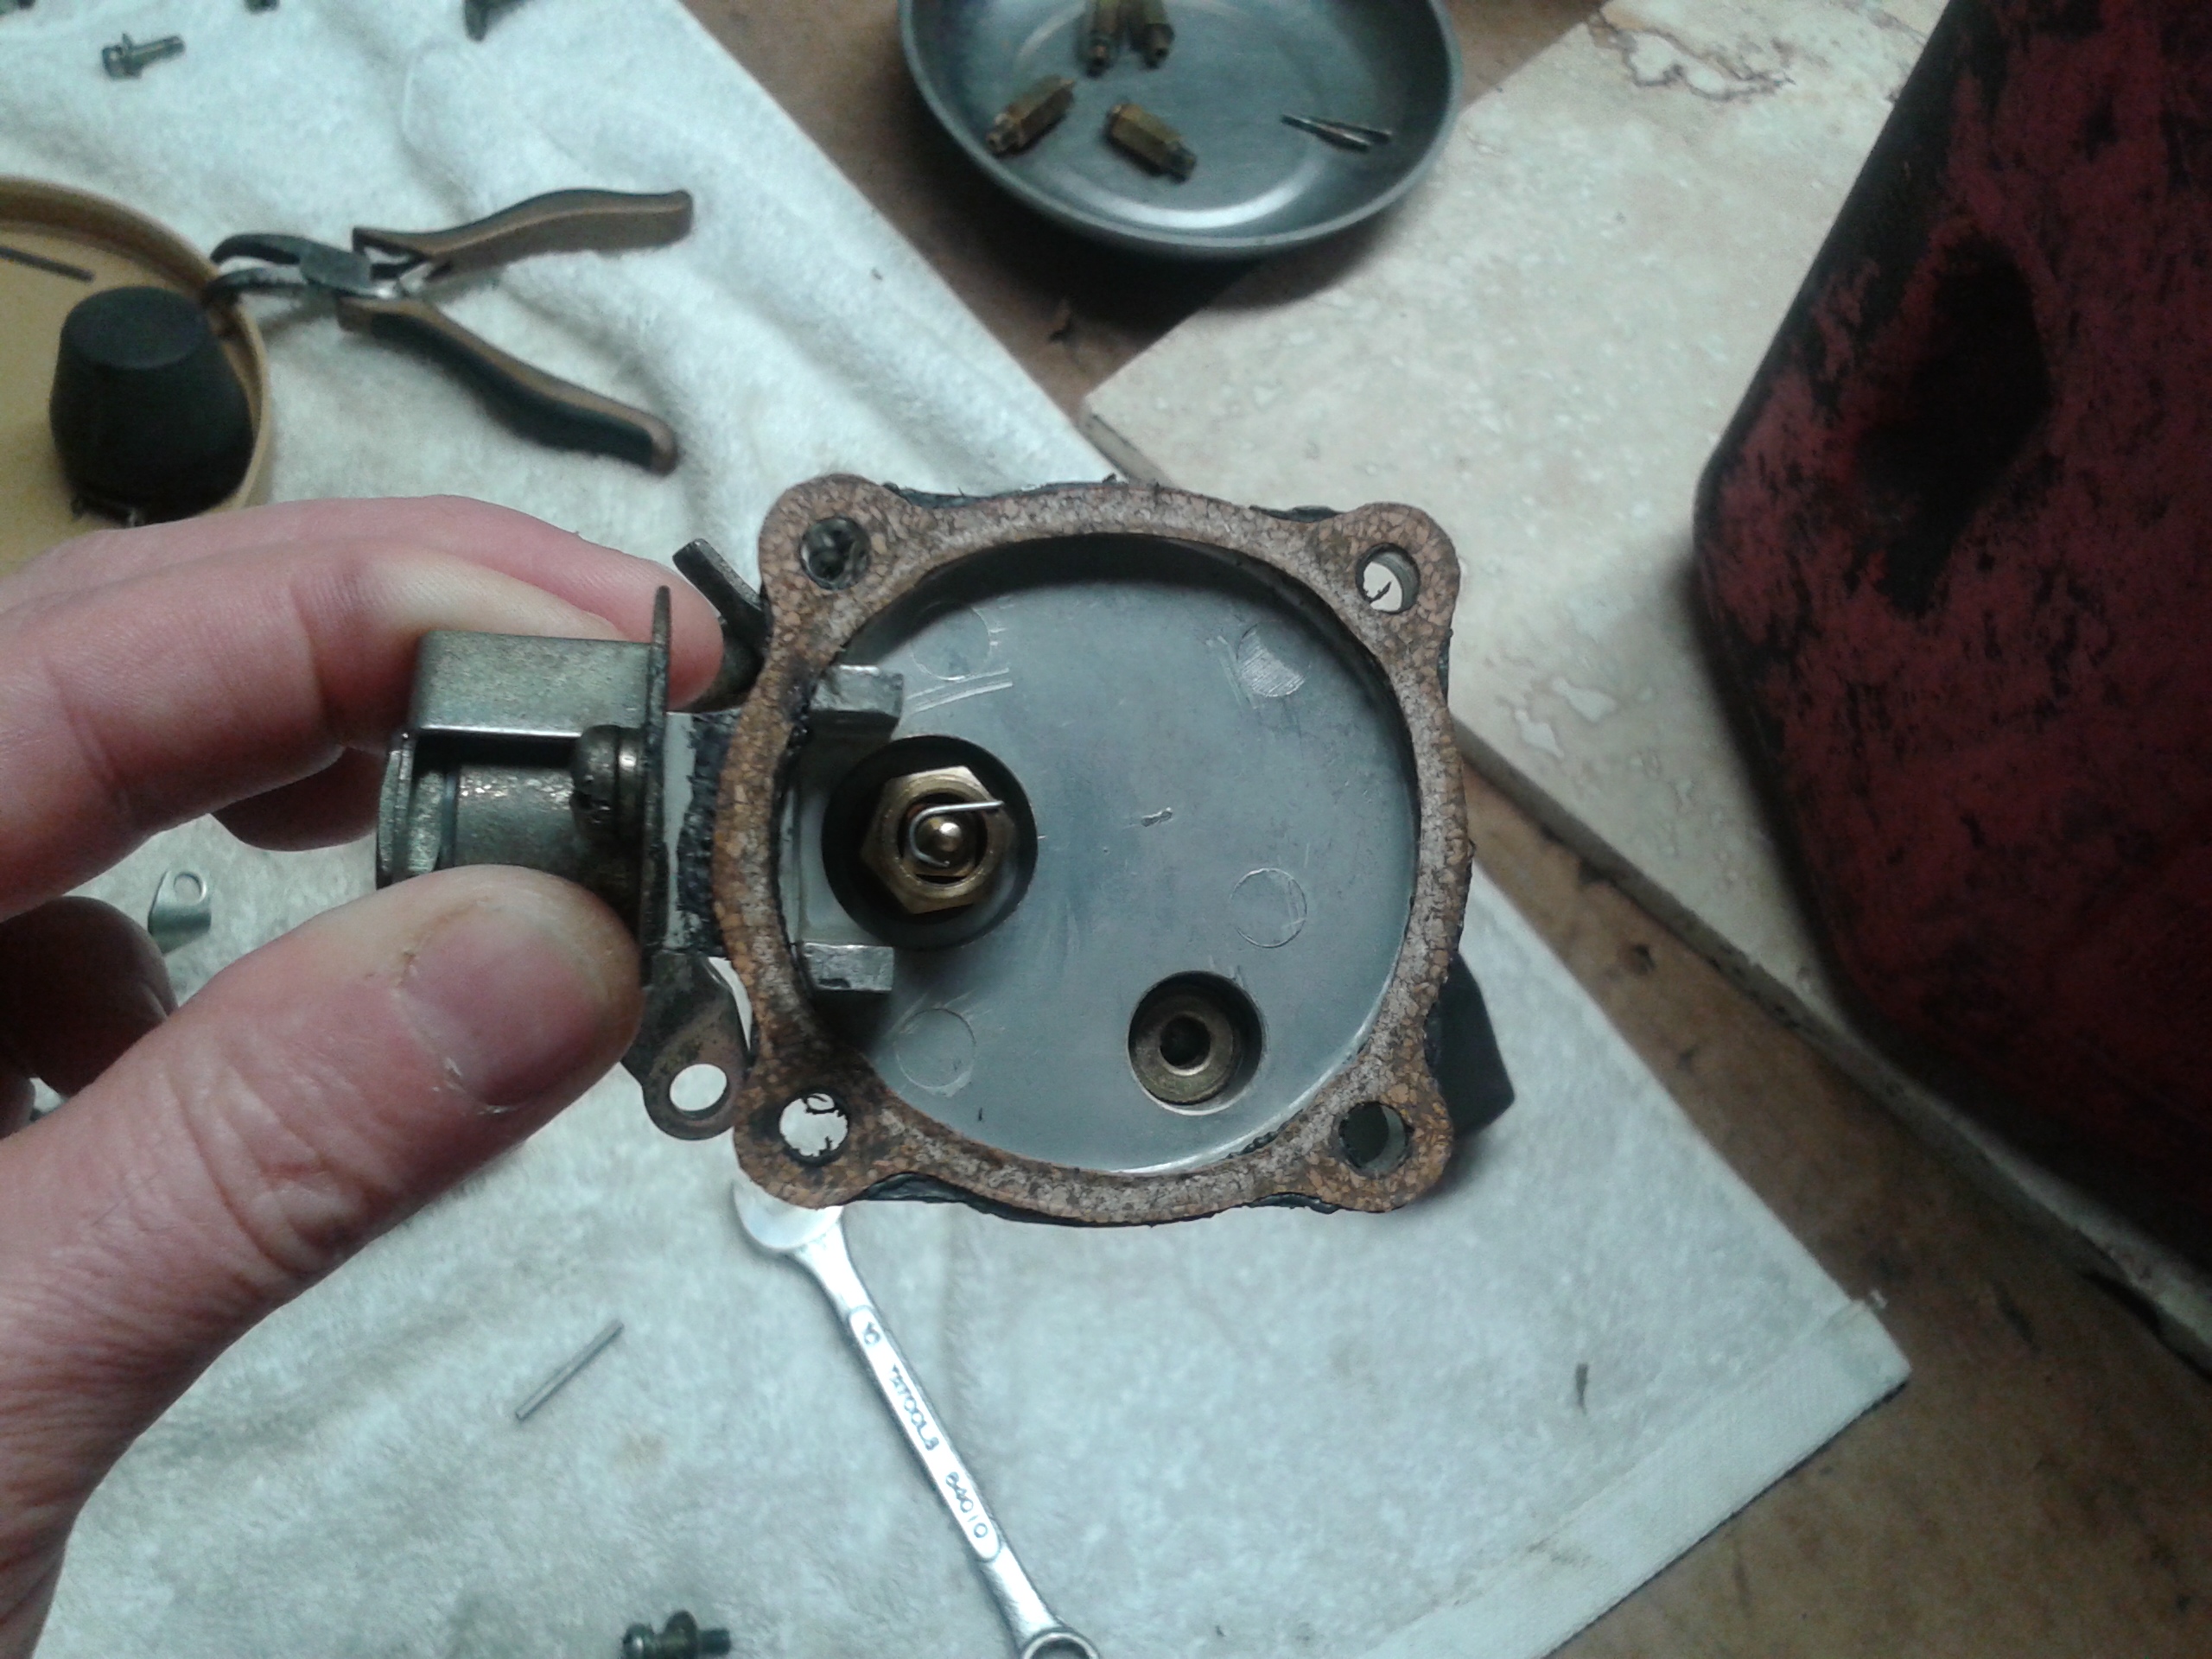
1 pointI've realized after working on a few and participating in a bunch of "help me with my carbs" threads, one of the easiest and most notable problems is the position of the the float hanger and the metal tang that the needle rides on. Mine was like yours, bent all to hell to get the valves opening and closing with the lids turned upside down. That was the old way to set them when they had Grose Valves. The newer style that has the small needle like pin will not hold the weight of the floats so you can not set them the way they show in the Z Therapy Just SUs DVD. It took me a year to figure that out. Your floats should look like this, the hanger should be parallel with the float's top and the tang should look like a bump not a ramp. Your floats are closing the valve too soon causing low fuel in the float chamber. Disregard the red circle
 1 point
 -
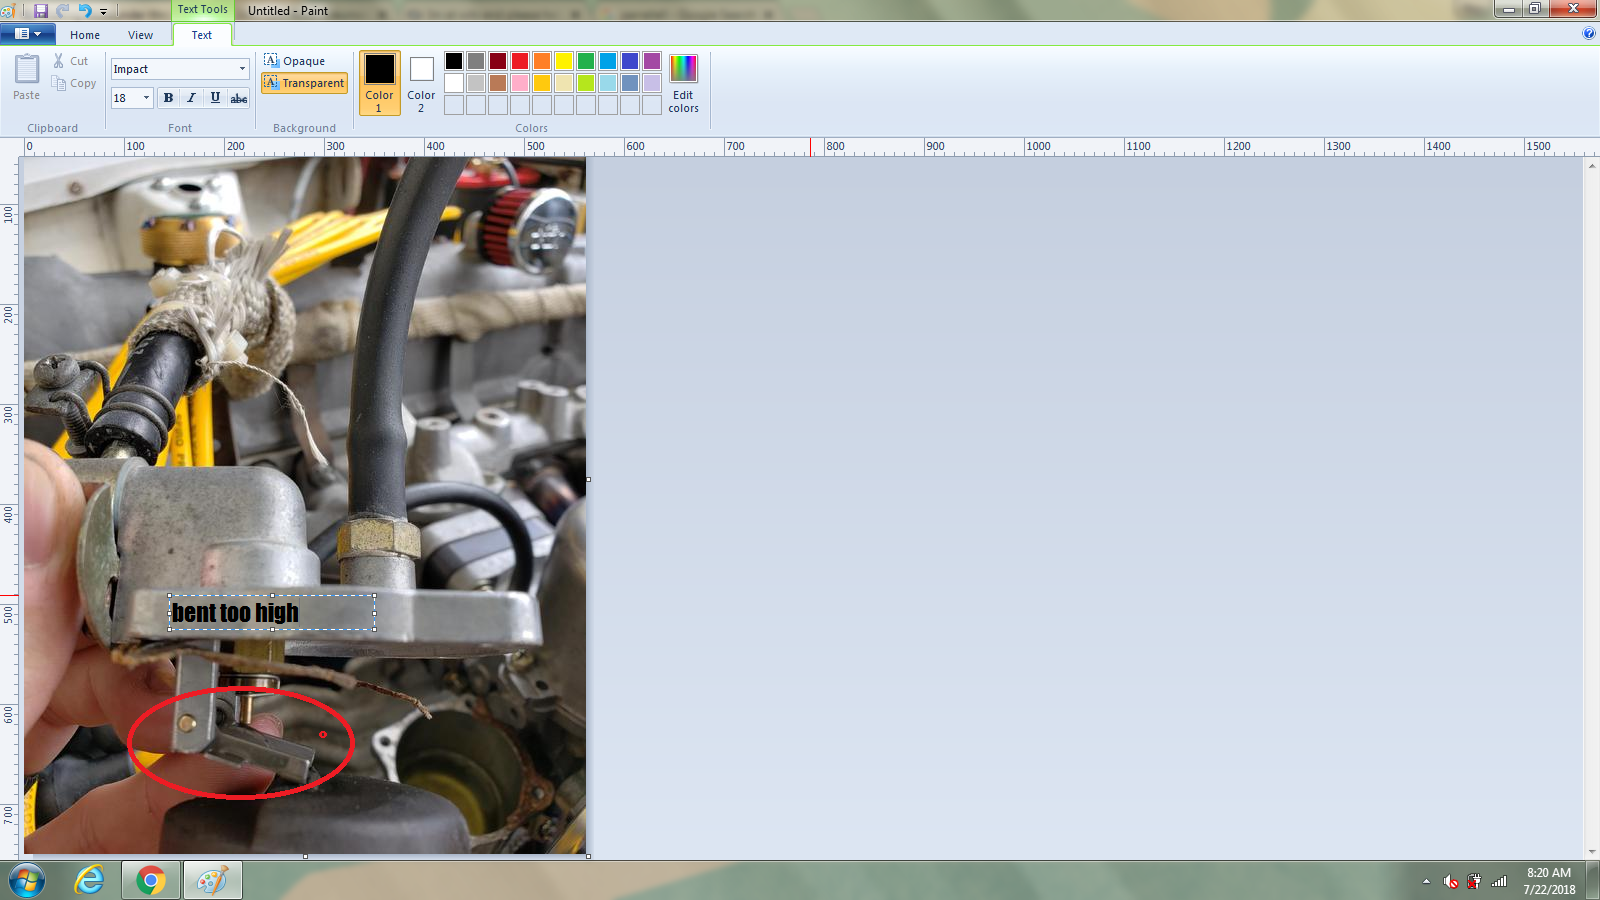
1 pointIf everything is working properly, the pistons should be hard to lift with a finger, but should fall easily. So the one that lifts easy has a problem. Something is wrong with the check valve jiggly bits on the end of the screwed-in stalk. Also, I'm not sure what you meant when you said that the rear carb has a return spring... If you are talking about the spring pushing the piston down, then they should BOTH have springs under the dome. Other thoughts? I don't like the looks of at least one of your needles. It looks like it's installed too deep into the piston, and it also looks chewed up and worn some at the hilt where it has probably been rubbing against the nozzle. The nozzle looks to be worn oval as well due to that contact. Dome/Piston/Needle/Nozzle alignment is very important, and the three screw round tops can be a problem if someone has cut off or dug out the dome alignment nubs (as has been done to yours). @Bruce Palmer Can describe the process necessary to align the domes (and hence the needles to the nozzles), but remember that each and every time you loosen or remove a dome, you must go through the same alignment procedure again. Here's your pic with the needle that looks worn: And here's your pic with what looks like a non-round nozzle hole that has been worn by contact with the needle:1 point
.JPG.2cce46902d5f46f0dce435be28c883b3.JPG)


.jpg.85555d7646d5db4aea8abe571fb52880.jpg)
.jpg.91749bfdcfc14adf9569a696a4af8197.jpg)