All Activity
- Past hour
-
 Wow, that dash has got some issues! I guess the answer depends on your budget and focus. You could always find another one and go that route, or you can send it to a restoration shop like Just Dashes. However, with the screws and missing foam, you are probably better off finding a better dash to use as a base.
 -
 I stole this cassette from my step-a s s hole when I was a kid. When cassettes where still off white colored, before the clear ones. I listened to it so much I still know every word to all the songs but this was my favorite.
 -
 It doesn’t seem to be.
 - Today
-
 Is the clevis pin that connects the slave cylinder to the brake pedal worn?
 -
 That's 24 degrees of rotation of the transmission, putting the shifter in the driver's lap. Can't remember which way the VG30 engine is rotated. It uses a different transmission. I wonder if it's a better option. Maybe it's been considered. Derek is mentioned in one of the articles. I assume that his engine is not rotated? Seems like poor timing on Nissan's part, waiting so long to introduce their head, when there were already two out there. Besides the fact that block supply is diminishing. Slim market. OS Giken Releases L Series Head - The Gentleman RacerOS Giken was born in the early 1960s; Osamu Okazaki wanted to build a true high-performance Japanese race car to compete against the sports cars from Europe dominating the sport at the time. Like many
 -
I had their greatest hits album when I was a kid. In retro my parents were probably concerned.
-
 The main challenge in the DOHC is that Nissan opted NOT to develop a transmission mount to deal with rotating the angle of the engine. Stock, it is rotated 12 degrees to the right. With the DOHC, it is rotated 12 degrees to the left. I guess if you're willing to plunk down $25K for the kit, you won't mind spending a few thousand more (I'm thinking around $10K or more unless you do fabrication) for the fuel injection and transmission mount. Hagerty MediaNissan DOHC Conversion Kit Can Make Your Classic Z Faster...The new Nissan DOHC conversion kit lets enthusiasts add dual overhead cams to several classics, like the 240Z.
 -
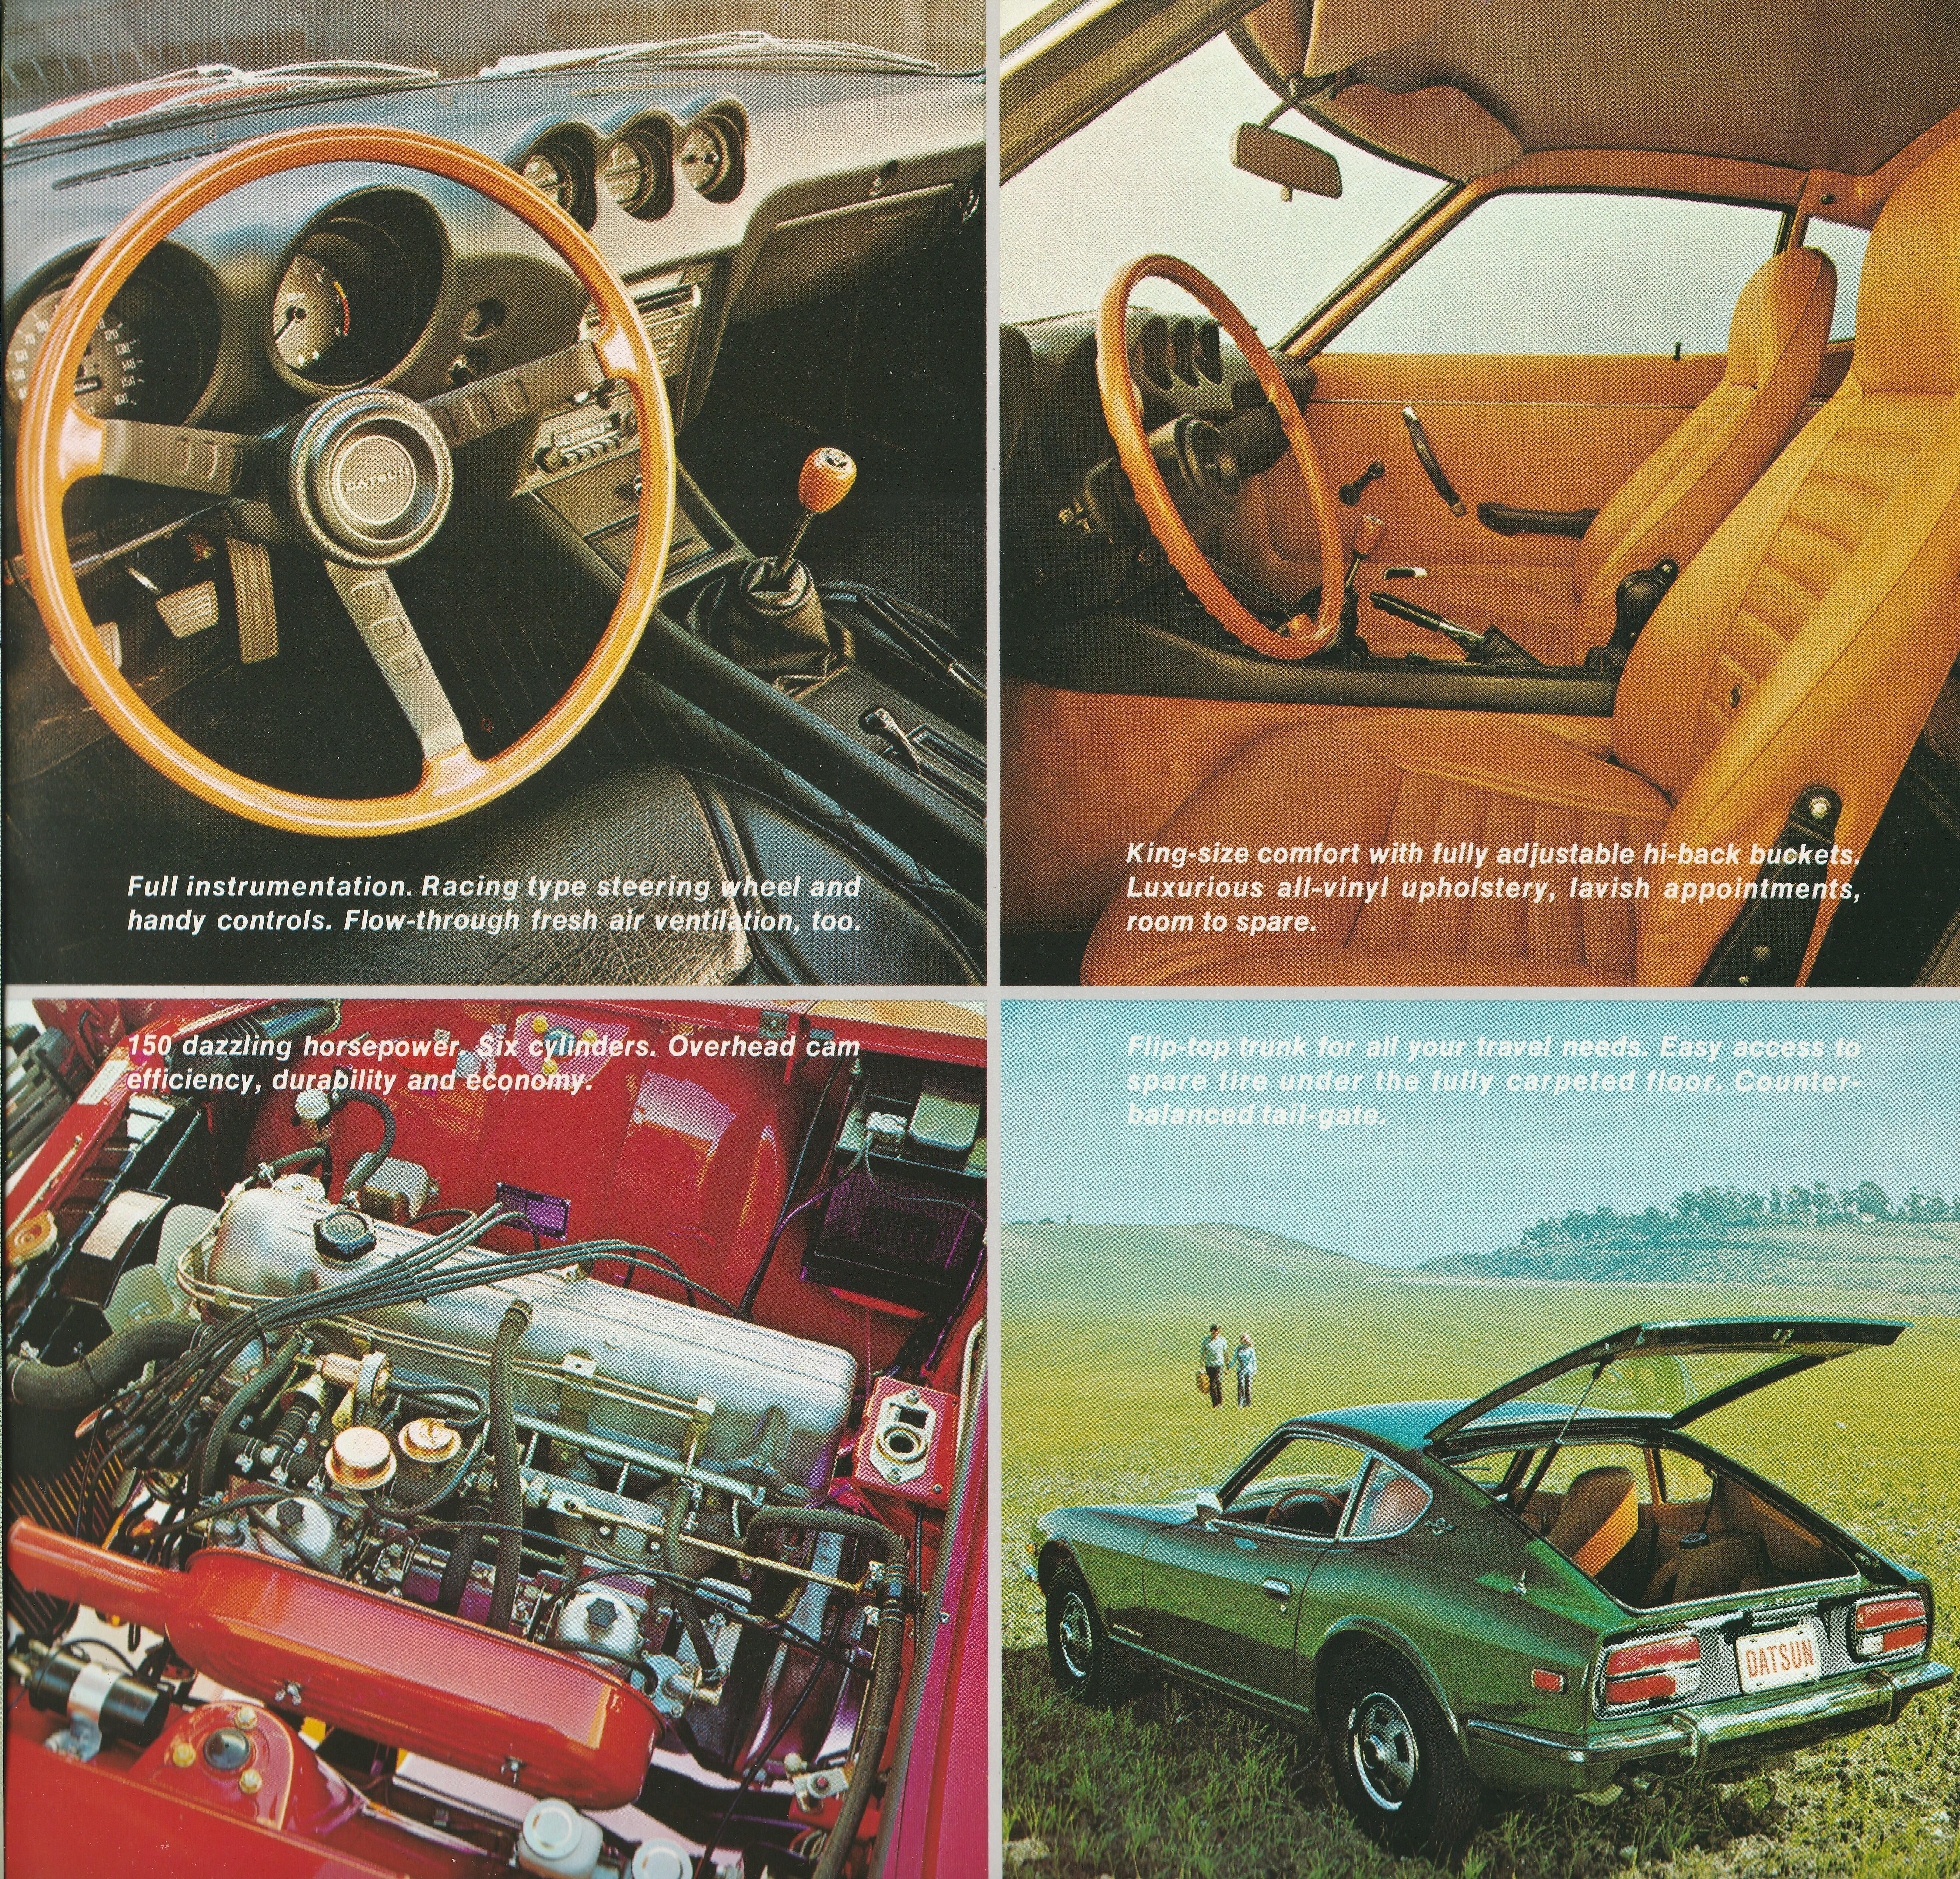
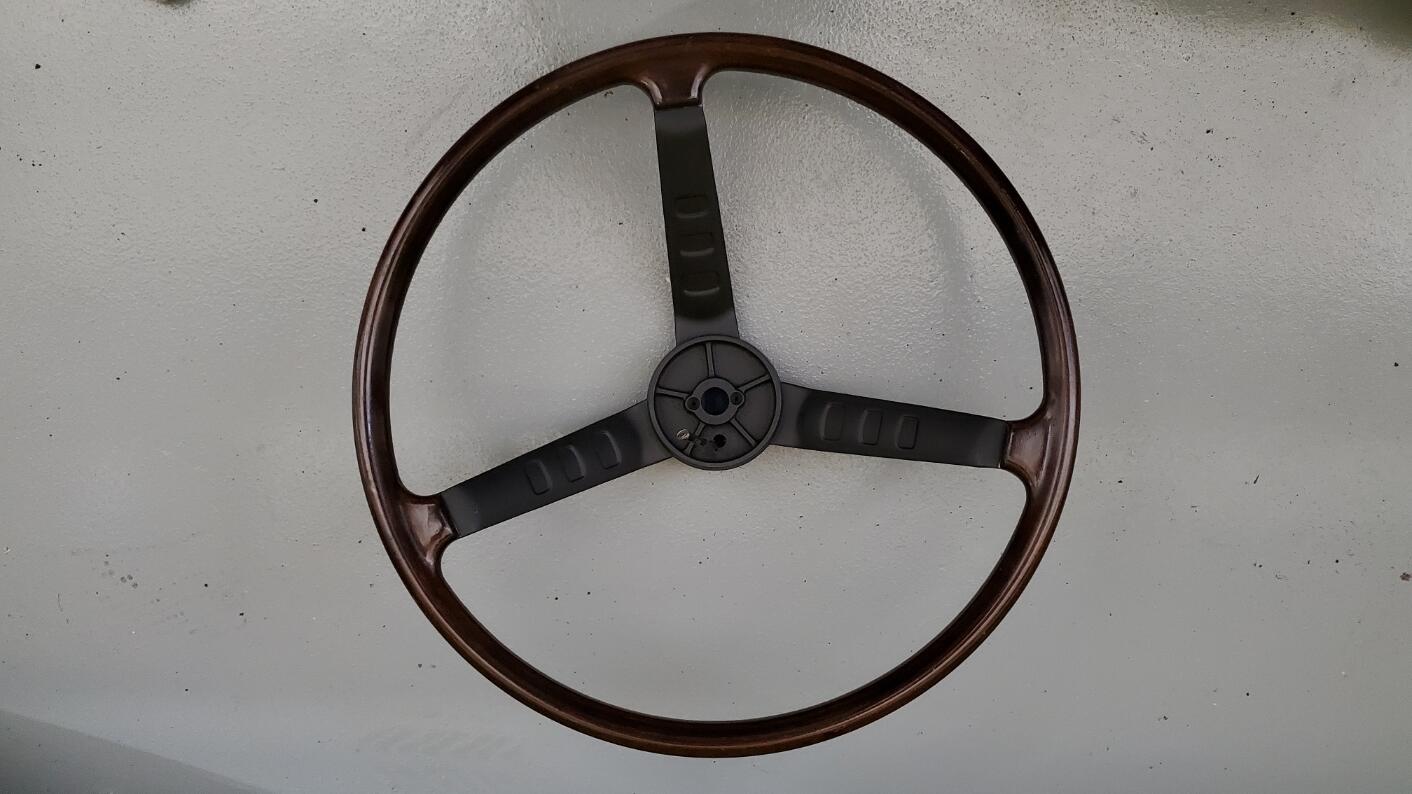
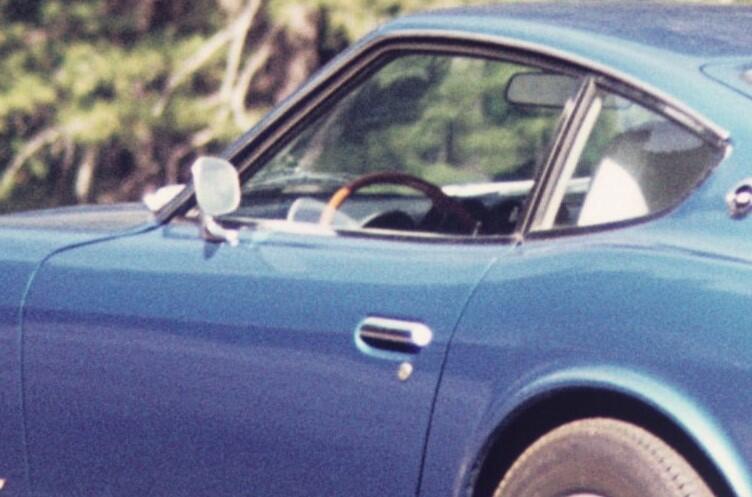
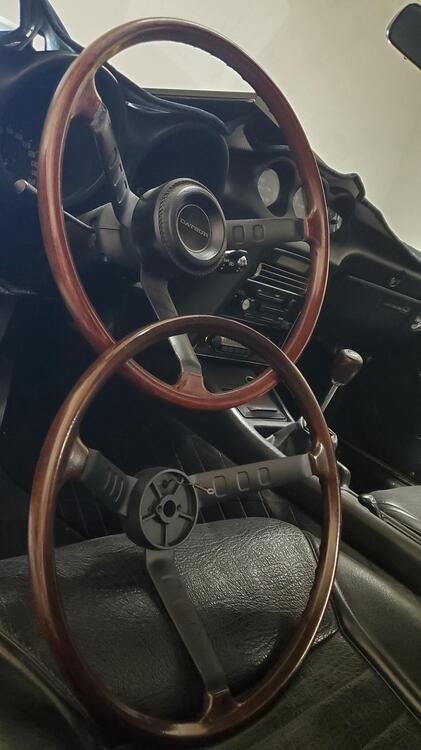
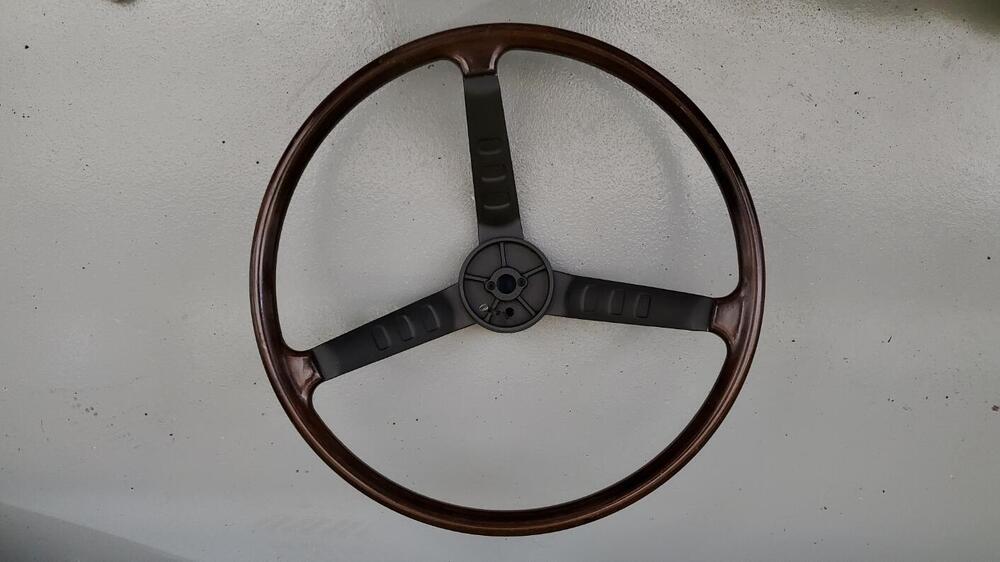
 Regarding the color of the steering wheel: I've always wondered what the "new" color was and it seems to me that most restorations get it a little too dark. I always compare against the 1972 brochure I've kept, and the photo I took of my 1973 240Z a couple of weeks after I bought it new. Of course, photo colors are not always accurate, and I've never had any judge question my (restored darker than these pictures) steering wheel, so it apparently doesn't matter very much. Cropped 1973 photo of my then new '73 240Z. Originally a kodachrome slide, digitized by Costo's Flordia lab a few years ago.

-
 Thanks for the input! The dash is a big project and i think im going to spend my time on the body of the car for now and set this aside. More than likely ill buy a new one vs repairing this one. there are so many issues with this one its beyond saving i think. might get a cracked one with only a few cracks vs 100.
 -
 I watched that progress over the years as he was developing it. It has been awhile since I looked at the details of it, so I am less familiar than I was at one time. I wonder what Derek's options costs (roughly)? I am sure there are various options depending on how the owner wants to proceed. But, I am sure there are some "round figures" for the head, cams, and associated cam operation hardware. Didn't see - does the head accept some off the shelf intake manifold... and header? Edit - found this https://datsunworks.com/Blog/pricing-for-the-kn20-dohc-head/
 -
 http://www.zcarblog.com/wp-content/uploads/2022/11/IMG_3902-1024x768.jpeg Happy 89th Birthday to our hero Peter Brock! You have been and continue to be inspirational to us Datsun fans worldwide. Here are a few pictures we enjoyed taking with you over the years: http://www.zcarblog.com/wp-content/uploads/2022/11/unnamed-1-1024x768.jpeghttp://www.zcarblog.com/wp-content/uploads/2021/11/DSC05510-1-e1637002594621-1024x1006.jpeg http://www.zcarblog.com/wp-content/uploads/2016/11/lagunaseca2004153-400x300.jpghttp://www.zcarblog.com/wp-content/uploads/2022/11/IMG_2311-1024x768.jpeghttp://www.zcarblog.com/wp-content/uploads/2021/11/IMG_9747-1024x768.jpeg http://www.zcarblog.com/wp-content/uploads/2022/11/sema-1024x1024.jpghttp://www.zcarblog.com/wp-content/uploads/2022/11/275435624_5253829184651694_278823018715978593_n.jpeghttp://www.zcarblog.com/wp-content/uploads/2024/11/314962664_499938492181328_4586337483149355287_n.jpg http://www.zcarblog.com/wp-content/uploads/2024/11/312177026_483959523779225_1687953212474383395_n.jpg http://www.zcarblog.com/wp-content/uploads/2024/11/382583804_692126209629221_266883468108368867_n.jpg View the full article
 -
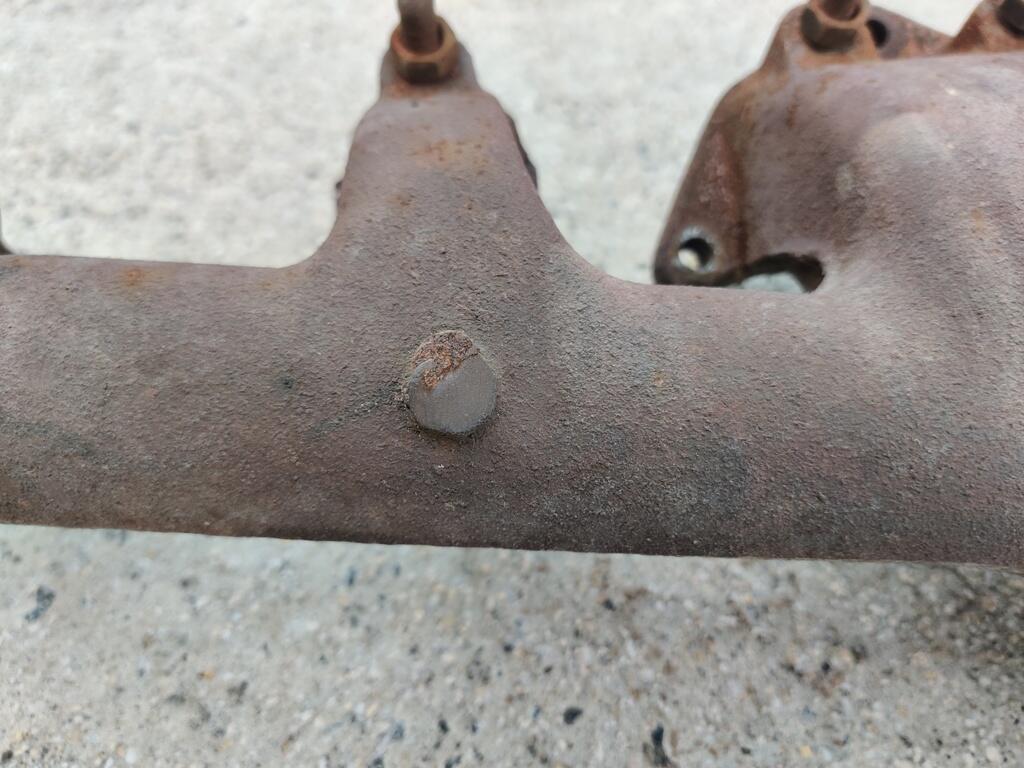
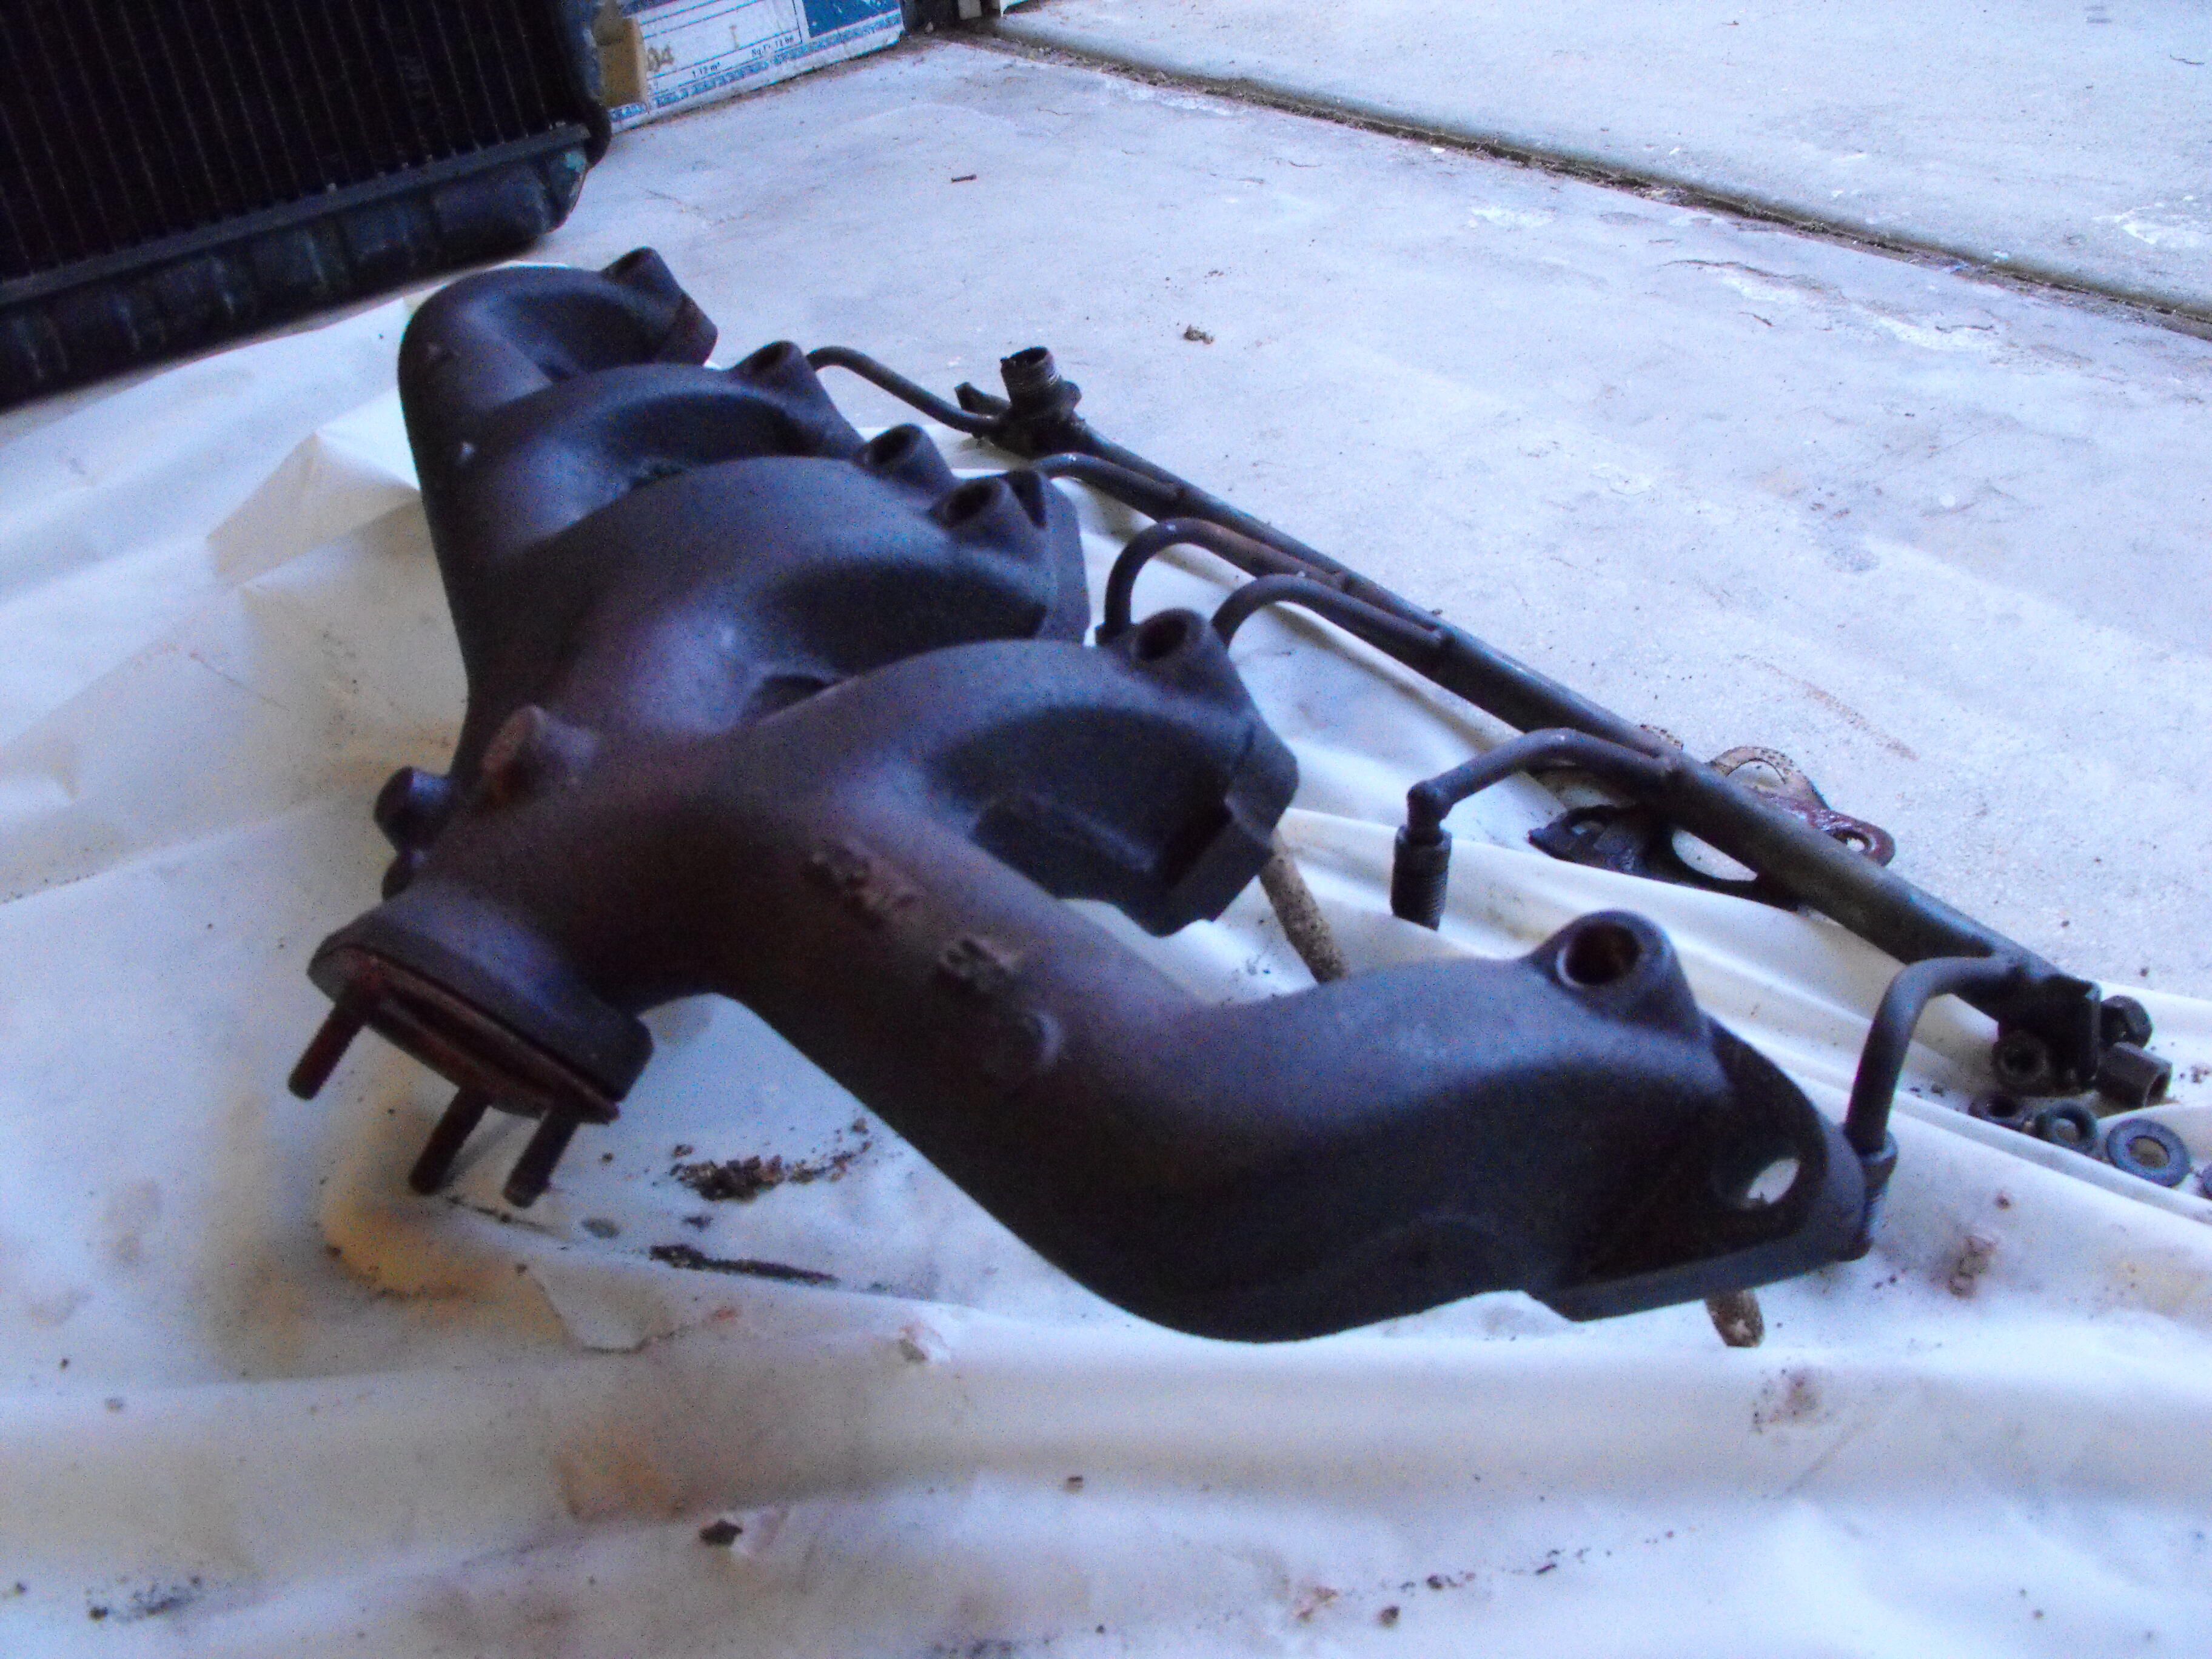
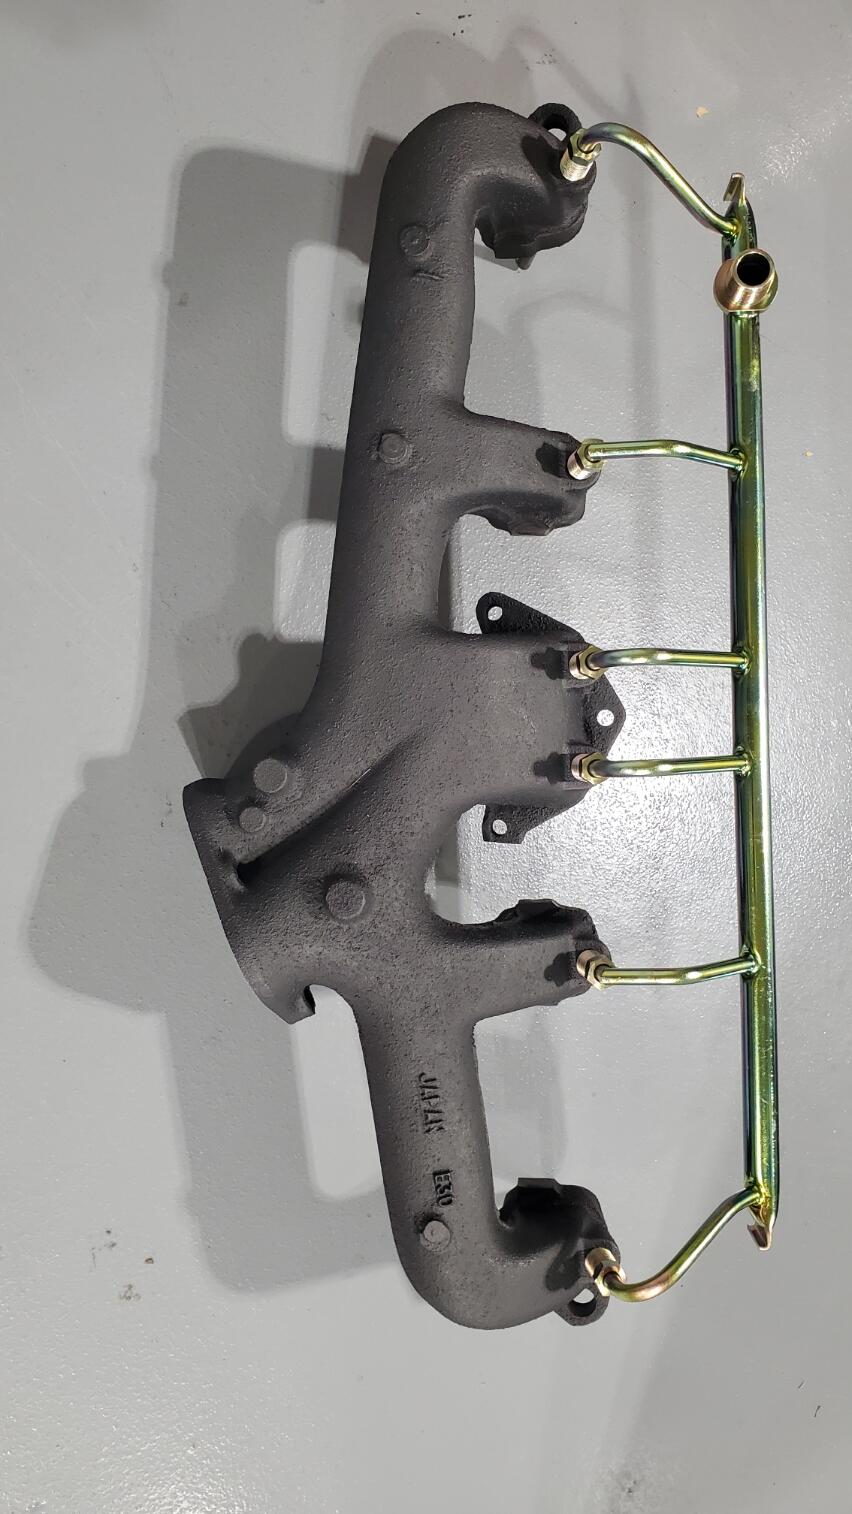
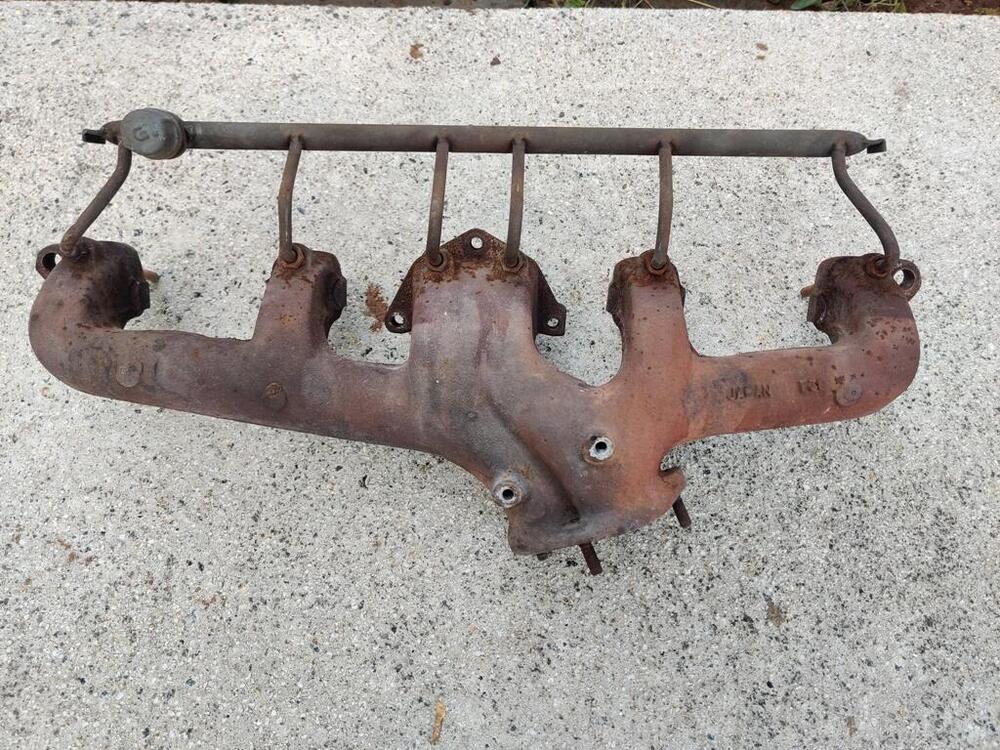
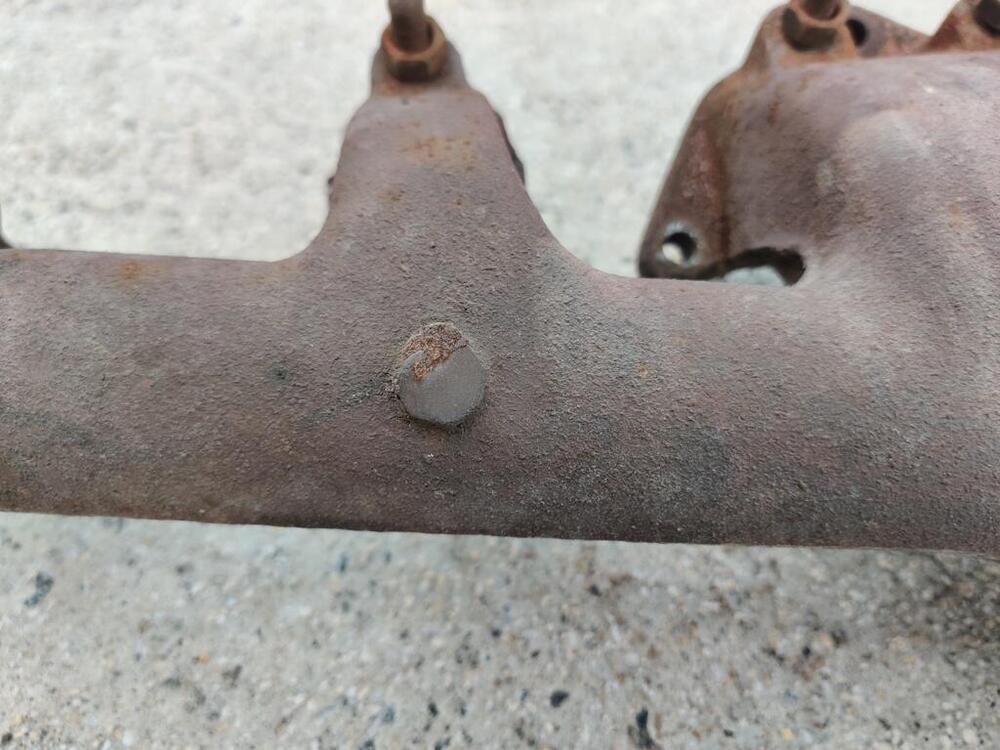
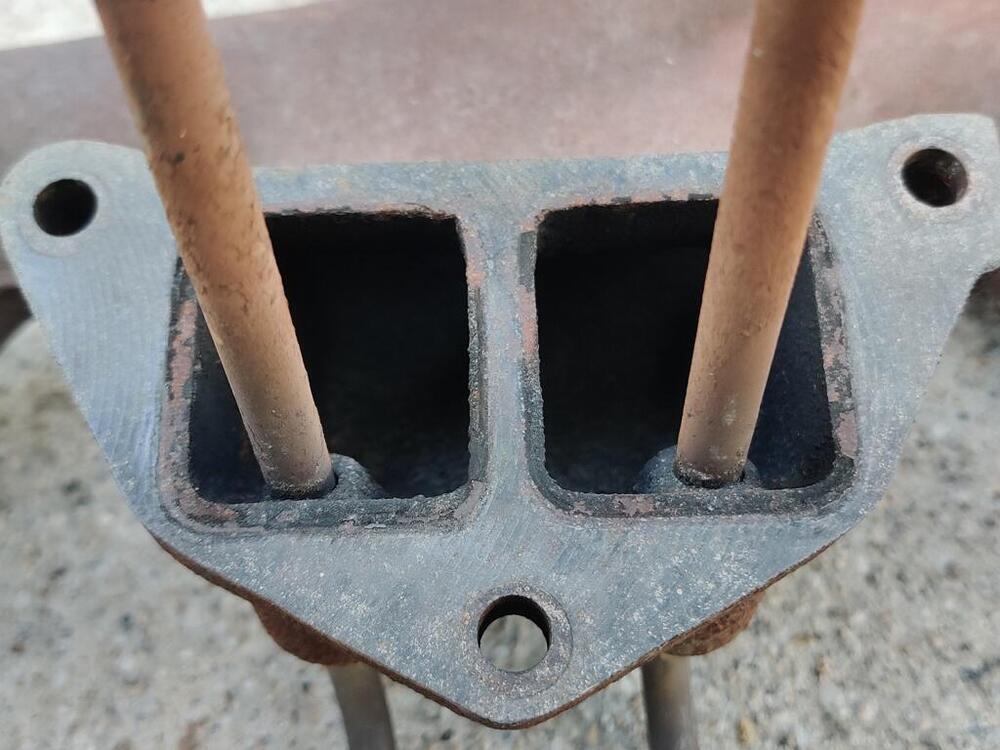
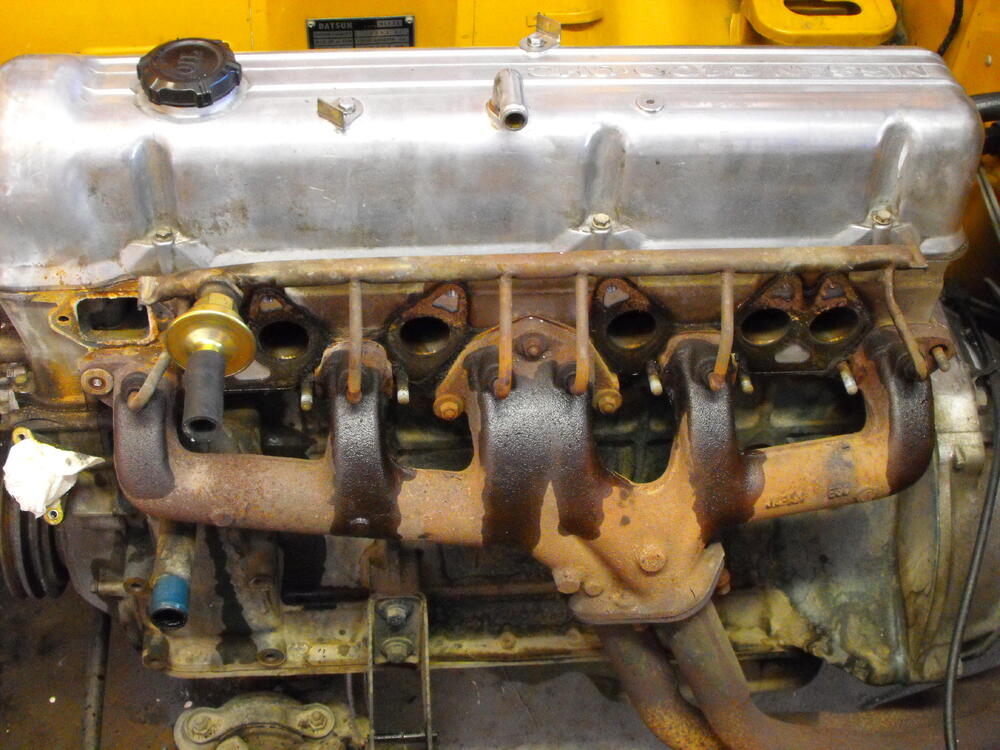
I am a bit dubious regarding the "correct" finish of the exhaust manifold. I do not think there was any kind of coating put on it by Nissan originally, so... wouldn't it just be a typical cast iron (as cast) color? If so, I think what you have there @motorman7 looks accurate. Not that this would necessarily be good reference info, but I personally kind of think it is - here are a few pics I just took of my 6/71 car's original exhaust manifold. The car was originally owned and driven in AZ for at least several if not all of its years on the road, and then stored in a garage in Colorado AZ for 30 years... Honing in on a "least rusted" portion: Machined (and not rusted) surface:
-
 That rubber glue may be the least of your problems! I've done a Z dash pad restoration, starting with something that had only 25% of the deterioration that yours has. Even at that, it was a time-consuming job. Not only does the pad surface need to be levelled (not easy to get right, given the multiple contours), it's also necessary to 'V' and then feather-edge all of the cracks so that the filler won't crack along the seams. I'll bet it would take you 20 man-hours of effort (or more) to level, edge-treat, fill, sand, and paint a dash pad like yours to a decent level of final finish. But before you even get started down that road, you'll need to convince yourself that what's left of your original pad has enough structural integrity to prevent the pieces from moving around independently when the cabin temperature goes up or down. With its many full-depth cracks, I don't think I would trust your badly broken-up dash pad to meet that requirement. As a litmus test, it would be interesting to know whether a professional dash restorer like Just Dashes would accept your dash for restoration. Maybe you should send a picture and ask them. IMO, your best path forward will be to either: 1) buy a used dash that offers a better starting point for a DIY restoration (as Siteunseen suggests), or; 2) buy one of the replacement dash pads that have recently become available. In the latter case, you unbolt the old pad from the underlying steel structure (known as the 'armature') and then bolt on the replacement pad. There are a couple of threads on this site that discuss these replacement pads. As a third, lowest-cost/effort alternative, you could just replace your old plastic dash cap with a new one.
 -
 CO, I have to apologize on what I said about the barb fitting taken off the 260z balance tube. I went back and looked at the balance tube, the fitting I have with 27 tpi did not come from the balance tube, it was in the box of parts and I assumed that's where it came from. You are right, you know your stuff. As soon as I get the brake problem solved I'll get back to my mixture adjustment and vacuum leak. Jim
 -
 Some thoughts on the above. First, the 1/8 pipe thread specs are very similar between NPT and BPT and they would be difficult to differentiate. The 1/8 NPT spec is 27 threads per inch, while the BPT uses 28 TPI. If you are holding a fitting up to a tap and that fitting only has four or five threads on it (which would be typical), it would be very difficult to tell the difference between 27 and 28 TPI. Second, there were no (what are typically called) "barb fittings" used by Datsun on the balance tube. So if you had something like the below installed, it was a previous owner modification. This is what I think of being called a "barb fitting": So if you had something like that in the 260, it WAS probably 1/8 NPT, but it didn't come from the factory like that. ☺️
 -
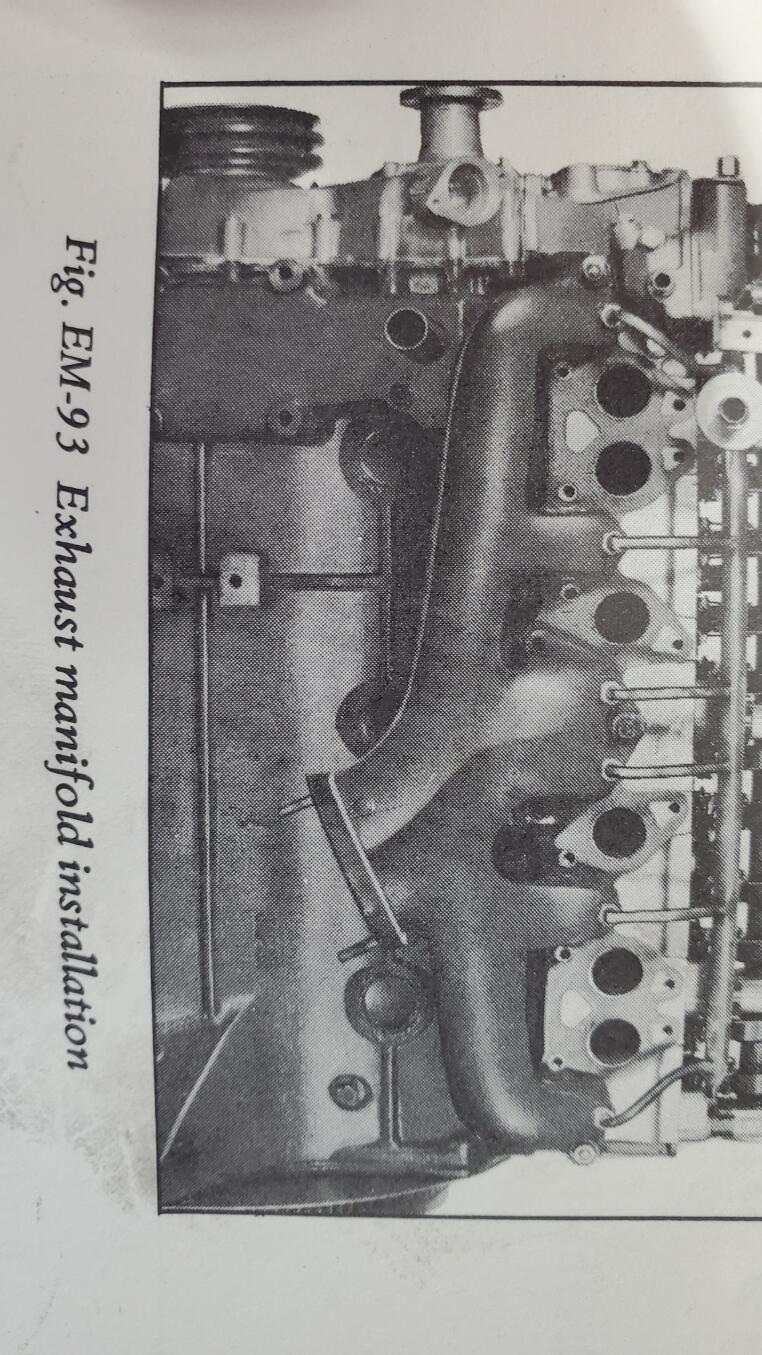
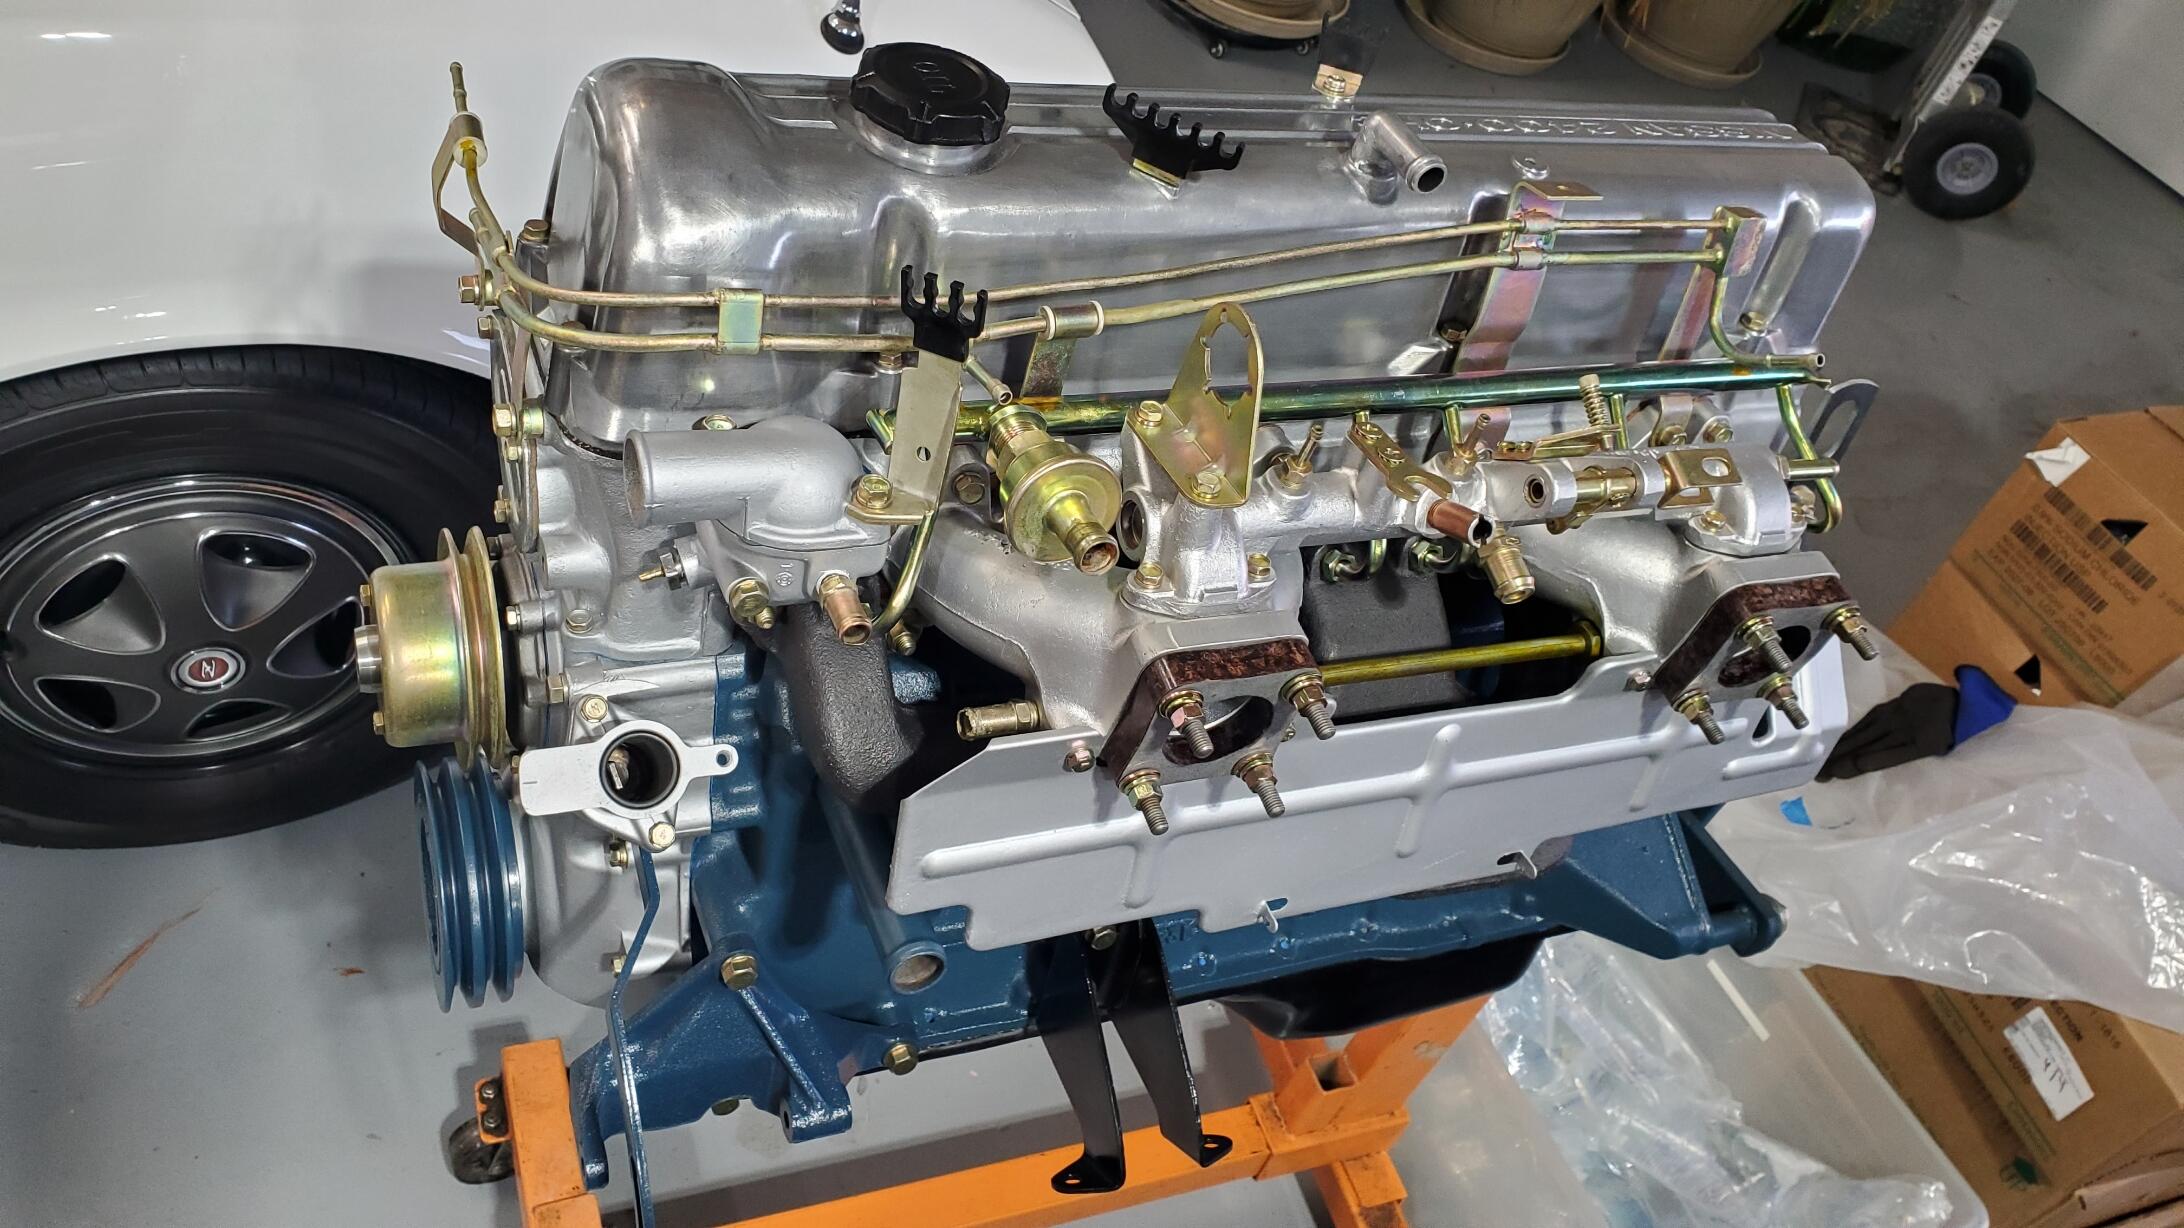
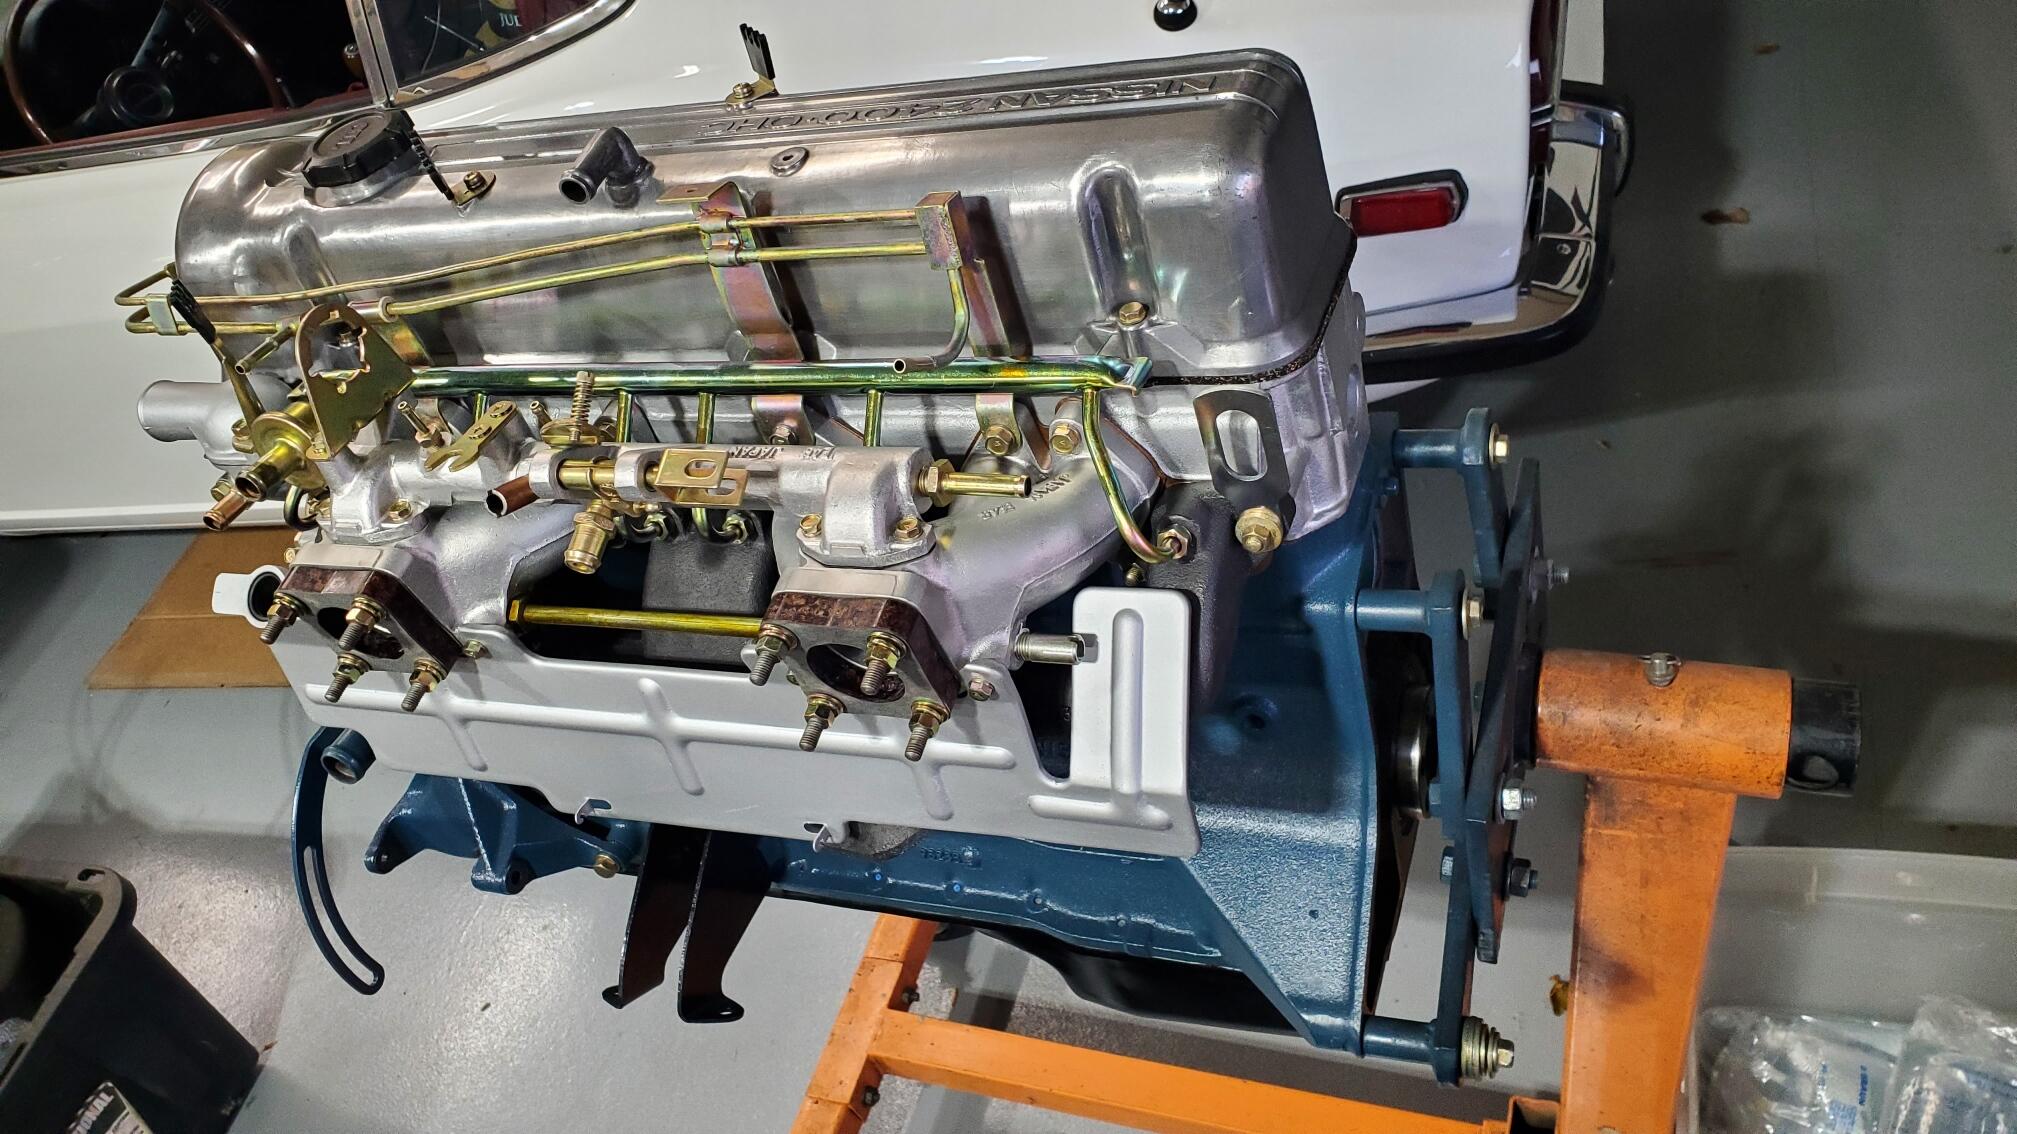
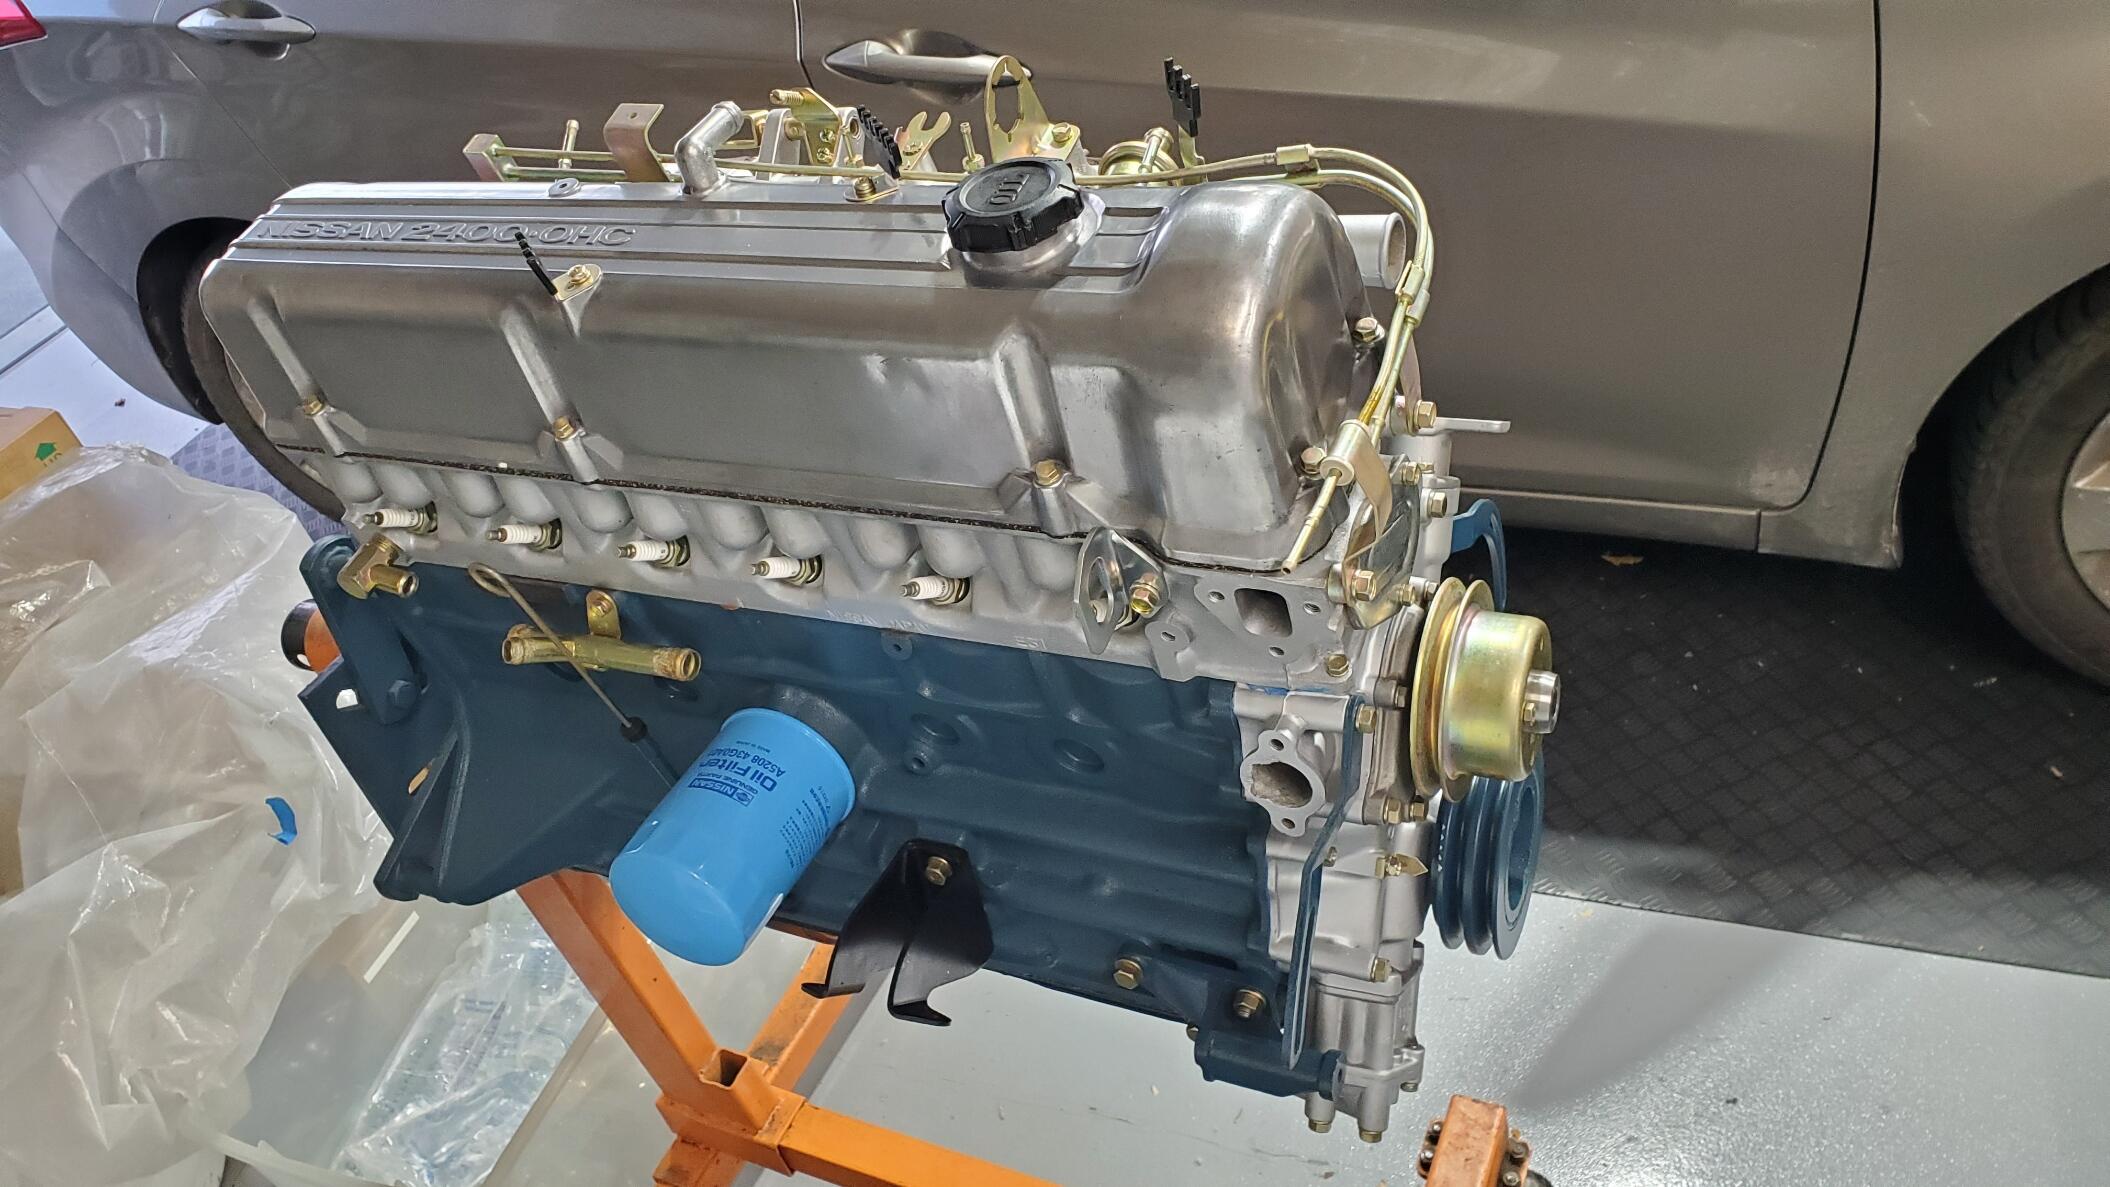
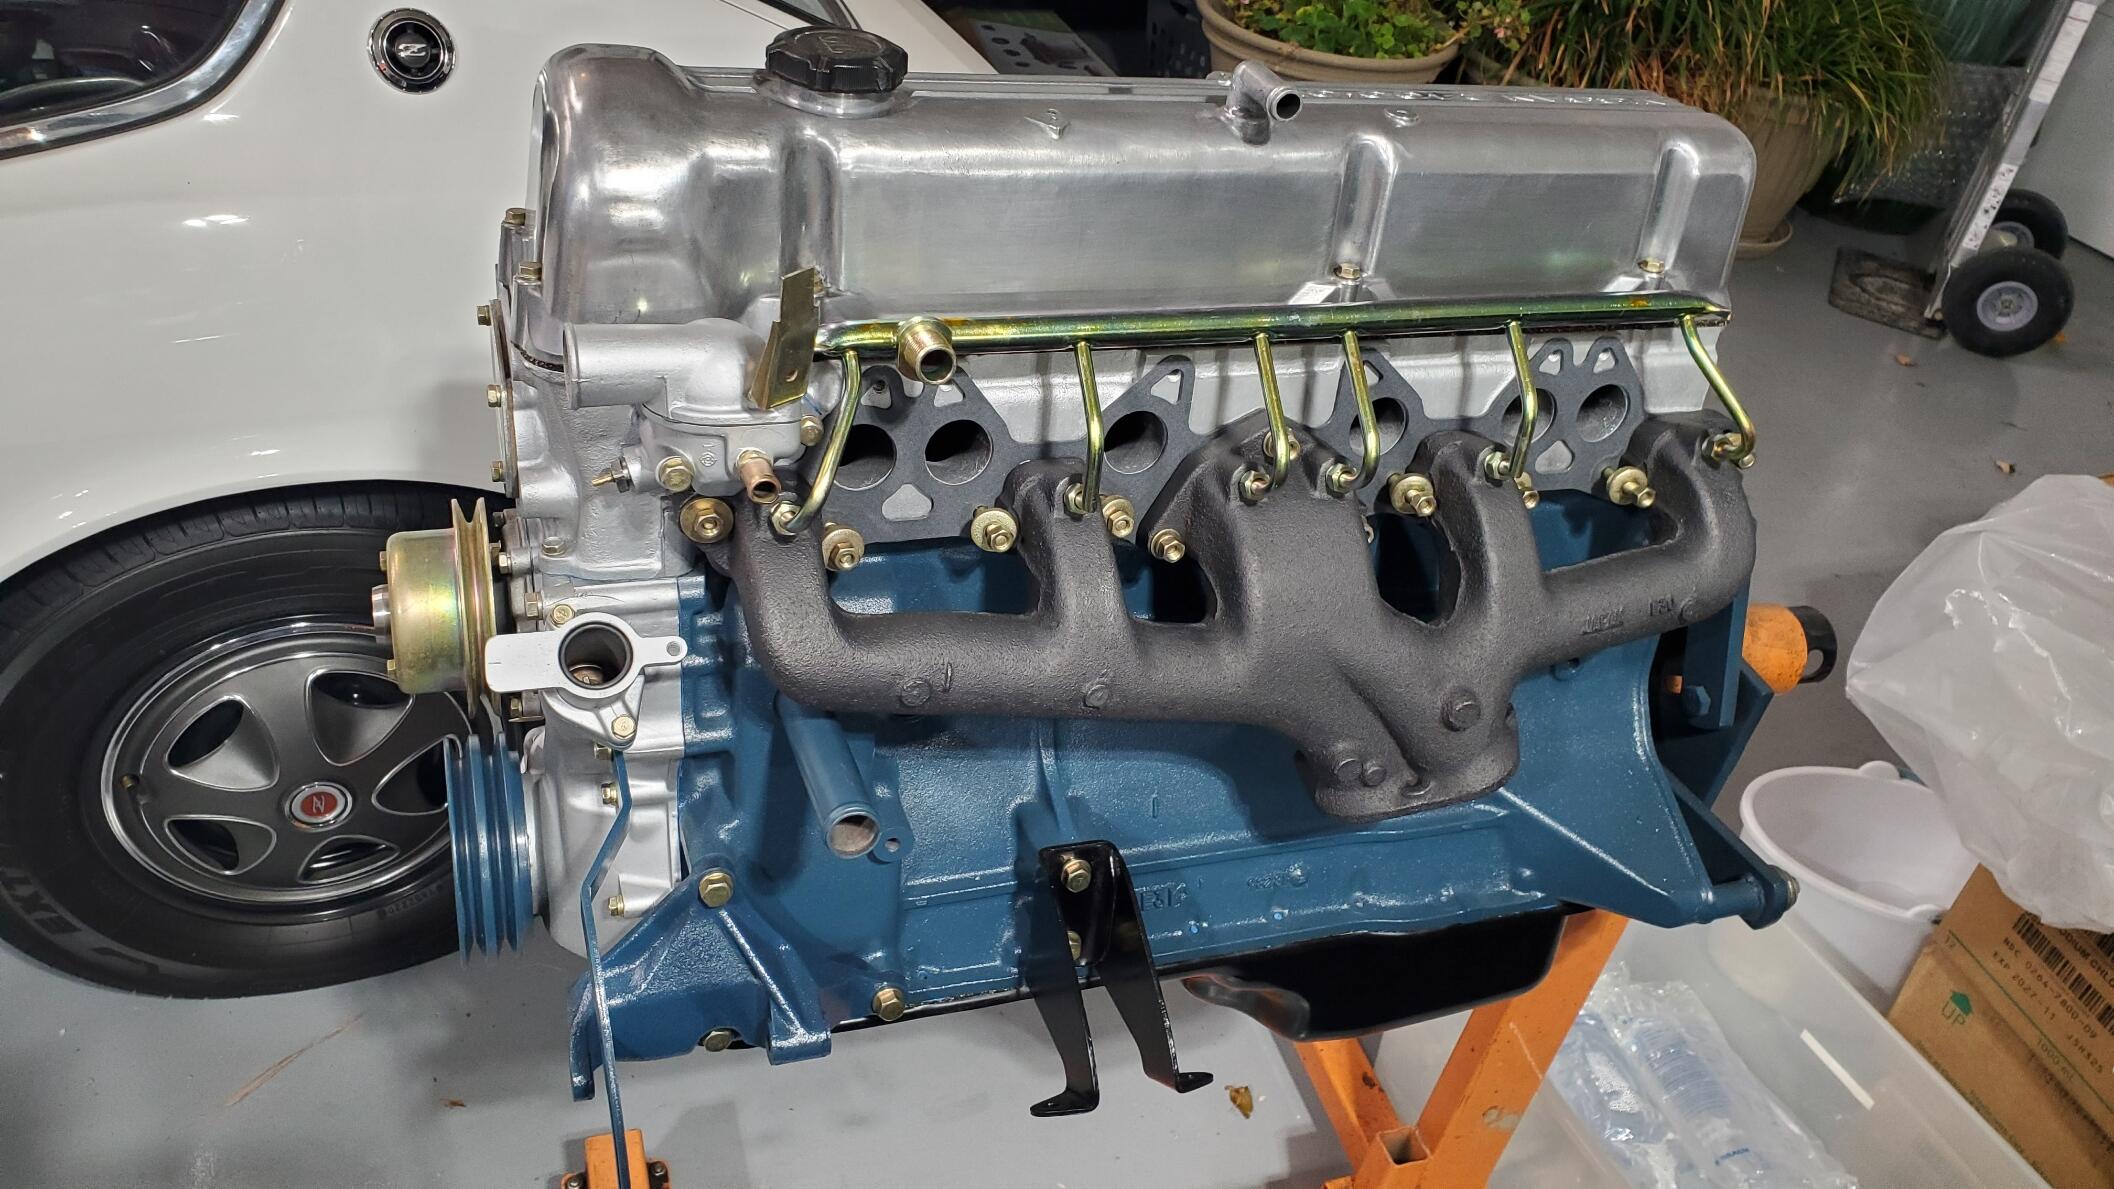
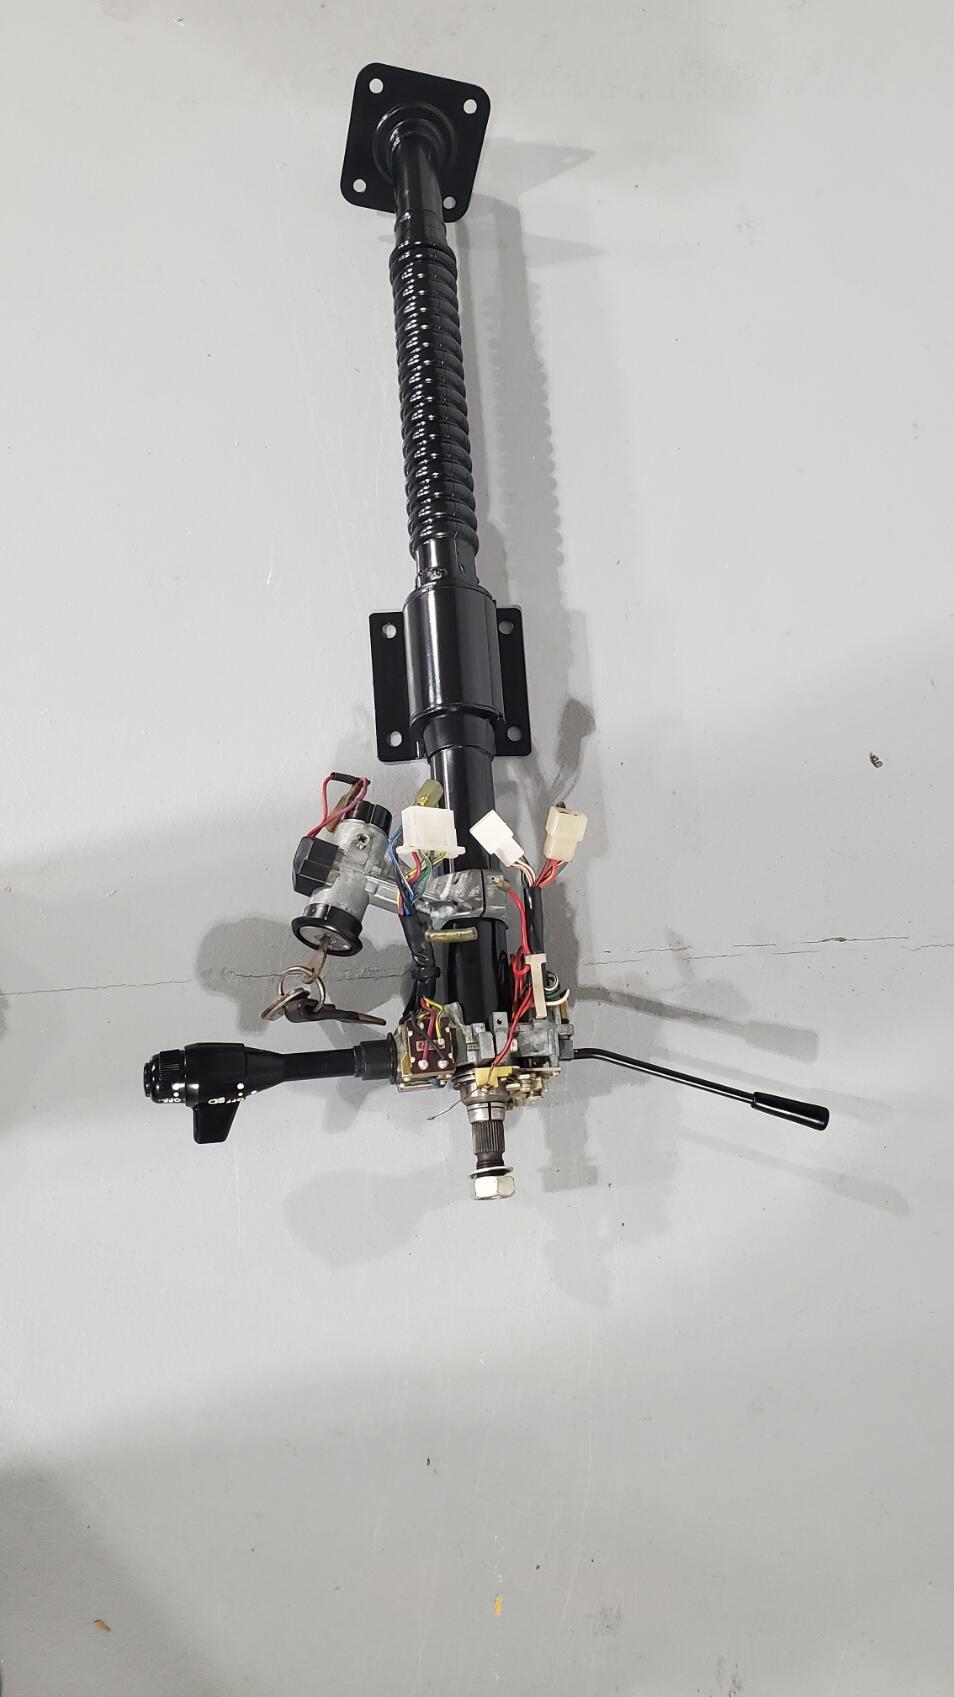
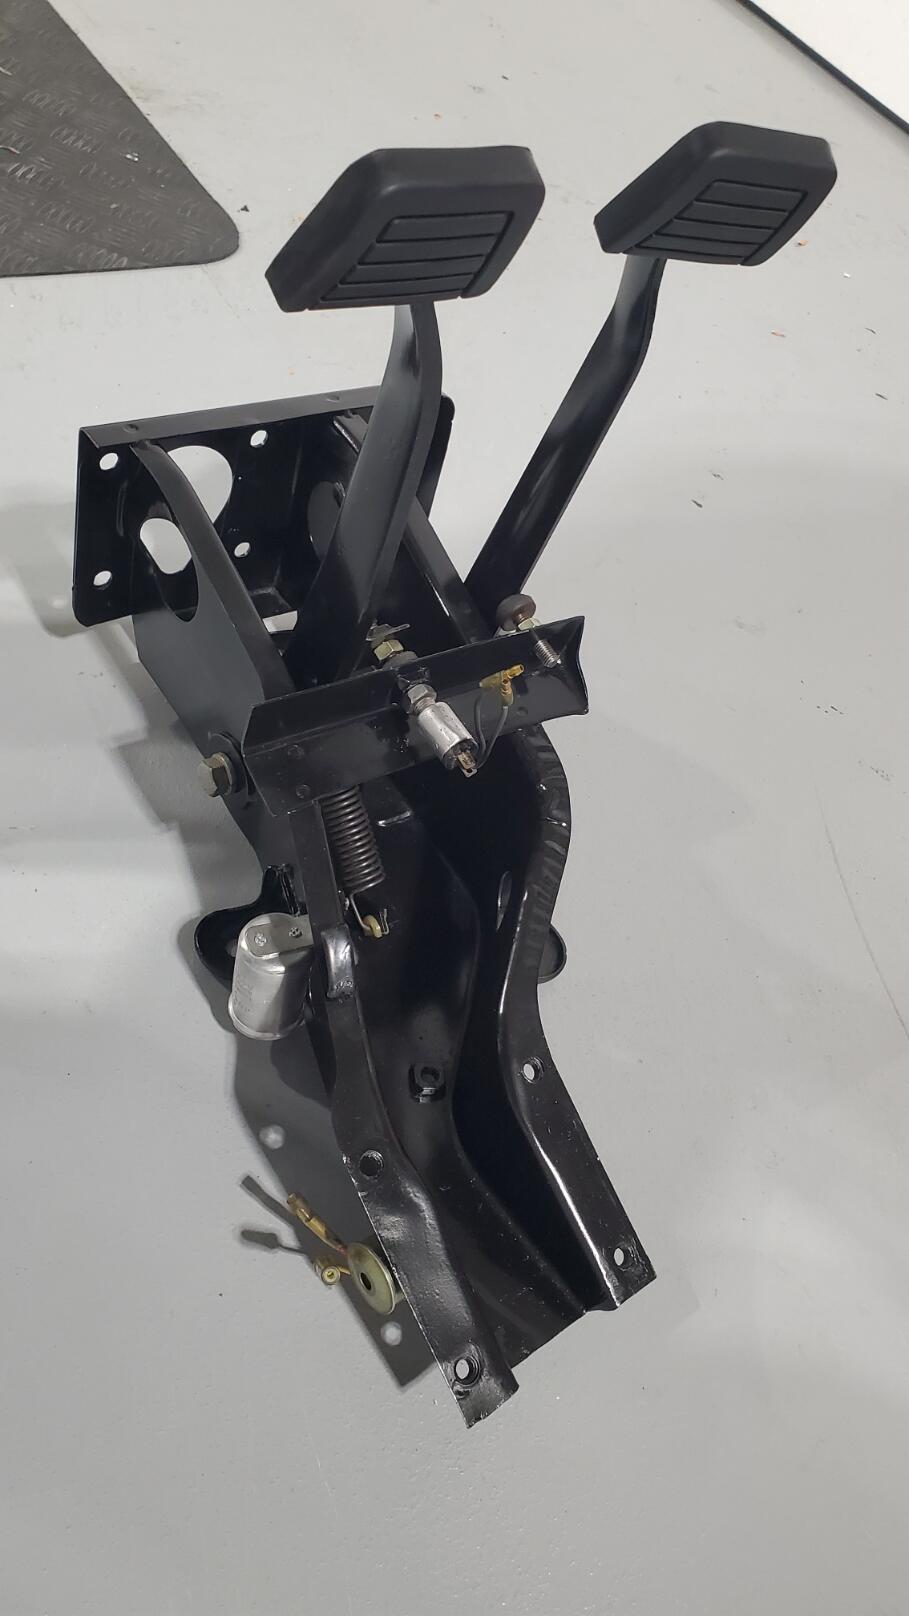
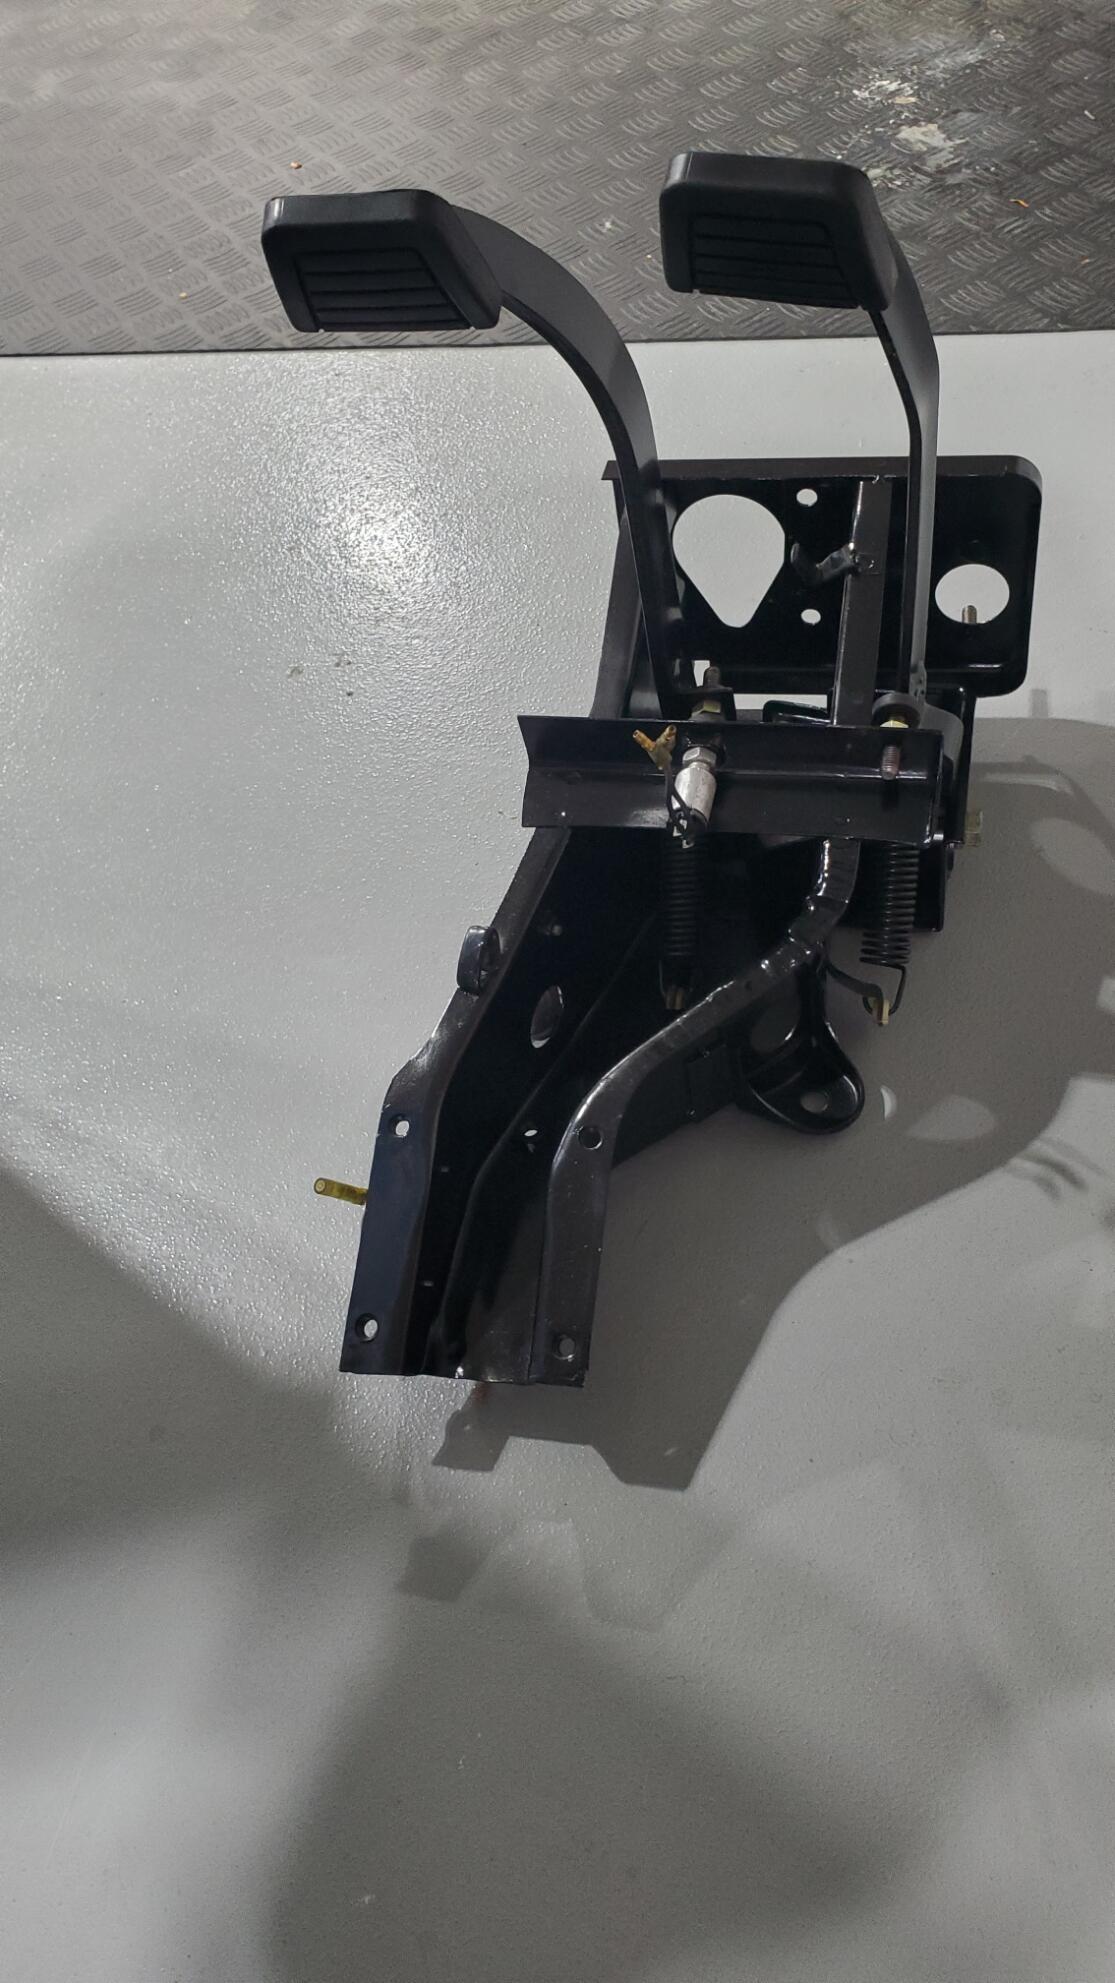
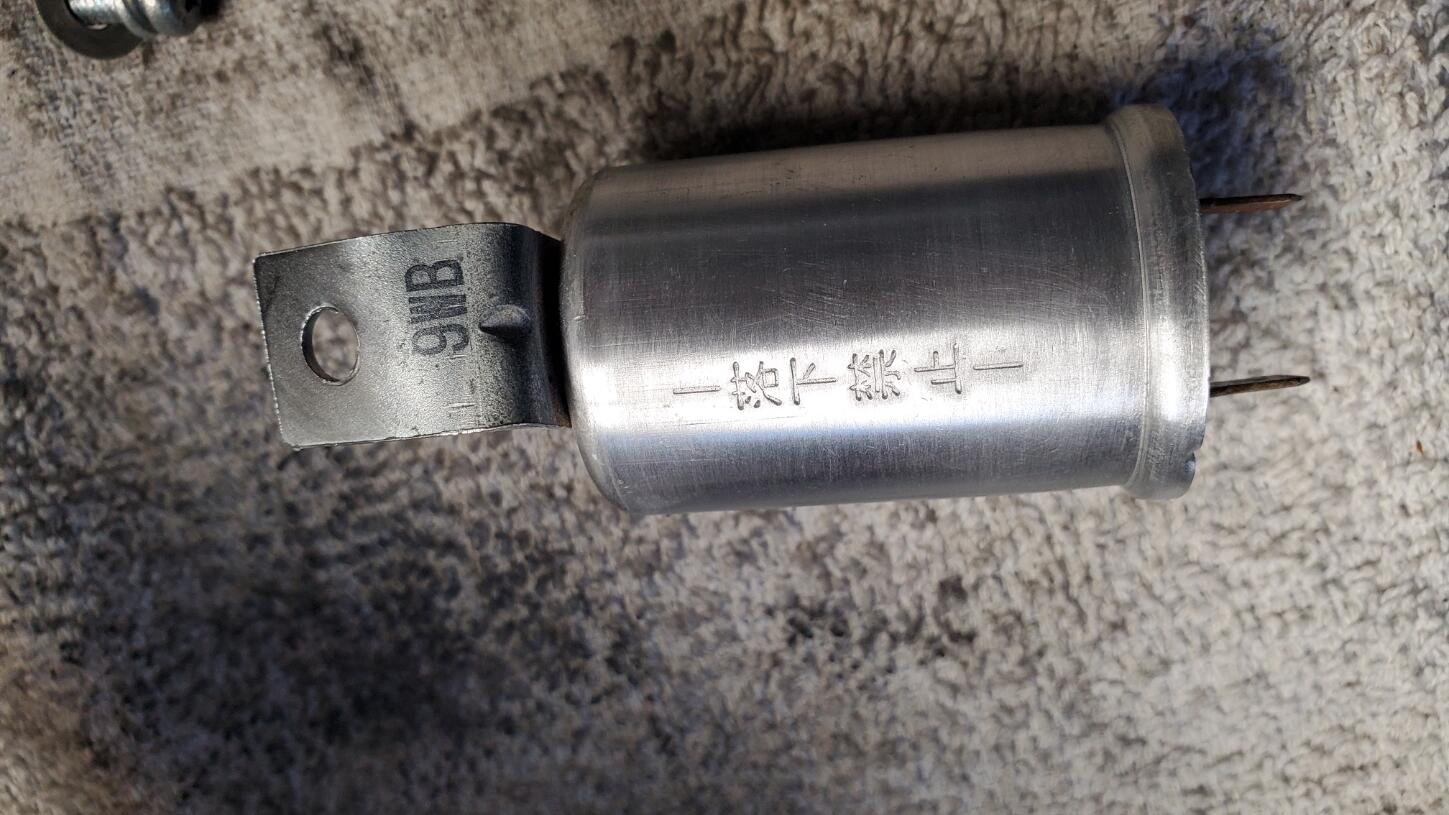
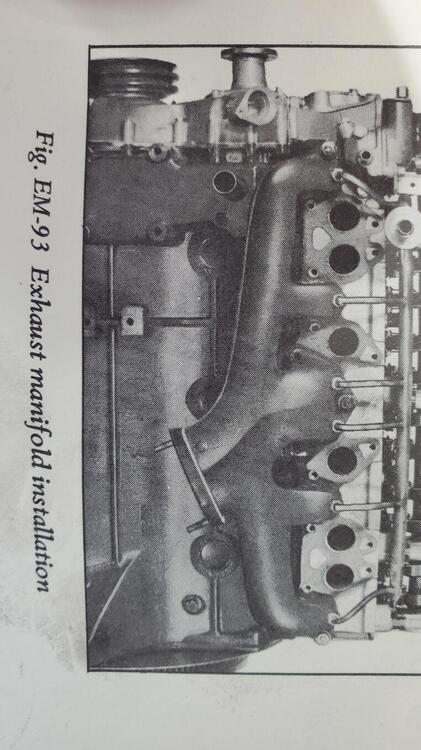
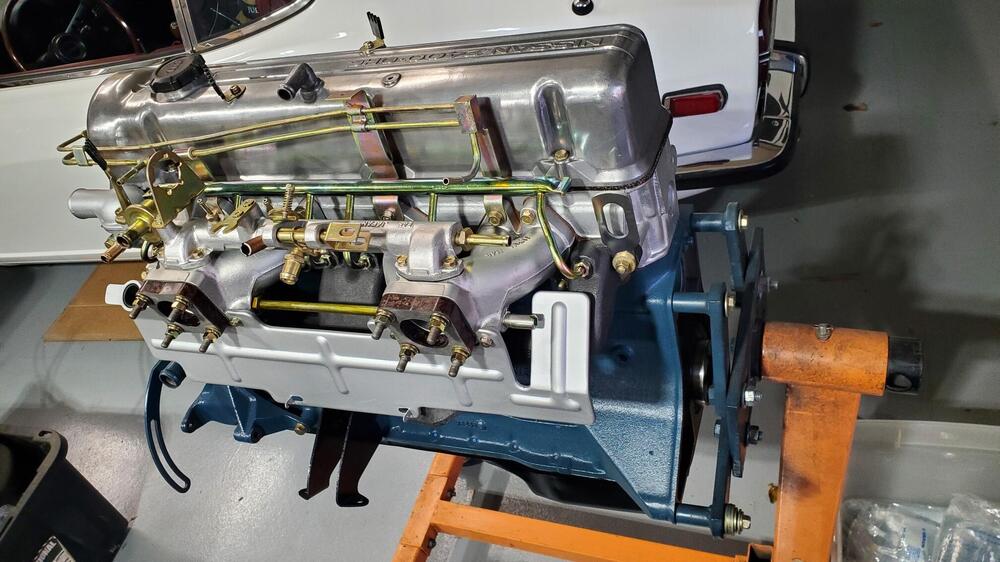
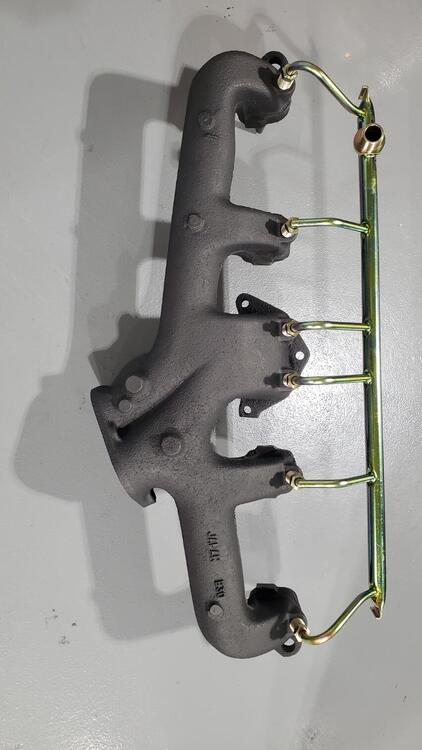
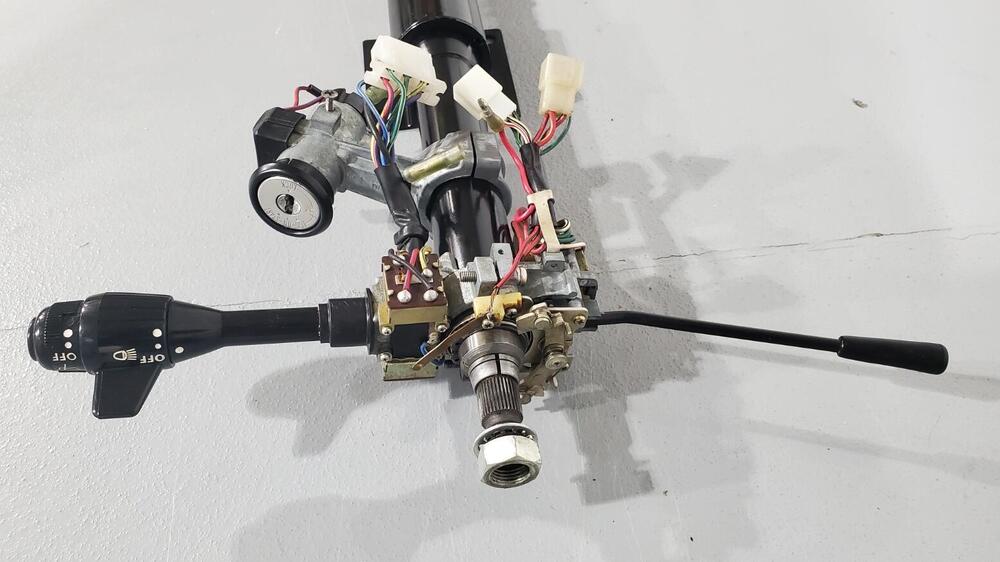
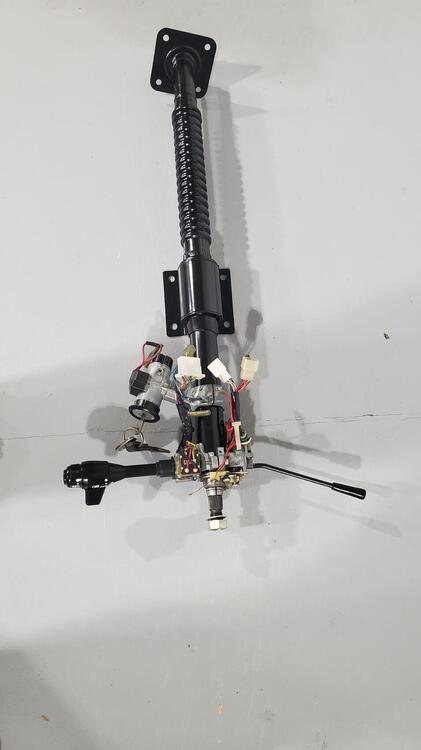
 I should have a lot more updates and pics here as I have finished my summer home projects. Also, I am hoping the body and paint will be finished in the next month or two, so we should see some good progress. I appreciate all of the input here. I am always open to advice and the knowledge of those that have seen and worked on these cars in the past. Personally, I will listen to the panel of experts and then move forward with what seems to be the best direction. Also, as most of you know, I own a pretty much un-restored early 240Z that I grew up with since I was 9 years old (in the family for 55 years) , so I have a nice reference vehicle. That being said, I find it interesting that there seems to be a tendency to hold the ZCON judging in high regard. Personally, I do not have a very high regard for ZCON judges. In reality, many of them have never owned an original Z car or examined one closely. As a result, they make a number of mistakes in their judging, none of which can be contested because you do not receive the judging sheets until several months after the show. One of these days I will start a thread here titled "ZCON Judging Errors" and see who weighs in, in addition to the items I would list. A few examples are the deductions on my early Z for the weld lines on my oil pan. (FYI 0042 has the same weld lines so they will probably mark this off too). Another good example is the Franklin mint car losing points for having the 'Silver zinc' coil holder instead of 'Yellow zinc' holder. I have heard of judges insisting the original brake lines were stainless steel, the rear diff cover was bare aluminum and fuel hoses were not the 'cloth wrap' style. I am sure that I am just hitting a very small portion of the errors as I am only familiar with the cars that I have been involved with and what I can remember off the top of my head. Anyway, just had to rant a bit about the judging issue. Don't even get me started on the non-Z show judging. Regarding the Exhaust manifold finish, that is an interesting discussion. For most of my restorations, I have always consulted Les Cannady at Classic Datsun Motorsports and never questioned his advice (He was just 10 miles down the road) . If I am not mistaken, I think only his shop and Pierre Z were the only shops approved to build the Restoration Z's. Because of that, I have always used the gray powdercoat that he recommended as the default finish. However, given the current discussion and comments, sounds like there are several other options out there that might be more true to form. After looking at a number of different options and comments regarding the color, I am happy with the graphite finish option. Two of the items that lead me in that direction are pics from the Nissan engine service manual and pics of my own motor disassembly that are pictured below. Both pics show a dark cast iron finish, not a light gray finish. So, I am sticking with the graphite and will probably go with that in the future as well. I installed the exhaust manifold and intake assembly to the engine. Pics below. (Also looking for a correct rear engine hoist bracket) I finished up the steering column, and replaced the connector on the turn signal assembly. The main shaft was sanded and re-painted and all the electronics cleaned up. I re-finished the steering wheel that now looks much better, but not sure I will stick with this. The wood finish should be more redish. Problem is that the wood veneer is very thin and I am not sure how much was removed in the restoration attempt from the previous owner. Previously, the nubs on the opposite side were sanded through unfortunately. I will let it be for now, but may revisit it. The center metal portion looks good though. I cleaned up the brake and cluth pedal box. Ready for install. I have no idea what is written on that silver can below.


-
 BobAtasc joined the community
 -
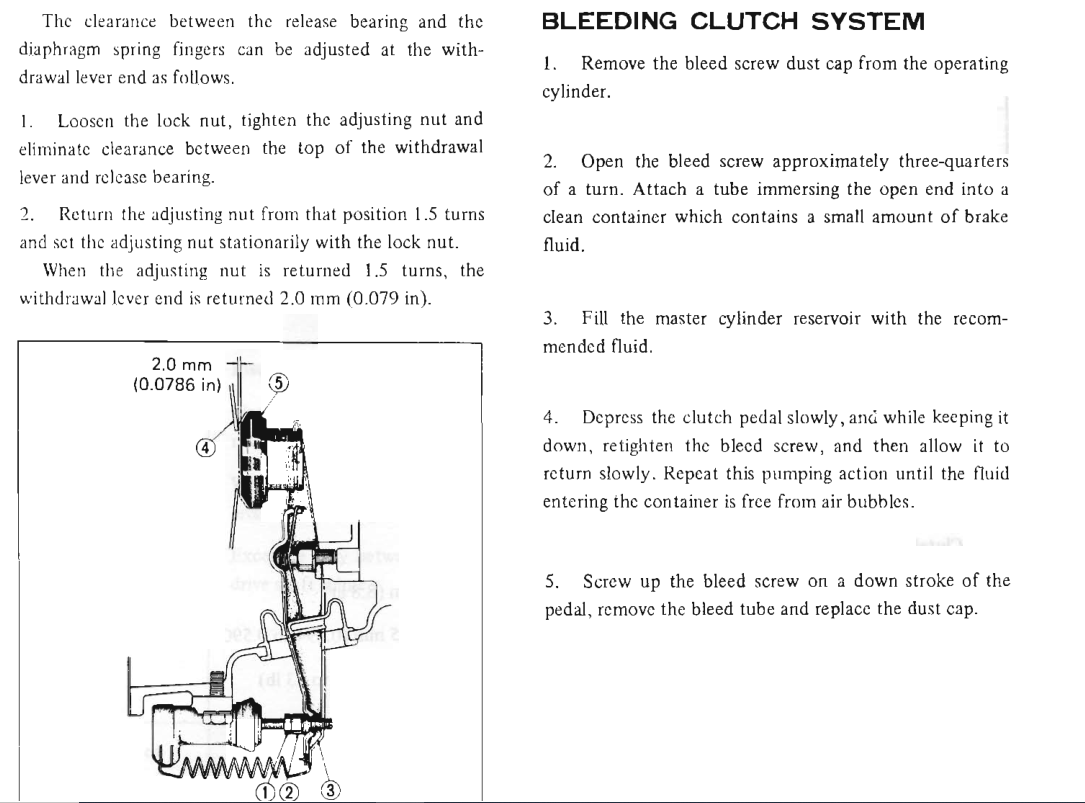
If it was mine I'd watch the play at the adjusting nut on the rod. Press the fork against the pressure plate fingers using one hand and run the nut in until you have contact with the fork with the other one. That would be zero play. Then back it off 1.5 turns. Easier to do the adjustment without the spring attached, since you'll be able to feel when you're on the pressure plate fingers. I've never done one but I think I understand what they're trying to accomplish. 2 mm of play between bearing and pressure plate when the slave clyinder is at the start of its stroke. Don't forget to check the pedal adjustment at the MC also. I've adjusted play there in the same way. Just max out the adjustment rod, being careful not to press the piston in to the MC bore, then back it off a bit. Another feel by finger job. And you don't need to remove the clevis you can turn the rod with a pair of pliers or a strong grip while everything is assembled.
- Yesterday
-
I missed the part on returning 1.5 turns, I’ll check that in the morning. This might be a dumb question but with the transmission in the car are you able to see the release bearing from underneath or is it more of a tighten until there is no play in the release lever and then back off 1.5 turns?
-
 Ready for my close-up Mr. de Mille…
-
Did you follow the instructions? Don't know why they show the measurement since most people will just tighten until play is gone and loosen 1.5 turns. Nobody's going to stick a feeler gauge in that hole. Don't forget to bleed.

-
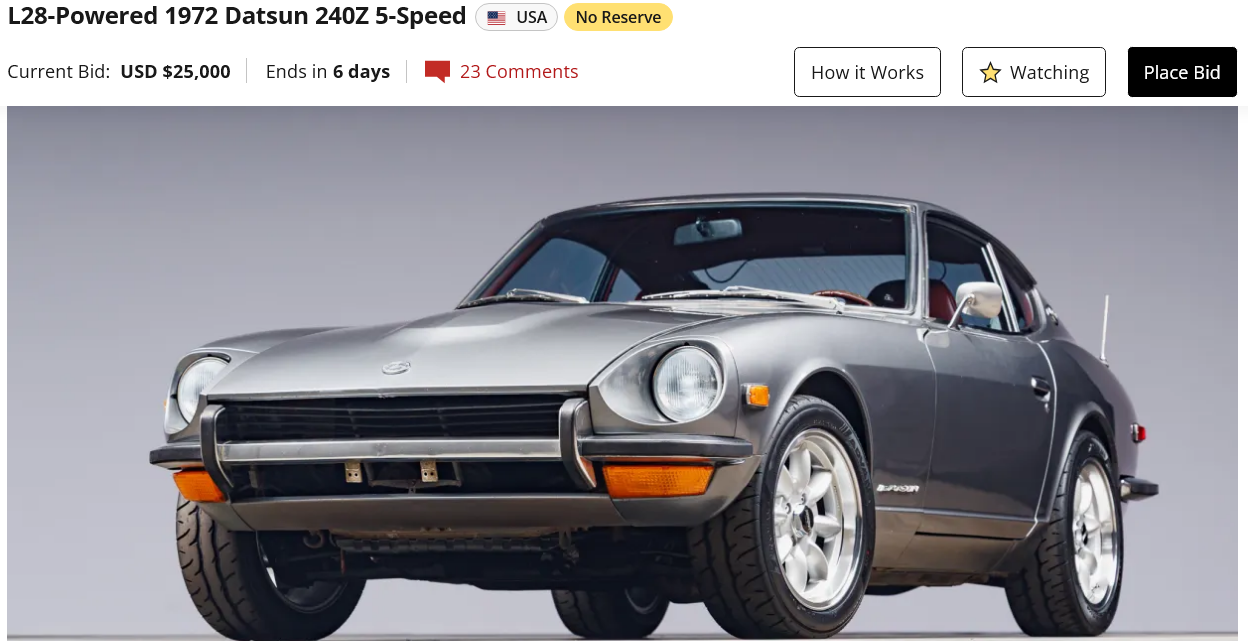
$36,000

-
I have a 71 240z that I’ve recently got driving again. It was having some trouble going into gear so I changed out the clutch master and slave cylinder. Now the car has no problem shifting up but seems to not want to shift down easily and grinds when I try to put it in reverse. Any thoughts? I’ve attached a video that shows the slave cylinder actuating when the clutch is engaged. Do I need to adjust the slave cylinder to actuate farther? When the clutch is pressed engine goes into neutral fine. IMG_1808.mov
-
dzcg might be having seller's regret. 🤢 Everyone knows about ad blockers. They work. Good luck.
-
 FWIW.. subscribing to a VPN like Surfshark or Nord, etc... eliminates at least 90% of the ads.
 -
@Derek makes something similar. https://forums.hybridz.org/topic/119641-twin-cam-head-for-the-l6-from-derek-at-datsunworks/?do=findComment&comment=1249401