Classic Z Car Club Hosting & Homepage Update We’ve recently completed a few important upgrades to ClassicZCars.com. First, the site has been moved to a new hosting platform, helping us significantly reduce ongoing server expenses while maintaining the performance and reliability needed to support the community. We’ve also refreshed the front page with a more modern layout and improved content presentation. As part of that update, the large advertisement that previously appeared at the very t
I’ve received a few reports about issues with our downloads section, so I took some time this morning to investigate. It turns out there was a permissions problem affecting access. The good news: this has now been fixed, and access to the downloads area has been fully restored. To avoid any confusion, here’s a quick reminder of how download access works: Guest Members – No access New Members – Up to 2 downloads per day Community Members – Full access Subscribing Members – Full access Moving
Hi everyone, We’ve introduced an updated user group hierarchy here at The Classic Zcar Club. This change helps us: Keep the forum safe from spam and scams Protect our technical downloads and resources Recognize the members who actively contribute to the community Below is a quick breakdown of how the new system works. 👀 Guest Visitors who are browsing the forum without creating an account. Permissions • Read-only access to public areas • Cannot post, message, or download files These are typic
Hi all, wanted to let everyone know that our events calendar is now back online. It took me some serious debugging and problem solving, but it's back online! Thanks for your patience as I weeded through the code. You can find it on the top menu. Mike
We’re rolling out some changes to make things better for everyone. Here’s what’s happening: 📢 Updated Process 🔹 Classifieds – Our classifieds have officially moved to the forum! You can find all existing listings in the Classifieds section, and new ads can now be posted there. ⏳ Features Coming Soon (Awaiting Code Updates) 🚗 Garages – A space for members to showcase their cars with photos and details. Stay tuned! 🆔 Profile Block – This will display your member number and a quick profile summary.
In case you were wondering what has changed in our website over the last week, here's a video I posted in our Youtube channel. This should help clear up some of the new features and how you can use the new website design to your advantage.
Exciting News: Welcome to the Next Chapter of The Classic Zcar Community! Greetings, Z enthusiasts! I’m thrilled to introduce you to the refreshed and revitalized Classic Zcar Community—the next evolution of the space we’ve all cherished for the past 30 years. While we may have a new name, our mission remains the same: to bring together passionate Z-car owners, restorers, and fans from around the world. This update isn’t just about a fresh look—it’s about embracing new technology while preservin
Wasn't sure if I added this somewhere on the site already. So, I'm adding this to my CZCC personal blog.
Mike Gholson of the Classic Zcar Club knows wheel fitment is key to getting the look that makes his car stand out. Mike came to VTO Wheels because he
Just wanted to share some photos of my Z over the years...
This photo is just after I bought and rebuilt the engine. I drove it around through college. At the time, I purchased the car from a family friend who was storing the car in his garage. Purchased for $500 with a frozen engine block, bad head gasket, and seized brakes.
After a few years, and the first split with my ex, I decided to 'man-up' and start taking the car apart. I spent the next several years sand blasting, wi
Back at it this past weekend after some much needed vacation! I removed the rear bumper, fuel expansion tank, and the interior. I had some help from my better half. We spent about 4 hours Saturday and 5 hours on Sunday. I started with the rear bumper. The original bumper has hole in the middle of the top, from what I presume was a hitch. The back side of the bumper has a good bit of rust. These two issues probably add up to a new bumper. Ouch!
Next was removal of the fuel expansion ta
This weekend I worked on starting the exterior teardown. I started with the rear finisher around the tail lights. This revealed more rust damage than what I expected. I knew the hatch sill would need to be replaced but now it seams like there is deeper damage. I will be able to determine the extent only after the sill is removed. I was also able to remove the hood cowl, wiper assembly and the front fenders. The first fender took a lot longer than anticipated. This was because the guide I'm
I continued removing hoses and the wiring harness from the engine bay. I labeled all the wires with duct tape and a sharpie. Also removed the gas tank. Other than 44 years of dirt and a small dent, it is in really good shape. I spent a total of about 4 hours working on it this weekend. No money spent this week, but I have started looking at the complete stainless steel hardware replacement kits. Looks like they run about $300, and for that price, well worth the convenience and quality upgrade
I will be restoring my 72z back to "near original" condition. I will utilize all original equipment that can be reused and replace what can't with new. I am not overly concerned with originality, especially if it is expensive. I have set a budget of $7,700, and must include some tools, but I will document that as I go.
I will be utilizing two primary resources as guides for the process; How to Restore Your Datsun Z-Car by Wick Humble and of course, the Haynes manual.
I began last we
Well hello and welcome back. As foretold in the previous updates I plan on starting up the second year of the Datsun rebuild. Looking at where I left off I’m starting to think I bit off more than I can chew with the build expecting to take three years with just the winters being the active time on the project. I know I said I would poke here and there on the Datsun in the summer, fortunately and unfortunately I did not do anything with the Z except for take parts from on location and place
Hi All! this is my first post on classiczcars.com and i'm super excited to let you all know that 3 days ago i found and rescued original Scarab #157! I put a link below to a short youtube video of the car when we got it back to the shop. If the the link does not work just do a youtube search of scarab #157 and it should pop right up.Within the next 24 hours I'm going to post a ton of pics of the car and lots and lots of documentation. This is a 2 owner car from California that was moved to the M
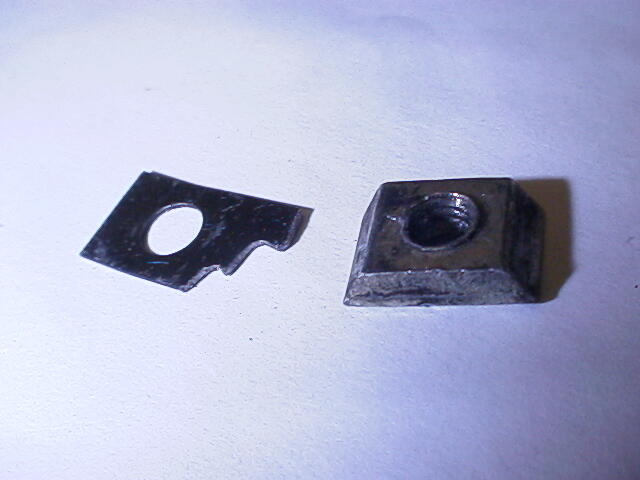
This is the original fascia nut and odd looking squarish washer that came out with it:
One of the captive nuts on the fascia on my car was stripped out so to fix that I made my own captive nut by cutting a rectangle shape out of a repair metal from Thrifty hardware and drilling and tapping it for the 4MM original machine screw. I used a bench grinder to make the new nut have the same size as the original and to have the beveled edges the original has.
The existing machine screw size is
Greetings and welcome to the Classic Zcar Club BLOG area. We have set aside this area for members who wish to host their own private Z-blog. The idea is this area will be to write articles, show build-updates, and other items related to your own projects. Think of a blog as a "journal" of your adventure. While the blog can be used to create discussions, we encourage everyone to post 2-way conversations in our Forums.
Enjoy your own personal blog and please feel free to jump up onto your own
Hi all,
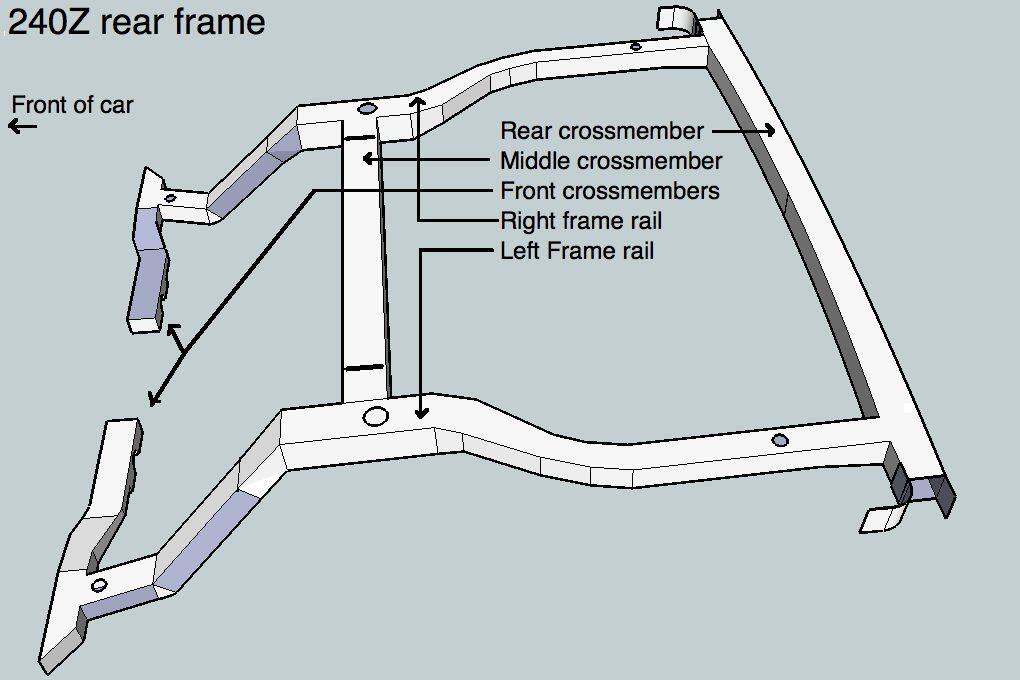
I sprayed all interior channels of the rear frame rails and interior of wheel wells of a 240Z with two cans of Transtar amber anti corrosion material using existing holes where possible. The front frame rails are more likely to rust but I had already sprayed the interior of the front rails on my car. A thread describing how I did the front frame rails is here:
http://www.classiczcars.com/forums/body-paint-s30/40048-two-frame-rails-tc-rod-there-floor-between-them.html
The Transtar
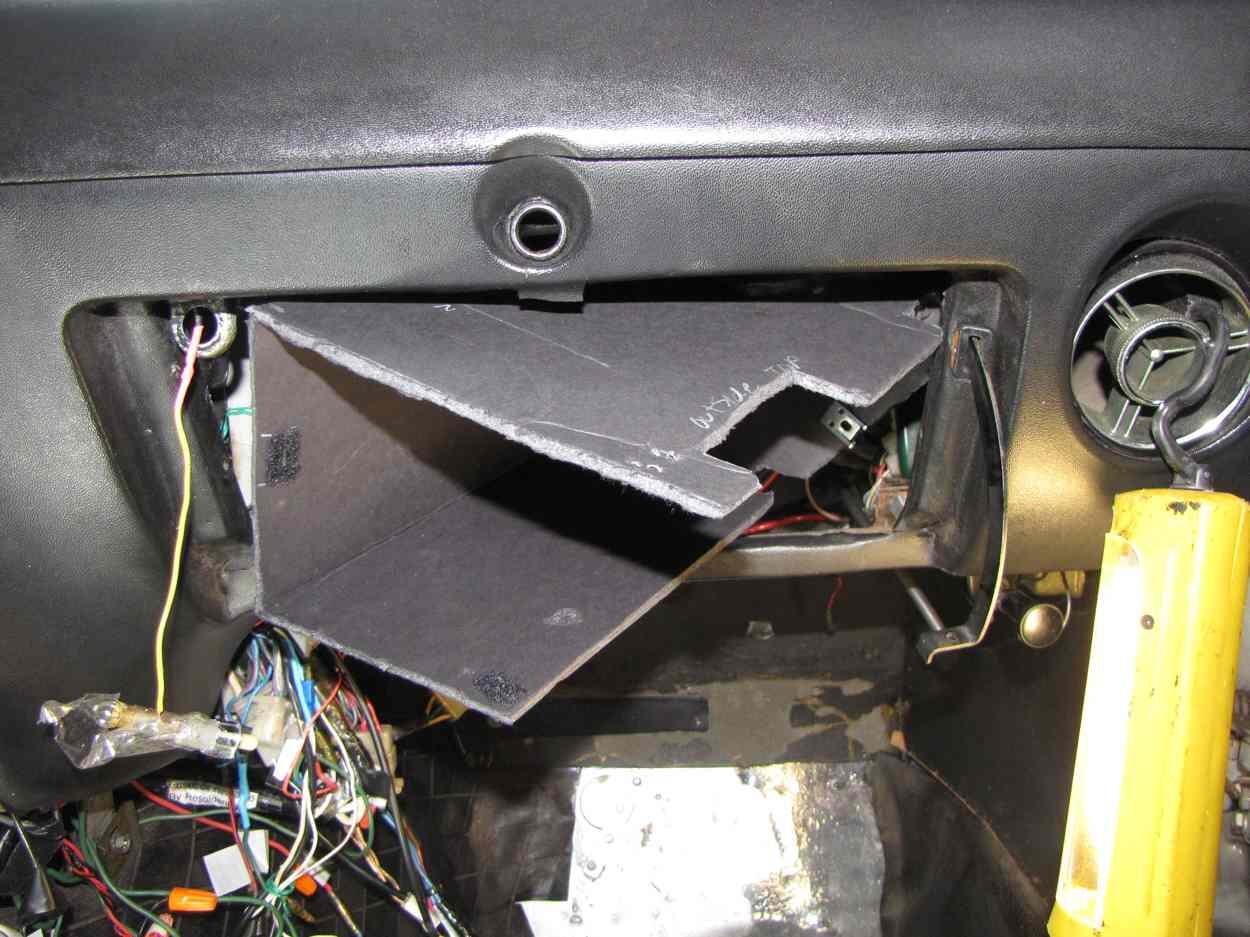
This describes how I made a two part glove box liner for a 240Z using 3/16" thick foam board.
The two parts make it easy to install:
Replacement glove box liners are available from classiczcars.com vendors however I like making things so I thought I would fabricate a new liner. I considered making this out of metal but my metal working skills are not that good so I thought I would use an easier to work with cardboard like material. After I made the liner I cut it in half 3 1/2" from
Hi all,
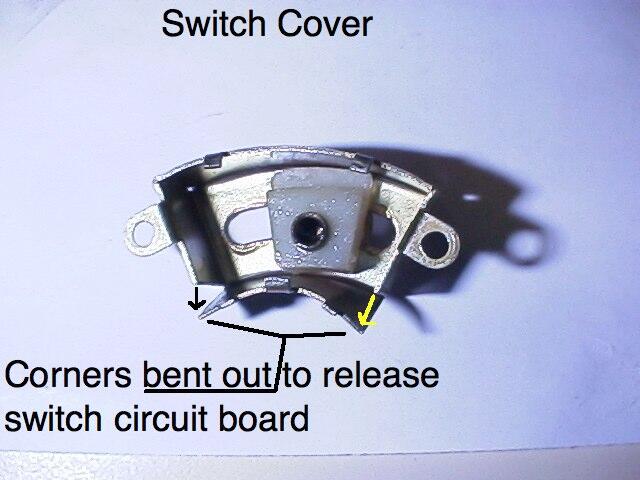
I added relays to the turn switch to take the current load off the switch by copying the idea on the website below. The mod is reversible and by doing so will leave only hidden soldered wires inside the clamshell as the only evidence it was done unless holes were drilled to mount the relays. With this setup the heavy current still flows through the fusebox but only a small current flows through the turn switch itself. I followed this website posting but I used a different brand of
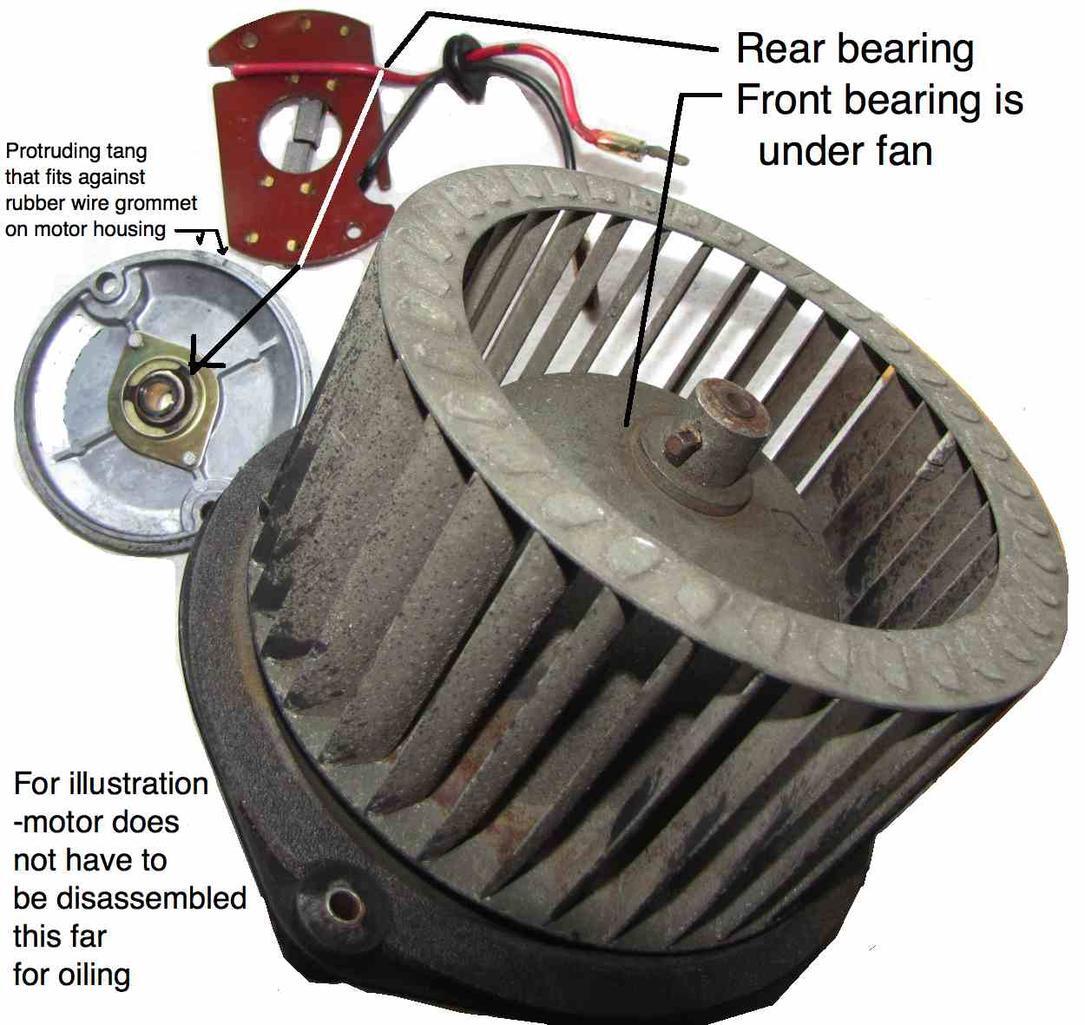
It is possible to lubricate both blower motor bearings without taking the motor out of the car to stop squeals or other noises related to motor bearings. I realized this after I had taken the motor out to lubricate the bearings. Many have opted to replace the existing blower motor and fan with a Honda civic heater fan. I like to fix things so I oiled the old motor because it was turning slowly and was squealing.
Oiling both bearings with the fan in place in the car can be done by taki
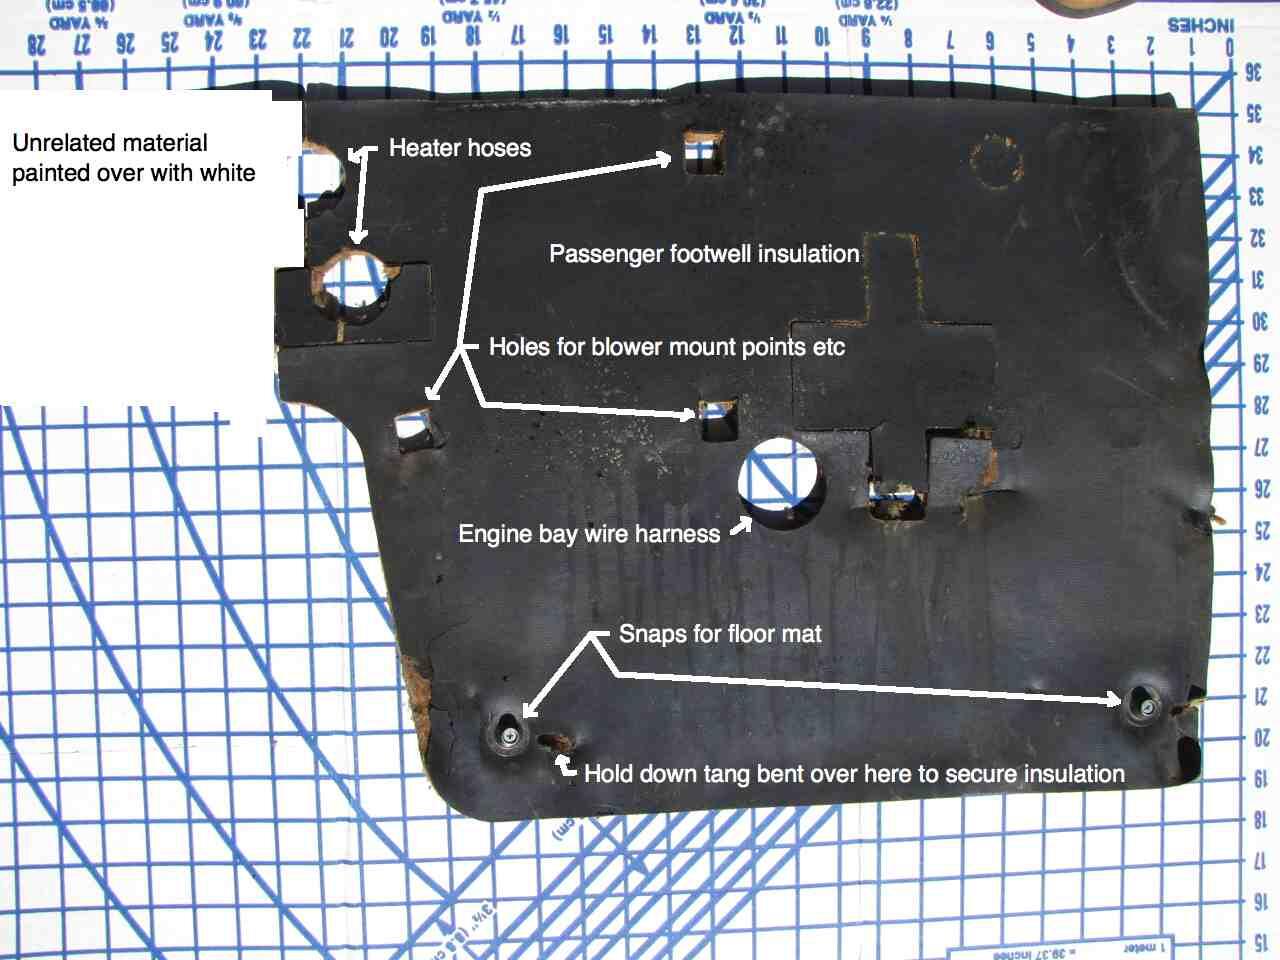
Here are pictures of the firewall insulation of a 1/1972 240Z on a "fabric board" with lines 1 inch apart going both ways to allow duplication if for some reason someone wanted to. Note that the top edge of all three pieces of the insulation are lined up with a blue line on the fabric board. Pictures were taken in full sun and have shadows. To clarify where the black insulation poster board ends and the shadow begins white dashed lines have been drawn. This could be printed out and the blue
Hi all,
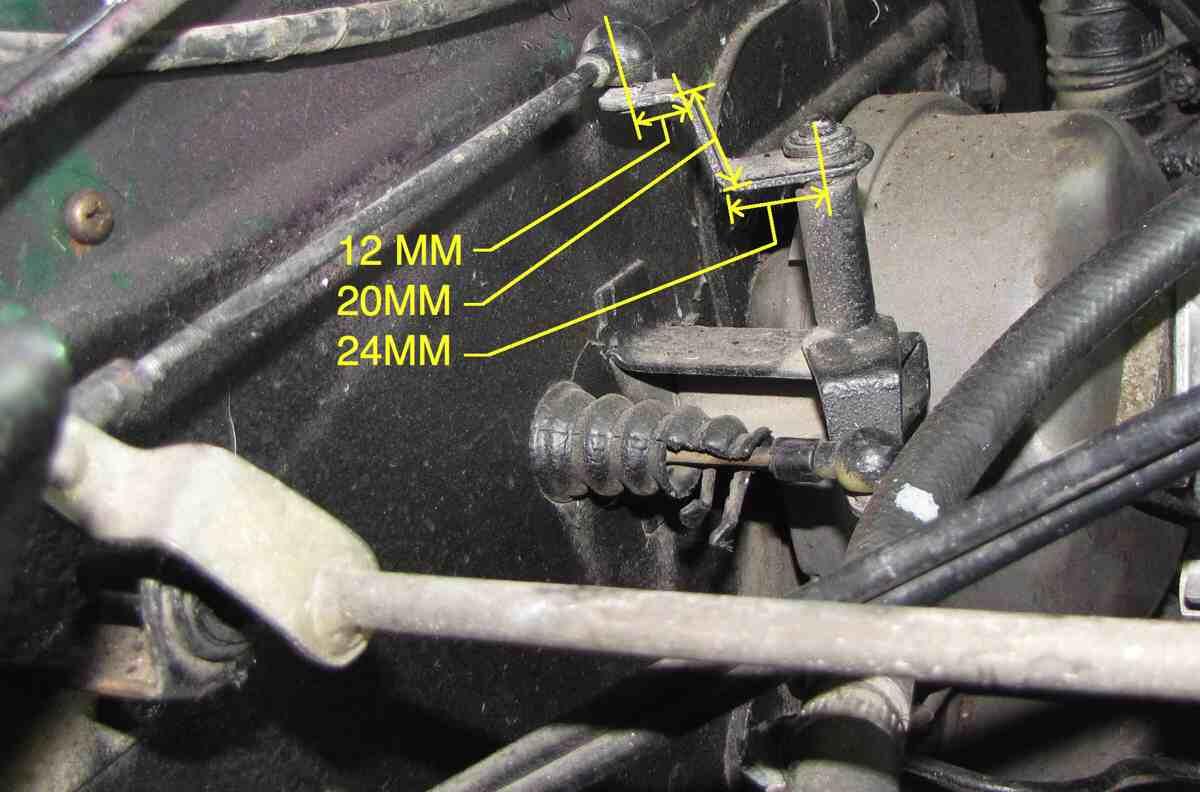
This mod eliminates MOST of the throttle jerk but not ALL of it. I owned the car for 4 years before I noticed it still has a small amount of throttle jerk. The previous owner of my 240Z reduced throttle jerk from idle to take off by bending the upper arm of the "turnstyle" as seen in the attached pictures to a stair step shape effectively shortening it. This mod is no cost, possibly reversible and requires no welding, drilling or adding parts. The connecting rod with a nylon bal