


By Mikes Z car
· 3,529 views
Hi all,
I sprayed all interior channels of the rear frame rails and interior of wheel wells of a 240Z with two cans of Transtar amber anti corrosion material using existing holes where possible. The front frame rails are more likely to rust but I had already sprayed the interior of the front rails on my car. A thread describing how I did the front frame rails is here:
The Transtar amber anti corrosion material I used is described on another blog here:
Hatch anti corrosion interior passageways - Blogs - Classic Zcar Club
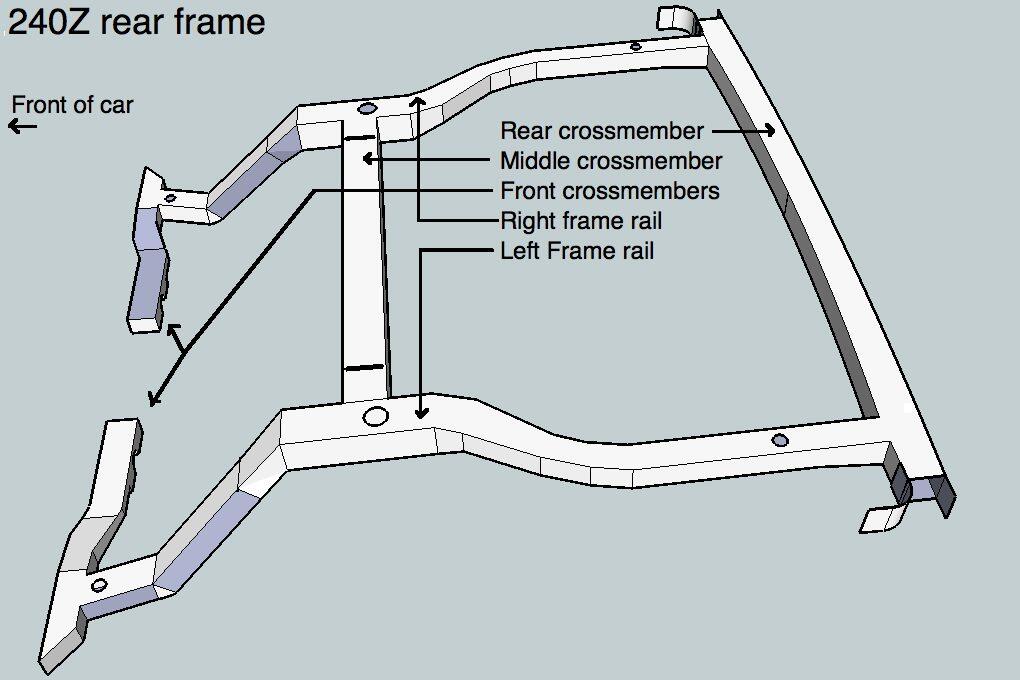
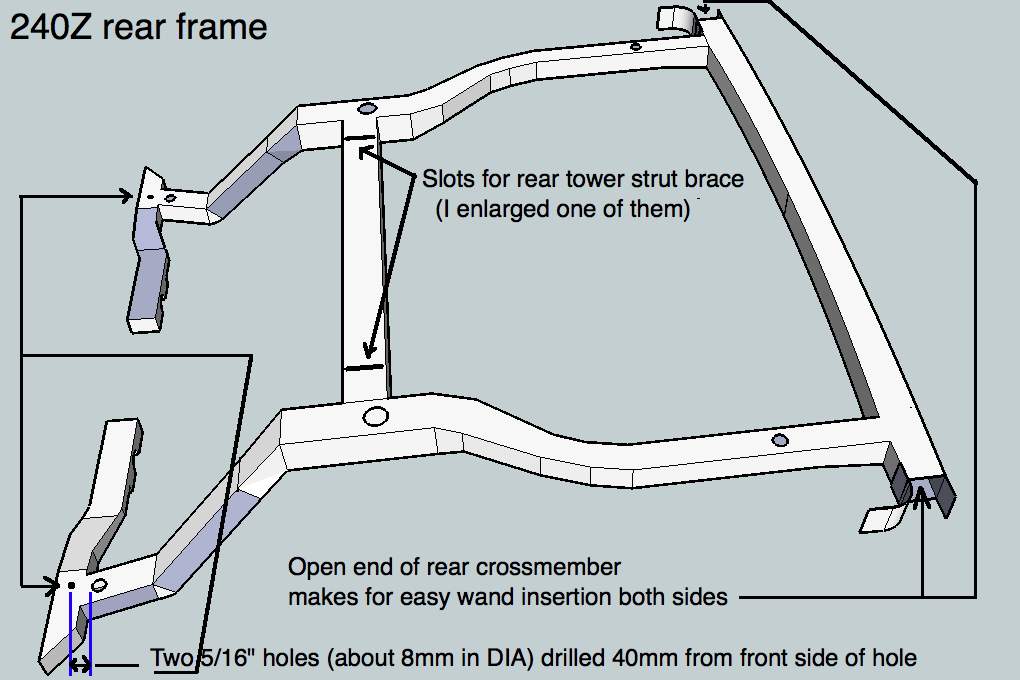
240Z rear frame naming convention I used (is there some standard for this?):

Preparation of the four crossmembers:
1. Front two crossmembers- I had to drill two 5/16" (or 8 mm) holes behind the seats on the floor, one behind each seat to access the two crossmembers right behind the seats (what I am calling front crossmembers). Right side -passenger side in U.S. shown -other side prepared in the same way:
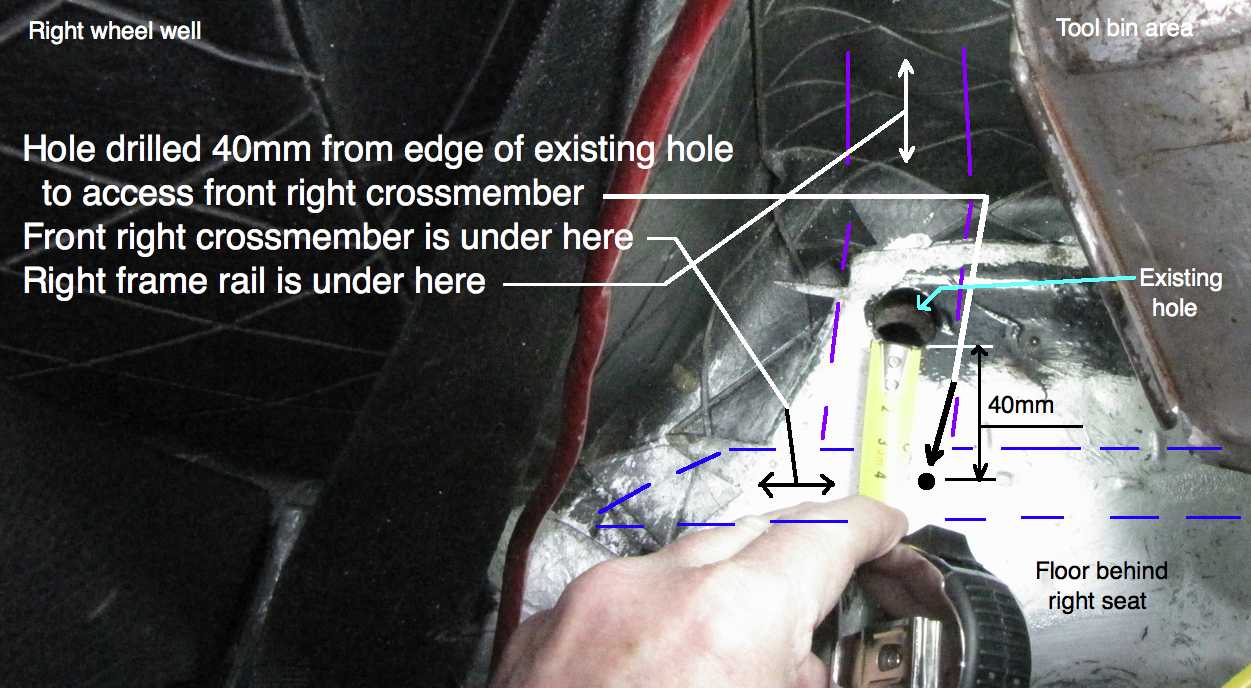
These two holes could have been made under the car to avoid having holes in the floor behind the seats.
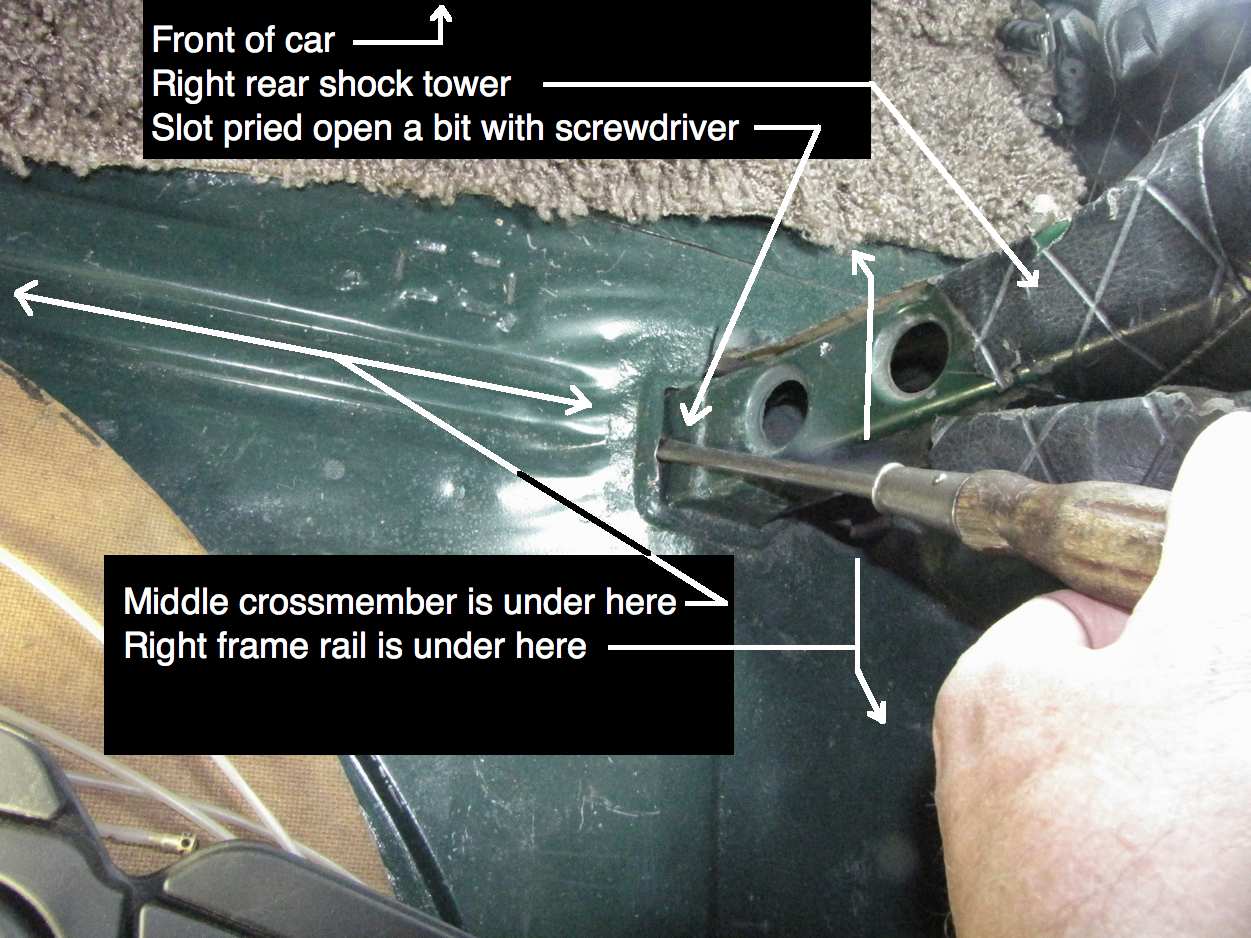
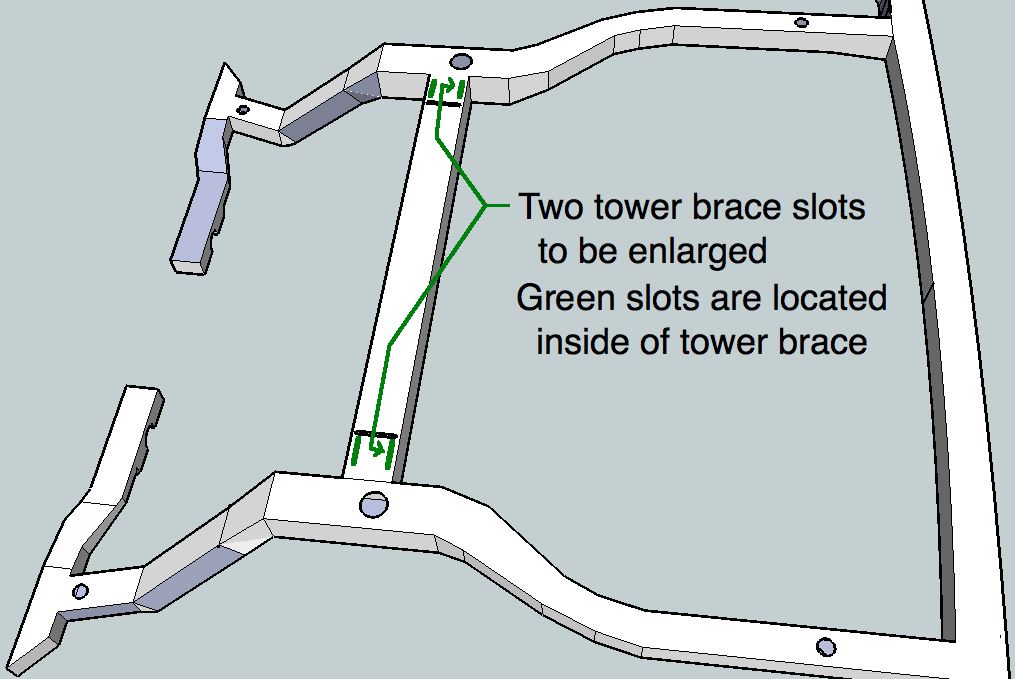
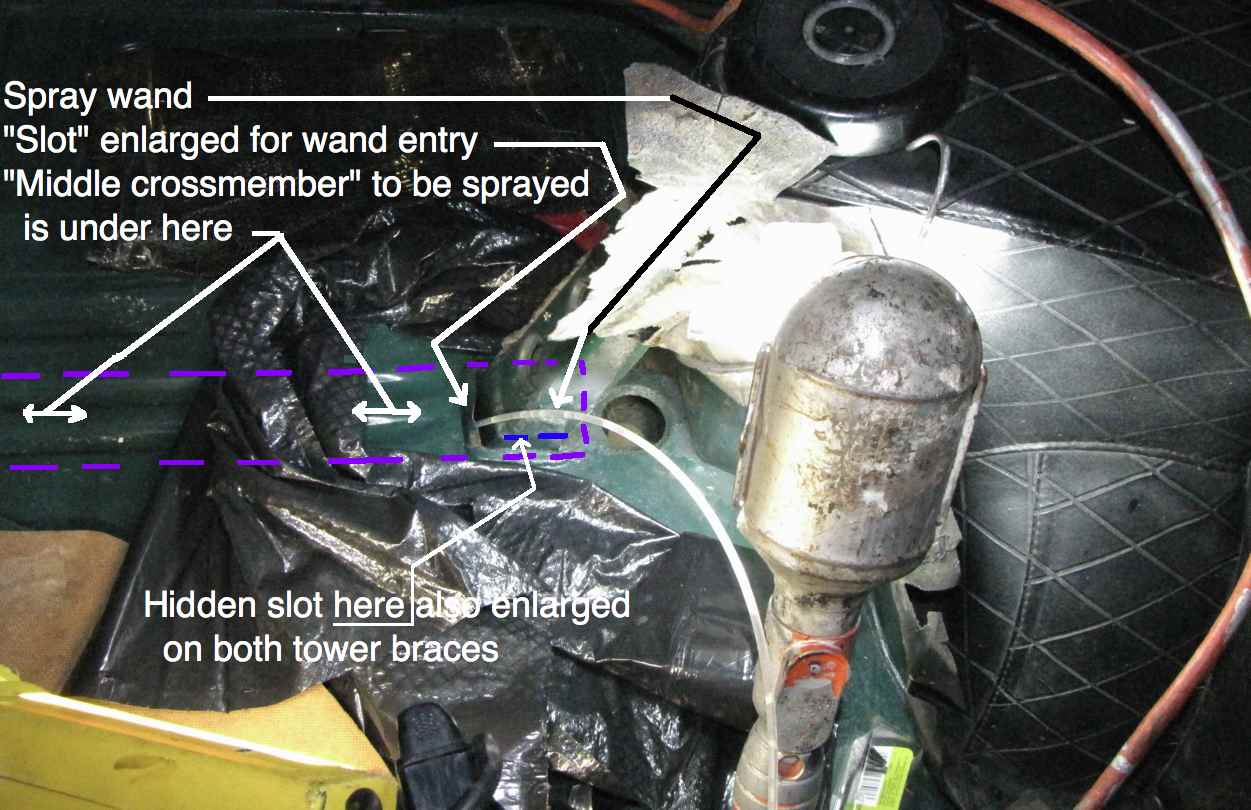
2. Middle crossmember- I had to enlarge an existing slot at the bottom of one of the shock tower braces on the floor with a large screwdriver to allow access to the interior of what I am calling the middle crossmember. Only one slot needed bending to access most of this crossmember, that one slot can be bent back later if desired, I left it bent open for possible future sprayings since it won't show when I put the shock tower vinyl back down:
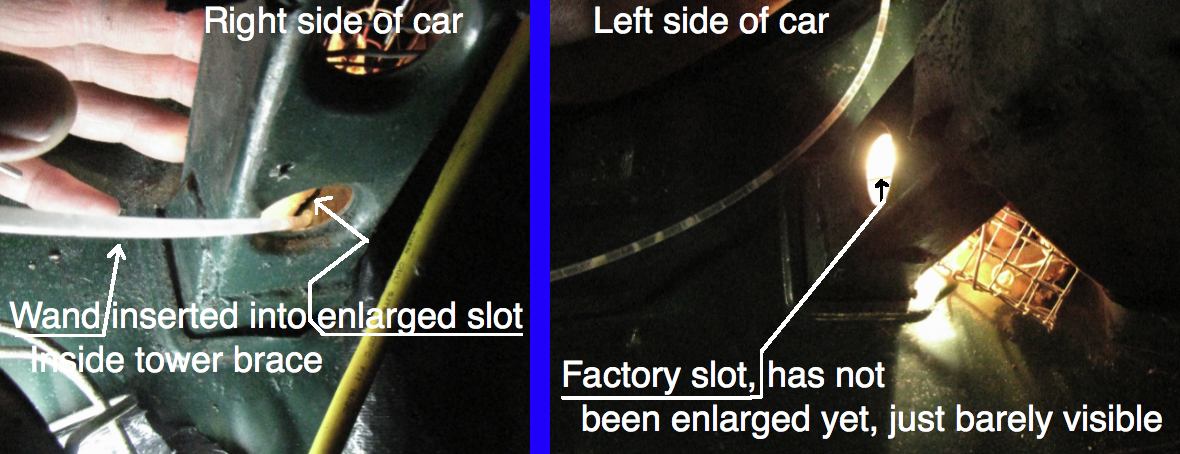
I also enlarged a slot on the floor inside the tower braces on both sides of the car to gain access to a two inch long portion of the middle crossmember on both ends of it. The slot I used is closest to the back of the car inside the brace, see the two drawings immediately below for further clarification. This step possibly could have been skipped but I like to spray everything. These two enlarged slots will never be visible in the car.
Total of two slots INSIDE the braces were enlarged, one slot on each side.
>>
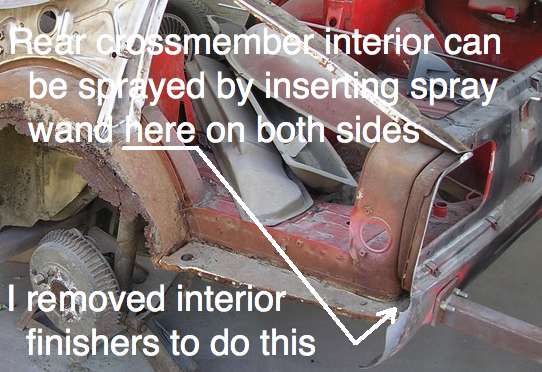
3. Rear crossmember- Removed rear plastic interior side panel finishers (not my car- thanks to whoever has this car):
Spraying operation (tip- cover spray nozzle and top of can with a ziploc bag when spraying as wand tends to pop off can sometimes- prevents getting Transtar on your car or hand):
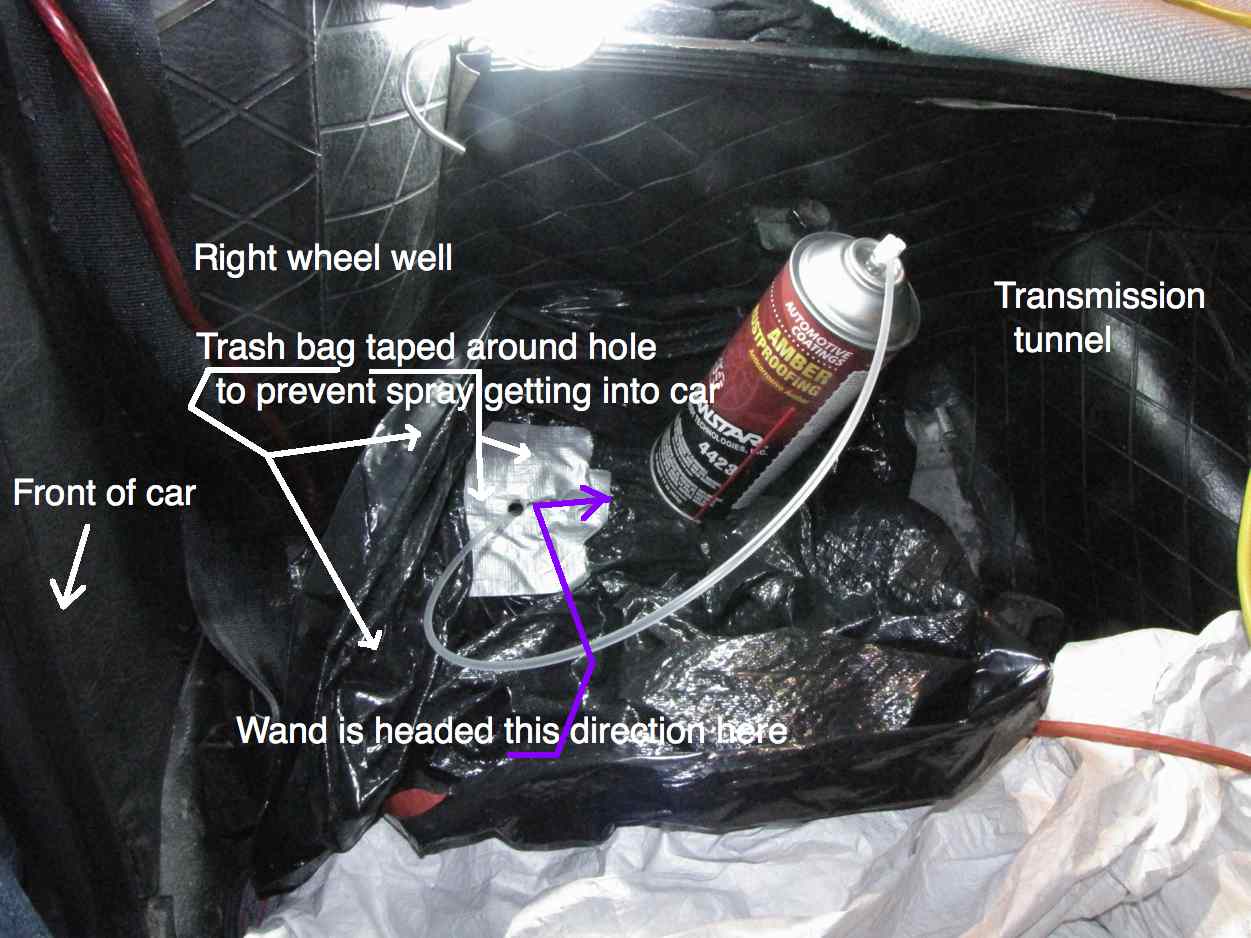
4. Front crossmember right side (both sides done the same way):
Spraying inboard from access hole
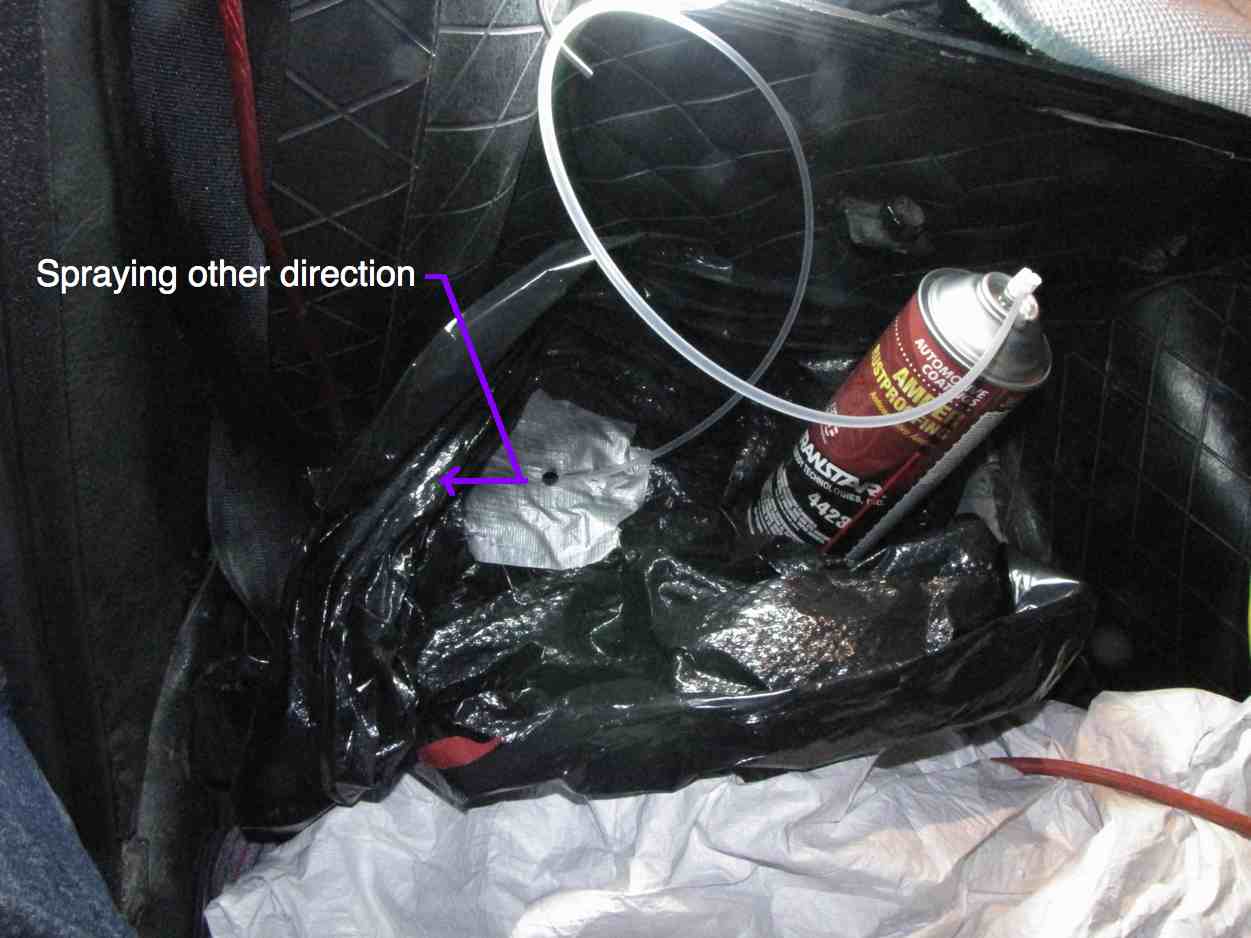
Spraying other direction, toward side of car
5. Middle crossmember:
I sprayed the middle crossmember by inserting the wand into the slot I enlarged slightly with a screwdriver. See step 16 below for more info. I also sprayed inside the last two inches of this crossmember on both sides of the car by inserting the wand into an enlarged slot inside each tower brace. See step 2 above for more info.
Top of picture is towards front of car.
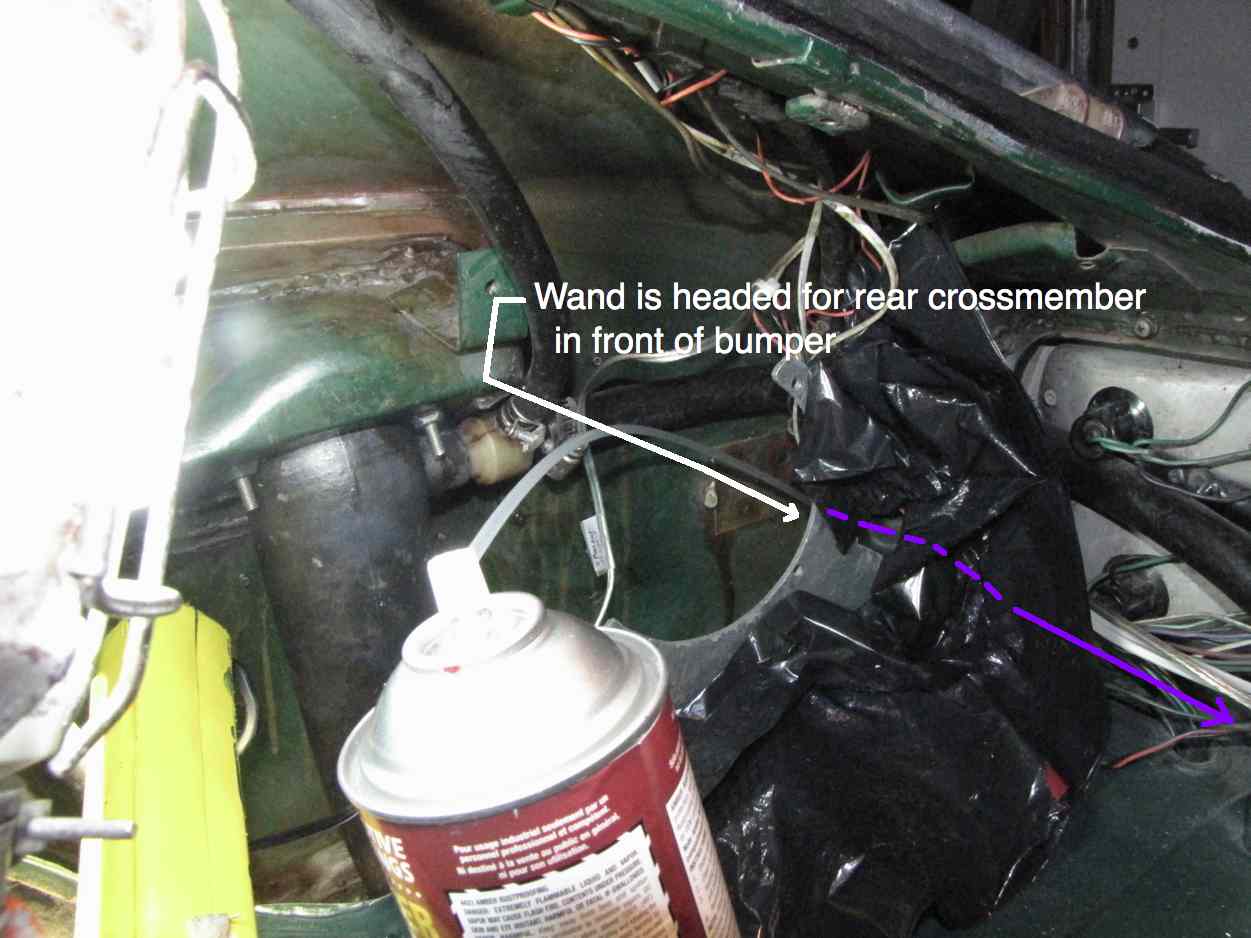
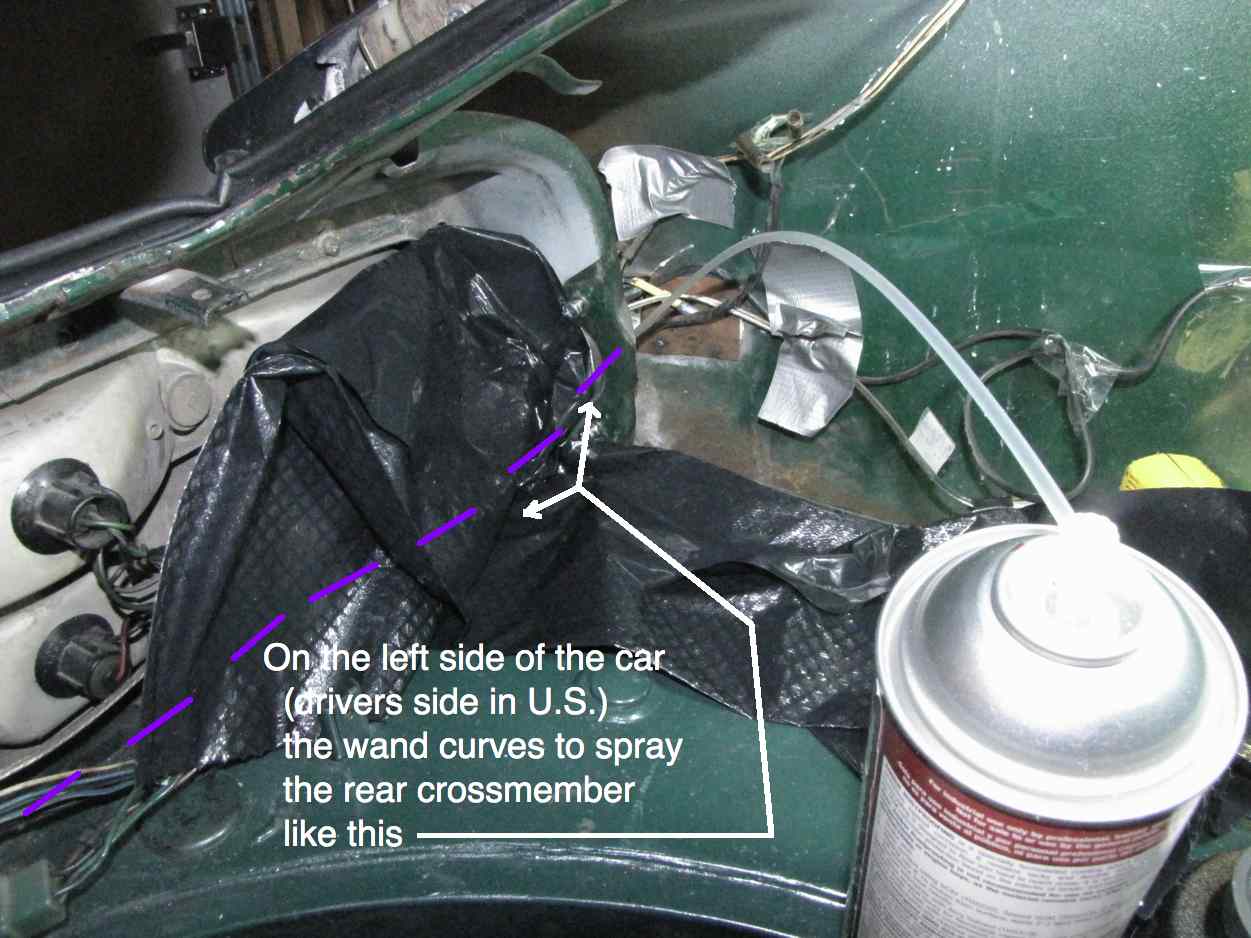
6. Rear crossmember (spraying towards middle of car from both sides):
Right side
Left side
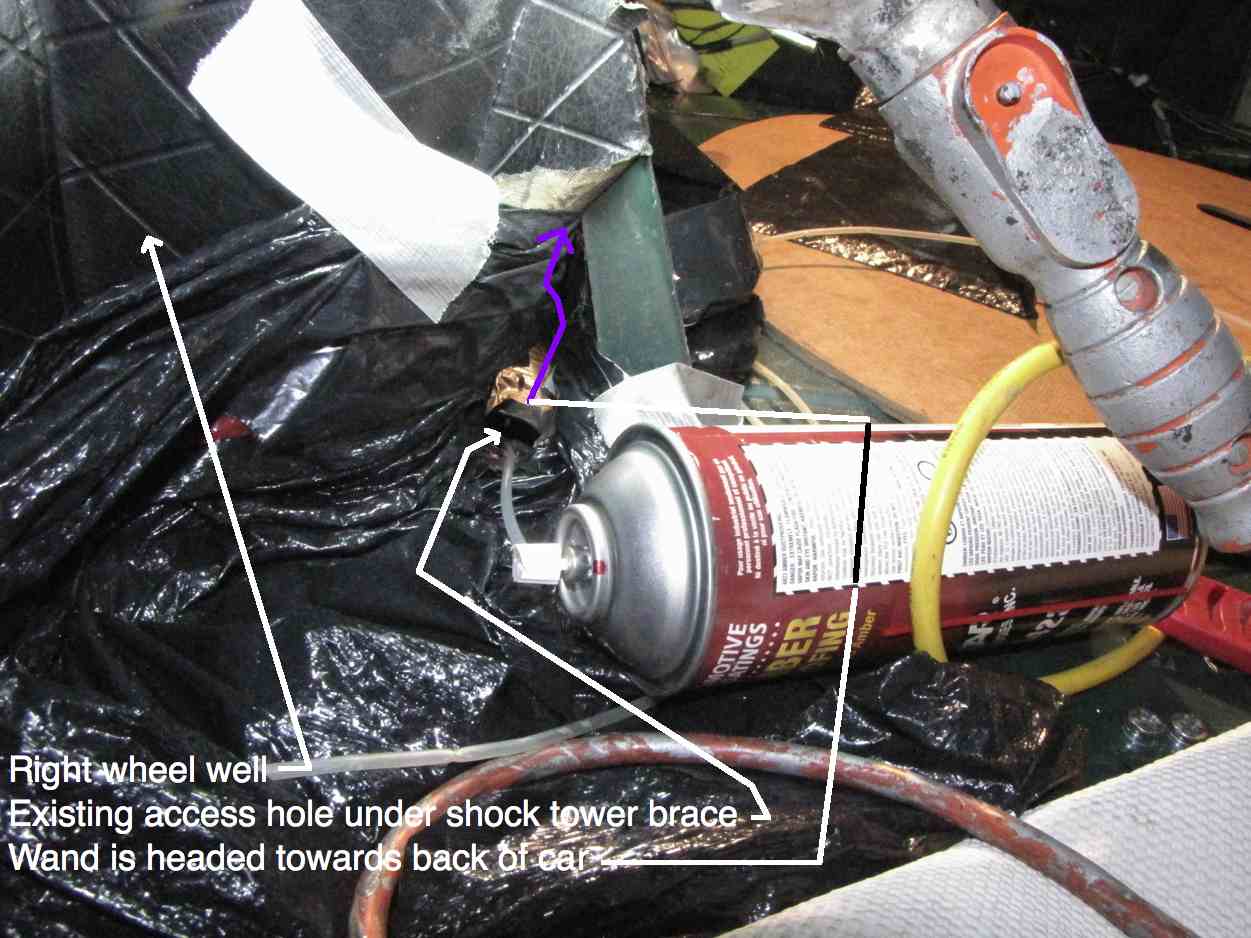
7. Frame rail right side (left frame rail was sprayed in the same way):
Spraying forward from access hole
Spraying toward back of car
8. This drawing shows drilled holes location, one of the slots that needed prying open a bit and access for rear crossmember. It does not show the tower brace slots inside the brace that I enlarged for that detail see last two drawings in step 2 above.:
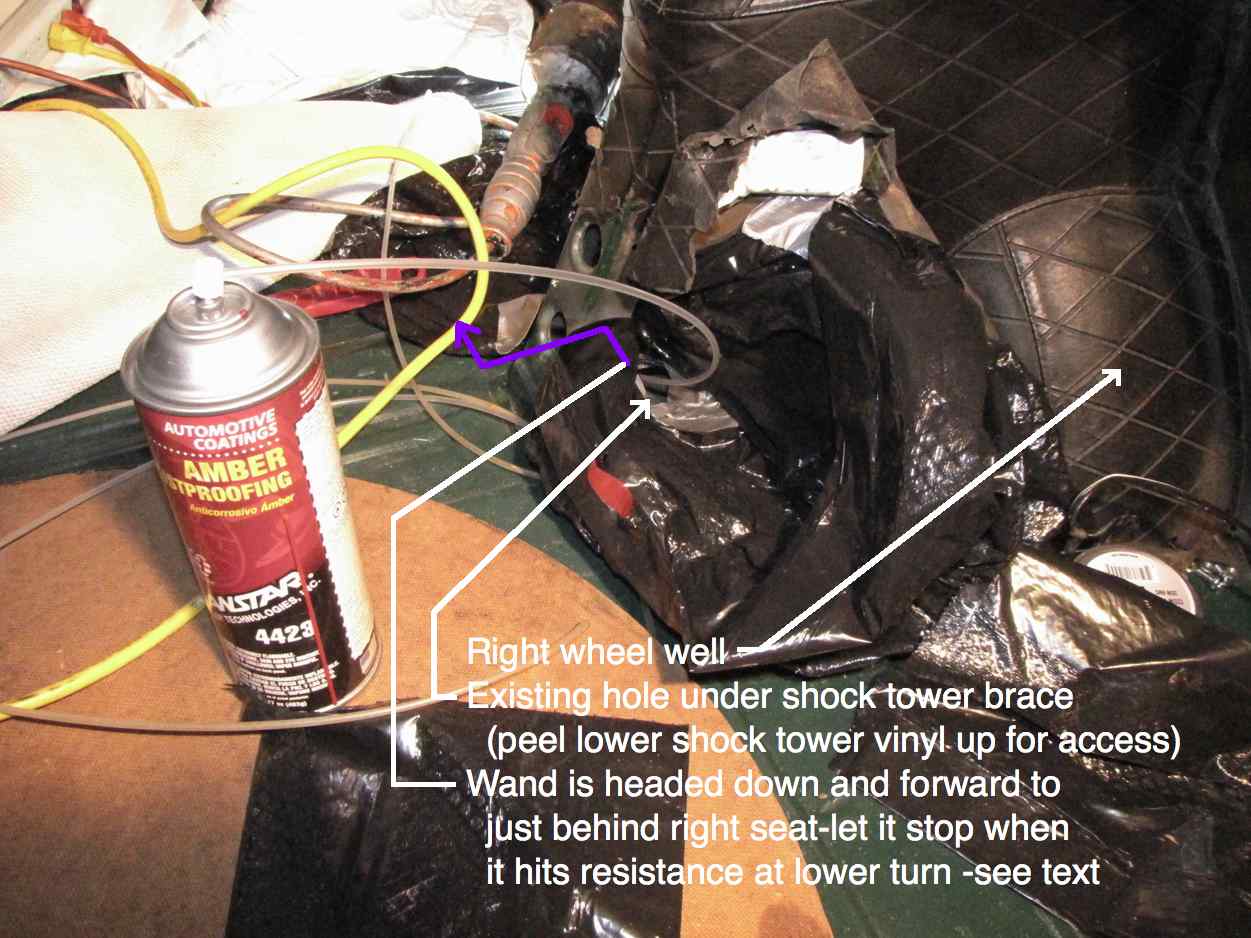
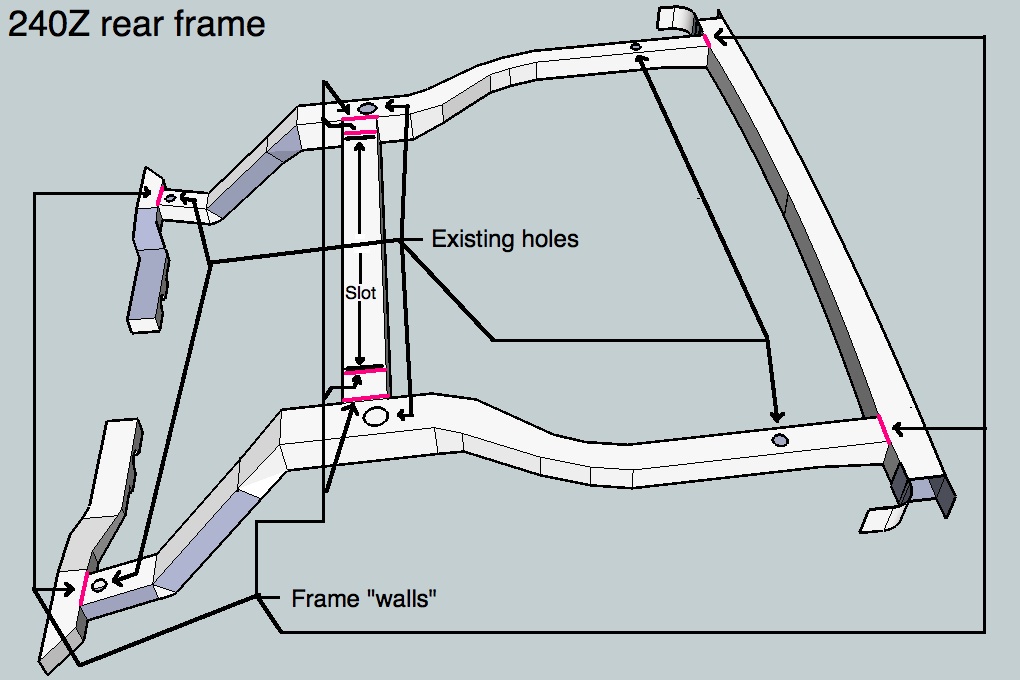
9. Existing holes and "walls" in the rear frame (I used the front four existing holes for spraying both frame rails at the sides of the car, vinyl on shock tower was peeled back for access to middle holes):
Preparation details:
10. For spraying the two front crossmembers behind seats on the floor I drilled a 5/16 inch hole (8 mm also would have worked) in line with an existing hole in frame rails and 40mm from the front edge of the existing frame rail hole. A 5/16" (or 8mm) hole is just large enough to allow the transtar wand with its 360 degree brass spray head to fit through.
11. I pried open the floor sheetmetal slot a bit at the shock tower brace bottom by twisting slightly with a large screwdriver to give access for spraying the center crossmember.
I also pried open the floor sheet metal hidden inside the brace itself to access a two inch long closed off area on both ends of the middle crossmember. Although I did this someone else might want to skip it.
12. I removed the side finisher panels immediately in front of the tail light finisher panel to gain access to the rear most crossmember.
13. I peeled the vinyl up from the floor on the shock tower braces to allow access to an existing hole in the floor to spray the inside of the side frame rails.
14. I poked a hole in the bottom of a trash bag and taped the hole in the bag around the holes I would be spraying into to prevent getting spray on the interior of the car should a wand be pulled too far out of a hole while spraying is in progress.
Notes:
15. The Transtar plastic spray wand can get kinked when spraying the side frame rails forward of the rear wheels. I actually broke an old wand practicing for the actual spraying and realized the frame rails that go forward and down from the shock towers make two turns, kinda tough on the stiff plastic wand. To minimize the chance of breaking a wand I inserted it gently until it met resistance at the second turn a few inches from the front crossmembers. I pulled the wand out and then inserted it into the existing hole behind the front crossmembers to spray the bottom part of the side rails just behind the seats. This existing hole is 40mm towards the back of the car from the two holes I drilled for the front crossmember. This bottom part of the side frame rails behind the seats is only about 4 inches long so after the wand goes in about 4 inches there will be felt resistance as it tries to turn up towards the shock tower. As soon as I felt that resistance I stopped inserting the wand as I had already done the portion of the frame rail the wand was trying to turn up into from the shock tower hole.
16. The center crossmember didn't want to let the wand go through the bent slot more than a few inches at first with the spray head on it so I used a wand with no spray head that used to come with the spray wand set from Transtar. The wand set I bought 26 Mar 2014 did not have a white third wand with no spray head however a brass spray head could have been cut off the 2nd wand that came with this recently purchased wand set and that headless wand used then. I used the old headless wand I had from the earlier wand kit purchase. I finally did get the wand with the 360 degree brass head to insert the full length of this middle crossmember, I just had to gently keep trying by trying different entry angles and by gently twisting the wand back and forth. Didn't want to kink the wand with brute force.
17. There is a blockage in the rear most crossmember in the middle that is maybe 6 inches long. To get around that I used a headless wand as that is skinny enough to go through the blockage and followed up with a wand with the brass 360 degree head on both side inserting it gently as far as it would go. The 360 degree head has a spray that sprays forward as well as spray towards the sides so the coverage is more than 360 degrees.
18. I made a mess, this project is a great job for the street as the Z frame has many joints for the Transtar spray to flow out of before it becomes waxy non moving anti corrosion material.
********************************************
While I was at it department - (sung to the tune of that old Beatle's song "I should have known better"):
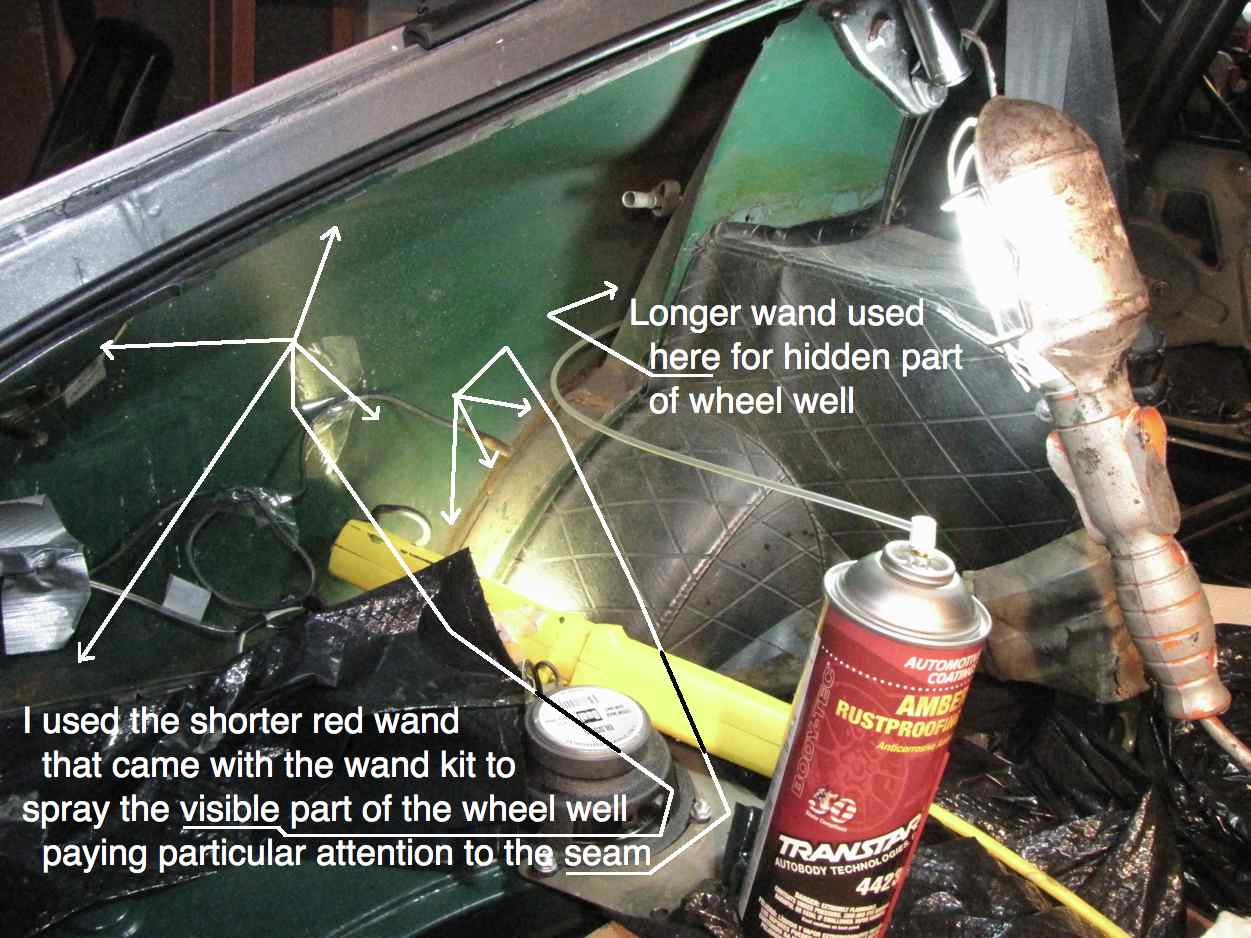
I also sprayed the interior of the wheel wells since they tend to rust and were accessible with the finisher panels out. After that since I had some Cosmoline handy I painted with a brush all metal I could reach including hidden areas not covered with transtar material. The Cosmoline I have is fairly thick and would not have flowed into the seam the way the freely flowing Transtar material did so I used the Transtar material first on the seam followed up by Cosmoline painted everywhere behind the finisher panel. If I had had no Cosmoline handy I could have dipped a brush into the Transtar spray by spraying the transtar on the bottom of the wheel well first.
Left side of car wheel well. Right side done the same way.
Recommended Comments