


EScanlon
Community Member
-
Joined
-
Last visited
Everything posted by EScanlon
-
I don't think it is the LOGO they're worried about. 2¢
-
So Phred, Beandip, you haven't chimed in as to whether you are going or not.......
-
I think the Auto / Manual distinction was only for the Point Dizzy's. The Automatics had the second set of points which were activated by the thermo switch connected to the transmission. The electronic dizzies did not do that as far as I know. Some one else chime in here. Enrique
-
On the issue of fuel pouring out of the carbs. Does the car have an electric fuel pump? I'm not a grease monkey, I do electrical and body work, but to my untrained mind that is what jumped out as a possibility to me. 2¢
-
Simple! You did say the rocker panel was almost gone, so you shove the nozzle of the penetrating oil through one of the holes and SHOOT it at the bolt! Voila, penetrating oil from the back side! Then, you use that metal tape to seal up the hole....... Enrique
-
I didn't see this when it came out, but I'll address it here: The Choke Light Switch is NOT located in the engine bay. The Choke Light Switch is located underneath your console, just forward of the lever. It is actually mounted to the bracket that the choke lever is attached to and swivels on. The switch is a normally closed, momentary open type of switch. That is, it doesn't make contact and close the circuit until you release it's button because the lever keeps it open. When you pull on the lever, it releases the switch, just like your brake switch, and allows it to close. If your Choke light is staying on, there are two possibilities: One, the switch bracket has been bent back, such that the choke lever now cannot push the switch to the off position. Two, you adjusted the choke cables such that when you have them all the way OFF, i.e. the cable has been pushed to the NON choked position, the lever is too far back to push the switch to it's off position. Both of these remedies involve getting underneath the center console and looking at the choke lever assembly. Enrique
-
Barring a serious conflict, this will be the debut of Z-Oro to the "Show Scene". Unfortunately, the Roadster isn't through with her facelift, and makeover to attend, but she'll be there in spirit. As far as a convoy, or caravan I'm game. However, I'm coming down from Felida (Up by Hazel Dell) and it would be easier for me to take the 205 to I-84 than to go I-5 to wherever. But, I'm game if there will be others. Beandip's is currently all naked and disassembled, so it will probably be later this year or next before it's out. However, I'm hoping he can escape and join us. Enrique
-
Glad you got your car back! As a suggestion, find out from the Police Supervisor if you can thank the force by sending them a couple of Pizza's or a Gift Certificate to Starbucks or (sorry for the stereotype) a box of Donuts or something like that. The police will appreciate it, and will in turn keep an even bigger eye out your way. If nothing else a Thank You! card. It may sound trite, but the Police rarely get thanked, usually all they hear is BS such as "Why aren't you out catching crooks...". So, even though they haven't caught the idiot, thank them for having found it and gotten it back to you. 2¢
-
All you need is some of that super duper speed metal tape and a couple or three gallons of fiberglass reinforced Bondo and at least ONE Type R and ONE V-Tech decal and you're good to go............... Seriously, 2mZ you're obviously wrenching too darn hard! You brute! Don't you know you should always shoot some penetrating oil on old nuts and bolts before you go applying 200+ lbs/in of torque on them? GeeeeeeZ! ES
-
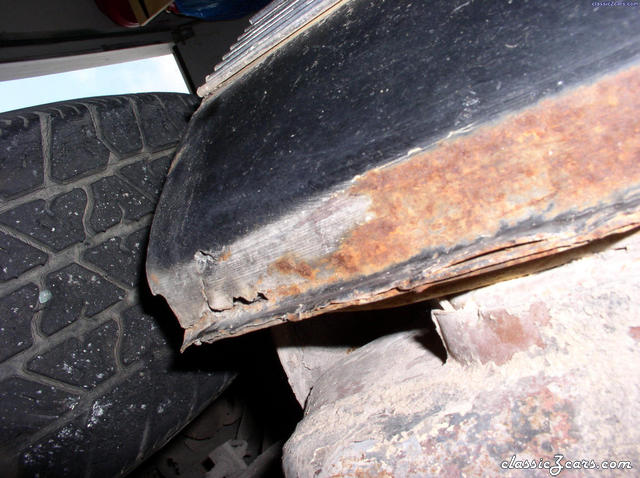 Rocker Panel rust coming from the inside. You can either buy the new rocker panel skin, or have a body shop cut and replace.
 -
From a quick look at your pictures, it looks as though someone took the time to go to a custom upholstery shop and had the car re-done. Although non-stock, it doesn't look bad. Granted the "ribbed" headliner is kind of odd. But is that Vinyl or is it Leather? Hard to tell from the pictures, but I recall some shops in the mid-70's and early 80's advertising Leather upholstery at some incredible prices. If it IS leather, you might be able to pull it all off and sell it on e-Bay as it would be a hard to come by item. Just a thought. Enrique
-
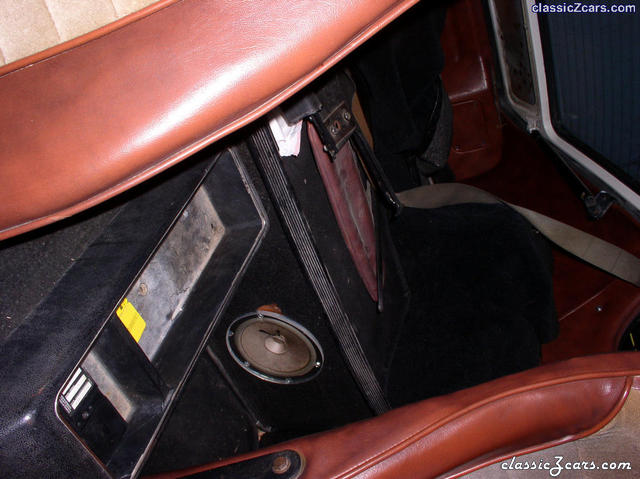 No, not stock, but a common placement for stereo "upgrades" in the mid 70's.
 -
And that specific area of the Front Fenders is a known problem area. Look in my gallery to see how I addressed the cause of that rust so that it wouldn't recur on my car. I took my fenders off, sandblasted the back then since all I had were pin-holes I used POR and the fiberglass matting they have. For the amount of rust shown on your vehicle, you may have to find a body shop that can do metal replacement, or do it yourself. You CAN find fenders both used and new. If as you've stated, that is the ONLY major piece of rust, and you are comfortable with the mechanical fixes needed, then go for it. Or post the guys address and phone and let one of us jump on it. Don't let the guys who "hate" 2+2's give you too much static. I'll bet dollars to donuts that if they found themselves Z-less and the choice was a 2+2 or a Pacer, they'd JUMP through hoops for the 2+2. Besides, in a few years the 260's and the 2+2's are going to be EXTREMELY rare due to people shunning them now. FWIW Enrique
-
You guys are too soft!:tapemouth If I didn't personally like my car, I would easily install a James Bond Theft Deterrent system similar to the one in his Lotus. Aside from that, I would advocate a Penectomy and Castration. That way EVERY DAY when he has to squat to pee, he'll remember what and why........
-
Scott: So the members of this board can be of better help to you, give us all the particulars. Color of car, any specific features that would readily identify it, type of wheels if non-stock, PLATE numbers on the possibility that they are driving it, basically all the info you would give the police and then with many of the members of this board being in the Pacific North West, let's keep our eyes peeled. Also post a phone number for you AND the police officer to whom we should refer sightings. 2¢
-
Just a couple of items: If you need to lubricate the filler hose, use engine oil instead of Vaseline. Vaseline can and will attack rubber. The worst thing you will get with the engine oil is a bit of smoke out of the exhaust. The picture of the gas tank you took to show the access plate to the filler neck is already showing that the access plate has been removed. That extra hole forward of the filler neck is for one of the vent hoses coming up to the evaporator tank from the gas tank. If you don't have the tank and don't plan on putting it in, then fill this hole as it is a good entry point for fumes etc. Also check for a second hole that is either to the front or back of that filler tube. That's for the second vent hose, again cap it if you aren't putting the vent hose in. FWIW Enrique
-
Here are the ones that I see as plainly obvious. Not listed in order of "importance" nor any kind of sequence. The car is being sold in Indiana. That tells me RUST BELT! I'd inspect this car with a very large and powerful magnifying glass. 38000 miles? Then why did it need new tires? Same with the brakes and master cylinder. S30 being rarer than the "other" 240's of that year? Hmmm, we must ask Alan about this one, I thought ALL 240's were S30's. If that paint job is recent, then why the rust stains in the hatch area? Or that major crack in the hood paint that NO, won't be an easy fix. (Ever tried to do a paint repair in the MIDDLE of a panel?) The bumper guards on the front end seem too close together. Then again, the side valance pieces don't seem to match the bumper contour (the indent). Somebody else look at this, but they don't seem right. The front center valance also looks like it took a punch to the chin. The rear bumper has the biggest problem I can see. Those bumper guards are set too far apart! Gosh, anyone should be able to spot that one. The rear license plate got lost between the first picture and the later pictures. Either that is some humongous fish eye on the side view of the front fender, or there's some serious rust holes being filled in with paint. Is there any weatherstrip left on the door openings? The clock doesn't work. Look closely and you'll note that it's stopped. (Think I'm joking? Check the clock on the CD player.) Ziebart plug visible above the manufacture date plate. There's rust behind that plate. Steering is all out of whack. You can tell because the logo on the Steering Wheel Horn is turned 90° to the main "arms" of the steering wheel. This is because you have to turn the wheel 1/4 turn to the left for the car to drive straight, so the horn button has been adjusted appropriately. Obviously, this used car dealership is hoping to make money on the 10% NON-REFUNDABLE deposit, as well as the $145 on-line transaction fee. Heck, they could sell this car 2-3 times in this manner and make a couple grand. The sellers rating of (0) would of course dispell any doubts I might have. The interior is listed as black, so the butterscotch is just a trick of the lighting. Listing it as a 3 door vehicle is no doubt part of the S30 "exclusivity". Now, for Indiana, this vehicle is probably "FULLY RESTORED", the rust stains are thrown in so that you get the feeling your car is in it's first winter. Choke Knob is broken. And last but not least, the tire balancing weights are on the outside of the rims. There, did I find enough of them for you? Enrique (By the way, if you were thinking I missed the trailer hitch, I didn't. I just realize that this car comes from Hoosier country and that's enough about that.)
-
That's so we don't end up with a bunch of pictures of (shudder) AMC Gremlins or Pacers or the Pontiac Aztec. 2¢
-
Nigel: At the risk of sounding trite: The value of an item is that value that that item will bring. Sounds like an idiot statement but it isn't. Trying to define the value of an item is an exercise of discussion, as that value cannot be determined until such a time as the item is offered for sale and the value can then be established. A part for a Z might be offered up for a low $....until you discover that you have to pay big $ to get it transported. Additionally, and I've found this to be true, if there is a "meet" or show coming up, then expect items to go for higher $ than immediately AFTER the show. (Case in Point: There was a big Roadster meet in California just recently. Just about every part offered up on e-Bay went for high $ with lots of bidding against it. Shortly after the meet, items would go the full 7 days with nary a bid.) So, FWIW, I hope this helps. Enrique
-
If you've already worked the strap loose enough that it is twisting, you might have it loose enough to unhook at the back part of the car. Look in the rear most portion of the tank. You should see a diamond shaped hole that the end of the tank strap fits into. The strap has a "T" shaped end that fits into the hole at the wide point and then slides down into the narrow end of the hole. If you have the strap loose enough that it is starting to twist, you might be able to push up on the strap until the end slips out of the hole. Or try to lift the hook bolt at the front out of the receiving hole. Other than that, you'll have to soak the nuts in PENETRATING OIL, not WD-40. WD although a good water displacer and light lubricant does not really creep in between the pieces like a good penetrating oil will. When I did my tank, I found that if I first shot it full of penetrating oil, then TIGHTENED the nut and let it sit, it would penetrate the threads much better. Then it was simple to loosen the strap. FWIW Enrique Scanlon
-
The biggest problems with masking anything before painting is that: 1) It is an incredible PITA to do properly, and an even bigger PITA as well as the rest of the body, if done improperly. 2) It is incredibly time consuming to do well, and even more time consuming to repair the problems with it having been done poorly. 3) It is incredibly hard to prep the area around the masked area for paint, without damaging the mask, which then must be re-masked. 4) No matter how good you mask, there will almost inevitably be some form of paint spray creep onto the item masked. 5) If you ever remove the item that was masked in lieu of removing it, you will show the old finish. 6) If you remove the item masked, there is an incredibly high incidence of chipping / lifting / cracking the paint around the masked area. 7) Removing the mask becomes a time critical element after painting. You must do it soon enough after painting that the paint is still pliable, but not so soon that you risk leaving fingerprints or other marks on the paint. With all of these problems, and believe me they are problems, when I paint a car I remove just about ANYTHING I can without incurring additional costs or hazzles. On the Z, that means I will leave Windshields, Hatch Glass but remove EVERYTHING else. Door Handles, emblems, antenna, bumpers to name the most obvious. Yes, it is a major pain to do so, but it is, in my opinion, even more of a pain to have to mask some of these items, as well as having to accept the consequences of not having removed them. As a final note, have you considered how you're going to mask something such as the Side "DATSUN" or the Hatch Emblems? Those would drive you crazy trying to mask them. FWIW Enrique
-
Having lived in parts of the U.S. where having your car buried under feet of snow isn't either uncommon nor cause for alarm, I'll chime in. Generally speaking, if the WHOLE garage dropped in temperature evenly, and the vehicles themselves were also cooled down at the same rate, when the water hit and began to freeze there shouldn't be a lot of problems for the paint or car. I remember an ICE STORM in Iowa that started out as a blizzard. For those of you in warmer climates that is where your Winter storm begins by dumping MASSIVE amounts of snow in a very quick hurry, THEN follow it up with a fast drop in temperature while a warm current of air flows over the top turning the blizzard into a RAIN shower. Now the rain freezes on contact, and you have the recipe for major disaster. Now, in the method of THAWING that is where you could cause some serious problems. I remember a neighbor literally ripping the gasketing off his Ford Torino when he yanked open his door, because he insisted that all he had to do was start up the car and turn up the heat. Well, it worked for the REST of the car, but his door gasket was shot. Then there was the other neighbor lady who decided to dump 2 quarts of very warm water on her windshield to remove the ice. Can you say Star Crazy? As in shattered windshield? Or the idiot I heard about who used a small propane torch to heat up the locks and handles of his pickup truck so that the ice would melt, then forgetting they were very hot and literally branding himself when he opened the door. As far as the paint, same thing applies, let it warm up with the metal, don't accelerate it except for VERY mild means, and don't pound on the sides of the car to "shake the ice loose". FWIW Enrique
-
If I recall, that's not just a plain wire, that's a fusible link. That's supposed to blow if something is wrong. You have another problem to hunt down. Hope this helps. Enrique
-
And for those emblems that you can't get to the back of (the C-Pillars, Hood) you can use a real thin scraper. We used to use the spring steel bondo spreaders. Slide it in carefully and work your way around the emblem's pins, lifting ever so gently. If the pin is broken or the barrel clip is rusted tight, it might be a toss-up as to whether you can remove the emblem without breaking the pin. 2¢
-
Mike: The Fog Lamp Wiring that you are looking for is in the harness. In the Front Wiring Harness, between the two Headlight Connectors, you should find a pair of bullet connectors, one on each side between the Horn Wires and the Headlight Wires. They will be a Red and Black Wire Pair. These are the ones that go to your Fog Lamps, the Black being Ground. If you have the single wire Fog Lamps that can be found now, then connect the black wire to ground, as that is what it is. Inside the Dash Wiring, you will find a Red and Red / Green pair of wires going to a 2 wire "T" connector (i.e. the spade lugs inside form a "T"). That is where you hook up your switch. The switch only CLOSES that circuit, i.e. you could connect the two wires and the lights would turn on. Power is fed to the Fog Lamps from the Tail Lamp / Side Marker Light circuit that runs through the Combination Light Switch. i.e. you must have the light switch turned on for the Fog Lamps to light. I wired my fog lamps through this circuit and they seem to work fine. Enrique