EScanlon
Community Member
-
Joined
-
Last visited
Everything posted by EScanlon
-
 Enrique working on the Z with his Shop Supervisor.
 -
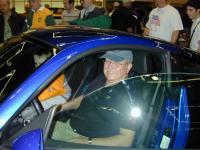
Oh, I wouldn't say I'm not an old fart. But Beandip is bigger and older that tells you a lot. The picture is poor as I was caught by surprise. My wife came in and saw Remington at my feet observing my every move. Beandip's pic is at the car show and he was examining the 350Z so he would know about it when he discussed it. For all his griping about it, he looks pretty happy doesn't he? Later Enrique
-
And here's a poor picture of me working on the Z with my Shop Chief supervising every move I make:

-
Beandip gave me permission to post this picture:
-
Just be aware that the "discount" at Courtesy, mysteriously disappears when you talk to them. It's happened to me and others. Call Chloe, she supports our site AND won't jack you around with silly bait and switch nonsense. 2¢ Enrique
-
Well, I hate to be the one to break the bad news to you, but in my opinion you've got a problem underneath that sheet metal and bondo. From what I can determine on the pictures the seam between the rocker panel and the front dogleg of the rear wheel opening is gone, that is how I can confirm that bondo has been applied. The major crack in the bondo is the first clue. Depending on WHY the bondo was applied in the first place is what will determine if you have a Major headache or a simple fix. I concur that it looks as though someone ran over a parking lot tire stop or a shop jack placed in that position. If the later, then it is a clear indication that the sheet metal in that area has been drastically weakened. Whether it was due to a prior bump that did not have the metal properly straightened and tempered or because the metal is so badly rusted that there isn't much strength left in it, is what will have to be determined when you open it up. Thankfully you can still get replacement metal, or at least I think so. If not, it isn't that hard of a piece to fabricate by a good body shop that has a good sheet metal man. The biggest problem is that determining how deep or extensive the rust/bondo damage is can only be done by removing all the bondo and seeing what you find, and possibly cutting into it. 2¢ Enrique
-
DEPENDS on the date of manufacture for the dash and vehicle. The EARLY 71 dash/wiring is essentially a 70 dash. The LATE 71 dash may have the some / all of the 72 Z changes. These are the differences which we, in the U.S., use to designate a Series I and a Series II, which as discussion on this site has enlightened us are not real or true differentiations. The 70 and Early 71 dashes typically did NOT have the hole above the Hazard Flasher cut out. Additionally, the indent for a label for the Hazard Switch was NOT there. This difference is cosmetic only, but for some people is a tell-tale item. The hole that was NOT cut out was for the Fog Lamp Switch. Most, if not all, U.S. market cars did NOT arrive in the U.S. with that option installed. The label indent was added in the later models because the non-indented dashes would not allow the label to STICK and would fall off. The label was added because apparently the UP-ON and DOWN-OFF was too complex a concept for some people. The latter 71 dashes that DID have the hole above the Hazard Switch opened up typically had the Cigar Lighter mounted there. That's because the Center Console changed, and the Cigar Lighter was no longer placed on the bracket to the side of the Fuse Box and THROUGH the top part of the Ash-Tray / Fuse Cover piece. If the 71 dash you are getting is close to the end of the 71 production year you may find that the wiring harness now has provisions for the following: Choke Warning Light Seat Belt Warning Light These items were now located in front of the shifter, and if your car does NOT have the wiring and relays for this, you will find that your connectors will be different. Another bit of wiring that will be different is the location of the Fog Lamp Switch connections as well as the Electric Fuel Pump interlock. Another item is that the later dashes / vehicles joined the Seat Belt Warning buzzer to the Ignition Key / Door Open buzzer. Another item of note: The method by which the Hazard Flasher Switch and Cigar Lighter opening were illuminated. Early dashes had the Toggle Flasher Switch which did not receive any illumination, whereas later dashes lost the toggle switch and received the Pull/Push switch which used Fiber Optic wiring to transmit light from a bulb holder located behind the dash right by the Instrument Lighting Dimmer Switch. The Cigar Lighter was also illuminated with Fiber Optic Cable. As a final item, and this is a very rare item, is the difference in the Tachometer wiring. The early tachs used a LOOP through the tach which required 2 connections, whereas the later used a SINGLE wire. These are the biggest differences I can recall right off the top of my head. As far as fit, there won't be any problem. The most significant change that I can recall is that the earlier dashes had the lower mounting pads "shimmed" whereas the latter dashes did not. To fix this all you need to do is to bend the lower mounting arms up a bit. As far as the wiring, what I would do is remove the wiring harness from the new dash and mount your old wiring harness. Enrique
-
Have you checked the Vacuum Advance Mechanism INSIDE the distributor to make sure that it isn't shot to heck? I've seen a couple people report that that was the problem. Aside from that, I had a pair of Webers on my car when I bought it, and my mechanic told me that in his opinion, neither Webers nor Holley's were worth the pain and hazzle on the L motor. So I switched to the SU's and have been real happy since. Enrique
-
Kats: Unless I am mistaken that 5th bulb is for the Parking Light. That is why you don't usually find it in U.S. market cars as they did not arrive with the Parking Lamp circuitry. Enrique
-
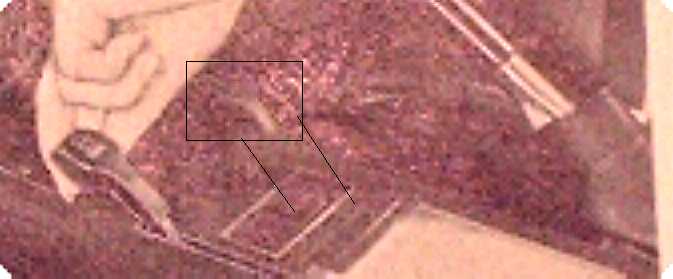
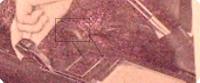
Alan: I am posting an enlarged section of the image. If you look closely, right below her wrist you will see the shape of the lever knob that mirrors the one for the choke. To the far right of the picture you'll see the emergency brake boot. Although the picture on the knob is undiscernible, you CAN see that the angle, shape, and general lay of the reflection of light can only match a knob / lever with the same configuration as the choke lever knob. As such, since the only other control on the car that got installed in that same general location was the Hand Throttle Control Lever, I presume that that is what I am seeing. I could be mistaken so now we have a reason for Kats to provide the picture on the page that shows the instruction for the Hand Throttle. How about it Kats? Enrique
-
Kats: Not since "Interior Ergonomics" have I had so much fun with a post. Your "question" in turn answers so many discussions that we've had. I would thoroughly enjoy reading that Owner's Manual. Could you take pictures of each of the pages and then post? Or if it takes too much time, you could send them to me and I'll post them to the website. Although it may sound like a waste of time, it is not. These manuals give insights as to what was considered "standard" or at least available to the Japanese Domestic Market. It is the differences between the JDM and the U.S. market that are so informative and interesting. A note to the side: The Center Console shown in the picture is what, in the U.S. is considered to be one of the key designations between a Series I and a Series II. (Sorry Alan) Granted, from discussions here we've seen that this differentiation is a U.S. only difference. That console shows the Parking Light Switch as well as the Rear Window Defog switch located in FRONT of the Shifter. The sliding cover ash-tray is also a "Series II" design. However, if you download the picture and then magnify and sharpen the image, you'll just begin to see the presence of a Throttle Control Lever to the RIGHT of the console. This was NEVER seen in the U.S.. Another note: The Headlight Switch to Lamps Light relationship chart shows that the Headlight Switch and Turn Signal Levers are in fact reversed from those we've seen in the U.S.. Additionally, there is evidence that the JDM cars were fitted with a Passing Light Relay circuit which allows the High Beam Lights to be actuated without the parking or turn signal lamps. Lastly, the picture for the Parking Lights. Thank you again in helping me procure that switch for my car. This picture describes the use of the switch perfectly. Thanks again! Enrique Scanlon
-
I think there has been some confussion within this discussion as to which of the plastic connectors each person is referring to. In the picture, the one to the right, which has a rod with a 90° bend in it, that's the one I think you are referring to. It's been a while, but you can do the screwdriver pry method mentioned above, or if I recall correctly, you can turn the rod 90° in the opposite direction of which it actuates and slip the "ears" of the rod end through the plastic retainer. The one that everyone is referring to as being threaded is the one in the "middle" of your picture. You'll note that it has a Hex Head and a smooth shaft. That's the one that is used to adjust the amount of travel that the outside door handle has before it opens the door latch mechanism. The last one, which no one has mentioned, is the one to the far left, which is the one attached to the door lock mechanism. You've already removed that one, so you know how, but for the sake of this post, you rotate the rod body clip to the side so that you can pull the bent rod end from the hole in the lock swing arm. If you'll recall that one also had to be aligned a special way before the rod end would escape. Enrique
-
The blower knob has a screw in that little hole. Using a straight edge screwdriver you then cinch it down on the switch pole. Enrique
-
Mark: Again, I apologize if my prior post seemed like a brush off, as that is NOT what I wanted to say. The electrical system of the 240 is a very basic system. It doesn't have the AFM or ECU or much of the latter additions that make it so difficult to troubleshoot or repair. The VAST majority of issues with the system, lights that won't work or work erratically, blown fuses, overloaded circuits, hazard lights working while turn signals don't, are for the most part a connectivity problem. That problem can be from corroded connections, cold solder joints, dirt and grime on contact surfaces, and rarely, broken wires. Although you feel that your symptoms don't match what's already been written about in the archives, I'll guarantee that once you find the cause of your problem and rectify it, you too will see that the answer was in the archives all along. 2¢
-
Mark: Do a search in the Electrical section and you'll be flooded with prior posts all asking just about exactly the same thing. In short, check all your electrical connections and switches. I hope I don't offend you by answering this way, as that is not my intent, but all of us have typed and retyped that response so many times that we will sometimes ignore the post for a couple of days. 2¢
-
I currently have my driving lights hooked up through the car's wiring. Some notes: I am only using low wattage driving lights, (think about 40 ? watts.) this is because I'm specifically avoiding using any bulbs with a power rating greater than the headlights. Remember, today's 100+ watt halogen's were NOT around when the car came out. If you do plan on using the higher wattage lights, then definitely power from the battery and use a relay. The inside end of the fog lights should be right below the radio and behind the fuse box. If I recall it's a Green White wire with a black. Note that you only need an SPST switch to close and turn on the light circuit. Enrique
-
To answer your original question: The 70 to 71 and for the most part the 72 Z's did NOT have intermittent wipers. If the combo switch you bought has a 4th detent for the wiper (Off, Int, Low, High) then that switch is for a 73+ Z with the ubiquitous late 72 mixed in there. That is why the connectors won't mate, there aren't enough wires in your existing harness to accomodate all the features of the new switch. Have you tried fixing the one you currently own? It is surprisingly easy, and as you pointed out, with the guys here, you'll get good advice quickly. Trying to jump the wiper motor or switch may seem easy but believe me it isn't easy to do. Disp: I don't know about the others, but I feel that the switch's seller's identity should be revealed. Not only did he refund your auction money, he refunded shipping?? That is exceptional. Knowing he's ethical is important for those of us who do shop on e-Bay on occasion. Enrique
-
Every once in a while that panel pops up on E-Bay for about $120. I haven't checked, but you might check with either MSA, V/B or our Z sponsor here Midwest Z. The rust bubbles may or may not be rust through from the backside, they may be poor preparation on the metal that is finally popping through. The "cup" for the inside of the gas filler access is spot welded and seamed to the fender, so it is very possible to have had some moisture get caught up in the seam. Hope this helps. Enrique
-
I'm chiming in and my input is going to seem like a cannonball dive at the local septic pool. Nissan's production year ran from January to December. That has been established as the main reason why we have vehicles that are "Series One" or as having features that really belong in the next / prior year. For those of us outside the U.S.; while the designation of Series One or Two doesn't apply, to us in the U.S. it denotes hatch, and vent or not in the pillar, as well as other interior changes. Series One are generally considered to be: Vent in Hatch; 240Z emblem on C-Pillar instead of Z / Vented. Ash Tray in console in front of the shifter; dash hole above flasher switch not cut out, Center console still has the opening for the Hand Throttle, although no mechanism. Same for Left/Right Marker Light Switch which mounts to the right of the Rear Defog Switch. The Series Two's main difference is the Hatch Vent to Pillar change. There are others, and there are many transition cars. That was the discussion that got us to the conclusion as to the production / model year debate. 2¢ Enrique
-
I think that little white cap was put there when the car got some sort of rust protection inhibitor sprayed in there. 2¢ Enrique
-
When Nissan was first making the Z, the cowl panel was fitted to the car with a pair of foam padding insulators to avoid the high speed vibration rattle that would / could rattle the cowl bad enough to rattle against the sub metal. Although at the time and for the first few years, the foam padding was water repellant enough to avoid getting filled up with water, over time the foam tends to break down and what was once CLOSED cell foam becomes somewhat OPEN Celled. For the most part, OPEN cell is another word for SPONGE. Closed cell foam has thicker walls between the bubbles and as a result don't completely compress unless CRUSHED. When they get crushed, as in the case of long term pressure and vibration, they will absorb water to a small degree. Add to this mix the fact that the galvanizing done on the sheet metal of the Z is not the thickest nor top coated afterwards and you have a perfect scenario for later rust problems. If you can access a different cowl in better condition, then go for it. If you haven't a choice, you can still repair the panel. Personally, I would recommend the POR and Power Mesh route. It's quick, will protect the rest of the metal, provide a good enough backing for most bodywork, and a breeze compared to brazing or welding a patch in. While you're at it, clean out the whole cowl area, POR it and check both drains and the vent hole. Enrique
-
Geeeeez! You can tell that the board has been somewhat dead lately. I've not seen more serious work suggested on something that MAY be very minor. First of all, check the SWITCH portion of the LOCK mechanism. That is a simple rotary switch scrwed onto the back side of the Lock Cylinder. The Z uses a small flat "key" to actuate the switch's rotary selector. The switch is held onto the Lock mechanism via two screws. I've seen these screws go loose, then the switch doesn't maintain the key inside the slot. (I hate when that happens.:cheeky: ) This may or may not be the solution. A second thought might be one of the wires on the back of the ignition switch having lost the soldered contact to the switch. And finally, a new switch. All before determining voltage regulator directional polarity, phase or any thing even more complicated. Remember Occam's Razor. Victor: I will admit to not knowing definitively. The explanation of the diode is correct, however, I'm not sure you CAN wire the alternator without the diode. The other theory sounds plausible, but I don't know. Enrique
-
After the Combi Switch, the next place that the Brake and Turn Signal lights are still mixed is at the Hazard Flasher Switch. Have you checked this out? Also check your Hazard Flasher, this is separate from the one for your turn signals. You'll find one by the steering column and the other on the passenger kick panel. Since you mention that the stop lamp switch was "burned out" I would start tracing wiring to ensure that it isn't burn and shorted. The White / Red or White / Black wires are the same ones at the combination switch as they are at the tail lights, and they are the ones that you would be using. Hope this helps. Enrique
-
I've commonly seen this type of rust on vehicles that tend to get parked bneath small leaved trees, (short pine needles, willow's, etc). The leaves fall off the trees, land in the area behind the inspection doors, then get washed down along the top of the Fresh Air Vent Tunnel to the front part of the engine compartment. Unfortunately, almost every Z I've seen that has NOT had the fenders removed, will undoubtedly show a lump of body sealant compound that they used. Unfortunately that lump is actually closing off the drain holes for this part of the car. For those of you who haven't removed their front fenders, check this drain hole, and make sure that it isn't plugged. As far as a repair, I'd do a simple braze replacement and then POR it well. Welding would be ideal, but you're not going to be able to get in to all the crevices there. So, FWIW, I would sandblast the area, then braze replacement metal and finally POR. Enrique
-
Check your turn signals also. If they also, do not work then your problem is more than likely where the three circuits come together. The combination switch. Hope this helps.