26th-Z
Community Member
-
Joined
-
Last visited
Everything posted by 26th-Z
-
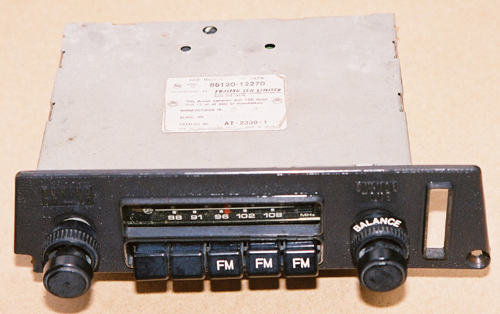
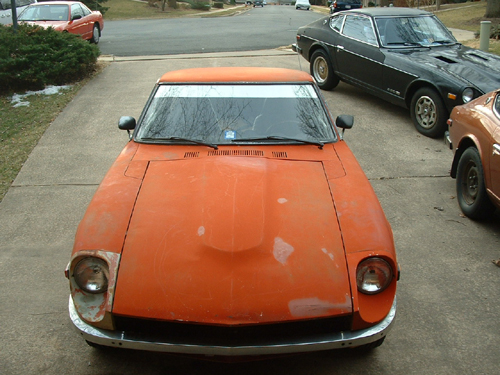
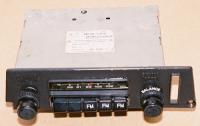
Gav, When I bought my Z in 1984, it had this Fujitsu AM/FM in it and I thought it was original. I didn't like the sound quality, so I put a Sony cassette deck in with an aftermarket face plate and I wired another speaker to the passenger side. The original face plate was broken and during my search to repair / replace the face plate, I discovered the radio wasn't original and the broken face plate had been modified further to take the Fujitsu radio. The car was originally equipped with an Hitachi AM (vert. toggle antenna switch) and the face plate has also the clear face for the radio tuner. Later models (1972) had the AM / FM with the horizontal antenna switch up top. Again, the clear tuner face is part of the outside face plate. Because of my low serial number, I am advised to make the car as original as I can dictating the lovely AM and single speaker arrangement. That's Ok, because the car has so little sound deadening material, listening to tunes is nearly out of the question! So much for my favorite Eric Clapton album. I found an original working radio and unblemished face plate to be fairly rare and expensive. I searched long and hard and was shocked to find a real nice radio and face plate as expensive as a contemporary sound system - paying for something that would look great but I would hardly use.
-
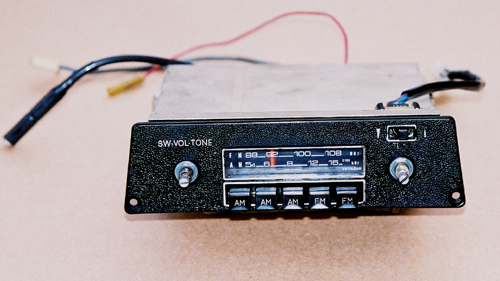
They are not the same. By 1972, the Hitachi AM radio was upgraded to AM/FM reception and the antenna switch was changed. This picture is missing the knobs on the radio, but they are the same as the previous picture.

-
The Walter Mitty Historic Races are coming up soon at Road Atlanta, Georgia - April 30 - May 2. This message came in the morning e-mail concerning the activities of Grassroots Motorsport Magazine and Classic Motorsport Magazine for the event. I'm not pushing the mags, but I do plan to attend the event. Thought you would be interested: Come Help Us Celebrate 20 Years of GRM and Classic Motorsports Magazine’s First Anniversary at Road Atlanta On May 1-2, in conjunction with HSR’s Classic Motorsports Walter Mitty Challenge, Grassroots Motorsports Magazine will be celebrating 20 years- and Classic Motorsports Magazine will be celebrating its first anniversary - in the heart of the action at Road Atlanta. Event highlights will include the Kumho Tires MINI Cooper Challenge (where attendees can try their autocross skills behind the wheel of a new MINI), on-track activities sponsored by the Tire Rack (hot laps and parade laps), concours judging and car club corrals. B.S. Levy, author of “The Last Open Road†and Classic Motorsports columnist, will be on hand to meet attendees. Carl Heideman and his British Motor Trade Association will be organizing a variety of technical seminars, and Champion Motor Cars will be building one of their incredible Lotus Super 7 replicas in the infield for all to see. And a variety of CMS and GRM project cars will be on display – come check out the legendary rotary-powered Spitfire, the new SRT-4 we’re campaigning this year at the Solo II Nationals, and our Triumph TR3A vintage racer, among many others. Have something to sell? Swap meet space is free to all paid entrants, and there will be a special area set aside for those looking to sell a car. For more information about the event, be sure to check out the party page at GRM Online: http://www.grassrootsmotorsports.com/party.php
-
Restoration sharks are the worst, aren't they?
-
 Great picture, Gav. Thanks
 -
600 grit wet-or-dry by 3M.
-
Oh yea! I would be interested in set of the chrome Z's also.
-
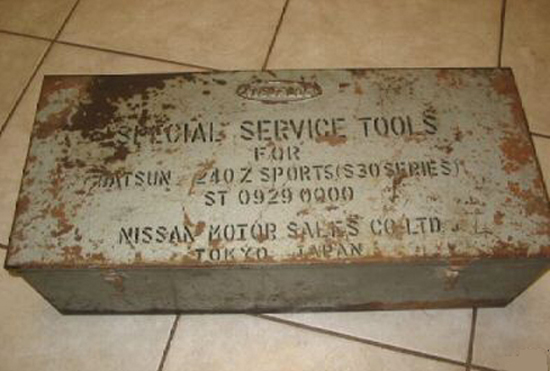
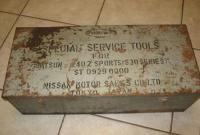
Hi kats, I have been collecting hose clamps for some time now. In America, mechanics do not like the wire type of clamp and it is common to have the banded clamp. Later style wire clamps had the hex head and it is almost impossible to find the rounded screw type any more. Your substitution screw is a good idea. I love how you lined up the screw heads - perfectionist! I usually see things like that on Porsches! I can't tell you how many times I have refered your site to people with questions. It is just great to have such a resource. I sent this picture to Alan last night. You may enjoy this also. Every now and then I see Datsun factory tools for sale and I collect them. For what reason, I don't know. But, I just found an original Special Services Tool Box. Have a look.
-
Don't feel bad, mdbrandy. I KNOW my badging is the later style. There was no badging at all on my car when I bought it. Kats, do you have the chromed plastic thumb latch for the fuel door? The later styles were chromed metal and closed in the horizontal position. The early ones were chromed plastic and closed in the verticle position.
-
 Thanks - no. I'll be using original wheels and hubcaps. I may consider some Watanabes and sell these for the sporting look, but I'm just not there yet.
 -
Great picture kats, The fog lamp pictures I posted are evidently not authentic as they were originally advertised. Strike those pictures! Do you know who manufactured the lights for Nissan?
-
Will do
-
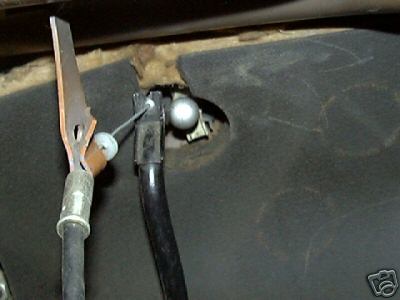
Ok you guys! Here is an interesting picture I just pulled off eBay concerning the installation of the hand throttle. Supposedly, all series one cars have this metal bracket welded up underneath the dash at the firewall. So you want my secret source for jute, eh? What's it worth to you? Check out Lebaron Bonney http://www.lebaronbonney.com/catalog.htm page 92, part number US 121, synthetic jute padding, 5/16" X 36" wide rolls - $3.99 a yard. I just called and asked for a sample.

-
A couple of comments and then some stuff from this morning's e-mail. The VIN # on the door post would match all the rest of the VIN #s on the car - dash, firewall, shock tower. The production date only appears on the door jamb. The value is simply a conversation piece and a unique quality - it is subjective. Differentials are notorious for rumble and clunk. It is entirely possible that the differential has been changed. Finally, this latest accounting ot the early import cars from Carl Beck: Here is a copy of my current listing of 69's.. Note that 789 is also a 12/69 date of production. We found 501 in a junk yard in Canada - it has an 01/70 production date. 124 1969's Found So Far: as of 17 Jan. 2004 00006, 00007, 00008, 00016, 00017, 29 of the first 100 00019, 00020, 00022, 00026, 00029, 00030, 00032, 00033. 00036, 00037, 00040, 00042, 00048, 00051, 00052, 00056, 00057, 00069, 00075, 00077, 00079, 00087, 00089, 00091 00101, 00105, 00114, 00126, 00127, 17 of the second 100 00128, 00129, 00140, 00147, 00152, 00157, 00158, 00182, 00193, 00194, 00195, 00198 00201, 00202, 00207, 00212, 00215, 26 of the third 100 00216, 00222, 00224, 00230, 00238, 00239, 00240, 00244, 00247, 00248, 00249, 00253, 00258, 00261, 00265, 00267, 00268, 00277, 00279, 00286, 00299 00300, 00302, 00303, 00305, 00308 25 of the fourth 100 00311, 00318, 00319, 00331, 00332, 00333, 00346, 00348, 00357, 00361, 00368, 00374, 00378, 00383, 00384, 00387, 00391, 00390, 00392, 00399 00402, 00405, 00415, 00426, 00429, 22 of the fifth 100 00432, 00439, 00448, 00450, 00453, 00456, 00459, 00461, 00464, 00471, 00473 00476, 00479, 00486, 00490, 00496, 00498 119 of first 500 69 Production 00502 has a production date of 11/69 00512 has a production date of 12/69 00504 has a production date of 11/69 00506 has a production date of 11/69 00789 has a production date of 12/69 +5 of 1969 Production 124 Total of 69 Production Year 00048 has a production date of 02/70 00300 has a production date of 02/70 - 3 (that were not 69's) 00474 has a production date of 01/70
-
Hello kats! Good to "see" you again! Great conversation. What is the panel behind the front wheel well about?
-
Yea! He got in the car with some woman at the airport? Now I'm going to have to watch it again - oh shucks. Great pictures - just great. I found what I was looking for - Brian Long; "Fairlady to 280Z", page 42 and 43. The Yamaha A550X and the Toyota. Long gives Goertz credit, but from other literature I have read, it's a stretch.
-
Whooops! What happened to the picture?

-
Thanks! It's really confusing. I just got this in my e-mail, how pertinent, number 793 with a 12/69 build date. There is just no real answer to what happened when. I know of a fellow who claims he used to own #1776 with a 12/69 build date. There have been many discussions about what parts appeared on what cars. "kats" has contributed a wealth of info and you should check out his site http://www.geocities.jp/datsunz903/ "HLS30-H" has posted numerous pictures from parts books I lust after showing parts and numbers with far better descriptions than I have. The more I look at parts, the more differences I find. What particular part (parts) are you having trouble with, billramsey2002?
-
I just returned from the Suncoast Z Car Club spring picnic. Lovely sunny day - low 80's - good turnout of members. 26 cars, 5 S30s.
-
Transmissions are not number linked to the VIN on early Zs. The doorplate showing an improper weight for the car model is a rare and unique conversation piece about the particular car and should be valued. 280Zs did gain a lot of weight, as we all know, but take pictures of your door plate and do some more investigation of your car to determine the build within the various categories. EScanlon could not be more correct. There is a tremendous amount of "bleed over". Here's the explanation. Datsun introduced the 240Z with a certain production run in mind. They were planning to send a few cars or so over here and keep a few themselves. Datsun sent out orders for parts from the different suppliers to meet this "production run". Remember now, that Toyota was having a flop with the 2000GT, the Fairlady Roadster was competing with the TR-4, MGB, and Austin Healy for American sales and not doing real well - Datsun was not real optimistic and the "production run" was not a big number of cars. Well, the whole thing blew up in their face. Sales and sales orders soared along with warranty issues that forced design changes along with new part orders from the suppliers. The suppliers had to gear up to meet the order demands, and they had design upgrade issues as well. For example, I have two series one differentials sitting on the floor here, and they are noticeably different. Mine 11/69 - the other 6/70. I have parts that I only see on very low VIN cars - grey plastic ash tray, plastic gas door latch, gas cap with no chain, metal name plates, clear deck lid glass... Generally speaking, parts fit across the board. There are only certain significant changes within the various categories / dates / VIN #s, but some old parts were used until they ran out and the new part replaced it. One can simply not tie it down. To top it off, ya'll are trying to tie "model years" into the equation. I think it just confuses the issue more. I like sticking to production dates stamped on the doorplate, confirmed with the VIN that is stamped in the firewall. The IZCC refrence is a great resource, certainly not completely correct, but it's not a complete accounting either.
-
You hit the nail on the head, Alan. James drove a 2000GT in what Bond movie? His tailor, of course was Savile Row. I truly believe that if Katayama san had brought the GT to America, this would be a different club. Like the difference between the 350Z and the G35 today. The Toyota is a beautiful little car with wonderful performance for its time. Alan, do you have pictures of the Yamaha prototype to compare to the Toyota? That would be interesting.
-
Alan, Are you home? Glad to see your response.
-
Couple more SR311 kits on eBay http://cgi.ebay.com/ws/eBayISAPI.dll?ViewItem&item=3177209090&category=2583 http://cgi.ebay.com/ws/eBayISAPI.dll?ViewItem&item=3176930484&category=2583
-
Baking Soda!?!?! Gotta try that. Sounds good.
-
If I'm not mistaken, this car was for sale a month or two ago. Remember that discussion? It started at $30 something, was reduced during the auction, and didn't meet the reserve. We had a long conversation about the "factory" restoration program and how it wasn't really the factory that restored the cars, the odometers being reset to 0 miles, this car having 51,000 miles on it with the comments about who would put that many miles one of these examples. Yep! here it is. http://www.classiczcars.com/forums/showthread.php?s=&threadid=10532&highlight=factory+restoration+program Ha! same car!