


Captain Obvious
Community Member
-
Joined
-
Last visited
Everything posted by Captain Obvious
-
i know there has been previous description of the wet-set method, but I don't have time to hunt now. But here's a couple pics that should make the process clear. This was done with the bowl off the car, but it can be done just as easily with the carb and bowl in-situ. Clear tube off the nipple at the bottom of the bowl: I find it helpful to put a sharpie line on the bowl to help with accuracy. You can see the fuel level in the tube right at the 20mm line:


-
It's really hard to gauge paint in pics like that, but it looks like there is too much orange peel, and it looks "deeper". Like base/clear instead of the original single stage. Hard to judge. And the rear tail light panel is the wrong color. Way too light. I'm thinking they painted that panel maybe at the same time they painted the rest of the car? Wait... Were the 2+2 rear tail light panels a different color than the coupes? Don't get me wrong. It's a beautiful car. I'm just curious what "all original" means these days.
-
Woof. Yeah, it looks like someone screwed up your nozzle. I've got a couple nozzles here and I'll take some measurements next chance I get unless someone beats me to it.
-
OK, so another data point that lines up. So unless someone else comes up with something better, I'm going with what we got. @SteveE, It was your pics that turned the corner for me. I had some 70 calipers here that were "0" year and a 78 pair that were "8", but I just couldn't believe it was that simple. Then when you posted your pics of your 8/72 build calipers that were all "2", it seemed that it WAS that simple. Thanks again!
-
Excellent! Glad it's running! And I wouldn't bother with trying to use a micrometer. I would just go to the wet-set method with a piece of clear tubing. It's the only way to be sure.
-
Actually I think that's exactly what Zed Head was talking about. Just like what kickstand suggested:
-
Are you thinking it's original paint? Hard to tell from a couple pics, but it looks like a tape line on the fenders up in the engine compartment. Like they taped it and sprayed it with the hood closed? Or is that just a trick of the light? And at quick glance, the interior isn't all original. Shift knob, center console lid, shift boot, E-brake boots. Those are all aftermarket adds.
-
@SpeedRoo and @inline6, Does the suggested decode breakdown comply with what you have in your possession?
-
Yes, it totally makes sense that the date codes on front and rear halves could be different. I would expect them to be "in the same ballpark", but certainly don't have to be identical. I would also consider it completely reasonable to see some cars with a build date early in a year to have calipers with a year code from the previous year. For example, something built in Feb 1971 might have a "0" caliper on it. Something from October-December 1970 maybe?
-
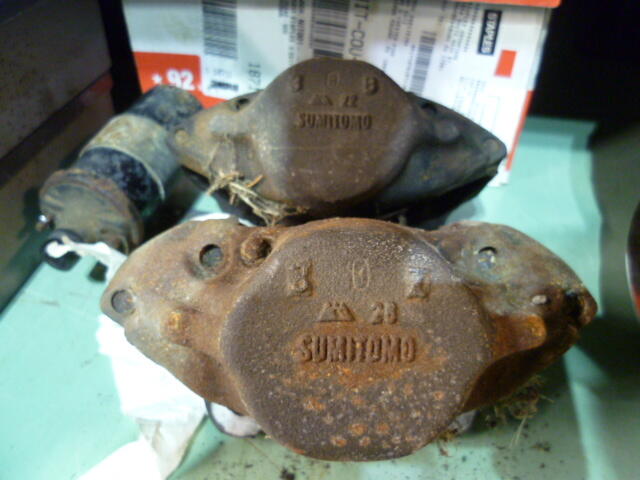
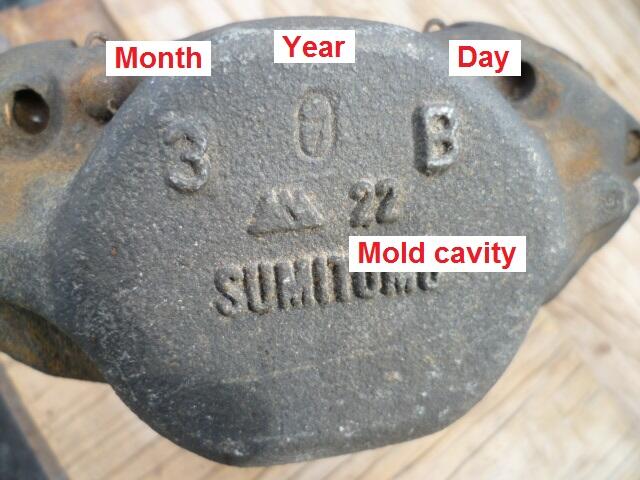
Thanks Steve. After looking at some calipers and seeing your pics, here's my read: It seems pretty clear that the number in the center is the year. And since the right position can have both letters and numbers there are 36 choices, I'm guessing that is day of the year. Making the left position the month. Some supporting pics. This caliper came from a 78. Date code "1 8 R" : And these came from a mid-1970 build. Codes "3 0 B" and "3 0 Z" : And on my 77, I didn't pull a wheel and take a pic, but I've got a "3 7 K"
-
Oh, and forgot to say.... It looks like a graceful crash landing recovery so far. Glad to see that!!
-
Answers to some of your questions that I haven't seen answered already: 2) Yes, it's that easy. (And I'd be interested in the relatively new hoses if you're looking for them to find a new home. Send me PM if you want.) 3) Those things are supposed to hold the throttle open a tiny amount when you are decelerating hard. You probably won't notice if they are working or not. 5) In theory, nothing you are doing should have any impact on the carbs or the tuning. 6) Probably, and probably.
-
Got it. Here's a pic of the adjustable bushings so I don't have to keep going to the website:
-
If I were messing with this, I would probably try to find the centerline of the car and go from there. While I'm here, what did you use for your adjustable bushings? Got any pics?
-
Bummer. Here's hoping that whatever path forward you choose, it goes smoothly and that's the end of the issues.
-
On your first question - The old valve should operate like the new one. You should be able to blow through it towards the exhaust galley, but not in the other direction towards the air pump. Your old valve is presumably stuck shut. Second question - There should be no link between the operation of that valve and mixture. The pump is supposed to push fresh clean air into the exhaust stream downstream of the cylinder. The cylinder already fired and pushed the spent charge out on the cylinder by the point where the pumped air is injected. Anything injected into the exhaust stream at that point shouldn't affect mixture (or drivability).
-
Cool. I didn't think they were hardened, but had to bring it up just in case. Nice work.
-
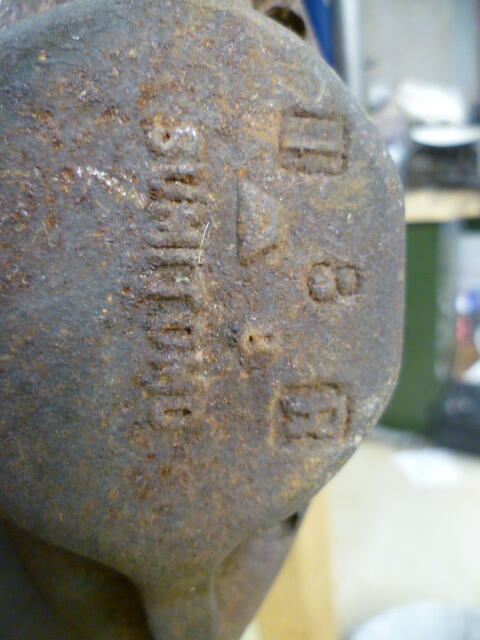
Bump. Anyone ever figure this out? Anyone have the Rosetta stone for the date code on the Sumitomo calipers?
-
Assuming the bleed screw isn't hardened, it sounds like a reasonably simple machining operation on a lathe. And even if it isn't fully hardened through, there is the possibility that it's case hardened. And you'll most likely cut through the case when you knock the tip off. Are you sure that the threads are the same as the generic bleed screw? You said a while ago that there was a "normal" one in there, and it was loose?
-
That connection point is above your left knee. It connects the output from your ignition control module to the EFI harness. If the car starts and runs at all, then that connection should be OK.
-
Good. Keep an eye on it. Here's to hoping the whole thing was a non-problem and just a couple chips left over from the head shave and gasket scraping.
-
I would back up a little and ask some questions: Are you double dog sure the oil pan was free of debris after your recent rebuild? Maybe those fragments are chips that have been in there from before the rebuild. Did you have the head cut? Maybe those fragments are chips that weren't properly cleaned off the head after that process. Are you sure the fragments are metal? Maybe chips from an old head gasket being cleaned off the block or head? Or valve cover gasket even. Some of those have a metal core. While you had the oil pan off, did you take a look at the thrust bearing on the center main? How is the oil pressure? How does the engine sound and run? Any reason to believe there's something wrong inside? I'm not yet ready to jump to the conclusion that there's anything seriously wrong.
-
If it's not to late... Don't pull the housing. If you have concerns about this being the issue, pull the valve cover and look down along the back side of the chain guide and see if the tip of the bolt is pushing against it. I wouldn't mess with the thermostat housing if you don't have to. They're too prone to leaks to mess with unless you really have a compelling reason to do so. And besides........ The chain guide backing plate is steel, not aluminum. If the stuff you found in the pan is non-ferrous, then it's not the metal from the chain guide.
-
Excellent!!
-
My understanding is that the reason exhaust valve seals are less of a concern is... The cavity where the valve stem passes through the exhaust port is never under vacuum like the intake port area is. It's less likely you would ever pull oil INTO that area because you just don't have the vacuum differential like the one you see on the intake side.


