


Captain Obvious
Community Member
-
Joined
-
Last visited
Everything posted by Captain Obvious
-
Yeah, that's a good question. I've been wondering that myself.
-
Here's a pic I hoovered from the web some time ago. Not my car:

-
So in 0.2 degrees of rotational change, you're seeing about .001 in longitudinal change. I'm with you in that's nearly zero play. But... That is unloaded, right? nothing to compress the spring(s) in the tie rod ends? Nothing to smoosh the grease out of the rack and pinion gears? I don't think you'll see much, but you might see a little more than that if you would lock the rotation and push/pull the the rack back and forth with the rotation lever frozen. Just thinking out loud for theory's sake.
-
Is the fuel pressure still at 38 psi when you are cranking it after it has stalled? If so, it's not a fuel pump or tank issue. It would (should) be relatively easy to narrow it down to fuel or spark. Since it just shuts off, I'll rule out air and ignition timing. But it should be relatively easy to determine which of the other two is causing the issue. Next time it stalls and won't start, pull the center wire off the distributor cap (the one from the coil) and lay it close to the nuts on the strut mounting point. Slide the rubber boot up the wire a little bit to expose the metal contact inside. Then crank the engine and see if you have spark from the wire to the strut nut.
-
Where did you see the stream of fuel? Over by one of the carbs? If so, I'd pull the rubber hose off the return hardline near the fuel pump and see what comes out as you work the pump arm. Maybe the orifice is plugged with crud?
-
I've looked around for rebuild kits with very limited success. The only rebuild kits I've found that I think are correct are on ebay for big money. I've been working with another supplier on putting together a correct kit, but no luck so far.
-
So thinking about it a little (trying to add a little value to your original question), there is no way the factory taped every one of those hubcaps before they sprayed them. I'm guessing they had some sort of mask(s) they laid over the top before they applied the paint. Have you got a spare hubcap that you would be willing to cut apart to use as a mask? You could carefully cut away most of the metal and leave yourself seven masks. One for each of the triangle holes, and two large rings. Lay them on top of your unpainted hubcap and spray it. Take the metal masks off, and your're done. Not the easiest thing, but if you've got a rusty spare that you would be willing to destroy, it might be easier than taping four of them!
-
-
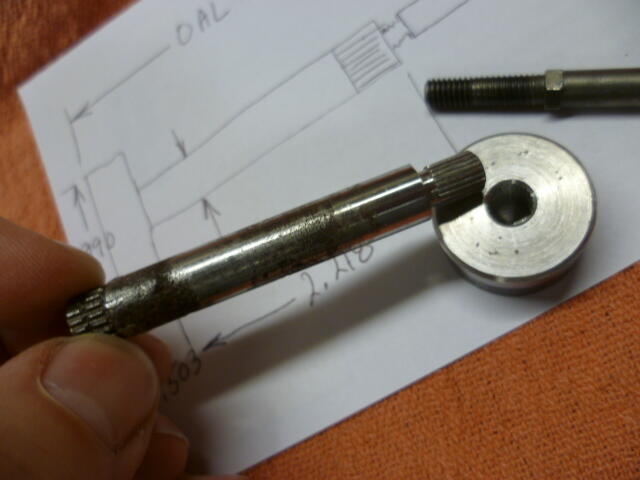
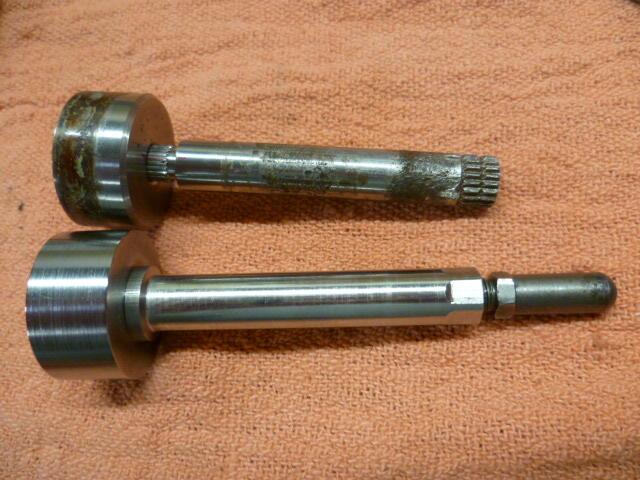
Looks like a bullet hole to me. Is there a matching hole in the door panel?Those two gauges share the same ground connection, but so do a whole bunch of other things. I don't think that's going to be the issue. I'm having a hard time coming up with a common denominator failure between the fuel and temp gauges that would cause the symptoms you're experiencing. So if the accessory in the lighter doesn't yield any insights, then try this... Turn the key to ON and see what the gauges do. If the temp gauge stays at "cold", go out to the engine compartment, pull the single wire off the temperature sending unit (should be yellow/white) and connect that wire directly to engine ground. That should run the TEMP gauge all the way to HOT.The little box on the back of the speedo does not contain the voltage regulator for the gauges. That box contains a "speed switch" that disables the throttle opener system below a certain speed (FSM says 13 mph). This is done with the help of a small set of contacts built into the speedometer that closes at low speed. Basically... They don't want the opener system to be actuated as you are coasting slowly to a stop. So the voltage regulators for each gauge are built into each gauge. In other words, the temp/oil gauge has it's own built in regulator, and the fuel gauge has a different regulator built into it. But getting to the root of your question.... If you lost both temp and fuel at the same time, it's probably something other than the regulators both failing at the same time. Are you sure you didn't lose temp and OIL (not fuel) at the same time?Well without a doubt, this guy is an order of magnitude more crazy than I am. I bow in honorable appreciation to the ridiculousness. The electro-etching of the number onto the head of the bolts and making your own nyloc style nuts. All I can say is "wow"!!Hmmm... Should have picked up oil by now. Do you have the spark plugs out? It will spin a lot faster with a lot less load on the starter with the plugs out. Also, the positive displacement style oil pump probably doesn't do a great job pumping air, so I've always primed it before I put it on. Just pour oil into the pump before you stuff it up into place. Not full to the brim, but just enough that you can tilt the pump during install without the oil running over the sides and making a mess. I also pre-filled the oil filter a bunch. Lastly, I've got my oil prime rod that I can send, but I bet you could make something for a lot cheaper than the shipping.And that's important for your cars too, not just your body.Day late, but... Yes, it is splined and pressed in. I made a new one that threads in instead of pressed in with splines. Made it out of stainless so it wouldn't rust next time Here's old and new: And save the rounded tip piece. It's special because it's hardened. Or if you do have a new tip made, make sure you have it heat treated to a similar hardness.
 Late to the party, but that's what I've seen as well. Water bypass pipe closest to the engine, then engine sling next outboard from that.I don't have any input into identification of what would be the correct advance canister, but I'm a little puzzled by the reaction you had with the one you tried. At idle, the vacuum advance should be doing nothing. In fact, you should be able to connect or disconnect the vacuum line from the canister with no noticeable effect. The vacuum source is a ported source, and there should be no vacuum in the hose when the engine is at idle. I'm not sure why your engine wanted to rev and then die.That'll do it. That's the same issue that inline6 had with his master. Stuck open. Cars really don't like to just sit. You need to get in and push the pedals a couple times a week just to keep stuff moving. Make "vroom-vroom" noises if it seems appropriate.Paid attention while driving my 77 yesterday. I think it's just the rubber boots that pushes my shifter away from 1-2. I don't think there are any intentional springs on that side.@zKars, Were the bushings correct for the 240 or the 260/280? I'm guessing they are focusing on the earlier cars since that's where the money is.The 1972 FSM says the ET is 15mm for the 5 inch wide wheels. I did not find documentation of what the earlier 4 1/2 inch wheels had for ET (offset), but I took some quick crude measurements comparing the 4 1/2 inch to the 5 inch wheels and it appears they added 1/4 inch to each side. If that is the case, then the ET would be the same for the 4 1/2 inch wheels.My 77 5-speed shifter does rest in center 3-4 position if you aren't pushing it to one side or the other. There is something pushing it away from 1-2. The spring pushing away from 5-R is much stronger than the force pushing away from 1-2. Might just be the rubber boots and linkage stuff, but there is something.


Important Information
By using this site, you agree to our Privacy Policy and Guidelines. We have placed cookies on your device to help make this website better. You can adjust your cookie settings, otherwise we'll assume you're okay to continue.