


jfa.series1
 Subscriber
-
Joined
-
Last visited
Everything posted by jfa.series1
-
 Here are two pics - one without the hard lines and one with them in place. If you can obtain a clutch hard line from a parts car, it should help you to position the bracket on the frame rail. Hope this helps.
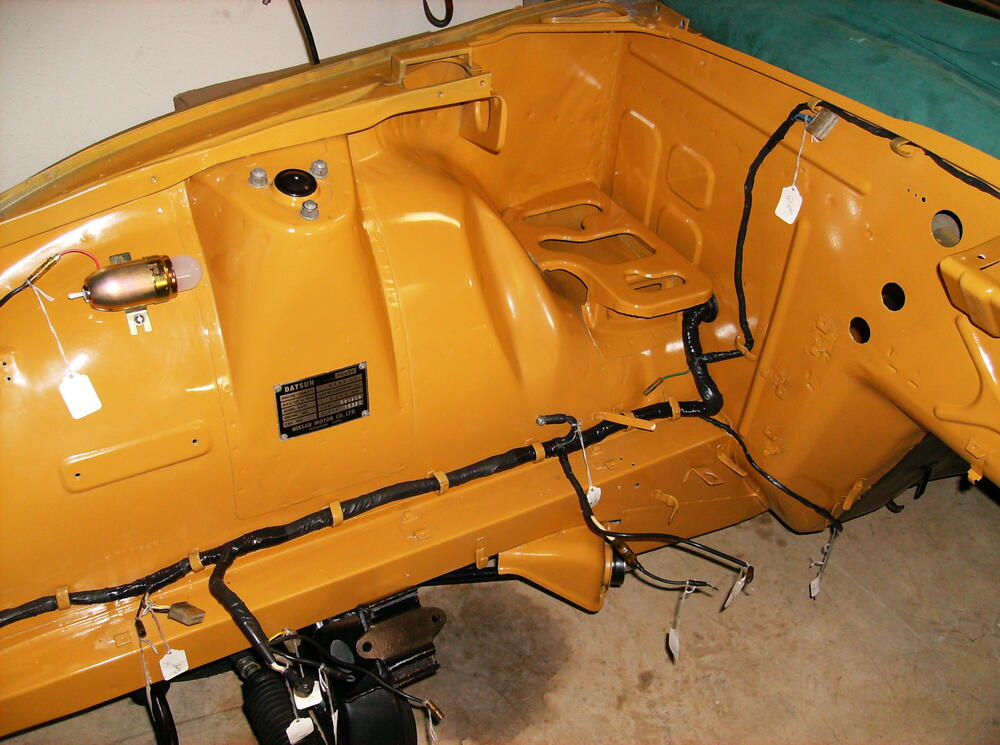

-
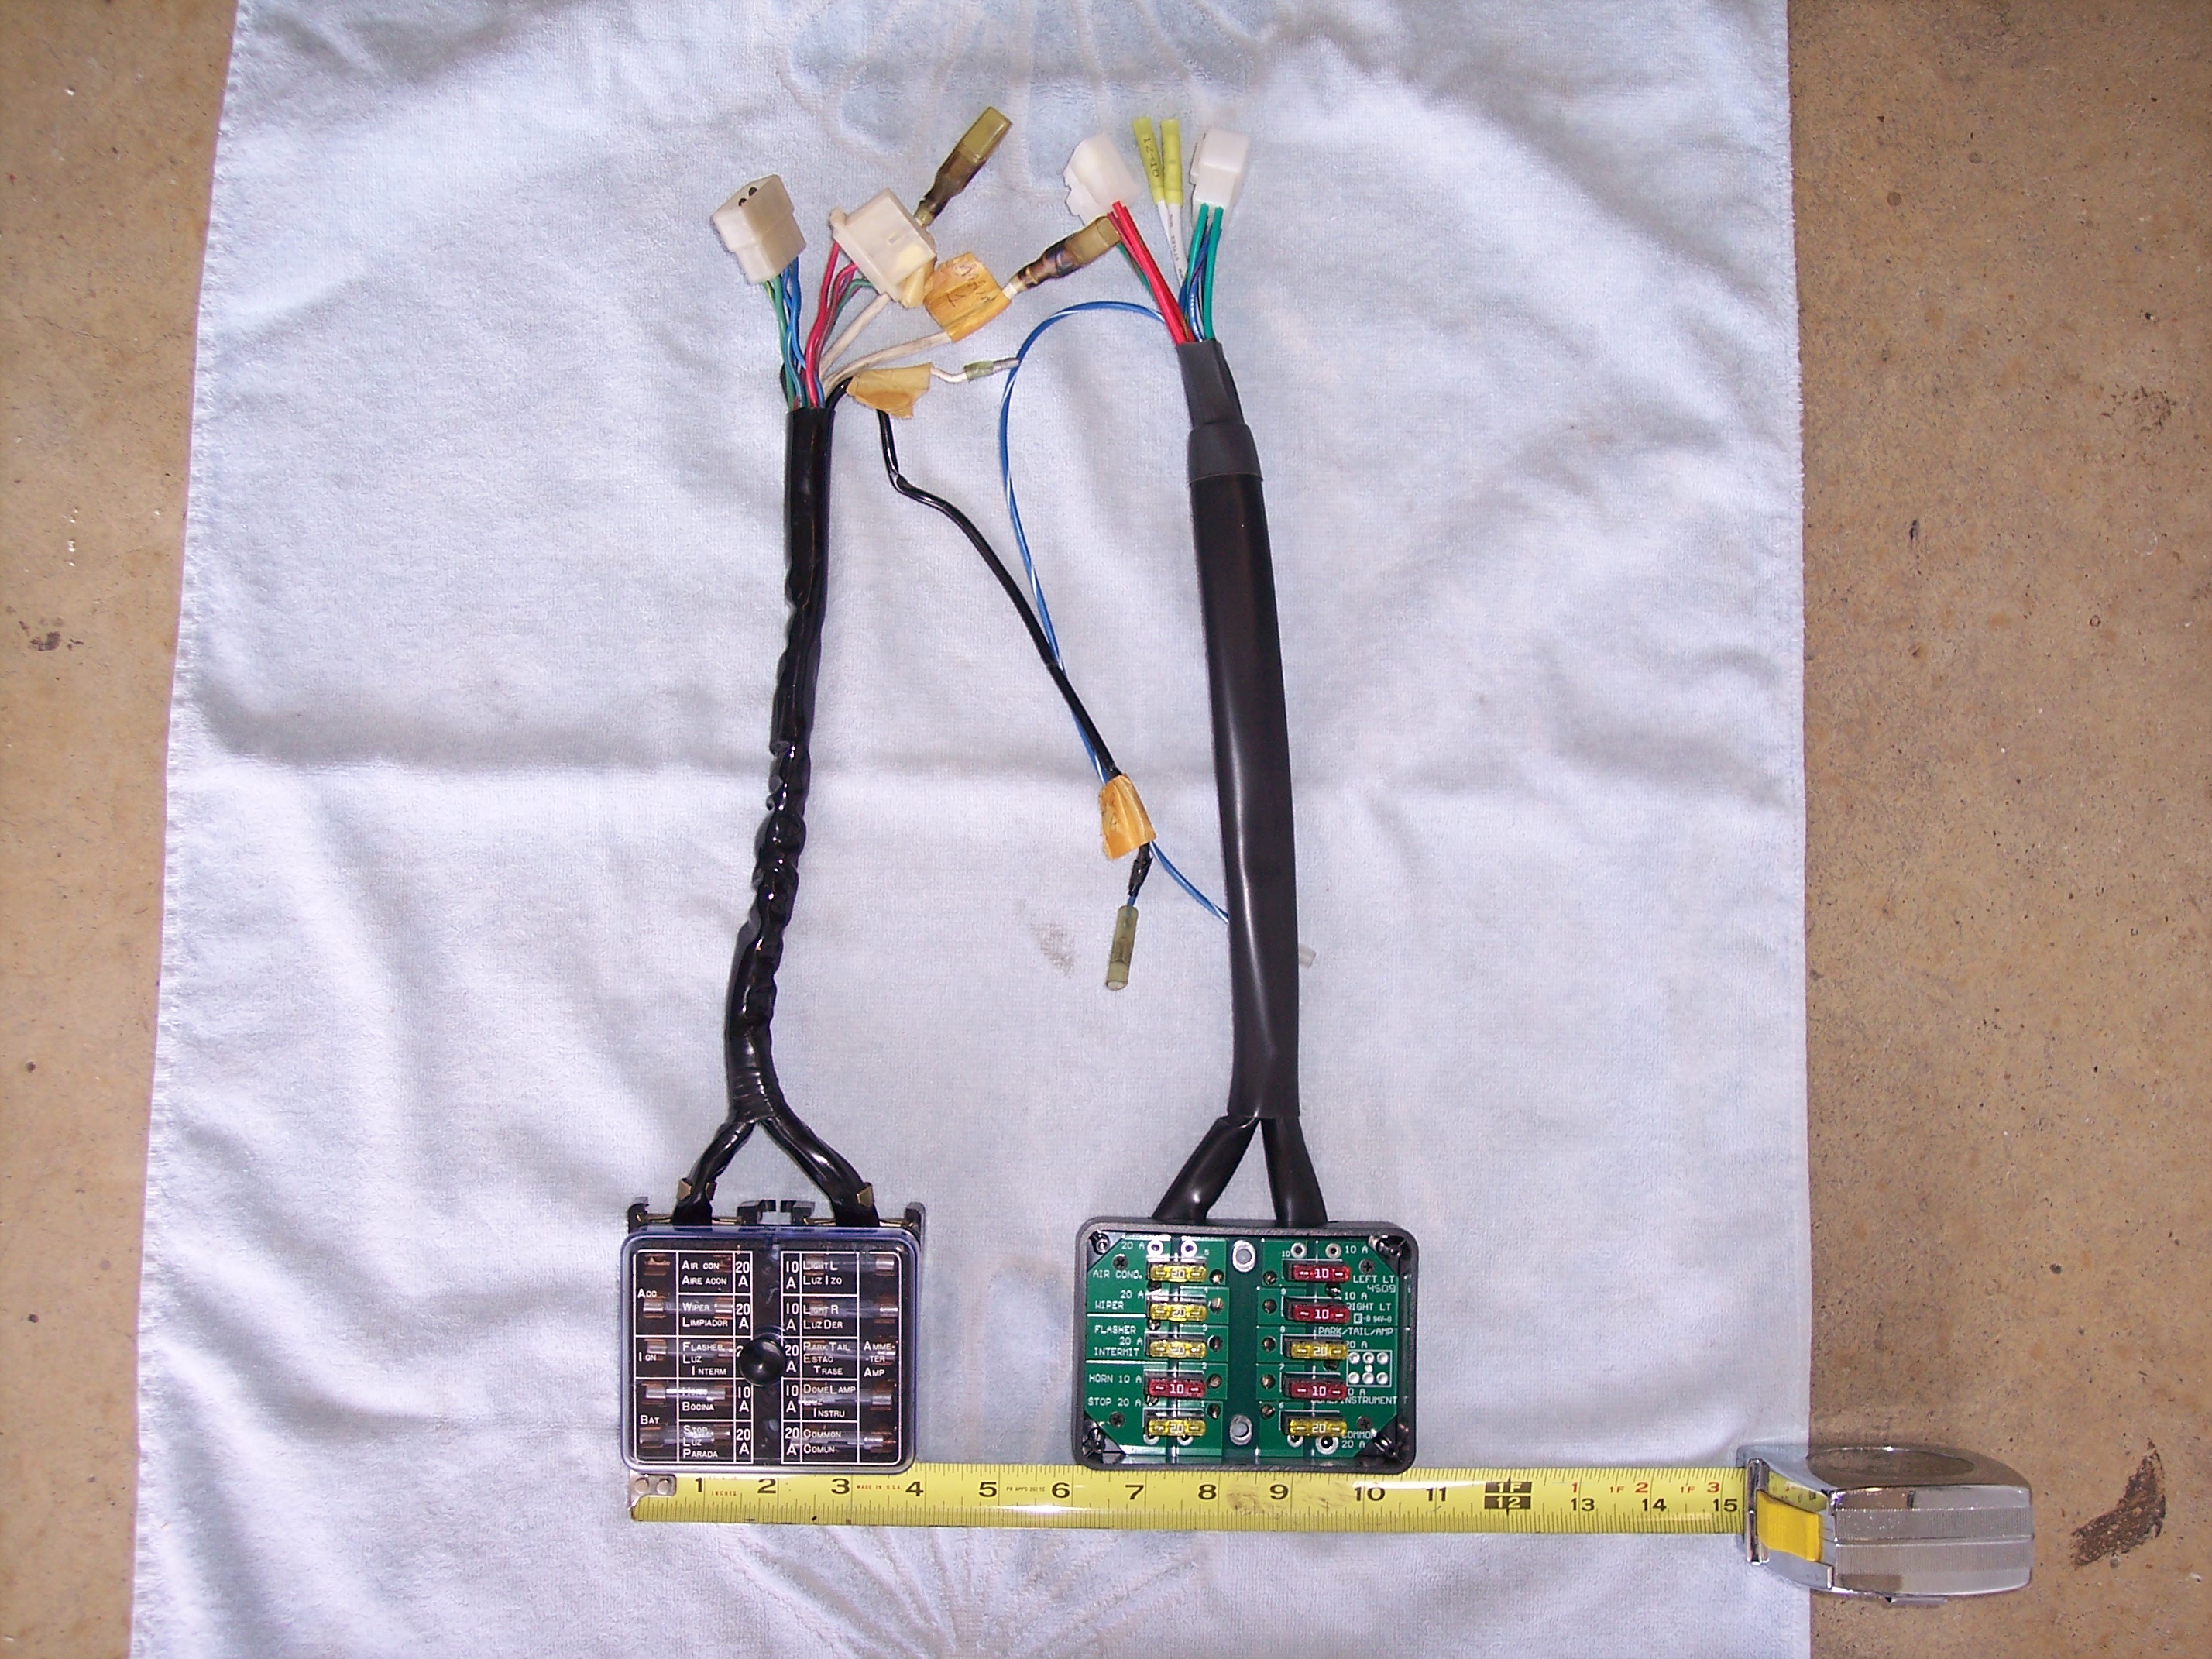
Charles, If your fuse box is toast, consider the MSA version with the spade fuses. I installed one with my resto. It was a good match with one exception - they did not have the two large female spade terminals, supplied butt connectors instead. I replaced those with spade terminals to match with the harness. Jim

-
Charles, Its been quite a few years but as best as I can recall I used either a 5/8" or 3/4" wide closed cell weatherstrip on both the edge of the splashguards and the bulkhead at the back of the fenders where it butts up against the A-pillar. This stuff is self-adhesive, usually available at most auto supply stores. Jim
-
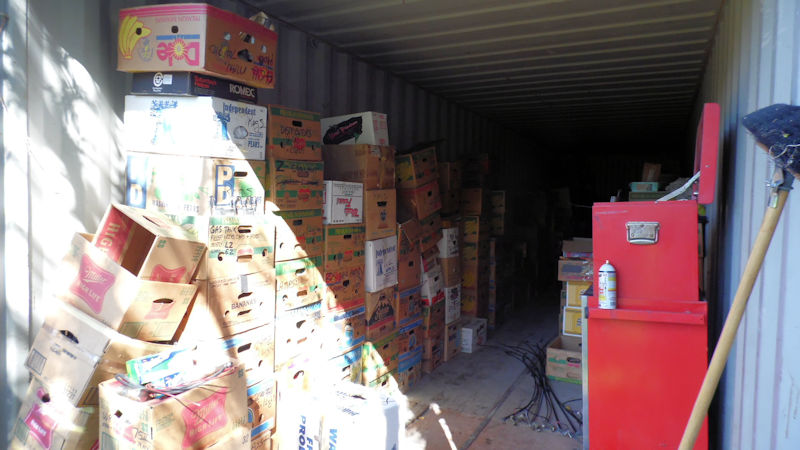
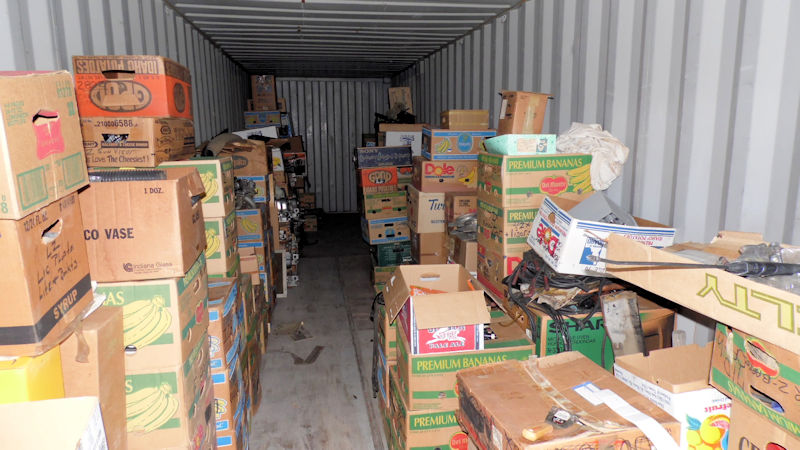
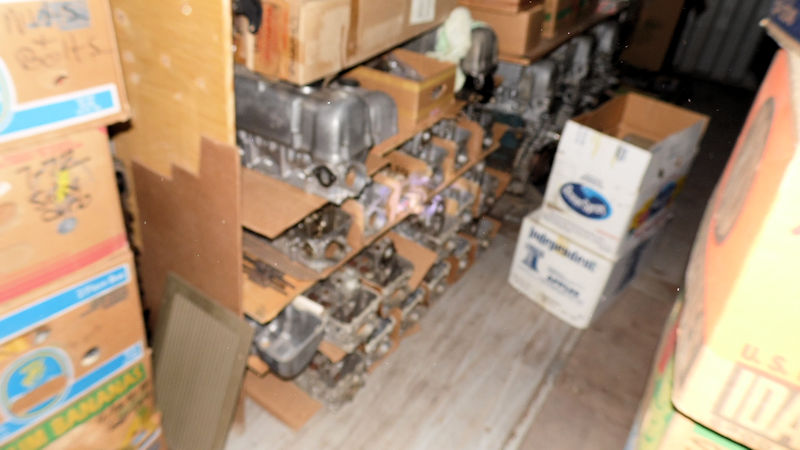
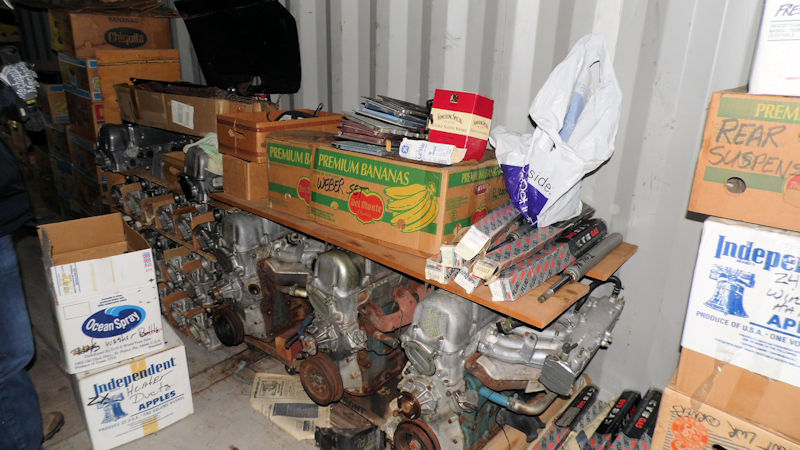
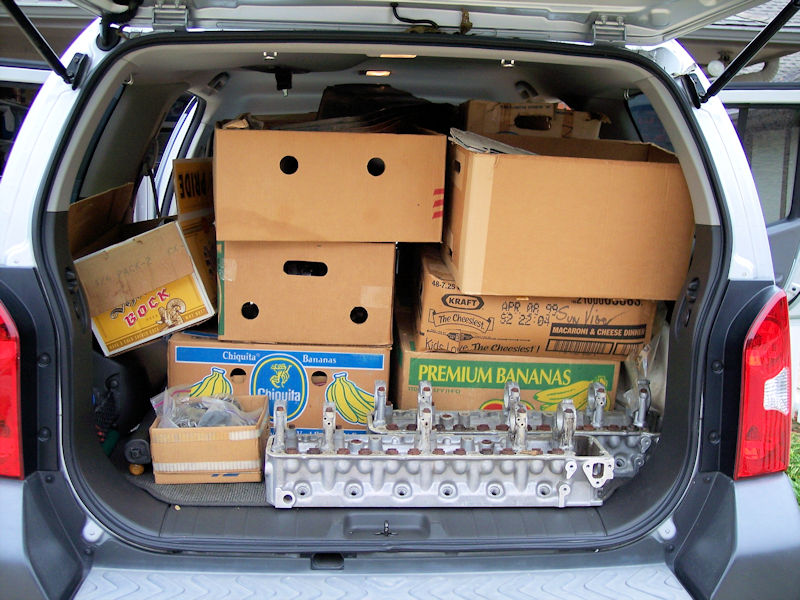
Just over four years ago my buddy @zed2 and I heard that there were some parts available a bit north of us so we made a road trip up to Sherman TX. We met with a guy that owned his own railroad station (another story there!) and he explained that a good friend was in the VA hospital dying of cancer. The friend was an old Datsun mechanic that had assembled some parts over the years and this guy was trying to sell some of them to help with the friend's bills. We followed him to another community and were introduced to what turned out to be a motherload of Z parts. There were several S30's and a couple of S130's on the property, a small dilapidated pole shed with some parts and a 30' shipping container. When opened, the shippiing container revealed boxes of parts lining both walls, all marked with the contents. With only limited time available that day we made a hurried sample inspection and made arrangements for a return trip with more time and more money. On the return trip we moved and inspected every box, setting aside those of further interest. I ended up with a lengthy list of purchases that filled the entire cargo compartment of my Xterra. A hoped for third trip was not to happen as the mechainc died and his property went into probate with the nearest family in Nebraska. I often wonder what became of the remaining parts hoard.

-
The splash guards mount directly to the body, no foam. The outer edge gets foam to seal it against the fender. Great work on getting Lily back together!
The overlaps on the plastic panels will give you a good clue. The quarter window panels fit on top of the rear panels. So... install the rear panels, then the quarter window panels. The panel across the back covering the lights goes in after the rear panels. The panel across the top for the dome light is last. Yes - the bolt for the shoulder harness goes thru the plastic on the quarter window panel. If you install some thin foam along the front edge of the rear panel where it fits under the quarter window panel, you can reduce sqeaking from the two panels rubbing against each other.
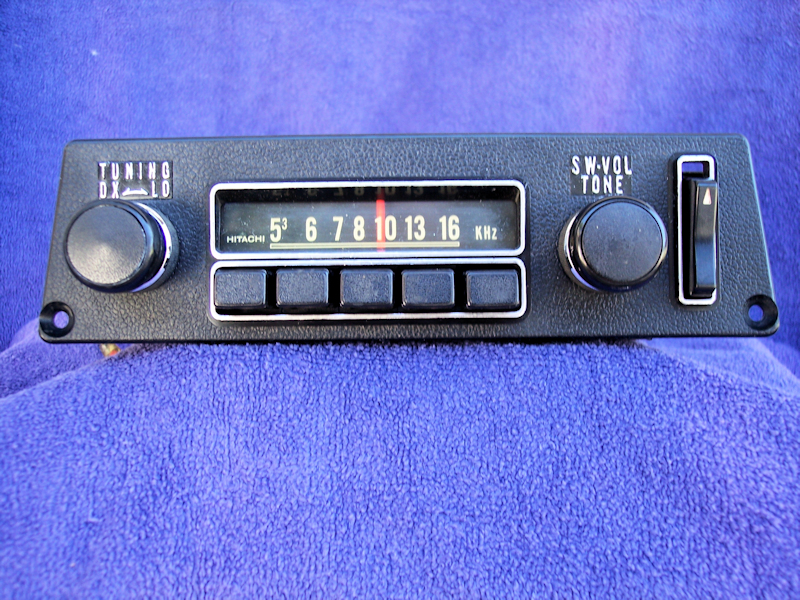
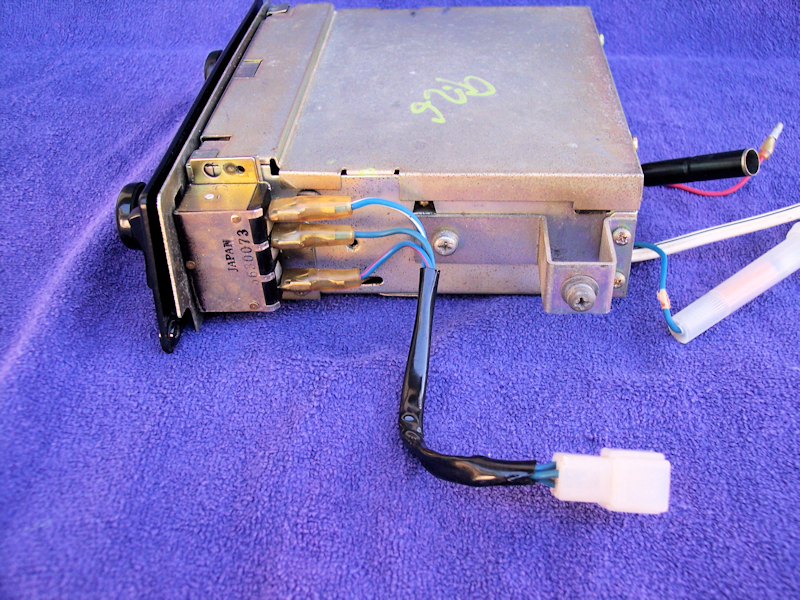
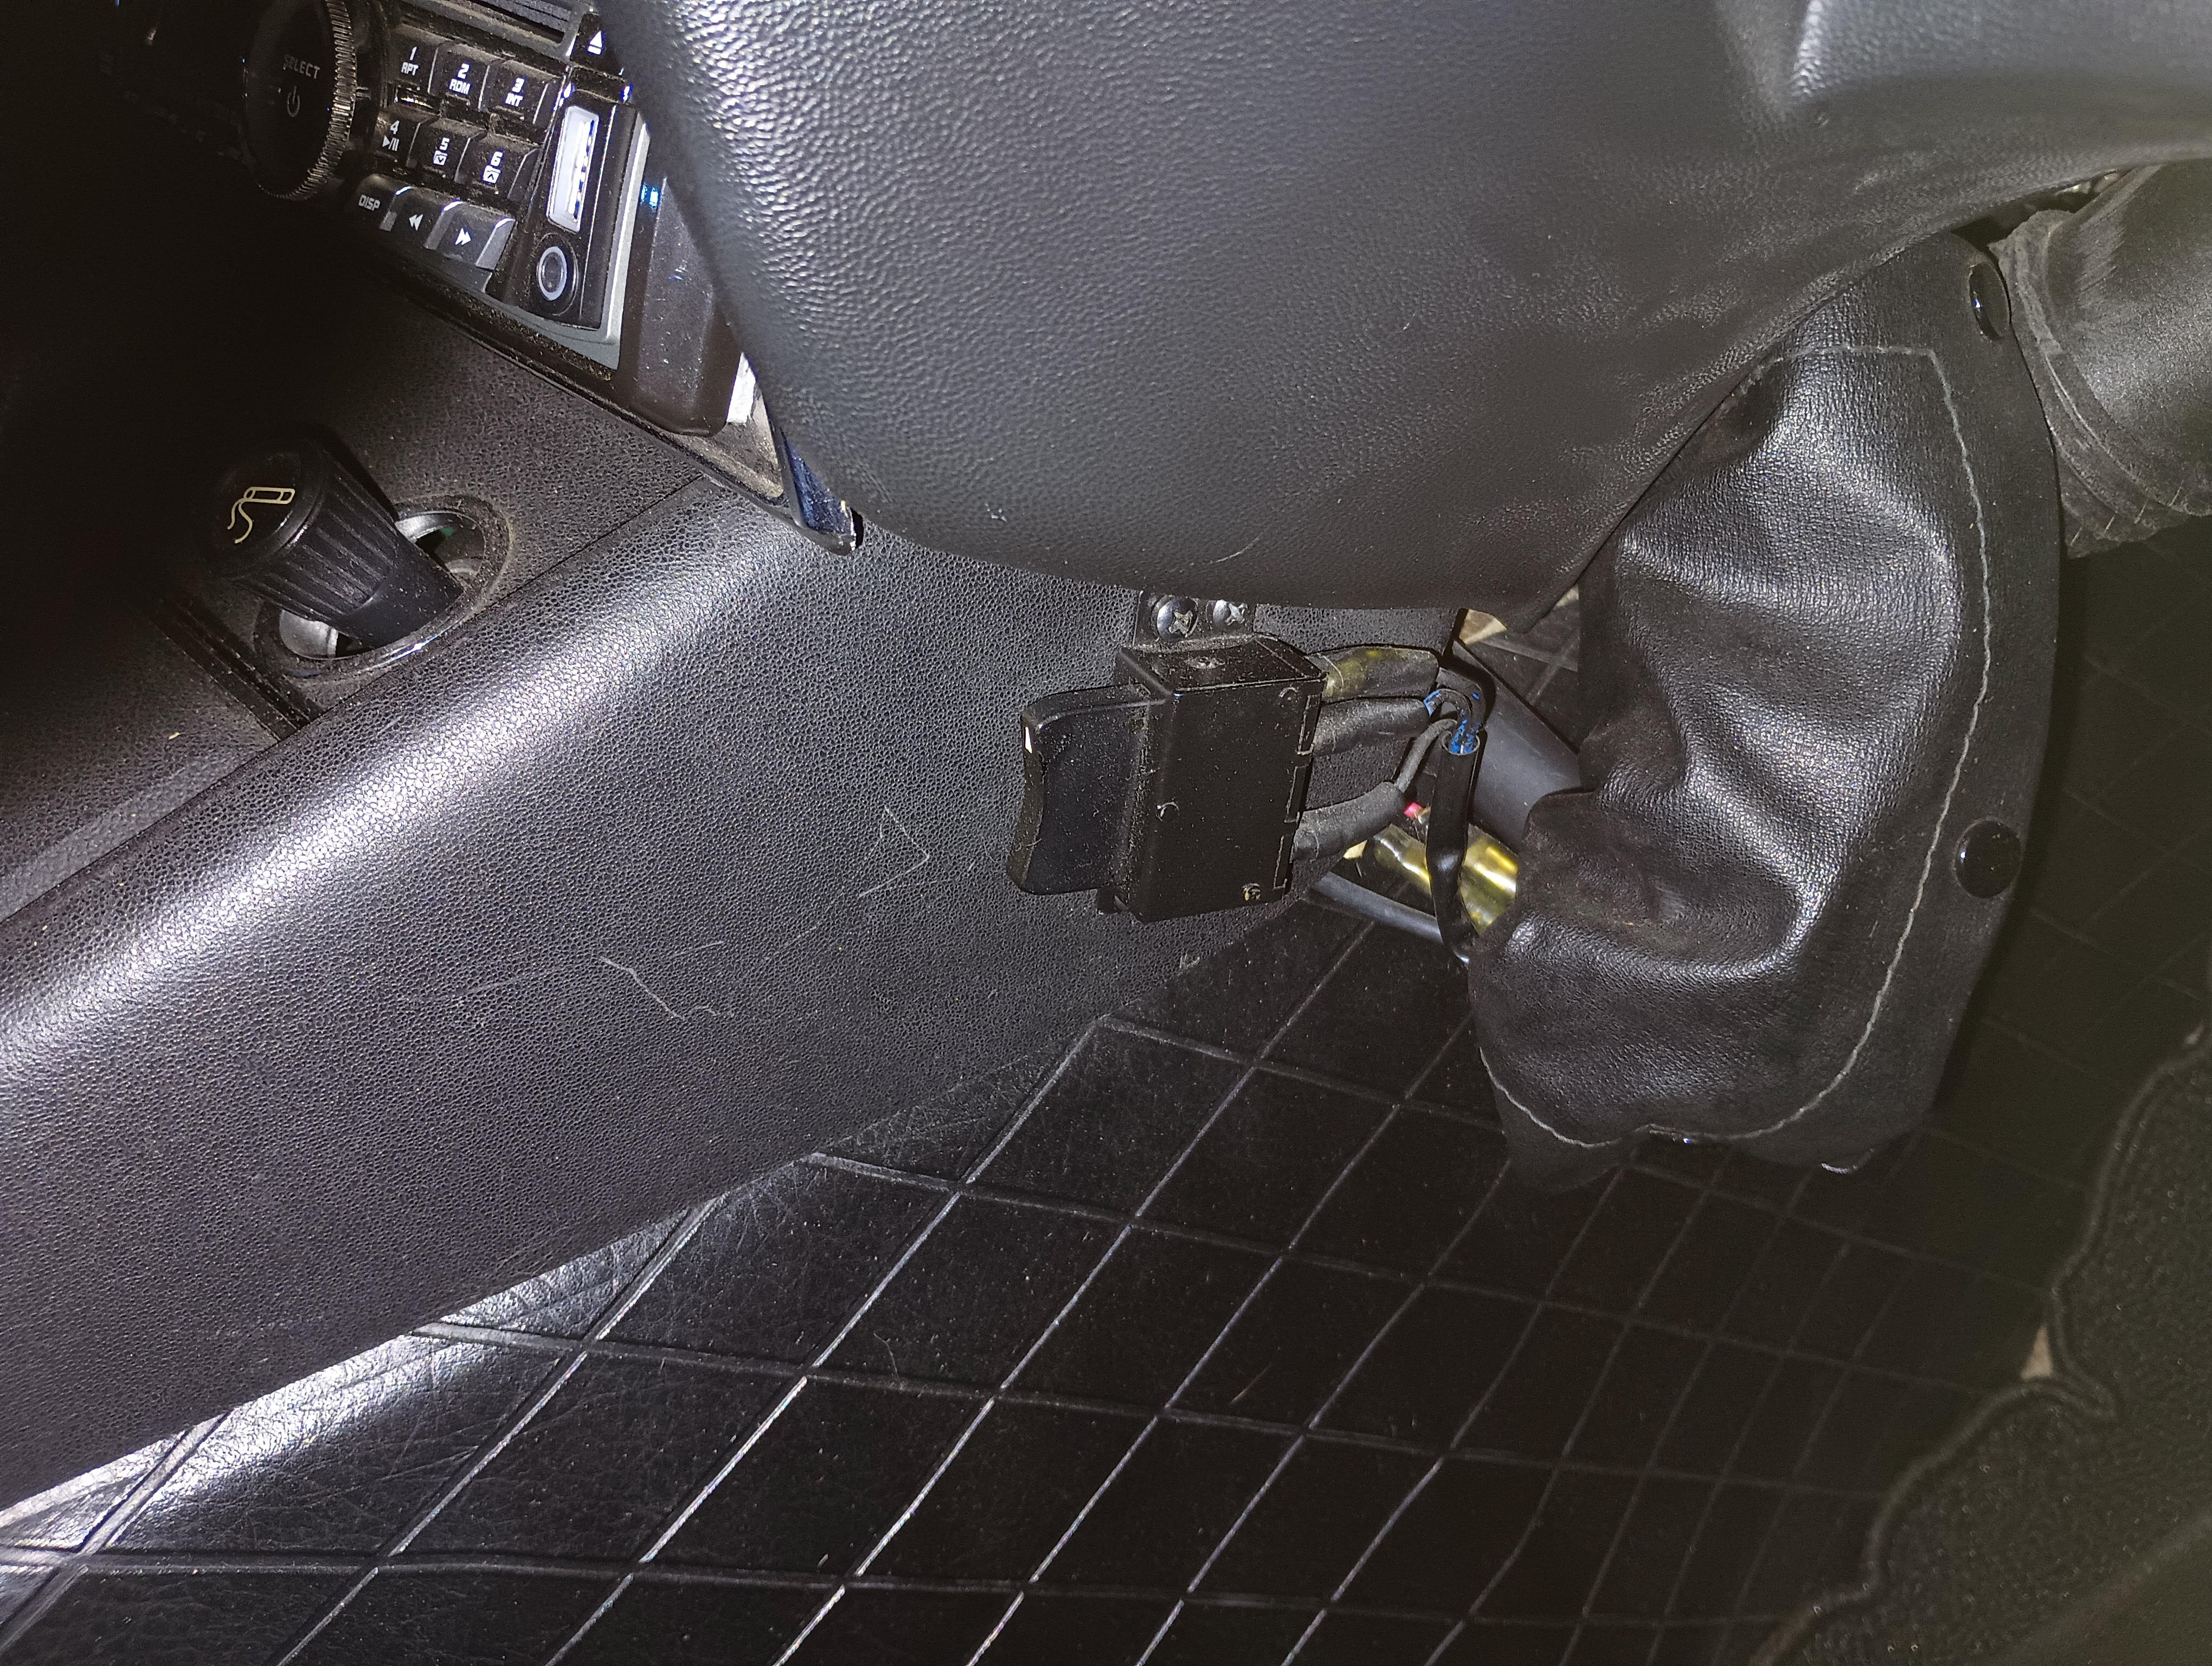
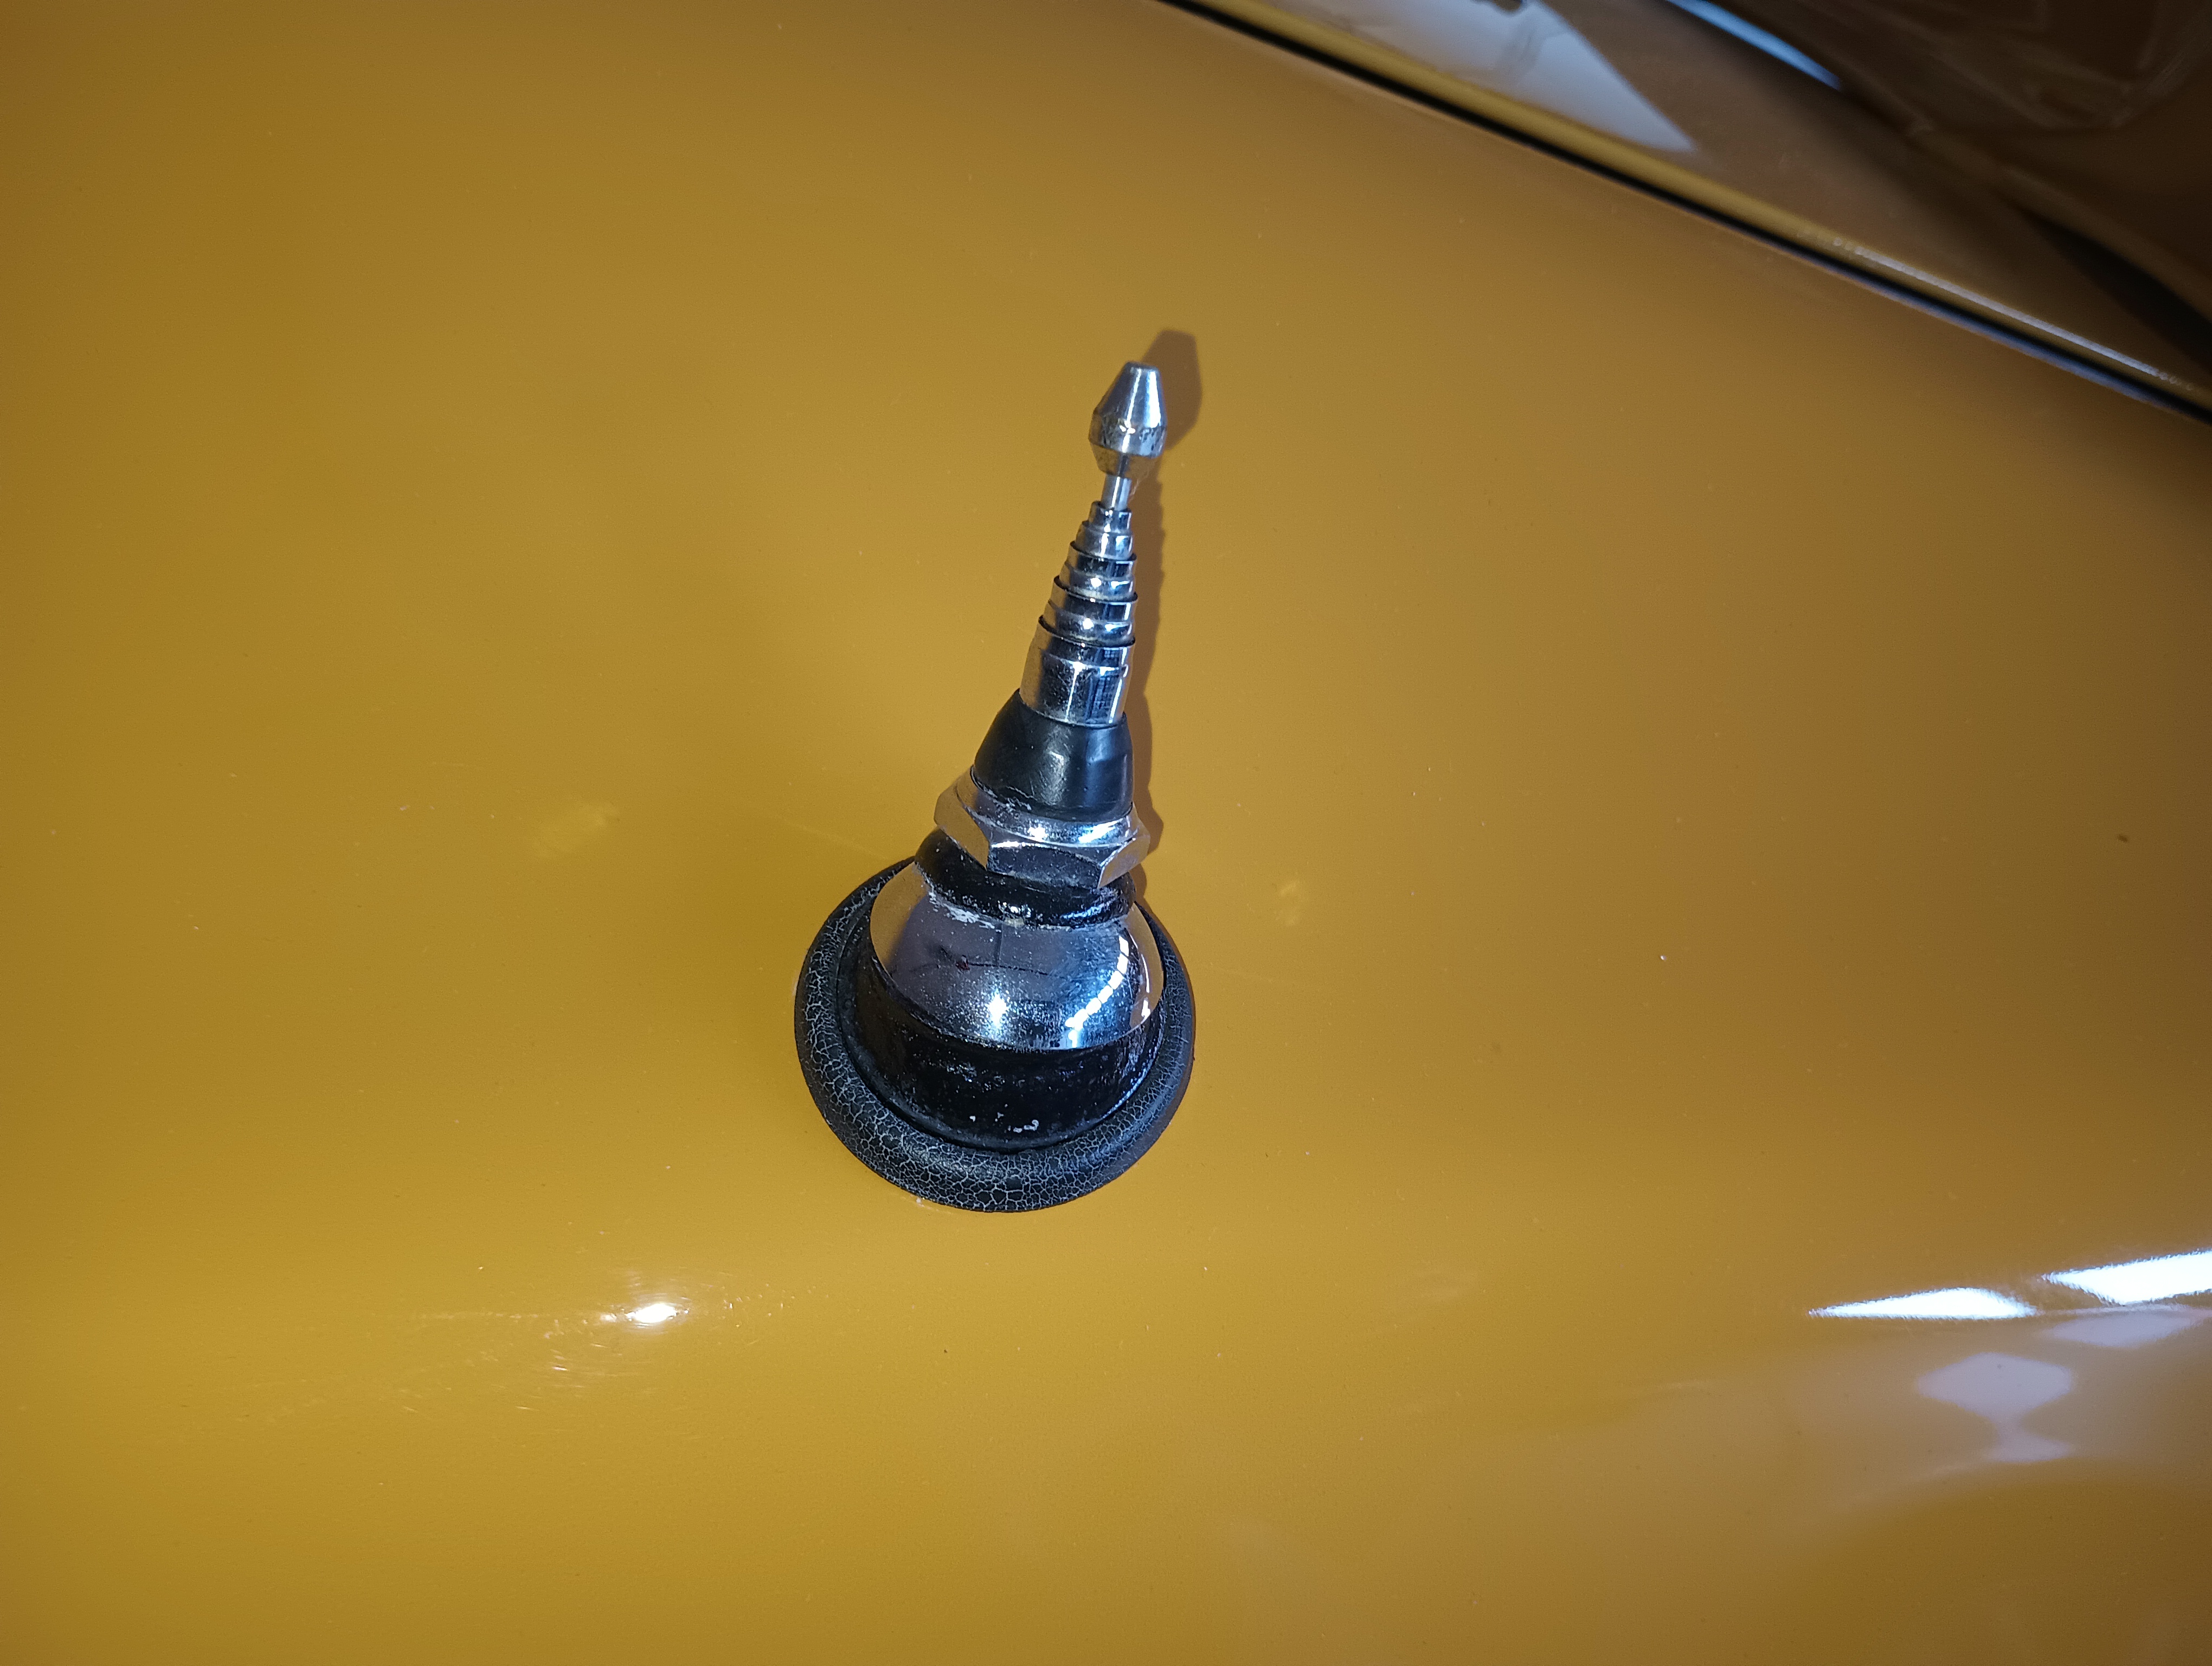
Testing the OE antenna motor function is pretty easy. It has two power leads, one for going up and one for going down. The antenna motor grounds thru the body. Ground the body and apply power to one lead and then the other but not to both at the same time. When I found my car on the showroom floor many years ago, the dealer had removed the AM radio and installed an 8-track unit. He moved the rocker-style antenna switch to the side of the console where it remains today. If you have the later style slider switch it could probably be mounted in a similar manner. Let us know which parts of the body mount you have and which ones are needed. I'm sure fellow members can fill in the gaps.

 A good alternative to clamps is blue painter's tape.
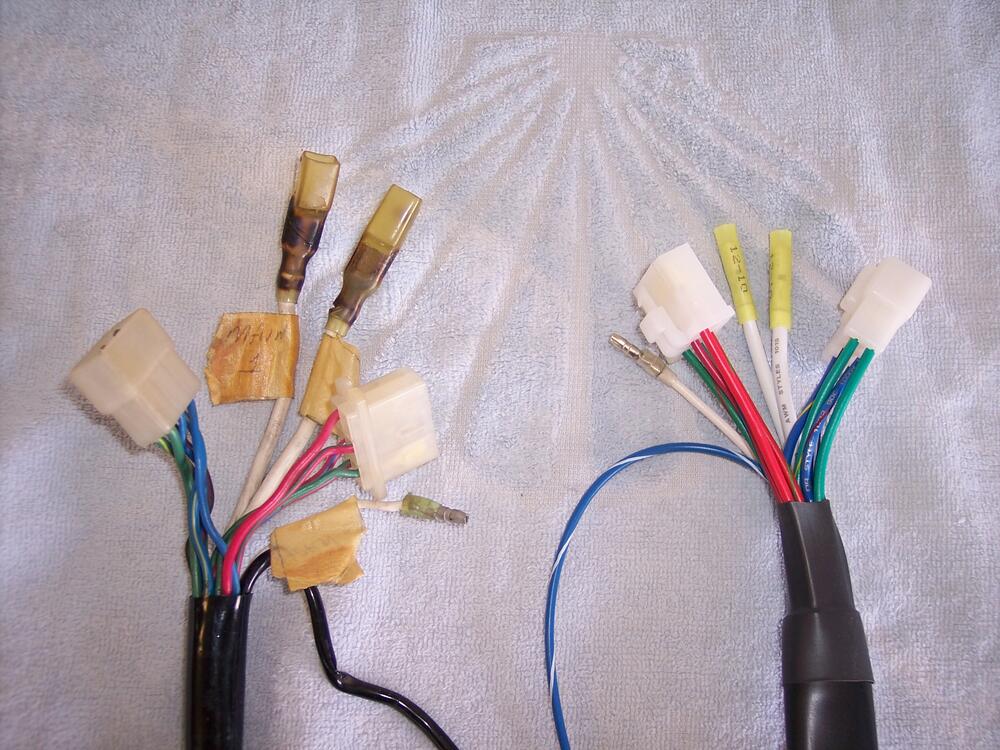
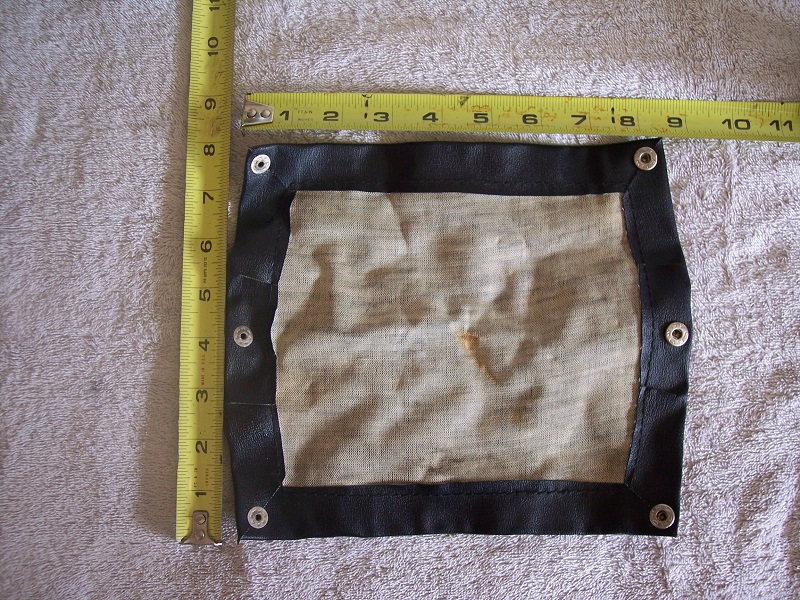
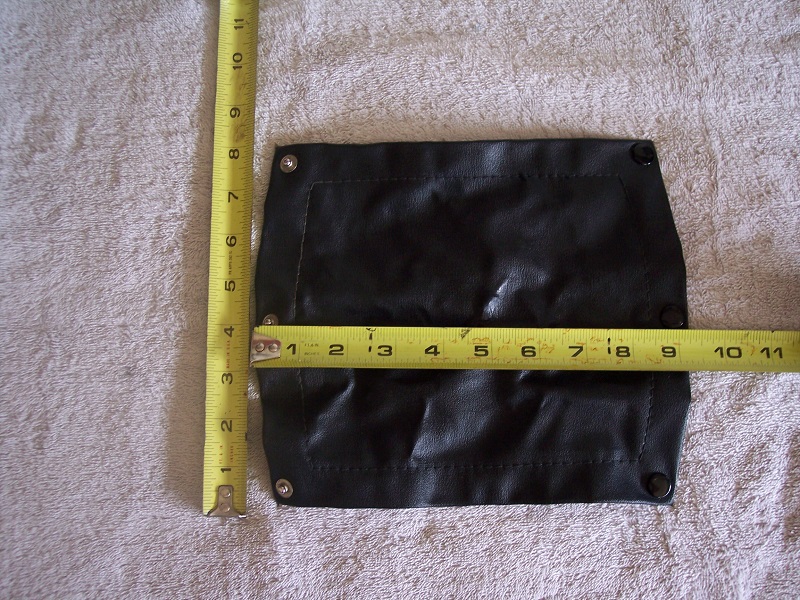
Here are pics and measurements for the OE wiring cover still on my car. The aftermarket cover offered by MSA mentioned by @26th-Z is notoriously undersized. Note that the edges of the OE cover are bowed out.
A good alternative to clamps is blue painter's tape.
Here are pics and measurements for the OE wiring cover still on my car. The aftermarket cover offered by MSA mentioned by @26th-Z is notoriously undersized. Note that the edges of the OE cover are bowed out.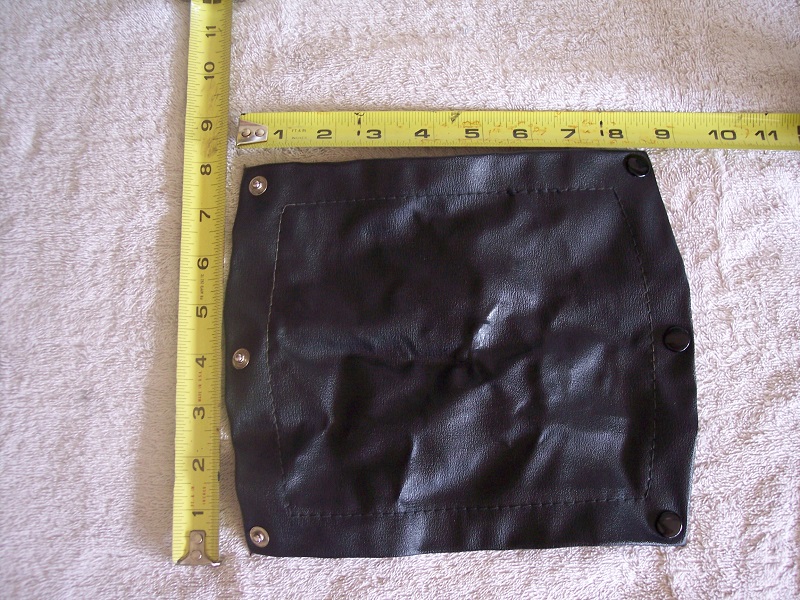
 The flow-thru ventilation change from the hatch to the sail panel was a hard change beginning with cars produced in February 1971. The parts catalog image supplied by @CanTechZ makes it clear that a second version of the Series 1 console was used thru July '71. Your shifter rod is probably a straight version consistent with the Type A transmission.
I have a box full of dash harnesses that I picked up a while ago, hoping for some 240Z treasures. Not to be! These are free for the cost of shipping via USPS Large Flat Rate boxes. Most, but not all, are unmolested. PM me if there is something of interest. 24013-N3600 '74 2+2 24013-N3601 '74 2+2 24023-N3600 '74 2+2, CONSOLE, 3 UNITS 24013-N4202 '75, 2 UNITS 24013-N4700 '77
Here's an instalation tip: When you are ready to fit them back into the car, apply some lube to either the car or the outside of the seals to allow them to fit into the car body more easily. New seals are going to be a bit fat and will resist seating into the curves of the car body. It will help greatly to have a buddy on hand to press and hold the windows in place while you fit the screws.
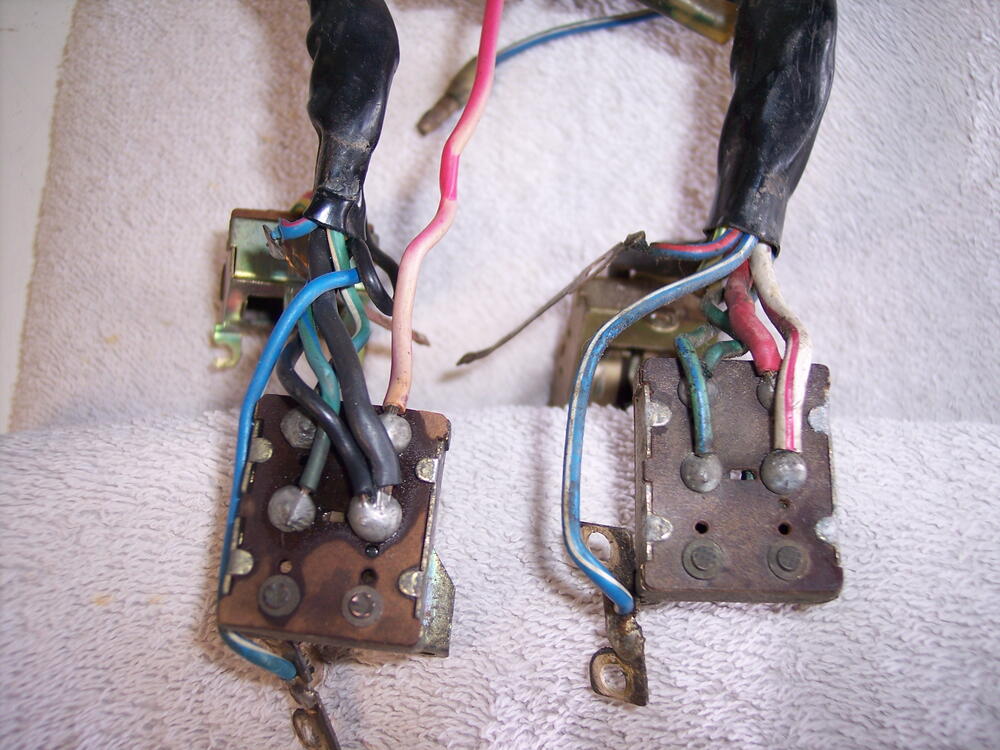
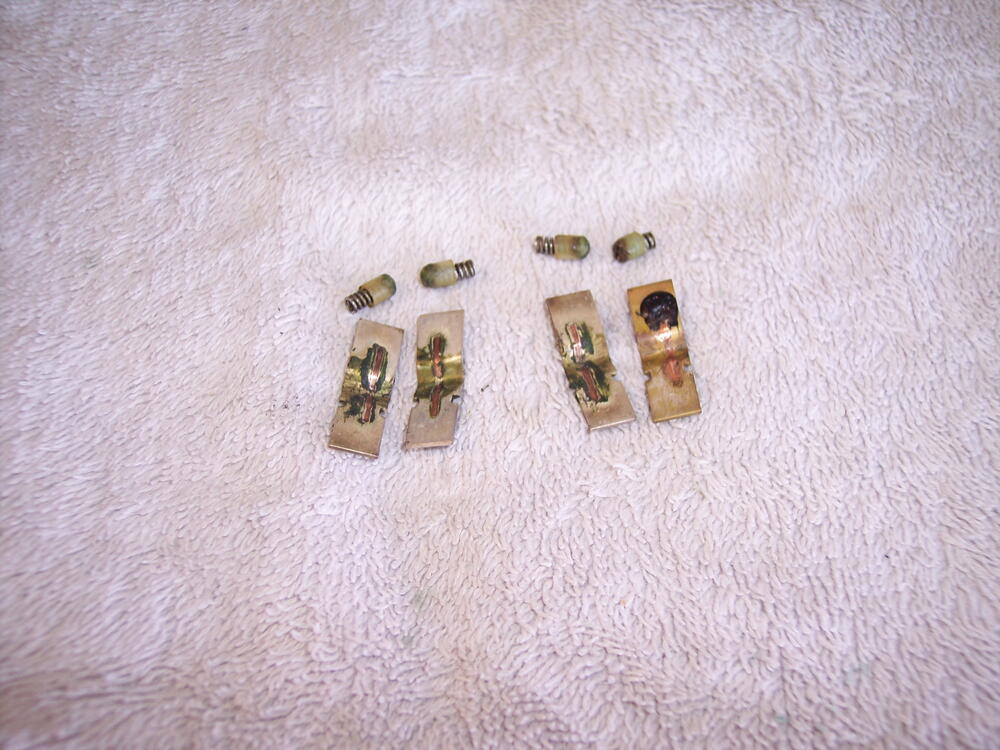
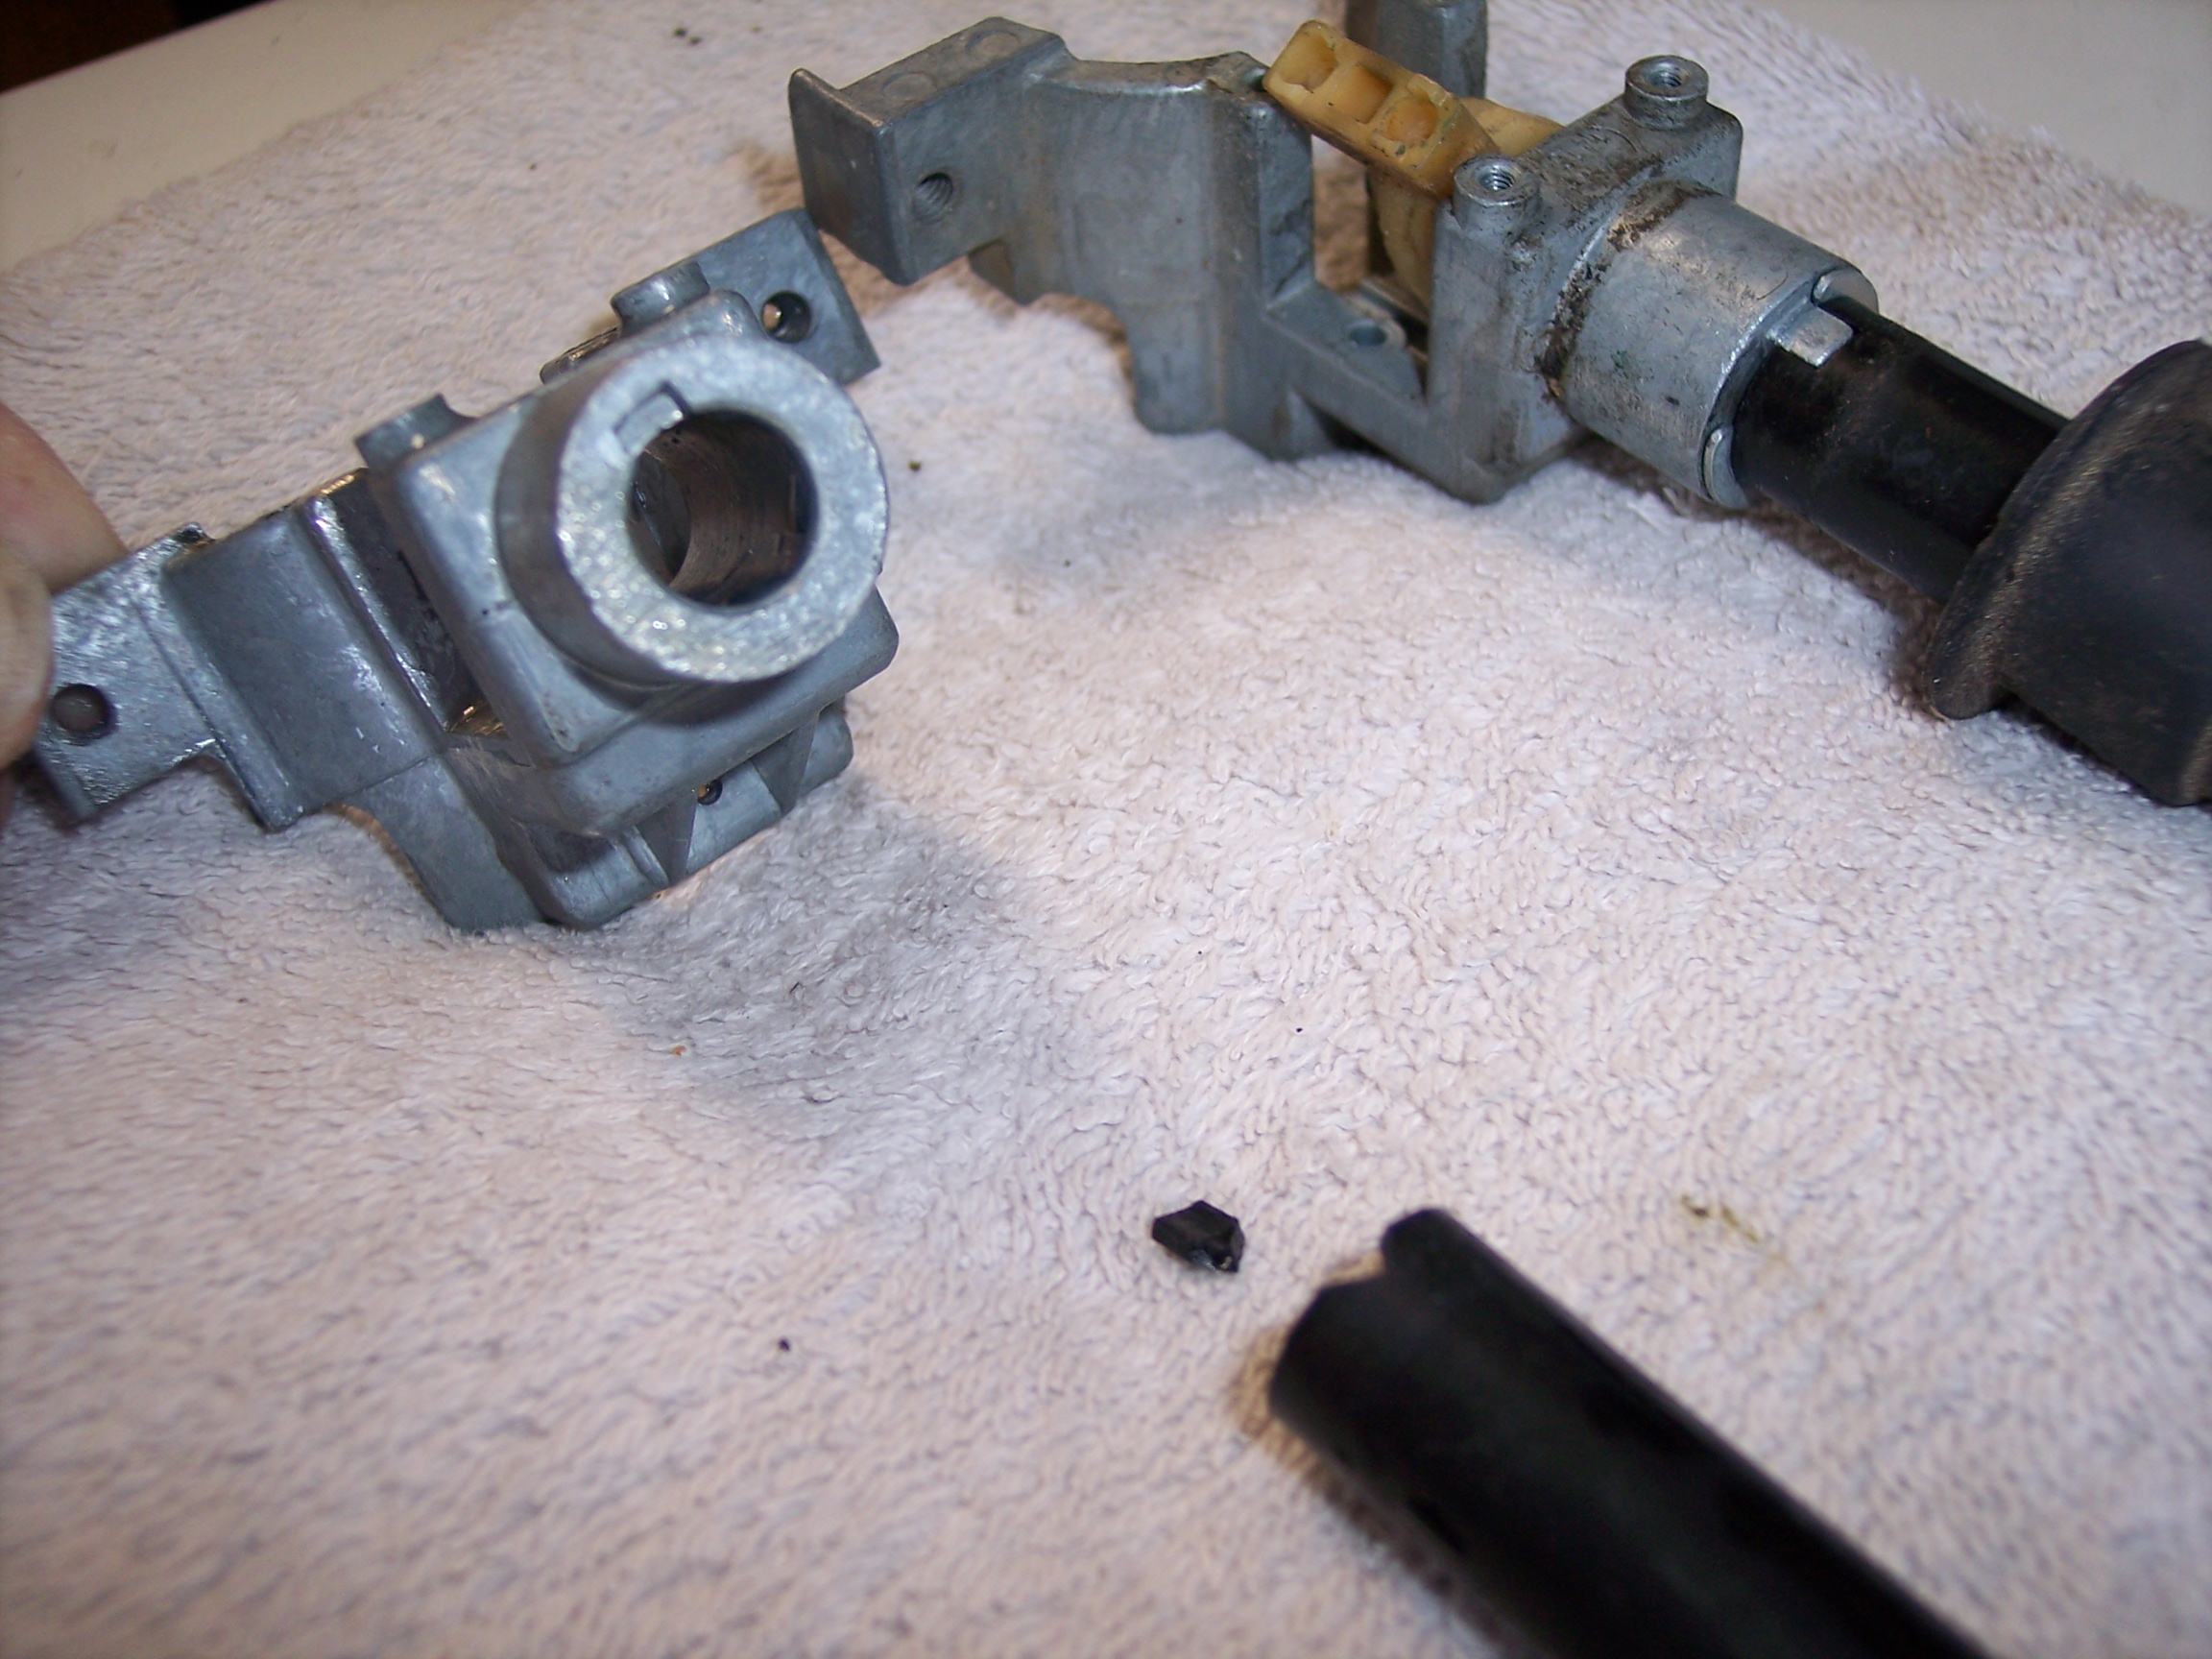
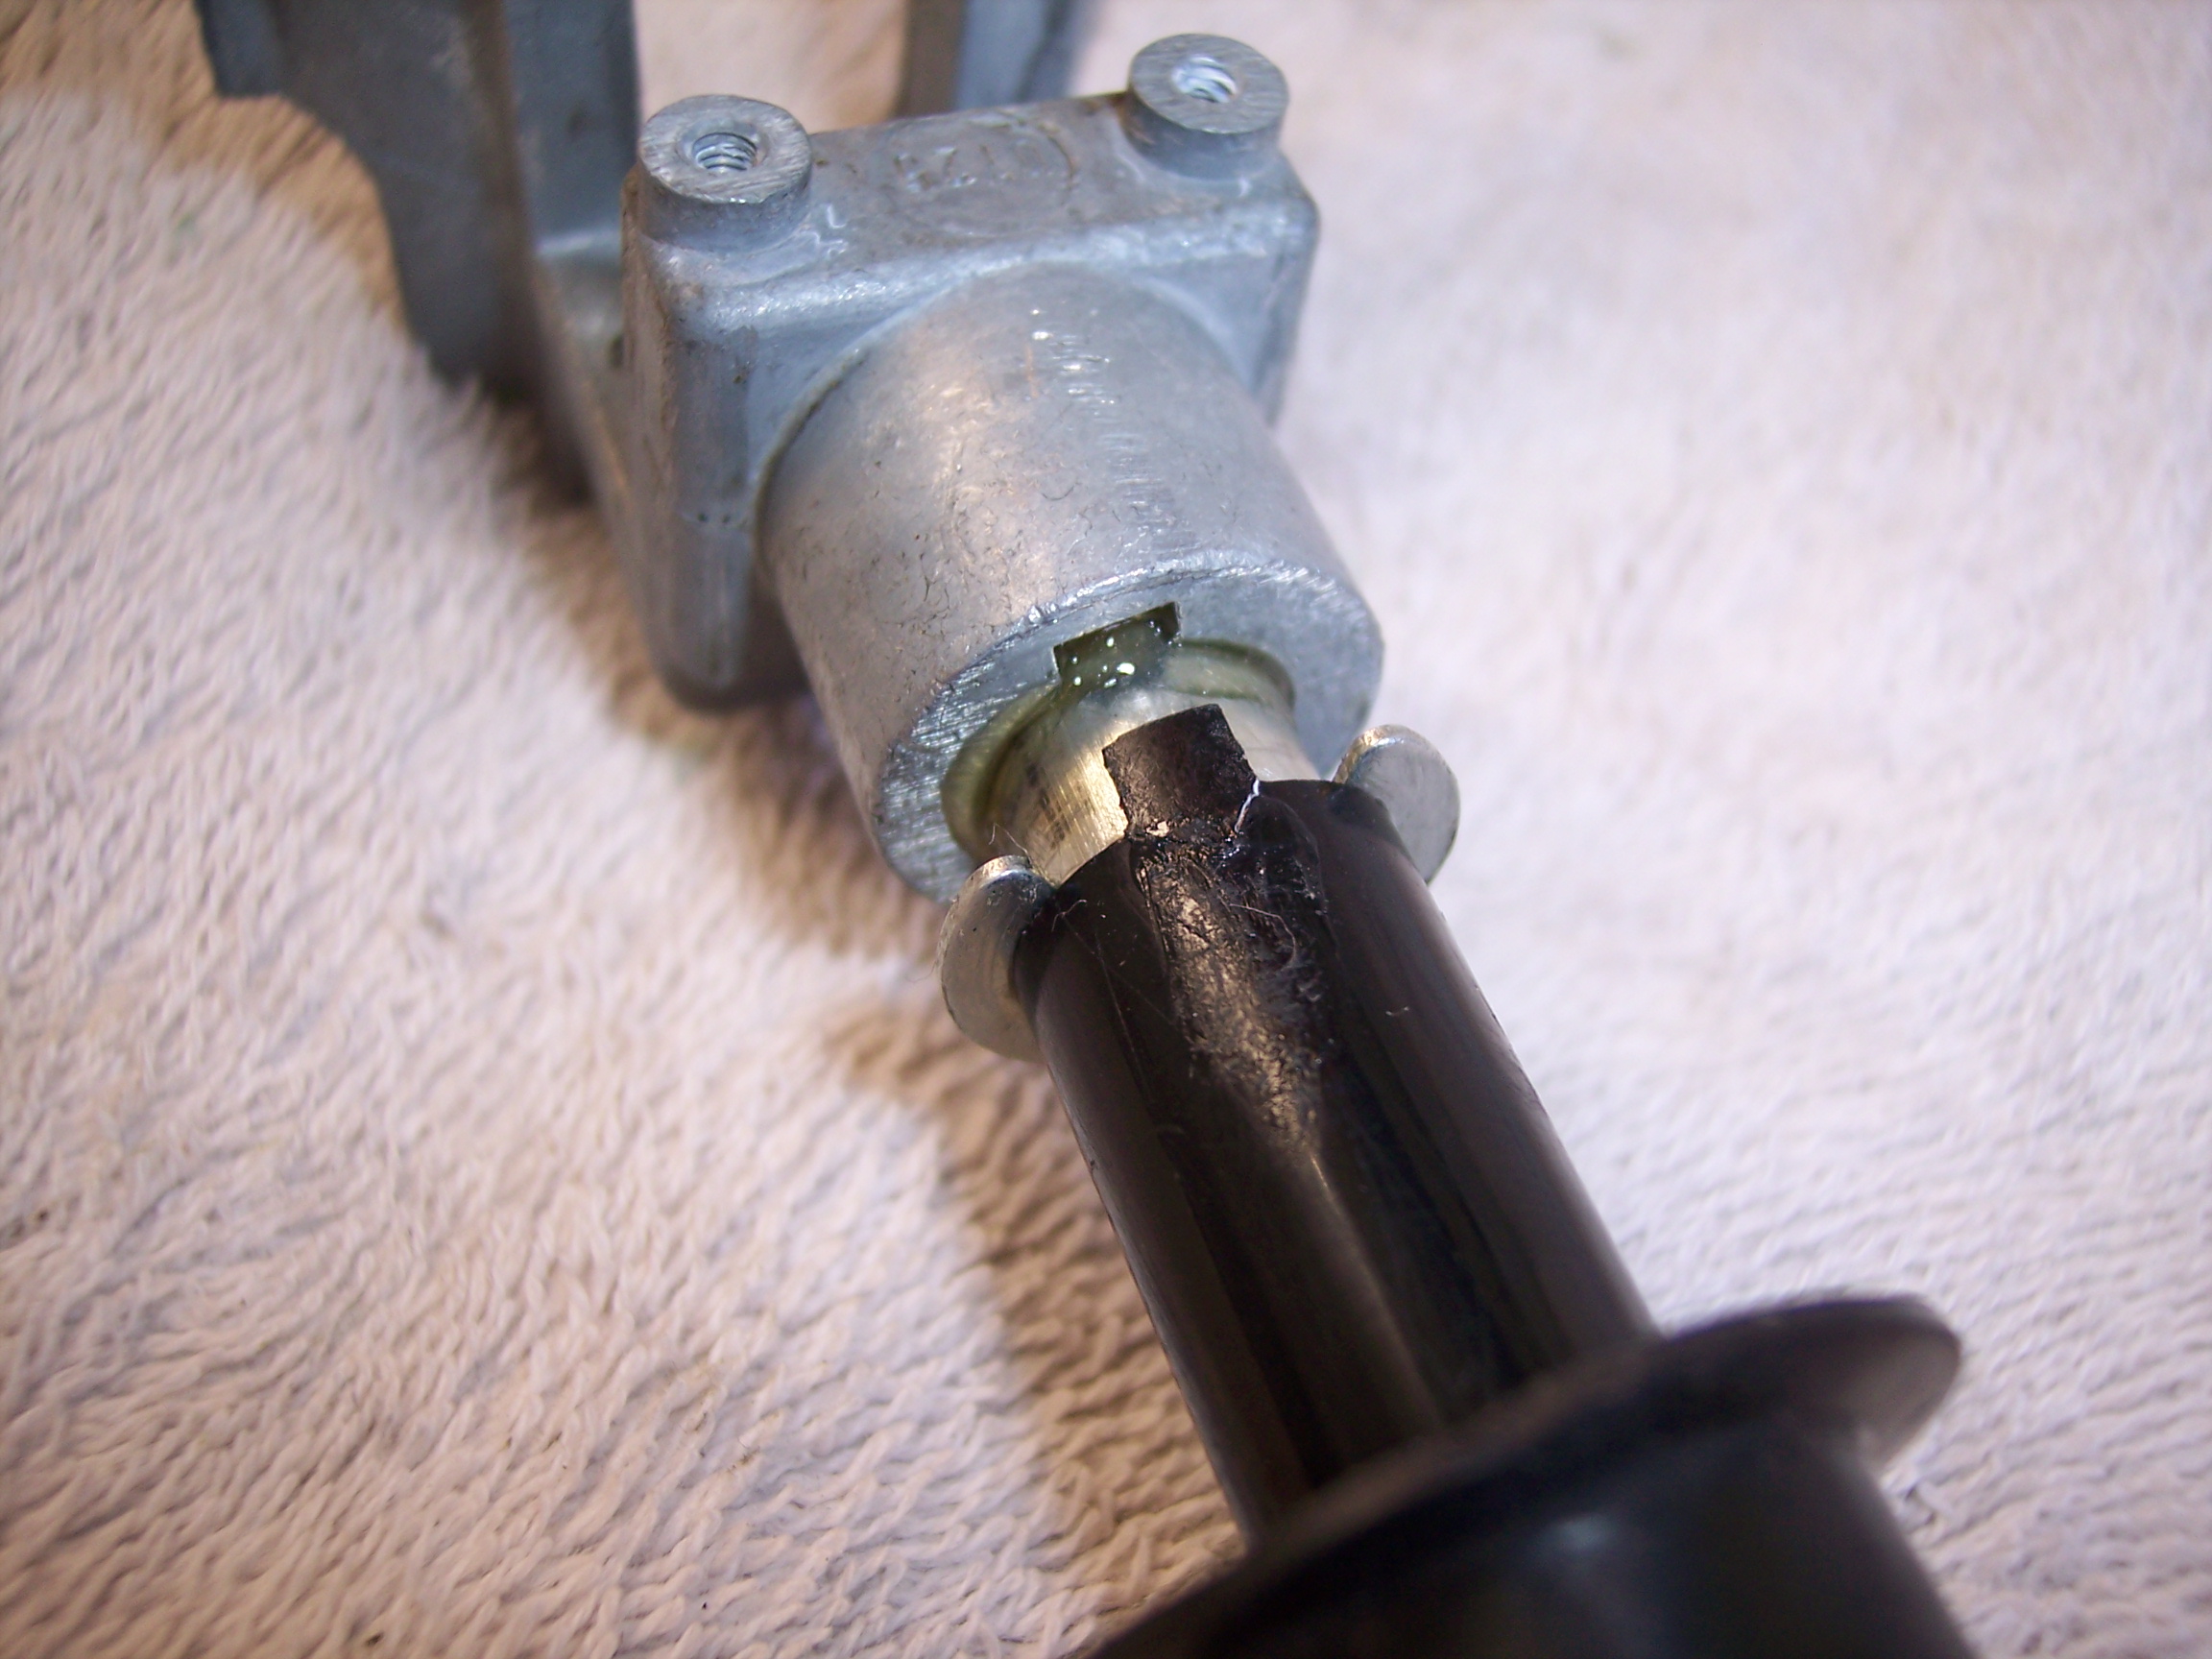
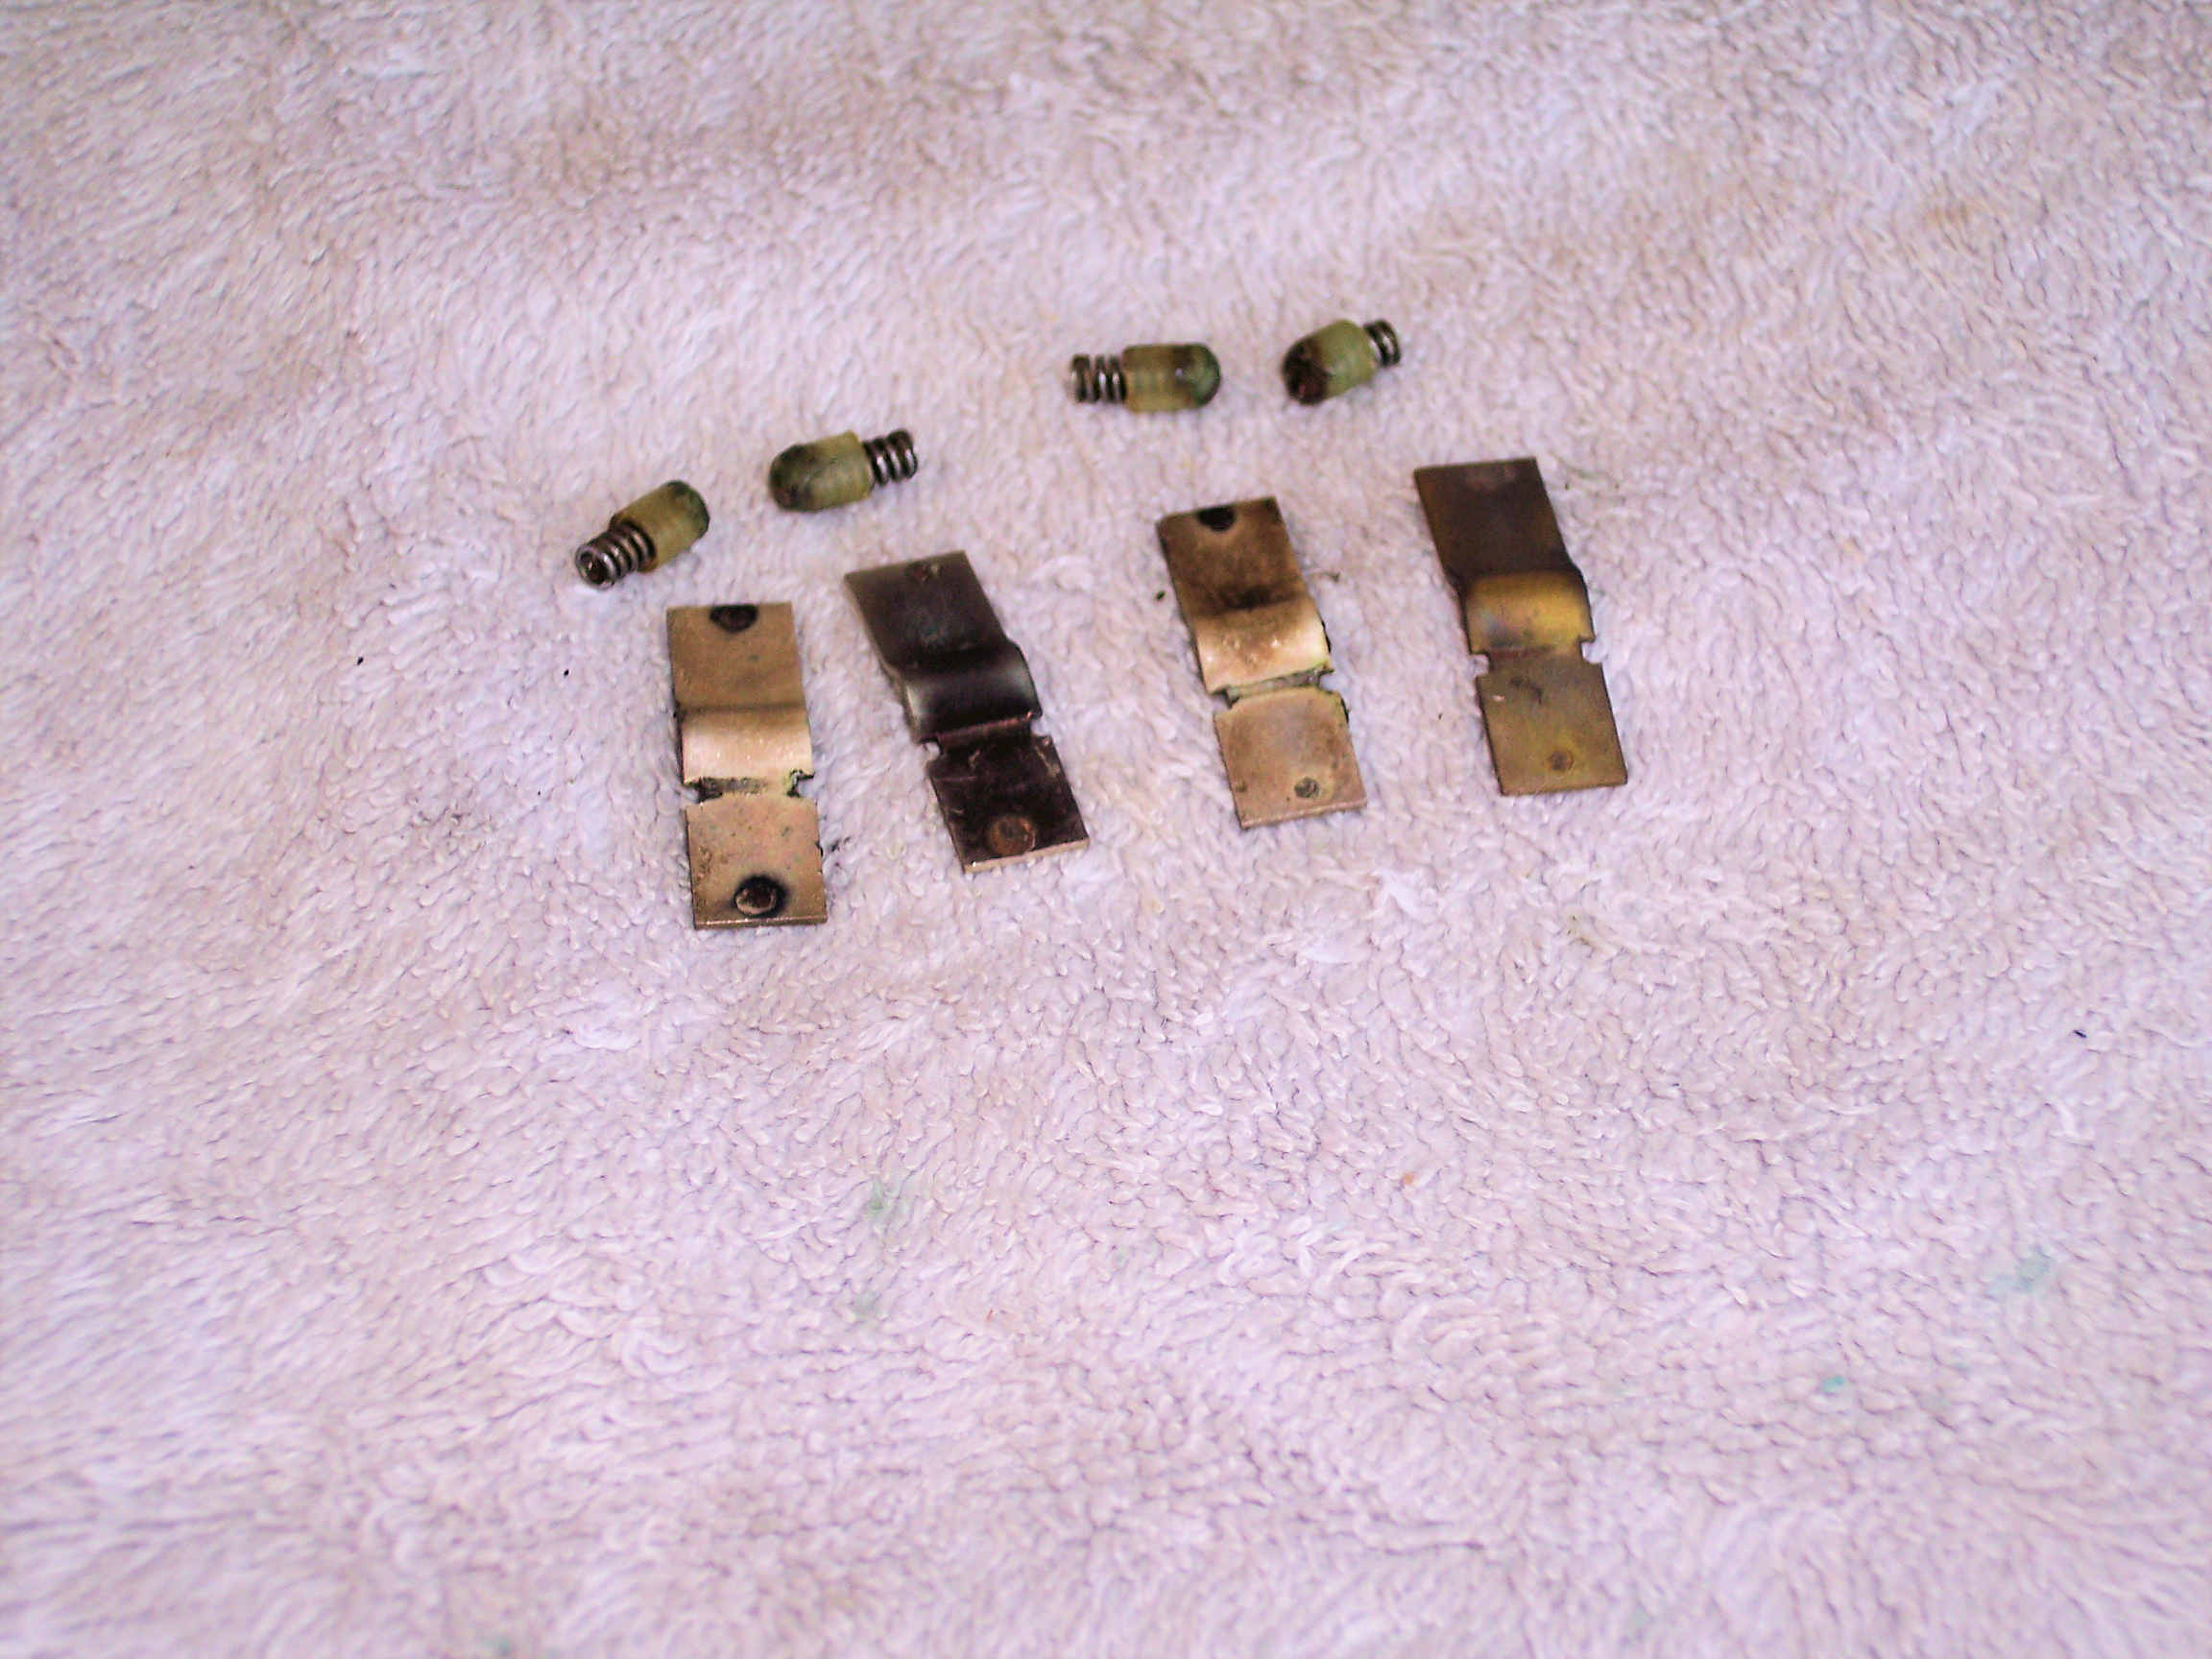
I'm working on a combo light switch dated 0Y (Nov. 1970) and came across some design deficiencies, one of which I posted about previously: The plastic stalk is indexed to the frame with an extended tab prone to breaking as it did on this one. Fortunately, the broken tab was retained in the boot. I took a shot of the frame compared with an April '71 switch where the design flaw was corrected. With the repair completed it was ready to be reassembled: The early design also had wiring deficiencies with light gauge wires, pictured on the left with the April '71 on the right: Here are the switch internal contact bridges with the remains of a melted nubbin: And the contact side of the bridges with a lot of carbon buildup: Note also on the early switch the discolored red wire. That one is providing high amp power directly to the contact point. That was changed in the redesign with power entering via the bridge pivot point. With all the high amp current being pushed thru light gauge wiring its no surprise that resistance built up and fried the poor nubbin! The early design was superceded in January 1971 and later changed again for the '72 model cars.
The flow-thru ventilation change from the hatch to the sail panel was a hard change beginning with cars produced in February 1971. The parts catalog image supplied by @CanTechZ makes it clear that a second version of the Series 1 console was used thru July '71. Your shifter rod is probably a straight version consistent with the Type A transmission.
I have a box full of dash harnesses that I picked up a while ago, hoping for some 240Z treasures. Not to be! These are free for the cost of shipping via USPS Large Flat Rate boxes. Most, but not all, are unmolested. PM me if there is something of interest. 24013-N3600 '74 2+2 24013-N3601 '74 2+2 24023-N3600 '74 2+2, CONSOLE, 3 UNITS 24013-N4202 '75, 2 UNITS 24013-N4700 '77
Here's an instalation tip: When you are ready to fit them back into the car, apply some lube to either the car or the outside of the seals to allow them to fit into the car body more easily. New seals are going to be a bit fat and will resist seating into the curves of the car body. It will help greatly to have a buddy on hand to press and hold the windows in place while you fit the screws.
I'm working on a combo light switch dated 0Y (Nov. 1970) and came across some design deficiencies, one of which I posted about previously: The plastic stalk is indexed to the frame with an extended tab prone to breaking as it did on this one. Fortunately, the broken tab was retained in the boot. I took a shot of the frame compared with an April '71 switch where the design flaw was corrected. With the repair completed it was ready to be reassembled: The early design also had wiring deficiencies with light gauge wires, pictured on the left with the April '71 on the right: Here are the switch internal contact bridges with the remains of a melted nubbin: And the contact side of the bridges with a lot of carbon buildup: Note also on the early switch the discolored red wire. That one is providing high amp power directly to the contact point. That was changed in the redesign with power entering via the bridge pivot point. With all the high amp current being pushed thru light gauge wiring its no surprise that resistance built up and fried the poor nubbin! The early design was superceded in January 1971 and later changed again for the '72 model cars.

 That's John Taddonio's ride. He's in the Rochester NY area.
Pretty sure this would be termed as a two-piston design, common to S30's. A single piston is common to most recent cars with a floating caliper design.
That's John Taddonio's ride. He's in the Rochester NY area.
Pretty sure this would be termed as a two-piston design, common to S30's. A single piston is common to most recent cars with a floating caliper design. The sidemarker works in a normal fashion when the turn signal is NOT engaged and flashes on/off when the turnsignal is in use. I also have Dave Irwin's headlight relay kit and turnsignal relay kit installed. The above upgrade adds only one filament to the fuse load for either the left or right turn signal operation.
I have these front sidemarker upgrade connectors installed on my car and they work great - a super safety upgrade. Note they are only for the 240Z. https://www.thezstore.com/product/6055/side-marker-conversion-plugs-70-73-240z They work best if the OE thermal flasher cans for both the turn signal and hazards have been replaced with an eletro-mechanical flasher such as this: https://www.autozone.com/electrical-and-lighting/turn-signal-hazard-warning-flasher/p/novita-turn-signal-hazard-warning-flasher-lf12/849392_0_0 Be sure to get a module that handles enough bulbs. VID_20221025_155204120.mp4
Here is my recent post on this topic, all new braided cover fuel hoses and valve cover breather hose - all from Belmetric. And yes... twin wire hose clamps were used for all the fuel lines. Agree, the very small ones are hard to find.
Lets hear from our Florida members on their status after the storm.
I've been replacing all of my 11 year old fuel hoses with braided cover hoses and decided to do the flow guide valve vapor hoses for a consistent appearance. My valve cover breather hose was already a OE braided unit but I gave it quick inspection. Uh Oh - big crack at one end, time to replace it as well. A visit to MSA showed me a repro unit for (choke!) $90! 😲 So it was back to Belmetric for possible options. The valve cover fitting is 16mm in diameter but Belmetric only has 14mm and 17mm hoses. The breather hose is about 14" so I ordered two feet of the 17mm hose at the most attractive price of $7.15/ft. (today it is $8.01). At 1mm oversize, obviously it is an easy fit but the OE circular spring clamps hold it securely in place on the valve cover and air filter box. All of the hoses at Belmetric are from Germany and are typically marked so on the hose. If you don't want the word Germany on your Japanese car, the markings can easily be removed with a vigorous rubbing with mineral spirits. I really like the feel of $75 still in my pocket! 😁 https://belmetric.com/m17x21-braided-continental-hose-rh17-n203701/
The sidemarker works in a normal fashion when the turn signal is NOT engaged and flashes on/off when the turnsignal is in use. I also have Dave Irwin's headlight relay kit and turnsignal relay kit installed. The above upgrade adds only one filament to the fuse load for either the left or right turn signal operation.
I have these front sidemarker upgrade connectors installed on my car and they work great - a super safety upgrade. Note they are only for the 240Z. https://www.thezstore.com/product/6055/side-marker-conversion-plugs-70-73-240z They work best if the OE thermal flasher cans for both the turn signal and hazards have been replaced with an eletro-mechanical flasher such as this: https://www.autozone.com/electrical-and-lighting/turn-signal-hazard-warning-flasher/p/novita-turn-signal-hazard-warning-flasher-lf12/849392_0_0 Be sure to get a module that handles enough bulbs. VID_20221025_155204120.mp4
Here is my recent post on this topic, all new braided cover fuel hoses and valve cover breather hose - all from Belmetric. And yes... twin wire hose clamps were used for all the fuel lines. Agree, the very small ones are hard to find.
Lets hear from our Florida members on their status after the storm.
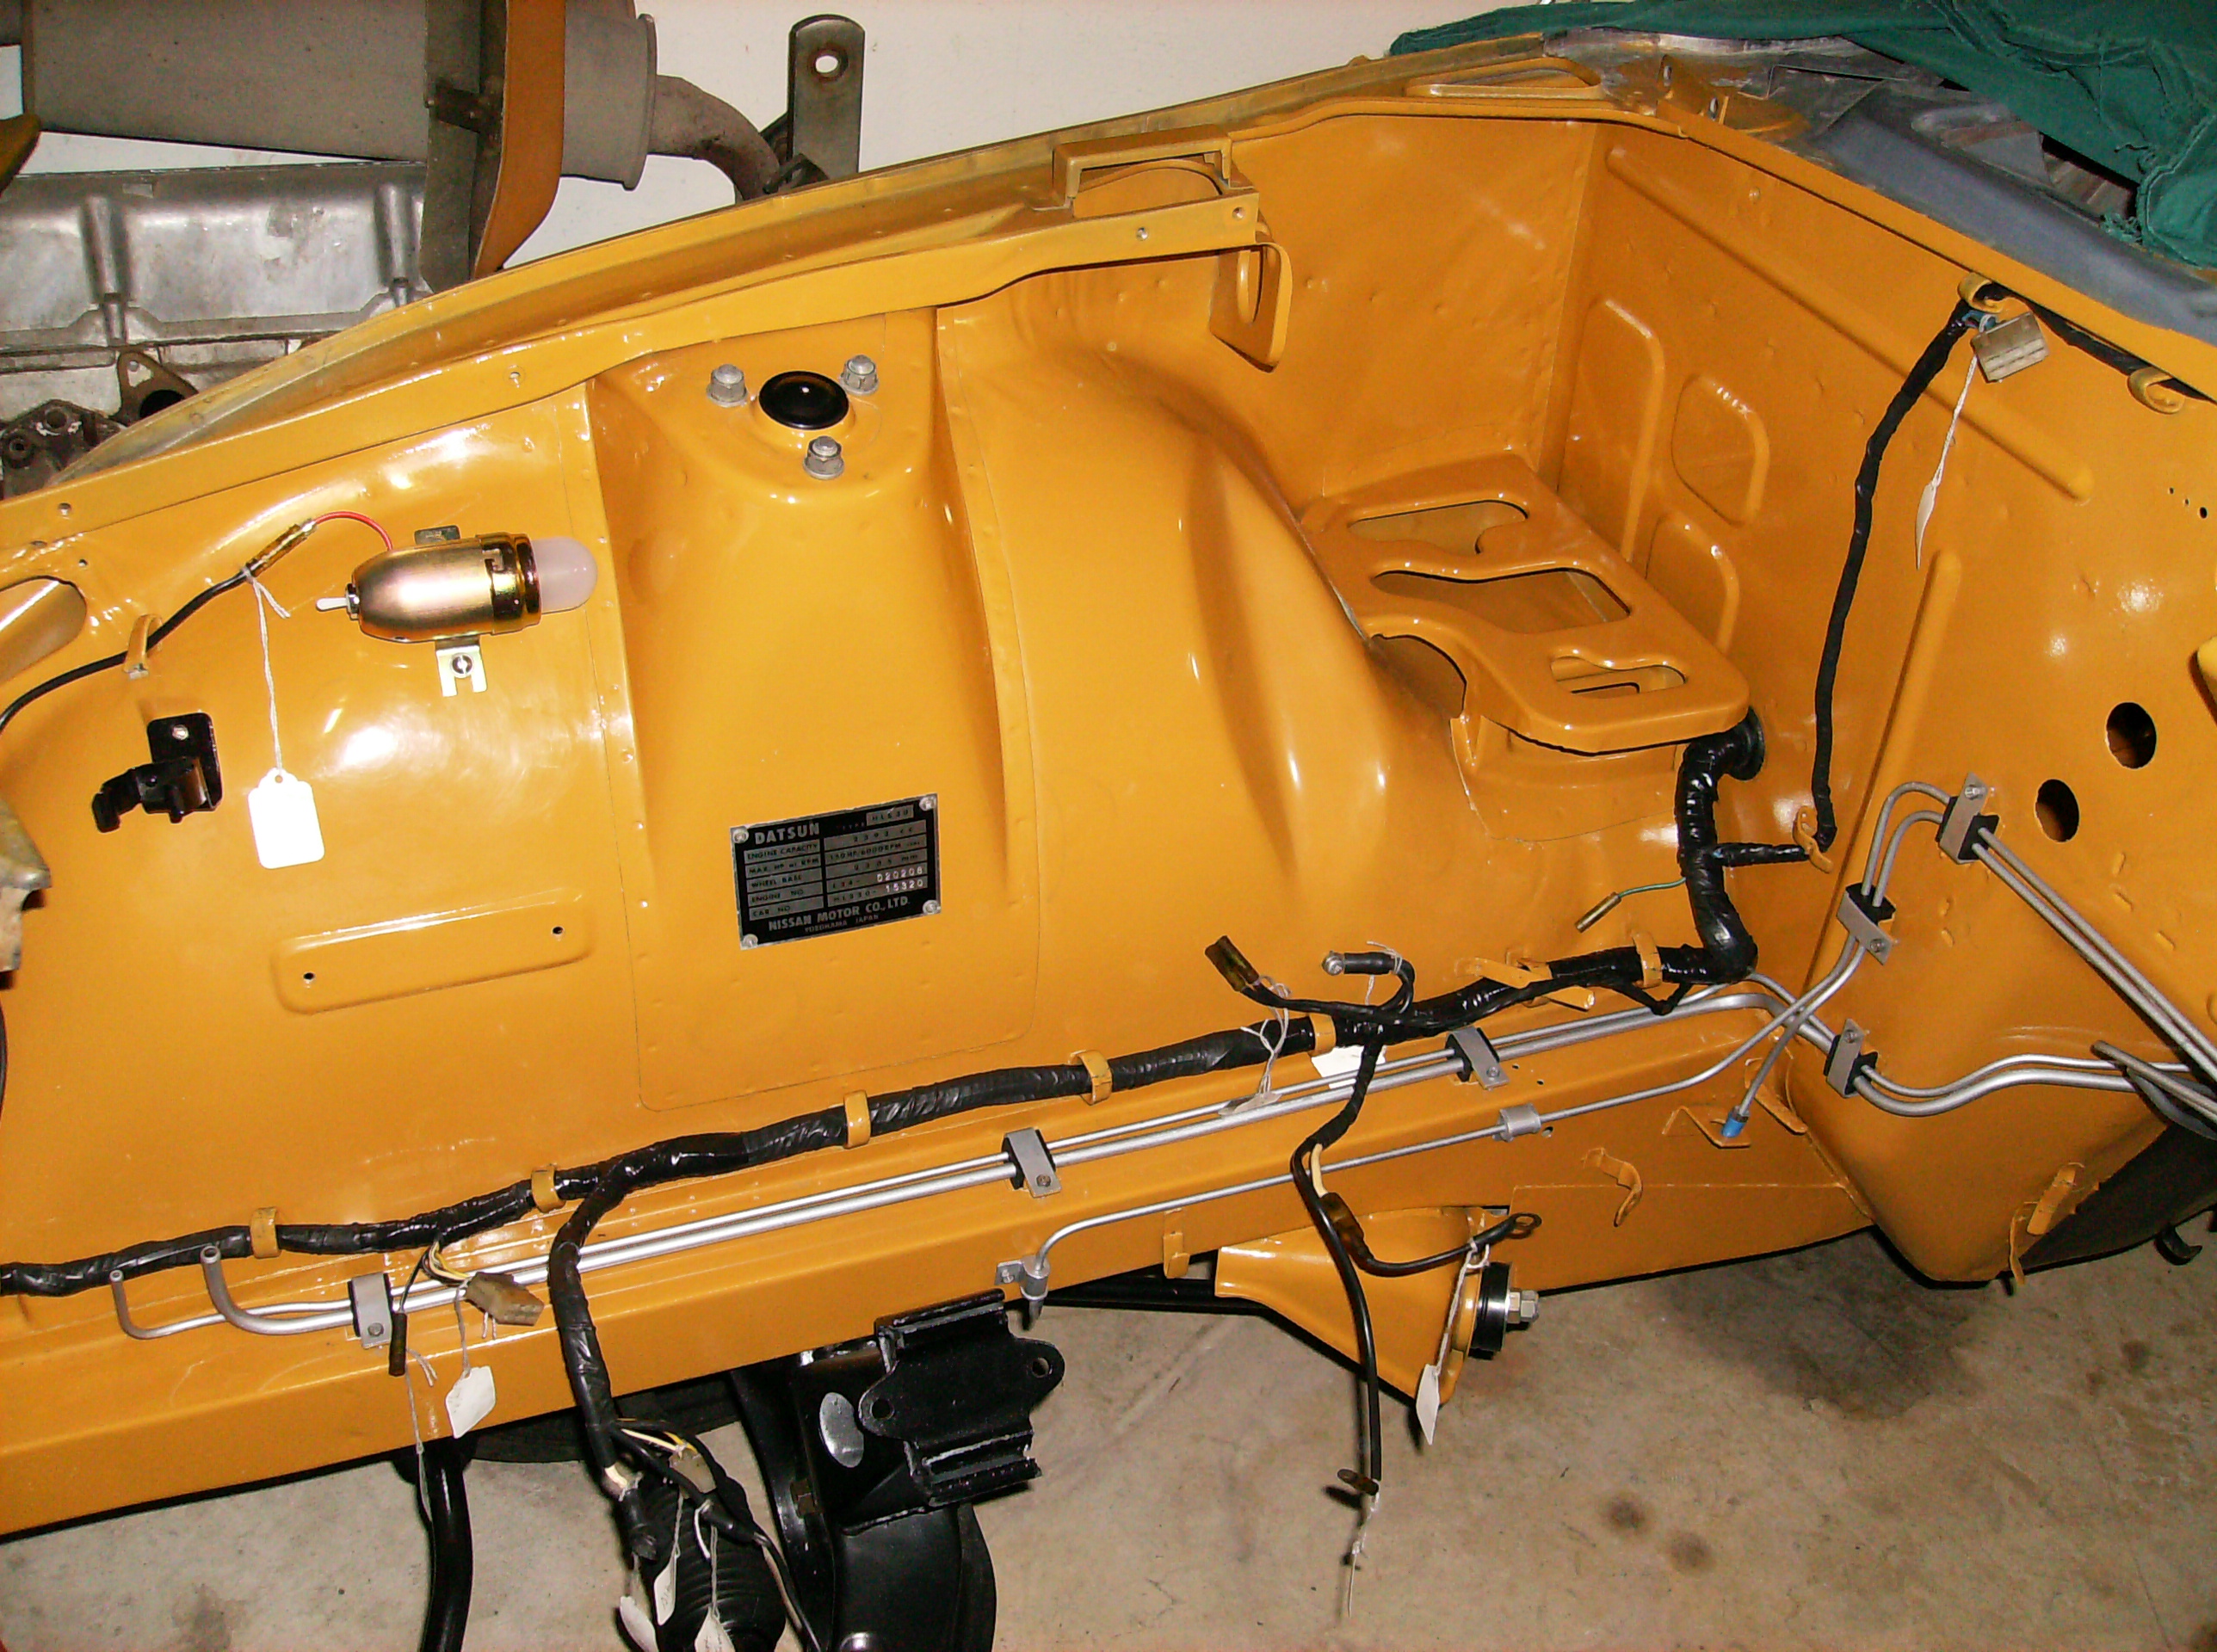
I've been replacing all of my 11 year old fuel hoses with braided cover hoses and decided to do the flow guide valve vapor hoses for a consistent appearance. My valve cover breather hose was already a OE braided unit but I gave it quick inspection. Uh Oh - big crack at one end, time to replace it as well. A visit to MSA showed me a repro unit for (choke!) $90! 😲 So it was back to Belmetric for possible options. The valve cover fitting is 16mm in diameter but Belmetric only has 14mm and 17mm hoses. The breather hose is about 14" so I ordered two feet of the 17mm hose at the most attractive price of $7.15/ft. (today it is $8.01). At 1mm oversize, obviously it is an easy fit but the OE circular spring clamps hold it securely in place on the valve cover and air filter box. All of the hoses at Belmetric are from Germany and are typically marked so on the hose. If you don't want the word Germany on your Japanese car, the markings can easily be removed with a vigorous rubbing with mineral spirits. I really like the feel of $75 still in my pocket! 😁 https://belmetric.com/m17x21-braided-continental-hose-rh17-n203701/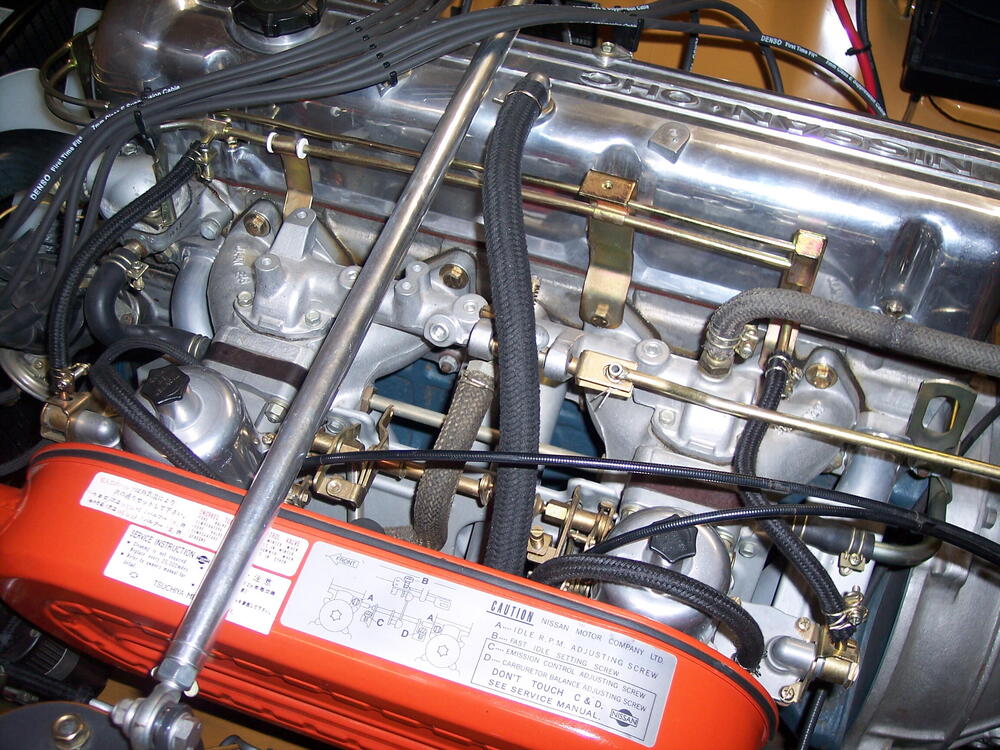 Carl, Here is an update for your list of the 12/70 cars. Regards, Jim
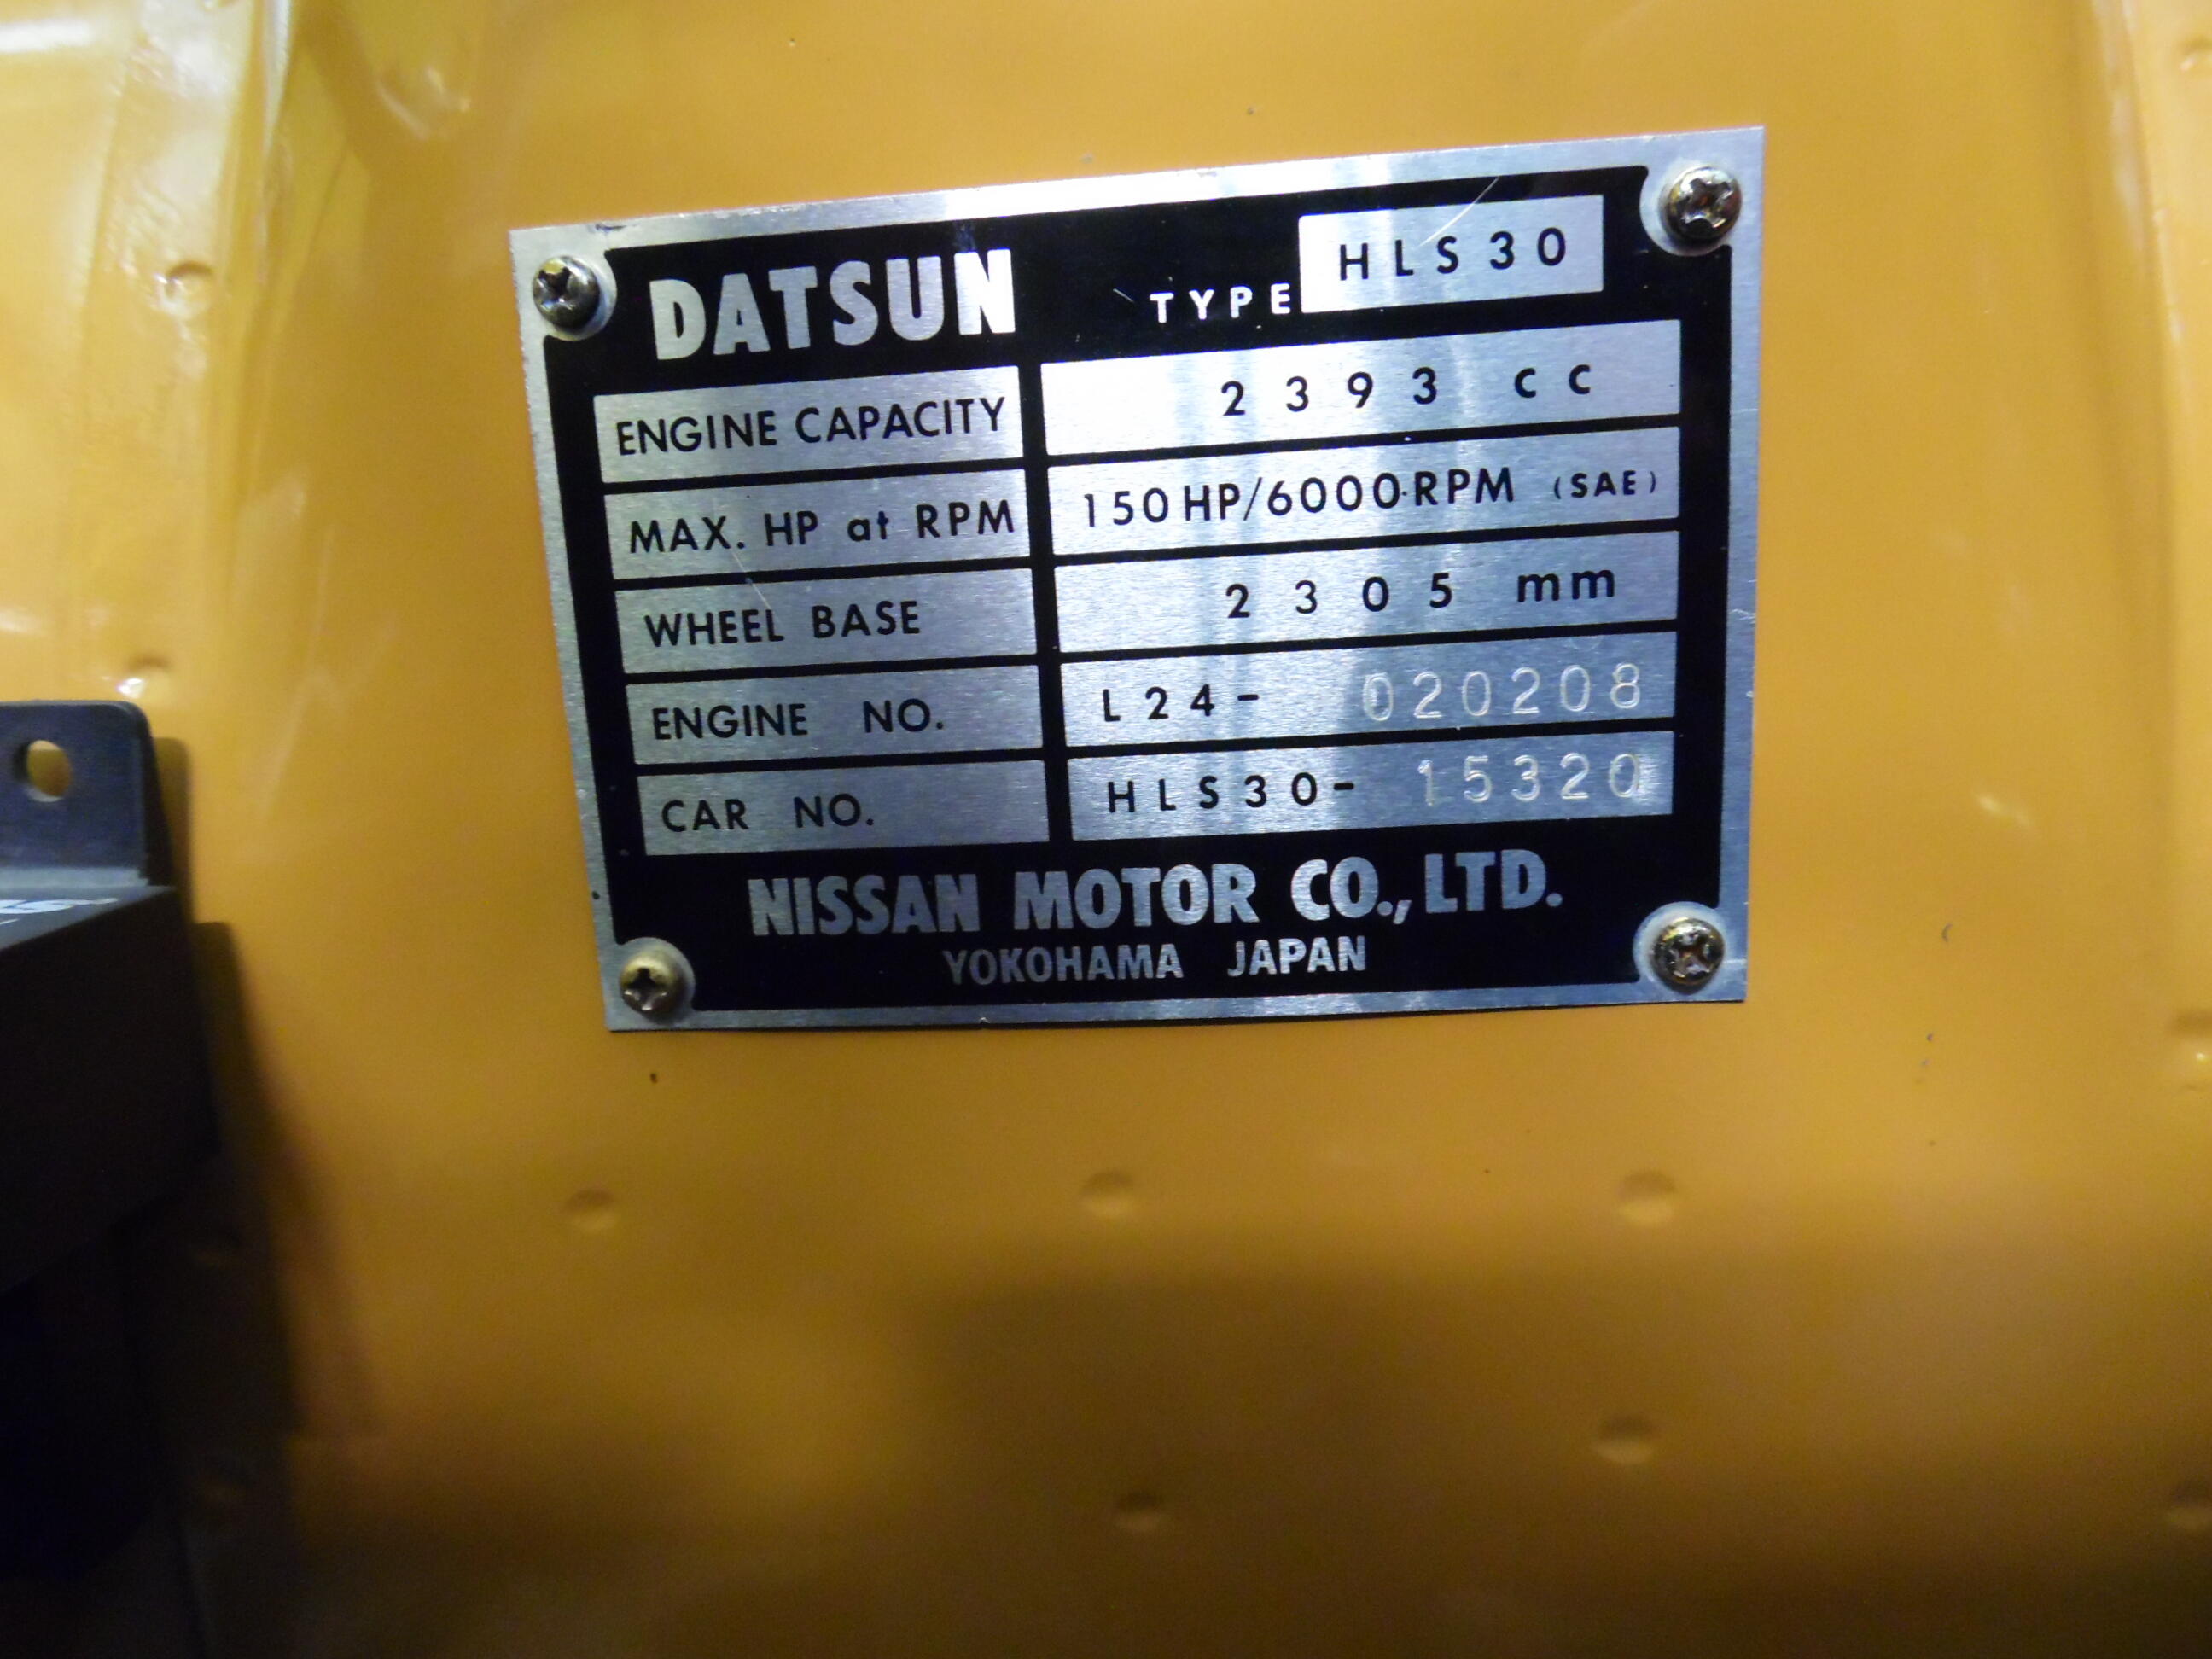
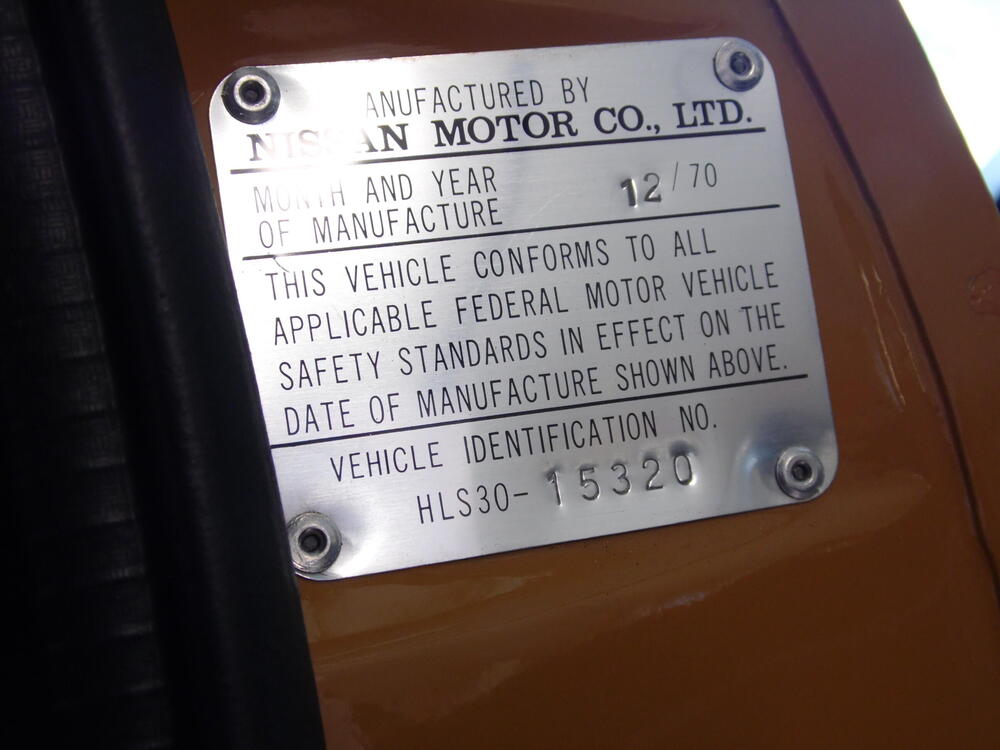
 View Advert S30 Hood Latch Set Complete hood latch set with bolts. Stripped to bare metal and professionally replated in yellow zinc. Not a single ding in the receiver plate, this one is restoration quality. $195 includes standard domestic shipping. Payment via PayPal, PM if interested. Thanks. Advertiser jfa.series1 Date 09/08/2022 Price $195 Category Parts for Sale
You are dealing with 50+ year old plastic here that will have gotten more brittle over the years. Consider bonding a thin reinforcement on the underside - one solid strip with a notch to match the factory shape. That plus @kats recommendation for a thin rubber washer under the knob should help hold back breakage.
The stock air filter housing checks all the boxes: - Cold air supply to both carbs, well protected from the exhaust manifold heat - Fittings for the carb overflow hoses and crankcase vent hoses - Air horns to smooth the air flow into the carbs - Efficient filter specifically designed for the carbs
View Advert S30 Hood Latch Set Complete hood latch set with bolts. Stripped to bare metal and professionally replated in yellow zinc. Not a single ding in the receiver plate, this one is restoration quality. $195 includes standard domestic shipping. Payment via PayPal, PM if interested. Thanks. Advertiser jfa.series1 Date 09/08/2022 Price $195 Category Parts for Sale
You are dealing with 50+ year old plastic here that will have gotten more brittle over the years. Consider bonding a thin reinforcement on the underside - one solid strip with a notch to match the factory shape. That plus @kats recommendation for a thin rubber washer under the knob should help hold back breakage.
The stock air filter housing checks all the boxes: - Cold air supply to both carbs, well protected from the exhaust manifold heat - Fittings for the carb overflow hoses and crankcase vent hoses - Air horns to smooth the air flow into the carbs - Efficient filter specifically designed for the carbs


Important Information
By using this site, you agree to our Privacy Policy and Guidelines. We have placed cookies on your device to help make this website better. You can adjust your cookie settings, otherwise we'll assume you're okay to continue.