Everything posted by Namerow
-
1971 HLS30-14938 "Lily" build
Ditto for my 5/70.
-
Main driver and passenger door seal and window alignment
Second that. Patcon's warping strategy was the only way I could get my P-side door's trailing edge to line up. I made up a torque arm out of 1" square steel tubing to help with the job. I drilled holes in the tube so that I could use two of the existing holes* in the back of the door to bolt it to the structure's trailing edge (* the holes that are normally used to attach the window sash to the door -- I had the window sash removed for this job). When bolted in place, the torque arm projected ~ 2' above the top of the door and ~ 1' below the bottom of the door. Sorry - no photos available. Just put a yardstick against the back of the door. You'll get the picture. The quick-and-dirty way to do this job is the block the bottom (or top) of the rear of the door with a piece of 2X4 and then push on top (or bottom). Easy to damage the paint using his approach (unless the car hasn't been painted yet).
-
1971 HLS30-14938 "Lily" build
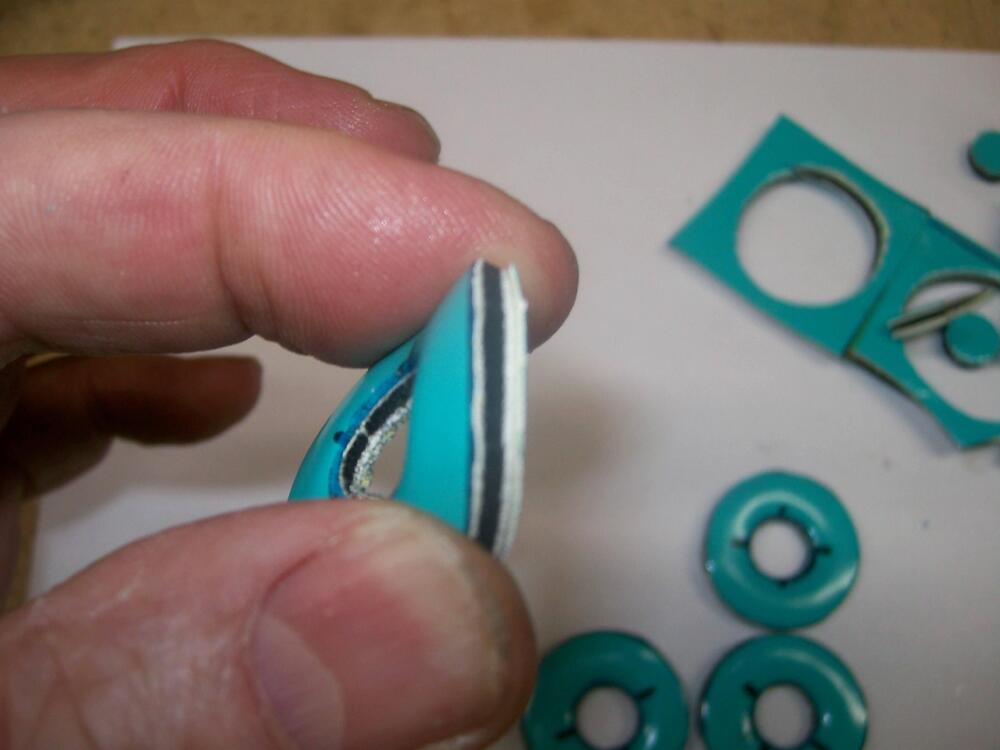
Here are a few more pix to help illustrate the lip on the 'bumper'. In its OE form, the lip -- looked at from end view -- is actually beveled... lip on the top, no lip on the bottom. When coming up with fix for the disintegrated/nonexistent lips on my bumpers, I ignored that little detail. My replacement lips were cut as strips from a sheet of 1/8", closed-cell foam. After a trial fit, I cut them to length and then glued them into each bumper. Not all that pretty, but functional (and completely out of sight after everything's assembled). I should mention that attention to detail will pay off in this part of your restoration. More specifically, lack of attention to detail will probably result in exhaust leaks into the cabin once you get the car out on the road again (this part of the early Zs' design was, to be charitable, not very successful -- too many parts, hard to assemble, didn't work that well). As others have mentioned, several of the pieces tend to warp with age. In the case of my car, the plenum moldings had both caved in at the top, meaning that they weren't going to seal well against bumpers without a little help. I just cut a piece of plastic to the right length and glued it into the plenum as a wedge so that the plenum flange became reasonably flat again. Another place to watch out for warping is the hatch trim panel. For my car, both ends were dished by a quarter inch or more (clearly visible in this photo). This panel has to achieve an airtight seal against the hatch sheet metal. Otherwise, the ventilation ductwork, with its one-way airflow control flaps, gets bypassed and air/exhaust gets sucked into the cabin by way of the hatch cavity*. Here, once again, I resorted to my 'squishy' sill wall foam tape to make a new gasket. Even that wasn't enough to overcome the warpage in the trim panel. I had to create some new holes on the inner hatch sheet metal to accept a pair of additional plastic trim plugs on each side of the panel. In hindsight, I probably should have spent the bucks for a new trim panel. All of this just underscores the fact that the entire airpath from the ventilator grill to cabin entry has to be airtight and the one-way airflow control flaps have to be in good condition. If your air control flaps have settled into a permanent droop (mine had), try turning them over before reinstalling.
-
1971 HLS30-14938 "Lily" build
That may very well be the case. Why not take a look and let us know what you find.
-
1971 HLS30-14938 "Lily" build
It looks to me like to aftermarket eBay pieces that you’ve bought have been incorrectly made. They appear to have been stamped out of some type of rubber or foam sheet material. That would make it easy to mistake them for gaskets. In fact, the real OE pieces (called ‘bumpers’) are molded from plastic. The plastic used has a bit of flexibility, but not much (probably made from PVC or Delrin, rather than from styrene). Each bumper's shapes consist of an internal lip and an external flange. The flange forms a shelf on which an actual gasket sits. That gasket can be cut from squishy, closed-cell foam tape. The purpose of the lip molded into the bumper is to make sure that all of the rain or wash water funnels down into the plenum chamber. Without the lip, some of the water could find its way into the hatch cavity as it drips down through the vent, leading to premature rusting around the periphery of the hatch and/or around the hatch window frame. The purpose of the gasket is to prevent rain/wash water from seeping into the seam between the top surface of the bumper flange and the unpainted underside of the outer hatch sheet metal. As for the retainer clips, I made mine from scratch (there were no replacement pieces available at the time). They may, then, look a bit different from the stainless clips that you bought. However, I sized the holes in them specifically to accept and grip on the plastic pins that are molded onto the bottom of the chromed-plastic vent trim pieces. There was/is no good way to use screws to hold the vent-gasket-bumper-plenum assembly together. Unfortunately, the pin-into-clip securement strategy means that it will probably prove impossible to remove the chrome vent trim piece after the fact without breaking off the pins. Here’s the correct assembly sequence: The plenum (#55) goes inside the hatch with the little accordion drains attached to the bottom of the hatch panel. Then the black plastic bumper piece sits on top of the plenum, with the lip pointed down into the plenum cavity. It looks like the factory used sealant in the join between the bumper flange and the plenum flange. Then the foam gasket (you’ll need to make this yourself) sits on the upper surface of the bumper’s flange, so that it will end up being sandwiched between the bumper and the underside of the hatch sheet metal. After all of the mounting holes are aligned, one of the stainless clips get snapped in place so that it sandwiches all four layers: hatch sheet metal, foam gasket, bumper flange, and plenum flange. Repeat at the other end of the vent cutout. The bent lower face of the clip fits inside the plenum. The flat upper face of the clip fits over the outside of the painted surface of the hatch. The compression of the spongey gasket provides some load within the layers, keeping things from rattling. The mounting pins molded into the back surface of decorative chrome-plastic vents are now pushed into place. No metal barrel clip is used. Instead, the edges of hole in the clip bite directly into the plastic pin. You may need to figure out a way to push on the internal tab of the clip so that it doesn't back away as the pin is pressed into place (i's been a while and I don't remember whether this was a problem or not). Note: I suppose that the lip around the inside of the bumper isn’t mandatory. However, I hope you can now see the logic in having it there. Making lips for your flat eBay bumpers won’t be too hard. You could even make them using an old inner tube (they don’t have to be stiff – they just need to form a funnel that's long enough to project into the top of the plenum). Once cut to shape, glue each lip into place and make sure the seam where the ends meet is positioned on the top (located at the front when the hatch is closed) of the opening, rather than the bottom. Note: I’m not sure how thick your eBay ‘bumpers’ are. If they’re too thick (relative to the OE plastic bumpers), you may not have enough room to fit a foam gasket. I suppose that you could use sealant, although assembly might get messy (and taking things apart at some later date would be a pain). Some 1/16”-thick closed-cell neoprene foam would probably work as a substitute (can be found a Michael’s craft centres). Not much give in compression. You may need to layer it to get the right thickness.
-
1971 HLS30-14938 "Lily" build
Yes. It's Part No. 64/65 in the online parts diagram, labeled as 'Rubber - Base Bumper'. It has a lip that fits into the top of what I call the plenum duct (Part 55 - 'Assy - Rear Duct Ventilator'). On both of my 'bumper' pieces, the lip had disintegrated with age. I had to fabricate a repair lip for each bumper, so they probably look a little 'non-stock'. You can just barely see the new lip in my #2 picture. Here's what they looked like before I made the repairs... Maybe these pieces were missing on your car?
-
1971 HLS30-14938 "Lily" build
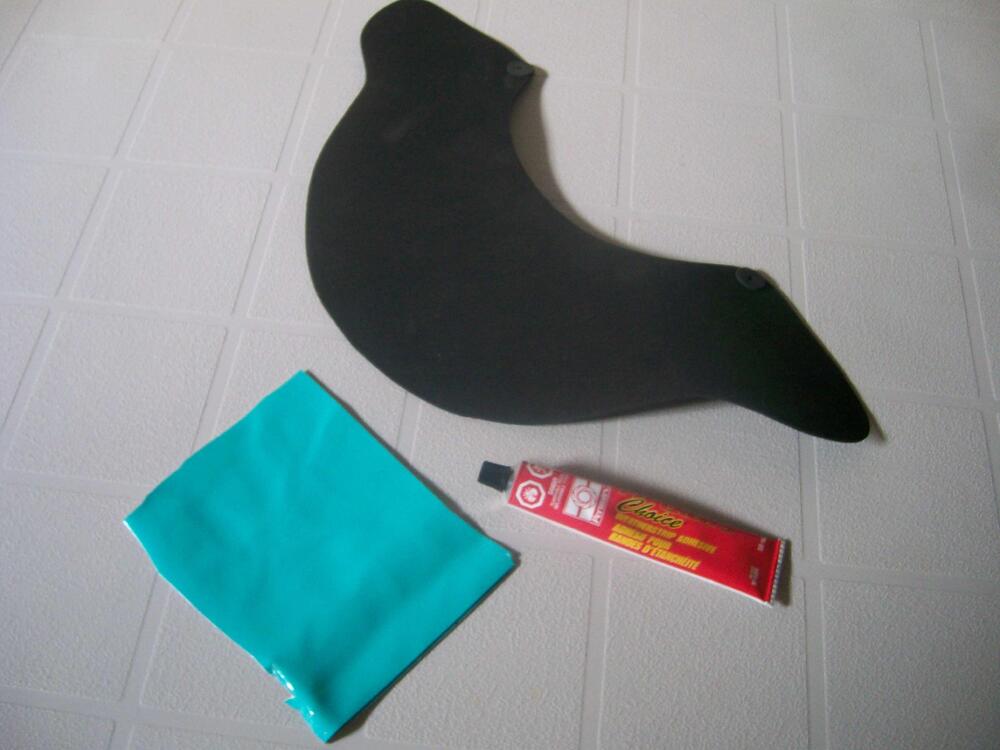
Here's a photo that I took when I was getting my hatch vents ready for installation. Self-explanatory, I hope... The factory gasketing for the plastic vent plenums was pooched, so I made replacements from soft, closed-cell foam (it's actually foam strip used for sill walls during building construction). You need to use something that's pretty compliant, because you'll need a lot of 'squishability' (technical term) to be able to push the clip into place... I used the same foam to create a new gasket for the interior trim panel... During final installation, I used strips of wiring loom tape (non-adhesive) overlaid by a hotel key card to protect the paint as I was sliding the clip into place. The key card is pulled free after the clip is in place. Then the tape is pulled away (the section of tape immediately under the clip can be left in place -- no one will see it and the plastic push-pin will penetrate easily when the chrome vent is pressed in place...
-
Dave W 1971/240Z rebuild
Nice set of photos, illustrating the logic of your metal-removal process. Too bad that one of the most complicated zones of the monocoque structure also happens to be the biggest rust pit.
-
Interior Innovations
Nissan's interior design folks seem to have been inspired by the 1965 Bizzarrini's use of diamond-stitched leather when they chose the faux-stitched vinyl for the Z's interior, so I suppose this stitched-leather replacement is kind of poetic justice and the 'puffy' look is historically accurate...
-
Dave W 1971/240Z rebuild
Can you talk a bit a bout your 'chipping' technique. Did you use dry ice, for example? What's your approach for drilling out spot welds and peeling the layers part? Is that a corn cob that came out of the air vent?
-
Dave W 1971/240Z rebuild
I bought one of those 'legendary' Blaupunkt AM/FM cassette players for my Z back in the day ( ~ 1980). It was a top-end unit costing $$$ (c/o Kromer Radio in downtown Toronto). It worked like a champ for about 1 year (just out of warranty, of course), at which time a small, unreplaceable plastic drive gear split at the root of one of the teeth, leaving the tape drive useless. I was not amused.
-
Dave W 1971/240Z rebuild
To prevent those cracks from growing (esp. after the dash begins to see solar loads and high cabin temperatures during the summer), you might consider drilling a hole (at least 1/8" dia) at the peak of each crack. Not sure how the owner would feel about the aesthetics, though.
-
Seatbelt extensions
Wesco Performance sells seat belt extensions... www.wescoperformance.com Better yet, get them to supply full replacements for your OE belts. If you need extra length, they can probably work with you on that. FWIW, your 50-year-old OE belts will probably be worthless at collision speeds beyond 20 mph. The problem lies with edge fraying and material degradation (sunlight, sir pollution).
-
Restoration of BringaTrailer 240z - HLS30-35883
You'll see the same thing in the FSM for the front wheels... I wonder if this has to do with the centrifugal force that acts on the grease when the wheels are turning at speed? There are two grease 'reservoirs' here: one formed by the pocket in the center of the wheel casting, the other along the wall of the dust cap. In each case, the grease will try to flow out to a region with a larger diameter. This would have the pocket inside the wheel casting feeding the inboard bearing and the grease in the dust cap (notice the slightly conical shape?) feeding the outboard bearing. Or... maybe it's not so much a question of having the grease actually flow as it is one of creating some pressure on the grease in the bearing cavities. If it's not one or the other, then the idea of putting grease into these two reservoirs seems kind of mindless. It might also explain why it's not a good idea to over-pack the wheel and the dustcap with grease (the pressure at speed might overwhelm the inboard grease seal). Just my theory. Probably only a chassis or lubrication engineer would know for sure.
-
Restoration of BringaTrailer 240z - HLS30-35883
Interesting. Assuming the same material and coil diameter, the spring constant for a regular coil spring varies as the fourth power of the wire thickness. At 0.116" vs. 0.102", the shorter of your two springs should be 67% stiffer (lb/in). The fully-compressed height of the short spring looks like it would be 3.5 x 0.116" = 0.41". The free height looks to be ~ 75% that of the taller spring, so 0.75 x 1.035" = 0.78". Full compression distance would therefore be 0.78" minus 0.41" = 0.37", so the preload force exerted at full spring compression would be 0.37 x 1.67K = 0.62K, where K is the spring constant of the longer spring. Using the same approach, the longer spring looks like it would have a fully-compressed height of 4.5 x 0.102" = 0.46". Full compression distance would therefore be 1.035" minus 0.46" = 0.58", so the preload force exerted at full spring compression would be 0.58K. So (if I got my math right)... At full compression, the shorter spring will be exerting about 0.62 / 0.58 = 7% more preload force, compared with the longer spring. That's pretty close. In fact, they're probably the same. The shorter spring will be more sensitive to turning the adjustment screw in and out, and it will get from max. preload to zero preload a lot faster... but I can't see that being an advantage. So, why?
-
Restoration of BringaTrailer 240z - HLS30-35883
Hard to see how the Factory counted 5.5 turns for the spring, as it's shown in the FSM diagram. I agree with your count: just under 4 turns (and your long spring matches well with the one on the FSM diagram). Your short spring looks like it's only 3 turns. However, the wire gauge looks like it may be thicker. Did you measure it?
-
Center Console Install/Hardware
IIRC, some Z shift levers use a black rubber/plastic grommet at the top of the shaft. That would serve to fill in the gap that you have with your boot. Not sure where you'd be able to source the grommet. It may take a little patience and/or ingenuity.
-
"The Brown Z" HLS30-11080
I fine illustration of a shade tree mechanic at work.
-
My two swiss S30Z Fairlady Restoration build thread
Impressive level of detail. I originally intended to ask whether you have any pictures of what this kit looks like once fully assembled, but then I found this video on Youtube... I'm really impressed. These kits can be disappointing if the proportions are off. This one looks perfect. Except for the wheels...
-
My two swiss S30Z Fairlady Restoration build thread
US $899.00 That seems like an attractive price, esp. when compared with the amount of time and labour required for a DIY repair and restoration of a cracked original dash. I wonder what Just Dashes are charging these days to refurb an S30 dash? You'd need to also take into account the fact that their solution requires 2-way shipping, whereas the JDMCP dash cap ships outbound only.
-
1971 HLS30-14938 "Lily" build
Item 50 in the FSM illustration (exhausts through the rotating chrome grille, Item 80). Cutting and then gluing the foam pieces around the duct's inside surfaces is finicky work. I can only assume that Nissan decided the benefit outweighed the additional manufacturing cost. You need to use open-cell foam for this location.
-
1971 HLS30-14938 "Lily" build
Maybe too late now, but I posted printable templates for all of the heater boxes, flaps and ducts in 'Resources - Knowledge Base'. Might save you some time. Don't overlook the foam liner for the centre air outlet duct. It's there to reduce air rush noise. Also: Be careful with the edges of the vinyl-faced flap coverings. They may need some edge profiling or cutting back to keep them from snagging as the flap moves from 'open' to 'closed' position. You don't want those things coming loose after you've installed everything back under the dash.
-
Center Console Install/Hardware
I don't recall seeing any restoration write-ups that have been specific to the centre console. I think you'll find (limited) discussions on the topic as part of broader write-ups on Interior restoration. If memory serves, the full-restoration thread done by CSCZ member @wheee! was based on a 280Z, so you might find some tips there. Most of the coverage that I remember deals with repairing the consoles for earlier 240Z models, which were prone to cracking where the choke lever assembly attaches. Perhaps it would help if you provide some details about the condition of your console, which will help us to understand why you think you need to replace some of the hardware. As for the removal/reinstallation process, the Factory Service Manual (downloadable for free from the 'Resources' section) should be your first pint of reference. SEM 'Landau Black' paint is generally considered the go-to paint for reconditioning the Z console. Most members use a 'chrome' pencil to restore the trim highlighting. Cracks can be repaired with cautious use of the ABS plastic cement used for plumbing. If its a long crack, you should probably reinforce the back side with a secondary layer (an old credit card or hotel key card works well for this purpose).
-
Replacement Windshield Options
Agreed. @cgsheen1 Would you mind spending a couple of extra minutes to post your write-up in the CZCC 'Knowledge Base'?
-
Replacement Windshield Options
Well, the good news -- maybe -- is that Pilkington (Britain-based, with manufacturing operations in several countries worldwide) has been owned by Nippon Sheet Glass in 2006 and now operates as a NSG subsidiary. Pilkington's website describes their automotive business as follows: " Operating as a single global organization serving the Original Equipment (OE) and Local Automotive Glass Replacement (AGR) Aftermarket sectors... The North American aftermarket operations supply laminated and tempered glass for the automotive glass replacement market. All products meet or exceed Federal Motor Vehicle Safety Standards. Products are shipped from its distribution centers in Columbus, Ohio and Phoenix, Arizona to external retailers and wholesale customers and its network of company-owned wholesale service centers throughout the US... Windshields, sidelites, backlites, accessories and specialty AGR products are included in the customer offering of Pilkington North America AGR". The British Pilkington website includes 'Pilkington Classics' products and lists hundreds of replacement items for older cars. That list includes both a 240Z windshield and backlight. It looks like they operate on a custom-order basis and no prices are shown. I suspect they wouldn't be interested in filling single-unit orders, but would be amenable to an order for 20+ from someone like MSA.