Everything posted by Namerow
-
Coolant in the oil.
I can't help but wonder whether this situation would respond better to big heat and big torque. As in, welding a nut onto the top of the stud and then putting a wrench on it. IIRC, @grannyknottalked about this in another thread a couple of years ago when the topic was extracting a snapped-off manifold stud out of the cylinder head. Something about the merits of using an oxyacetylene torch rather than a MIG? The difference here is that we have a large-diameter stud (bolt shank) that's seized inside a cast-iron engine block (vs. a small-diameter stud seized inside an aluminum head). Whereas it's the galvanic action of dissimilar materials that typically creates problems with steel fasteners getting stuck in alloy castings, for a head bolt it's steel-in-iron so I would think that the causes for the locked threads would be simple air (oxygen)-generated corrosion (unless the block has a micro-crack and coolant (water) has leached into the stud threads -- but let's not talk about that). In my (limited) experience of removing cylinder heads from high-mileage L24's, the head bolts take a lot of torque to break free and some of them really pop when they give way. Looking at the threads after the bolts came out, they appeared 'sooty' but not really crusty-rusty. I think that part of the problem with these head bolts getting stuck in the block is that they were installed at the factory without any lubrication so as to get accurate torque readings during tightening. Having said all that, I will repeat another story that I wrote about previously. In my area of the world (on the fringes of a 7-million pop. Canadian city), I discovered a contractor who provides the new-car retail industry with specialist services for extracting frozen fasteners from customer cars. That's all he does. He told me that there a certain model years for certain higher-end car brands where a key fastener (e.g. suspension mount) is chronically frozen, hard to get at, and often snaps off during attempted removal. That's where he makes his money. I hired him to get the snapped-off studs out of my Z's cylinder head (still mounted on the engine, in the car) and it was one of the best $120 I ever spent. He came to my house, rolled a tool caddy out of his truck, sized things up, and had the job done (without using any heat) in 10 minutes tops. Cheating? Maybe. Depends on your threshold for potentially-painful outcomes. You might consider looking for a comparable specialist in your area. The service managers at your local Benz, BMW, Audi and Volvo dealers might be able to help you find one.
-
Can't align HVAC trim panel?
Maybe I'm missing something but, from your photos, it's not obvious how that trim piece can achieve any left-right position other than what's determined by the two mounting screws. That suggests that what you've got is the way it's meant to be. Maybe a 280 owner can verify. Are you sure that the HVAC lever assembly has been correctly installed/aligned?
-
Where to buy tie rod castle nut
I think I might have the answer for you... https://www.belmetric.com/stainless-castle-nuts-c-3_558_1376/cn8ss-castle-nut-stainless-steel-p-8342.html?zenid=3j9n5fjlbd4p3hntj7jub44nl5 Looks to be a lot shallower than what you bought, although maybe not quite as shallow as the Nissan OE item. I've bought from Bel-Metric before. Good vendor, good products, great catalogue. BTW, if all else fails you should maybe pay your local Nissan dealer a visit. This might be a PN that's still available.
-
Grinding Weld Beads - Recommendations, please
Lots of useful info. Thanks very much. Now to the next question: What processes and/or chemicals do you recommend to prepare the welded area for primer and paint?
-
Grinding Weld Beads - Recommendations, please
What are members' recommendations for tools and abrasives to dress down MIG weld beads? For reference, I'm talking about stitch welds on sheet metal. The typical combinations I've seen suggested are: 1) angle grinder/flap disc 2) mini die grinder/2" sanding disc Abrasive grade recommendations I've seen are 36-grit to start and 60-grit to finish. I'm curious to hear thoughts on which combination(s) works best.
-
1976 280Z Restoration Project
That was an impressive amount of bondo on that door. I suppose someone considered it easier than trying to align the door with the rocker and the door pillar. There's an interesting build thread on the Ferrarichat website that details the restoration of a 275GTB that had been bought for $$$ and was being restored to make it worth 10 x $$$. The 'before' photos show a car that looked ready to compete in a concours. However, when the shop started to strip the body for a re-paint, they discovered that the entire nose are had been re-sculpted with bondo. Almost an inch thick in some places! The work of an artist, to be sure. Re your Zkars replacement door, are you going to replace the metal in the mirror mount area? That seems to be a chronic corrosion area for these doors.
-
My weekly rant. Premature Parts Death Plague
Interesting. If you look at the consumer-driven stats for the auto industry's products (J.D. Power, Consumer Reports, etc), you find that vehicle reliability has been on a steady and significant improving trend over the past 30 years. Here's an irony for you to consider: Back in the 1960's and 1970's, your vehicle's structure would basically disintegrate after about 5 - 10 years, leaving you with a bunch of perfectly good parts and sub-assemblies attached to an undriveable vehicle. In 2019, the parts and sub-assemblies crap out at the 5 - 10 year point, leaving you with a perfectly good structure that isn't worth keeping because of the uncertain cost and frequency of parts replacements. The vehicle manufacturers are under intense scrutiny over vehicle reliability. For that reason, the vehicle OEM's put their attendant OE systems and parts suppliers under a similar amount of scrutiny. However, the aftermarket parts suppliers are under no scrutiny whatsoever. The only people who tend to know whether a particular repair part (or part manufacturer) is unreliable are the service professionals (who will talk) and the parts supply wholesalers/retailers (who probably won't talk). This because they see such a high volume of incidents. As individual car owner/consumers, we're not in a good position to avoid buying bad stuff. Although it's not a guarantee, I think that the best practice is to stick to well-known brands, even if they cost more (and they almost certainly will). Although many of these manufacturers now have factories in China (and Vietnam, Taiwan, the Philippines, and South Korea), I'm inclined to think that they exercise a higher level of quality control at those plants than would be the case at the generic manufacturers' facilities. Electronics are a special subset of this issue. You can hide a lot of bad quality in 'black box' device without it being evident at the time of installation. Name-brand manufacturers have QA/QC programs and add the cost into their pricing. Generic manufacturers, I suspect, have no such programs.
-
Air Cleaner Won’t Clear Brake Bleeder Valve
I had my 70 Z's brake m/c sleeved and rebuilt a couple of years ago at a cost of Cdn $275. A problem I encountered at the time was finding a rebuild kit (the design of the pistons, etc for the early-model m/c is quite different from that used for the later cars). The brake rebuilder that I used operates a big business and has been around for many years, so they had the parts in stock. That was in 2016. Maybe a new stash of rebuild kits has surfaced since then with one of the Z aftermarket suppliers. If not, be sure that you're happy with the condition of your seals and pistons before you invest any time in sleeving the casting.
-
[2019] What Did You Do To/with Your Z Today?
They're pretty smart when it comes to finding a comfortable place to live...
-
Cut Off Strut Tubes Wanted
So you spun up the tube and cut from the inside until the spring perch broke loose? How did you avoid having the perch and the separated part of the tube create a jam when they dropped free?
-
Solid Series I 240Z on Craigslist
Side mouldings are gone, too (a good thing). That suggests it's been re-painted.
- The other moustache bar bushings - the wavy rubber washers
-
The other moustache bar bushings - the wavy rubber washers
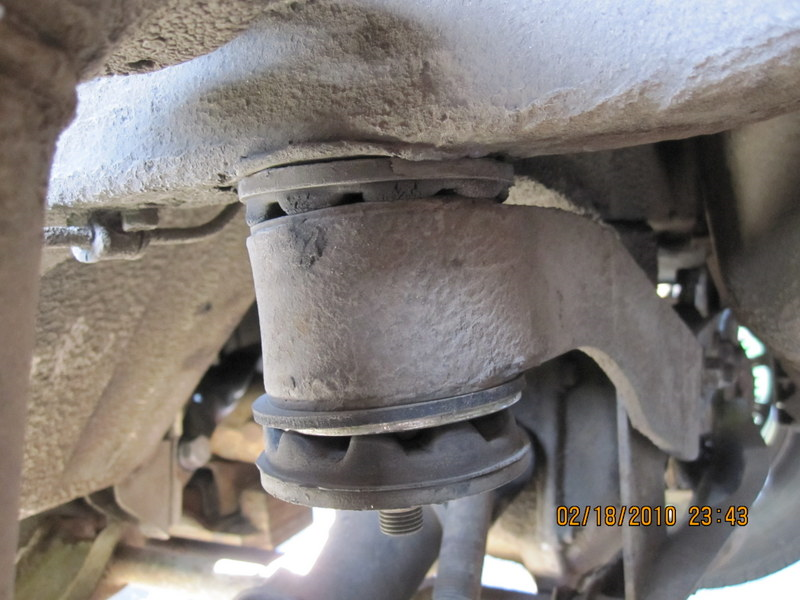
A lot of this discussion about design changes is starting to sound familiar. There's another Topic somewhere from about 2 years ago that has an extended discussion with lots of photos. Re your photo of a car with no lower rubber washers fitted to the MB, it's hard (but not impossible) for me to believe that Nissan would have decided to put the wavy rubber washers on the top rather than the bottom of the MB end mount. After all, the diff weight should be forcing the MB down, not up. That said, I don't understand why the MB bar in the photo is jammed up against underside of the car. Possible answer: The owner used the diff as a jacking point. As a result, the whole diff/MB assembly got pushed up against the wavy washer and got stuck there. Let's assume for the moment that maybe there is only one of these rubber washers fitted at each end of the MB. If that's the case, it makes more sense to put them on the bottom of the mount rather than the top. By the way, that's the way it's depicted in the Parts Manual diagram. What makes more sense to me, though, is that the wavy washers should be fitted to the top and the bottom of the MB end mounts, so that they're put into a slightly pre-loaded state after everything has been tightened up in assembly. In the parts listings, I see four different iterations of the 'Stopper - Differential Mounting'. In every case, the manual specifies 2 uppers and 2 lowers. I don't know exactly what to make of the arrangement shown in your photo. Maybe someone with an unmolested early Z (is there such a thing?) can chime in.
-
The other moustache bar bushings - the wavy rubber washers
TS71-18 describes a cobbled-up fix that Nissan came up with to address complaints from owners about powertrain noise in Z's with automatic transmissions. It largely consisted of hanging a big-arse weight off the back to the diff casing. It also doubled up on the number of wavy rubber washers at each of the 4 places where these are located. It's interesting to note that the 'teeth' of the new, add-on washers appear to have been designed to interlock with those of the original washers. That would have really stiffened things up. Although I haven't checked the parts manual, I doubt whether this dealership service kit ever made it into actual production. Nissan probably found a more elegant way to solve the problem with the auto-trans Z's (different final drive ratio, maybe?)
-
The other moustache bar bushings - the wavy rubber washers
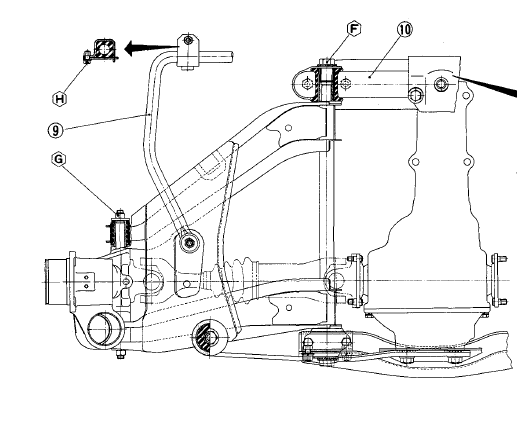
As has been pointed out by others, the moustache bar isn't really part of the rear suspension. It's function is to provide a fixed/flexible rear mounting system for the differential. None of the (primary) suspension loads feed through the differential. See diagram below for more understanding. That said, Steve may find this distinction irrelevant to his overall policy of keeping away from parts that he feels may have high potential for liability issues. I guess we'll have to wait to see whether he responds.
- The other moustache bar bushings - the wavy rubber washers
- The other moustache bar bushings - the wavy rubber washers
-
The other moustache bar bushings - the wavy rubber washers
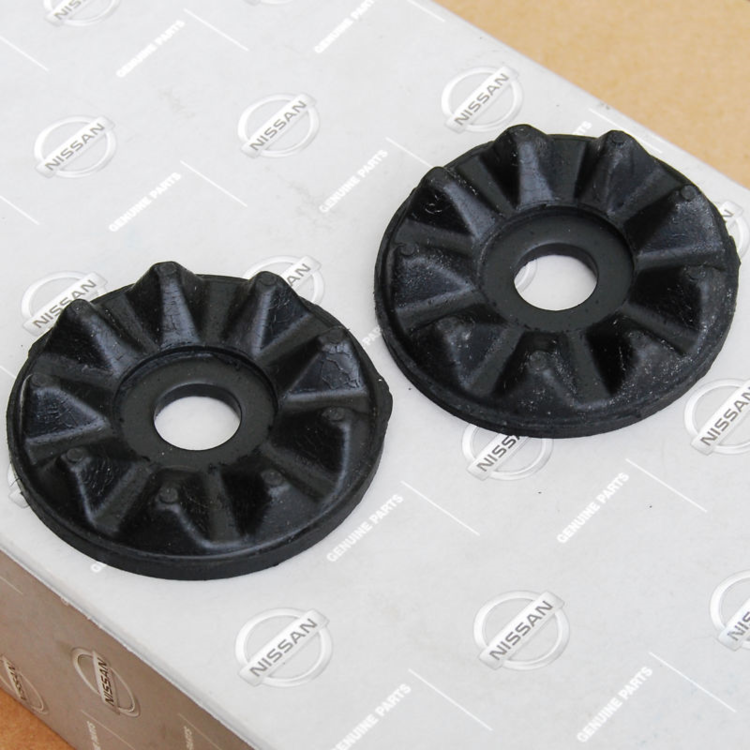
This topic picks up on a mini-conversation that I started on Grannyknot's 280Z build thread. These little washers are an important part of the NVH isolation design for the Z's rear diff. The design, from an engineering perspective, is a lot more sophisticated than meets the eye, so there's an incentive to try to install a proper replacement if your own have deteriorated (which they probably have, if they're 50-year-old originals). Unfortunately, the part is NLA from Nissan and none of the primary Z restoration parts suppliers offer a substitute. There's been some discussion about the need to use vulcanized rubber. I think that's a red herring (look up, 'vulcanized') and was meant to infer that the rubber part needs to be bonded to the metal part. While the originals might have relied on a heat-bonding process, its now 2019 and we have aerospace adhesives for this purpose. So: All we really need is the rubber part. Steve / Nix240 has cobbledup a wide range of rpreviously unavailable rubber parts for our Z's. I see nothing special about re-creating the moustache bar runner washers, other than using a suitable durometer rubber and having access to a good-condition original to create a mold. After that, they could be bonder to a suitable metal washer and, presto, we have another part taken off the NLA list. I think these washers carry across the entire 240-26-280 series without any differences. Maybe even the ZX's? Also: I'm thinking that the same might be the case for the Series 1's diff front insulator. Steve creates the rubber piece, then the owner carves the perished rubber out of his insulator, cleans up the metal armature, and then bonds in the new rubber. @nix240z Steve: What do you think?
-
Just what the Doctor ordered. 1977 280z
So as not to hijack Grannyknot's build thread, I'm going to start a new topic about the moustache bar bushings.
-
Best. Driving. Ever.
For another view of fast driving on Irish roads, check out some of the videos available online of the 1950's-era Dunrod Tourist Trophy race. At the time, the drivers (Stirling Moss, Mike Hawthorne, etc) considered it on par for difficulty with the two better-known open-road races, Targa Florio and Mille Miglia. Dunrod was discontinued after a single accident at a blind brow killed two drivers and wrote off three cars. If you're thinking about taking a vacation in Ireland, you should be aware of one important fact: It rains a lot (so more pub time). Other than that, I highly recommend it as a destination. When I was there, I drove the south coast road and used the town of Dingle (south-west tip of the island) as my base.
-
Just what the Doctor ordered. 1977 280z
Are those new mustache bar mount bushings (the serrated ones)? If they are, where did you find them?
-
Restoration is back on track (with a lot of help)
Faceplate and knobs are in great shape. Looks like 'AM2' was the owner's favorite.
-
Tail Light Lens to Housing sealant help
As I understand it, the felt covers were provided to keep bugs from getting inside and turning the light housing into insect housing. Probably also help to keep out road dust.
-
Head Gasket leak?
Magnaflux, the company, has attracted competitors over the years. If you go this route, you (or your machine shop) may decide to use someone else's product. There are two generic methods available. One (UV-illuminated dye penetrant) is suitable for an aluminum part like your cylinder head. The other (magnetization of the part) only works with parts made of ferrous materials (steel, cast iron, etc.). Although I have no direct experience, I would hazard a guess that the dye penetrant check might deliver the best results if you pre-heat the head in an oven before spraying on the dye. Not flaming hot, but maybe 250 degrees F. Read the instructions that come with the kit first, though, to make sure whether this is a good idea or not.
-
whoopsie ...
Looks like it ran up the support cable that can (I think) just barely be seen running down from the top of the pole. Hidden from view under the car because the upper half has been pushed to the left. Damage to the hood, grill, front and rear valence panel, front and rear bumpers... and maybe the oil pan .


