


Zed Head
Community Member
-
Joined
-
Last visited
Everything posted by Zed Head
-
Haven't read the details but if you're planning a CX axle conversion you'll want to take good measurements if you're using aftermarket CV axles. Apparently they often have longer compressed lengths than the factory CV axles. People have had problems. Don't forget to use the axle shaft as the center for machining when you convert to hub-centric. Since Nissan used lug-centric they would have no reason to set a tight tolerance on the rough cut of the "hub".
-
-
-
-
It's a good time to grease the u-joints on your half shafts. There are small slotted plugs in the Zerk fitting holes.
-
#4 might do fuel pump stuff. #1 might actually be the trigger wire for the ECU from the coil negative. By the diagram and the connector shapes.
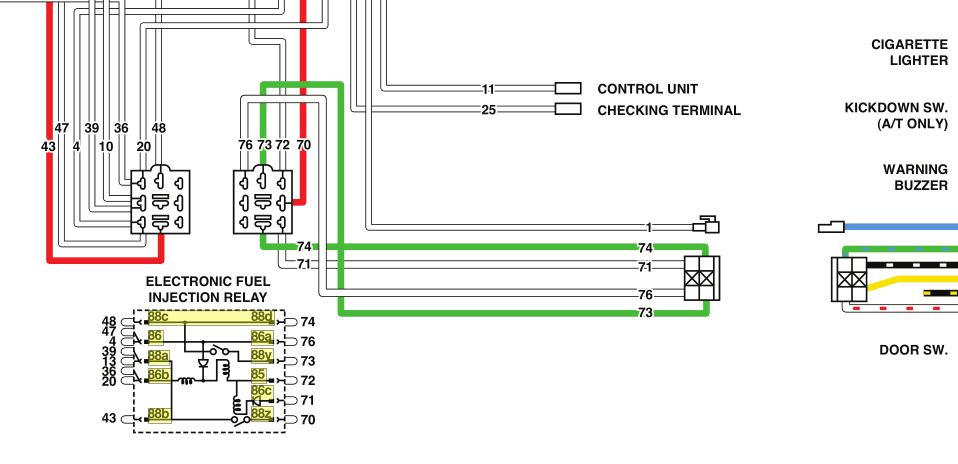 The Factory Service Manual has the pinouts and the connector shapes shown in the various chapters and the wiring diagram. For #4. https://www.classiczcars.com/files/Here's an old thread that talks about replacements. Big picture though, you could just use the wiring diagram and power things up to get the EFI system working. The combined relay is more complex than it needs to be. In 1978 they split the two relays apart. Were it mine, I'd power up the EFI system using the 1978 diagram, and use more modern methods for the fuel pump, like an inertia switch system. Or, just use 1978 relays and a 1978 wiring diagram. The two white wires in your picture are for diagnostics. You can ignore them. #1 is probably the ground wire.When I posted the post above I had only read the last short post of yours. What you wrote here is a very good description of a failing ignition module. It's how mine acted as it was crapping out. Search "HEI ignition module" on the site for a cheap and pretty easy swap to a more modern, by just a little, cheap ignition module. You can also find them around the internet, but a used one is going to be on its way to failure also.It will only happen when the problem is happening. The module gets hot and starts firing the coil at a higher rate than designed. Extra sparks out of time, and extra fuel because the EFI is controlled by spark. Let the module cool down and it works properly. Mine would do it whenever I got above 3000 RPM. I could cruise around at low RPM, get on it, and end up having to pull over and restart. The tach would show 4000 or so when I knew it was only about 2500, plus it was quivering and jumping around. Just clues to look for.There was a statement earlier about affecting something when you changed the alternator. So, next time, if you try again, you can do some testing before swapping. It might even be enough to just wiggle some wires.Seems like the basic questions is - do you have the proper voltage at the S pin, and is the S supply consistent during operation? The problem is overcharging. You can run a completely separate jumper wire from the battery positive to the S pin and see what happens. If things start working correctly then you can get in to the harness. If they don't then the alternator has a problem.
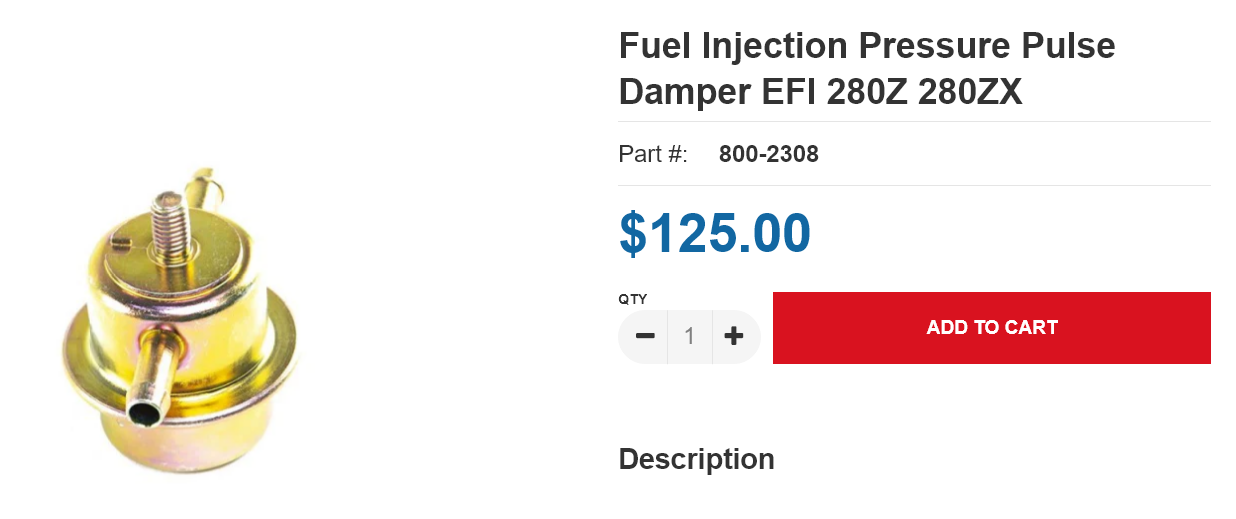
 Edit - didn't see the title, it doesn't show when you read a post. Putting the details of your car in your signature makes it easy and consistent from post to post. Good luck. Can't tell what you're working with, looks like a 280Z, by the picture of the engine. Your problem description fits a failing ignition module pretty well. Does the tachometer needle behave normally while the engine is acting up? Or does it jump around and read higher than it seems the actual RPM are?Here's a cheap alternative. https://www.oreillyauto.com/detail/c/standard-ignition/fuel-delivery/fuel-injection/pressure-damper/3ef9efd721d3/standard-ignition-fuel-injection-pressure-damper/std0/fpd84?pos=23 Compare to others. https://www.oreillyauto.com/shop/b/fuel-delivery/fuel-injection/pressure-damper/3ef9efd721d3Maybe just saving some money? Didn't have spare hose or tubing? Had a spare FPR laying around and needed to stop a fuel leak so he could sell it? There was a thread in the past about alternatives. They're out there but if you go to the Z specific web sites, that looks like a quick and dirty good idea. https://zcardepot.com/products/fule-injection-pressure-pulse-damper-efi-280z-280zx
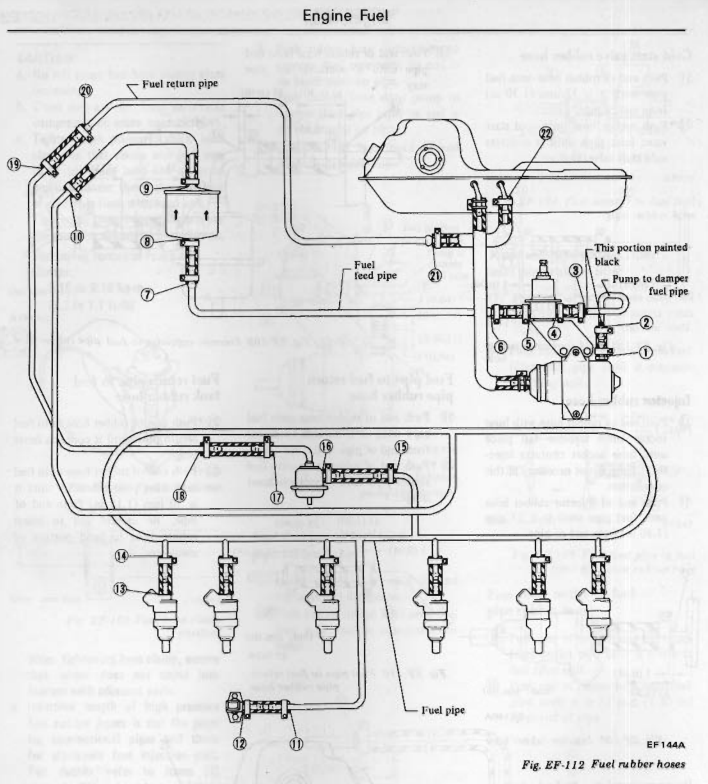
 ZCD has stuff. https://zcardepot.com/collections/fuel/products/fuel-line-pump-to-engine-stainless-steel-280z-1977-78Fuel won't flow backward through the FPR. It's pushing on a tiny little area. Hydraulics.
 Maybe just spanning the gap between the old crusty hoses ends. Looks like a new FPR though. Strange. @zspert, that old braided fuel hose could blow, or just slow leak from longitudinal cracks, at any time. It's on the high pressure side. I remember that soon after I bought my car, after I had installed a new pump and got the car driving well, I was pulling out of my neighborhood and a UPS truck driver pulled up beside me to tell me that fuel was pouring out from under my car. A PO had used low pressure fuel line and it had split. Luckily everything was cold and I was within walking (running) distance to my house where I had some spare hose. I was able to squeeze under the car which I had parked next to the curb behind a strip mall to replace the hose and get it back to the house. I felt bad about the big gas stain on the pavement but at least there wasn't a pile of melted plastic and tire rubber.Many people don't really understand what the sealing surfaces are in a compression fitting. It's important the surfaces are clean and that the tube is round, not distorted. It could be also that the Nissan 8 mm nominal tubing dimension is just not right for the typical US domestic automotive repair kit. Things to think about. Good luck.Could be a check valve to make up for a bad one in the pump. What is on the fuel rail on the engine?Did you guys use a ball hone? Looks scrapey. The angle seems shallow like it wasn't moved up and down fast enough. Not an expert. You can still see the scratches. Don't have the experience to say if it will seal well with the scratches but it doesn't look ideal. I think that you're on the edge of "go cheap and hope" or spend the money and do it "right"? If you have the means of tearing it down again easily, I'd probably just put some new rings in it and see what happens. If you have limited space and time maybe you should spend the money and make sure it's right. It's a dilemma. Another way to describe it - if you like working on it do the rings and take a chance, if you like driving it spend the extra money on an overbore.I was going to suggest strapping the ramp to the wheel with a bungy cord. An old inner tube under the ramp might work too. You could even glue it down.I'd use the scissor jack under a control arm then set the ramps under the tires and drop it down on them.Anybody notice this one go by? If you're gonna modify, modify bigly. https://bringatrailer.com/listing/1972-datsun-240z-273/


Important Information
By using this site, you agree to our Privacy Policy and Guidelines. We have placed cookies on your device to help make this website better. You can adjust your cookie settings, otherwise we'll assume you're okay to continue.