Zed Head
Community Member
-
Joined
-
Last visited
Everything posted by Zed Head
-
eBay is notorious for fake ratings. People who sell there will give other users bad ratings if they get one, so everybody gives everybody else a good rating. The ratings are essentially useless. Post the guy's name. If he has sold 100's of cars and owned 100's of Z's then he should be known to this community. Nothing wrong with vetting a person who's asking you for thousands of dollars. And, here in the States anyway, expressing an opinion about how someone does business is not a crime. The old high bidder bailed out routine is a common scam technique. And, on the same point, the high bidder, if there actually was one, is in the same position as you. He agreed to buy the car then changed his mind. He would get sued first, if that was an option. But it's not an option, nobody is getting sued. The seller/scammer is pressuring you because he senses that you are unsure. An easy victim. Everything about this says scam or big problems. He might have a car but once he gets your money, it might take forever to actually get the car, plus I would bet that there will be many extra expenses for shipping, and insurance, and miscellaneous. Please post this person's name. It's probably a fake one anyway. At least post the eBay name.
-
The dial does not actually do anything. It only indicates the state of something. Probably something that opens and closes.
-
Probably fresh air vent actuators. Pull on them.
-
Seems like a pretty good value. http://portland.craigslist.org/clk/pts/4763144210.html
-
This is not right, the top part (no offense). The AAR just lets metered air past the throttle blade to increase idle speed for a short while. The idle air adjustment screw on the AFM lets air past the AFM vane, leaning out the fuel-air ratio at low RPM. You might see a small change in idle RPM if you turn the screw, but it's a side effect of changing the fuel-air ratio. It doesn't let any more air past the AAR or the throttle blade. The AAR is only active for a few minutes then its internal heater should close it completely. The AFM idle air screw is used to tune the idle mixture to give the right ratio of combustion products for passing emissions tests.
-
-
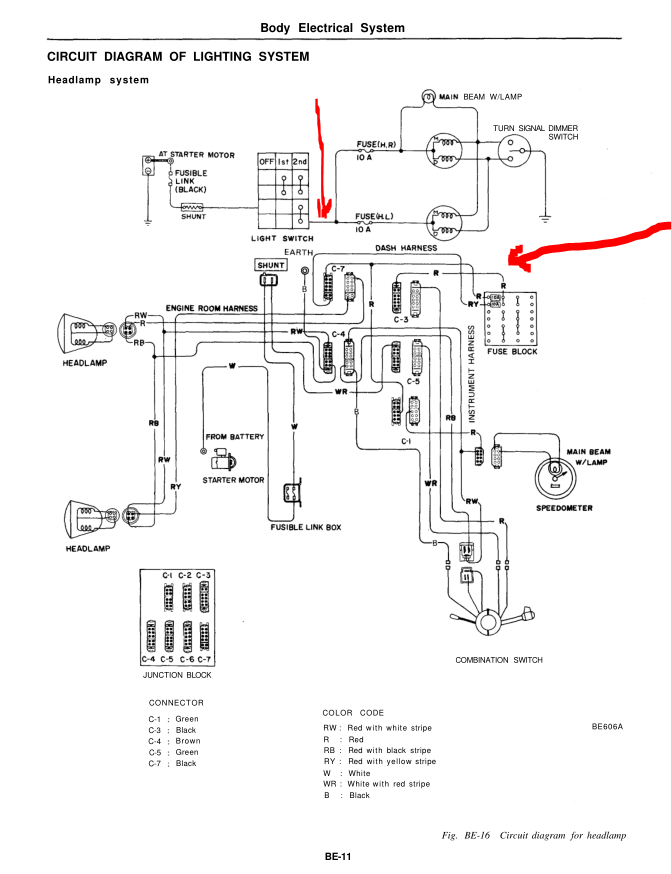
I was just suggesting the simplest way to get rid of the main problem with the headlight circuit. The switch on top of the steering column, with its old, pitted contacts. I have a single relay that only bypasses the headlight power switch. I left the dimmer switch intact since it doesn't seem to be a problem, besides getting stuck open occasionally (in the past for me, no problems since). I'm just being super-economical. Looks like there are many ways to take the power switch (supply), and the dimmer switch (ground), and the old wires out of the circuit and replace them with new.
-
I notice that nobody has a relay between the headlight power switch and the fuse box fuses EDIT - as another option. The switch is the part that tends to get pitted and hot and cause the solder joint to break. I put a relay in front of the fuse box to take the load off of the headlight power switch. It's easy to get to for 1976, it's the red wire at the fuse box that feeds the two headlight fuses. Looks the same for 1975. I assume that for 1975 you would have to use the shunt supply to keep the ammeter working right, basically replacing the headlight switch with a more durable switch (the relay). 76 has a voltmeter so I just ran a fused line from the battery. I also did the same for the running lights but it was more difficult. The wires are buried up in the dash. I had a pretty big voltage drop across the switch and eventually both solder joints, HL and running lights, broke/melted. The contacts in the switch had matching pits and bumps making for a tiny contact area. Edit 2 - the two relay way would be best for taking the load off both supply and the dimmer. I went with the one, in the cabin, because it was easy and I didn't really see any problems with the dimmer switch. I wonder if the dimmer contacts really are much of a problem in the circuit?
-
There's a lot of rural land around the small city of Portland. And, apparently, some Portlandians keep goats at their homes in the city. She said goats had jumped up and walked on the roof.
-
Dieseling is from hot spots in the combustion chamber. Usually carbon deposits from running rich or burning oil. Might be worthwhile to take it out on the road and (ab)use it to clean out the combustion chambers.
-
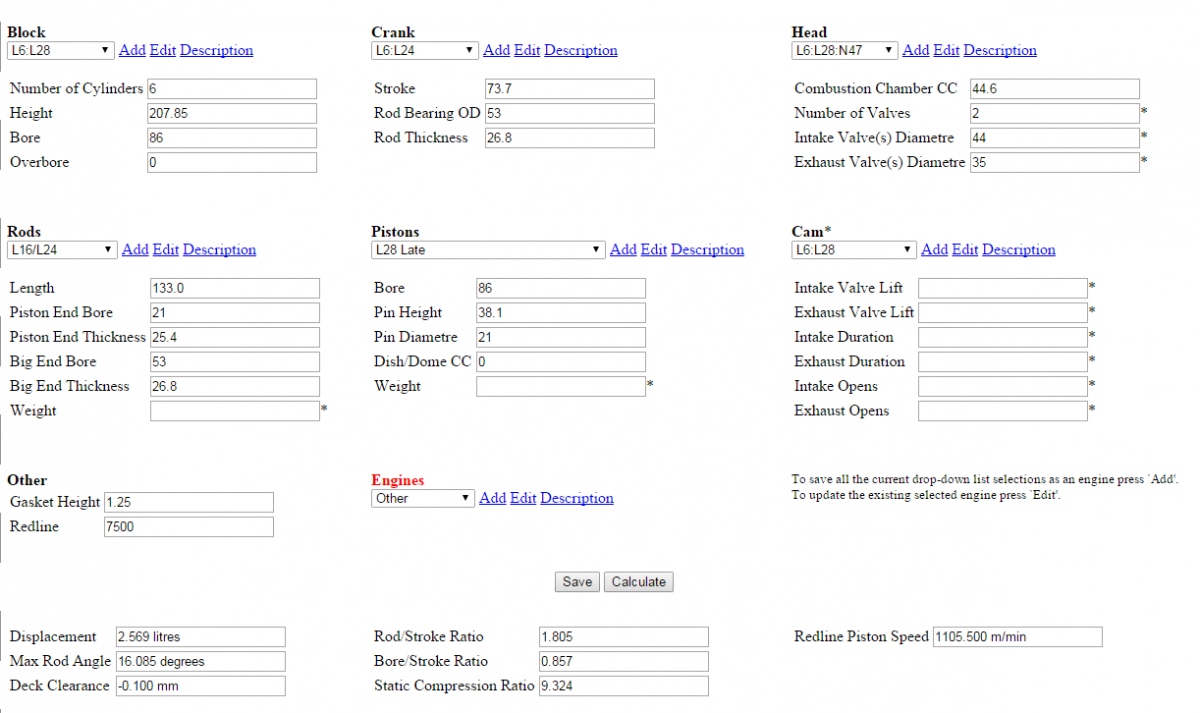
Looks like it would. In essence, a bored out L24, but with an L28 head, I assume. Bigger valves and ports. http://www.ozdat.com/ozdatonline/enginedesign/
-
Kind of interesting. Comes with goat tracks. She mentions "that other Z" but may not realize it doesn't show up anywhere. http://portland.craigslist.org/wsc/cto/4758855597.html
-
I think that this would normally be a sign of a bad regulator. The regulator is supposed to do what you did. Since you've tried three regulators though, the problem might be in the wiring to and from the regulator. With the wiring diagram you should be able to check each wire's connection and continuity.
-
Used to. In the old format. Maybe. Other forums have an arrow. Just click where I drew the red circle.
-
I clicked on "Today" under your screen name on the right and it brought me directly to the last post. I think that there used to be a little arrow-shaped thing there.

-
Bad text formatting in the description! Boooooo
-
Doomed, we're all doomed....
-
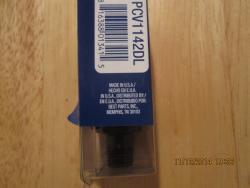
Discussions crop up occasionally about parts sources and the quality of said parts. Thought I'd start a thread to collect information on parts made in USA. I'll start with a Duralast PCV valve from Autozone. Feel free to add other parts from other places. I've seen a few parts Hecho in Mexico in the past, I think they were motor mounts. Anyway, maybe a trend will pop up, hopefully identifying where to get good parts, for good prices. Supposedly, the manufacturing pendulum is swinging back to the states. A potential downside though, is that we might realize that crap can come from anywhere.

-
Change is happening! I got interested in PCV valves, decided to check out prices, and picked up some inexpensive Autozone valves, one for my 76 280Z. And surprise, surprise, they're made in USA. $2.99, on the low side for parts store prices. No idea on quality, it looks fine, but who can really tell if their PCV valve is in-tune. I'm surprised that there are so many varieties, they have the same outer body, but different applications. The internal spring rate is different, I assume. We should start a Made in USA thread just to see what's out there.
-
It's more about being disingenuous than outright lies. Like the "youtube" link takes you to the Firsttrade web site, not a video. It's the key to being a successful used car salesman. No direct ties to the misinformation. Here's a very small lie though - "Every nut and bolt either new or re-plated!" (rusty nuts on the steering rack u-clamp) $29,500, Reserve not met...
-
No offense intended, but this thread reminded me...
-
Yes, over the top and attached to the body. There should be a metal clip on the side of the tunnel to hold the cable up, back by where it connects to the transmission, and probably one more on its way along the firewall. The cable stays in place when removing the engine and transmission.
-
It works! Looks good. Thanks. But...can you do the same for the quoted text?
-
Isn't 863 a '70? He says he knows the value but doesn't set a price...............
-
90 invested does not mean 90 returned. This is why car restoration is not a viable business unless you have a deal with Discovery channel. Just trying out some fonts...