Zed Head
Community Member
-
Joined
-
Last visited
Everything posted by Zed Head
-
There is a range of years of Ford F150 pickup trucks that use the Bosch pump. For those wrecking yard scavengers. $70 for new is a good deal though. The yard charges about $30.
-
The way to check FPR and pump operation is to remove the vacuum hose from the FPR, if the engine is running. Or just use the Start circuit if it's not (remove the solenoid wire). The fluctuating pressure is odd. If the vacuum hose was connected, it was going too high. If it wasn't it was too low, then got close to correct. I had an FPR that went rich when it got hot. Took me forever to figure it out. One day it finally went way bad and ran really rich and I realized it had to be the FPR. More tension on the AFM spring makes things lean (less vane movement for the same amount of air squeezing by). If you want more fuel, the potentiometer on the cooling circuit is a better way to go. Speaking of which, the sensor with the ground wire is actually a switch for the timing advance circuit. It doesn't really do much, just advances timing by ~6 degrees when cold, through another circuit in the ignition module and pickup in the distributor. The coolant sensor is the smaller of the two sensors with EV1 (injector-style) connectors. The thermotime switch has a very large body and wrench flats, compared to the coolant sensor. The fact that 60 psi got things running right suggests that injectors might be clogged or there are vacuum leaks. That should be adding quite a bit of extra fuel. Like having 242 cc/min injectors instead of 188 (stock).
-
I see it now. I'd forgotten how all those throttle linkage parts fit together. Had to go open my hood to refresh. It would be interesting to see the rest of the system to see how it all works. There must be a mechanism in the vacuum can and an electrical switch somewhere. Do you press the throttle to where you want it and lock it? Is it just a throttle lock or does it have some sort of speed-based adjusting mechanism using engine vacuum? More stuff to cause problems...
-
Both pictures, site's and snake's, show a switch on the brake pedal too. Electrical, and looks like one of the hoses from the can by the booster might attach to the brake pedal switch. I'd be with CO, on some sort of primitive cruise control but I don't see any throttle control, unless it has some sort of air bypass around the throttle blade.. Maybe it's a starter lockout system, for safety. Edit - find out where the ends of those two hoses attach.
-
That sounds like a typical body shim.
-
Moi? There was discussion that the car might be an almost original condition, low-miles, "survivor" type car. But it looks more like a normal, been worked on, not quite right car now. More fun in the long run because you don't have to worry about ruining something special. Considering the loose wiring and the missing parts and the fact that it doesn't have what it needs to run anyway, it's in perfect position to get a multimeter, and the Engine Electrical, and Engine Fuel chapters, and the 1980 Electronic Fuel Injection Guide, and just spend some time taking measurements, and making everything right. Then when you're ready to put a battery in it and see what works, you won't get any surprises.
-
The chain hanging over the clutch pedal and the long black zip ties around the wiring bundle aren't stock Nissan parts. The car is looking more typical.
-
Wouldn't be too surprising if those missing parts were either borrowed or stolen. It happens when cars sit for a long time. The engine and cooling system might be fine. Check the oil for moisture, along with the fuel tank. The fuel tank probably is full of residue and "varnish" from whatever was originally in there, even if it stayed dry. The engine might have some surface rust so squirting oil around inside the cylinders is a good idea.The tires are dry-rotted probably, but they might offer a clue to age. Get the number from the sidewall and post it. There are codes for later tires. The injectors might be fine too, but the hoses are probably dry-rotted also. They tend to split lengthwise. Same with the fuel rail hoses. But if they've been inside for years they might be okay for a while. The injectors might have residue inside also that will take time to dissolve and flush away. There's a ton of tiny details to look at before you start it and drive it.
-
You're still not helping us if you don't tell where you got the kit. (Edited some stuff out)...The reason the head is lower diameter than the skirt is for two reasons - there's more material there to expand, and it gets hotter than the skirt area. Here's some terms - http://www.hastingsmfg.com/ServiceTips/piston.htm Here's a really good link from a well known university, used by another well-known university - http://courses.washington.edu/engr100/Section_Wei/engine/UofWindsorManual/Piston%20Design.htm
-
Don't forget the black ground wire. Similar area, but connected to the negative post, and no fusible link.
-
There's nothing wrong with putting the name out here, especially if you've done the homework and taken the proper measurements. We need to know who the good and bad suppliers are. The "How To Rebuild..." book )pg. 76) says the skirt should be at least 0.0005" (.013 mm) bigger at the skirt than at the wrist pin area. No upper limit mentioned though. .75 mm (the middle) seems off, about 60 times bigger than minimum. Even your smallest measurement seems big. The question though is what are the ITM specs.? It will be interesting to see what the Silv-O-Lite pistons measure at. What does "did not fit correctly" mean on the HG? Looks like fun.
-
Actually, this is exactly, to the T, how the engine dies when the fuel pump runs dry om a corner because of poor baffling. I should mention that it will also happen on a right hand turn, but it starts sooner (with more fuel in the tank) on the lefties. I have a certain corner that I accelerate through, from a stop light, and it will happen every time if the tank is getting low. Only adding for clarity. The repeatability will tell the story on that possibility.
-
On the pickup tube blockage - I think that engines tend to rev higher as they go lean, like when they're running out of fuel. Especailly if they're running rich beforehand. So that might explain the rev to 3000. The difference between the two potential causes is that the left turn baffle problem is reproducible. So, if you can get the engine to die on a left turn, repeatably, that would lean towards the low fuel/poor baffles theory. If it's random, clogged pickup.
-
It may be that the two things aren't related. SteveJ seems on target. Were you taking a left turn the first time, at a fair pace,with a tank less than 1/3 full? The 280Z's fuel tank baffling is known to be deficient at low fuel levels. The fuel pump runs dry on left hand turns. I've had it happen but it starts right back up once it straightens up. Is your car a manual or automatic? An automatic might just die and not restart. I have a manual transmission so the engine keeps turning when it happens.
-
There's a fairly large vacuum hose directly from the intake manifold plenum to the cap of the emission's carbon canister, in the vicinity of the fuel filter. You might check that. I've used the carb cleaner trick. Since it's only a squirt, if there was a spark you'd just get a flash. But you do need to be careful. The other thing about it though is that it will dissolve some paints, and the glue on tapes. It's potent stuff. I wouldn't use it on a good-looking engine. Stater fluid is a potent solvent also but more flashy/vaporous. If you decide to try one, experiment on a known (self-created) leak to see how little it takes so you don't dissolve things by accident. The tiny vacuum bottle hose on the top of the plenum is a good practice spot.
-
I think that ground wire is an extra ground path. The mounting screws should allow the same path. The plug hangs below the AFM. Gravity might have pulled it loose. First place to check.
-
-
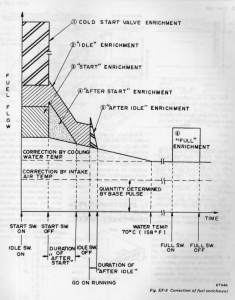
Kind of funny - I misinterpreted the chart again. It actually shows CSV enrichment as separate from Start enrichment. So Start enrichment is probably always there hot or cold, maybe to varying levels depending on temperature. Since the system is designed to be started with the throttle closed, idle switch actuated, I wouldn't be surprised if your idle switch is dirty or maladjusted and part of the problem. Also wouldn't be surprised if ti was fine and not your problem.
-
Since you're above CSV activation temperature, but the engine does try to start, you might look at the other enrichments. I've studied the chart and the descriptions and sometimes misinterpret what they're saying, and can't always tell when exactly things happen, but they're still worth a ponder. "Start enrichment" is the CSV contribution I believe. In the past I thought that it might be more time on the injection pulse but probably not. "After start" enrichment is an interesting one. Seems to fit your time frame but it's not clear what parameters put it in to action. Maybe the "idle" switch along with the Start signal? Maybe just the Start signal? Who knows? "Idle enrichment" seems easy enough. If the idle switch is actuated the ECU adds time to the injection pulse for more fuel. So there's two things that might affect behavior right after starting, both connected to the idle switch. Were it my car, I'd check the throttle position valve [TPV (aka TPS)]. They have contacts inside, not well protected from the elements. They get dirty. Maybe you're missing your idle enrichment. Check at the ECU connector first, where the signal gets used. Here's another link to a useful book, which hsows how to check everything at the ECU connector, maybe easier to work through than the FSM. Use the 280Z/ZX Electronic Fuel Injection Guide. Third one down. http://www.xenonzcar.com/s30/otherguides.html
-
Here's a specific tip -assume that the distributor breaker plate is rusted together. Take the distributor out and take the breaker plate off and examine it before trying to start the engine. It might save you some money if you can refurbish it before you break the plastic ball bearing holder.
-
Nice find. Good body and a nice paint job. Assume that many small parts will need replacing, like the brake master cylinder (no caps means moisture ingress), and try to save money on the new parts. The nickels and dimes will add up quickly and you'll need to replace more parts than you think. RockAuto.com is a place to spend time on. Here are some links to browse. A lot. http://www.xenonzcar.com/ http://www.nicoclub.com/FSM/280z/
-
I would get specs. on the clutches and specs. on the engine and see if anything gets eliminated. Then I'd consider how I plan to use the car. If you'll have big tires and want to break the tires loose, use the strongest clutch. If you'll be tooling around the city, only using roll-on power, consider pedal pressure, for driveablity. Some of the high-perf. clutches have a pretty heavy pedal. Also consider that the puck-type clutches generally chatter if your technique is off and can be a pain to drive. I'm thinking Center Force unless you want to drag-race, and forget both of them if you want a comfortable clutch. Maybe a 240 mm stock setup. The Center Force has a heavy pedal, I think.
-
This is good. You're on the right forum and you picked the right car. I've often thought that the 280Z EFI system is an excellent starting point for learning about cars and EFI. Very basic and fundamental, with excellent documentation in the FSM's. If I was an auto shop teacher, I'd use the 280Z as a teaching aid. Looking back, you might be making a bigger deal out of the starting issue than it really is. This technology is primitive, compared to today's cars. The occasional stuttering start is fairly normal, and as I mentioned, could well be a tank of fuel that the system has trouble with. But, if you want to forge ahead - consider the cold start valve (CSV) as CO mentioned in #42. But look at it both ways, working too well and not working well enough. It's function is to squirt a load of extra fuel in to the intake manifold, to give a fast start. Many of us have removed our CSV's because we're okay with an extra second or two of cranking. But there are times when I realize I could use its benefits (cold day after sitting in the garage for a week or two). By the way, Captain Obvious and SteveJ are the two electrical/electronics gurus on the forum (no offense to any unknown gurus,sorry for the pressure Steve and CO). Consider their electrical words most carefully.
-
You're kind of at the "think" portion of the typical learning process. Usually starts with Do. Do-think-do-think-do...etc. You have the tools and you're taking measurements but some of them are done using incorrect methods. Working on old EFI can be tough if you haven't had some lessons in basic electrical concepts but it's possible to learn on the job. The two things you're looking at now are voltage and resistance. Voltage is typically measured from a component's electrical contacts to a ground point, which is any metal body or engine part. The battery's negative post is connected to the body and engine, so you're actually measuring the supply of voltage from the battery by this method. Resistance can be measured between any two points and is used to determine either how good the path to the component or to ground is, or to see if a component has the proper resistance for its function (the coil, for example). Sorry to get all teachy, but your methods show some lack. No offense. The more times you run through the do-think cycle the more comfortable you'll be with the troubleshooting process. Even the pros have to stop and think occasionally.
-
The FSM says that you should see battery voltage at the coil with the key On. You're seeing zero, although it's not clear how you're measuring. There's a diagram in the FSM. You should measure from coil negative to ground. Actually, coil positive to ground would work also. The around 12 volts while cranking is a good number though. You could evaluate spark strength, and fuel injection. Put some of FastWoman's Christmas tree lights on the injectors for injection evaluation. Also described in the FSM. Make sure they're flashing. And check that the spark produced is thick and blue, not thin and weak. There are many other basic meter measurements you can take, coil resistance, for example. These things are all described in the Engine Fuel chapter, and Engine Electrical chapter, in detail. Just saying, if you want to get ahead of the thread. You might have a weak coil, or a weak pickup coil, or just a loose connection, or a dying ignition module. You'll know what's right, what's wrong, and what's marginal.