


Leaderboard
-
Patcon
 Subscriber
 4Points11,142Posts
 -
HusseinHolland
Free Member4Points1,031Posts -
conedodger
Free Member3Points12,513Posts -

Jeff Berk
Free Member2Points620Posts


Popular Content
Showing content with the highest reputation on 08/03/2024 in Posts
-
2 pointsI'm going to check with T3 on which of their spacer will work to be on the safe side.2 points
-
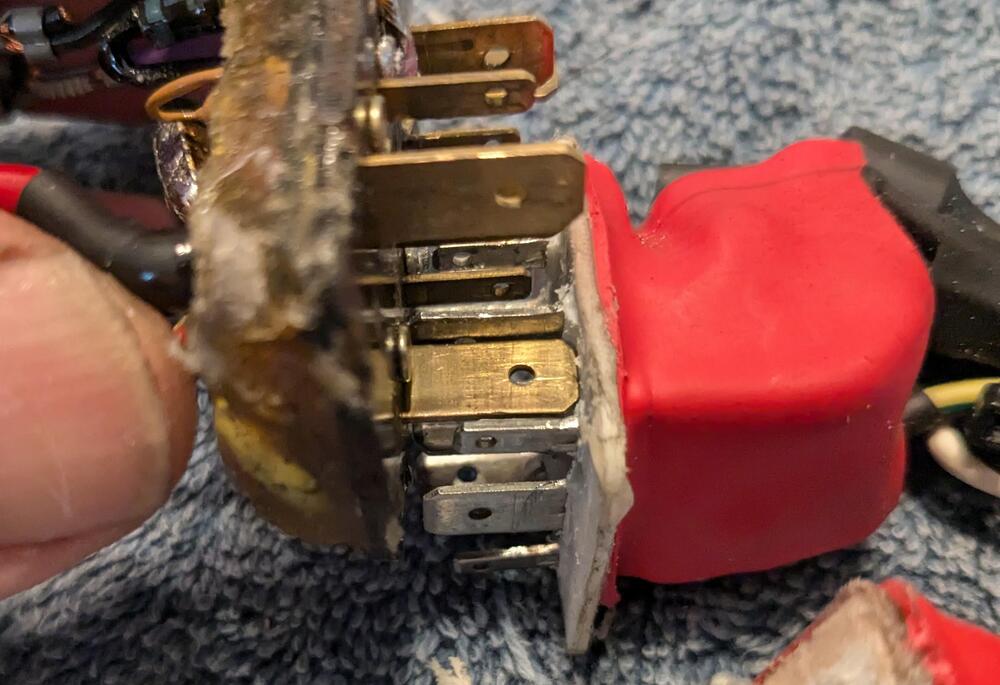
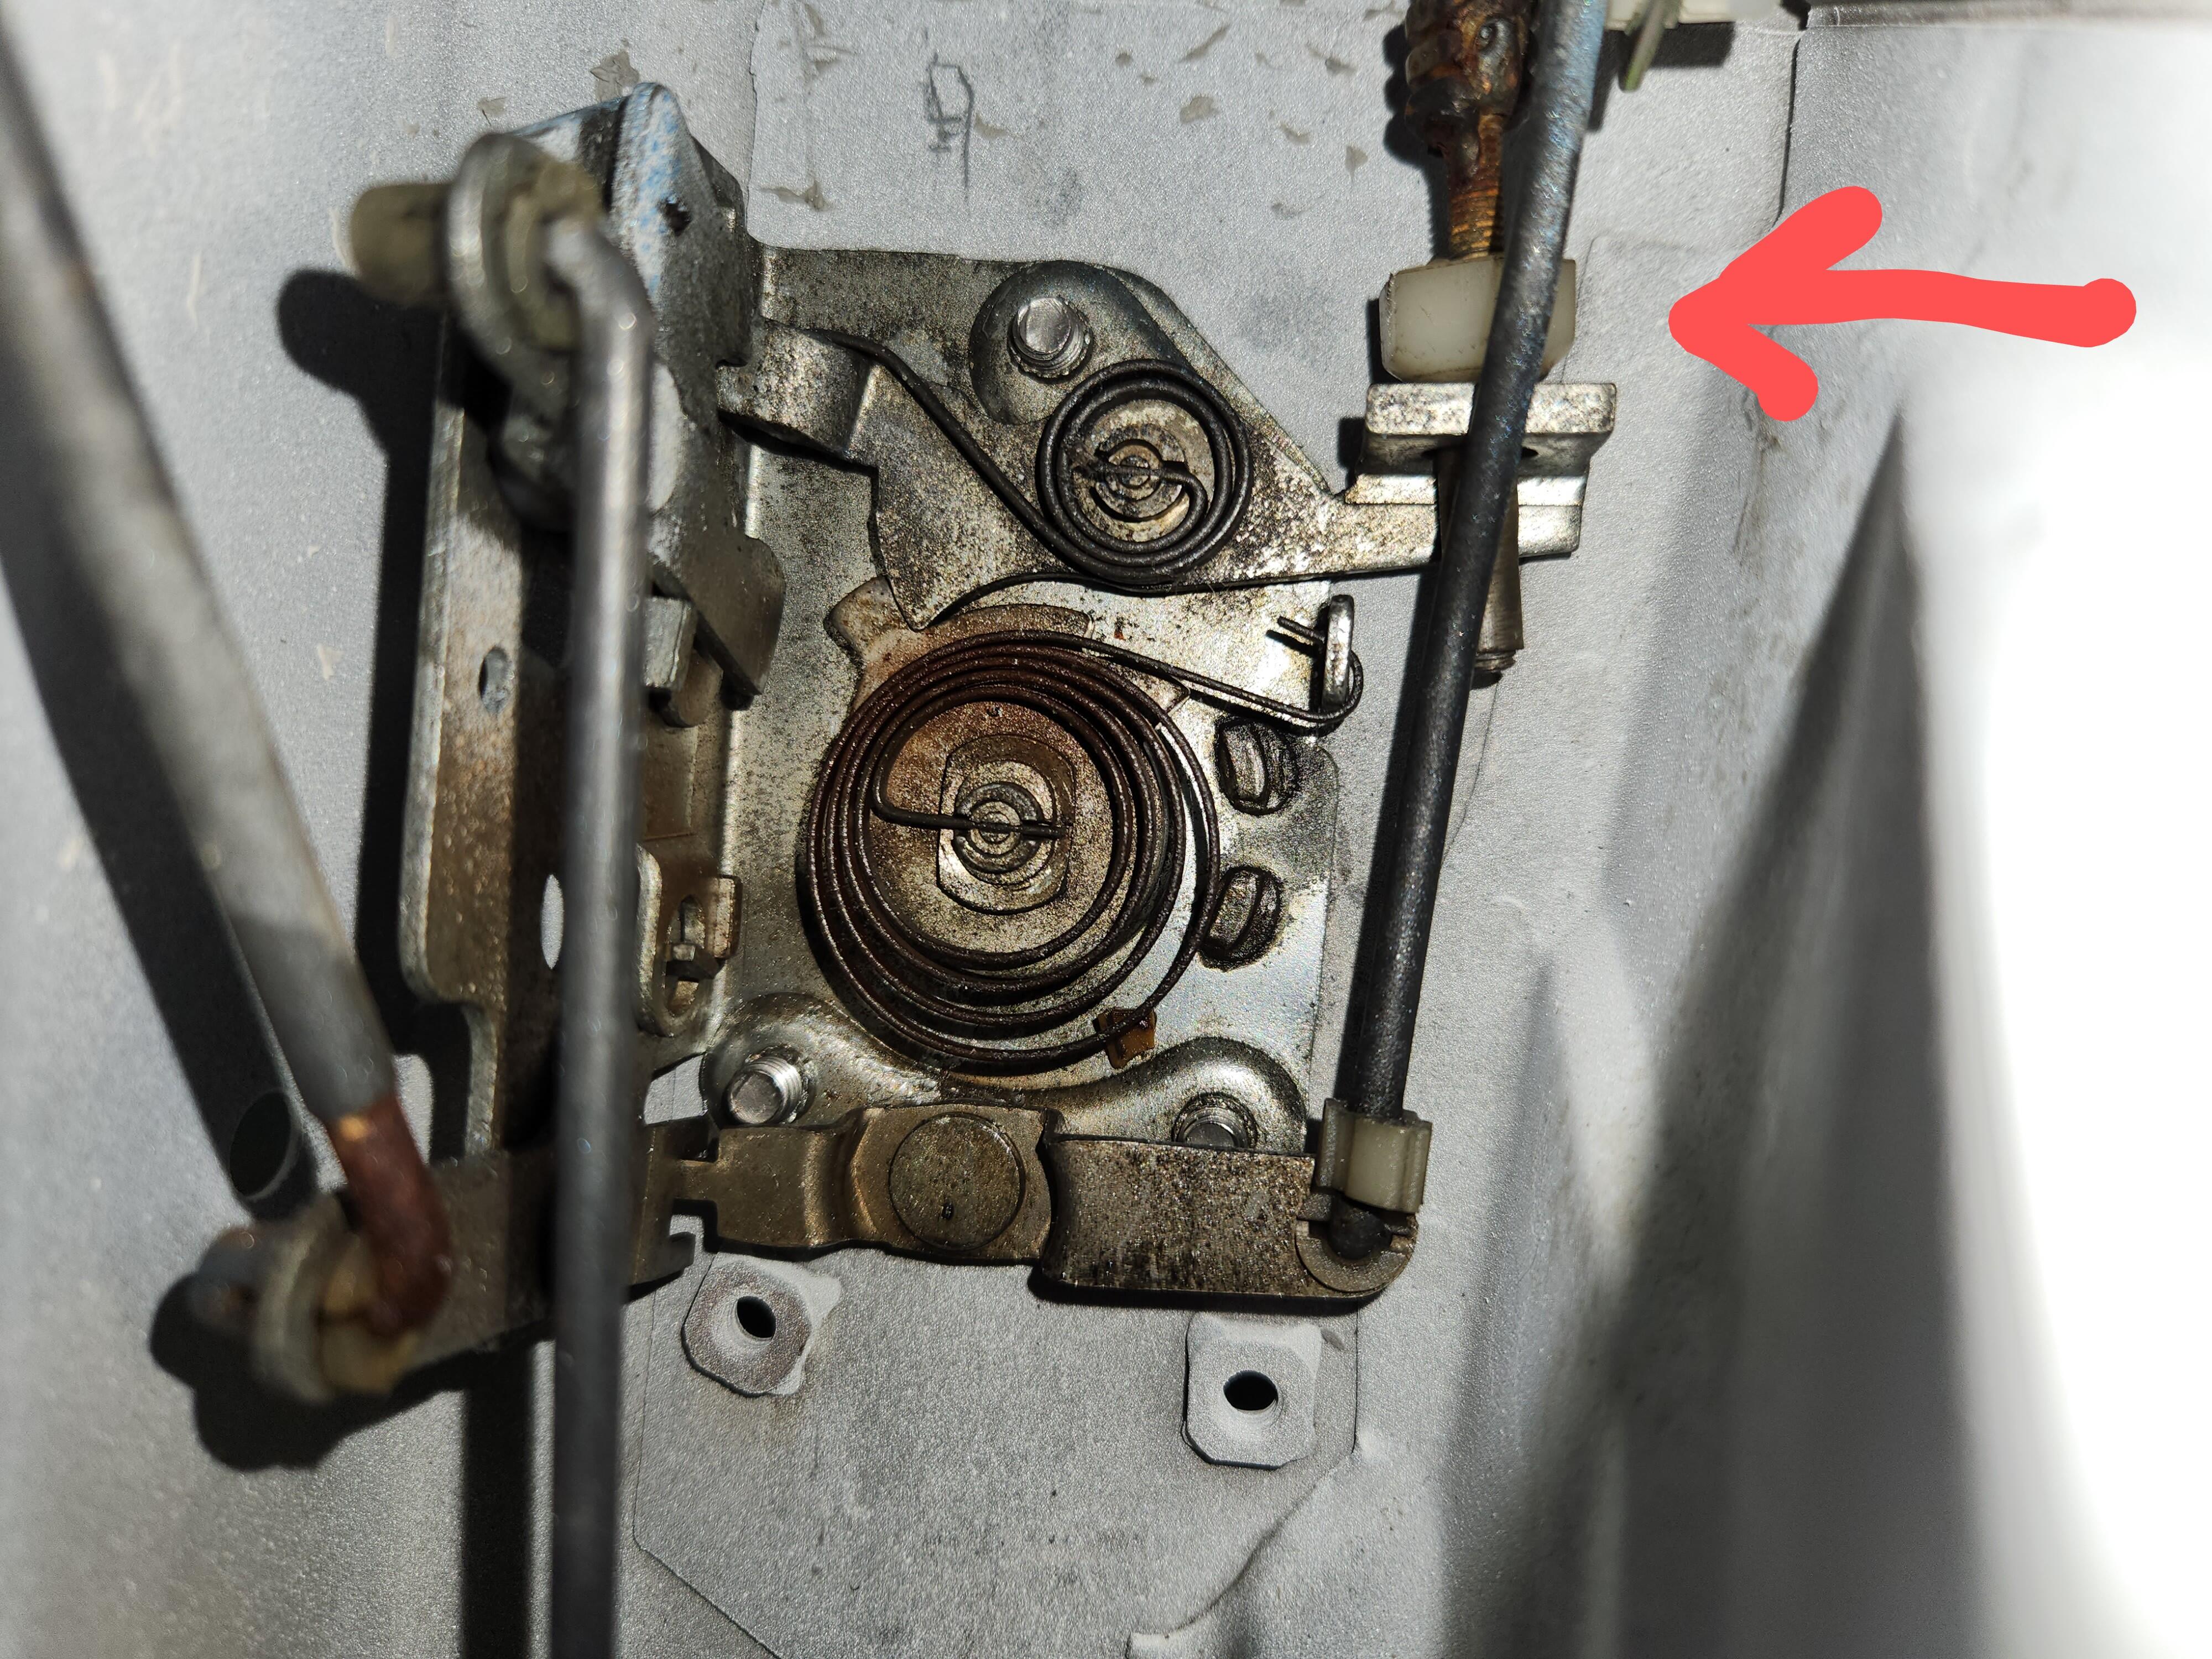
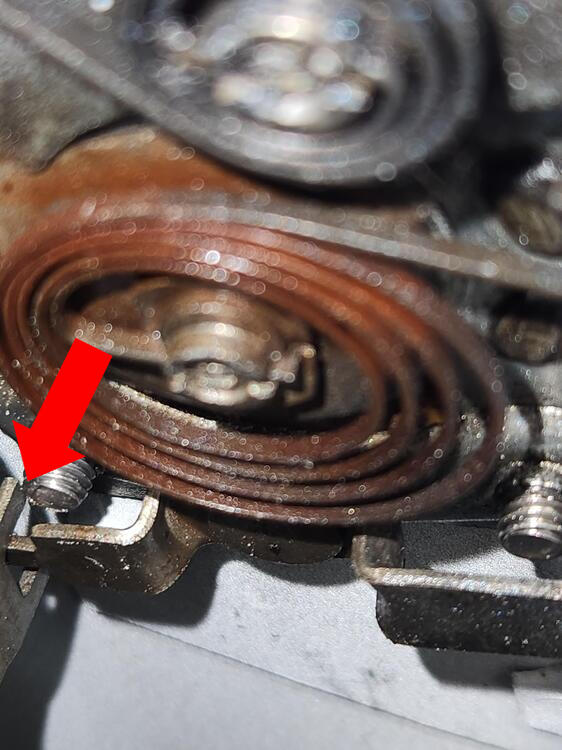
2 pointsI found another wiring issue - I noticed that the driver's seat wasn't working one day, so I swapped out the fuse - that lasted for several days, seat was working fine, then I came back to it about a week later & it was blown again. I swapped out the fuse, and operated the seat reaching over from the passenger side, worked just fine every time. A side issue of my own creation here is that I wired the switched feed to the power seats from the same fuse that governs the Volvo constant idle system - so on at least one occasion that fuse blew instead of the seat fuse, which meant no idle control & stalling condition on decel. Of course THAT happened when the wife was in the car, so now she feels even less safe driving around in the car. I have to rewire the feed so it has no impact on any other circuits. Drove the car again & the fuse blew. So, my weight on the seat was a contributing factor - I thought I had been careful to route the wiring where there would be no contact. I found this (pic below) when I pulled the seat switch. I had already purchased a new one, since I had no idea what spect of the switch was shorting the fuse, so now I have a spare (sleeved the exposed wire). EDIT- Looking through my seat install pics - I'd say the upturned channel lip is the problem.2 points
-
2 points
-
2 pointsI think the spacer goes between the hub and the rotor. So it would shift the rotor inboard2 points
-
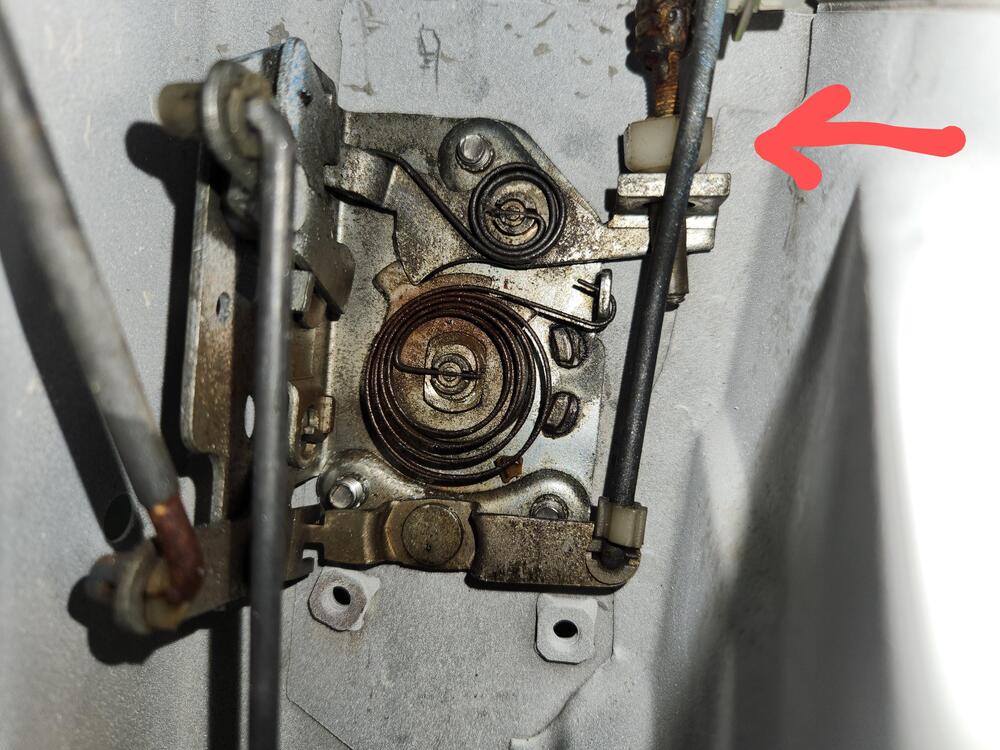
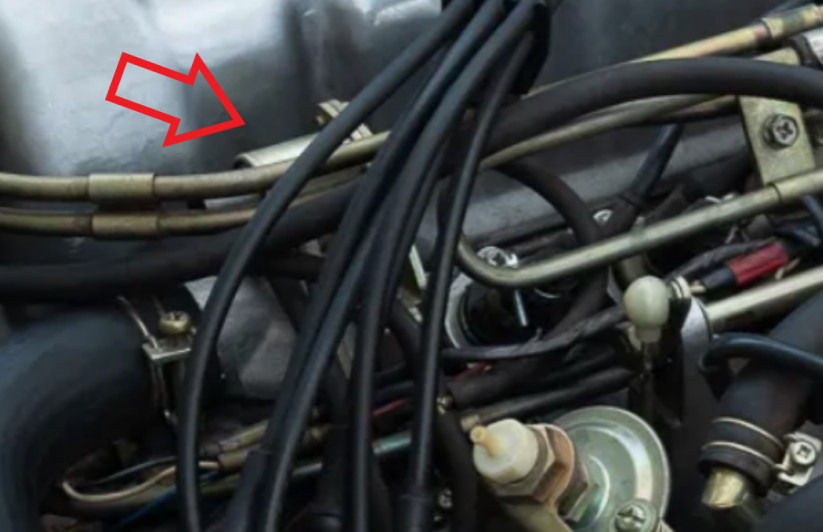
2 pointsI finally figured it out. The white plastic adjustment screw for the outer door handle rod was screwed too far out. I screwed it in further and it works. Whew.
 2 points
 -
NATS delete for the stock 350Z ECM1 point
-
1 point
-
1 pointI don't know if the 71 had the seat belt warning. I think the headlights may have constant voltage with the headlight switch completing the ground path. In the 72 & 73, the headlight switch connected the positive with the fuse box with a red wire. There may be some other differences that I haven't tried to determine.1 point
-
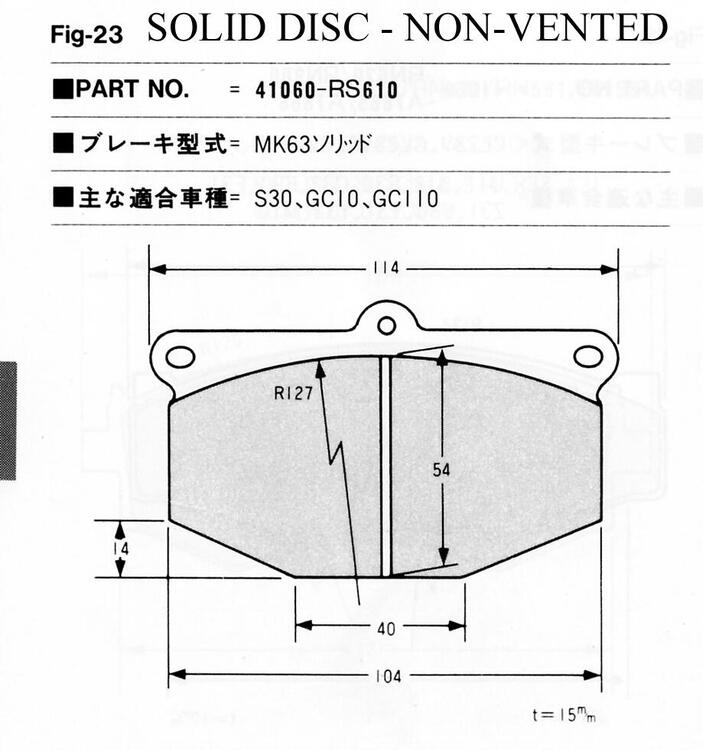
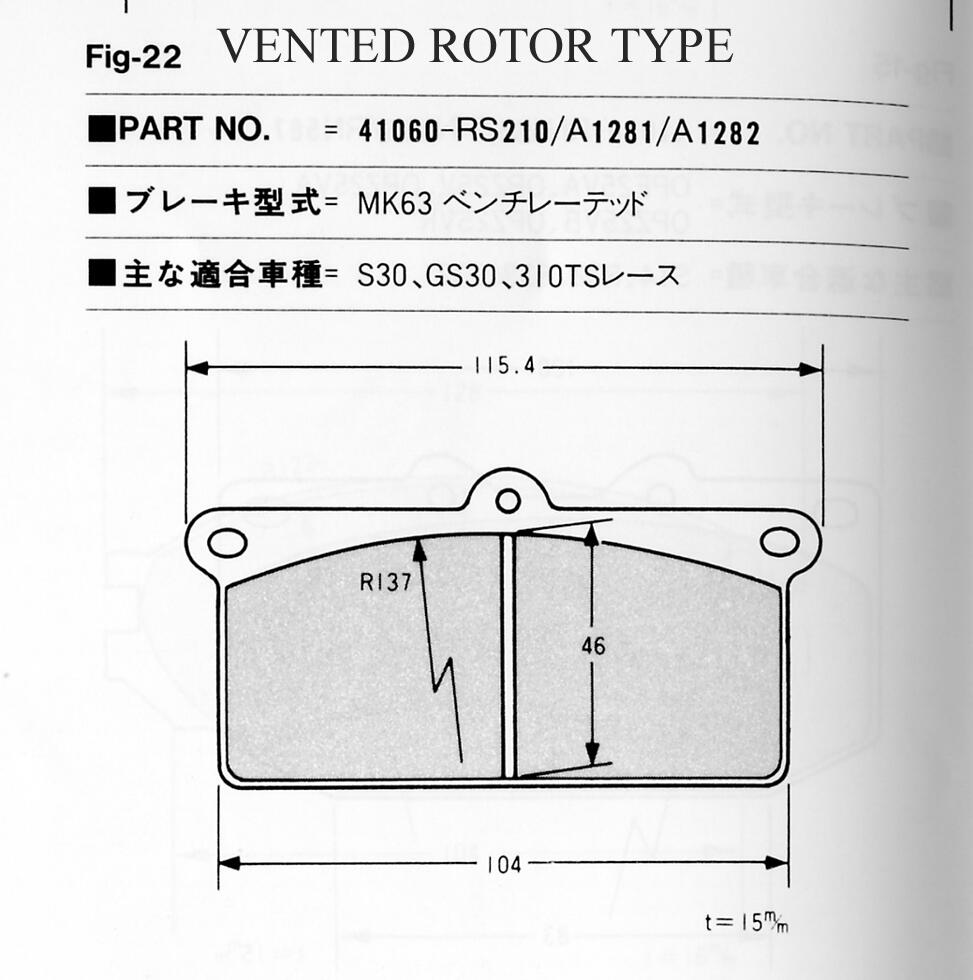
1 point1 pointI calculated 1.5" exhaust versus 2.5. I'm not sure if the stock exhaust is 1.25 or 1.5"1 point1 pointI agree with @Yarb the T3 spacers fit between the hub and the rotor. Thereby spacing the rotor back in to the car. This will move the caliper back to the spot where it will clear the strut housing bracket. Do install the correct pads too.1 point1 pointHere's the pad data. You have the NON-VENTED (solid rotor, narrow caliper) type with the cutaway shape. I have a vague recollection that there's a Ford pad (Capri?) which is very close and only requires a little trimming around the edges to fit and work safely. Worth asking your brake supplier if they can come up with something that has these dimensions. I'll include the VENTED rotor type data for completeness, but the pads are not interchangeable.
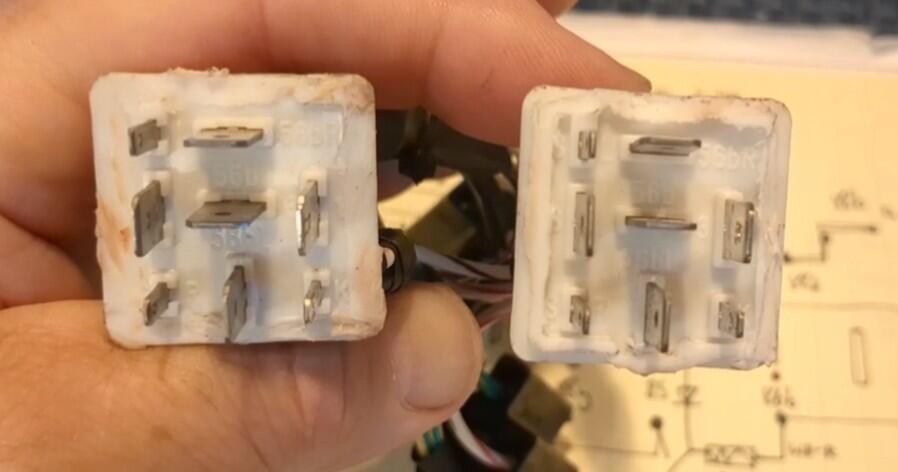
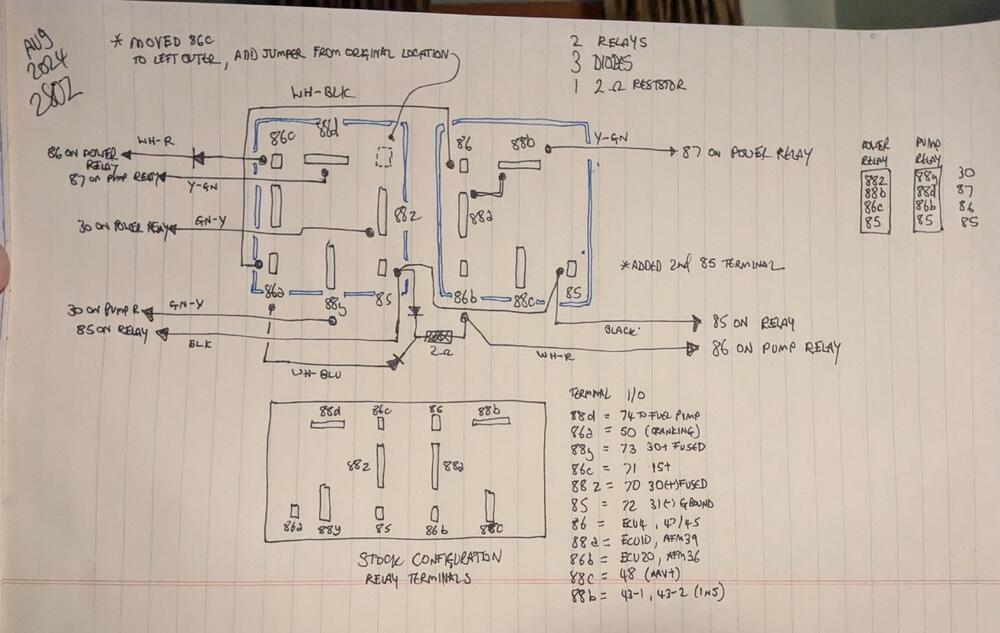
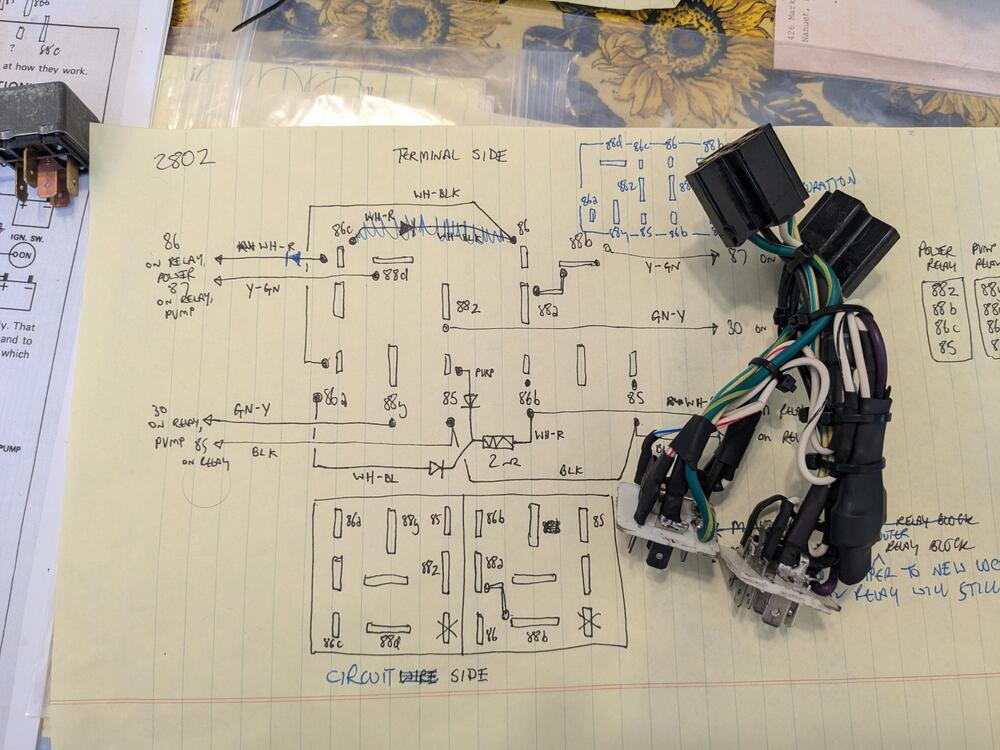
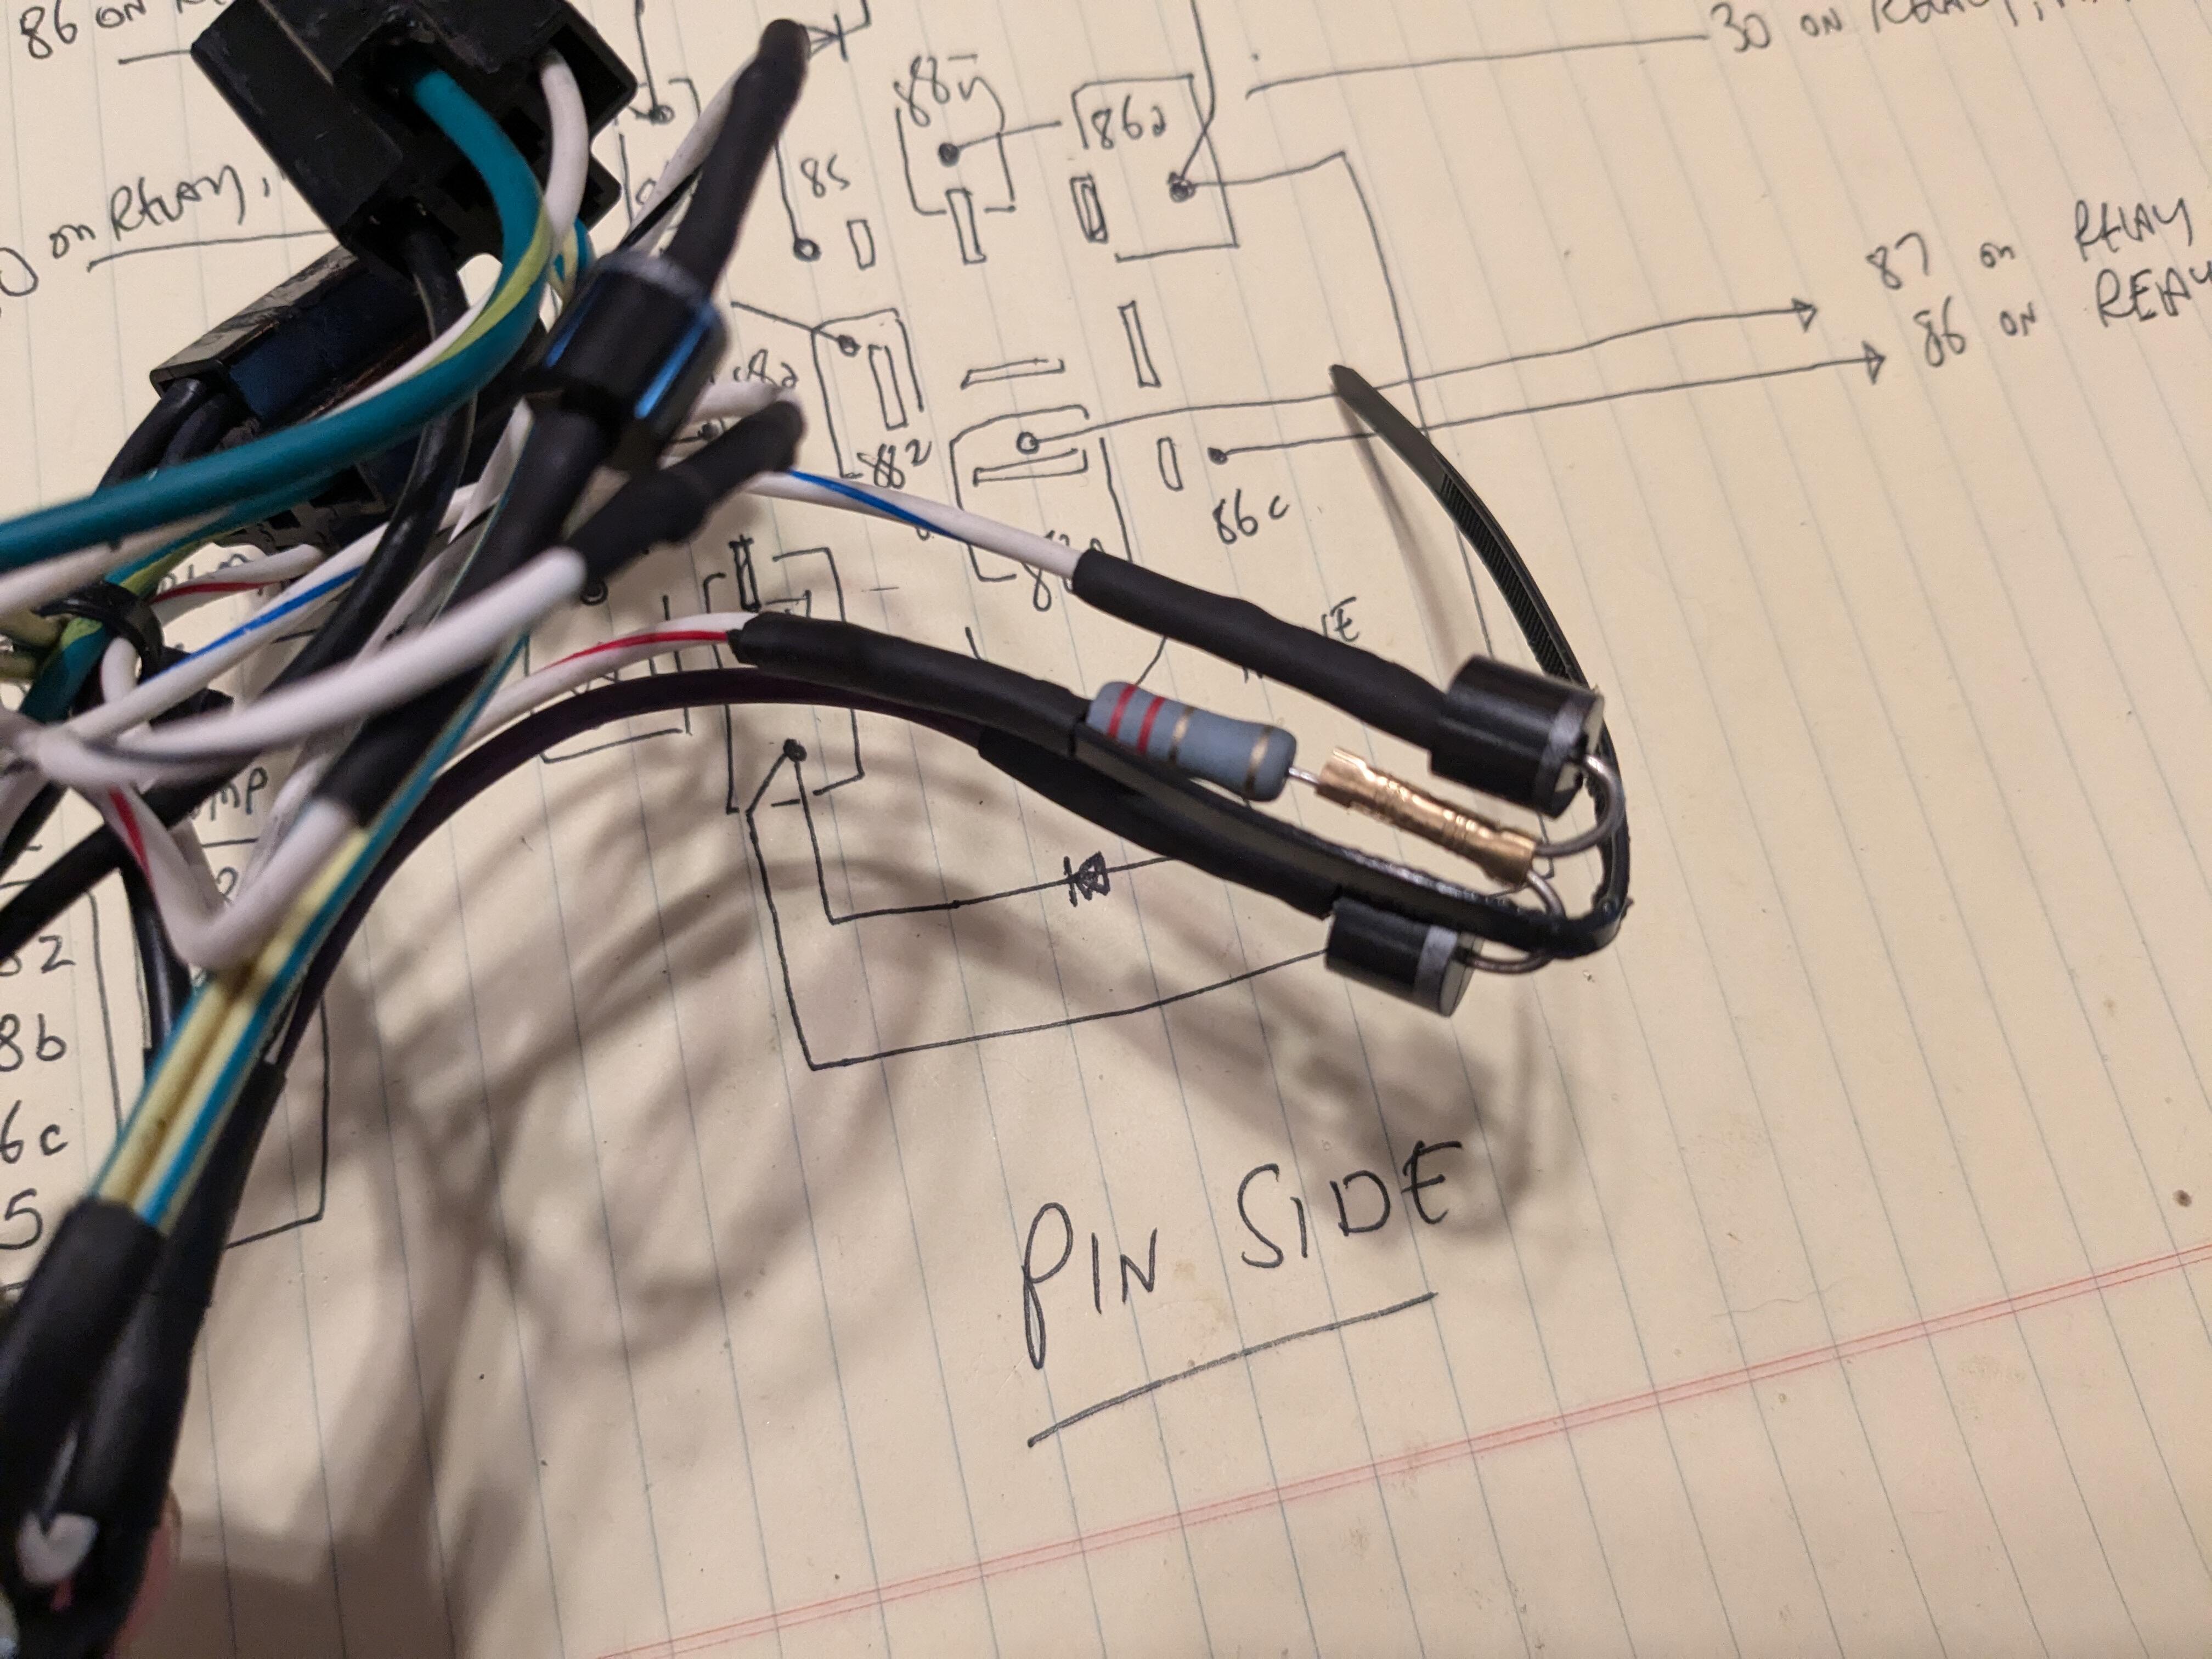
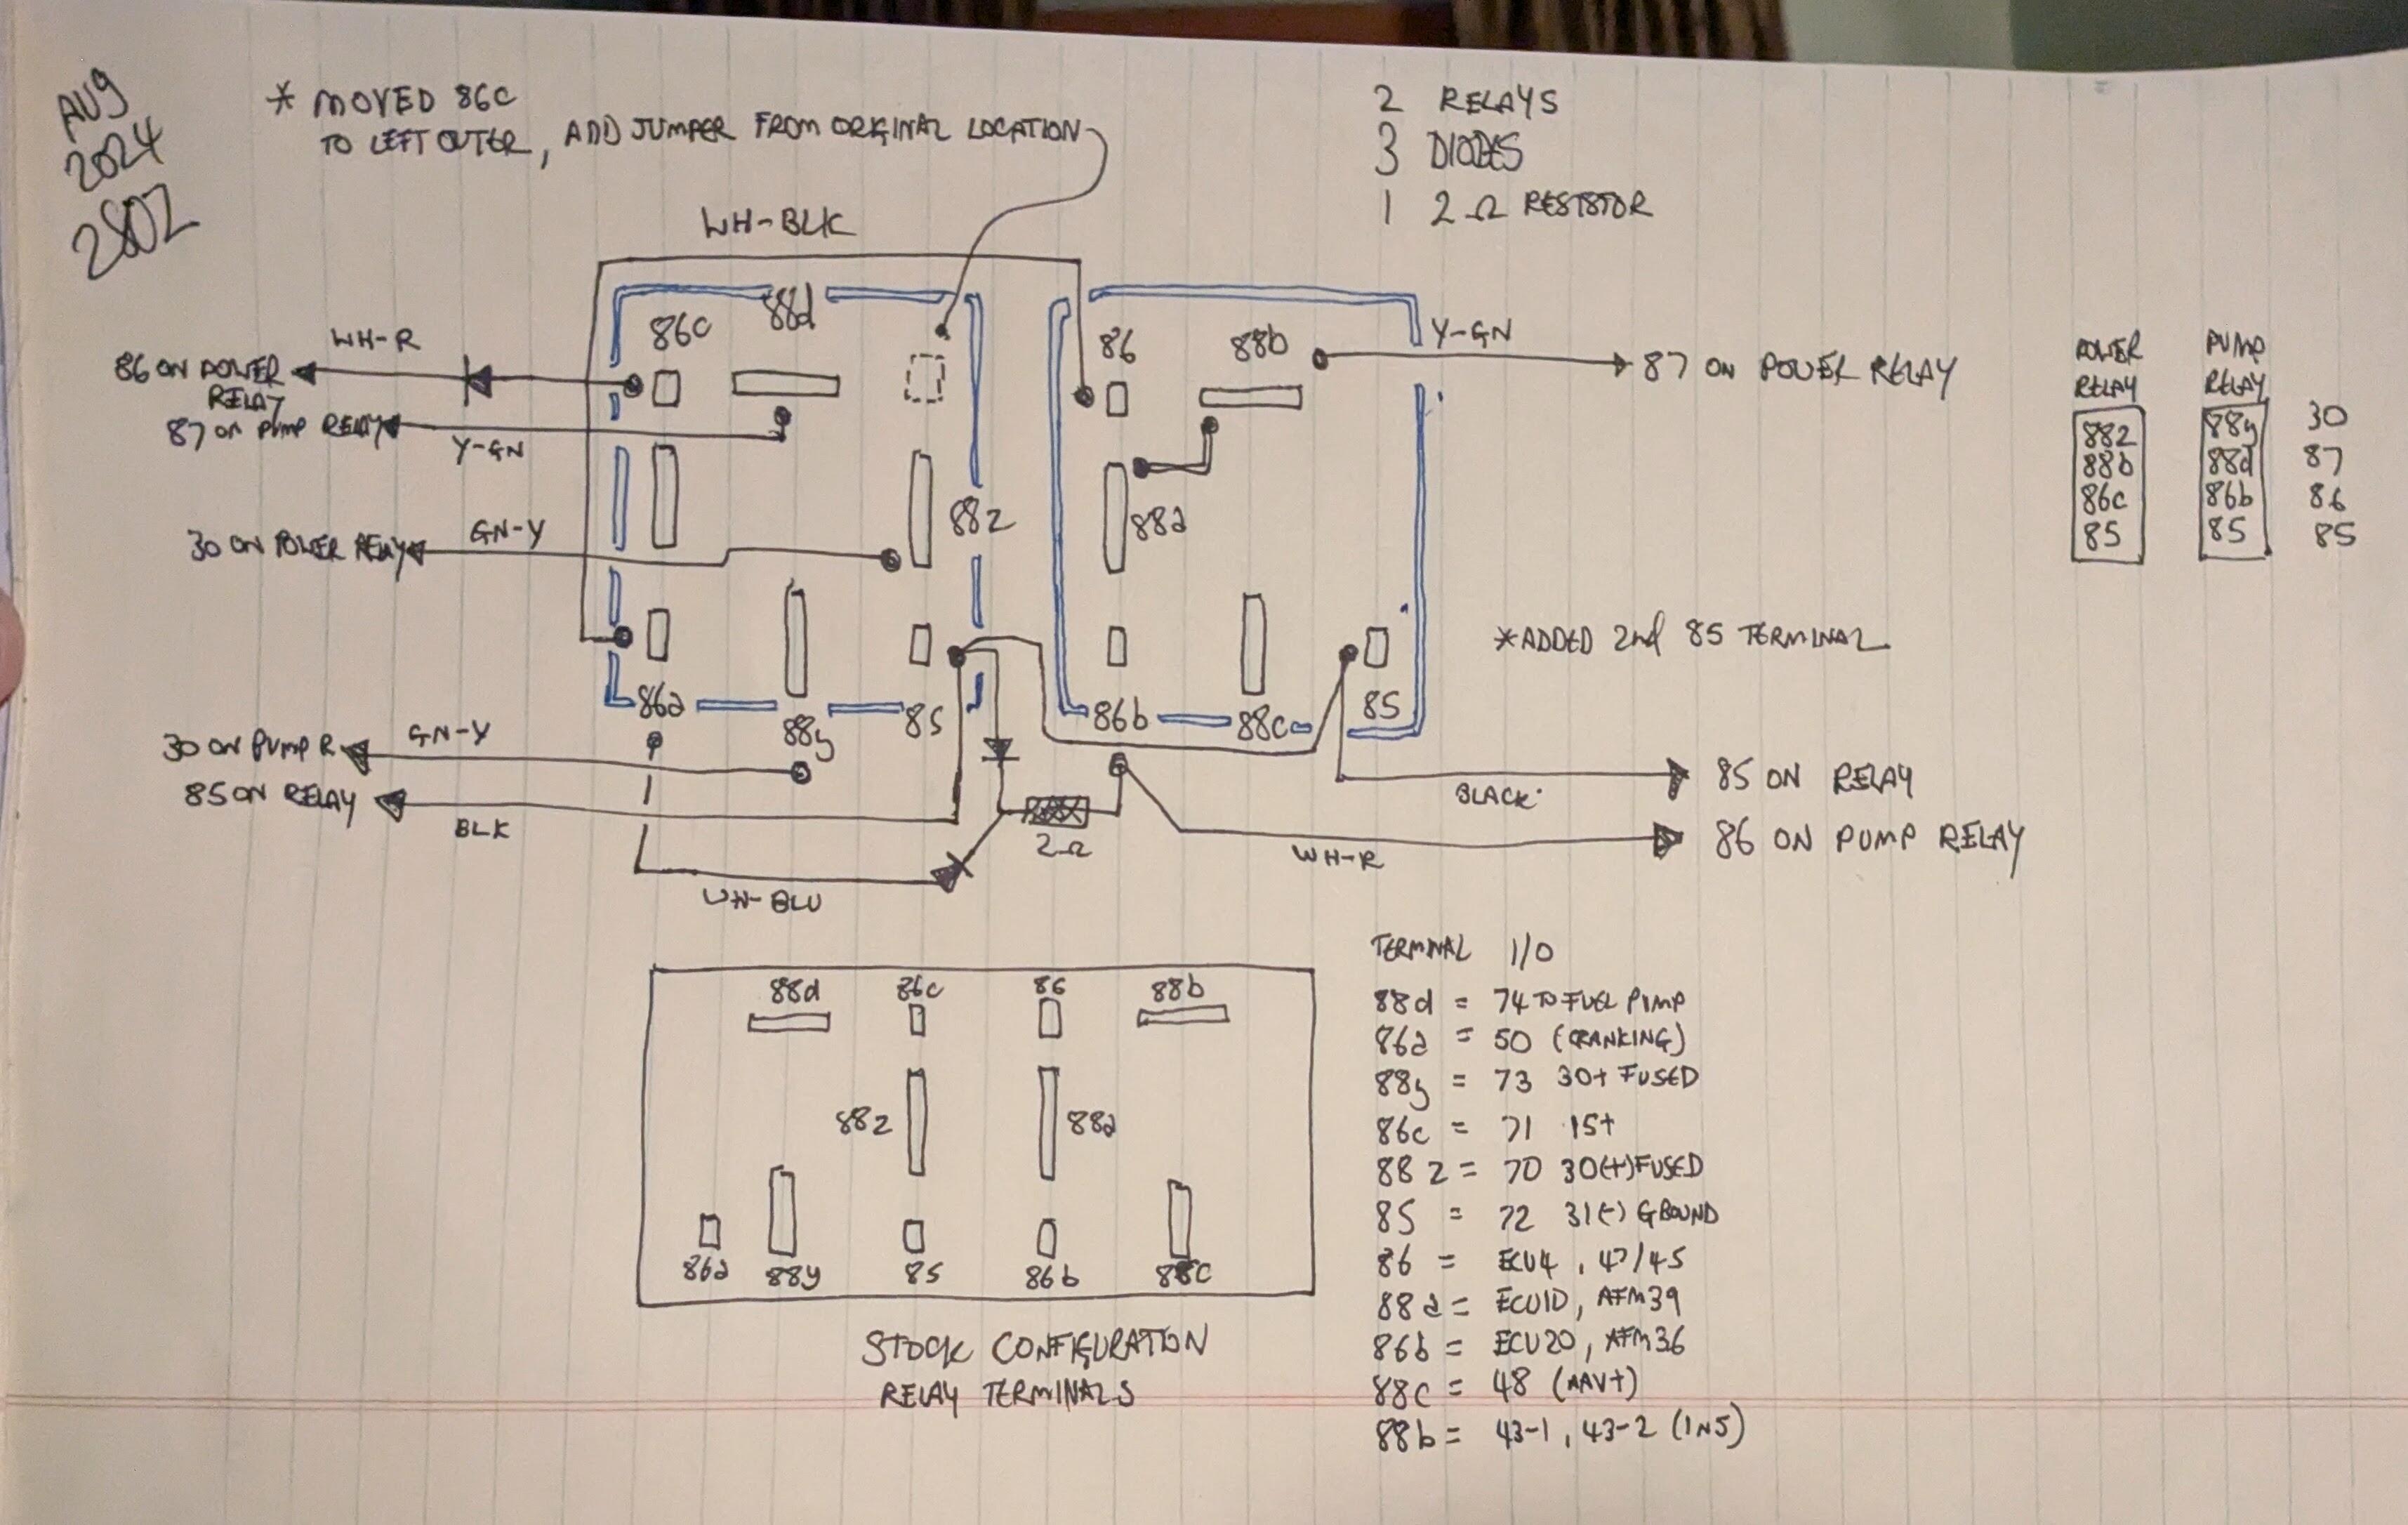
 1 point1 point1 pointIn the bottom left hand corner of your pic, one of the 3 screws that hold the mechanism to the door appears to be too long and may be interfering with the lock lever, just a guess.1 pointCar started exhibiting the same symptom as with the original relay - dropping the pump feed & monetarily cutting out. I was afraid that using the original base could lead to issues, so I made a new new from a couple of Volvo relays. I wired in the 3 diodes and a 2ohm resistor. Had incorrectly marked the 86c feed to the coil on the power relay (tied it to 86 as well, NOT good), so I had to redo that corrected wiring Male pin I'm using for 86c is also on the outer left instead of inner left, so a bridge on the relay socket was needed. There are male pins in the 85 location (bottom right) on both bases. I had already made a bridge on the relay sockets, to allow the use of the Fiat version L-Jet relay, so both are connected to the ground circuit. The next problem was that the male pins are shorter length than the ones used for the Datsun/Bosch L-Jet relays, which meant they were not fully seating in the relay sockets. This meant the connections would come & go, took me awhile to figure out that was the problem. I shaved back the base on the relays - that wasn't enough, so I had to shave the small rise around each pin also. That made the overall male pin depth close enough to the factory length. With that, the bases stay properly seated and no connectivity / functional issues with the adaptor after driving it this afternoon.
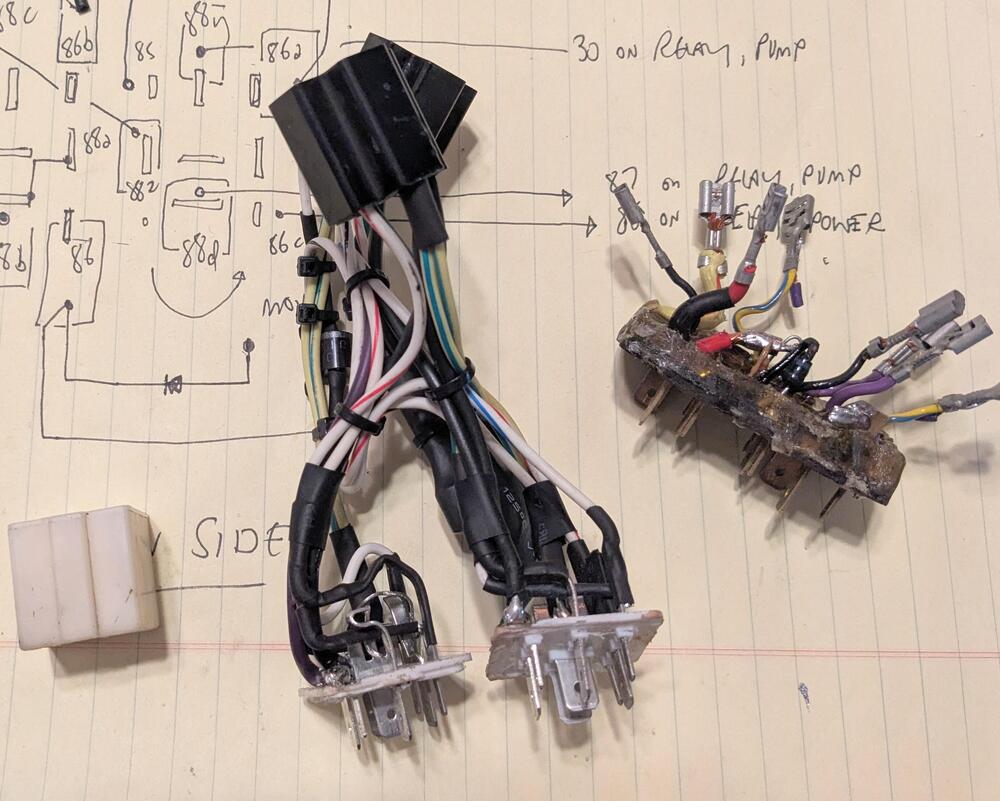

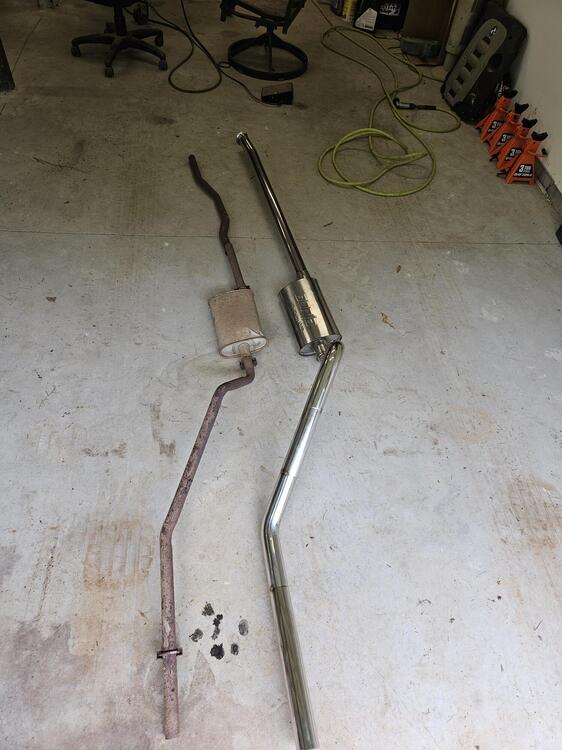
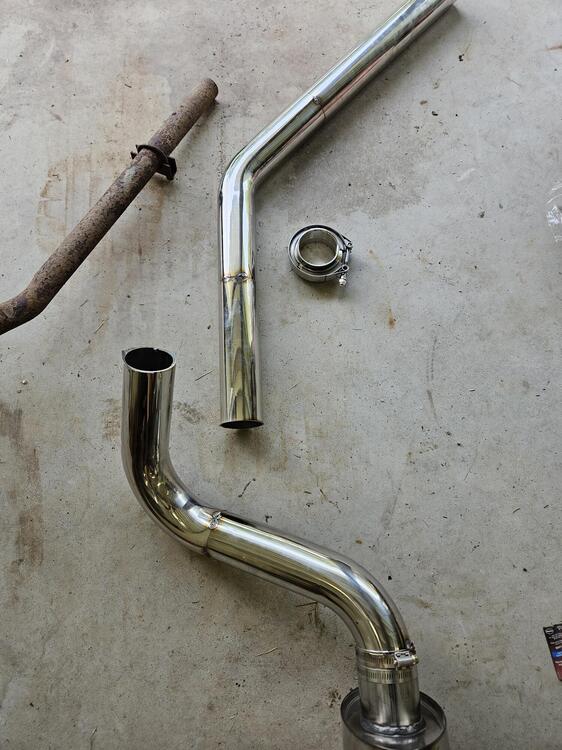
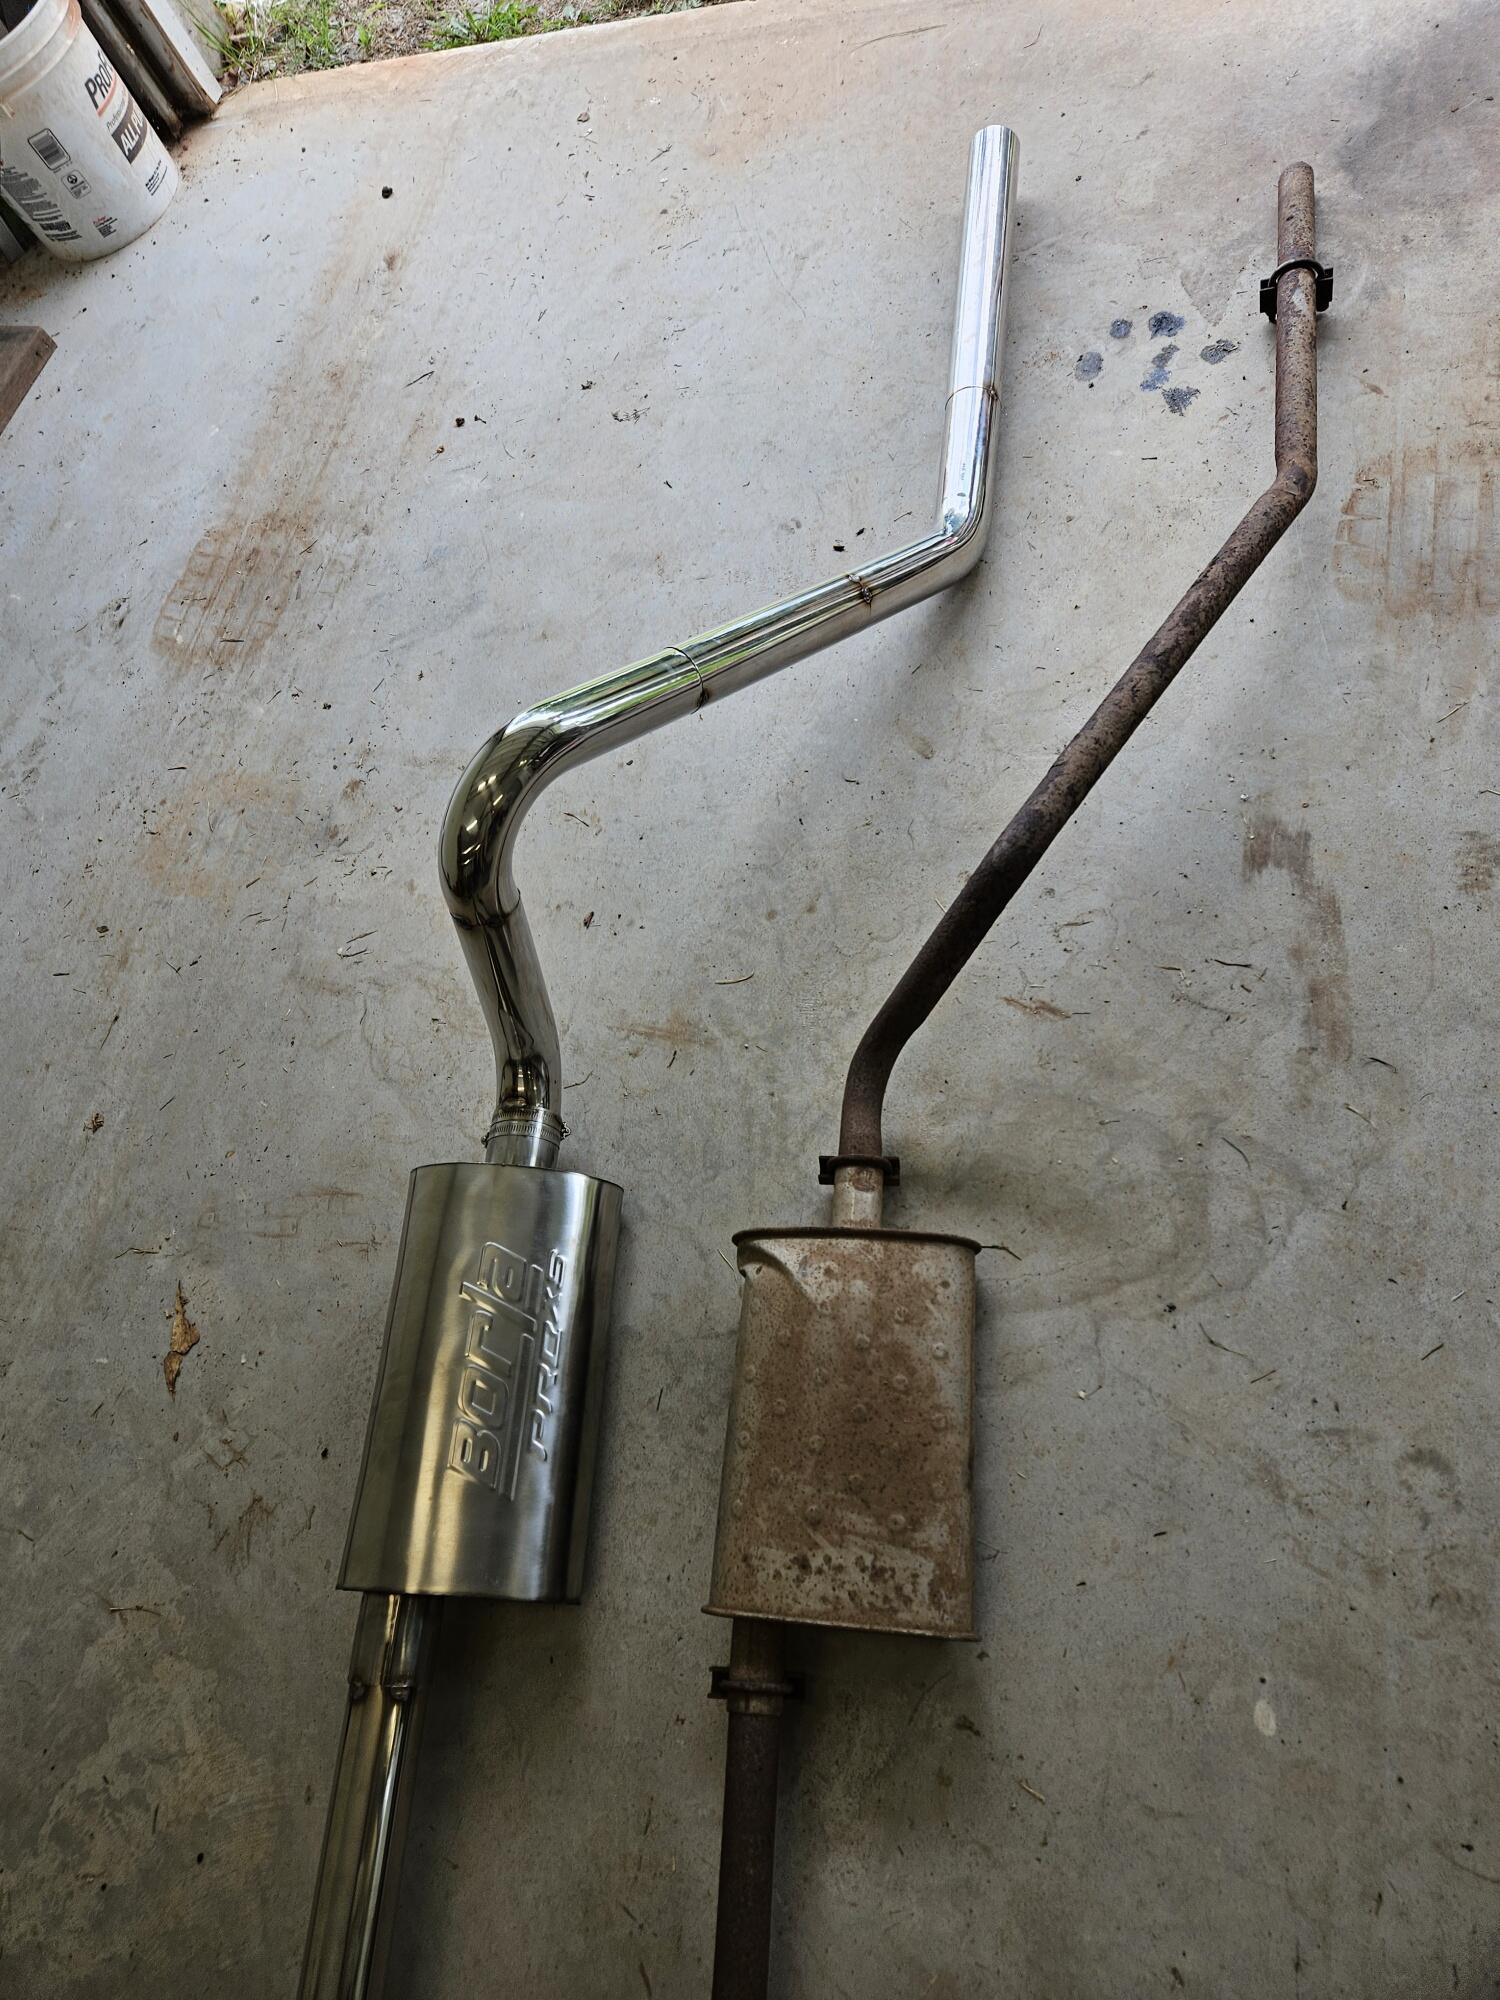
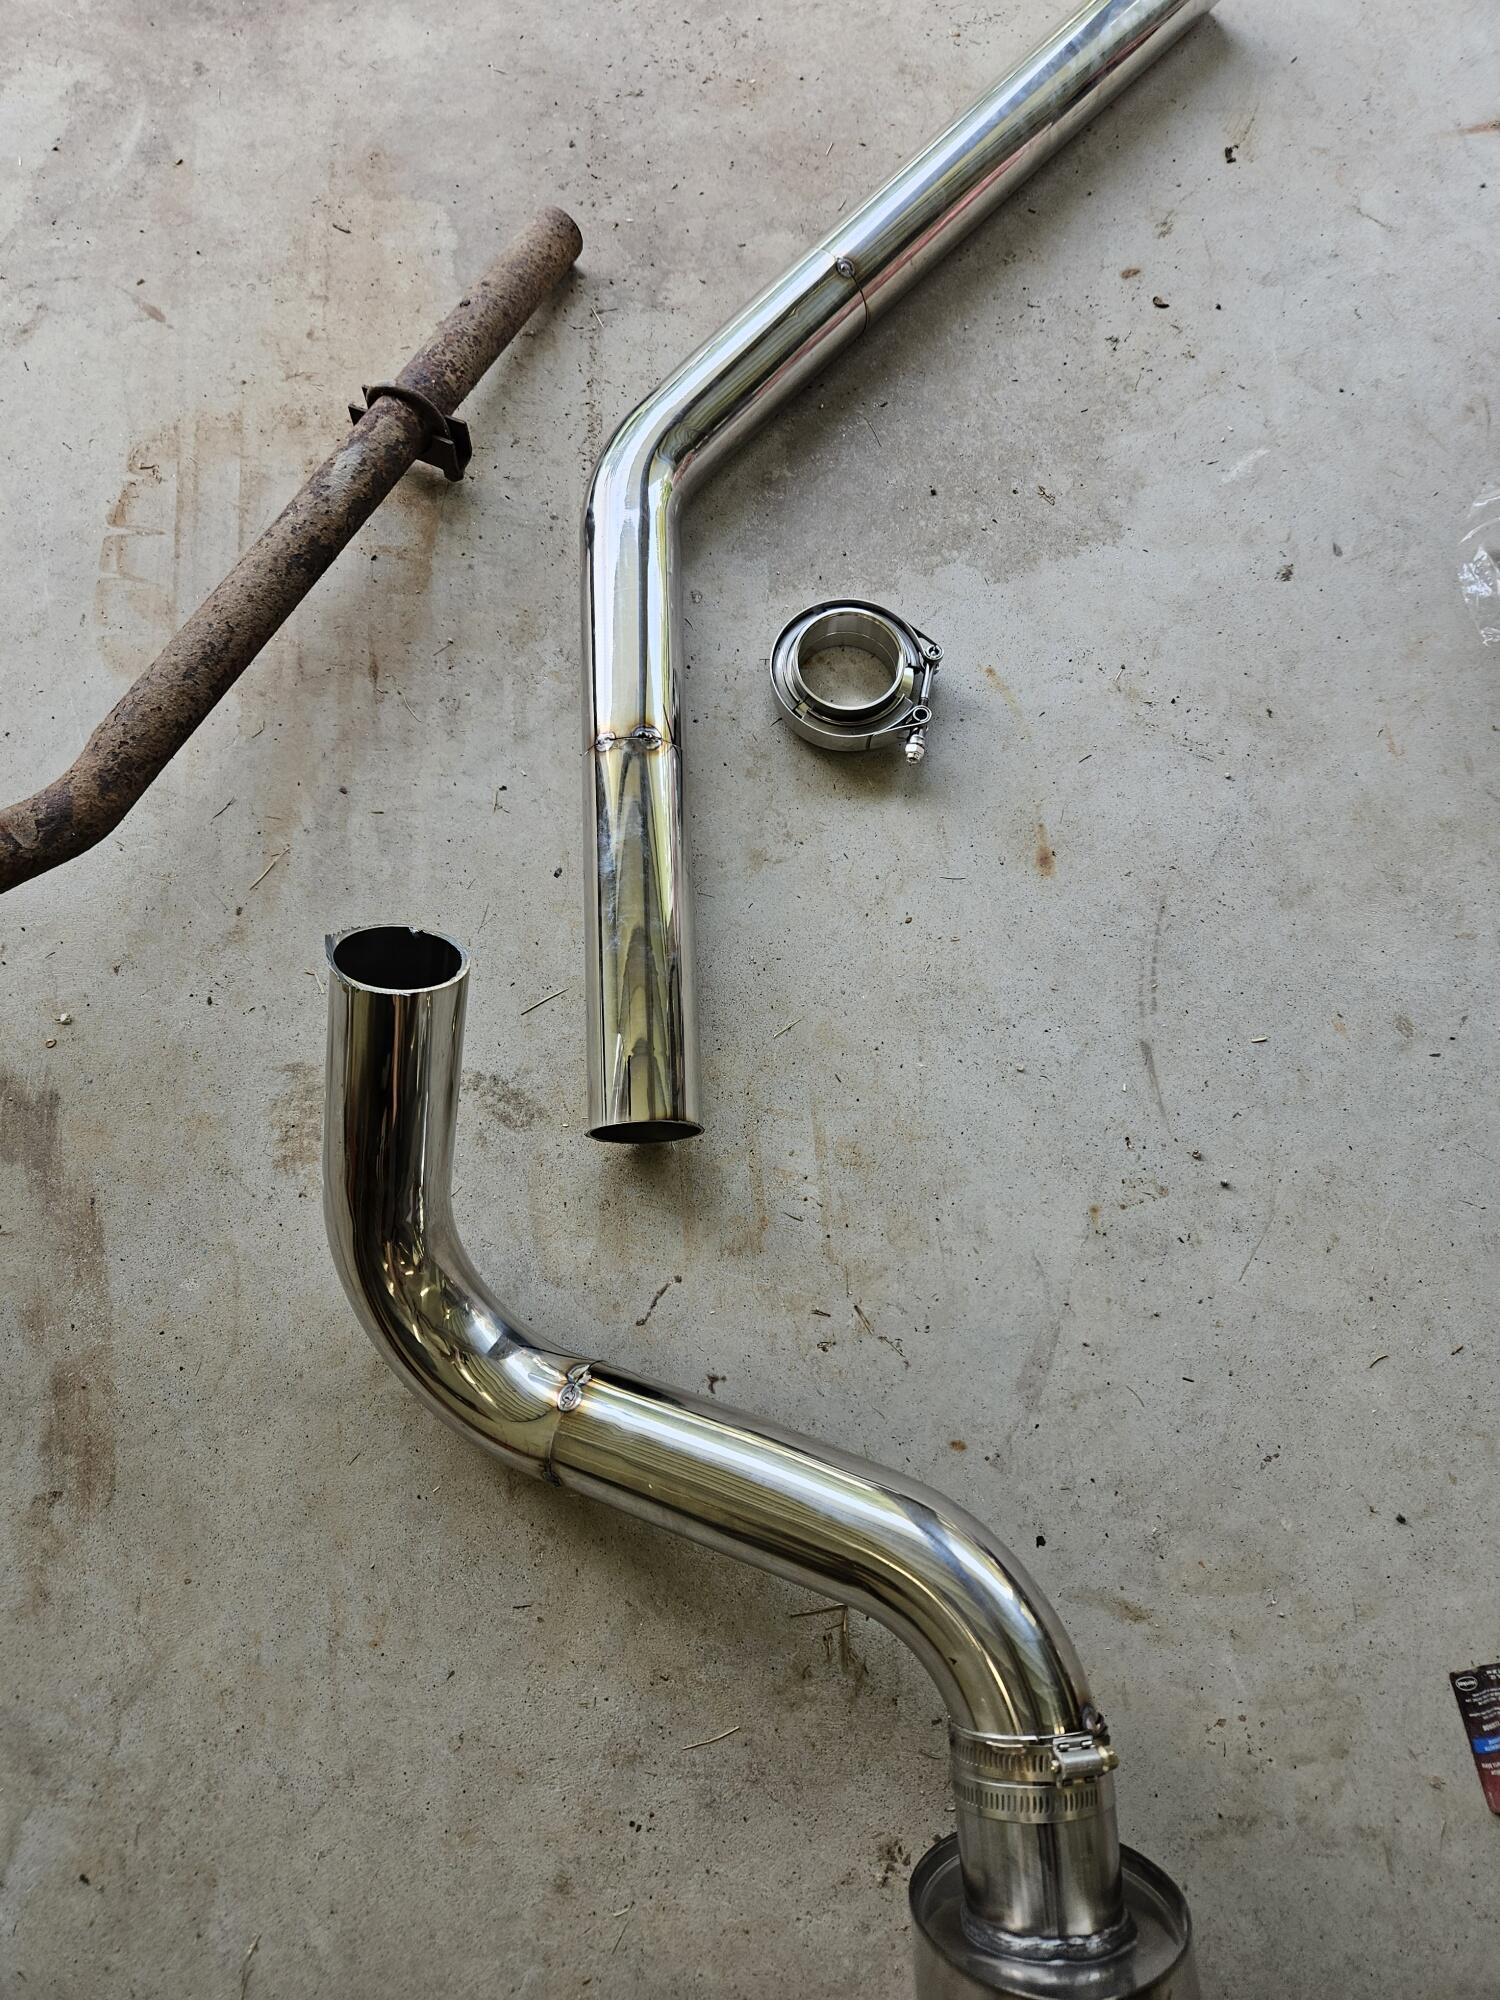
 1 pointGood. Keep an eye on it. Here's to hoping the whole thing was a non-problem and just a couple chips left over from the head shave and gasket scraping.1 point1 pointSo more exhaust work last weekend I can't load all the images I want to. I get an unknown server error -200 @Mike Here are the one's that did load Old next to new We couldn't get the exhaust back under the car once it was tacked up. So we cut it here and will add another Vband. It pretty much all tacked up up. Once we verify that, we will ship off the header for jet coating. The cross section on the new exhaust is 315% bigger then the stock exhaust (1.25" vs 2.5"). It'll probably be rowdy but Cody will like that
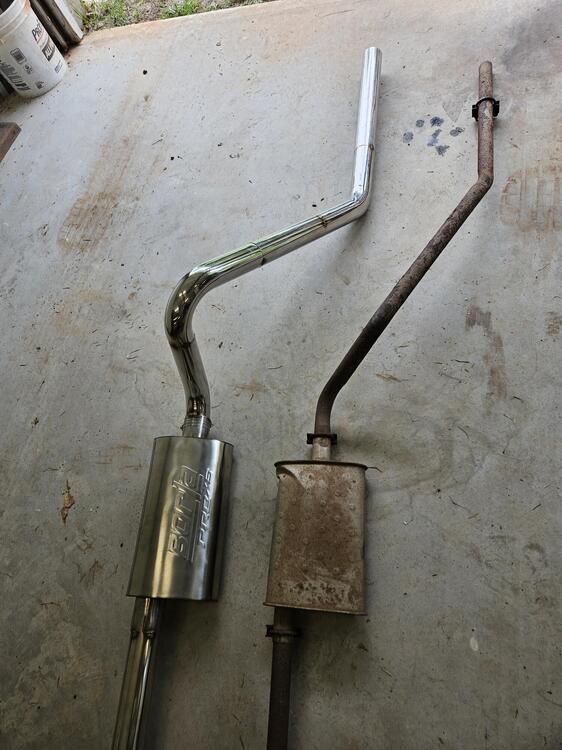
 1 point


Important Information
By using this site, you agree to our Privacy Policy and Guidelines. We have placed cookies on your device to help make this website better. You can adjust your cookie settings, otherwise we'll assume you're okay to continue.