Leaderboard
-

dutchzcarguy
Free Member2Points2,677Posts -
HS30-H
Free Member2Points5,509Posts -
zKars
 Subscriber
 1Points3,770Posts
 -
Patcon
Subscriber1Points11,142Posts


Popular Content
Showing content with the highest reputation on 05/17/2023 in Posts
-
1 pointDrove it to work yesterday, I don’t plan on doing it daily. Left early to minimize traffic (5am) and to get a feel of driving at night. Driving home at 330pm was a different story. Thumbs up, folks saying they’ve always “wanted a 240” at red lights. My route led me near a high school, where teenagers wanted to race. Given the Rebello’s lope, I’m guessing I’m going to need to get used to that. It’s amazing to see how small an S30 is compared to Teslas.
 1 point
 -
1 pointall done, hood back on, test drive complete, no leaks, runs very smooth, not sure if I can notice any performance pickup other than the smoothness, will have to get it out on a high way and really open up. Will take the cool running (90's today, and used the AC), and solid oil pressure. Now I will start the oil consumption testing. That was really the main reason, as I just was getting tired of the oil loss (qt per 800-900 miles). Should be interesting to see if any better. I also will hold off on tearing down the original engine until I get some time on this one, JIC something goes bad wrong, i can quickly replace it with the oil burner and not loose any drive time. So long term plan will be to continue the wire harness mods for Plug N Play turbo, and a complete tear down of the original engine to see if there is obvious reason for the oil burning. I have hoping for stuck oil rings or clogged piston drain back holes. I will do an inspection for cylinder wear using the rings to check for any out of roundness. I did pick up some rings (std) just in case its not worn or damaged to the point of needing a rebore. All this is a ways off as I need to get some drive time in. Been too long since I had a nice road trip. Maybe up the east coast this time....1 point
-
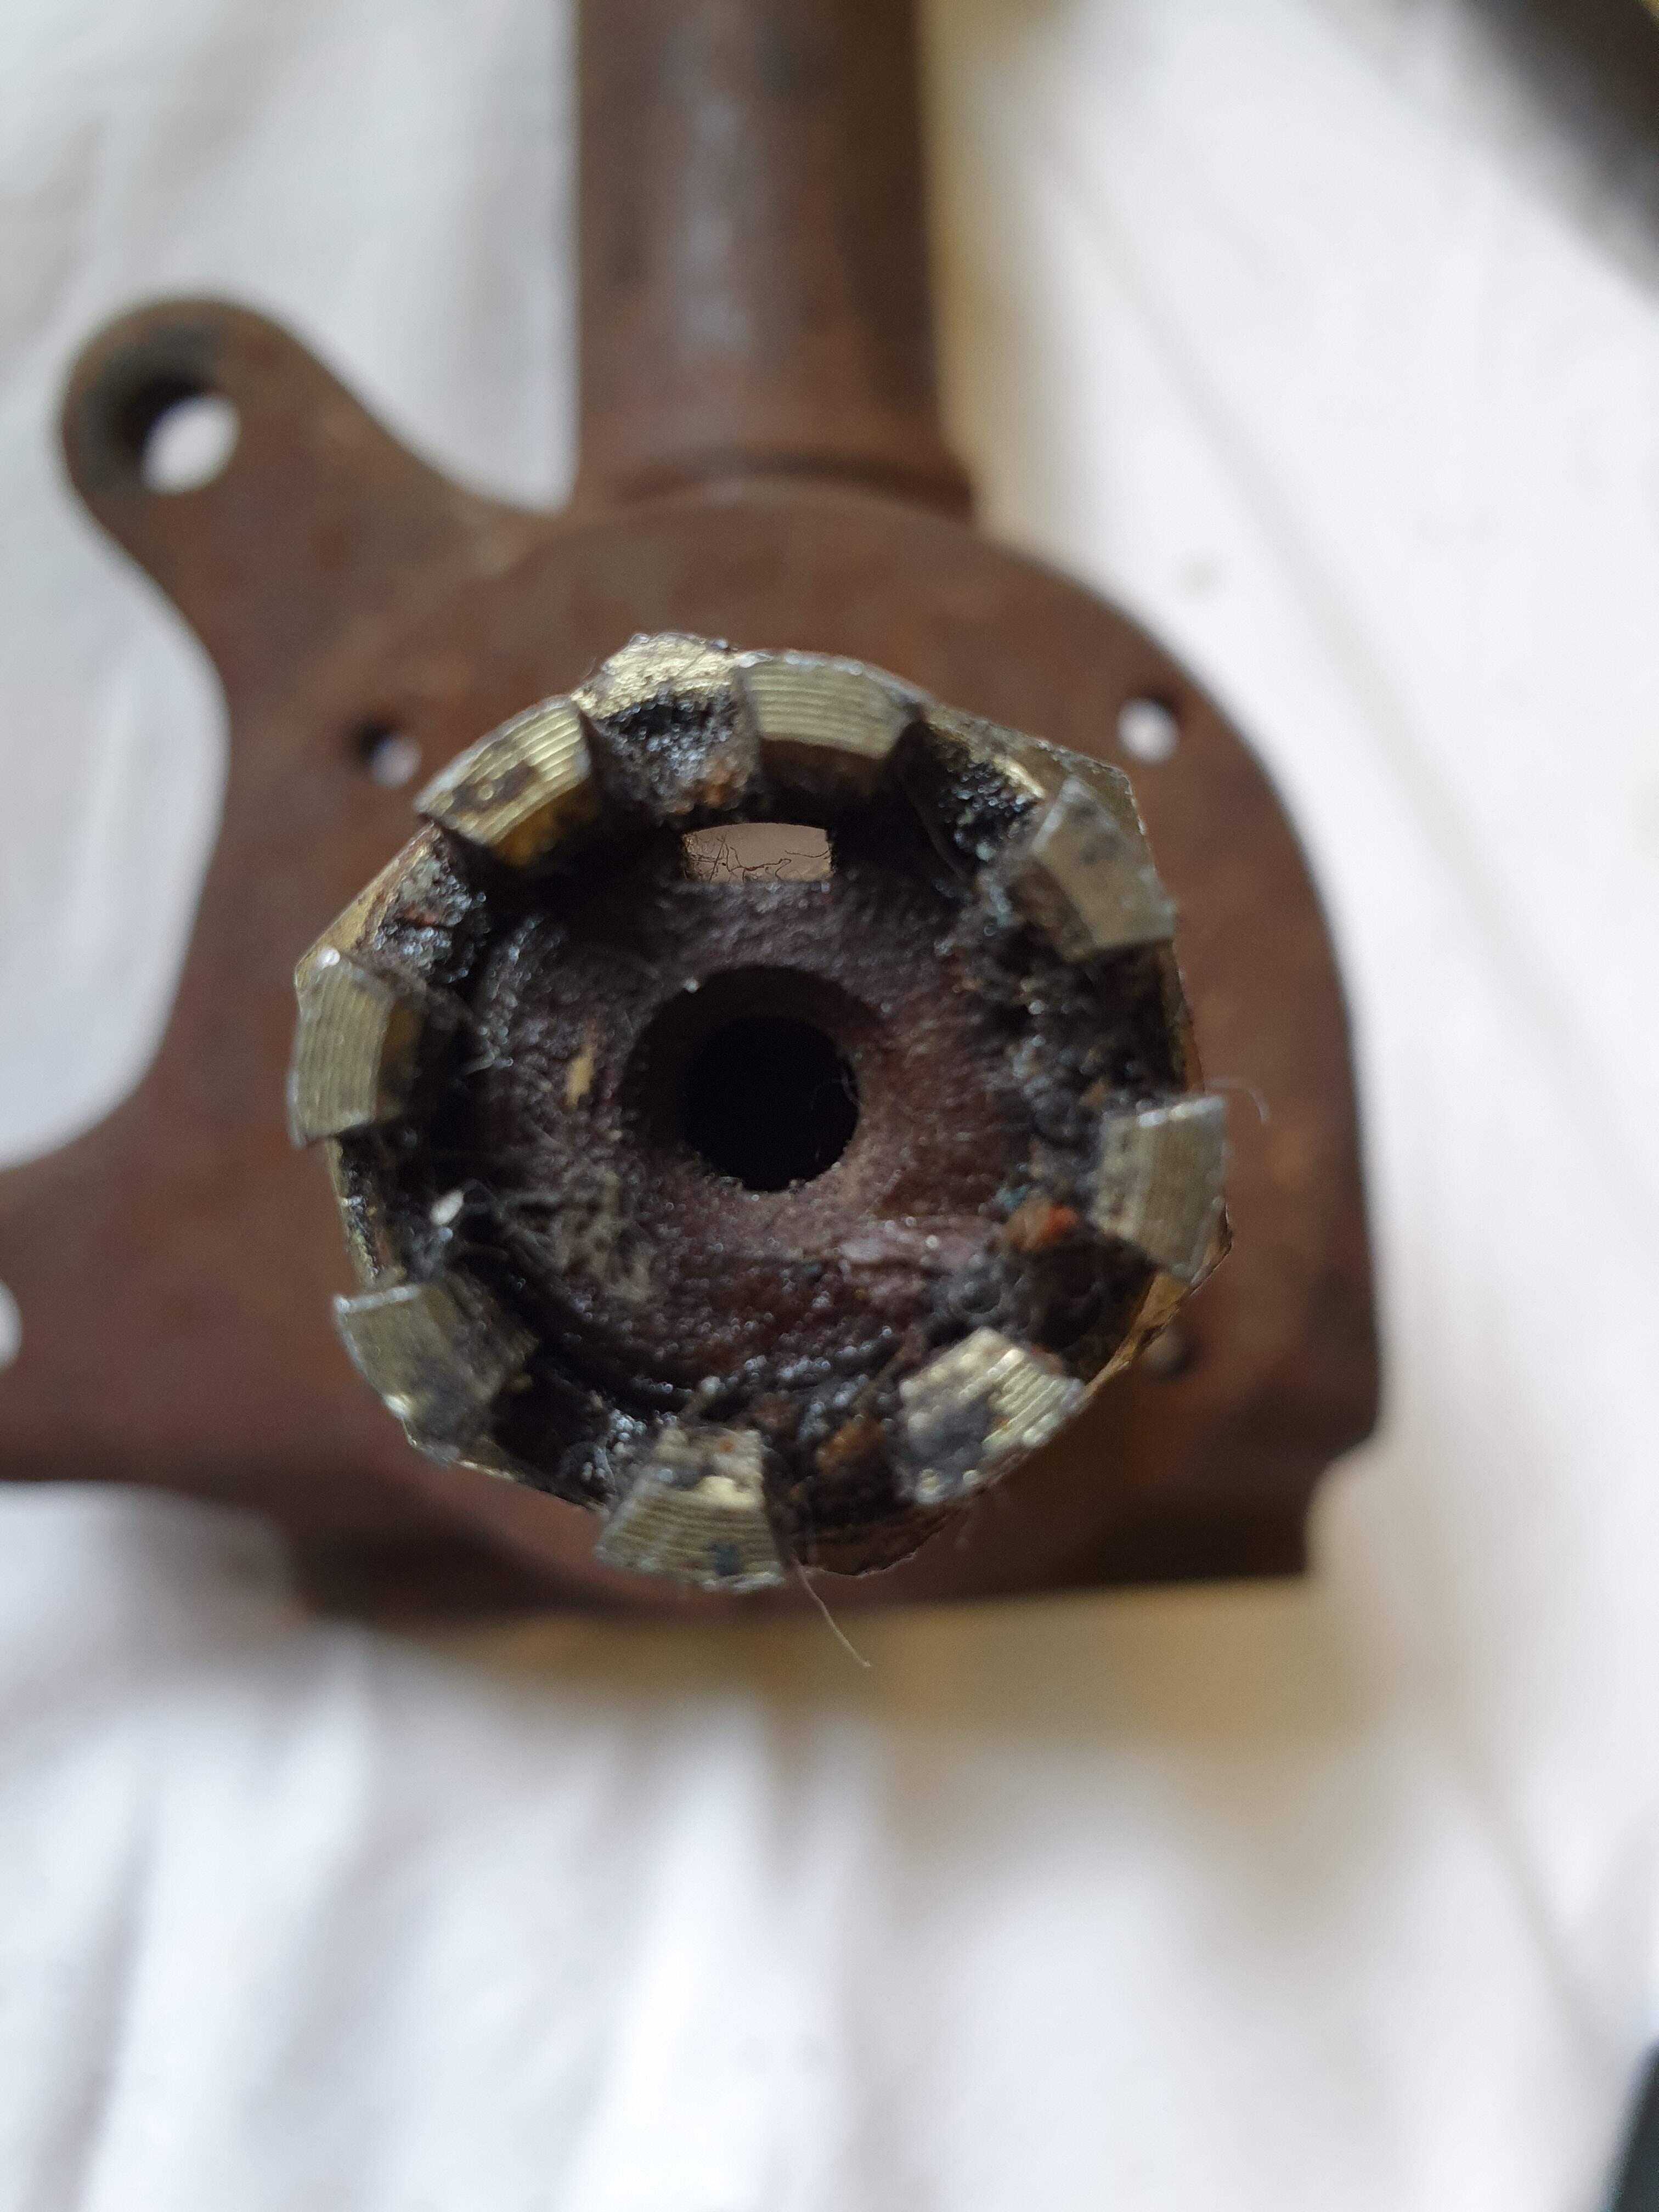
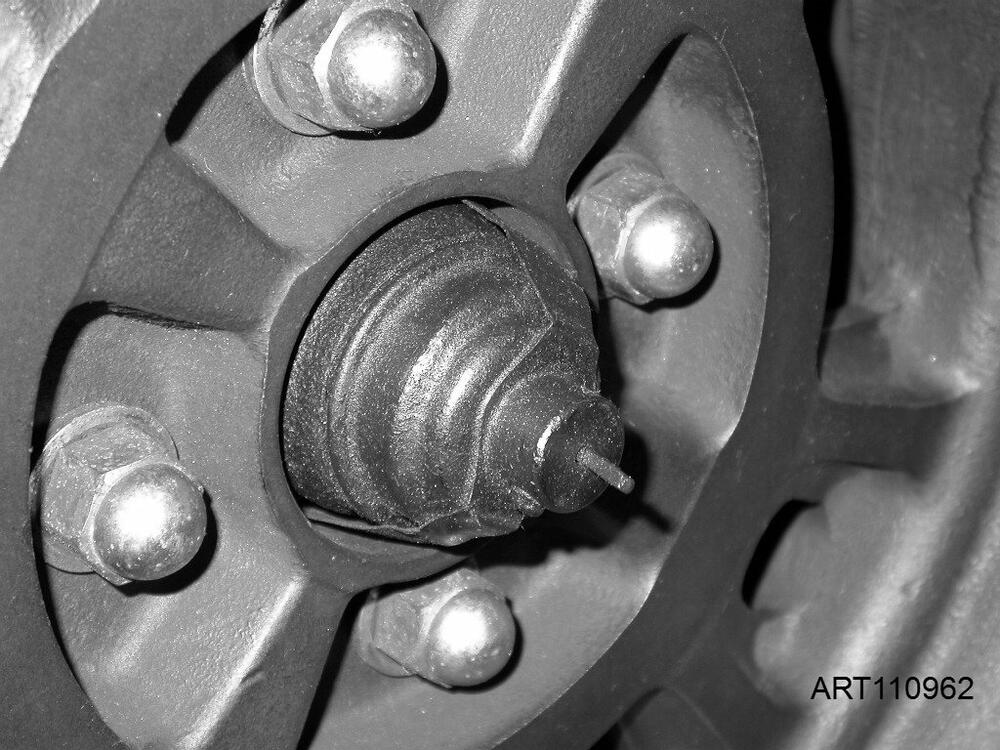
The front spindles were drilled for the Halda drive cable to pass through, with a specially-adapted hub bearing cap holding the (square) end of the cable so that it was forced to rotate with the wheels. The Haldas were geared to translate that wheel rotation into an accurate measurement of distance travelled per revolution. The Navigators were equipped with pre-set computations for different tyre selections. Note the special bearing cap and its tabs which were clamped firmly between the wheel and hub:
 1 point
 -
Assuming you mean these, the screw is M5x0.8 thread, round pan head, phillips, star washer, 10 or 12mm long.
 1 point
 -
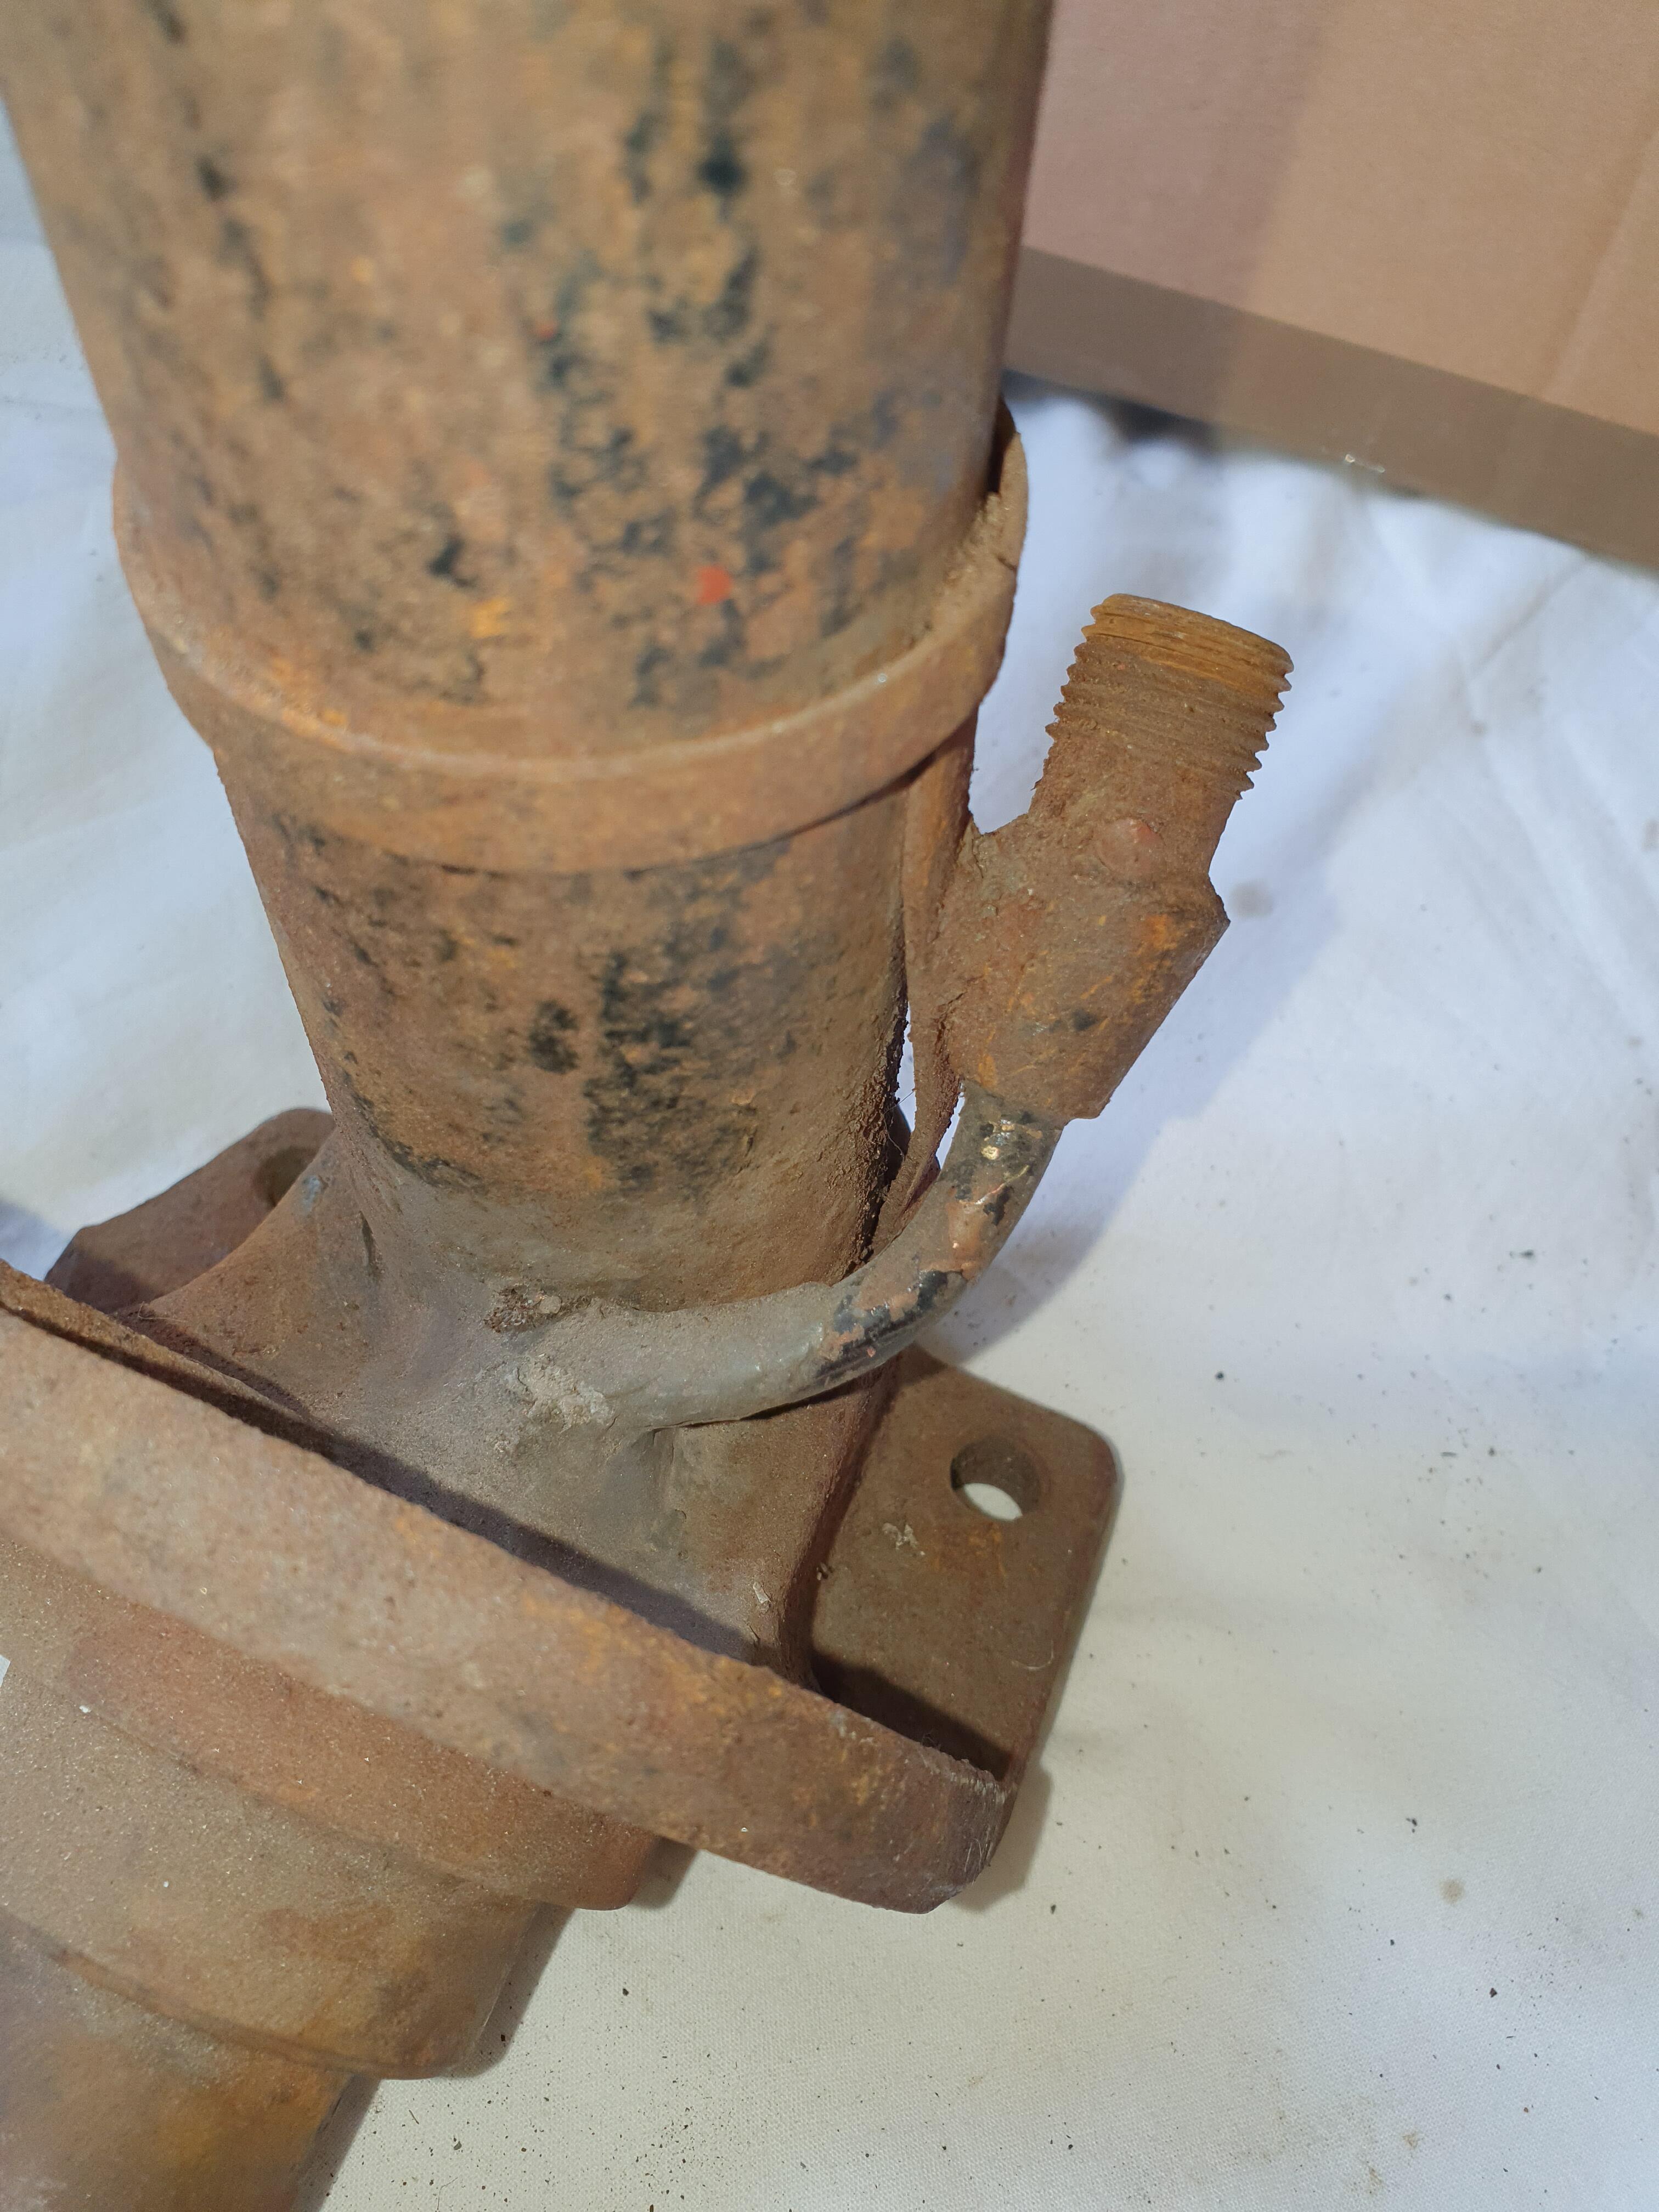
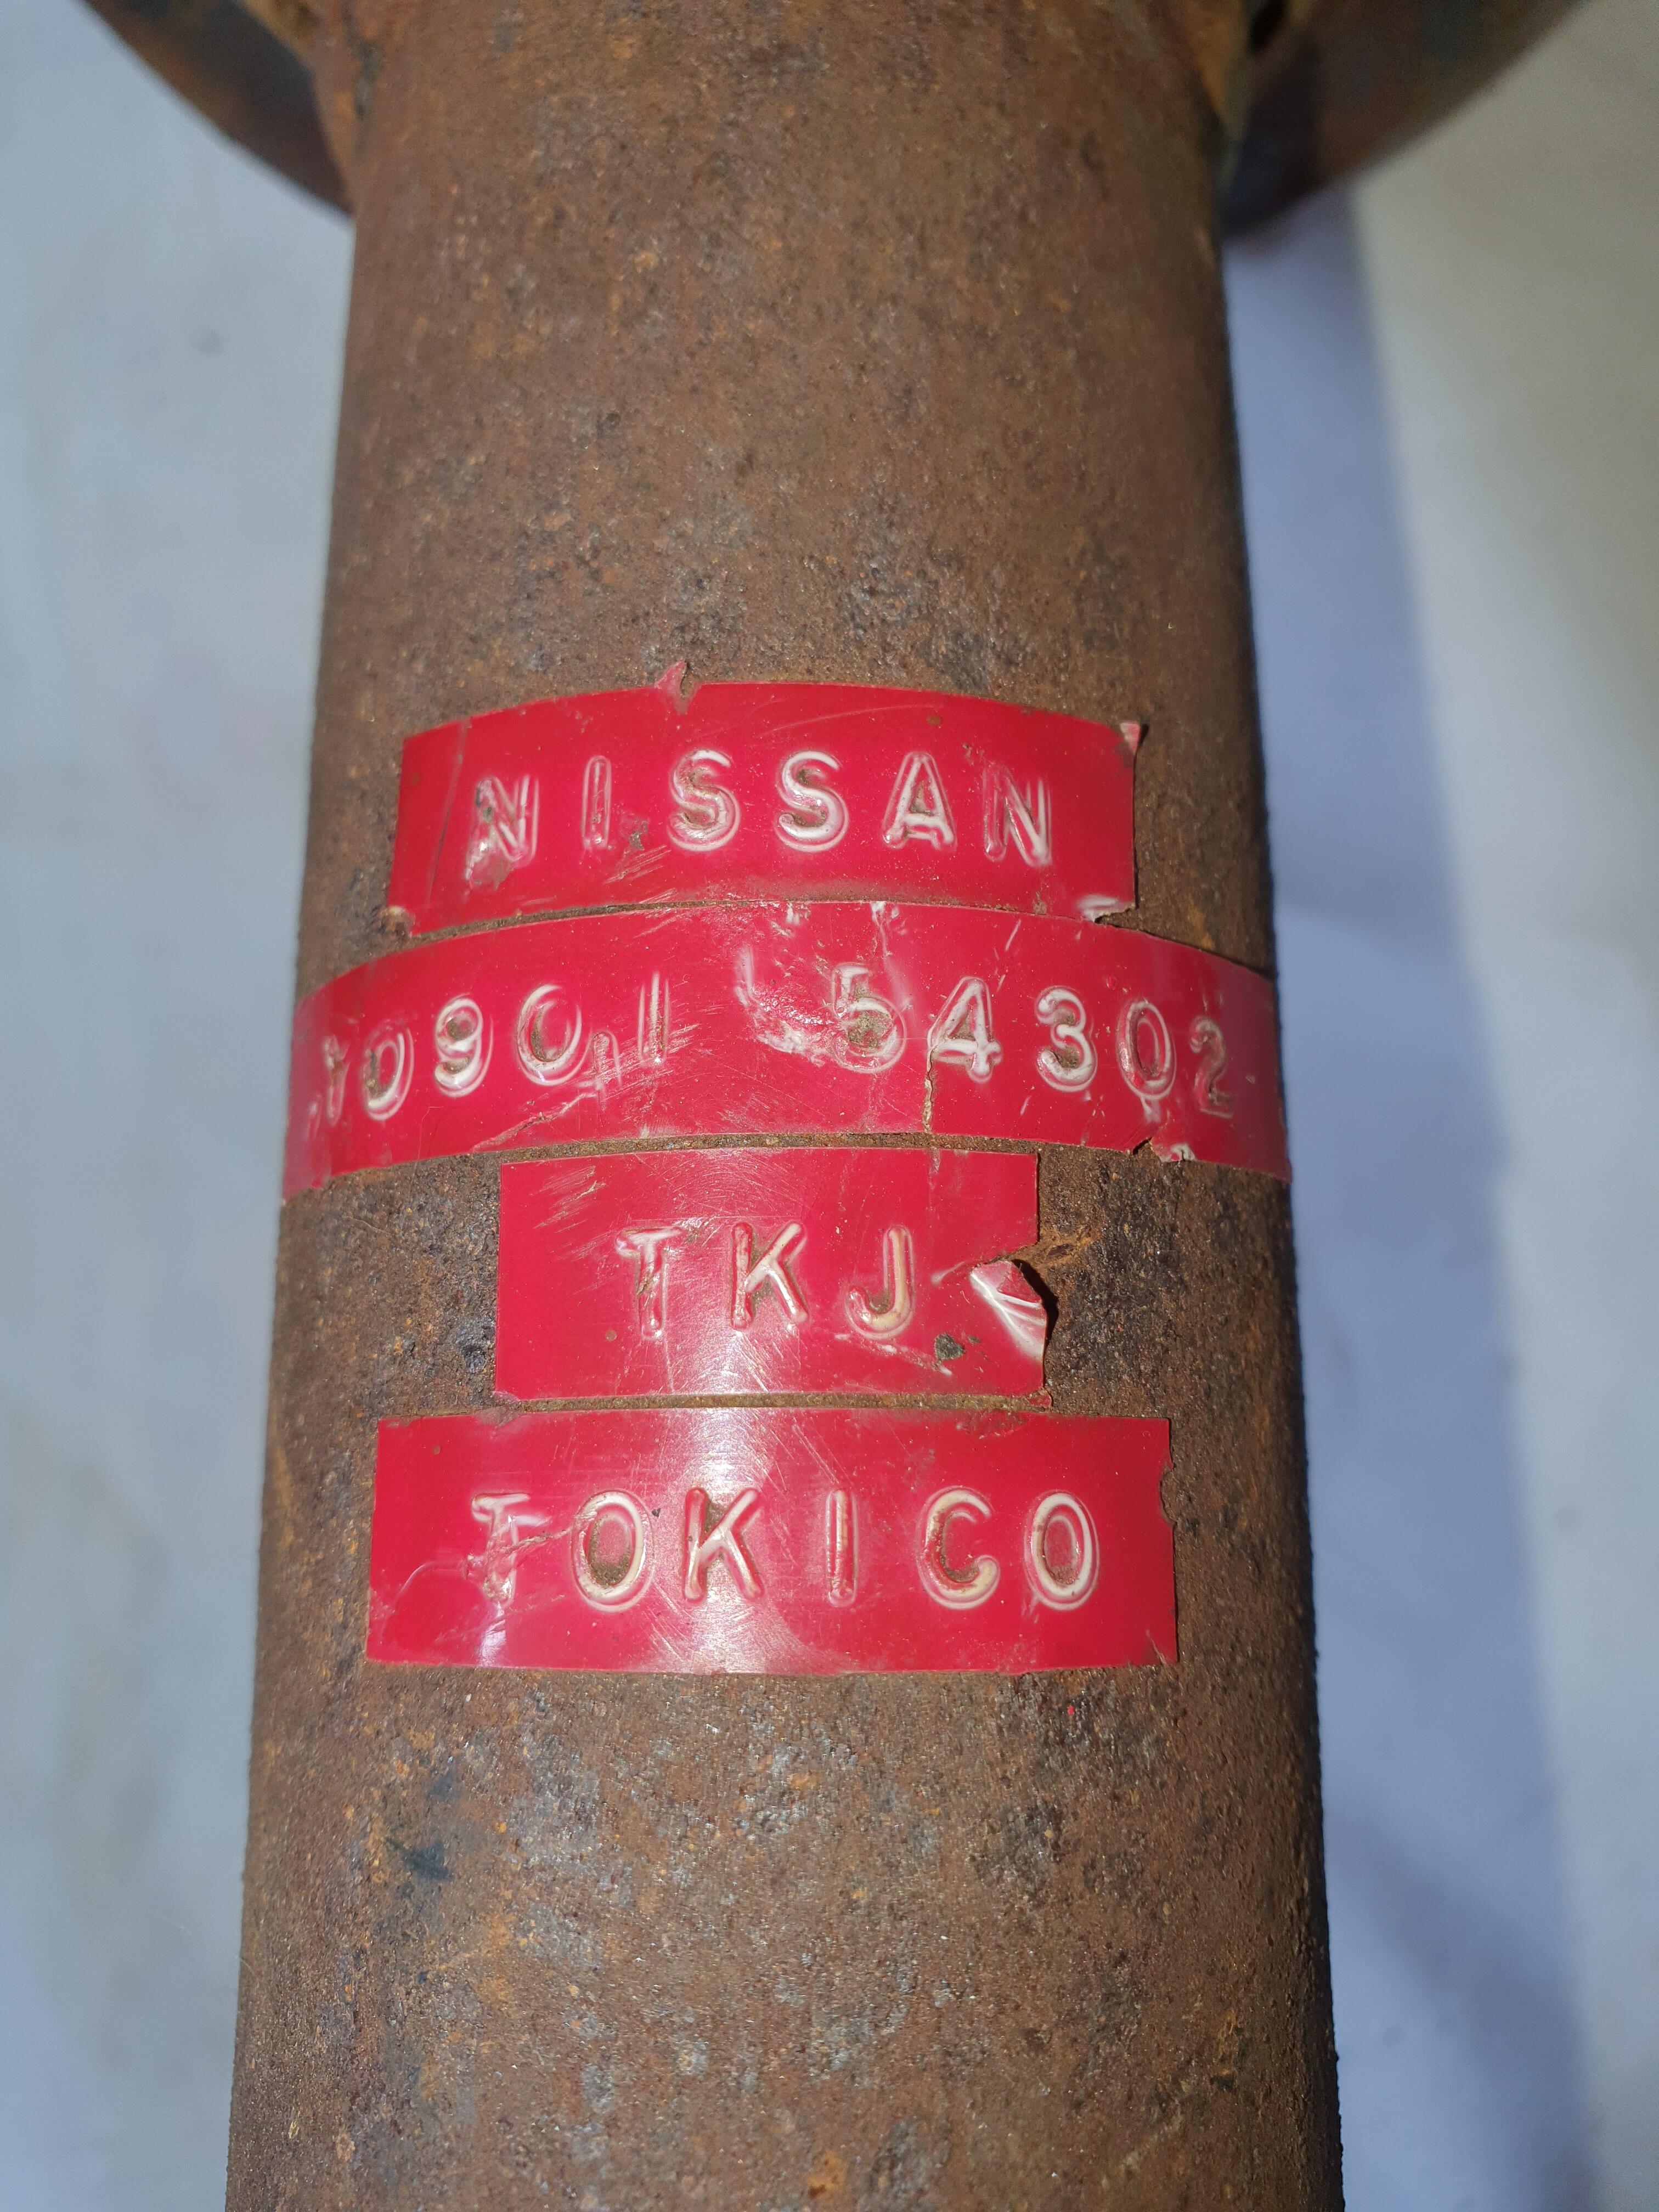
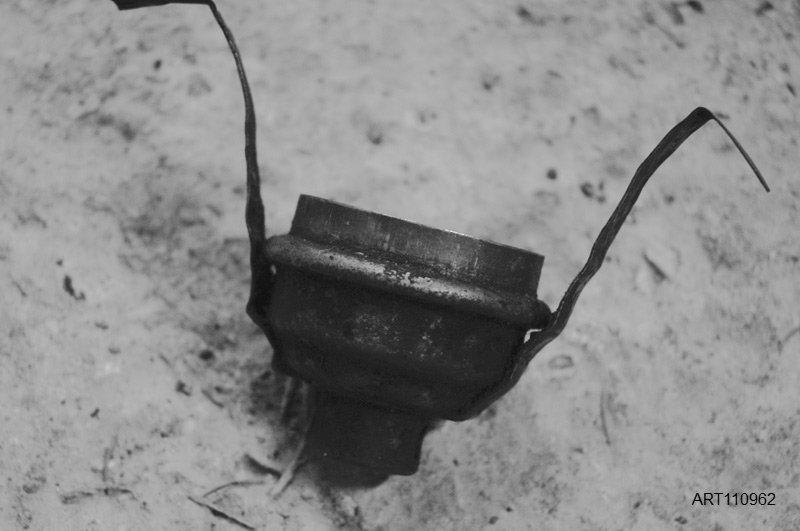
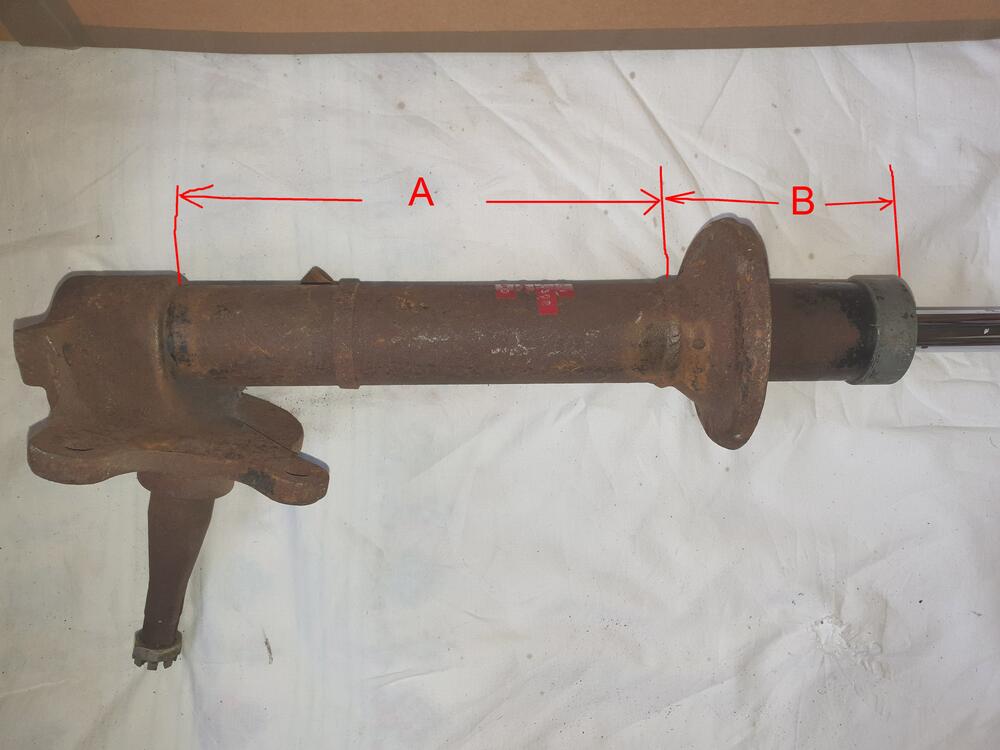
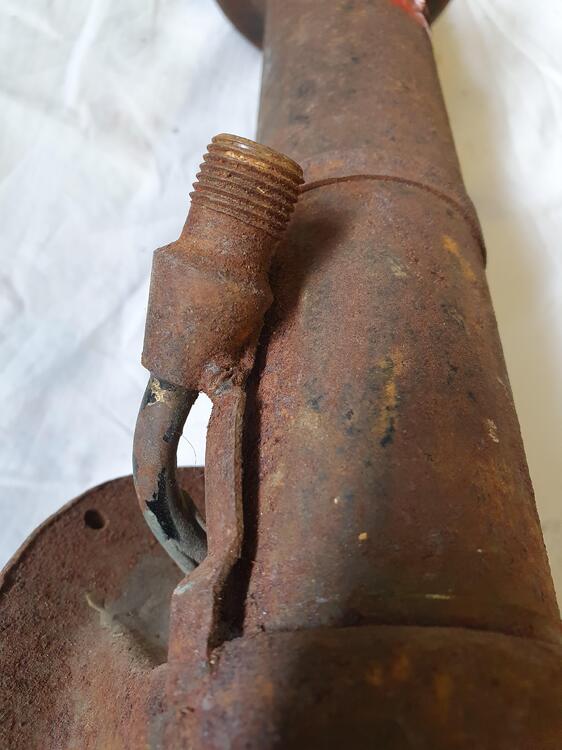
OK, here we go. Please excuse the crappy graphics... My Y0901-54302 (it came to me as an 'ex-Monte Carlo' Works strut) measures as follows: Dimension 'A' (spindle/hub casting to centre of spring perch weld) = 240mm Dimension 'B' (centre of spring perch weld to top of damper retaining cap) = 115mm Strut tube diameter is 51mm Damper rod diameter is 22mm Spindle is drilled for Halda cable with outer cable connector welded to strut tube with steadying bands. This appears to be the 'early' type Works Tokico-built unit without gas charge to mitigate oil foaming, as seen slightly later. Can take any other measurements you need. Reference photos:


 1 point
 -
1 point
-
The ammeter is probably not inaccurate. You probably put the new loads on the battery side of the ammeter. That means in order for the alternator to provide power to the EFI, the current has to flow through the ammeter. Did you check the resistance of both sending units? It may be a difference in resistance between the two that is affecting the fuel gauge. As for putting a 260Z AMP/FUEL gauge in the car. NO! DON'T! FORGET YOU EVER HAD THE IDEA! The 260Z is wired completely different from the 240Z for how this gauge works. For better or WORSE, all of the current flowing from the alternator to the battery in a 240Z goes through the dash, and the terminals on the ammeter don't have boots. (At least that I have seen.) The 260Z is measuring the current through a shunt. (Good luck finding that shunt, to install in your 240Z, too.) To wire the car to handle the 260Z ammeter is likely more hassle than it's worth. As for the fuel gauge, the sender for a 260Z is the same as a 240Z, and the gauge is the same. The correct answer to your question is to move the power source for your EFI away from the battery side of the ammeter and try again to adjust the fuel gauge.
 1 point
 -
Reading through this thread, and I see lots of good information, but I also see some that isn’t so good. When new Datsun required 95 octane fuel. I use the highest octane fuel available when filling my street driven Zs, and use with 100LL avgas or 110 racing fuel in my race engines. The engine in stock form has 9.0/1 compression, so low octane regular pump gas isn’t suitable. As mentioned, if these cars are sitting for extended periods without being run, a fuel stabilizer is a great idea. Octane boosters do nothing to stabilize the fuel during extended storage. Note that even stored in a sealed container the fuel can degrade over time, as the additives separate as vapor, and are lost when the container is opened, and no, shaking before opening won’t recombine them with the fuel, you need a refinery to do that. Regarding setting fuel mixtures, having access to a 4 gas automotive exhaust gas analyzer makes the process a cinch. Not having one doesn’t mean that it can’t be done, it just removes any uncertainty regarding the correct mixture settings. Setting the mixture without one goes like this: turn the mixture lean until the engine begins to stumble, then turn the collar towards rich until the stumble goes away. If the engine is running too rich, then lean it out very slightly. Tuning SU carburetors isn’t as difficult as some people make it out to be. The SU is an amazingly simple carb. I found the following on Classic Motorsports, a web page centered on British cars, and feel it is relevant here: [quote]Assuming that the carburetors are in good condition and have properly sized needles in them, the tuning procedure is not as complex as most people think. However, before the carbs are touched, ignition dwell and timing must first be correct. It's a good idea to ensure valve clearances are correct as well. A quick check for vacuum leaks is next, and only once this is done is it time to move on to the carburetors. Next, if there are two or more carburetors, they need to be synchronized. This can be done with either a dedicated synchronization tool or a short length of hose. With the engine running at idle--usually 600 to 1000 rpm--the synchronization tool is placed over the inlet of each carburetor to get a reading on its gauge. The idle screw is adjusted on each carburetor until each one gives the same reading on the synchronization tool. The low-buck method is to substitute a 12- to 18-inch length of 1/4-inch or 5/16-inch hose for the tool. Hold one end of the hose up to the air inlet of each carb and the other end to your ear. When each carb emits the same noise through the hose, they are synchronized at idle. (Note that revving the engine slightly and periodically throughout the adjustment process helps to "clear out" the carbs.) After the carbs are synchronized at idle, the throttle linkages can then be adjusted to ensure they remain synchronized throughout the rpm range. With just a little free play in the linkage, each throttle arm should start moving at the same time when the accelerator pedal is depressed. If not, the locking nuts can be loosened to adjust the linkage. The idle mixture is set next. The conventional method, which is published in most manuals, works very well. First, each piston is lifted slightly, about 1/16-inch (usually a small screwdriver is helpful for this step). If the engine speed falls off, the mixture is too lean and the jet is lowered via its adjustment nut or screw. If the rpm rise, the mixture is too rich and the jet is raised. If raising the carb's piston causes the engine speed to rise by about 50 rpm before returning to its previous level, the mixture is just right. An alternate method is to use a vacuum gauge and adjust the mixture in each carb to get the highest vacuum at idle that is possible. At this point, the idle speed can be verified to be correct and the tuning is nearly done. All that is left is the "choke" adjustment. As discussed before, SUs don't really have chokes, as they richen the mixture instead to allow smooth engine starting. This is usually accomplished through a linkage and cam that lowers the jets and raises the idle speed. The linkage and cam only affect idle speed in the first two-thirds of the distance of choke cable travel; it increases the air/fuel mixture as well as the idle speed during the final third of travel. The two steps to adjustment are to ensure that multiple carb setups have proper linkage balance between carbs, then to set the high-speed idle screws that touch the cams. High speed idle is usually around 1800 rpm.[/quote] Note the second paragraph which mentions the state of the ignition tune. Very important.1 point
-
@siteunseen, @Dadsun Have you tried easing the choke on during the flutter? Over the years I found the choke to be an easy method for checking lean mixtures.1 point
-
Truly unfortunate that the suspension aftermarket suppliers are so biased toward 'performance' in their choice of the urethane grade they use for these bushings. I suppose it makes sense for a 3000 lb + American muscle car or for competition use, but it's way too stiff for a small coupe of sportscar being used on the street and highway.1 point
-
1 pointAnd that would seem to be THE problem, even with good panels, which I have. The freight charges getting them to Thailand and then getting the finished products back to the U.S. are phenomenal. Now, I'm no international shipping maven (are there any on this forum?), but just messing around within the UPS website produced a quote for a 15 pound box with dimensions of 43"x24"x7" at over $1,000. And that's just getting the panels to Thailand. I'll have to mess around with FedEx, DHL and the USPS but I suspect they will all be in the hundreds of dollars. So, unless you know someone going to Thailand for a while and who would take your panels there and back as checked baggage, this exceptional craftsman's work looks to be simply out-of-reach for a typical Zcar owner. I HOPE someone will be able to disprove the above statement.1 point
-
Two guys whom I know in the UK had their compression rods snap with a big BANG due to poly on both sides, so beware! This was not an isolated incident either. Fortunately both those guys were moving slowly and one of them had his go while going over a speed bump at an appropriate speed. Poly on both sides makes it too stiff under it’s normal operation on a public road without billiard table smooth surfaces! Imagine a paper clip being held in a vice and bent back and forth constantly - that’s basically what is happening. I bought the special kit from MSA to replace my poly ones with and not only did it sharpen the steering but it got rid of the wandering under braking where the toe angles were changing. https://www.thezstore.com/product/6551/tension-rod-tc-kit-70-887-zzx In summary - Always rubber at the rear side.1 point
-
1 pointThe internal part with the rubber parts is a perfect test .. put it in washing detergent and let it soak a few days (heat it up sometimes to max 60 C. you get new rings.. (only if the rings are not damaged ofcourse)1 point
-
1 pointYeah, better safe then sorry.. You let us know how it went, i always leave it in the solution for a few days and put new hot water and "detergent"(washing powder) on it and hot water.. (not higher than 50-60 degrees Celcius!) (We have forgotten herr Fahrenheit..hahaha) You can repeat the proces a few times. Very hard parts can take a week or 2.. but i always got them soft again.. I must say parts from very hot area's are the toughest to get soft.. I also remember some rubber rings out of a pinball machine, they were so bad, they had lots of little holes in them when you stretched them, after a good soak there was not a single hole in them it rejuvanated completely! They were white rubbers from the flippers and a lot of dirt came off. they where whiter and looked like new! Enough talk about rubbers! 😏1 point