Leaderboard

 Subscriber


Popular Content
Showing content with the highest reputation on 08/08/2021 in Posts
-
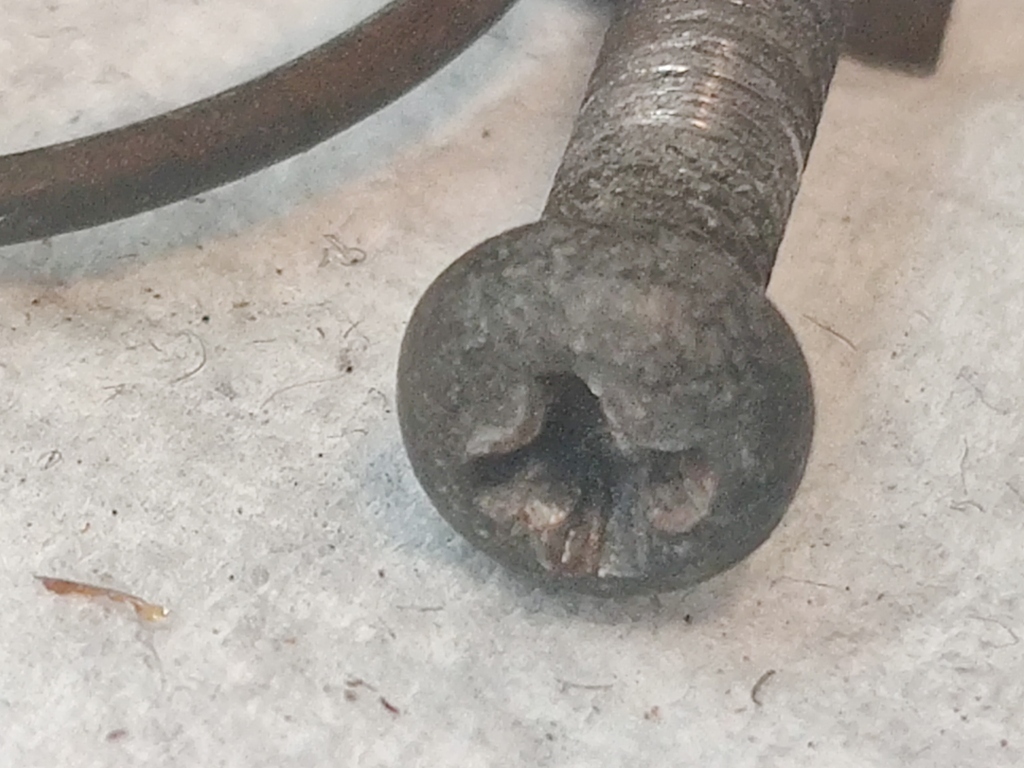
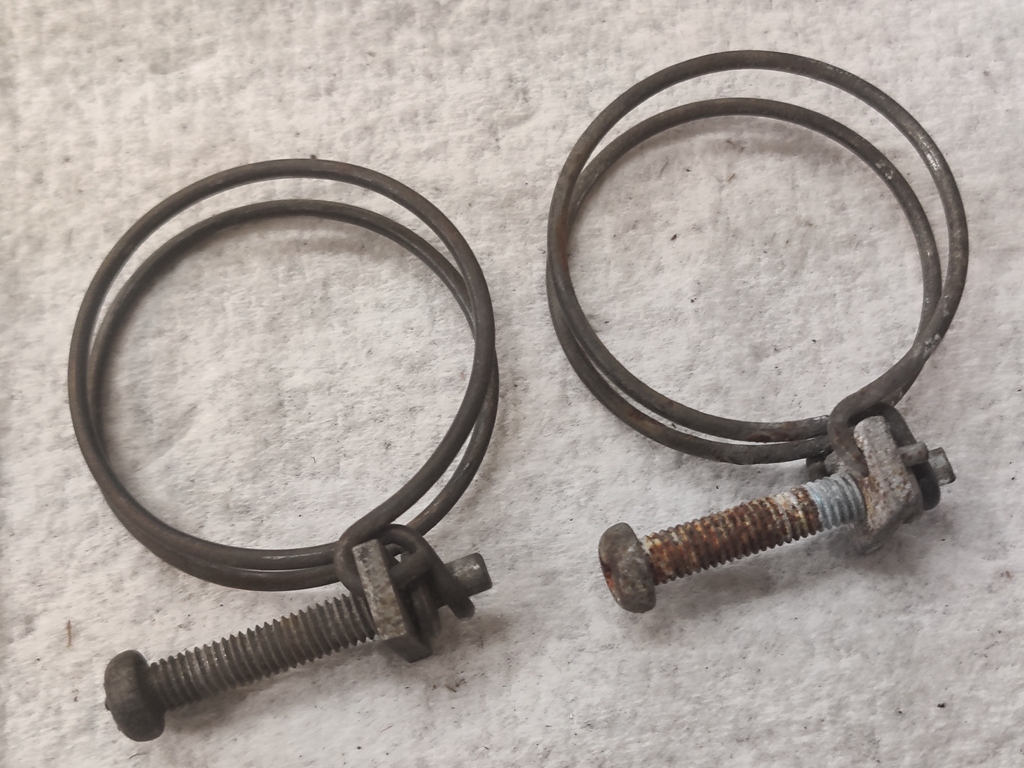
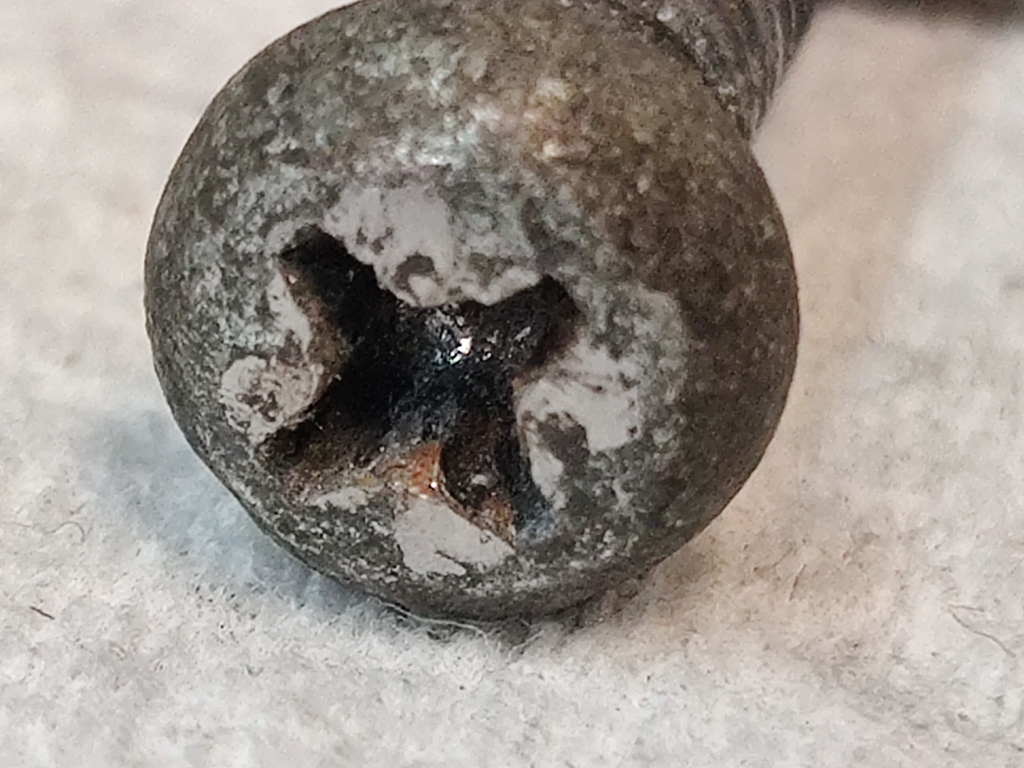
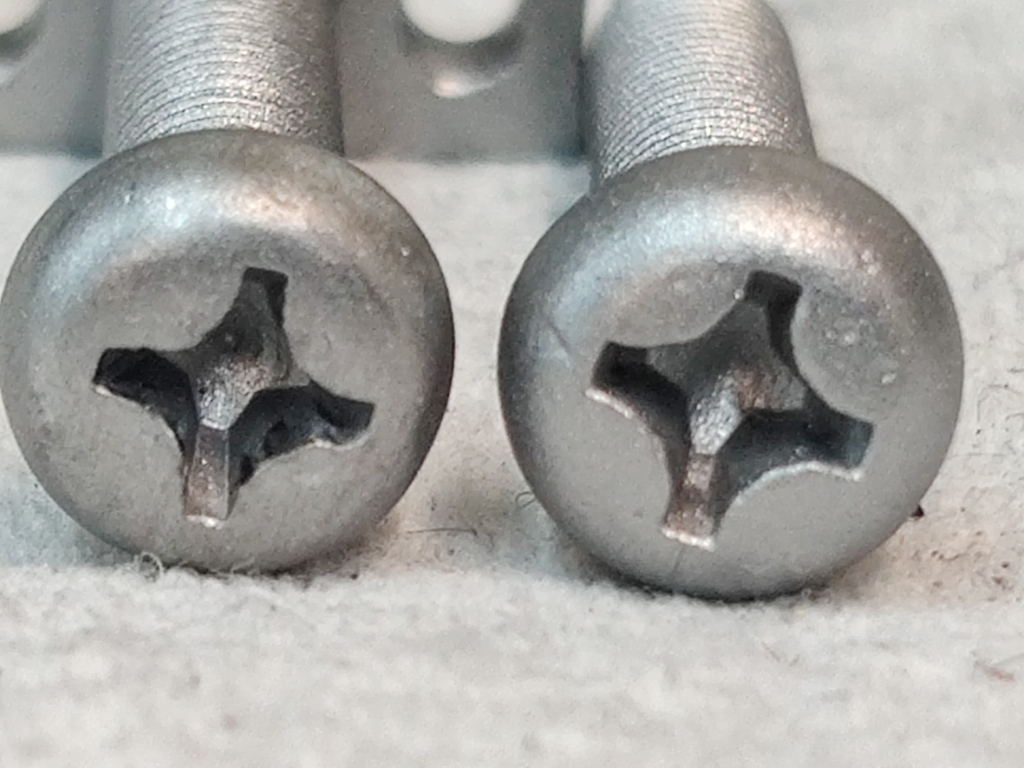
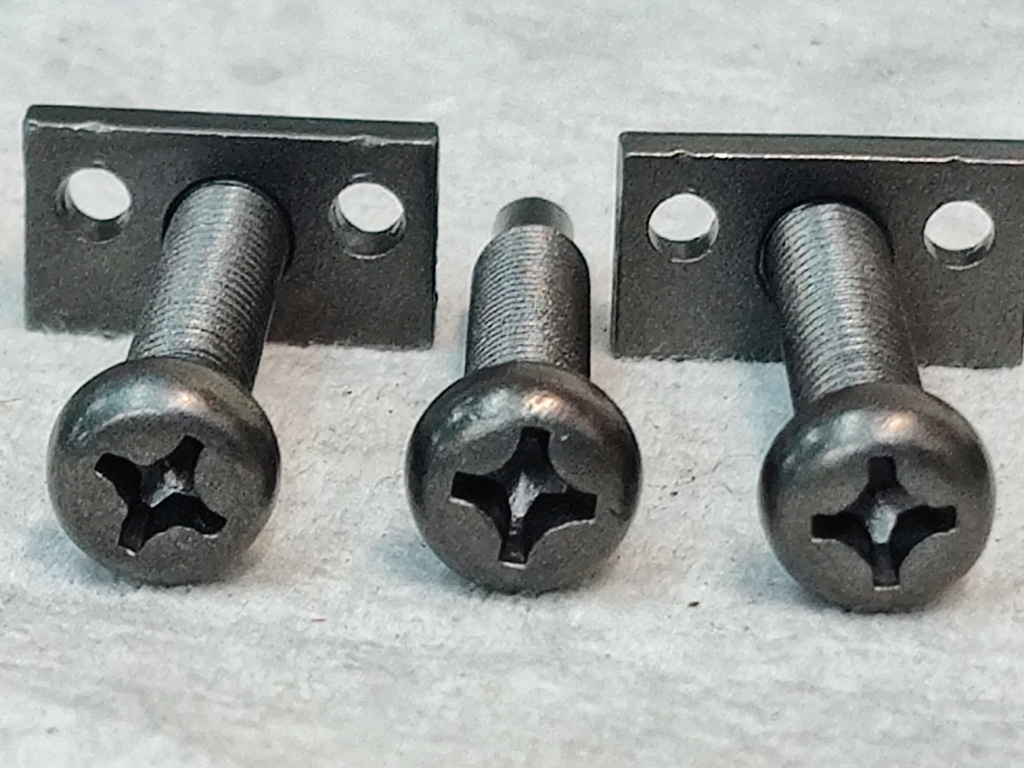
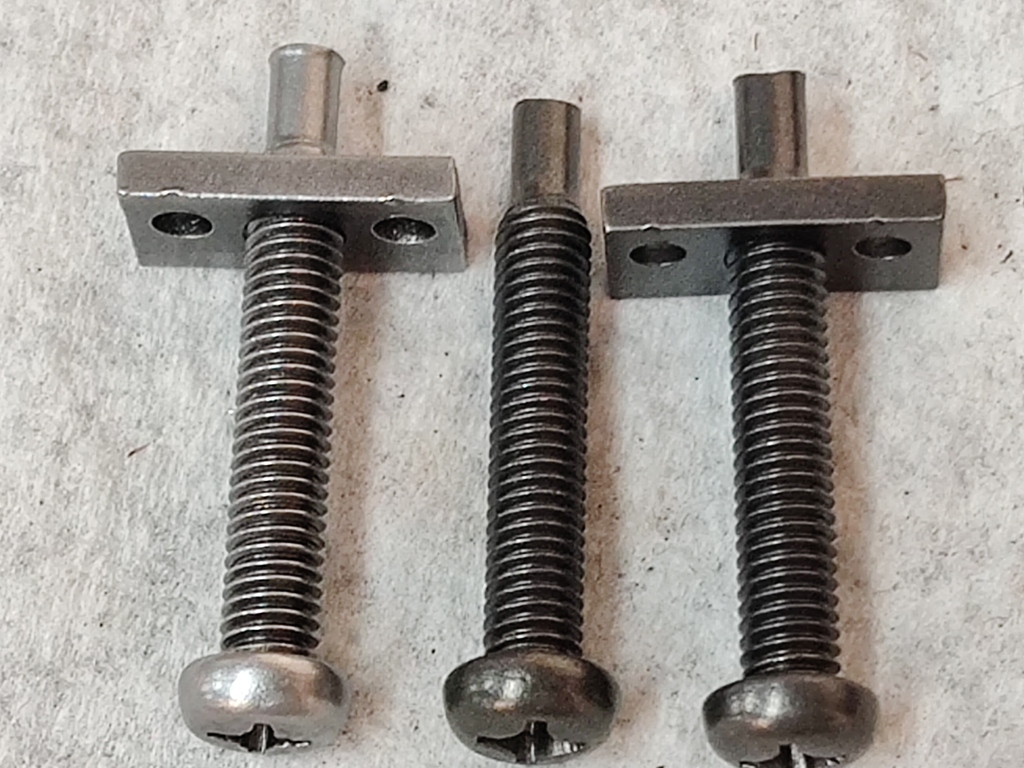
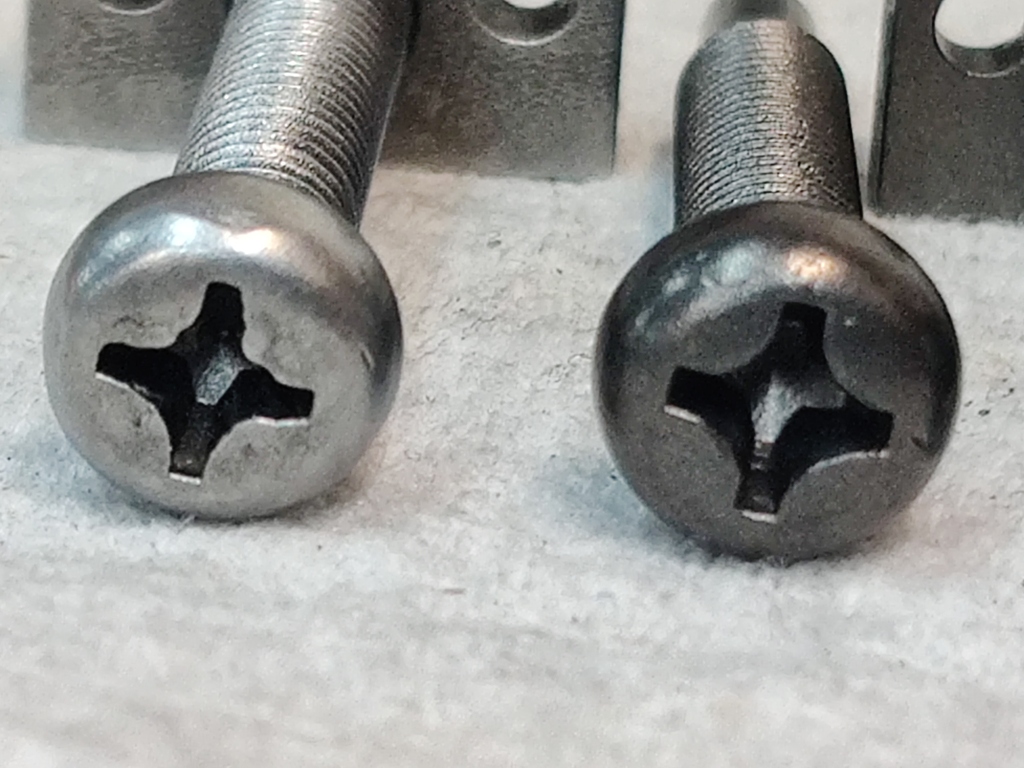
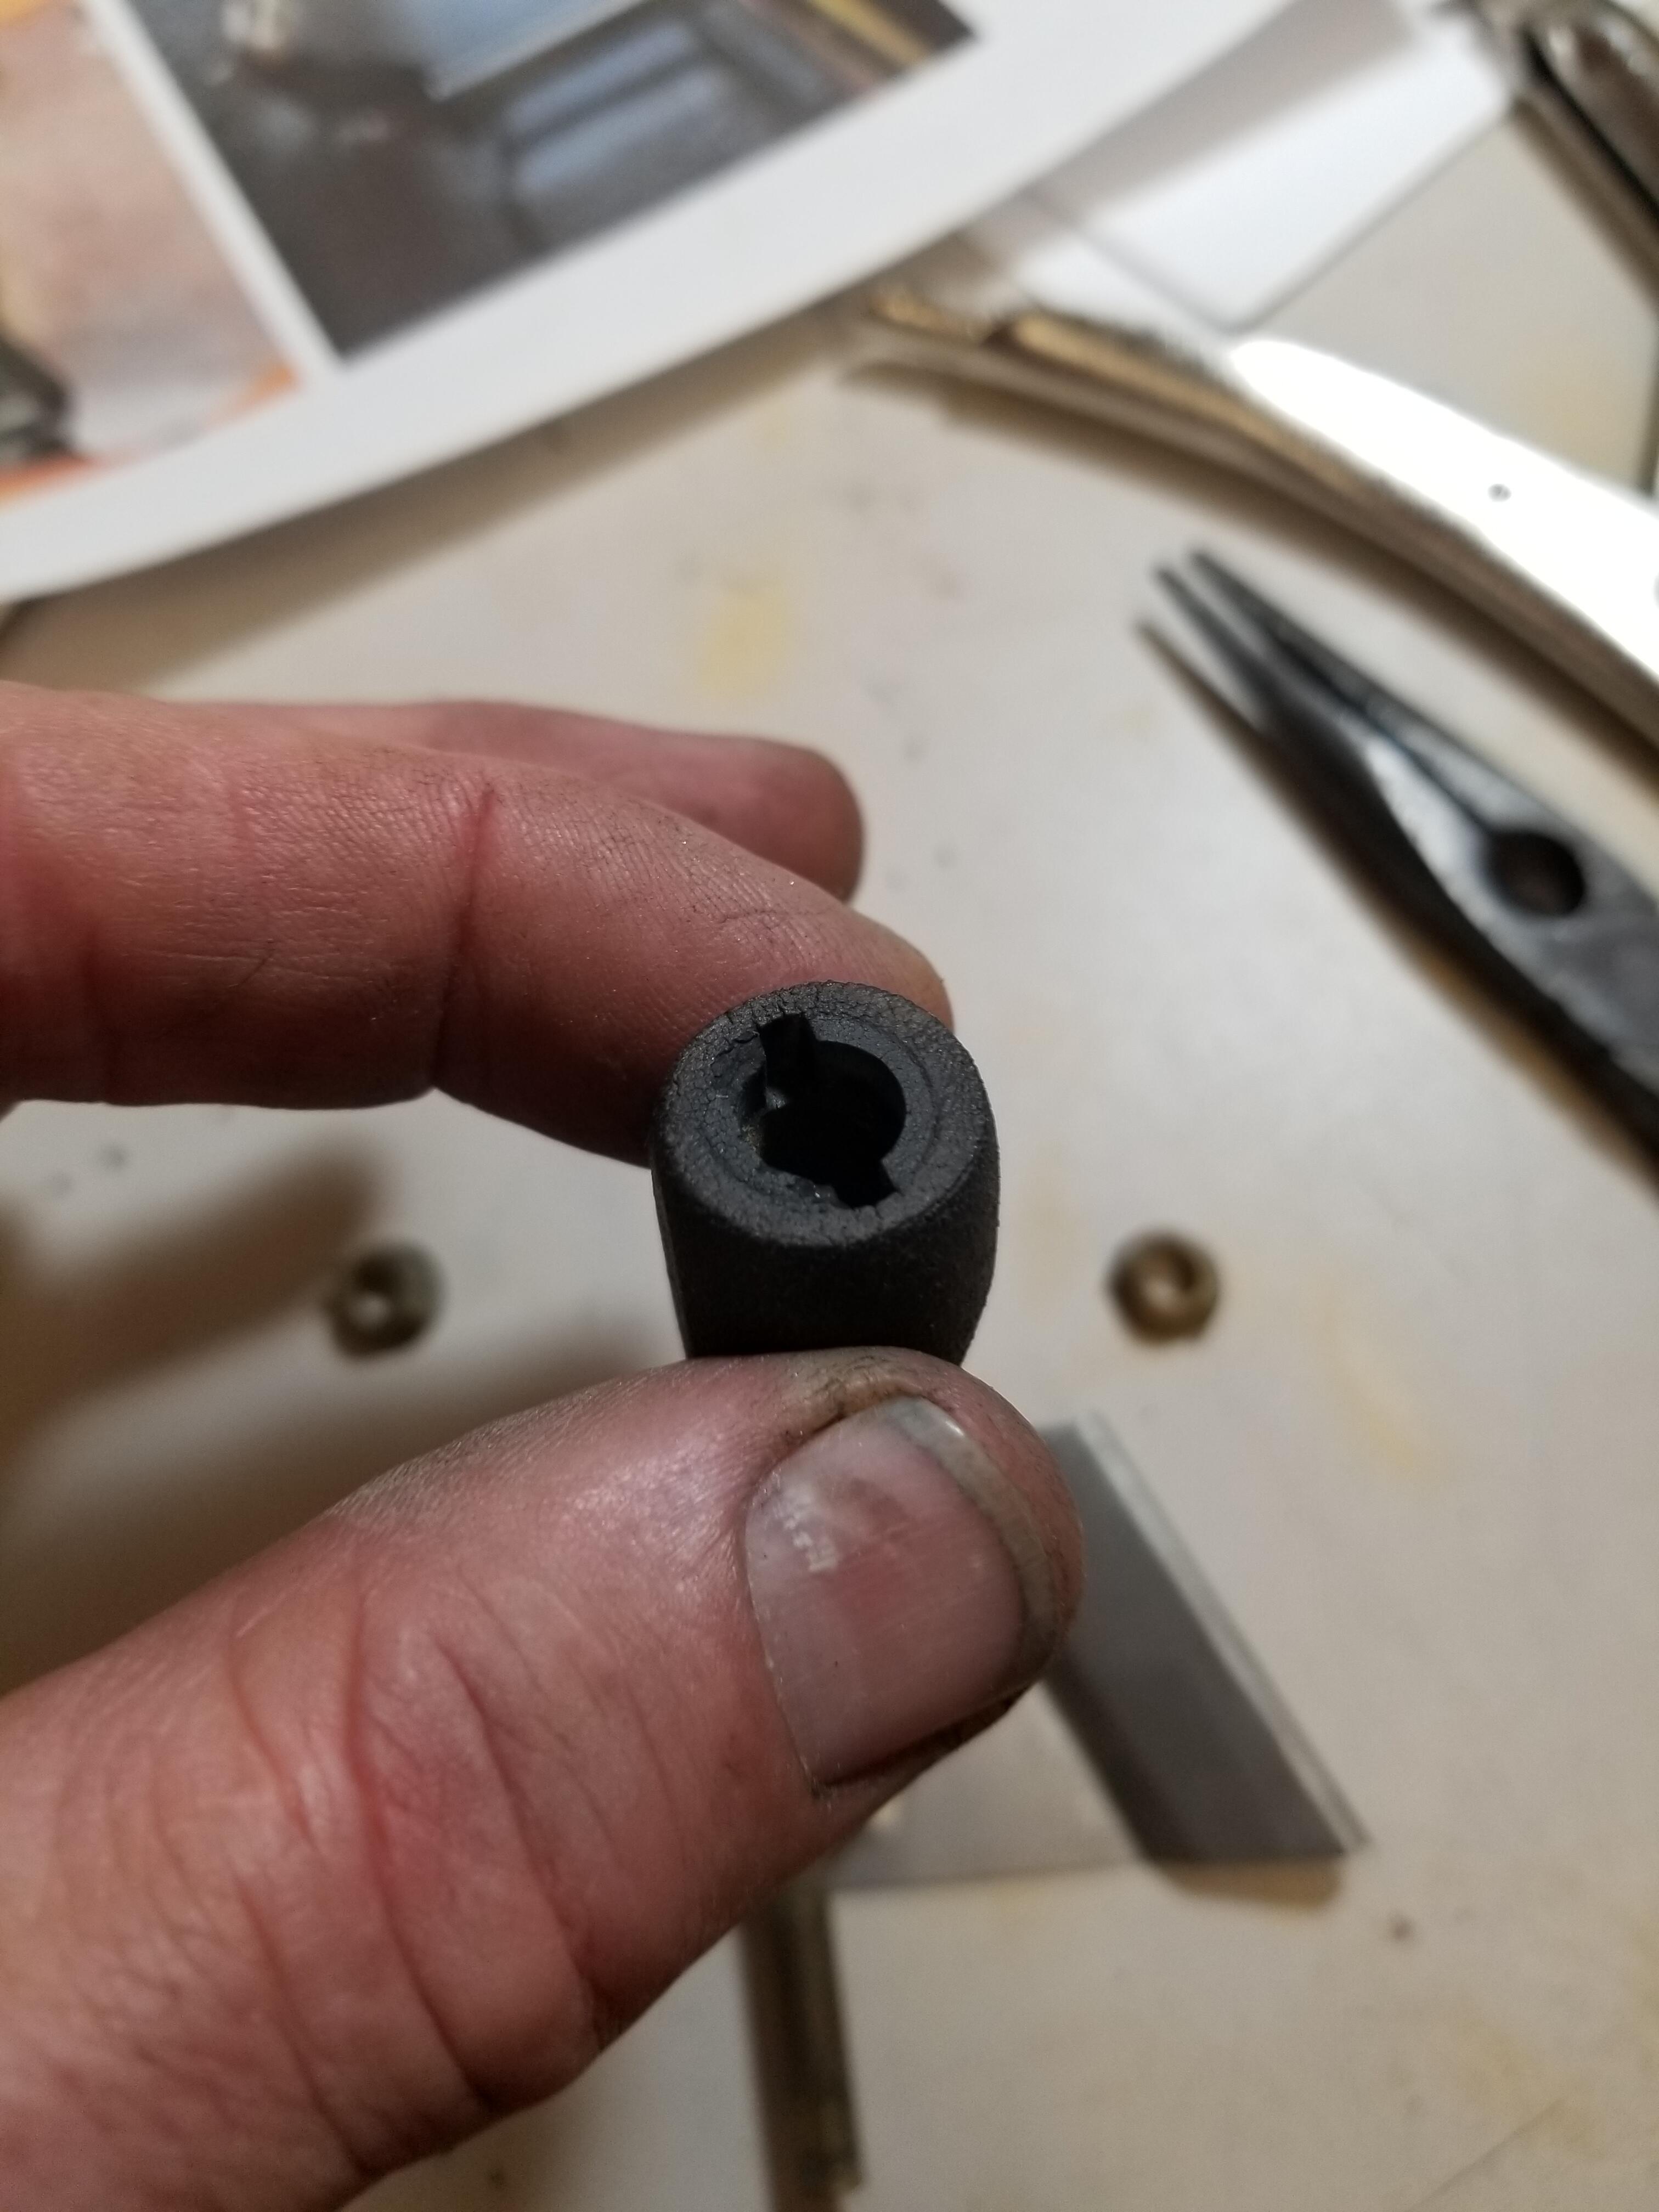
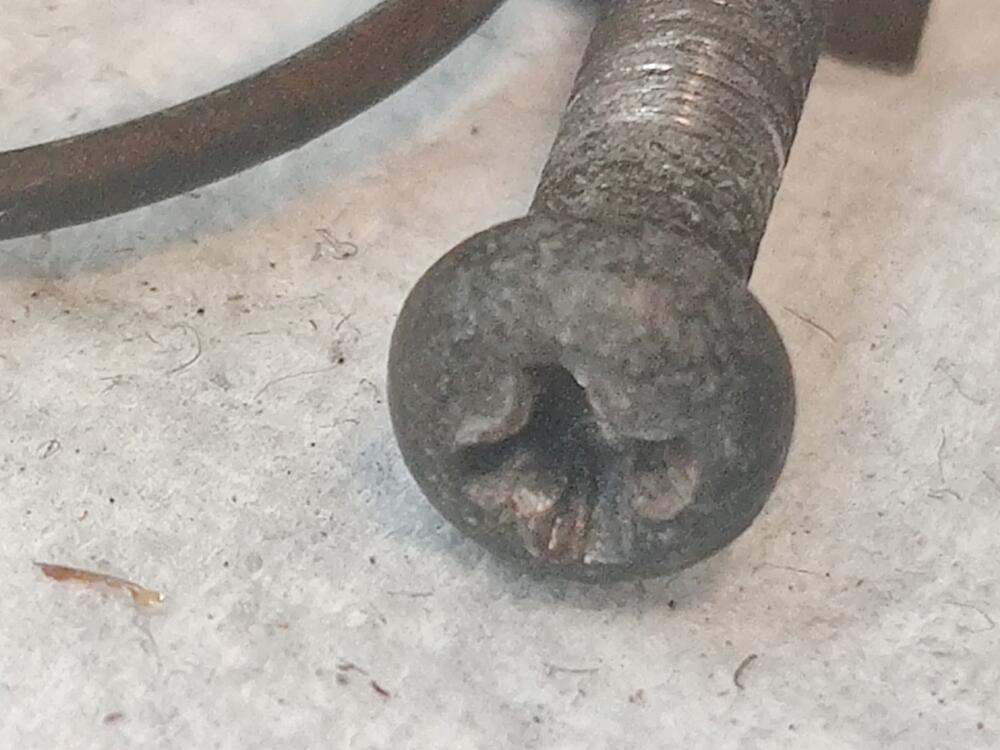
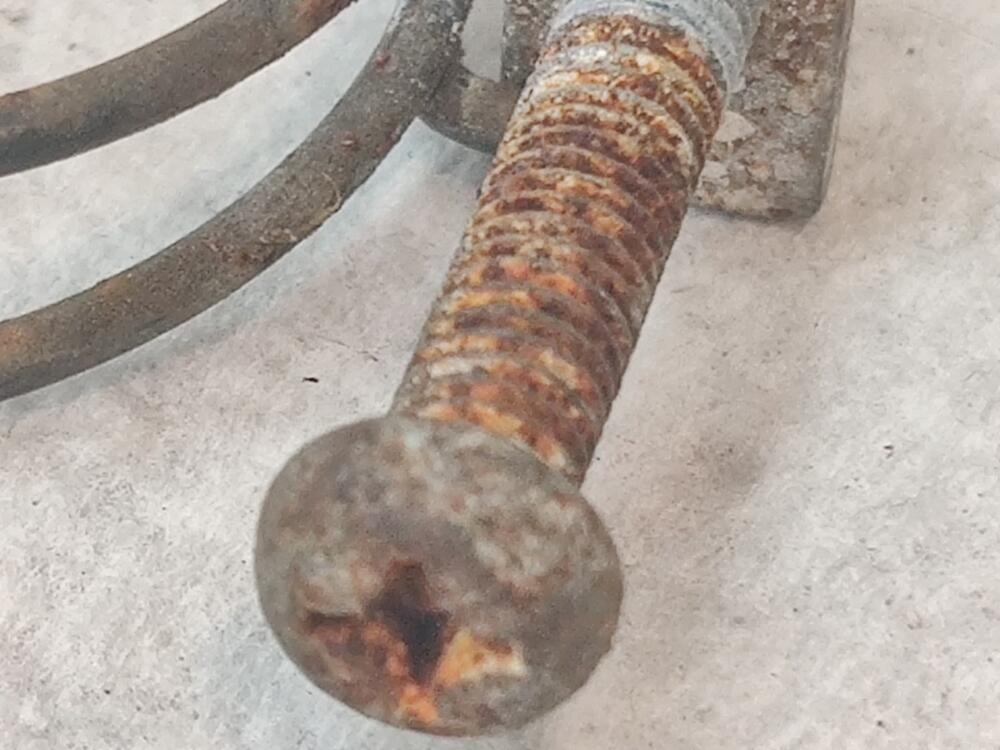
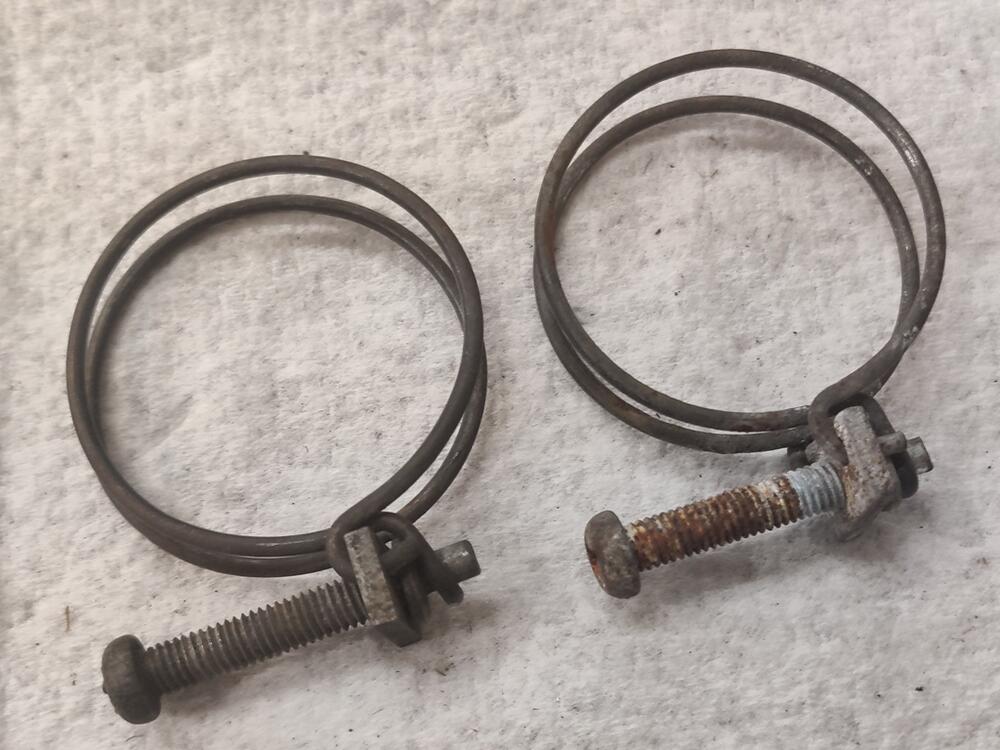
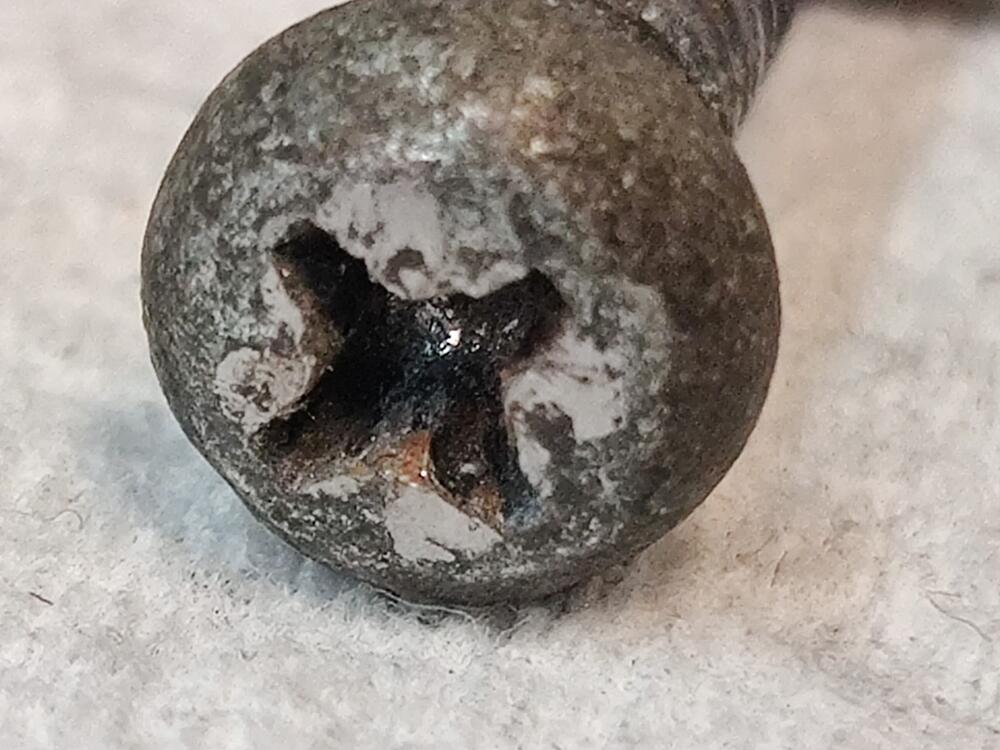
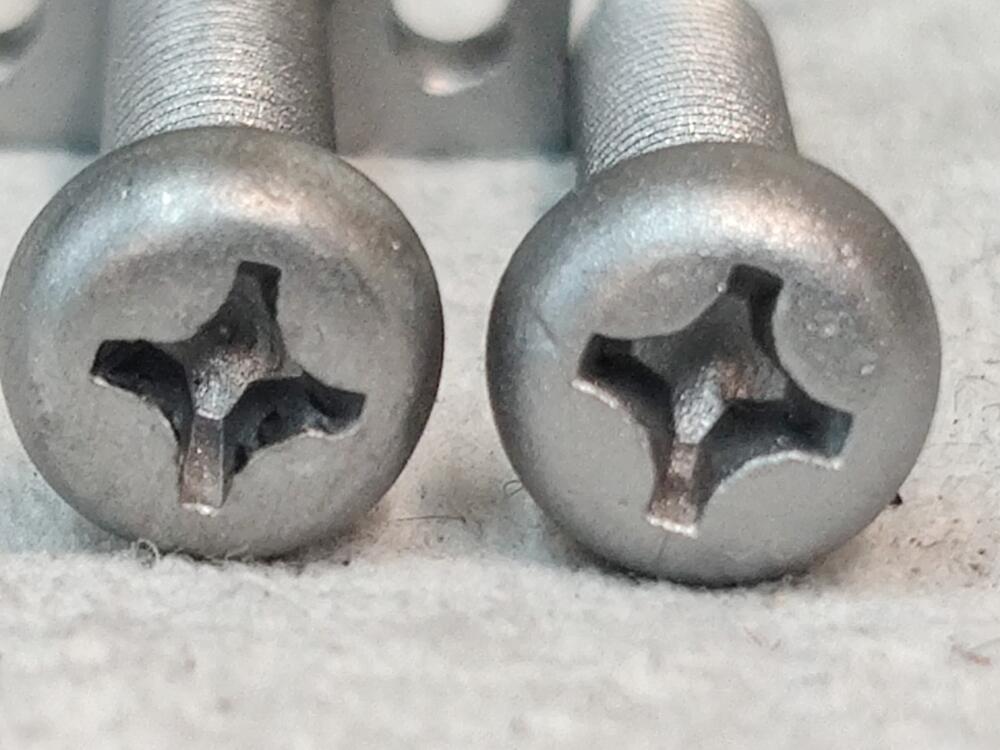
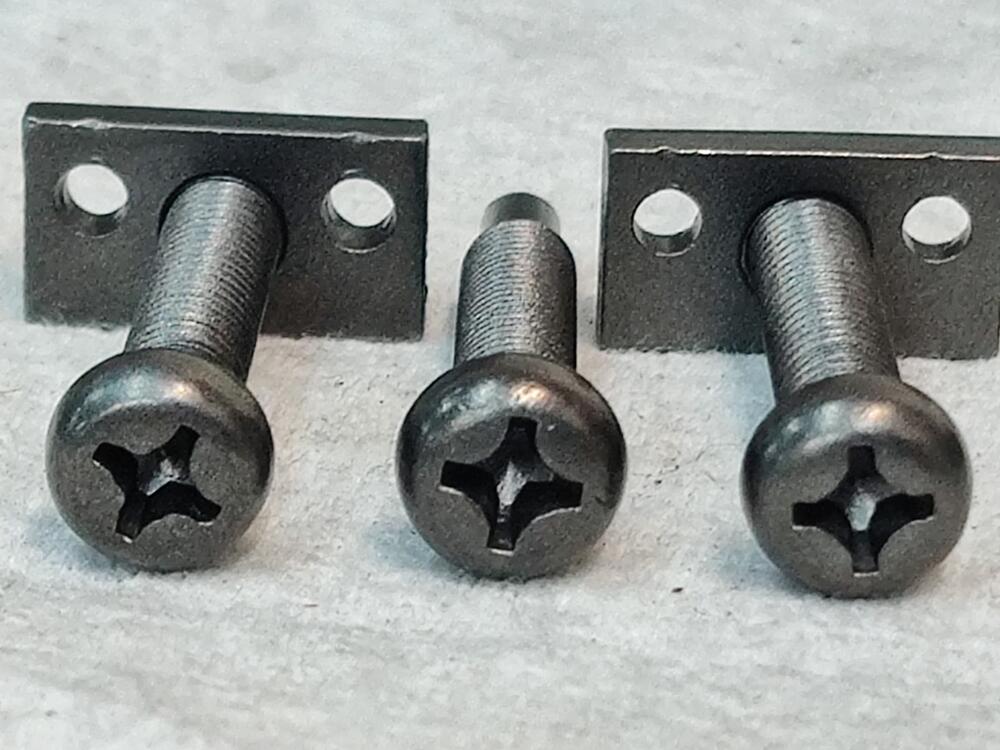
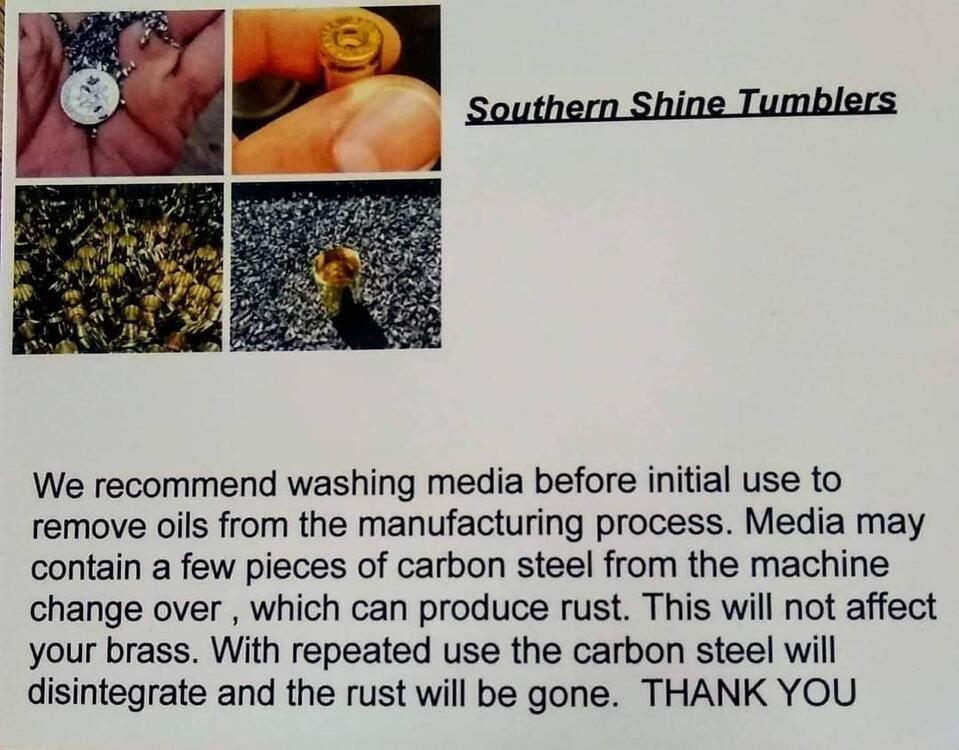
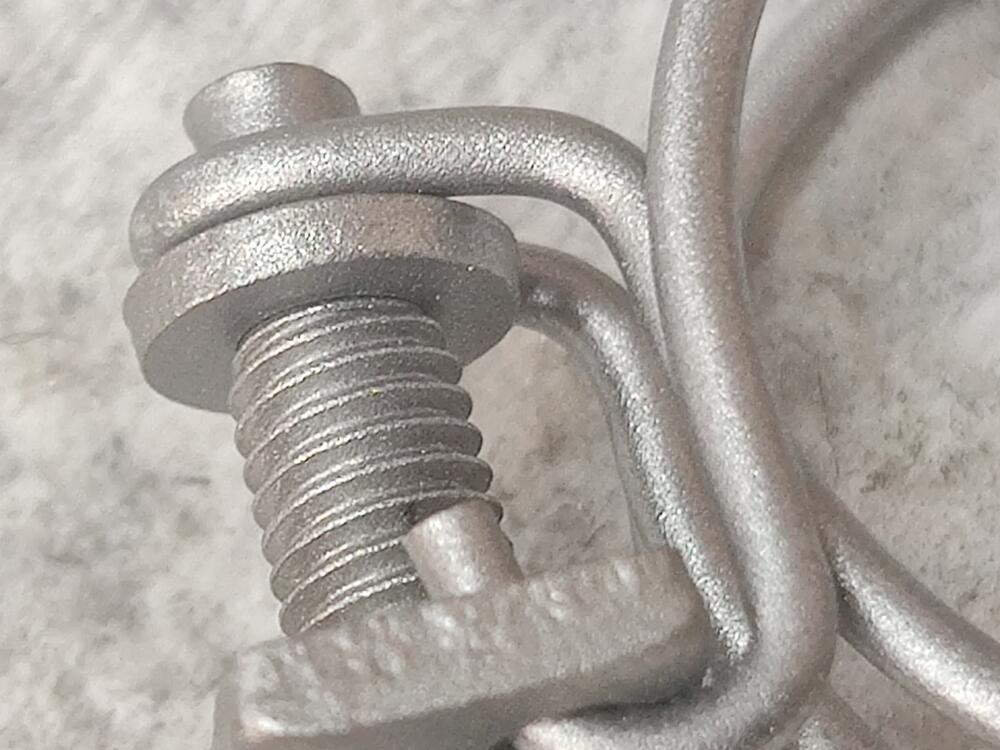
I thought I would take content from a post in my "build thread" and share it more broadly here. I've been working to prepare almost all of the hardware for my 6/1971 240z for re-plating, and have learned some, improving my process along the way. Here is some example hardware I ran through the process this week: These hose clamps are in pretty average condition after 50 years. Note that the less rusty one has some common damage on the phillips head. It has been mangled a bit. Something I have learned is that you can restore most philips screws with this type of damage by tapping the area with a hammer. I place the bottom end of the screw on the flat surface of my vise, and then use a hammer with a smooth face to tap on the top of the screw, working the metal back down where it belongs. I chose this one as an example to show that even when mangled this badly, decent results can be achieved (more pics below). So, here is a description of the process. Use these glass beads from Northern Tool and Equipment, important for size of grain, and bead blasting at 90 psi with a 1/8th inch nozzle to remove all rust, and to establish a consistent finish. I use one of these baskets and find that putting a variety of hardware (big and small) is great for trapping the parts in place so I can blast them without them flying around too much. For large parts, you don't need to use the basket, and you can then go back over them with the pressure at 50 psi to put a smoother finish on them. This smoother finish allows "second stage prep" by hand with less work. After glass bead blasting, all hardware (bolts, washers, nuts, screws and odd small bits) then goes straight to tumbling in one of these vibratory tumblers. I now use a stainless steel media (bought from Southern Shine Tumblers on Facebook). See pic below. It consists of tiny little bits of stainless steel that are good at getting into tight spaces, like between threads, phillips head recesses, etc. And I now use it dry. I was using water and a bit of citric acid, but I think that is best for doing brass shell casings. I was fighting keeping the parts from starting to oxidize/rust, and have found that the media works better and faster dry... to put a nice finish on the hardware. Minumum time in the tumbler is about 2-3 hours. You can add 2 to 3 times that and get an even nicer finish. For large parts that I can't tumble, I use a Dremel tool and the little wire wheel brush attachments after the glass bead blasting (first) step. For final, more consistent finish, I follow that wire brushing by hand rubbing the large parts with #0000 fine steel wool. It doesn't take a lot of work at that point by hand, but the combination of using the Dremel followed by fine steel wool by hand does end up taking some time. After hammer and top of vice on the screw head, then after glass bead blasting - with comparison to head that was not damaged, and lastly, close up of bead blasted texture: After tumbling, the hardware has a dark grey look to it. After wiping with lacquer thinner, the repaired screw in the second and third picture here is notably lighter in color. Sanding the top of the screw briefly with 320 grit or 240 grit would have been a good idea before tumbling, as I see some surface imperfections, but the screw looks pretty good compared to its initial state. Most of the screws I have done this to were not in as bad a starting point as this one. If you want to get the same media, send an email to Southern Shine Tumblers first to inquire on pricing and availability: southernshinemedia1@gmail.com They accept PayPal.


 3 points
 -
2 pointsDon't worry about Kats, he's fine. I'm in regular contact with him. Lots of disruption in his industry (air travel) at present, as you might imagine.2 points
-
2 pointsI’ve had guys come to me with the fuel supply plumbed into the vent lines, The vent lines T’d and joined to the fuel supply lines, and every other combination of crazy things It’s not like 4-5-6 were dead, they were alive, BUT the imbalance of richness or lean-ness or power was not making the engine run all that bad, it was just making such an interest exhaust note. Anyway, file this one away. Either leave your fuel vents open, or connect them to the air cleaner through hose with an actual hole that does all the way through.2 points
-
2 pointsOver about the next 10 seconds, at idle, the engine went from sounding like bad rap concert to the most beautiful symphony orchestra playing a soothing waltz!! The transition was the most astonishing thing I’d ever experienced working on these things. Like I’d laid a hand on it and it’s cancer was cured. I’m sure I heard angels harps too. Well, maybe that was the sound of my breath as I sighed a huge sigh of relief. So the rear vent hose was kinked closed. It was very short and ran out the back of the plate horizontally, then 90 degree up, then 180 back down to the breather nipple. Kinked right there at the 180.2 points
-
2 pointsMight as well do headers! Also, you might as well delete all that emissions stuff, or just cap off the ports and leave them off since it's already apart. I could clean mine up better, but I haven't. The car runs fine without all that. I have aftermarket EFi that controls cold idle and startup, but even before that with stock EFi after cold start injector /circuit delete you could mimic it by applying a little gas with the accelerator pedal. Unless of course you want to keep it as original as possible, which is perfectly fine too..
 2 points
 -
It is a special group of true believers (perhaps slightly mad) that decide to do their own parts prep and plating. If I had it to do over again, I think I would build a Shinto shrine next to the garage so that I could visit it and ask for the gods' blessing before committing my parts to the plating bath .2 points
-
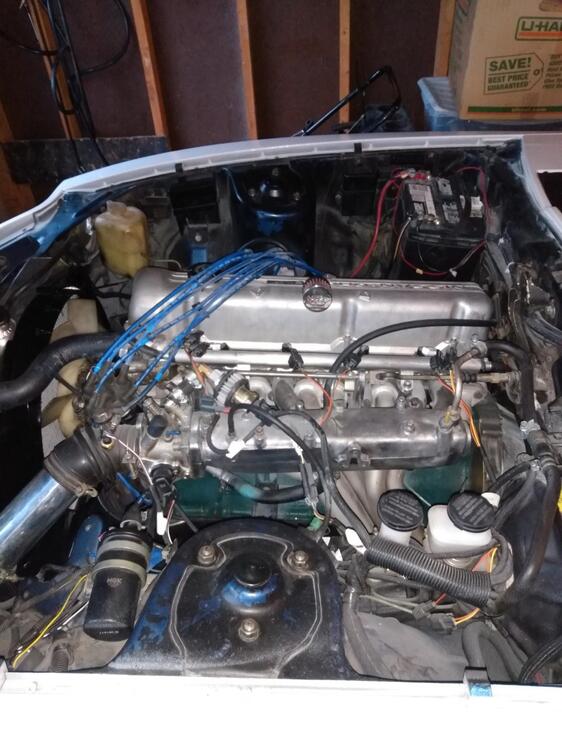
2 pointsI haven’t done a whole lot other than pull and clean things as they come off. The first thing that started it all was a rotten coolant hose going to the air control valve. Oh I’ll just fix this and put it back together, Cleaned it up a little and replaced the nipples with ones from my donor 280zxt parts stash. Then from that to now Of course I had to keep cleaning things up and pulling them. One of my main goals is to paint the engine bay the body color. Never liked being able to see the red and someone else decided to rattle can black what they could while apparently removing nothing. At least it cleans off relatively easy. I’m currently cleaning up and undoing the wiring harnesses. Sent from my iPhone using Tapatalk2 points
-
2 pointsResist...that’s what I had to do. My wife hates my Z too. Says “what a piece of crap”. She only appreciates something with headed seats, SiriusXM radio, adaptive cruise control and CarPlay. I don’t need that crap. Wait until she finds out it doesn’t even have cup holders. I had to tell my wife, why do you want to stop me from enjoying my hobbies...that’s not what your do to someone you care about. You can also say, you can’t get much money for it the way it is but with some work it has some value and working on cars is better than drinking booze and gambling. It’s a harmless hobby. Resist! Sent from my iPhone using Tapatalk2 points
-
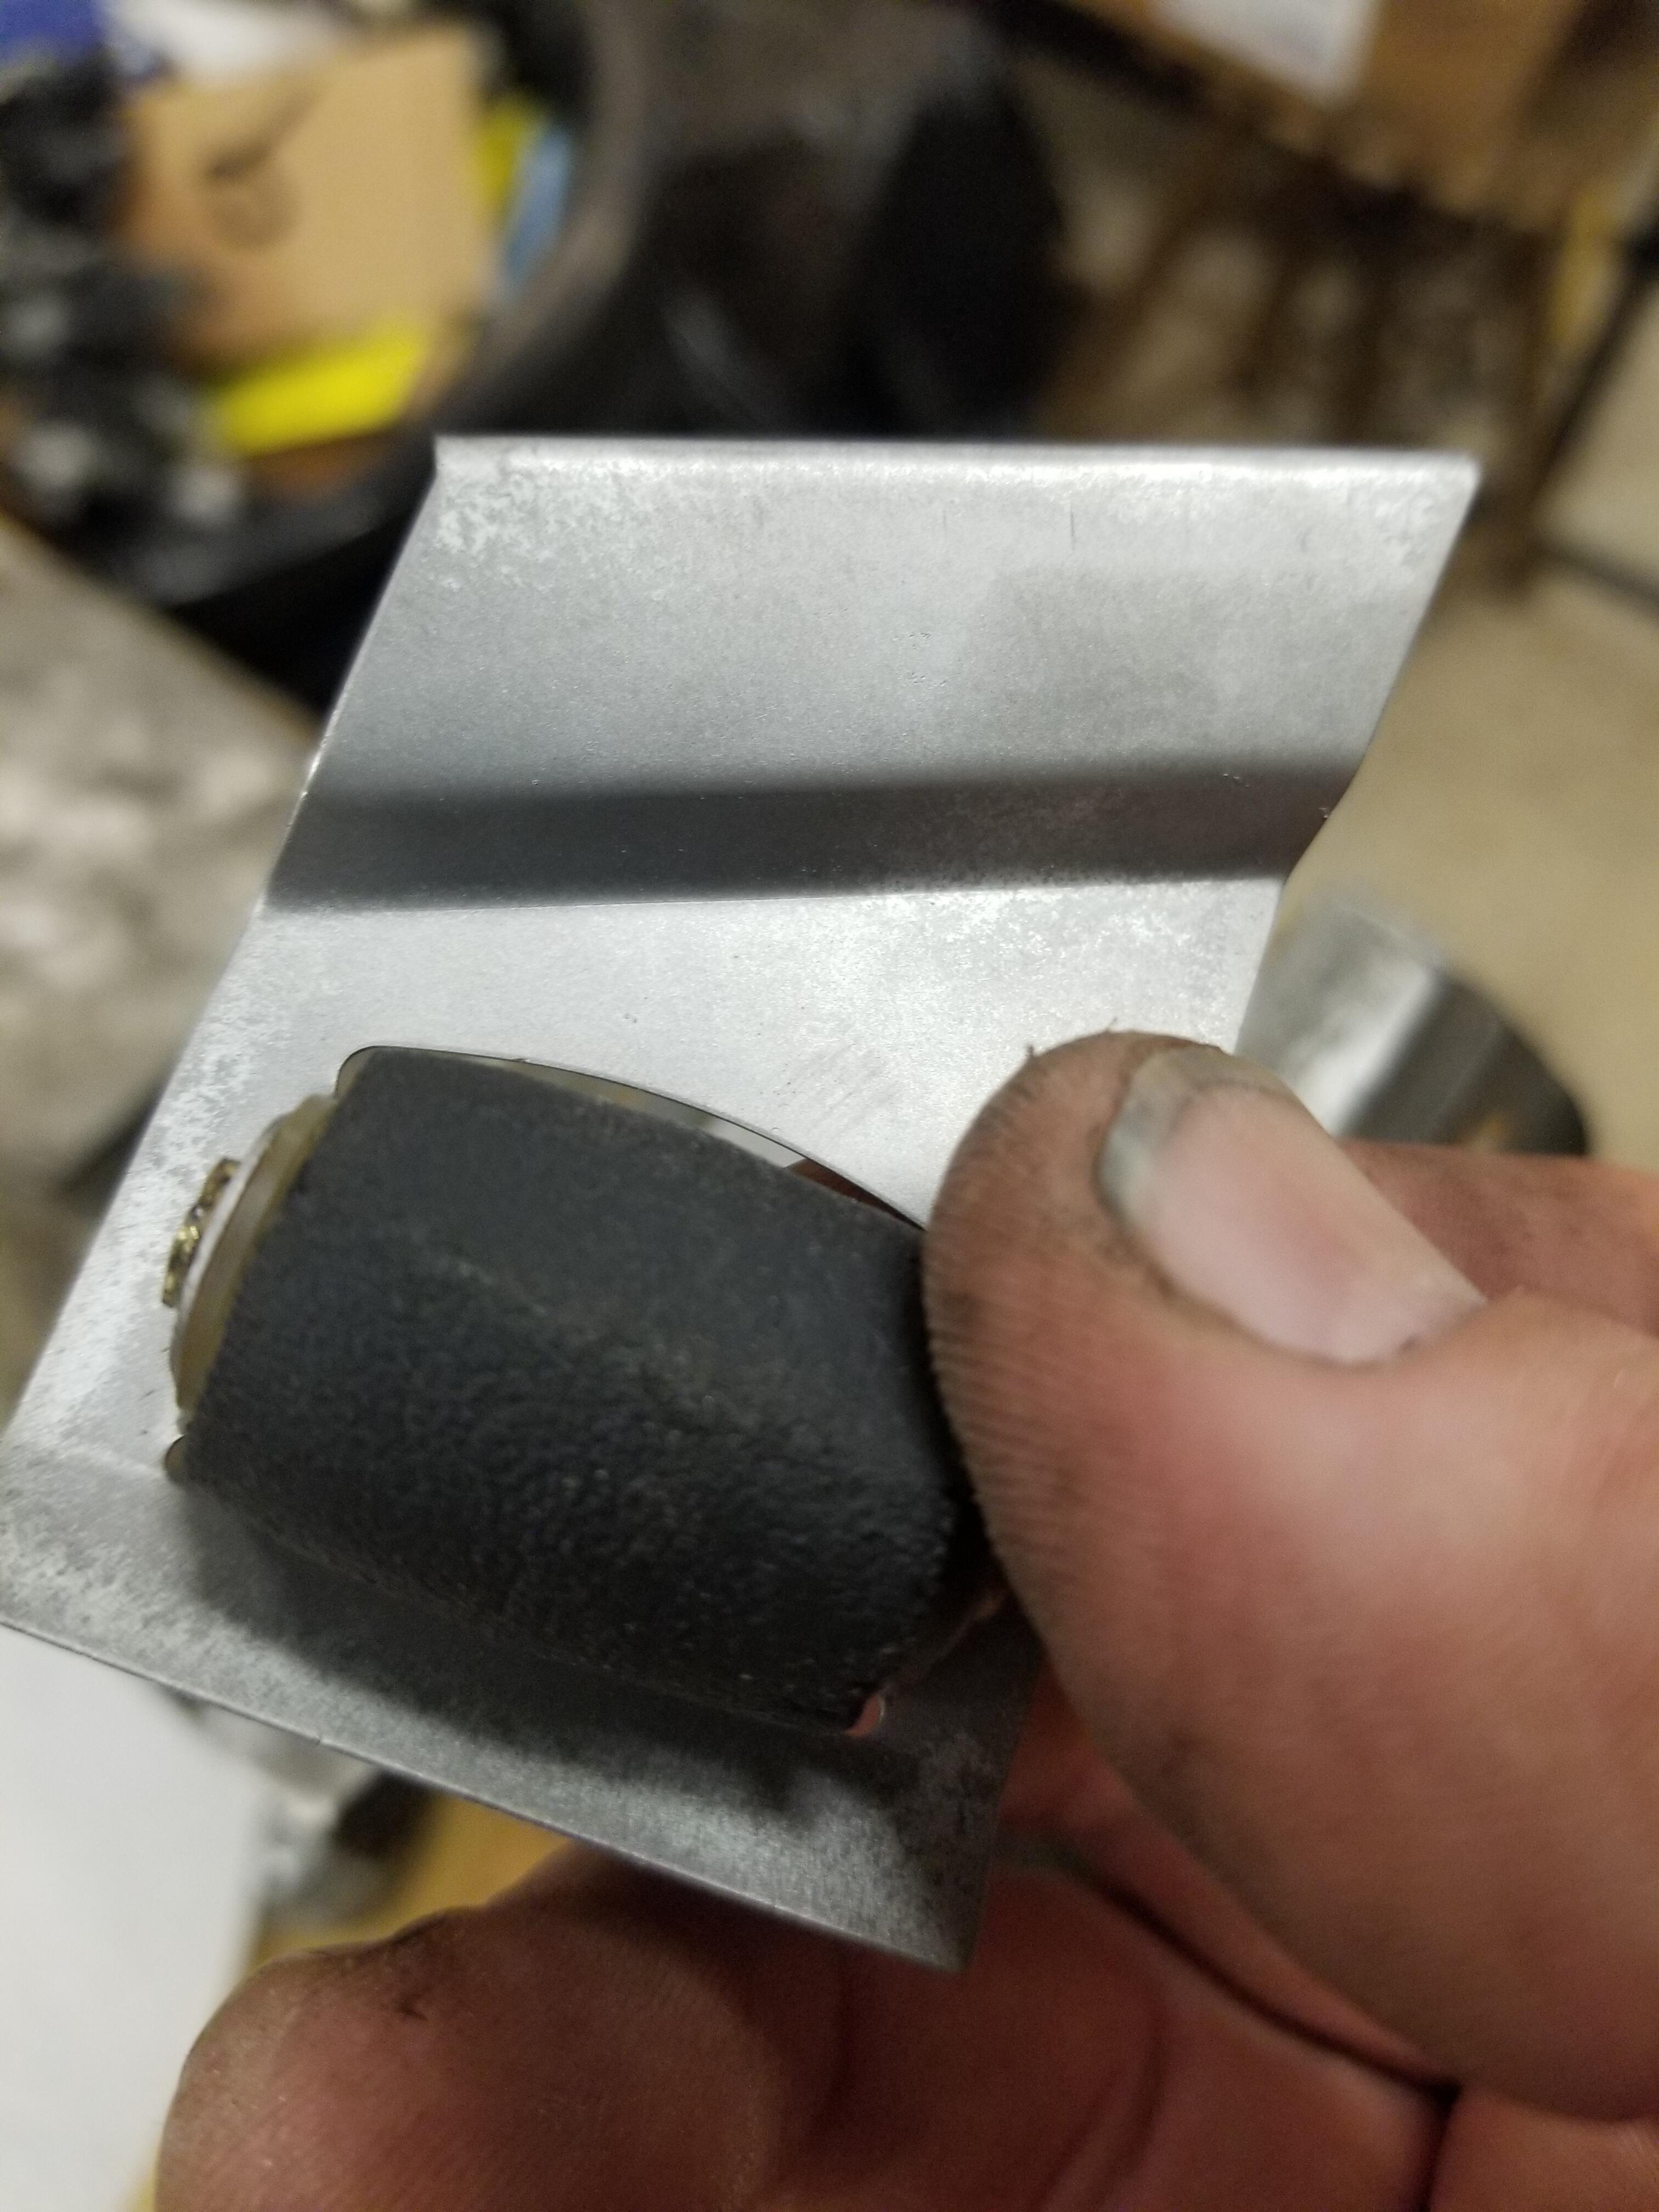
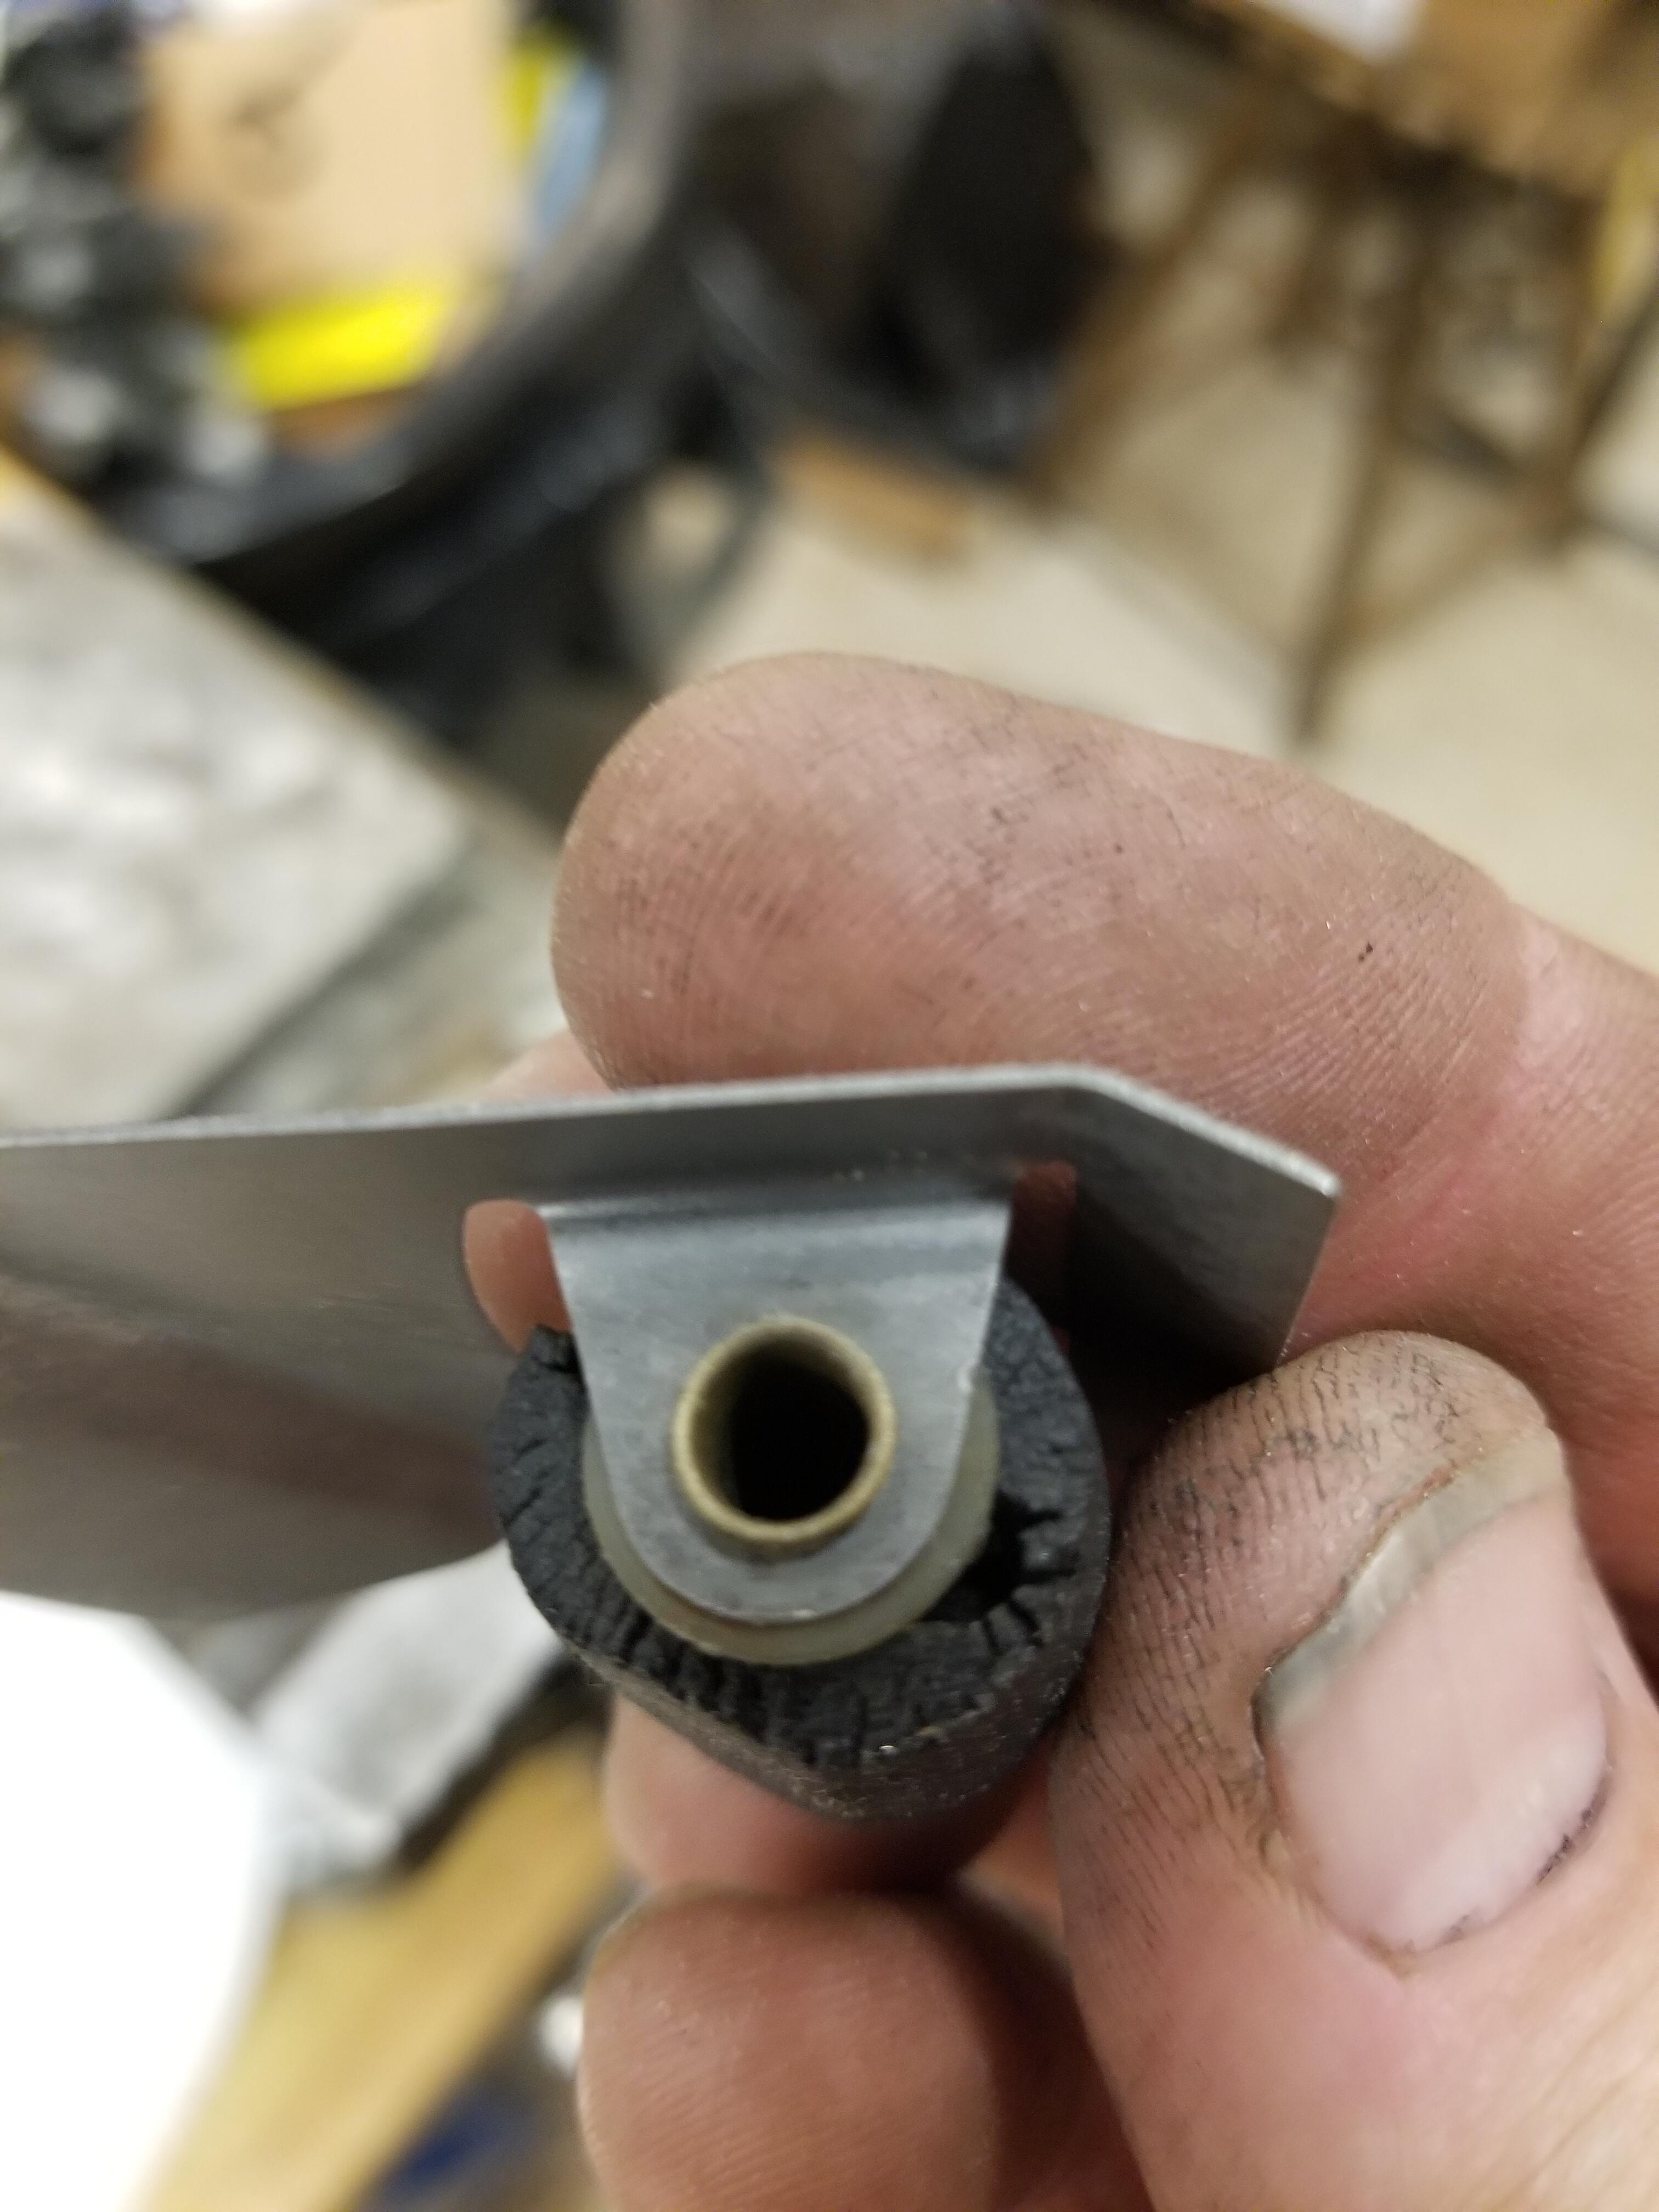
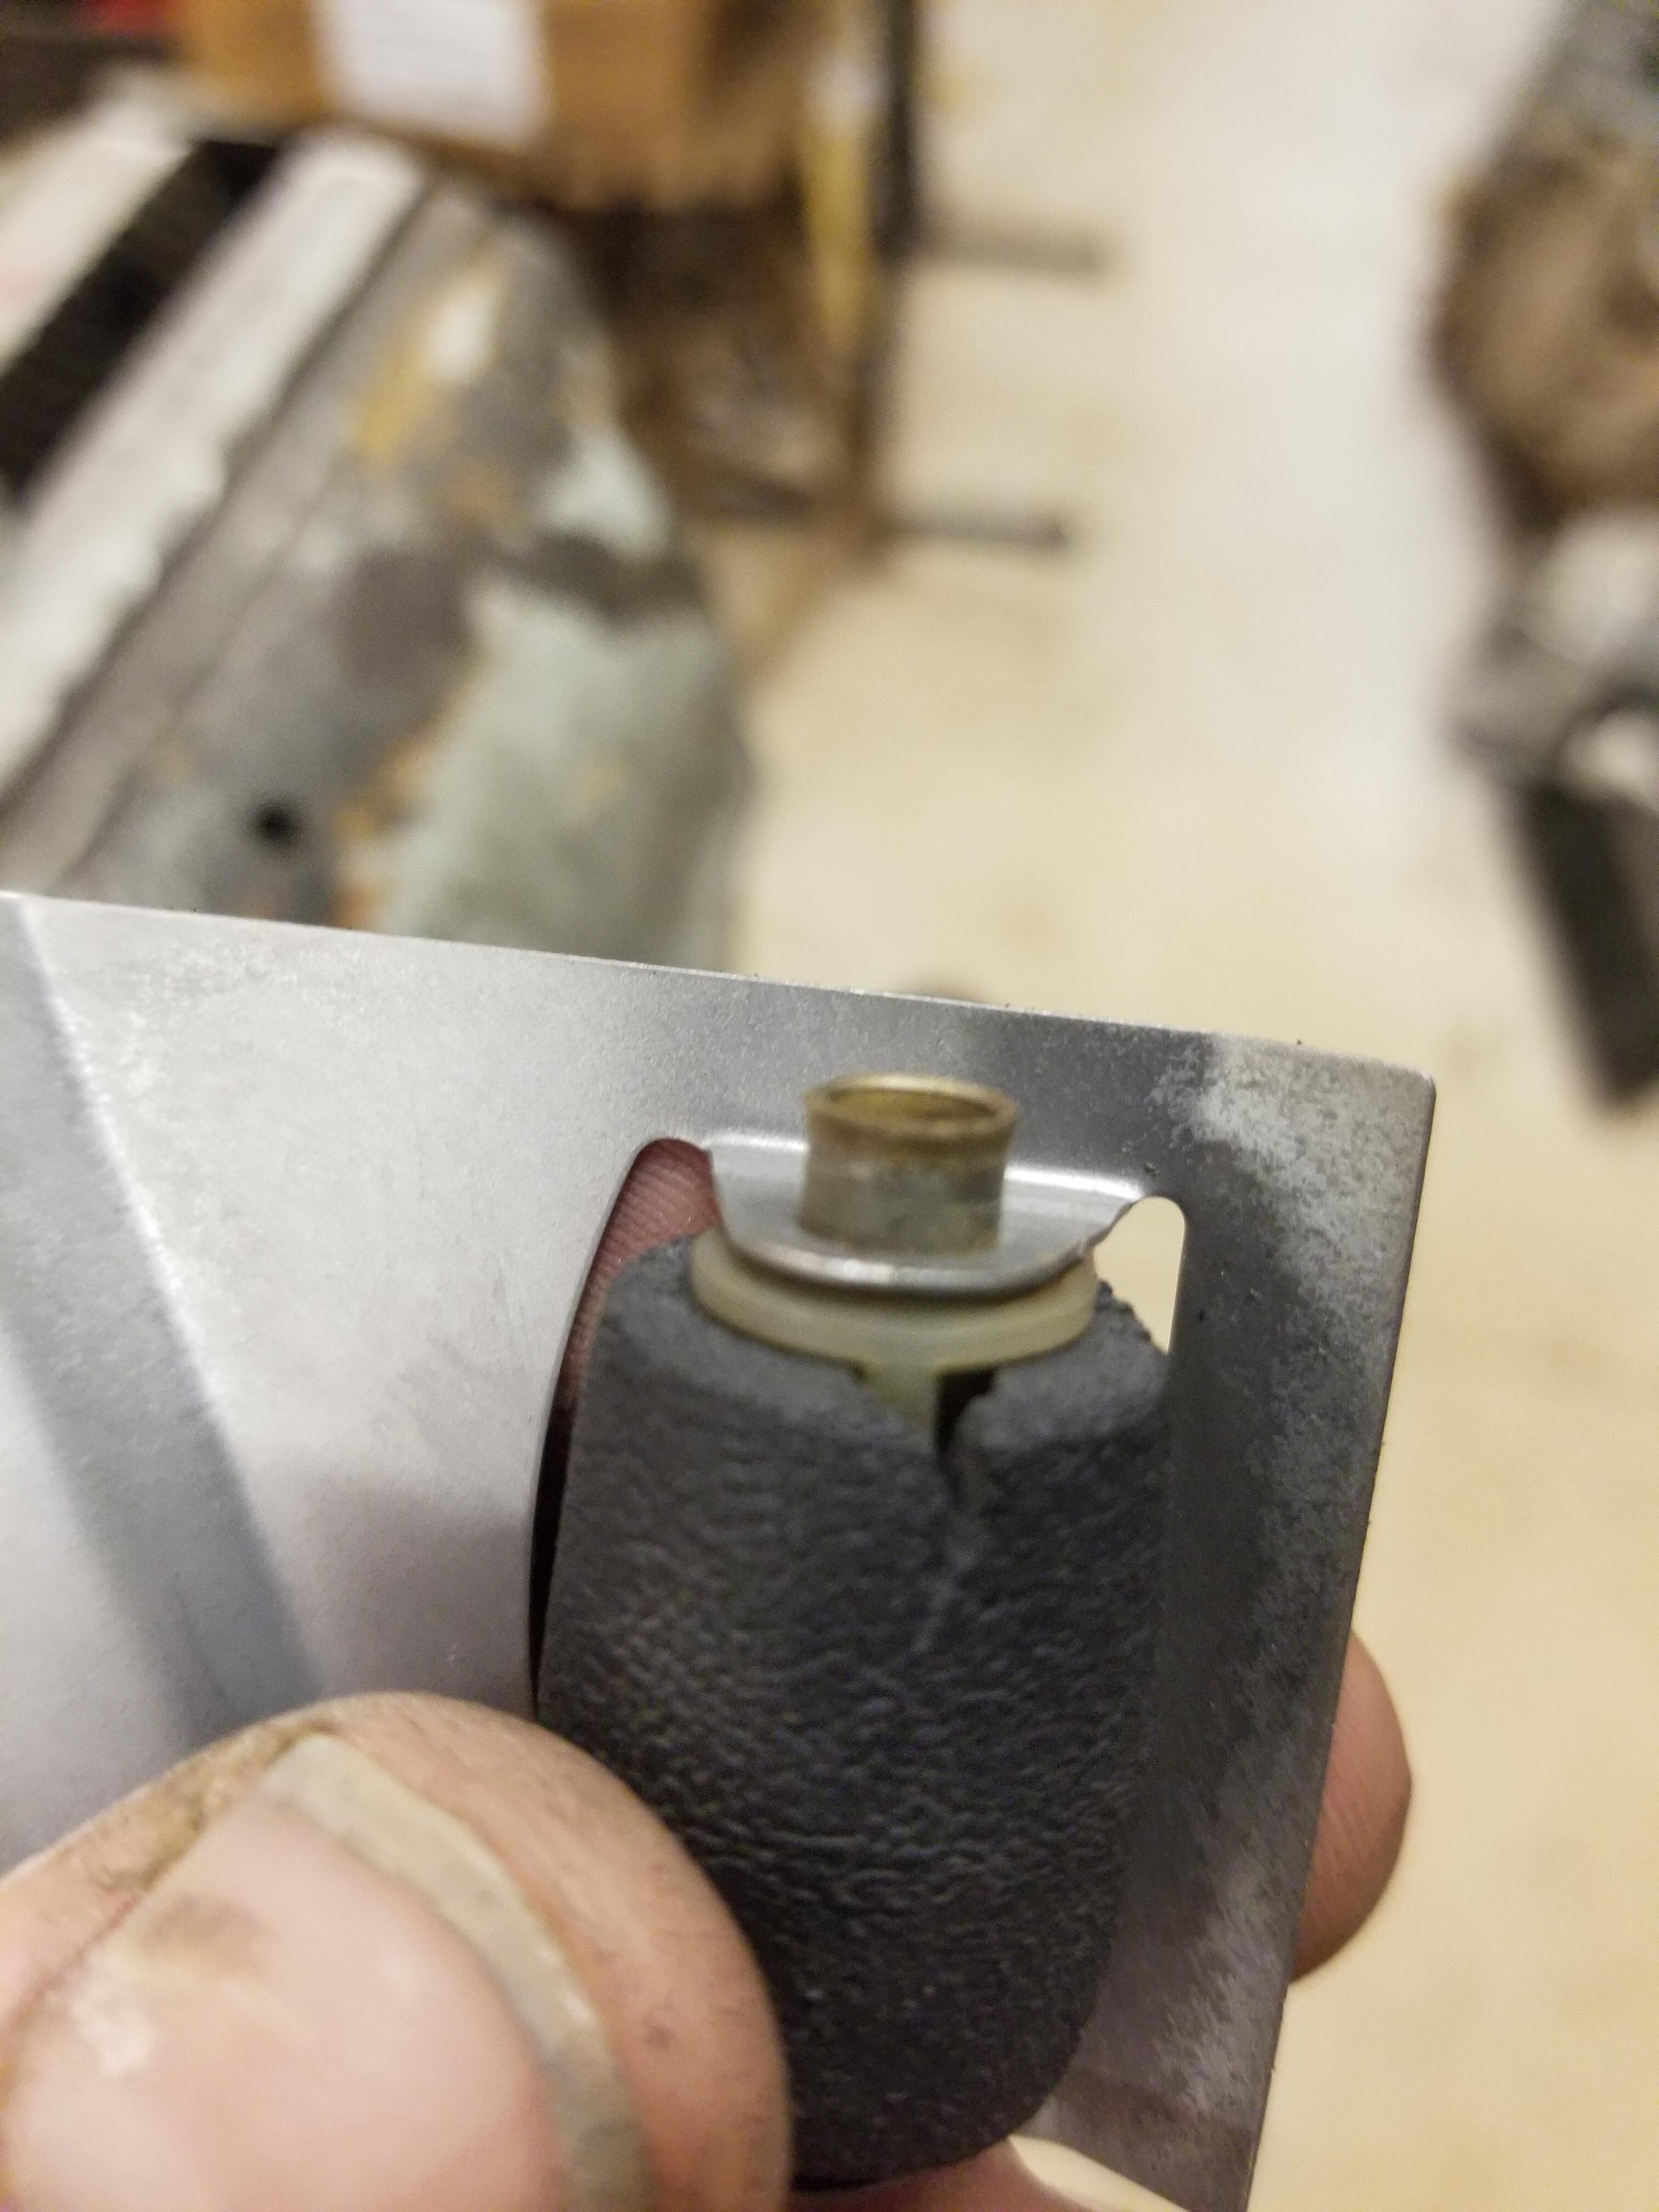
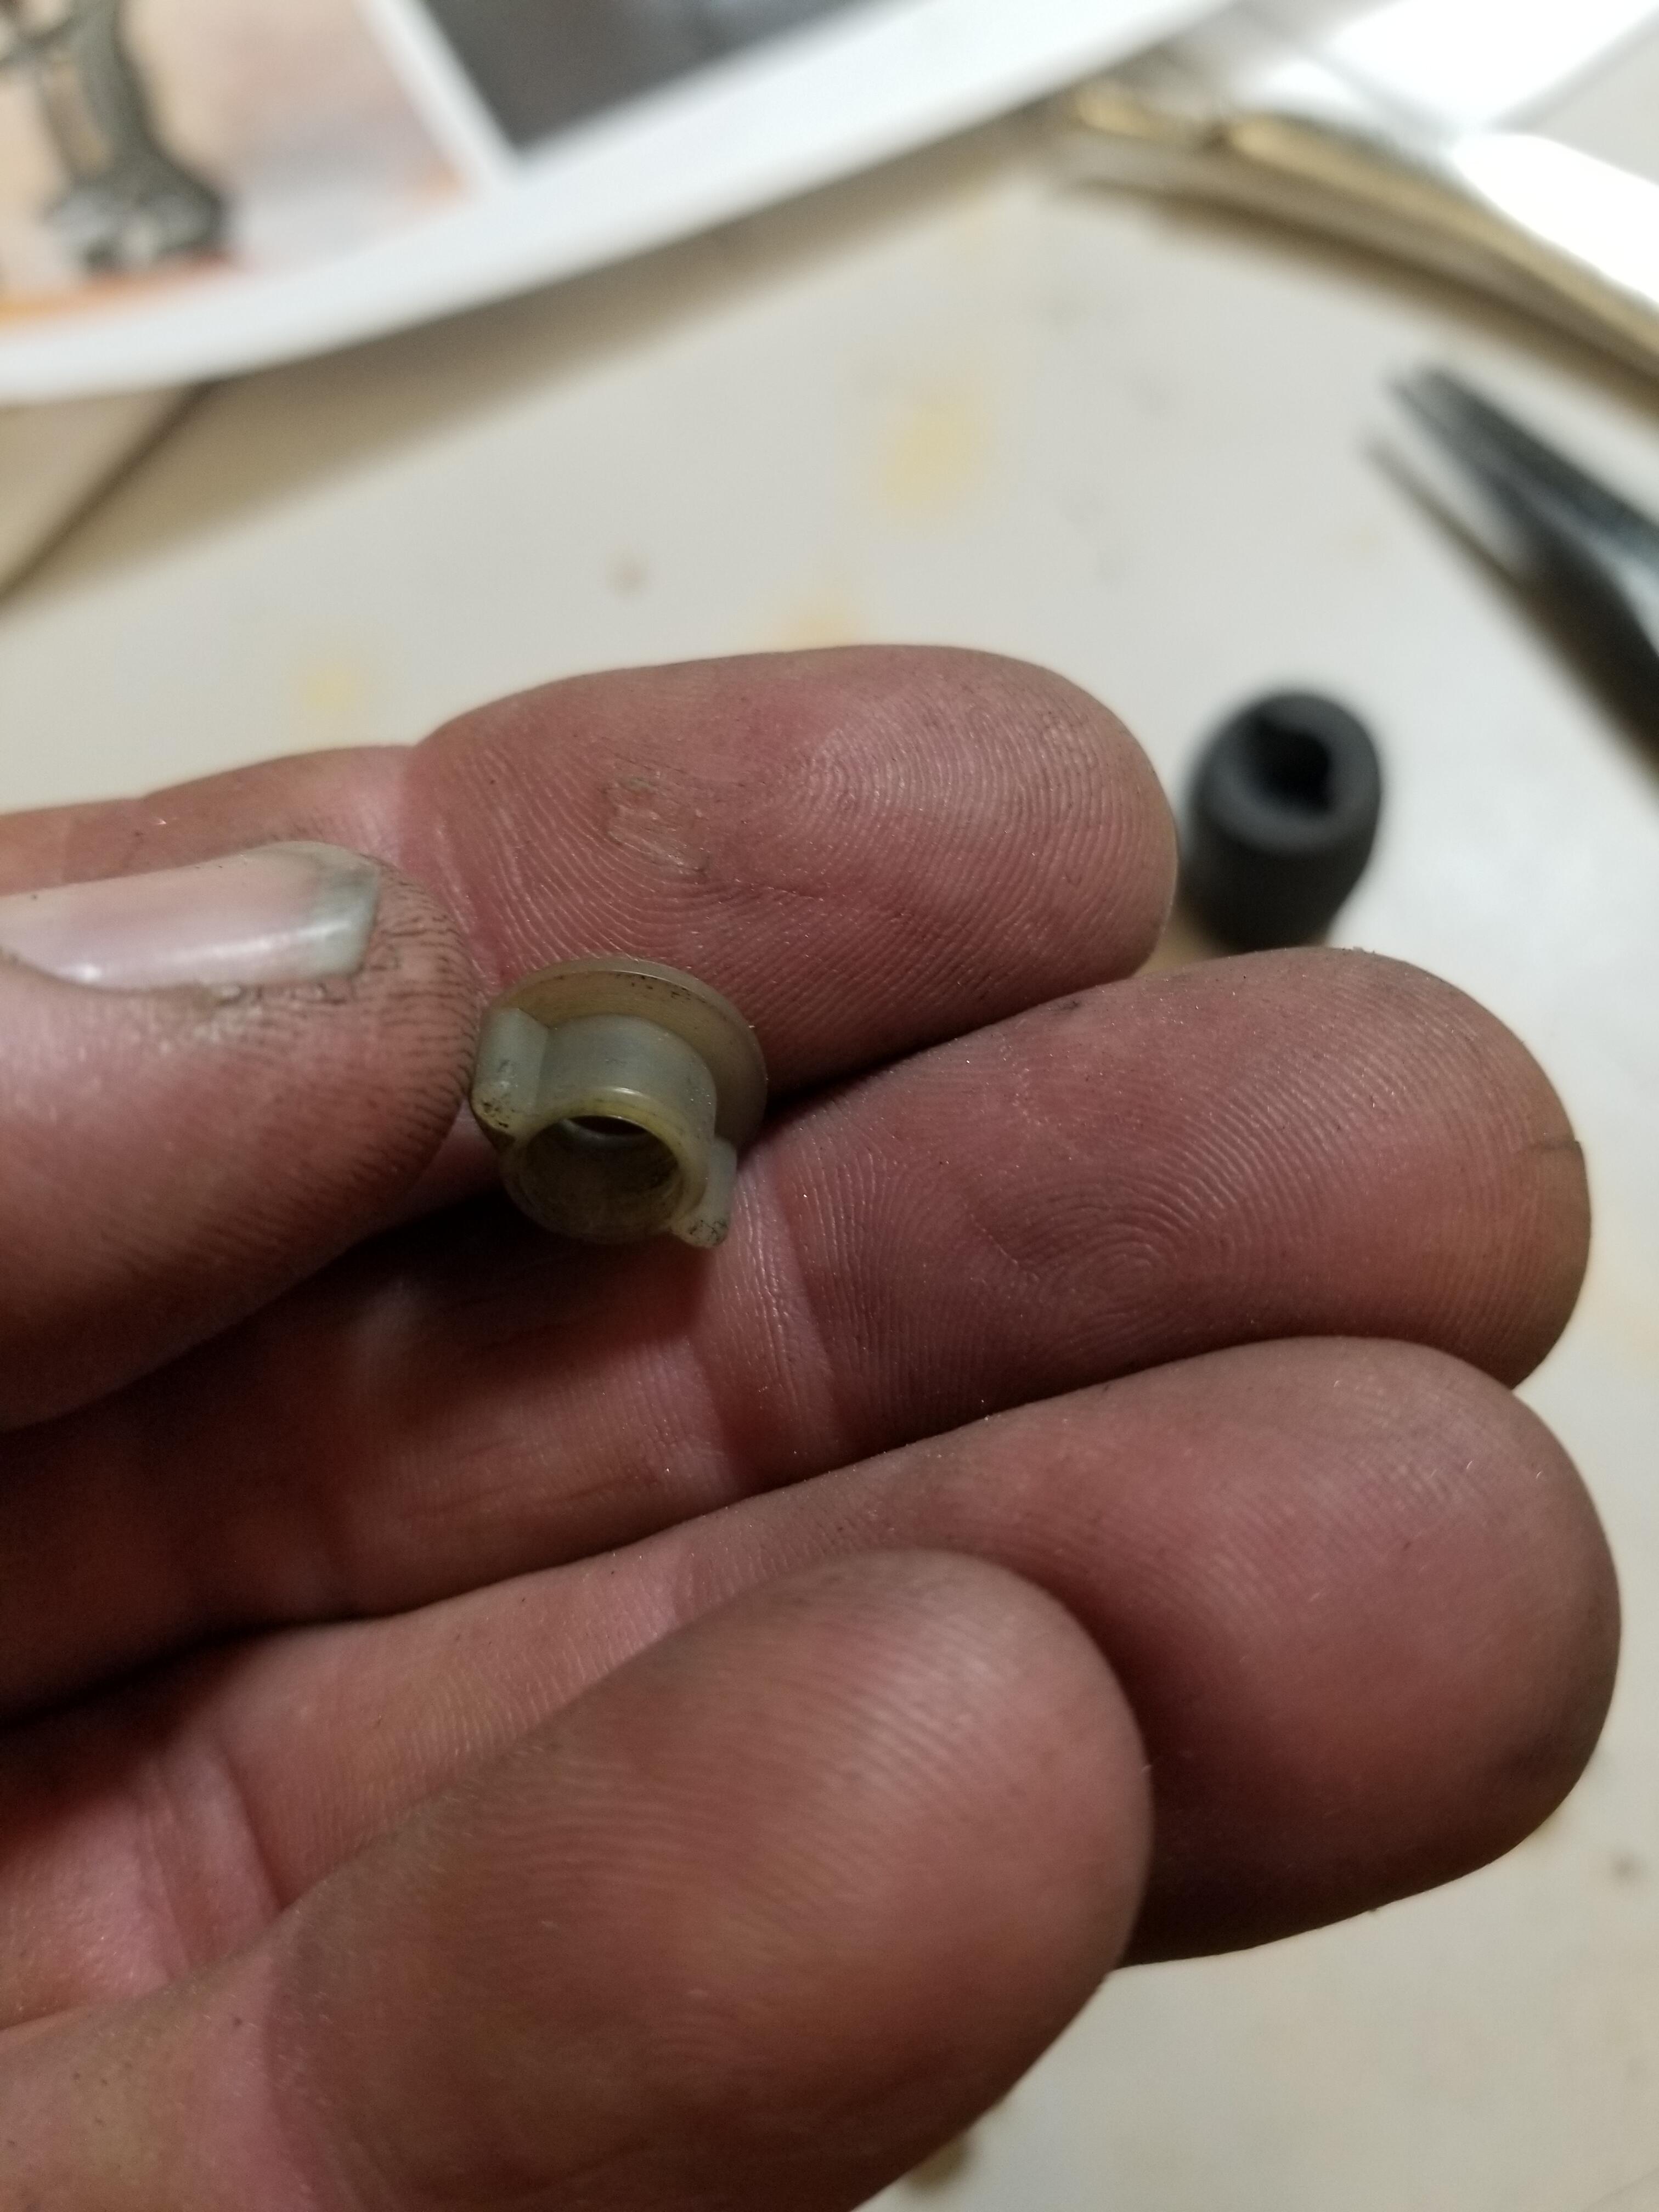
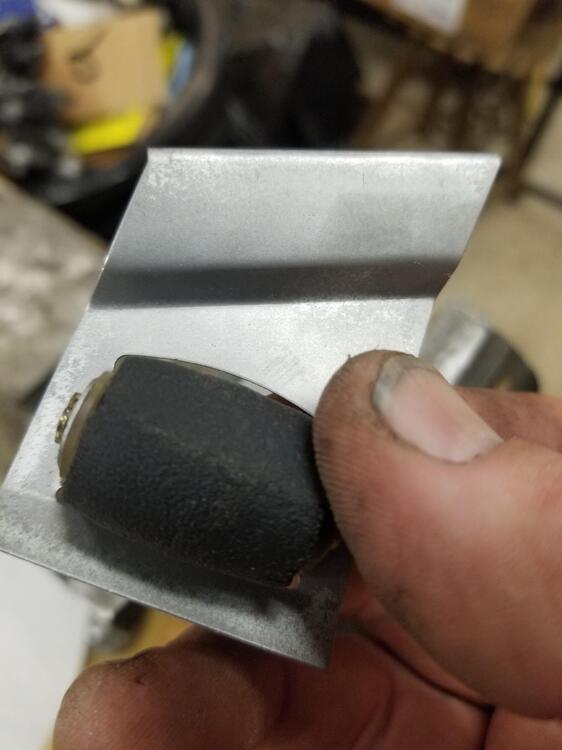
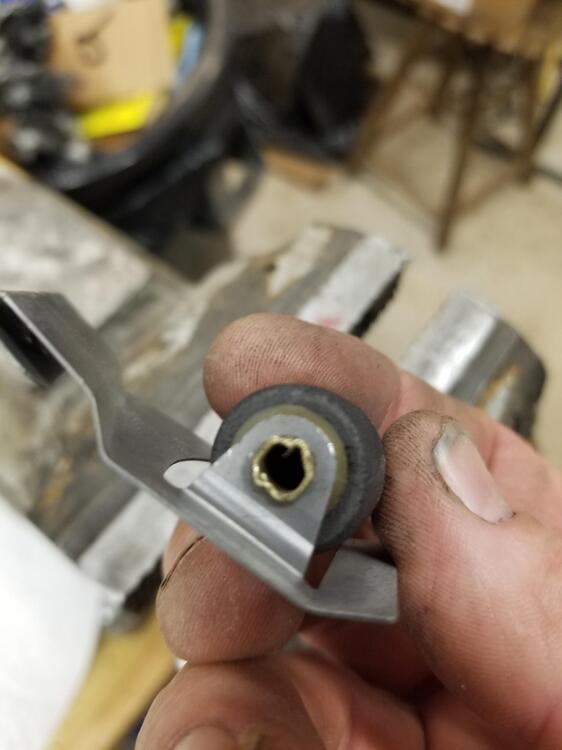
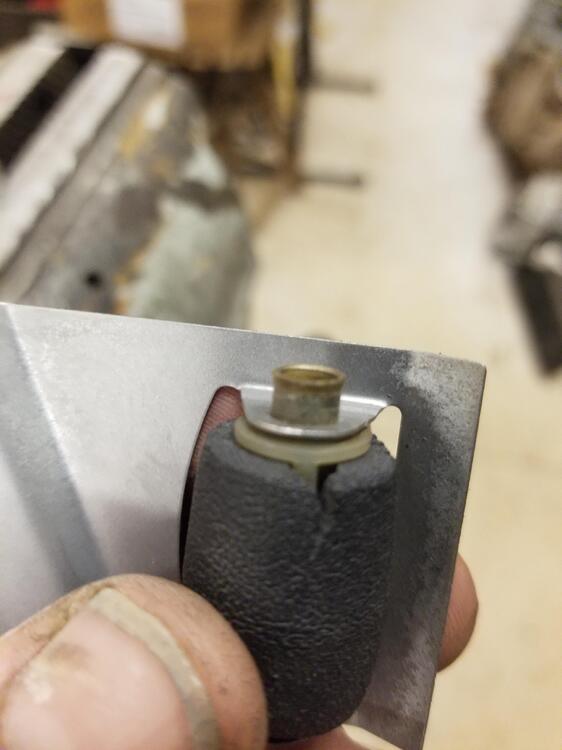
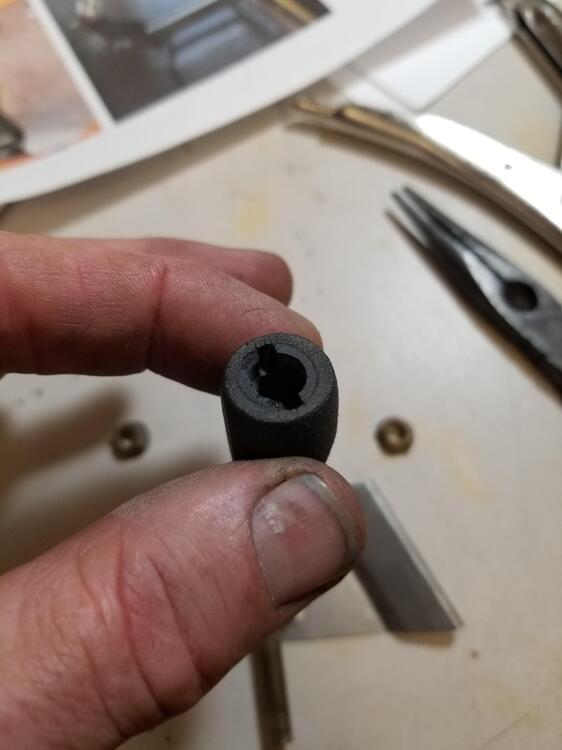
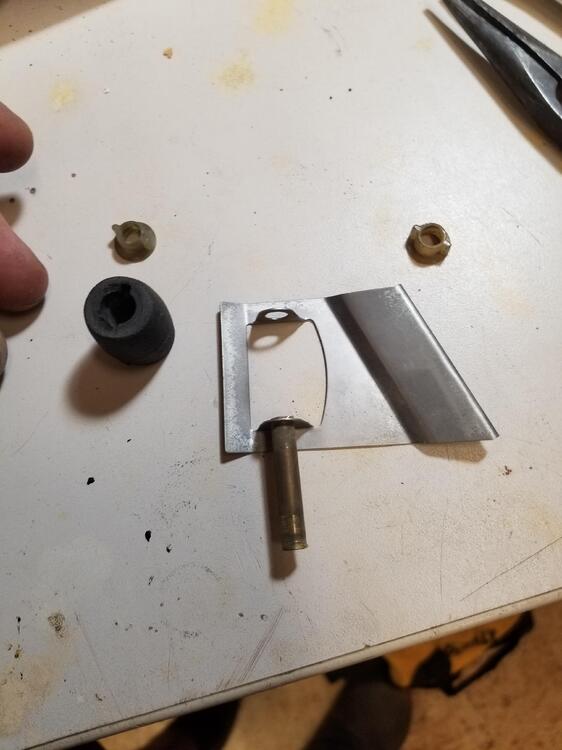
1 pointSo I was pulling plating together today. This window roller is in bad shape. The rubber is rock hard and is flat on one side. So I worked on getting it apart. I crimped the end back closed and got the pin back through. Then the roller came out So then I was like, where am I gonna source a new roller. I wonder if Steve Nixon makes one? Lo and behold! https://www.240zrubberparts.com/apps/webstore/products/show/7727245 @nix240z I plan on reusing the tube and expanding it with a long skinny punch


 1 point
 -
1 pointGreetings! I’m in the sharing mood again, so thought I’d share an episode from the series “I have no idea what just happened, but you won’t believe what the solution was”. Yesterday, local Z owner wants to drop by for an SU tune on a recently acquired late 71. It’s “running” but is overheating and doesn’t run “Well” overall. Suspect mixture too lean or fuel supply lacking. So do the usual, no need to bore you with details, but here is the overview, no order intended. Bowl fuel level Fuel pressure air flow sync linkage evaluation. How many turns down for the knozzles, Nozzles were down 1 turn on the front and 1.5 turns on the rear. Aha. Too simple. Turn them down 2.5 each. As I have decided in the past, got the AFR gauge out finally, stuff it in the tail pipe, 12.5-13 at idle. Much better. That should do it. Get the owner to go for a quick around the block test to see if there is a noticeable change in performance. Goes around the block and comes back with big smile. I could here him enjoying the hell out it, the exhaust is not subtle on the car. Says there is 50 more HP and while it was short drive, the engine temps were much lower than before. We are DONE I say. About this time another friend drops by, so the inevitable conversations ensue and finally I decide the put the air cleaners back on and send the young man on his way. I do so, he starts the car, and it sounds a bit rough, but off he goes.1 point
-
1 pointThanks for sharing that. It's a good thing to add to the memory banks. That's similar to what I dealt with recently. I tuned a friend's 72, set the floats higher, etc., but the car wouldn't run worth a damn. Another friend messed with the dwell, and the car ran better for a short while. The first friend had me check the car again, and I told him it had to be the ignition. When I finally installed the Pertronix, that car ran like a scalded dog. It was another matter of having fixed everything else, what is left to mess with?1 point
-
1 pointOk, what madness is this? I touched nothing else, what the **** did I disturb? Ok, what did I do befween the time it ran fine and when it went to crap…. Think….. Well I put the air cleaners on. Notice I said cleaner”S”. They look more or less like this. I did not take pictures of the actual situation. Anyway, These flat pancake air cleaners fit just fine, AND they have a knipple ob the back for a rubber hose to run to the fuel bowl vents. I had faithfully put these back on with the air cleaner bodies of course, good little boy that I am. Little short black vacuum like thick walled hoses. So on spec, with the car idling madly, roaring away, and not from high RPM, I pull the rear fuel vent hose off the top of the fuel bowl. And then the most magical thing happened.
 1 point
 -
I feel ya, it’s a lot of prep and you are doing it the easy way compared to me. I’ve just been using a vinegar bath and then wire brushing them by hand and repeat if needed. If the pieces were not rusted/pitted much they could probably go straight to the plater but most of mine will need some more work which I have not decided how to tackle yet. I guess it’s Dremmel wire brushing and some hand sanding and steel wool. Sent from my iPhone using Tapatalk1 point
-
1 pointWait Till she hears the " Peace Of Sh*t " is gone up over 80% in price only in this last year!! Thats golden... I'm glad that i don't have to answer for my hobby!1 point
-
Have you contacted them to inquire about their process steps? I would expect: Degreasing Pickling - which will remove rust Plating Chromating Possibly a post plating baking to remove nitrogen Some platers might also offer abrasive stripping services. I am planning on using the same plater motorman7 uses. We'll see on the results. They told me all the paint needs to be stripped and rusty parts might be pitted... So I inferred they don't do any abrasive stripping. I have been using the SS media. It actually has a little paint thinner in it from me cleaning it. That helps when tumbling. I wont go to the level you have because I'm not sure it will matter. Pickling tends to dull the metal and can change the surface finish. It all depends on how the plater handles it. I have spoken to TFC also. I would be open to using them too.1 point
-
1 point
-
1 point
-
I don't think I am exaggerating when I say I have probably 20 weekends of time invested in fasteners: going through all of my labeled zip lock bags, measuring and writing down details regarding nearly all of the fasteners on the car, identifying any non-original hardware that was on my car, replacing it from my 510 fastener collection (I was young ok... and I wrecked a couple!). I may have more than two hundred hours of glass bead blasting, lots of hours of dremeling, and a dozen hours of polishing with #0000 steel wool - all "invested" in prep for plating at this point. Today I spent a bunch of time going through all the boxes of parts on my shelves looking for any fasteners I missed. I found a couple of clips for side marker lights. I found a couple of clips that hold the chrome tail light trim bar to the lens. I found that my throttle rod that Paltech did is just ok, not great - so I will have it redone. I found a few other odds and ends. Soooo... I'd love to find out that my time spent glass beading and tumbling and steel wooling... was completely unnecessary. I am tired of it. And my restoration is just dragging on. I thought I had a chance at getting the car painted last August. Now it is this August, and I haven't done any additional bodywork since last year. I've got a 510 sitting in the corner of the garage that will go through a similar level of restoration sometime after I finish this car. It would be great to just dump all the fasteners in a couple of boxes and send them off, and have them come back like new. It sounds like that may be possible based on a few of your comments here. I plan to use http://tfcplating.com/. I forget how I heard of them. Anyway, if anyone can share more detail about their platers, maybe some before and after pics, then maybe I can discover the even easier way than my "easy" way of getting good results.1 point
-
I would prefer to plate everything in house but it is so slow!!! I also just don't have the correct power supplies or large enough ones. So I am going to send a batch out. I will hold back a few things I can do in house that they might mess up. Hoping for good results1 point
-
1 point
-
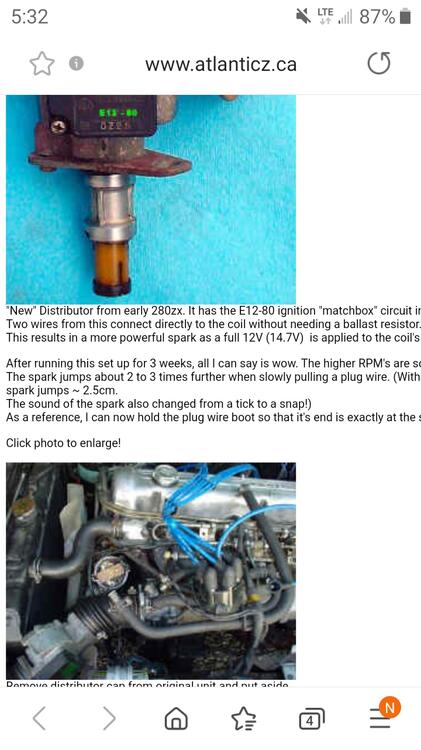
1 pointYou should follow this word for word. Same car as mine and yours. I did it. Very simple. All we can say is "wow". Thank you Phillip @240260280 https://www.atlanticz.ca/zclub/techtips/distributor/index.html
 1 point
 -
I believe the plater will acid dip all the hardware prior to plating. So any residual rust will be removed. Although the cleaner it goes in the cleaner it aught to come out. Also, as a note, I have found that JIS screwdrivers will still easily turn screws with this sort of damage. JIS screwdrivers are the proper screwdrivers for all Nissan screws1 point
-
Three minutes in Muriatic acid does wonders. Eats rust off......not so much grease. The stuff is cheap and you can do a large batch at a time. Bolts and parts come out clean.......ready to plate. IMO1 point
-
0 pointsReally hard to say. Classics are now worth more in the US strangely. I think it has to do because of all the liberal green deal agenda stuff going on here for 2030. The might even ban driving classics here, who knows ? I hope not.0 points