Leaderboard
-
240260280z
Free Member3Points5,426Posts -
Jeff G 78
Free Member3Points3,007Posts -
psdenno
Free Member3Points2,632Posts -
hatepotholez
Free Member1Points323Posts


Popular Content
Showing content with the highest reputation on 12/31/2014 in all areas
-
Well, that explains the dry cleaning charge my mechanic adds to all his bills. Dennis3 points
-
I always tune my carbs in a suit with French cuffs and cuff links, Doesn' t everybody?3 points
-
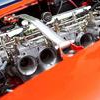
You must tune the carbs in two stages. 1. Idle 2. Off idle **** DISCONNECT CHOKE CABLES **** Pull them out of the levers on the carb! Make sure the jets move up and down freely and do not bind. To tune the idle, you must warm up the car and, as mentioned above, ensure that timing and valve lash are set correctly with no vacuum leaks. The pistons in the carbs should fall freely and both at the same rate when dropped by your fingers. Do this with the oil dampers removed. You should also visually ensure they fall completely to the bottom of their travel. The needles should be straight and placed in the piston so that the shoulder of the needle is aligned with the flat of the piston bottom, not with the machined trough. (refer to the next two pictures). Before warming up the car, turn the knurled knobs under each jet all the way up then back down 2.5 turns. The next picture shows how to turn the knob. It is like a regular screw and turning the jet up would be turning CW if you were looking at it from below. The first step in tuning the idle is to ensure the linkage from the accelerator pedal to the carbs is disconnected. Simply pull the nylon socket off the Aux. Throttle shaft (8) in the figure below. The next step is to balance the air flow into each carb at idle. You do this by turning the "throttle ajdusting screws" (10) in the figure below. There is one for the front carb and one for the back. The goal is to get equal air flow into each carb AND get the idle where you want it. It is good to use a syncronizing device to measure air flow. Once you are happy with the air flow balance, the next step is to adjust the fuel balance between the carbs. A quick check of fuel balance is to lift each carb piston up a little (one at a time with a 10 sec break between lifting) and note how the engine stumbles. It should behave the same for each piston being lifted. Next lift a piston all the way up and see if the car will run on just one piston. Repeat with the other piston. If the car stalls out, restart (you may have to blip the throttles by hand to get it going as the rod coupling the throttle linkage should still be disconnected). When you raised a piston, you disabled THAT carb so the car was running on the other. If one carb runs worse than the other, give it more fuel (turn its jet down 1/2 a turn) and re-balance the air then try disabling both carbs and compare. Both should run equally crappy. Repeat until happy then have a look at the plugs #2 and #5 so verify that the front carb #2 and back carb #5 are similar. I'll add off idle tuning later.2 points
-
They look great! If you need any other parts let me know. Series 1 ash tray? I have a box of little NOS parts that I have to go through. Chuck1 point
-
1 pointDon't overlook the coil or coil wire as a possible culprit. A coil usually fails completely but you might be getting intermittent HT performance at the source.1 point
-
NOTE: Early SU carb's AIR balance can be adjusted for both idle and off-idle however there is only one FUEL adjustment that can be optimized for idle OR off-idle. (both fuel balance between carbs and fuel). If the carbs are not worn, the mechanical design will keep the idle and off-idle fuel differences minimal. To set up off-idle: Warm up the car Attach the rod linking the throttle shaft (11) to the Aux. Throttle Shaft (8) Turn the fast idle screw (see picture below) to get the idle ~ 3000 rpm Measure the air flow into the front carb then turn the Balance Screw (14) to adjust the air flow into the rear carb. Match the rear carb's air to that of the the front carb. (here is how to use a unisyn) Once the air is balanced, lift the piston in the rear carb and note the RPM where the engine settles (the car is now running on the front carb only). Next lift the front carb's piston and note the RPM where the engine settles (the car is now running on the rear carb only). Adjust the fuel height of the rear carb's jet so that the RPM's match that of running on the front carb. Repeat the three steps above to confirm air is balanced and RPM drop is the same Back off the fast idle screw completely so that it does not touch the plate. Leave a 1mm gap from the screw end. Final adjustments: Drive it, read plugs, and note power. Adjust jets up and down (in equal turns) to match your target plug colour. Enjoy the car! Thanks to SteveJ (Georgia's SU expert) for helping refine the above tuning procedure.1 point
-
One of last winters projects was to remove my dash cap and console. I also removed the door from the glove box - gave it all a good spray with SEM Color Coat 15013 Landau Black. Everything looks great - matches nicely with the original color. Color Coat is more of a dye than a paint. You can't scratch that stuff off with your finernails at all. It takes a beating and looks great.1 point
-
1 pointWell overdue update: Still running strong. Had a new friend for a short while: A 1978 Land Rover 88 Santana, fresh off the boat from Spain. The highly-and-professionally modified 1975 280z in the photo is for sale. Jason @ www.JTMmotorworks.com1 point
-
Thanks Chris, I ordered from both sites. Eastern beaver saved me on the .312" male blades that I needed!1 point
-
1 pointI'm doing the bodywork on my 260, finally got around to the rear. The lower valance panel has a factory hole on the left side, directly below the reverse light, app. 5" x 1 1/2" I'm curious what is the function of this hole? My 240 has no hole & in the dim recesses of my memory, it seems as if 280s had more than one. Also, I want to clean up the area behind the bumper & put 240 bumpers on it eventually, What is the best method of filling the recessed area, behind the bumper, that is dotted with welds & holes. Seal it up & weld a piece over it or fill it with a fiberglass product. I'm thinking layers of mat and cloth or stranded jelly. I'm open to any suggestions. Thanks Mark1 point