All Activity
- Today
-
 Another way is to go through the tachometer opening if your hands are small enough.
 -
 Never mind. I erased my internet history and the problem went away. Didn't know that "cookies" could do that. I think I had clicked on something by accident. Back to original programming...
 -
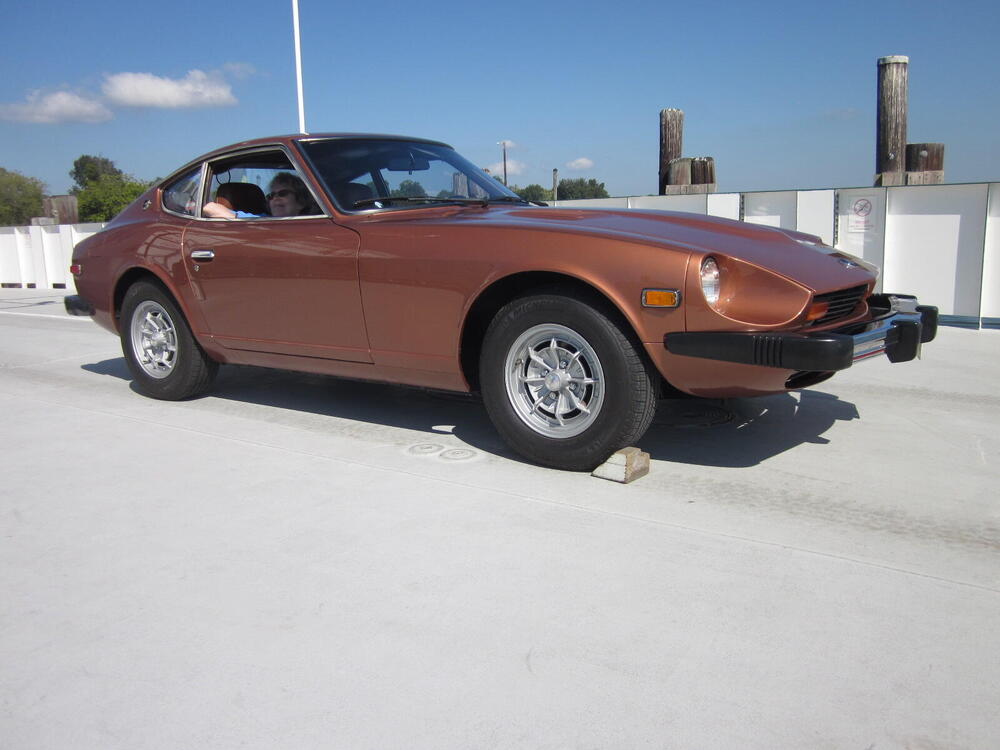
 About this Vintage Z - As I recall - this one first showed up for sale about 20 miles North of me. New Port Richey or Holliday Florida. A friend of mine went to look it over, and reported that it was very poorly cared for. The next time we saw it, was its first sale on BAT. My fiend remarked that it had been very well detailed for that sale and looked 100% better than his personal inspection. Now we see it again, with an owner that put some significant funds and I’m sure elbow grease into it - to bring it up to better condition. Will the customer modifications hurt its market value? Not as much as the current market itself, the mod’s might hurt it a little as most collectors don’t want to mess with fixing anything.
 -
- Yesterday
-
 Yes, thats the point Im trying to make. I also note that Carl has this particular car logged on his "Vintage Z" Owners Register. The photo of the car shows that it had original steel wheels and "Z" style hubcaps installed, I assume when it left the remanufacturer. So, the installation of the Panasports is yet another change from "Factory".
 -
Is anybody else suffering a barrage of ads on the forum? Just started. I'm signed in and even getting pop-ups even though I use Adblock. Never had this problem on the CZCC forum.
-
Yikes! Also see some nastiness in the comments, (468!), from 2020. Didn't read through them but Lstepp4re seems involved. I don't keep track of all of the players on BaT so not really sure who he is. It's up to $70,000.
-
 It was extremely tight but with gloves on i was able to get couple of turns to get the cable seated on the threads. Rest was the pliers ... (you have to go under the dash with a light to have some visibility).
 -
 How would you get your hand in there with the dash in? The defrost cowling removed is not near enough room to provide access.
 -
Just noticed that car was on baT in 2020. The new owner did some work on it. Wonder if the new work diminished or enhanced the original Restoration work. Original > Restored > Enhanced? It's definitely shinier now than then. 105,240 + 9,000 = 114,240 to break even. "...A paint correction service was performed, and the paint was ceramic-coated in September 2021. ..." https://bringatrailer.com/listing/1972-datsun-240z-127/
-
 Mr. Beck, You're correct in stating that Nissan didn't use any 1973 model year cars in the Z Store program. One can only imagine the confusion and delay that would have caused! However they did use - how many I have no way of knowing, more on this subject later - 1972 model year cars that required what I call "late 72" door jamb ID plates. Nissan sent me one of each of the plates they wanted me to reproduce. These were not new unstamped plates but used plates which were in good enough condition to serve as models for reproduction. I assume(ed) that they had come off of the cars they, Nissan, had purchased for the program. After a 1 year apprenticeship followed by 10 years as a Datsun dealer mechanic - no, not a "tech" - I opened Banzai Motorworks in the summer of 1980. From that time until I closed my shop on 12/1/23 I retained copies of ALL of the repair orders I wrote. If stacked up they would have been 2+ feet tall. They all had production dates and VINs. From time to time I referred to those ROs whenever an anomaly got in my shop - saw a few of those - or a parts customer had a question or concern about where his/her car fit in the pantheon. A handful of those cars had 4 or 5 of 72 production dates and "late" 72 door jamb ID plates. Ran into this with a recent ID plate order. As I remember his is 5/72. There is a lot of info/static about how many cars Nissan bought for the Z Store program, how many they planned to restore or how many were restored. However, I can state as FACT that they, Nissan, ordered 50 of everything I reproduced for them. That fact, and the first, second and third paragraphs of this rant, I'm comfortable standing behind. Why because, unlike the originators of so much of the disinformation surrounding the program, I was there as a direct participant. Cheers
 -
PATCON, Please don't misunderstand me - of course what one does with his/her car is his/her business. Hell, I've done a handful of what I call easily reversible personalizations to my 280. However, my point is that every Z that gets irreversibly modified means one less of a finite number. Cheers
-
 No, it would not.
 -

-
We have some AI on here already, "why won't my car run as I think it should" 10 years going on 20.
-

-
This is AI playing a game... https://apnews.com/video/beijing-hosts-chinas-first-fully-autonomous-3-on-3-ai-robot-soccer-match-e304c40f16684667a9c35a73ab8e5b31
-
I don't believe that can happen for the North American market 240Z. The brake light and turn signals share the same bulb for the rears. Look at the turn signal switch. That's where it happens. You can make an adapter plug, but you have to add a wire for the brake lights.
-
 Hi, I am curious where you are located?
 -
This maybe?
-
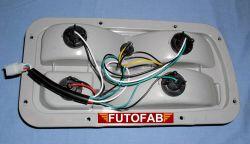
I bought mine from Futofab.com and they were plug-up and go. No changes on my end.
-
 Am I dreaming or do I remember correctly that someone somewhere had created a plug-in pigtail that 'converted' our US based wiring to the JDM for use with the JDM lens? The purpose of the pigtail is to prevent from having to cut into the factory wire harness.
 -
 Thanks, Captain! This is a great tip. I learnt a pretty cool shortcut today.
 -
 You can do final torque to the center nut after installation of the strut assy on the car. That way, the three insulator studs are held firm by the car body and you can get a good torque on the enter nut. So keep an eye (or ear) on it and if the clunk develops again, it's quick and easy to snug those center nuts while on the car. If if happens again and torquing those nuts takes care of the issue, it might be time to get some new vibration resistant center nuts. Replacing those nuts is easy with the car on the ground... The weight of the car will keep the springs compressed and you can take that center nut completely off and replace it. Buzz one off, buzz new one on. Easy peasy.
 -
Re: the strut lock nuts - if I remember right, these are the cone shaped nyloc style lock nuts. I couldn't tell if they were noticeably loose. I replaced my old 280z insulators with 240z shorter ones with the zpartsdepot's adapters. I used 60 ft lbs to torque them. I had to use my breaker bar wedged between the insulators' studs to hold them to apply the torque. I don't remember myself doing this 10 years ago lol - it is possible I didn't follow the FSM's torque specs to the letter. Now I have to tackle another project - there is some oil seepage around my oil pan/possibly rear main seal. I might have to drop the transmission, replace its seals/gasket as well. Really not looking forward to it.