Zup
Free Member
-
Joined
-
Last visited
Everything posted by Zup
-
Site & gang o' beautiful ZZZZZ'z, My photos are not nearly as nice as yours----but here is one that sorta works. Thanks for thinking of me!
-
Grannyknot and Patcon are ubercorrect--- Mike is THE BEST!
-
I'd think it was the manufacture date. Windshield gasket weatherstrip is something they will sell a lot of and it isn't a surprise that they'd make more----looks like a fresh batch! Good news!!
-
ooooohhhhh yeeeeehhhaaahhhhh!!!!!!!!!!!
-
45- hip- hip- hoorahs for you both Jim! Nothing like being a first and only owner---ahhh the memories you must have together. Are you bringing to Branson ZFEST? Jim D. "Zup"
-
From all of the discussion we had on the subject years ago I would have to say that is not the original carpet. The carpet material IS very similar, but the edge treatment is not. Originally the carpet edges were finished on a serger (or overlock sewing machine) with thread, verses the flat sewn tape shown in your photos. Get with Jim at C&H and specify that you want the edges serged. The rear hatch carpet appears properly cut but the originals did not use snap fasteners. It was laid to the hatch floor loose over the jute, with Velcro at 2 points at the rear where there were cutouts in the jute underlayment. The carpets at the floorpans were held by snap fasteners at the corners onto the firewall insulator pad and used cutouts in the carpet that fit over bent metal clips that were spot welded to the floorpan just in front of the seat rail at the rear most edge. This was held in place by a spring steel clip. The photos of the jute appear correct. The firewall insulator pad appears correct as well. I will try and post some photos soon of the things I mentioned above. Jim D. "Zup"
-
If you decide to "chuck it" chuck it my way--I will gladly pay the shipping--no kidding. I think what you are seeing is a small amount of tearing as the rubber was taken from the mold or extruder---a minor manufacturing defect. If it were me, I would install it and dress it down with a liberal application of Mother's Protectant after the install. When the hatch is closed---which is very nearly always---there is little that can happen to further degrade the rubber. Biggest fears would be if there were an ice buildup (you are in Canada) and tearing of the rubber upon opening the hatch. If your car is out of the elements in winter, then I wouldn't even worry about that. Please, send me a PM if you decide to "chuck it"! Jim D. "Zup"
-
Carl Yeagar is www.new-datsun-parts.com He sells good stuff but it isn't cheap. I've ordered several items from him and it is as advertised--I've been satisfied with what I received every time.
-
http://www.classiczcars.com/topic/26884-loop-pile-carpet-any-recent-purchases-2008/?page=1 This thread from 2008 contains 134 posts and covers just about everything anyone had to contribute to the topic. It's a long read, but it is pretty informative, spiced with many facts/photos and some speculation. Jim D. "Zup"
-
The Wurth matting is quite close to the original thickness and accepts paint very well. Just be sure to clean it with some spirits. I do think you can spray it if you have access to a small hvlp gun. The paint on the original interior floorboards, hatch floor and transmission tunnel wasn't intended for much beyond matching body color. It is not a very high gloss finish and appears hastily applied. Use of a spoon or trowel is a must as you do have to heat the mat to a temperature that will be too hot to handle comfortably---(ask me how I know) This heating must soften it sufficiently to conform to the relatively small but tight radius of the floorpan and hatch floor metal stampings and allow the adhesive to set when cooled. Overheating the material will lose some of the ability of the adhesive to stick. If this happens, Weldwood contact cement can be used to bond any areas that are not well stuck--especially around edges if they become a problem. The carpet from Chester and Herod is as original as you can get. They were the first suppliers to Datsun (Nissan) when the cars were imported without carpet and buyers were demanding carpet--not rubber mats---in the interiors. As carpet goes, it is not of high quality---although you can get higher quality carpet material (wool) from them it will not be loop type--- I am of the belief the original type was loop instead of pile. You should examine your originals and verify which type you have. The best part of C&H carpets is the original style serging of the carpet edges with thread and the cutouts for the carpet clips on the front mats to keep them in place. The are the only suppliers of carpeting for these cars---that I know of-- that do this. The C&H carpets also come with the female snaps for the front corners of the mats which attach to male snaps on the firewall insulation board as original. Hopefully you retained the male portion of the snaps from your firewall insulation board. If not they can be replicated. Be sure to specify that you want carpet for a early 240Z (70/ early 71) without the split for the tool bins found on the later models (late 71/ 72/ 73) All in all I am happy with the C&H carpets. They fit pretty closely in pattern and were short only a little in a couple of spots---probably not much different than original. You may want to make patterns of your original carpet and send them to C&H. If you call C&H ask to speak to "JIM". He was with the company when they originally started providing the carpets for Datsun and is still there 40+ years later! We had a discussion of all of this several years ago as we were trying to determine what was original-----backed, un-backed, loop, pile, etc. The site search engine is pitiful for finding old threads, so a Google search may be the best way of finding it. I'll see if I can find it among my posts and give you a link. Maybe it will be helpful. Jim D. "Zup"
-
I'll second what Rich said! Eiji's package of engine bolts is the cats meow---I used them on both of my Z's and new fasteners really look nice! Jim D. "Zup"
-
Be careful with any ideas of using roof underlayment. You will not want the smell and it may not stick as nicely to the sharp deformations in the pans. I initially tried it and then butyl rubber sheeting. They were not at all as good for the purpose as the Wurth mat which is made for original replacement in Porsches. It is not that expensive and it is a quality product.
-
Thanks Zeddy---- Glad I could help! Steve's reproductions are the best out there by far----very accurate and the craftsmanship shows in all of them. I have had the pleasure of providing several NOS and good condition pieces for him to use as patterns and know first hand how well he makes the replacements---there are no dis-appointments. All the Z community is fortunate to have a man of Steve's talents and abilities. His parts are not unreasonable in cost when you consider the time and investment in tooling he has made. Many of the parts are not available anywhere else and some never had part numbers associated with them as they were a part of an assembly. The service is TOP NOTCH to boot! (end of accolade) Jim D. "Zup".
-
Contact Steve Nixon-- He's reproducing them --- http://www.240zrubberparts.com/apps/webstore/products/show/6337398
-
Regarding the original tar mat--- http://www.classiczcars.com/topic/49853-replacement-tar-mat/#comment-453543 I used the Wurth tar mat to attempt reproducing the original mats. It worked very well. I deviated from original by painting the floor board areas first, then applying the mat, then painting over it all so that it matches the original painted surface treatment. HTH Jim D. "Zup"
-
Regarding the jute----- http://www.newportupholstery.com/auto_underfelt.htm This is a promising source from Canada/US very similar to what I used. http://trf.zeni.net/webcatalog/specials9.35/38.php This is what I used in the restoration of my 7/70 240Z. The jute from The Roadster Factory is very close to the original in thickness and texture. An added bonus was that it came in 54" wide rolls which allowed cutting without piecing to make up the largest areas. I am quite pleased with the way it turned out.
-
For the record--- Captain Obvious "Nut Cutter Nonpareil" Many thanks Bruce and Jim! You guys are the best!
-
So happy for the both of you Mark! Best thing I've heard all day!! Here's to continued improvement and good health-- All the Best!
-
Mark, As S30Driver said---no apology is needed. My thoughts and wishes for Kathy's speedy recovery.
-
Not a source for one identical to the original in the photo but--- a very good "modified to look and function like" is available from: http://www.ztherapy.com/ It is their product number: ZT128 Not inexpensive, but it comes from a reputable CZCC vendor. Alternately, you might PM contact Jim Karst (aka: zKars) or Chris (aka: grannyknot) on this site as they are Canucks and may be able to assist you in finding an original from the North. HTH Jim D. "Zup"
-
Damn---wish it had turned out differently Namerow! A quick google search turned up this: http://forums.hybridz.org/topic/109345-su-carb-manifold-heat-control/ An interesting discussion of this occurred in 2012 between TonyD (knower of all things) and JimCan over on Hybridz. Seems there is/was a replacement out there (but as always not cheap) Here's the .pdf of the unit------- Manifold water control thermostat TVHAT.pdf Unfortunately Therm-Omega-Tech does not seem to exist anymore. All searches for links to their homepages and such that I have done appear but "Page cannot be displayed". Maybe they've been bought out and there has been a name change or something---I dunno. I'll do some searching at McMaster-Carr. They have a lot of industrial application stuff that may turn up something useful.
-
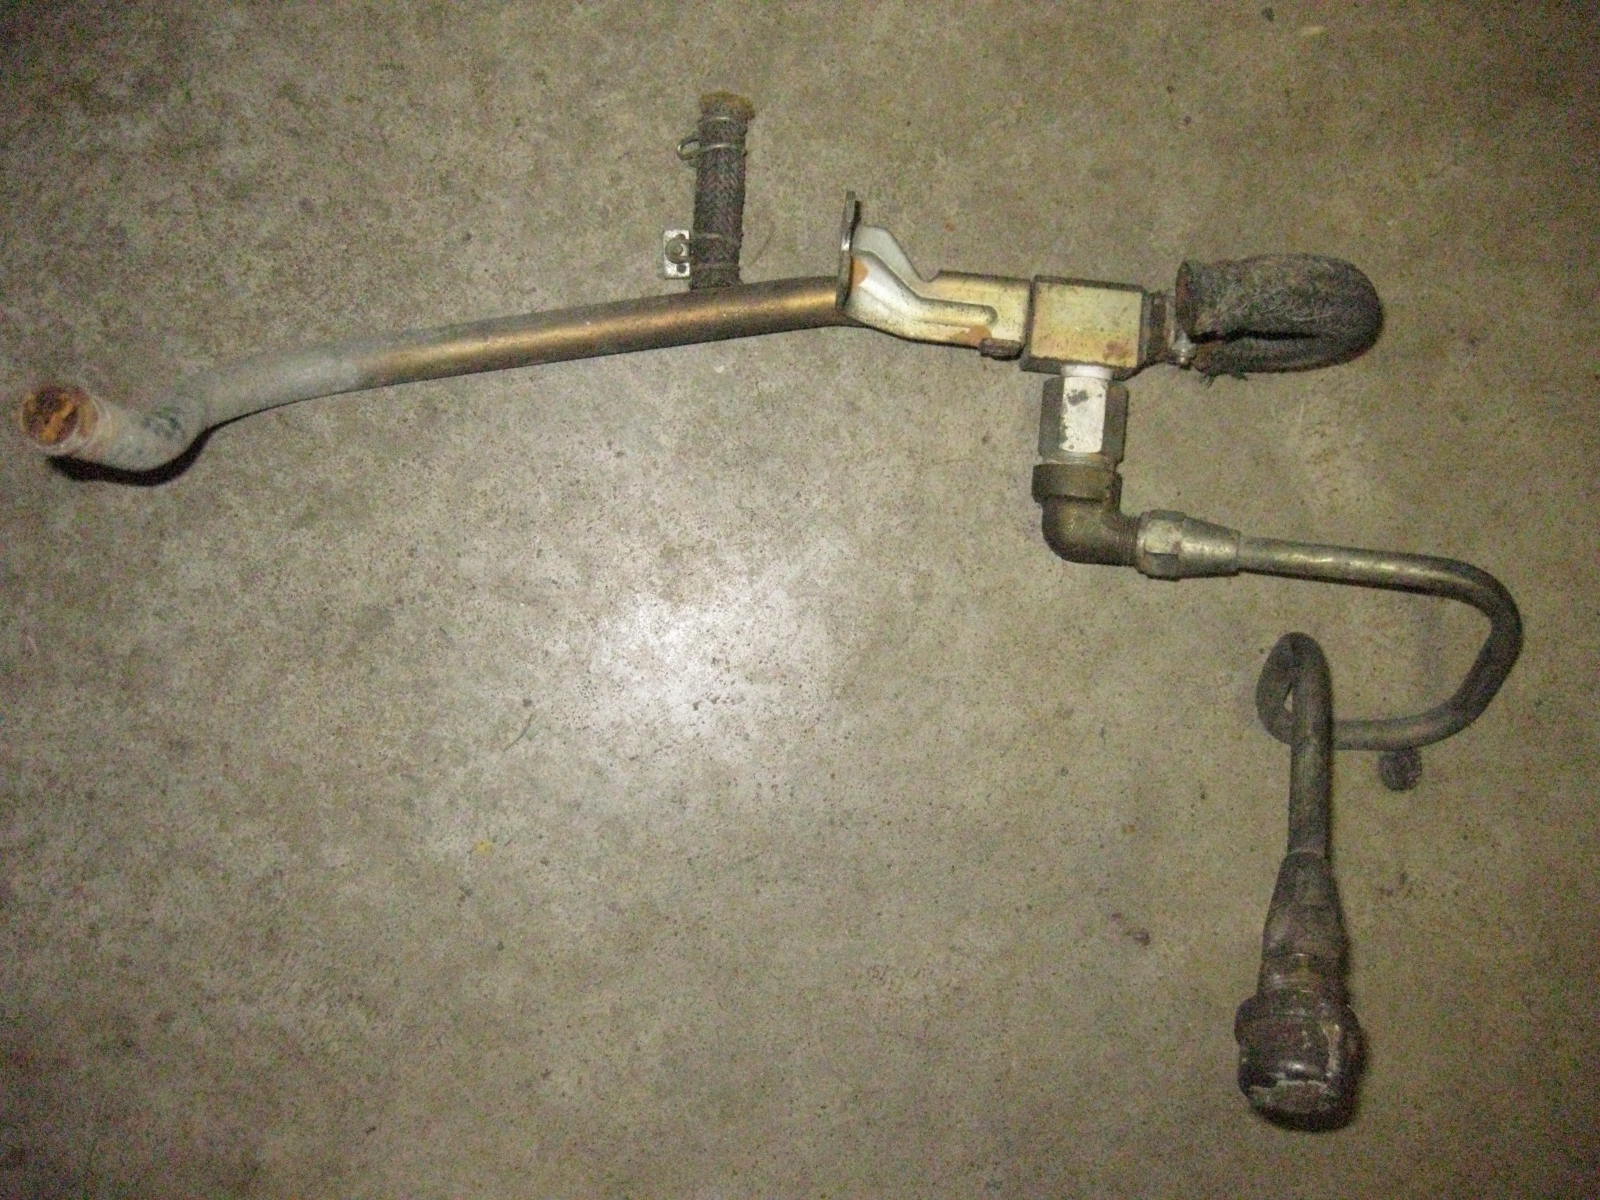
Zed- Your post made me go look at the 72 FSM I have here in the garage. I agree it probably can't be taken apart, but thought it interesting that there is an adjustment nut as Namerow suggested. Hopefully Jim K. will find his and free one up, or Namerow will get his working. That would be neat! This photo is of the original rear manifold water pipe assembly from my 73. I may be wrong, but I think the location of the manifold heater thermostat was moved to the rear manifold water pipe and the term for the device was changed to "Water Control Valve". I'm pretty sure it is the silver hex sided piece in the photo above. (I know many will think that this is just a bunch of discarded plumbing pipe, but the only part that is NOT supposed to be there is the iron pipe cap at the end that the PO placed on it when he had this mess removed from the car in a conversion to downdraft Weber carbs) The "Water Control Valve" is shown in the 73 FSM section EC-1 as #9. Scan20002.TIF


-
Page EC-12 and Fig. EC-20 from the 72 FSM indicate that the operation of the manifold heat control thermostat are as you all have described above. It closes above 150* F. Fig. EC-20 shows a section of the thermostat. It may be that there is a mistake in the section labeling as there is the possibility that #7 Adjusting Nut and #8 Case Cover have been transposed in the image or vice versa. If so, there may be some adjustment to the thermostat as mentioned by Namerow. (click on TIF) EC-20 manifold heat control thermostat.TIF
-
PM sent Jim. Jim D. "Zup"
-
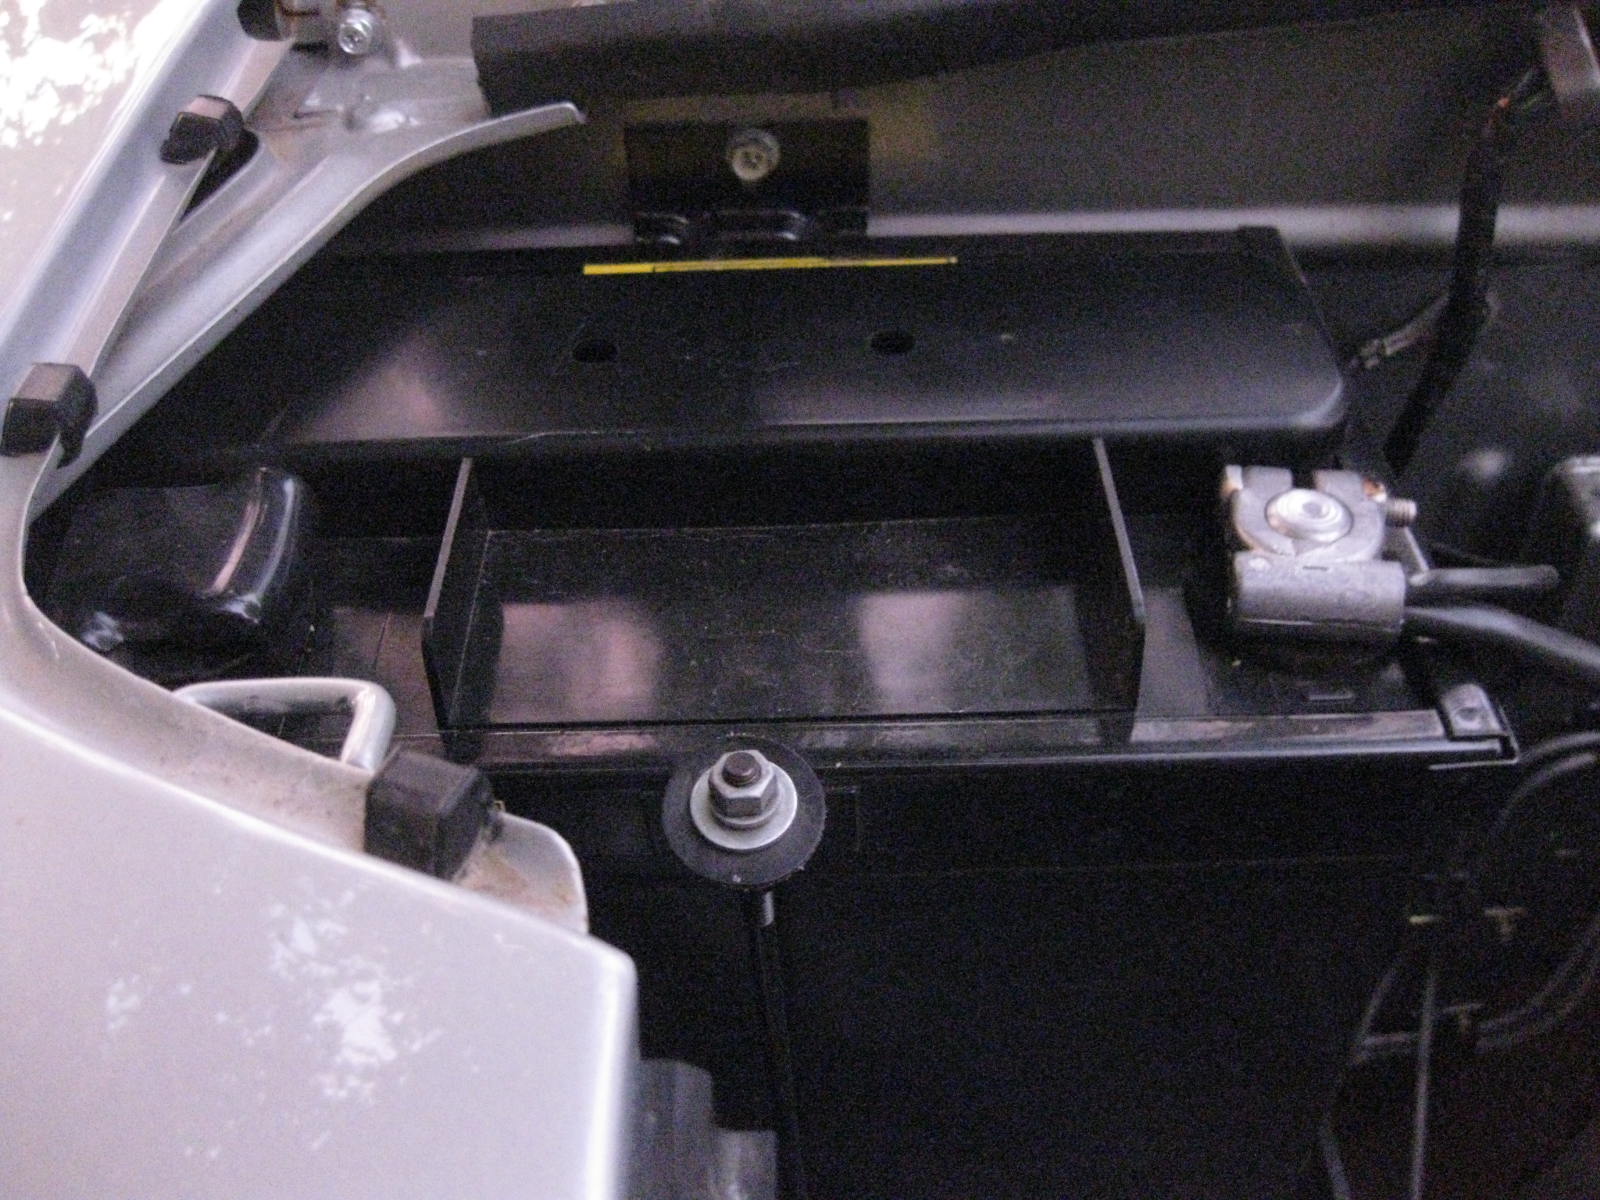
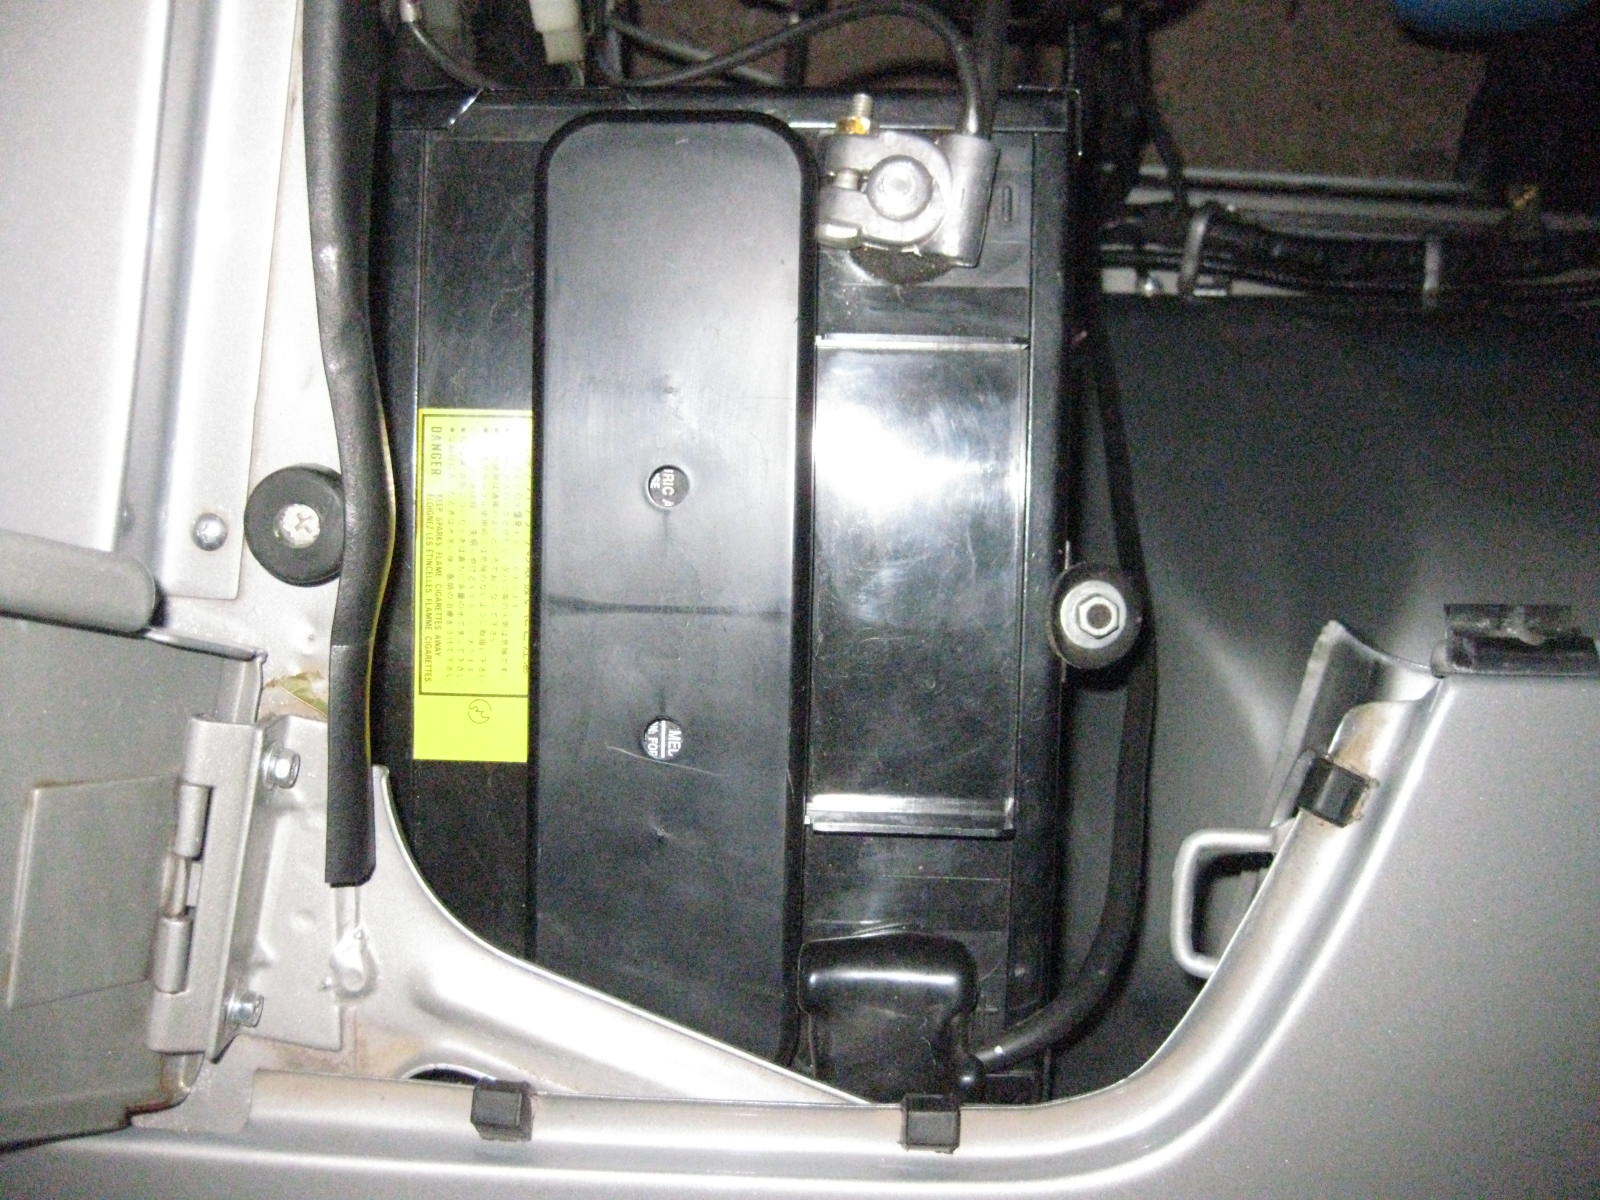
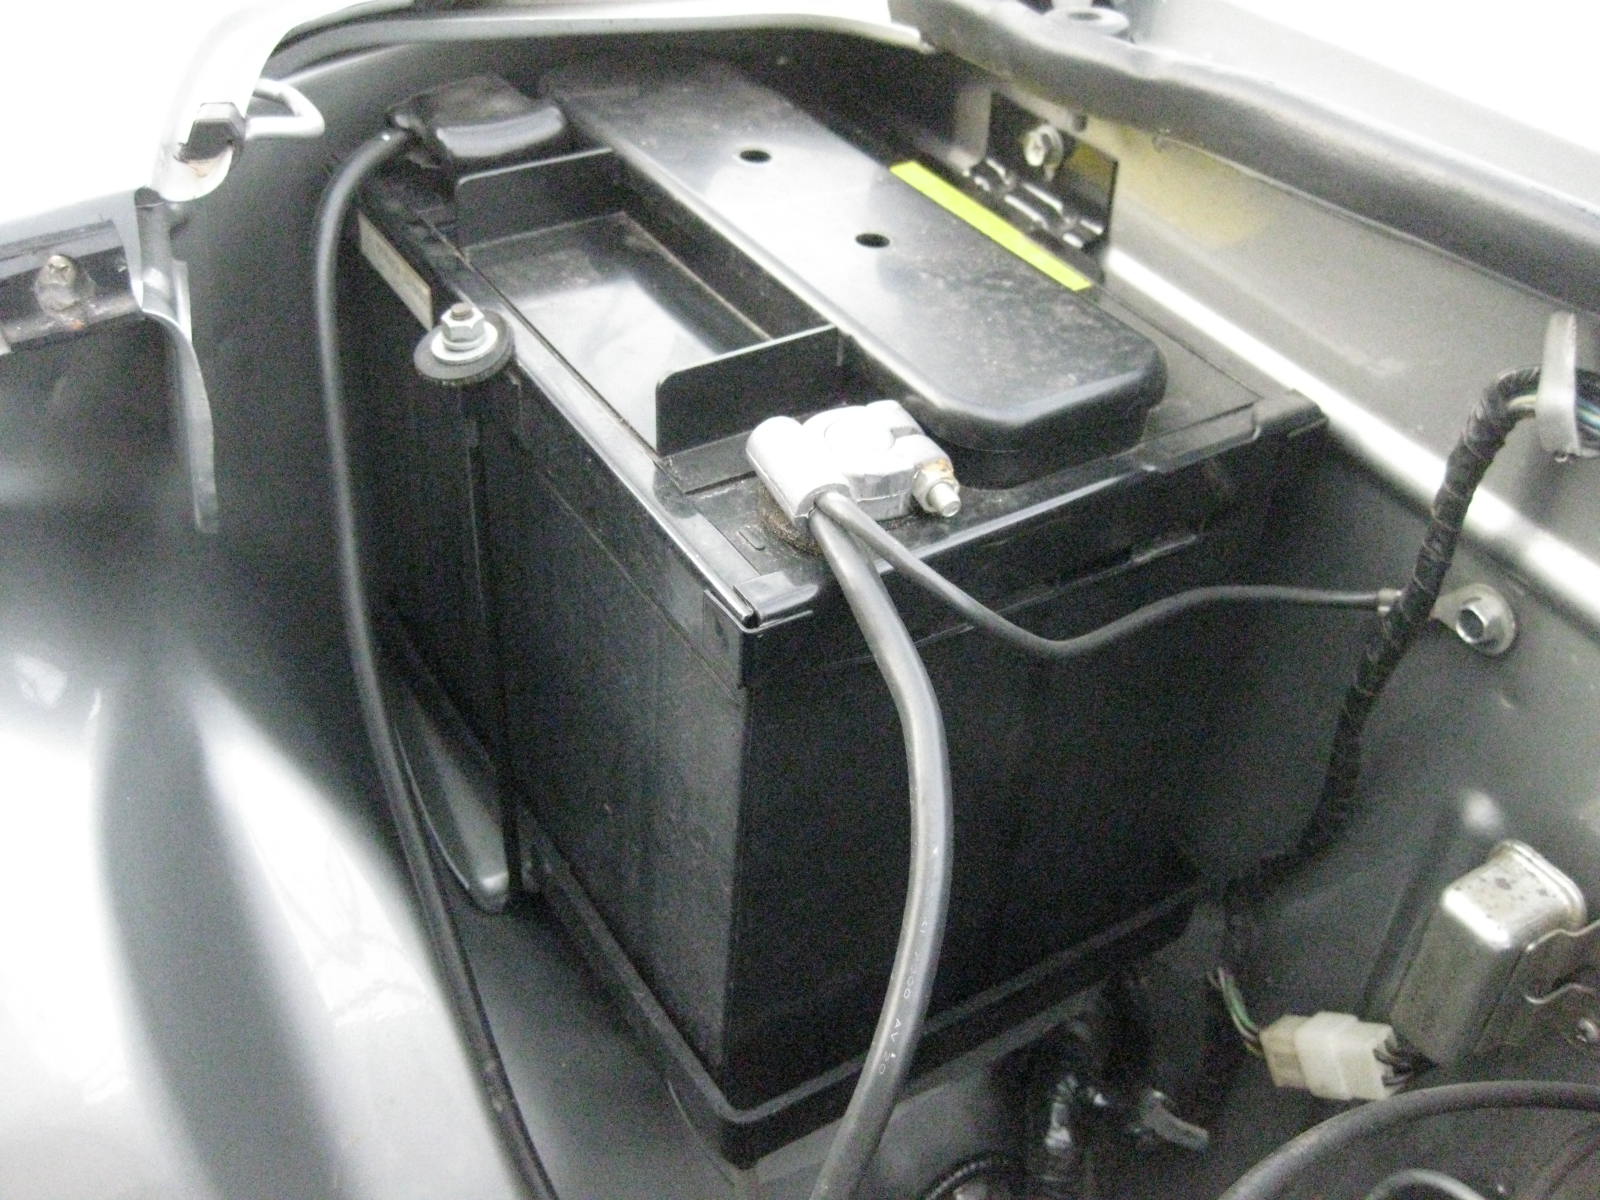
Here are some photos of the battery setup in my 73. Nissan sells the proper sized battery in an all black case. It is a group 24 battery. Part number 999M1-NB24F. This part number places the positive terminal to the engine side. Originally (correctly) the positive terminal should be to the fender side under the inspection lid of the fender. This changes the part number to 999M1-NB24C. I am not completely sure of this second part number as it is currently covered by the battery cover/cap assembly in my car and it is cold outside. I know I wanted the positive terminal where it originally was supposed to be so I had to return the NB24F and get the one with the terminal to the opposite side. They sell both. Steve now reproduces both the cover and the cap as mentioned above. The caps came both with and without the 2 holes. He and I discussed this when I sent my "unholy" cap to him for reproduction. It is uncertain which came first---with or without the holes. My thoughts were that the cap without holes came first and that possibly out of concern for corrosion or combustion Nissan decided to revise the cap with holes to provide ventilation----a way of allowing sulfuric acid gases and moisture to dissipate or evaporate. Of course this could be complete bull$hit on my part.