.JPG.cfcada9cf1c1b502df3f5f2f2ca3ff36.JPG)

SteveJ
Community Member
-
Joined
-
Last visited
Everything posted by SteveJ
-
Belmetric.com also has JIS bolts and nuts.
-
Check the voltage at the solenoid when trying to start. It would be nice to know the current flow into the solenoid, too. The other option would be to throw a new solenoid at it, but I'm not a fan of the parts cannon.
-
Start 3 new threads. Blower motor Turn signals Parking lights They are 3 different circuits, and you don't need the great unwashed in the peanut gallery steering you down rabbit holes.
-
Yes, it is normal. The only way to prevent any fuel vapors would be to chill the tank below the vapor point of all of the volatile organic compounds (VOCs) in the fuel. Since it isn't practical to refrigerate the fuel tank and the ambient temperatures in the summer are well above the vapor point of the VOCs, Nissan has the carbon canister to capture most of the fugitive emissions from the fuel tank. On the other hand, you have to allow some make up air into the tank to allow the fuel to flow to the fuel pump. That is why you need the two-way check valve. Here is how the purge system works in modern cars: https://www.samarins.com/glossary/purge-valve.html
-
You don't want to over pressurize the tank. You want the carbon canister catching the vapor, not venting to atmosphere when someone pulls the gas cap.
-
And to clarify further, there is one for the round top. The last part number is for the flat tops. I'll look to see what are on my 73 & 74 if I can remember by the time I get home.
-
@HusseinHolland I decided to get some empirical data on the headlight housing temperature rise when using the LED headlights. I drove the 260Z to a car meet. The lights were on for about 50 minutes. Ambient temperature was about 49 degrees, and the outside of the metal housings were 50 degrees according to my IR thermometer. I didn't try to get an IR reading on the front of the housings.
-
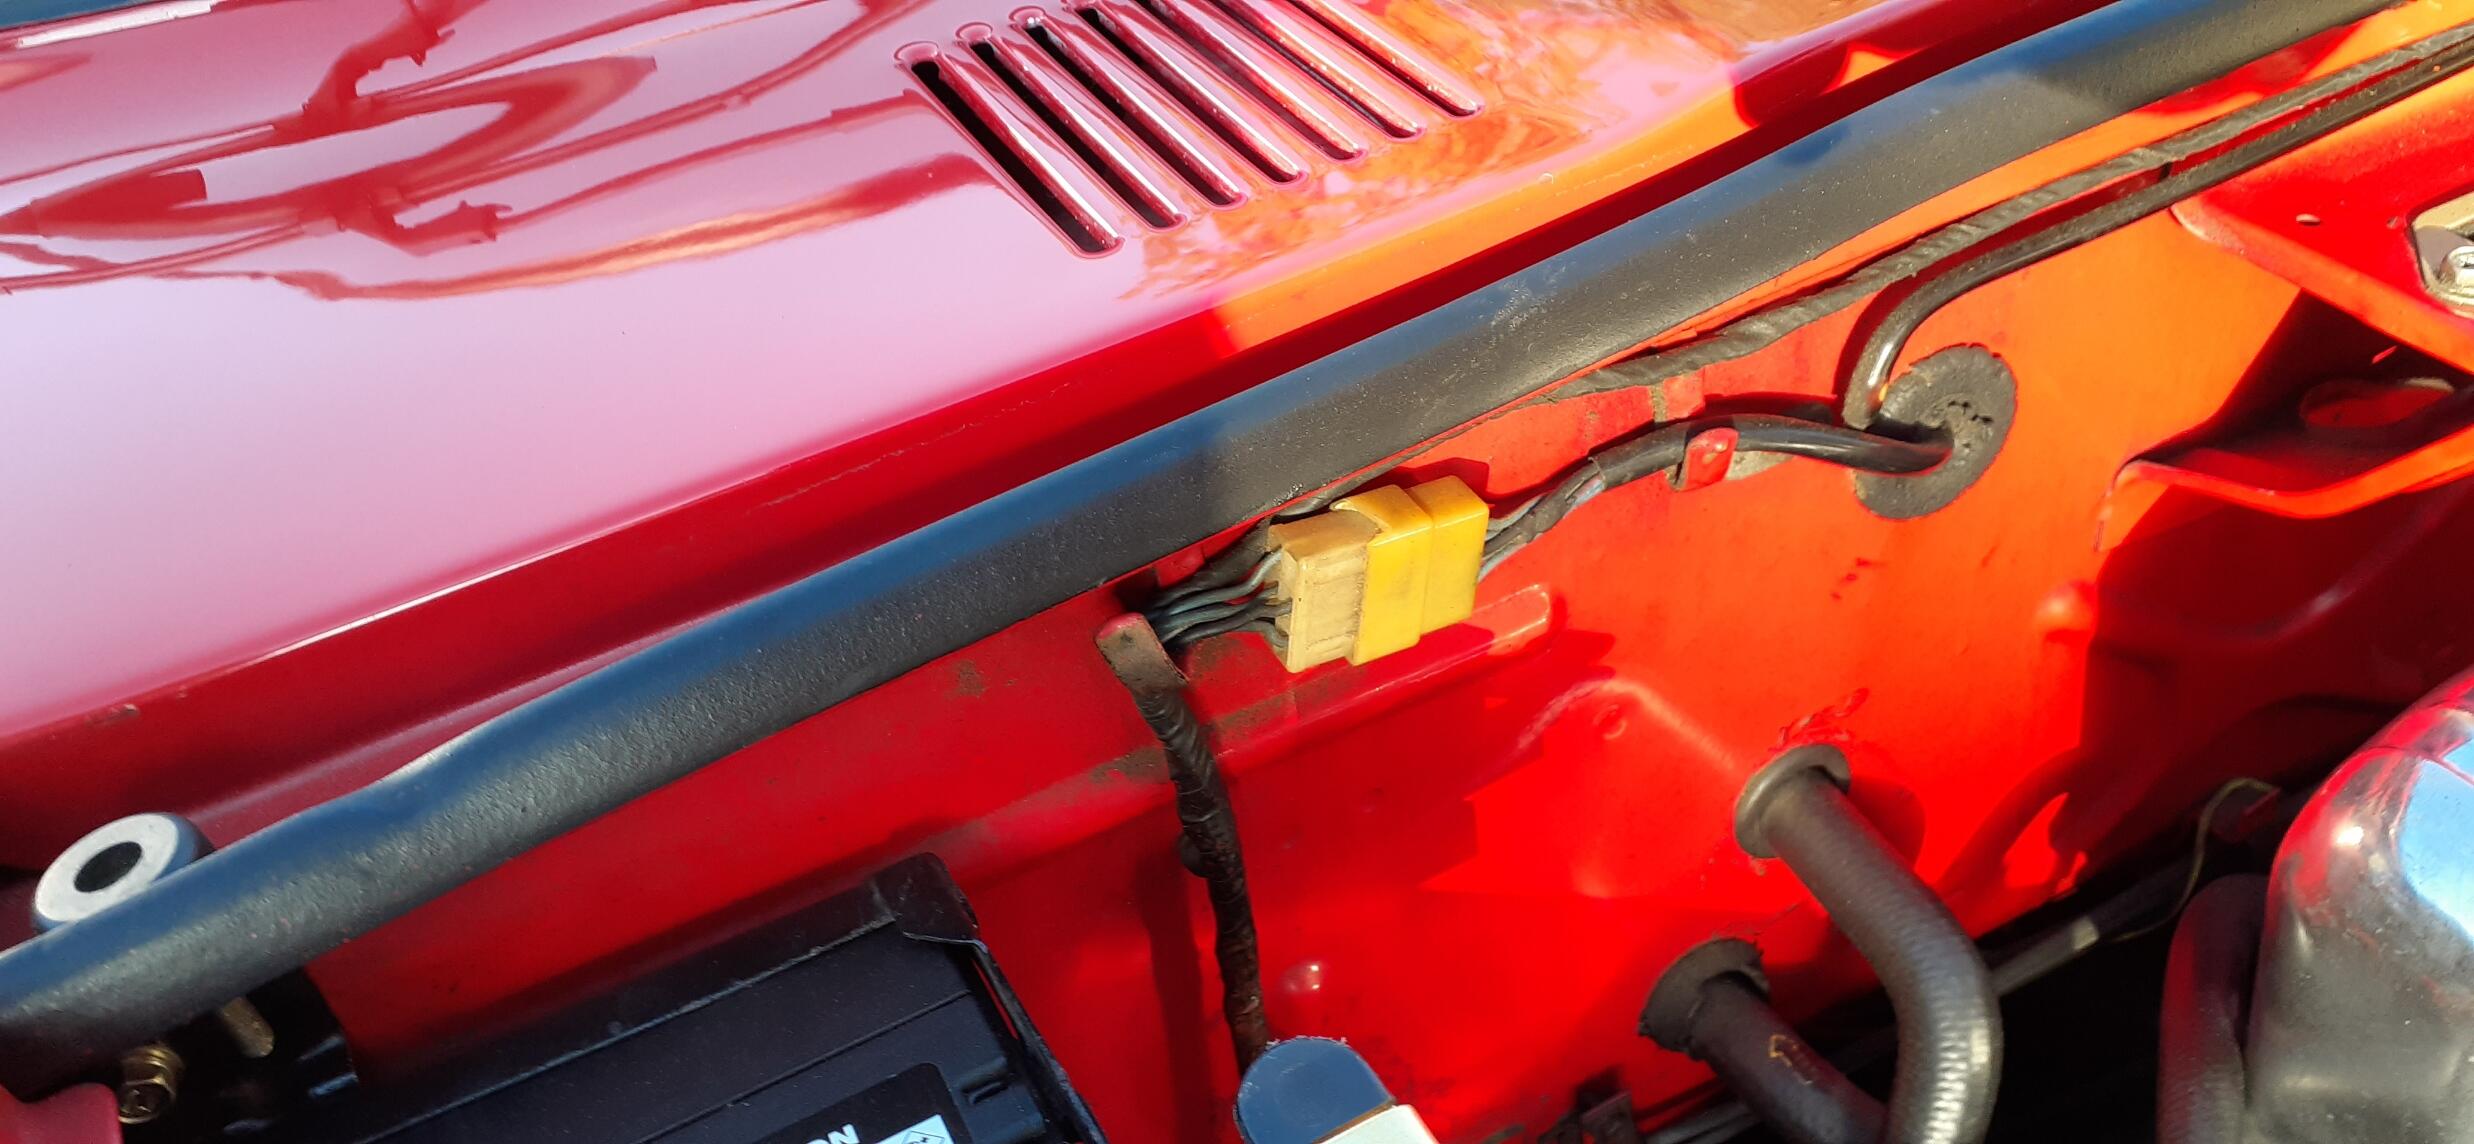
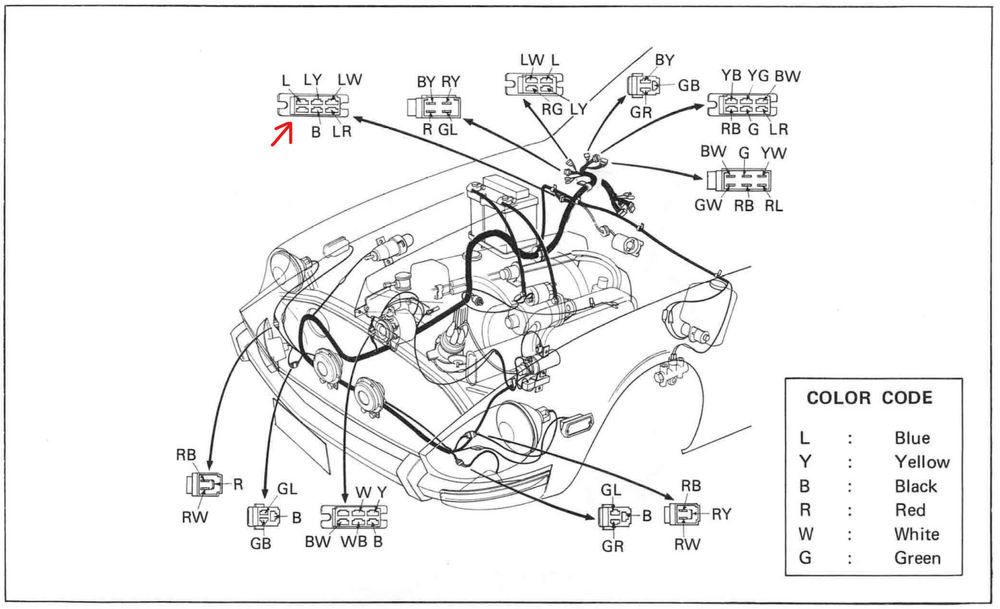
So the connector for the wiper motor in the engine bay should be like this: Note that it only has 5 wires. For the combo switch connector, the dash harness side should be this: GL GW LW L LY LR So your connector on the dash harness is correct. On the switch side, you should have YG GL GW LR RL YB So your switch is correct. Verify the dash to engine harness connectors and wiper motor connector per my earlier post.

-
I don't think you're looking at the correct connectors. I will take a picture later to show you the connector for the wiper motor to line up to my post.
-
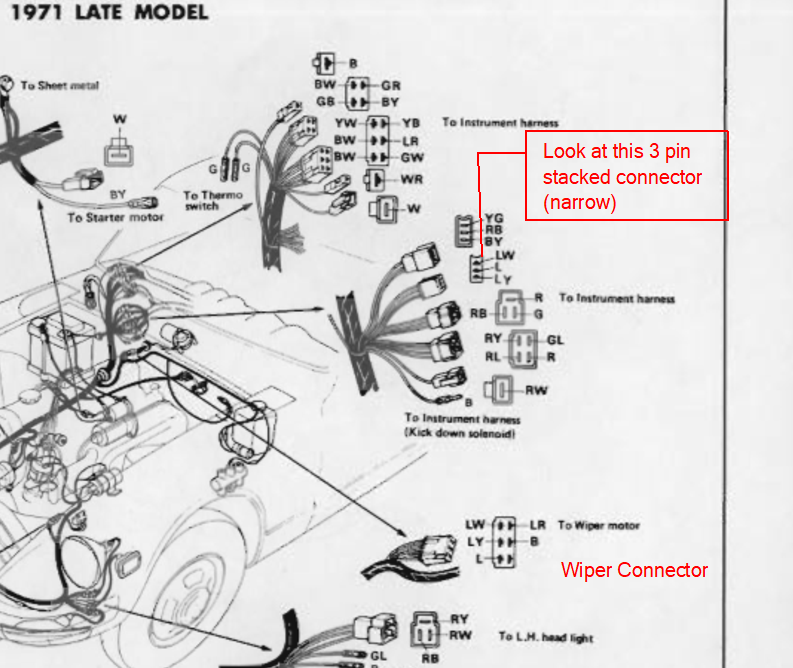
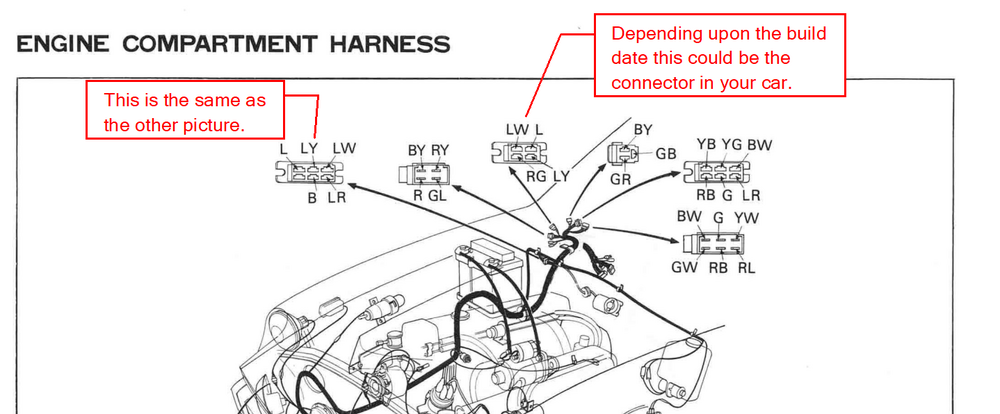
So depending upon the build date, you could see some variations in wiring. Here are the connectors for a late 71. The dash to engine harness has a stacked 3-pin connector for the grounds coming from the stalk. For the wiper motor connector, the one I think you have labelled as B, you look at it facing the side that connects to the wiper motor. The indents are at the top. Top row: L LY LW Bottom row: empty B LR From the manual: And here's from the 70 manual in case you have an early 71: (Note that the wiper grounds from the switch are in a 4 pin connector with only the 3 wires coming from the switch.) IIRC, the wire layout for the motor itself doesn't change from 70 to 73.
-
The infamous Tony D clued me in on the existence of adjustable rate flashers. Once I tried them, I knew they were keepers.
-
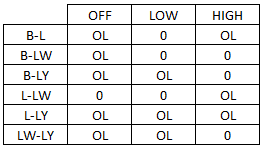
So for this test, you can disconnect the battery negative. In the engine bay, disconnect the 6 pin connector (with 5 wires) for the wiper motor. It's on the fire wall. For this testing, ignore the LR wire. That is the positive. Testing: Put your meter on resistance. Have the wiper switch in OFF. Measure L to LW. It should have low resistance. LW should not have continuity with LY or B. LY and B should not have continuity. Put the wiper switch in LOW. You should have continuity between B, L, and LW. LY should not have have continuity with the other wires. Put the wiper switch in HIGH. You should have continuity between B, LW, and LY. L should not have have continuity with the other wires. Ideally you should see this: Report your results
-
Another thing is that we don't know how many different H4 LED bulbs he looked at. I lucked out 3 years ago when I got the Auxito bulbs. I first purchased them in late 2020. It was about a year later when I found they were polarity independent because I already had relays in my car.
-
No, he is knowledgeable about wiring and headlights, but that doesn't mean he's always correct in his assessments.
-
Daniel Stern has frequently downplayed LED lights for automotive applications. This includes replacing incandescent bulbs with LED bulbs in side markers, taillights, etc. While I'm not a "recognized expert" like him, my eyes don't necessarily agree with his opinions.
-
Nope. The next test will require the switch to be installed. We know it tests good, so now we will use it to test the wiring.
-
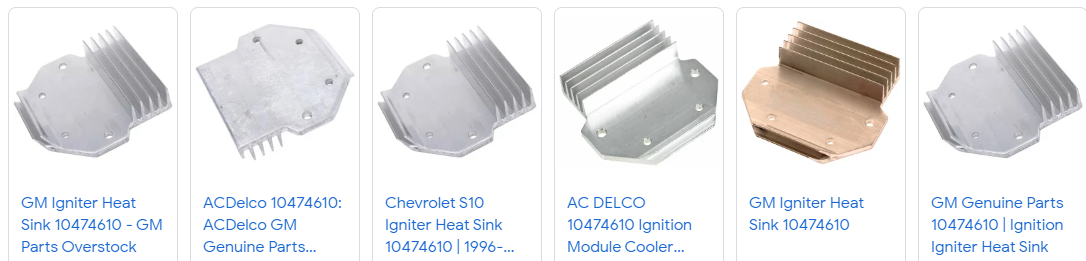
It's not just about absorbing heat. You have to reject the heat, too. If the heat sink reaches equilibrium with the ignition module, it doesn't accept more heat. The cooling fins allow some air flow to release the heat. Mind you, the cooling fins should be mounted vertically to allow air to move past. If you mount the cooling fins horizontally like you. currently have, the heat cannot flow out as easily. On the other hand, you could mount the cooling fins pointing up, and that would allow heat flow, too.
-
Nope. It's designed that way. The ground for Low drops out when you go to High.
-
What I'm thinking is that you carry an IR thermometer in the car and find a place to park safely when it acts up. If the problem is heat related, you should easily have a couple of minutes to measure the temp. Also another trick is to keep a can of dusting air in the car. If you can hold it upside down in that tight space, spray the HEI with the dusting air. The contents should come out as a liquid when upside down and evaporate quickly when the liquid comes in contact with the HEI. That will cool the HEI rapidly. If full function returns, you most likely have confirmed an overheating problem.
-
I'm not sure of the heat produced by the Volvo ignition vs the GM HEI. Thermal mass is what I'm concerned about. Is there enough mass to absorb the heat from the HEI and reject the heat into the environment. Most of the HEI heat sinks I have seen include cooling fins. That makes me think that heat rejection might be an important consideration in design. If you have an IR thermometer, it might help you figure it out.

-
These results make a lot more sense, and it mirrors my testing. Your switch is functioning properly. The next step is to connect the switch, disconnect the wiper motor and test the grounds out there. I'll write up the procedure soon.
-
Do you think you have enough of a heat sink on the module? It sounds like the old one could have been overheating. I do like the fact that the heat sink is above the HEI, though.
-
If the black wire is either OL or 47+ ohms to the other wires, that is a problem. The circuit operates by grounding the YG (on the switch) wire in low and high. That is for the relay in the motor to spin it in the correct direction. (The opposite direction is for the park function.) Then, the low speed wire (YB on the switch) is grounded in low. It should have low resistance to the black wire. (I would want it to be as close to zero as possible.) Next, the high speed wire (RL on the switch) is grounded in high. Again, it should have low resistance to the black wire. The reason for disconnecting the switch is to prevent confounding results. I have not tested a wiper motor separate from the car, so I didn't know if it could affect measurements. I have a couple of wiper switches that do not appear to the functioning properly. I may take one apart soon to make a video of it. That may shed some light on what is wrong with your switch.
-
For the heat soak, you may want to try something like this: https://www.amazon.com/gp/product/B000E267JC
-
First off, let's verify. Did you swap out the guts of the tach with a Volvo tach? 😉 Increasing the impedance in the tach circuit to get it to work is rather puzzling. I'm wondering if a diode in the circuit would accomplish the same thing. That would indicate there is a large voltage spike on coil discharge. The best way to verify would be to use an oscilloscope. (Thanks to @Captain Obvious for pointing me to videos on checking the ignition with a scope.) To be sure, check the coil wire and all of the plug wires to see if they are fully seated in the wells of the coil and distributor cap, especially the coil wire. I would try to run the car without the tach to see if the tip-in issue would go away. I'm thinking that could be more of a fuel pressure issue than ignition. I have seen something similar on a car I was working on that was too rich because of the FPR setup. It would bog on tip-in and catch quickly. I could see the AFR reading dancing at tip-in.