.JPG.cfcada9cf1c1b502df3f5f2f2ca3ff36.JPG)

SteveJ
Free Member
-
Joined
-
Last visited
Everything posted by SteveJ
-
 I'll take a look sometime, but I hadn't registered any issues. Maybe I've just been of the mindset that I enjoy seeing the gauges at night.
 -
The gauge illumination and brake light sockets are next to each other. On the top, the high beam light and gauge illumination are next to each other. The brake light bulb has 2 wires, and the gauge illumination has 1 wire, grounding on the speedometer.

-
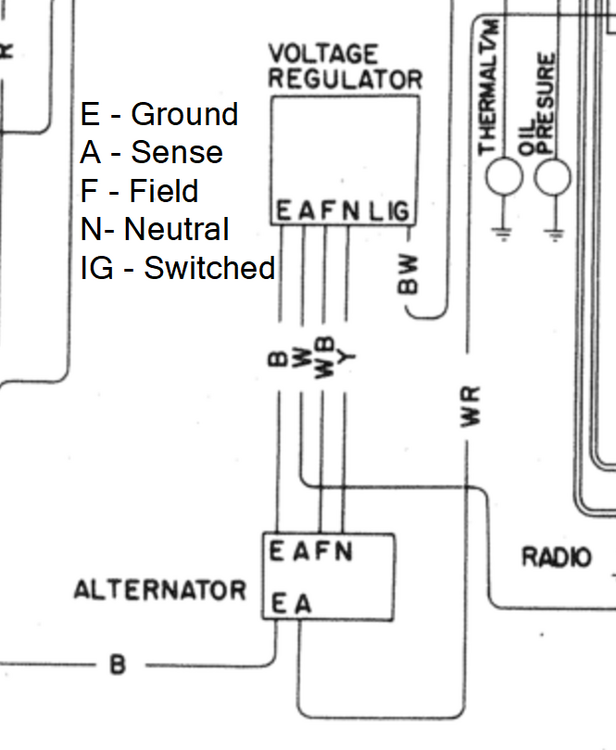
You don't have a stock voltage regulator. The wiring diagram shows 5 wires. Sense means it is reading battery voltage. Field is the wire that it uses to excite the field of the alternator. Neutral is the neutral of the alternator. The L terminal isn't used, but it would be for the Lamp signal. If it was used, it would connect to a bulb in the dash, and the other side would have a switched source. If the alternator wasn't charging, the bulb would light up. It's a shame they didn't use it. The BW wire with the bullet connector is for a condensor that isn't shown in the wiring diagram. It resides around the VR.
-
For @Yarb, I will be documenting and de-pinning the connectors to get the grommet on the harness. I'm not cutting anything I don't have to cut.
-
This goes back to a thread somewhere on here about using an oscilloscope to diagnose ignition issues. I need to play around with that some more. You need an attenuator on your voltage input. That gets connected to the negative terminal of the coil. It helps to use an inductive probe to put on the plug wire for #1. That will serve as the trigger for the scope, and you can trace the signal from the coil voltage to a cylinder. Larger spikes on the coil voltage trace when the ignition is firing is indicative of having to overcome a larger gap. That gap could be at the rotor button, coil HV wire, or plug wire. There are videos on YouTube that explain this better than my quick summary.
-
You're welcome. Now that we're out of scorching hot weather around here, I may see about doing the fan swap in the 260Z. I can shoot video of it, too.
-
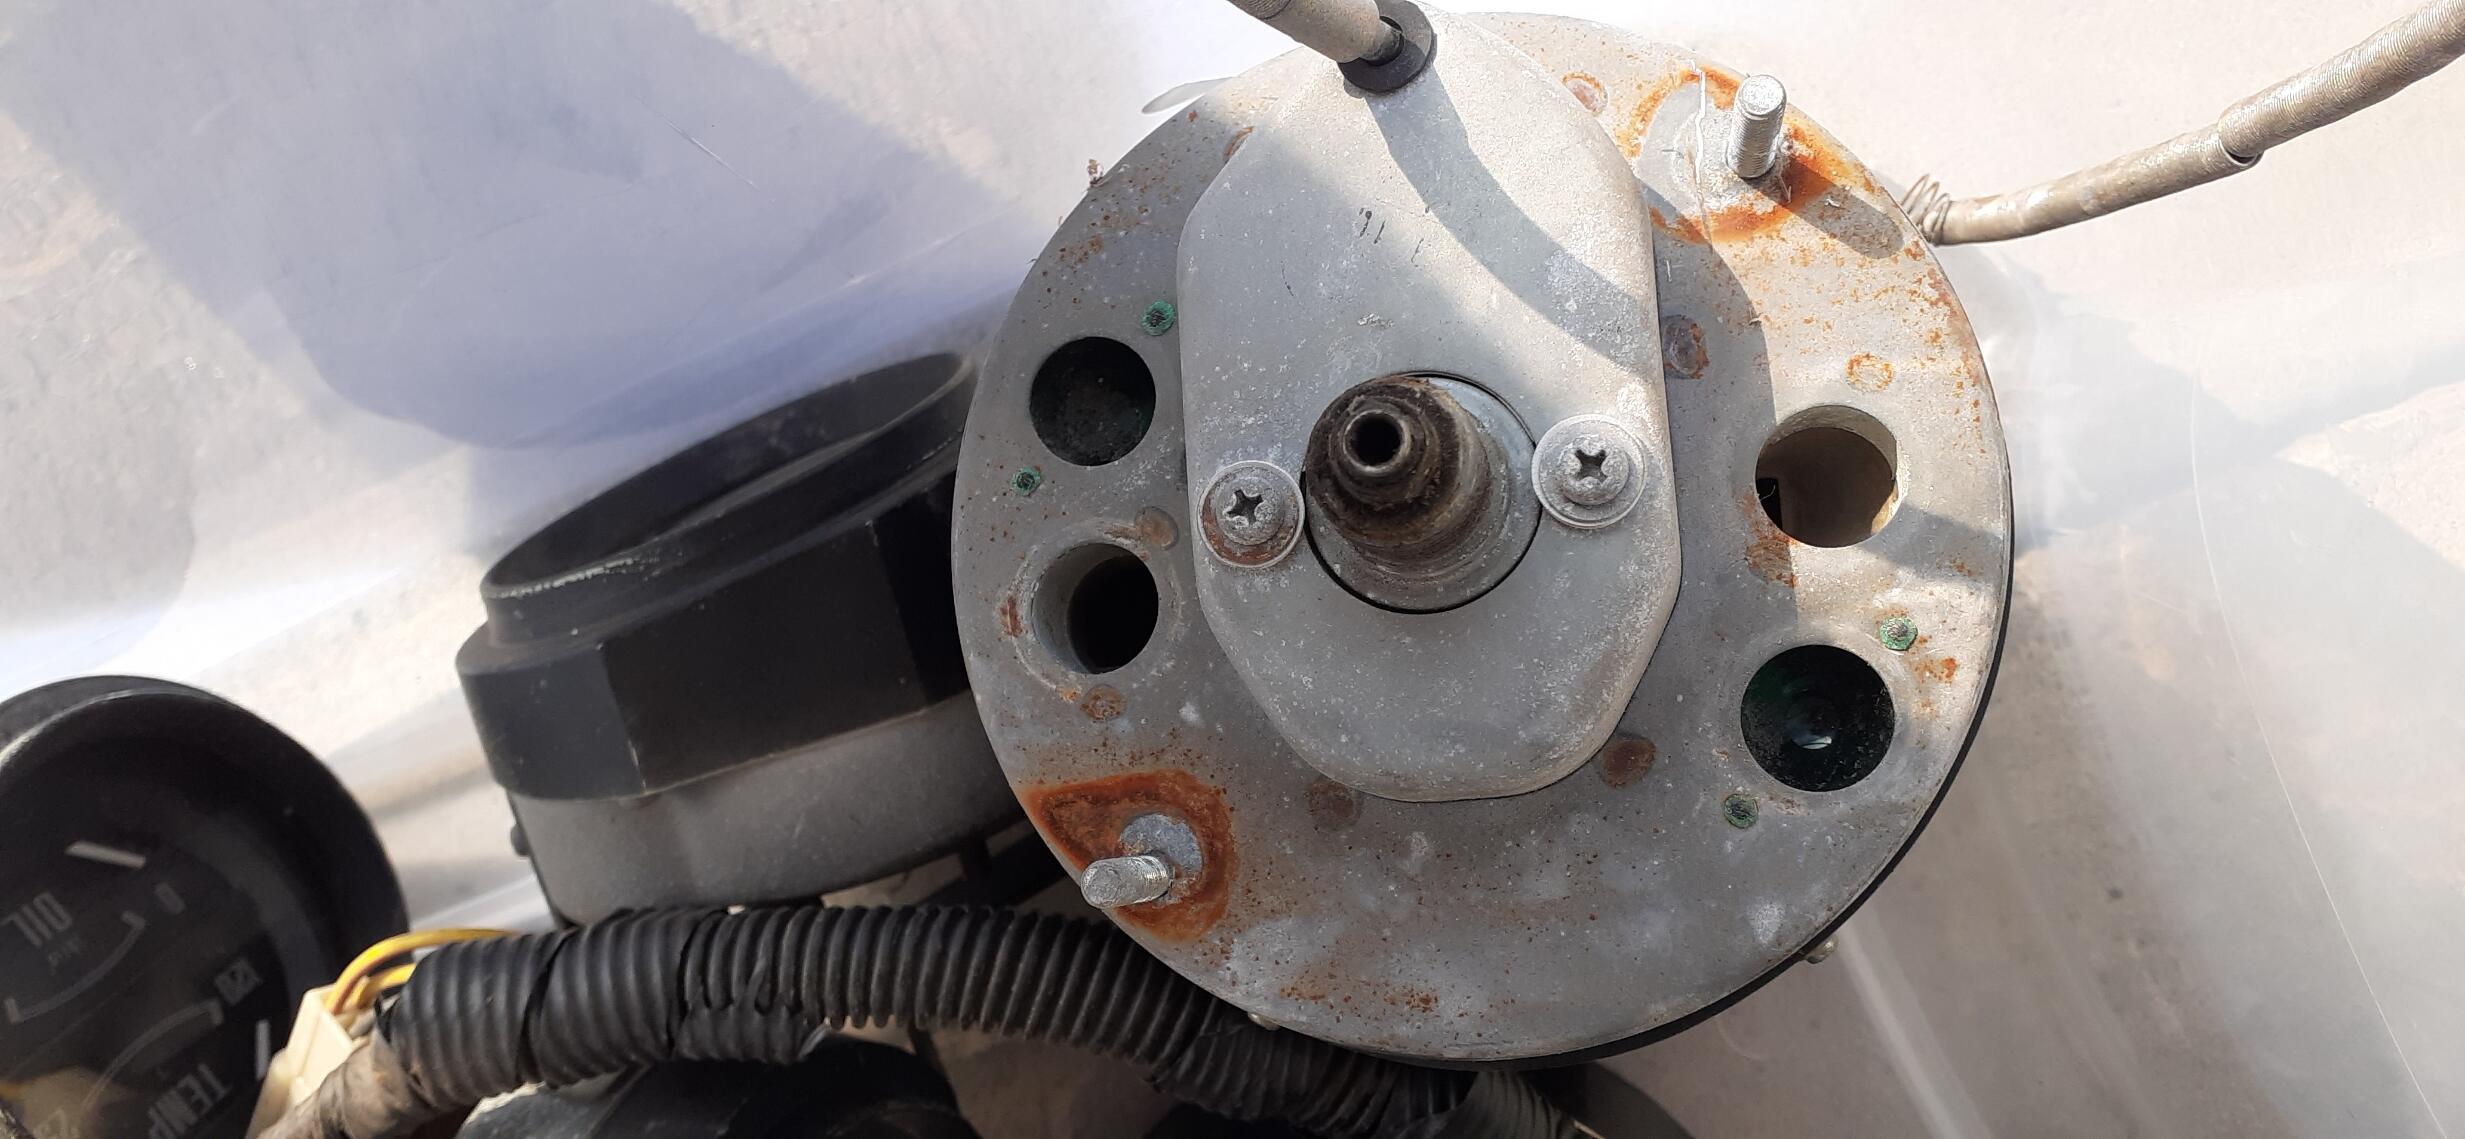
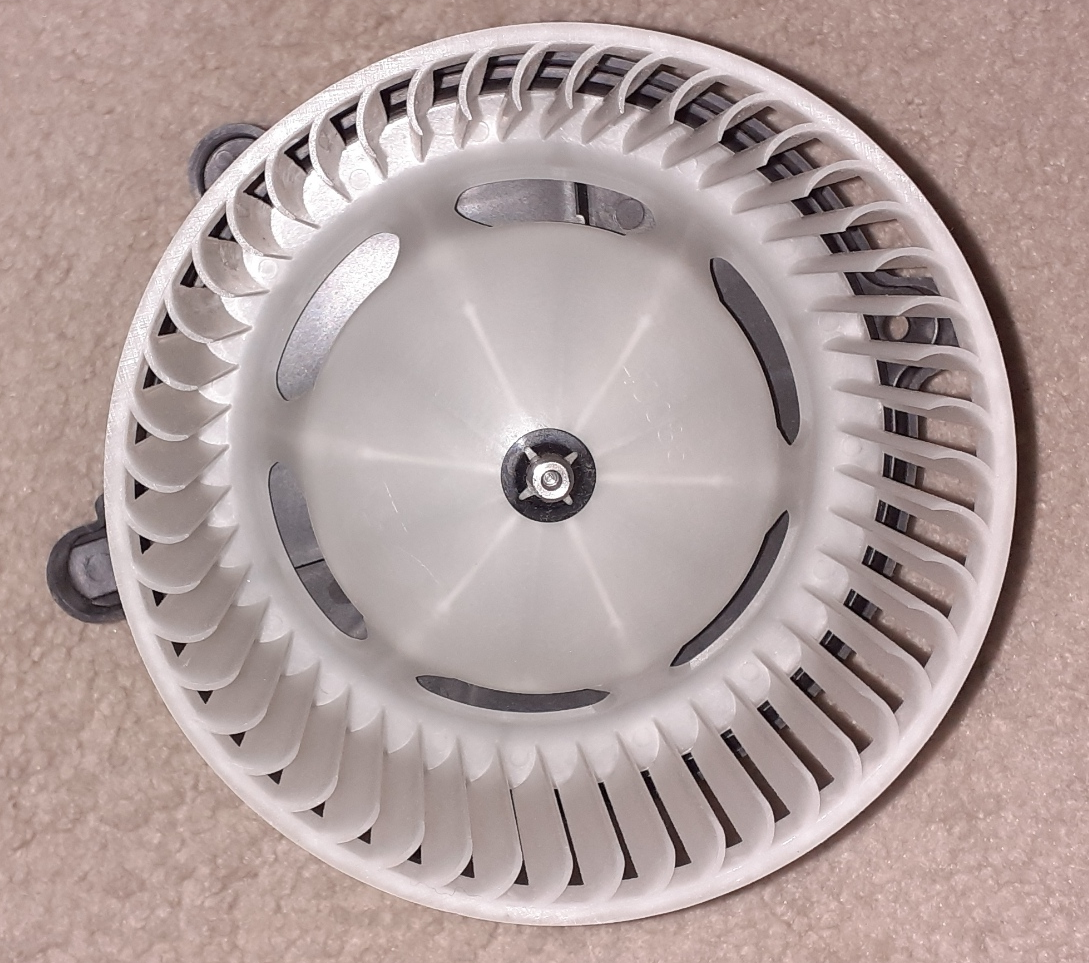
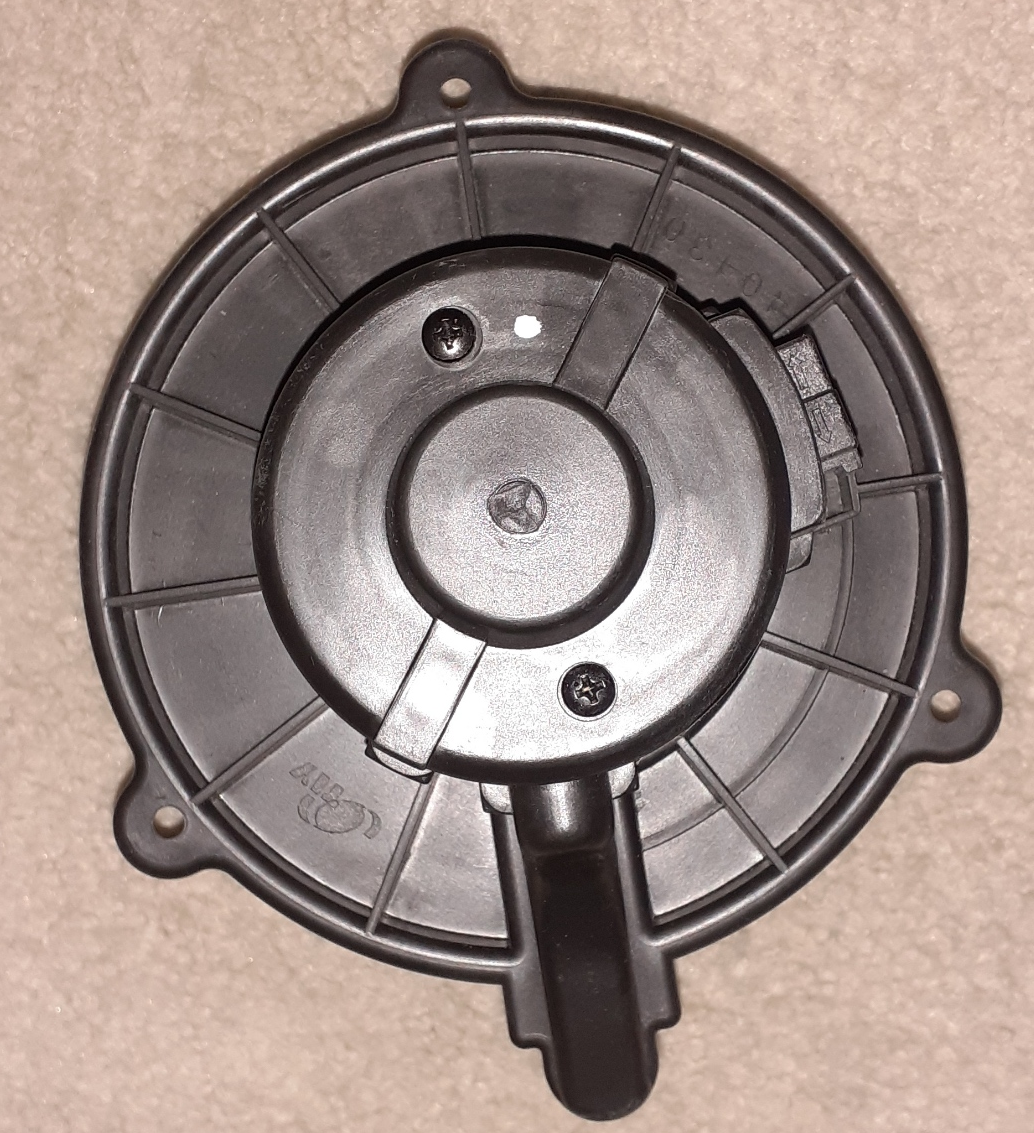
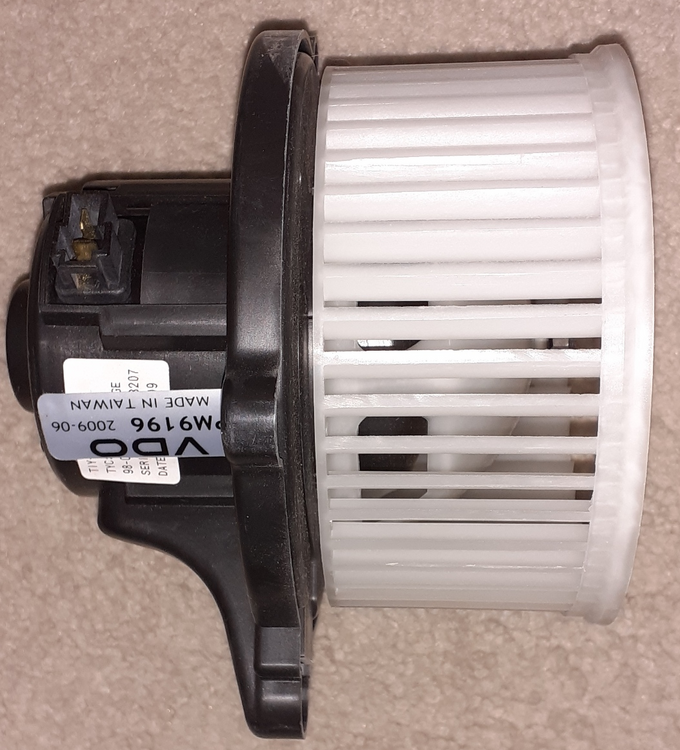
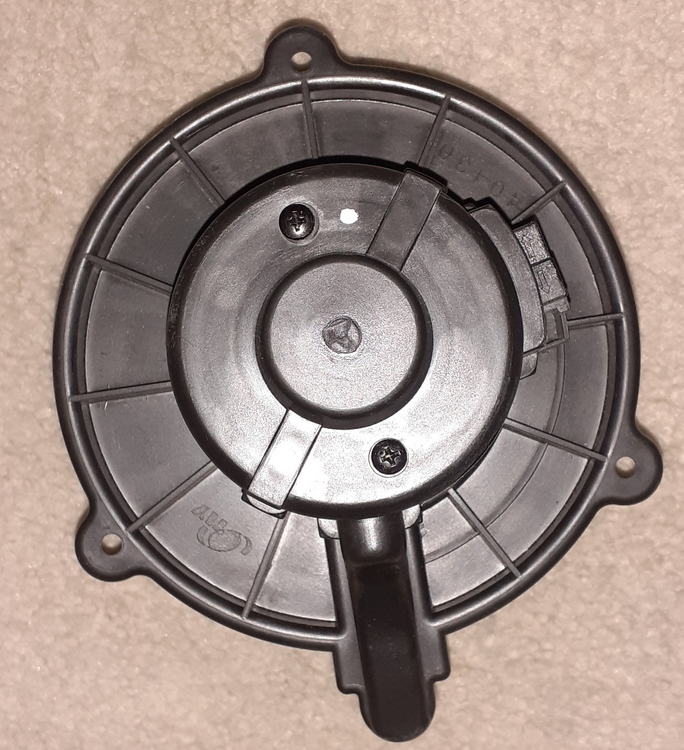
So I finally remembered to look at the VDO PM9196 that I have waiting to go into the 260Z. I already put one in the 240Z without trimming. I guess I'll find out if it's different with the 260Z. As I mentioned before, the holes need to be enlarged to line up better with the 240Z housing. The squirrel cage measures 5.75 inches in diameter. Side view Outside

-
I have to admit that I do a lot of random searches and try new things for two reasons: I have learned a lot from this forum and Zcar.com, and I want to give back. I like researching the obscure. You should have seen it when I was trying to track down a replacement alternator for my friend's 2.4 turbo swapped Datsun Roadster. From starting with a Google search and pictures of the Nippon Denso alternator that was on the car, I found that the 85 Toyota Tercel, 85 Toyota Van, and the 85 Isuzu I-Mark had similar alternators. I even managed to find a replacement plug for the back of the alternator. Some of the tools and gadgets I suggest come from watching mechanics on YouTube. They have some great toys. My wife has all but stopped questioning any of my tool choices because she has figured out that I can justify pretty much all of them. Anyway, I've met some great people from this forum in person including @Captain Obvious, @Yarb, @siteunseen, @jfa.series1, @240260280, @Patcon, @Zup, and the list goes on. I'm getting a lot out of @Mike's hard work.
-
Okay, i don't think the parts manual drawing I posted shows those panels. I was thinking of the knee panels that mount to the bottom edge of the dash.
-
This picture from the parts manual may help. Are you sure the larger panel is for a 280Z? It looks quite different from the parts manual drawing. As a matter of fact, I have my doubts about the smaller panel, too. Are you sure those aren't the panels for a 280ZX?
-
IIRC, you should see tabs below the dash for mounting. They might be shown in the body section of the FSM.
-
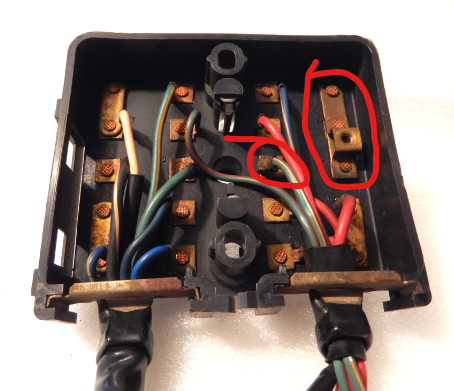
For cleaning the contacts where the fuses go, look for small bore cleaning brushes. I like the ones with the 1/4 hex end for using with a drill or hex screwdriver handle. https://www.amazon.com/Variety-Stainless-Twisted-Cleaning-Corrosion/dp/B09P5237JH Make sure you have the negative of the battery disconnected before attempting this.
-
The only thing is that this will change periodically from vendors changing their offerings.
-
My complete list: Here is my current list of recommended LED bulbs: White LED (license plate and reverse lights) https://www.amazon.com/gp/product/B08XWWJ4N4 Amber LED (front side signals) https://www.amazon.com/gp/product/B08XWXXPN5 (fixed 10/27/23) Red LED (rear side markers) https://www.amazon.com/gp/product/B08XWX81ZD Red 1157 LED (rear turn signals and brake lights) https://www.amazon.com/gp/product/B08H4MXQMZ Amber 1157 LED (front turn signals) https://www.amazon.com/gp/product/B08CZ1GRJY (fixed 10/27/23) Green LED (gauge lights) https://www.amazon.com/dp/B092VNXS6H (Non dimmable but not too bright.) Red 1156 LED (rear lights) https://www.amazon.com/gp/product/B00WGAUIR2 Gauge Lights: Green LED (gauges and turn signals) https://www.amazon.com/gp/product/B0B9MGSX7K (For 260Z & 280Z) High beam LED https://www.amazon.com/gp/product/B08GS325N6 Brake idiot light https://www.amazon.com/gp/product/B08GRJGD5Y Flasher Relays (2) https://www.amazon.com/gp/product/B0811GTVH2 Hella H4 housings: https://www.amazon.com/dp/B001G76Q2W or Koito H4 housings: https://parts.toyotasouth.com/oem-parts/toyota-headlamp-assembly-8111060p70 Auxito H4 LED bulbs: https://www.amazon.com/gp/product/B07TQLK6SH
-
I like this one: https://www.amazon.com/gp/product/B0811GTVH2
-
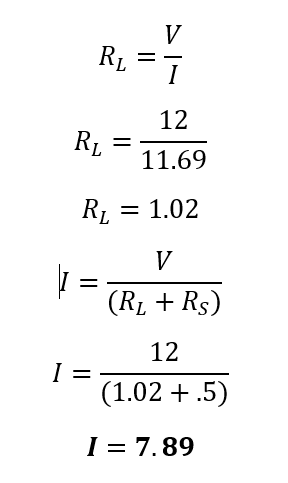
Actually if it is carboned up, it would be dropping the amount of current flowing through the fuse as it would be acting as a load in series with the lights. So we can solve for the nominal resistance of the bulbs, add some resistance in the circuit for the switch (0.5 ohms), and see what the circuit current would be. So the current through that fuse would drop by over 3A. The switch would still be a hot spot, but it should not affect the fuse box.
-
I still have a VDO PM9196 in the box. If I can remember, I'll take photos and measurements, too. The only trimming I saw that may be necessary would be for the brackets for the mounting screws. The VDO went right in.
-
The strange thing is that I didn't trim anything for it to work on my 240Z. You may want to see if you can swap the squirrel cages between the fan motors.
-
What part is larger? Are you talking about the squirrel cage?
-
I've never taken thermal readings, but less current flow results in less heat. I have not seen signs of overheating in the parking light circuit in my 260Z since I changed to LEDs 12 years ago.
-
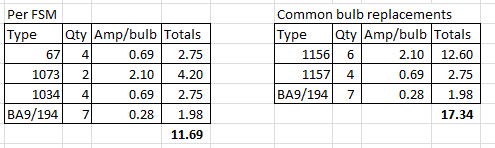
The contact that is at the point of melting is the load side of the fuse. The line side has enough copper to spread the heat out. I know I posted in the past about the amount of current that runs through this circuit. I'll put it out there again. The design of this circuit is marginal. Using the specified bulbs, this is approximately what the current is in the circuit with incandescent bulbs at 12VDC. The circuit is rated at 20A, so the fuse is fine, but if a previous/current owner used the wrong bulbs in the side markers (either to make the car more visible or due to ignorance), the current goes up quite a bit. This is why I push for LED replacements. This goes double for owners of 73-76 cars as they use a smaller connector at the steering column, and I've seen that connector burned up too many times. After replacing the bulbs with LEDs, the fuse should be downrated to 10A. I can get the current down to around 3A or less on my cars with LEDs for all the marker and gauges lights.
-
Still, that's good to know about the risk of "discounted pricing" at Amazon. Thanks.
-
What meter did you purchase? You might help someone avoid the same problem.
-
Rockauto is cheaper, even when you take shipping into account. Also, you can always search for a 5% discount code for RA. https://www.rockauto.com/en/moreinfo.php?pk=488596&cc=1209260&pt=4588&jsn=837
-
RW - High RY - Low The switch is a toggle switch. Every time you pull it back all the way, it toggles between the high and low.