Carl Beck
Free Member
-
Joined
-
Last visited
Everything posted by Carl Beck
-
I completely agree with Steve. This 280Z is worth twice the asking price - as it sits. If it were anywhere close to me, I'd grab it in a heartbeat.... FWIW, Carl B.
-
See: http://ZHome.com/Classic/240ZFloorboards/ChrisFloorboards.htm This may help.. FWIW, Carl B.
-
Hi Chris: Yes - there were 10 cars done, for the average the paint work alone was around $4K to $5K for a single color. The Parnelli car and a couple others had paint jobs that ran $6K to $10K.. but that was three or more colors with lots of custom graphics etc. If you use the best materials, it's easy to spend $1,000.00 on materials alone. Then you have the costs of overhead for the environmentally friendly paint booths etc... As I recall the "House Of Color" supplied the paint for several of the cars. Apply several base, color and clear coats and you spend some serious time and money on the paint job. FWIW, Carl B.
-
$200.00 Or Best Offer....Good part to have as a spare if you can buy it right and if you are in the area.. FWIW. Carl B.
-
You are never done.. pull the fork back out.... Now you just have to get rid of that black undercoating over-spray on the lower radiator support. Or black out the radiator support area altogether... When you are really "done" - then it's time to get another one to work onROFL Looks Great.. Carl B.
-
I think it was a model car that blew up...
-
If you find that your odo matches your speedo - - ie that your speedo is OK. If the speedo is reading 59 at an actual 50... then you need an 15% decrease in the speed at which your speedo cable is turning - to make the speedo. indicate your true speed. 59 mph x 0.15 = 8.85 mph 59 mph - 8.85 mph = 50.15 mph The stock rear end for a 4 spd. 240-Z is 3.364:1 It calls for a speedo gear of 16 teeth (yellow) So IF THAT IS WHAT YOU HAVE - you would need a speedo gear with 15% more teeth. 16 teeth x 1.15 = 18.4 teeth - - So you need an 18 tooth speedo gear to correct the error. A 18 tooth speedo gear happens to be the speedo gear called for use with a 3.7:1 ratio rear-end. On The Other Hand: If your speedo was reading 60 mph when you were doing an actual 50... then you need a 17% decrease in the speed at which your speedo cable is turning - to make the speedo. indicate your true speed. 60 mph x 0.17 = 10.2 mph 60 mph - 10.2 = 49.8 mph 16 teeth x 1.17 = 18.72 teeth - So you need a 19 tooth speedo gear to correct the error. A 19 tooth speedo gear happens to be the speedo gear called for use with a 3.9:1 ratio rear-end. 3.364 rear gear calls for a speedo gear of 16 teeth (yellow) 3.7 rear gear calls for a speedo gear with 17 teeth (Blue) 3.900 rear gear calls for a speedo gear of 19 teeth (white) Take a friend to watch the GPS and do the recording - so your eyes can stay on the road. Run the car at 60 mph and 70 mph according to your GPS - then record what you speedo is indicating. That way you can more accurately dial in the % correction you really need. That is to say that difference between the 16 tooth, the 17 tooth gear and 18 tooth gear will be large enough to overcome rounding errors... and relative positions of the speedo indicator needle etc. Then simply get the correct speedo drive gear and put it in the transmission. The bonas is you will have a good idea of what rear gear you have as well. NOTE - pull the present speedo gear out and count the teeth FIRST....Make sure it is a 16 tooth gear - - You may simply have the wrong gear in there to begin with... so you may need to apply different correction factors... FWIW, Carl B.
-
You may have a floating ground. Can't hurt to try. I'd remove and clean the battery to body ground, making sure you have a bare metal contact between the two. - - and I'd add a good ground between the body and engine. good luck, Carl B.
-
Hi Martin: You can rebuilt the top end about three times before you need work on the bottom end - if the engine has had any care at all. If the rockers are worn - then you might as well plan on replacing everything with a new cam kit and be done with it. The cam to rocker interface will never be as quite as it should be with mix and match cam lobes and rockers.. Did you stop by Jaremko Nissan in the Valley? Paul and his son still race a roadster, and the Parts Manager used to own a 240Z - {don't know if he sold it or not}... at any rate they might be able to come up with something for you... If you do stop in, tell Paul I said hello... FWIW, Carl B.
-
Complete replacement of floorboards, frame rails, inner-fenders and exterior panels seems to be routine during a correct restoration of almost any cars from the 50's, 60's and early 70's. It seems that Mr. White has a very highly regarded reputation, that has been built over decades. So I'd have to guess that any rust issues were dealt with properly before the cars leave his shop. Hard to boil down three or four weeks of work, and still show all the important aspects in a one hour show. A friend of mine here locally has "restore", "street-mod'ed" and "refreshed " many late 60's and early 70's muscle cars. Several have been National Show Winners. He is simply a "master metal man". Looking at the job Arne's guy did on the roof of his car, it seems Arne has found another. In my experience, these guys simply can not bring themselves to sluck bondo on anything to cover it up.... With decades of experience, and the personal skills they utilize, they find it easier and faster to simply replace entire panels, or do what ever metal patching is necessary - than it is to try to shape bondo. Nonetheless - there are always lots of shops turning out shinny paint jobs over rust buckets that have not been properly nor completely repaired... it is always "buyer beware". FWIW, Carl B.
-
Hi Stephen: Nothing. What was impressive about this series, was the fact that they kept track of the actual hours and cost to complete the body work and paint etc. on all of the cars - - and shared that information with the viewers. Like I said, amazing how often we hear from people that have had their cars in shops for 6, 12, 18 or more months - to get couple of weeks of actual work done... FWIW, Carl B.
-
There was a very interesting TV series that ran last weekend here. Barry White and his crew set the goal of restoring/refreshing or building restro-mods out of 10 more or less junk cars -and completing 10 cars in 10 months. Then taking them to the various high profile auctions around the country. Did anyone else watch that series? What I found very interesting about it - was that they told you how many hours of labor went into each major step, of each car. They also kept a running total of the costs... Keep in mind that this crew has lots of experience, and they were working to a goal, for a TV show.. The cars came from junk yards, or private owners. Most were purchased for a grand or less. Nonetheless, it gave a good idea of just how many actual labor hours it takes to do a very complete body prep and high end paint job. Quarter panels replaced, metal patches made, car stripped to metal and put in epoxy primer in most cases.... Most took between 60 and 80 hours of labor to do the body work, panel replacements or metal patching. These were done right - not sluck bondo jobs. Once the body was ready for paint -they sent it out to a local shop for the actual paint job. This was a one to two day process. The show quality paint work was $5K to $10K... that's for the paint job... 80 hours is two men working on the car full time for five days. The labor rate was about $37.50 per hour. When the cars went to the auctions - most sold for between $40K and $60K, as Super Muscle Cars.. One was a recreation of the Mercury that Parnelli Jones drove in NASCAR circa 64 as I recall.. All had upgraded brakes, suspension and high performance engines etc. http://www.racingjunk.com/category/71/Pro_Stock/post/1478085/1964-Parnelli-Jones-Nascar-Mercury-Marauder.html At any rate - its a far cry from having a car in a body shop / restoration shop for a year or more... just to get the body and paint done... FWIW, Carl B.
-
It certainly looks "restorable". Pretty early car too. Take your time and enjoy the process... BTW - The tires look like they have been on the car since before 87? I think I have a set like that..from the 70's. best of luck, Carl B.
-
Hi Guy: Yes if the combustion chambers are 46cc's that is correct. On the other hand that also means that the first engine was not 10:1 but rather 9.56:1 Thanks for the input - I'll add it to the C/R data base... Be sure to Post some pictures of the combustion chambers when you get the head back.. FWIW, Carl B.
-
That is two of us.:stupid: Although in my case it was just 20 years ago... You have to keep saying to yourself "this is supposed to be fun". "Getting the project done is not the objective - enjoying the process with your son is the goal." Matter of fact - I'd print that out on a large size sign, and put it on the wall of the garage - if I had it to do again. Come to think of it - I do have it to do again, only this time with my Daughter.. FWIW, Carl B.
-
Hi Chris: I'm sure you know what you mean - but I have to say that I an not sure I understand what it is that you are asking. Can you be more specific... exactly what did you do the first time? FWIW, Carl B.
-
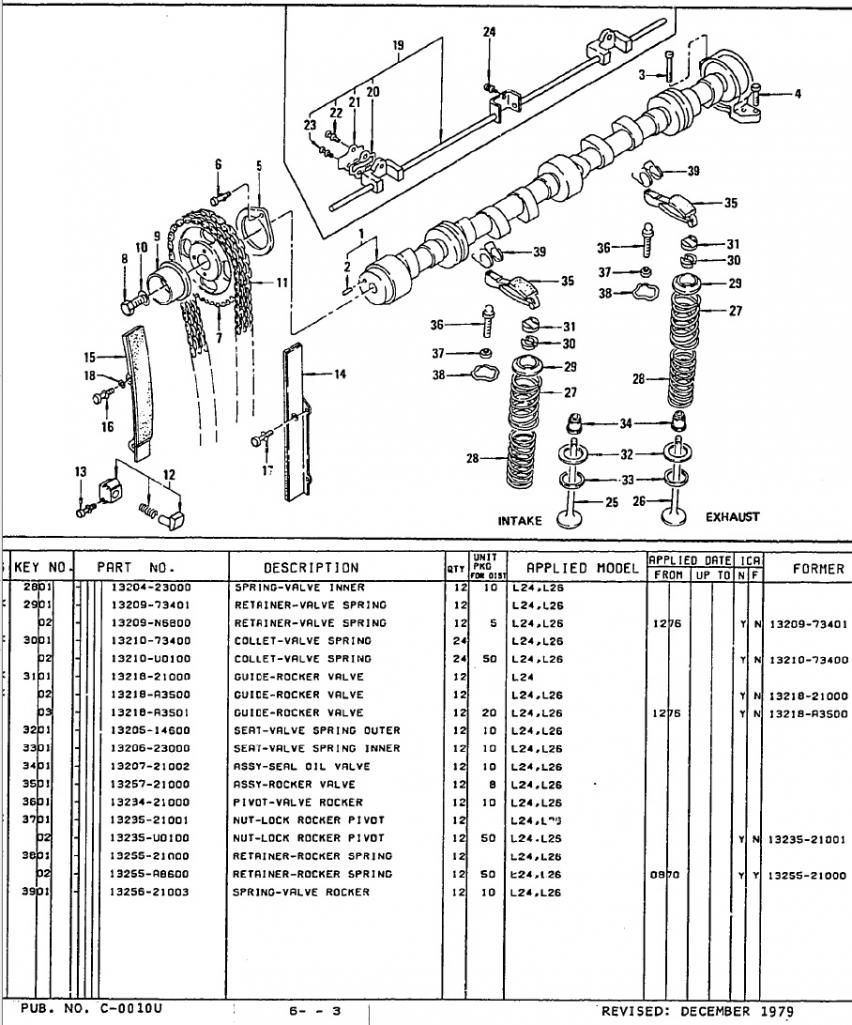
Retainer-Rocker Spring See attached... #38 In the picture it seems to be, in the place it is supposed to be in. FWIW, Carl B.

-
At least as it pertains to the two previous owners, that would be quite possible. I do not believe that they had access to someone like John Williams in Atlanta. That is to say, access to a knowledgeable and experienced mechanic, used to dealing with the flat tops. John had to take them completely apart and clean the varnish out, then readjust etc. Prior to that, I believe the owners simply kept the car to preserve it. Once it had sat for years without being started, it got to the point that it was impossible to restart without major service work. FWIW, Carl B.
-
Hi Randy: Just to make sure I understand which/what "heater hoses" your talking about. First there are outlet hoses, a reducer hose and fixture on the block itself for the heater. Then there are the three inlet/outlet hoses that run to/from the block, to/from the heater core & control valve, and from the control valve to the heater core If you are missing the heater hoses that go through the firewall - to the heater core, Then I would suggest just making a loop out of standard heater hose, and going from the outlet on the block, to the inlet fixture on the block. This would by-pass the heater core altogether. When you get the heater hoses that go though the firewall etc. you can then install them later. Given the very sharp bends on the very end of the heater hoses, that go through the firewll - a attach to the heater control valve - I wouldn't want to attempt to use straight hose in place of them. There isn't much working room under the dash and the hose might crimp/kink. FWIW, Carl B.
-
Hi Guy: First let me say that I have more questions at this point than answers. I've received somewhat conflicting data from different sources over the years. Sources with a high degree of creditability and years of personal experience. One reason is that the data from L24's is based on engines that ran in SCCA's "Stock" classes - and were therefore torn down and checked, time after time. So right from the beginning those engines were built to very exacting specifications. With the data from the L28's - that is not the case. For the most part with the L28's we are getting inputs about modified engines - and the data becomes more speciifc to the engine and engine builders. For example: - From various engine builders we get inputs that "deck height", the amount the piston exceeds the cylinder wall in the block is either "0" or 3.69cc - Depending upon the cylinder head gasket used, the volume added to the total volume and the combustion chamber volume can both vary between 7.6cc {stock 88mm L28 gasket} and 13.01cc {2mm thick, with 91mm dia.} for the metal gaskets. - Then of course there is the question about the actual cc's of an altered head/combustion chamber. So I'm hoping that as you work with Z doc - you'll be able to pin down some very specific data related to your current project. In effect ask them to cc the combustion chamber and report the exact value, and ask them specifically what cylinder head gasket they plan to use. All this is something I wish I had the presents of mind to accurately measure and record years ago when I swapped in my first, second and third L28's. My present engine uses Nissan's Flat Tops with a 2cc pop-up and 0.5mm overbore, a 72 E88 head with increased valve size, unshrouded valve seats and the Nissan Slalom Cam Kit {0.475" lift & 275 degrees duration}. Triple Webers and UniLite distributor w/o vacuum advance. At the time we built the engine, we calculated the C/R at about 10.13:1. Runs fine on 93 octane pump gas, not quite so well on 91 octane as the timing has to be retarded a couple of degrees. For the sake of discussion, below are three different ways of calculating the C/R, depending on what was done, and/or what parts were used, and using a "0" deck height. Holding everything else the same - it would seem that the 0.040" overbore raises compression ratio from 10.78:1 to 11.58:1 . Z doc may well be doing other things that will lower that to something closer to the 10:1 your looking for. STOCK 8.5:1 C/R L28 with Flat Tops and P79 Head Swept Volume of Cylinder = 458.9cc Combustion Chamber volume = 53.6cc Gasket Thickness = 7.6cc Deck Height = 0 cc So: 53.3 + 7.6 = 60.9 combustion chamber volume 458.9 + 60.9 = 519.8 total volume 519.8/60.9 = 8.5 : 1 Compression Ratio = = = = = = = = = = = = = = = = = = = = = = = = = = MODIFIED #1 10.78:1 1mm Overbore and 2mm Milled Head: L28 – Flat Top Pistons (79-83) & 1mm overbore (0.040") Swept Volume of Cylinder = 480.5cc Combustion Chamber volume = 53.6cc minus 11.62cc for 2mm (0.080") shave head.= 41.49cc Gasket Thickness = 7.6cc Deck Height = 0 cc So: 41.49 + 7.6 = 49.09 combustion chamber volume 480.5 +49.09 = 529.59 total volume 529.59 /49.09 = 10.78 : 1 Compression Ratio = = = == == = = = = = = = = = = = = = = = = = = = MODIFIED #2 11.58:1 Same as Mod #1 except the block has been decked by 0.020 to assure flatness, or it may be true that the stock L28's pistons do exceed the block deck height by 0.020" to begin with. L28 – Flat Top Pistons (79-83) & 1mm overbore (0.040") Swept Volume of Cylinder = 480.5cc Combustion Chamber volume = 53.6cc minus 11.62cc for 2mm (0.080") shave head.= 41.49cc Gasket Thickness = 7.6cc Deck Height = - 3.69 cc So: 41.49 + 7.6 - 3.69 = 45.4 combustion chamber volume 480.5 + 45.4 = 525.9 total volume 525.9/45.4 = 11.58 : 1 Compression Ratio So if you get a chance to talk to the people at Z doc - see if you can find out what the measured cc's of the combustion chambers are and what head gasket they will use. Also see if you do have pistons with a positive deck height or not, you'll be able to tell once the pistons are installed. I'd also suggest that if you can get the specific data - unlike me, write it down and keep the records. FWIW, Carl B.
-
Hi Guy: The reason I was hoping we could verify the combustion chamber volume with an actual measure - is because when I plug the numbers in - I get a C/R of 11.6:1 - - if you are using flat top pistons and stock head gasket. I'm not certain that milling the head 2mm (0.080") removes 11.62cc's however. The reason is that the combustion chamber walls are dished, rather than straight. The other unknown at this point is the type of cylinder head gasket Z doc plans to use.. L28 – Flat Top Pistons (79-83) & 1mm overbore (0.040") Swept Volume of Cylinder = 480.5cc Combustion Chamber volume = 53.6cc minus 11.62cc for 2mm (0.080") shave head.= 41.49cc Gasket Thickness = 7.6cc Deck Height = -3.69cc So: 41.49 + 7.6 - 3.69 = 45.4 combustion chamber volume 480.5 + 45.4 = 525.9 total volume 525.9/45.4 = 11.58 : 1 Compression Ratio To get to 10.0:1 you'd need a combustion chamber volume of 53cc's. So you'd have to pick up about 7.3cc's somewhere. Dished pistons increase combustion chamber volume by about 10.9 cc's. Using a 1mm thick metal head gasket, with a 91mm diameter opening, would increase combustion chamber volume by about 6.5cc. The 2mm thick metal head gasket would add 13.01cc's. Playing with the numbers is fun, but it is better if we have verified numbers to start with. FWIW, Carl B.
-
Hi Guy: I'm hoping that The Z doctor would have a Plexiglass cover to fix to the head, through which he would inject a precisely measured amount of fluid into the combustion chambers. It's a fairly simple process that most engine builders use to assure even combustion chamber volumes. One Example - if you google "cc'ing combustion chambers" http://www.cosworthvega.com/cc_an_engine_GEC.html FWIW, Carl B.
-
Hi Guy: Looks great so far... Please Post some pictures of the combustion chambers with the valves installed. If your machine shop cc's the combustion chambers, I'd be interested in knowing what you would up with in the end. regards, Carl B.
-
Hi IBZINYA: With 90K miles and a repaint - it is no longer in the "Collector" car category. Collector Quality #1 and #2 examples can usually bring $25K to $30K+. The absolute BEST - - all original, with about 650 original miles - went for over $65K. Depending on the quality of the repaint - and the over-all condition of everything else on the car, it is usually easier to resell a Black Pearl than any other stock color in like condition. People that like the 280Z's to begin with, might place a small premium on the rarity of the color. That may result in a grand or two more out of the sale if it hits the market at the right time... I do believe that NADA's values are at present lower than the market outside the Dealer Lots. NADA's "High Retail" is about the same - definition wise - as a mid level #3 Condition car. I've seen 78 280Z's with less than 45K miles, in stock and exceptionally well cared for condition sell for $16K and above pretty easily over the past five years. These are exceptionally low mileage, pure stock, and with no body damage, scratches, dings, dents etc.... With a minor clean-up and good detailing these cars can win Local Club Shows etc. About 85% of the market value is dependent upon the actual condition of the car, and about 15% is dependent upon its location and the sellers willingness to work at selling it. We'd have to have a lot more specific information about that cars condition in order to even put a price range on it.... Nonetheles we can discuss it in general terms. If we say that your friends Black Pearl received a decent repaint ($5K job) - with all trim and glass removed etc {no masking lines etc}... and we say that the Black Pearl paint was mixed to OEM spec.'s... Lets say that the car is as rust free as one would expect a well cared for 280Z to be if it was stored in the Winters etc. - If he paid less than $6,500.00 for it he got a deal..... The Picture makes the car look great!!... If it hadn't been started in 20 years - he can figure on putting a few thousand in it right up front... Easy to spend $600.00 to $850.00 for new OEM injectors alone...then things like rear wheel cylinders, brake and clutch hydraulics, cooling system work, tires etc etc... So as long as he'd got less than $10K in it, by the time it is road worthy... he's in good shape... BTW - I see the rear shade is on the car. The original Racing Mirrors were delivered to the Dealers in the car - in the typical DATSUN box, same as you would have received if you purchased them over the Parts Counter at the time. If they are still in that box - it is quite possible they were never installed at the Dealership. If you get a chance - show us some more pictures of the car - including the engine compartment and interior... the door jams etc. Also tell you friend to see: http://ZHome.com/History/BlackP.htm He should e-mail his information to: RWilliams@cognizant.com Ross maintains a Black Pearl Register - and he can send a lot more current information to the owner. FWIW, Carl B.
-
I like it alot - Looks great.. FWIW, Carl B.