Carl Beck
Community Member
-
Joined
-
Last visited
Everything posted by Carl Beck
-
Hi Mike: Get on the phone and call some local Auto Parts Stores.. and ask them if they carry metric fuel line sizes. When you find one that does - simply cut a 6 inch piece off the different size hoses that are on the car and take them to the store with you. As the car seems to have the earlier SU's now - no you shouldn't need to retain the fuel line insulation. FWIW, Carl B.
-
Hi Arne: Measure the distance at the front end of the rocker panel, from the ground to the bottom of the rocker, and let us know what you find. Then do it again after you install the rear springs.. thanks, Carl
-
Hi Guys: During our discussion, we may be introducing some misunderstanding or errors in terms... So this is how I understand it... Stock Ride Height: Measured from the garage floor - to the bottom of the rocker panel, at the front and rear jacking points - a stock 240-Z sits about 7 3/4 to 8 inches high (the 73's actually sit a bit higher than the earlier cars do to the headlight height standards and bumper height standards for that year). Bottom of the rocker panel - means just that - NOT to the pinch weld that sticks down farther... (this is from the Factory Service Manuals, not from older springs..). Installed Height: "Installed Height" = the height as installed on the car. This is not the compressed or non-compressed length of the spring on the strut before it's installed on the car. So shock travel doesn't effect installed height. Free Length, Spring Rate and the Load placed on the spring does. (that way the shock can travel higher than the installed height - as well as lower). Coil Springs compress at a "more or less" constant rate - once they are pre-loaded to about 80% of their length. The rate will vary greatly during that first 20% because the distance between the coils and shape of the spring wire at the top or bottom are made to sit in the different types of spring perches. So Free Length and Load are managed to provide the desired Installed Height at any desired spring rates. Once the spring is installed on the strut, and the car is sitting on the strut - from that point forward the spring rate will be more or less constant. So only three factors determine "ride height" as far as the springs are concerned(ruling out wheel/tires) ... once the spring is installed on the car. The Installed height of the spring is determined by its Free Length, Spring Rate and Typical Load. If the Free Length of the Stock and Euro.Spec. Springs were the same to begin with..and the only difference between them was their spring rate - then yes - the stronger spring would result in an increased ride height. But that isn't the case.. the Stock Front Springs have a Free Length of 14.7 LF and 15.2 RF with a spring rate of 83 in/lb. and an Installed Height of 7.9 inches. Typical load is 604lbs on the Right and 562 lbs on the Left. The Euro Spec. Stage I Springs have a Free Length of 13 inch, a spring rate of 102 lb/in and an installed height of 7 inch. So if everything is to spec. - The Euro Spec. Springs "should" lower the front of the car 0.7 inch. The Stock Rear Springs are 15 inch in Free Length, are rated at 103.6 lb/in and carry a typical load of 635lbs. So their installed height comes out to 8.86 inch. The Euro Spec. Stage I springs have a Free Length of 14.2 inch and are rated at 112 lb/in.. with a typical load of 635lbs. - - - so their Installed Height is supposed to be 8.86 inch as well. For a rough aproximation of the installed height - you can take the Free Length and apply the Load to a given Spring Rate... The spring rate isn't as constant at it's free length - but you'll be close to the real world.. Stock Rear: 15 inch free length minus (635lbs divided by a 103.6 lb/in rate) =6.13 inch of compression) = 8.87 inch installed height Euro Spec Rear: 14.2 inch free length minus (635lbs divided by 112 lb/in rate)= 5.67 inch of compression) = 8.53 inch installed height. Of couse all this is based somewhat on the Factor Spec.'s being correctly rounded, converted and reported... FWIW, Carl B.
-
Hi Jeremy: I understand. One of the advantages of a public discussion here, is that incorrect or misleading information might be questioned as well as corrected and/or clarified if necessary. I questioned the "81 T-5"... with the hope that in the end, we'd both know if that was correct or not. As it turns out - if it's a T-5 it had to come out of either an 82 or 83 ZXT, as the 81's were available with only the A/T. FWIW, Carl B.
-
For the life of me - I only remember the 81 280ZX Tubo being offered with and A/T. I'm pretty sure they didn't get the T-5 until 82...
-
Hi Jeremy: 134 RWH is very commendable... The car looks super too,... pays to keep looking until you find a good one and it looks like you did. A T-5 from an 81?... Carl B. Carl Beck Clearwater, FL USA http://ZHome.com
-
Just wanted to get to you before Alan did ! <img src=http://www.classiczcars.com/forums/images/smilies/c.gif> Just too funny.... by the way... is that 213 or 223? The image is a little fuzzy..
-
Good to know Mike ... you are right we seldom hear of failures of this type in the 240-Z's. They have a well earned reputation for rock solid reliability. Nonetheless, they are now 30+ years old... and it would most likely be a very good idea if we all started checking the bolts/nuts in our drive-lines, as well as everything under our cars. Anything less than proper torque - and those old nuts/bolts can get tore up pretty fast. Carl B.
-
Did that stamp say "S30-" or "HS30"? Is that 213 or 223? 213th (223rd) RHD DATSUN 240-Z maybe? It is an A/T...<img src=http://www.classiczcars.com/forums/images/smilies/adminfinger.gif> Carl B.
-
As I recall the OEM Brake M/C was TOKICO on the 240-Z's and NABCO was OEM on the 280ZX's. Checking the Parts Catalogs that seems to be the case as well. FWIW, Carl B.
-
Yes - 70/71 (Series I and II up to Aug. 71 Tokico) had the larger reservoir for the front brakes in front, while the 72/73's (Tokico - from Sept. 71 forward) have the larger reservoir in the rear. The 70/71's had the bleeder valves on the inside toward the engine, while the 72/73's had them on the outside under the fender. Huge difference in price between the two also (at least the last time I bought them). Hummmm.... the distance between the brake line fittings is closer on the 70/71... and they are wider apart on the 72/73.... If you tried to interchange them, I don't believe that the brake tubing would line up properly... so you'd know something was wrong.... as you tried to force them into a new location... ( as I recall, I made that mistake once...).... FWIW, Carl B.
-
Ok - sometimes, it's a matter of getting the brake line (the tubing) headed perfectly straight and even into the fitting.. so that the flair nut will also allow itself to be screwed in perfectly straight. A very slight misalignment of the tubing into the fitting... and the flair nut will seem to start - then when the bottom of the nut hits the tubing in the fitting - it stops... nothing will go in - nor come out right... at that point. Sometimes you just have to get the tubing oriented correctly and seated in the fitting .. and sometimes that takes several tries. The trick is to not get frustrated and not to force anything... If you have one fitting that screws in correctly and feels good while your doing it.... you have at least one example of how it should work.. Try working the tubing a little - as you screw in the flair nut.. it it doesn't go.. back out and try working the tubing a little more to improve it's alignment with the hole... etc etc. Sorry I can't think of a better way to describe the process.. nor the problems you run into.. Sometimes it's better to just stop - take a break... and come back fresh later.. FWIW, Carl B.
-
Yes - that is why I ask if it was an OEM Nissan Replacement Part Agreed - that is why I said "tapered fittings",... it was the only way to describe how the flair nut would feel as it was initially screwed into place. FWIW, Carl B.
-
Ok - so once you bled the MC.... did you then proceed to bleed the brakes again? To assure that you have now cleared any air from the lines... Carl B.
-
Hi Steve: The were originally smaller versions of the plastic rivets as used in the interior panels. I believe you can still order them from your Nissan Dealer's Parts Dept. FWIW, Carl B.
-
Hummm.... that's one of those questions that without being there to personally put your hands on it - and feel it.... it's really hard to say. The brake line fittings are tapered fittings - so they are going to screw in only a short distance easily by hand... but you should feel that they are screwing in straight and when you put a line wrench on the flair nuts, they should be very easy to turn with the wrench until the begin to tighten down... Is this a Nissan OEM Part?... and are you sure it's the right one? FWIW, Carl B.
-
Hi Arnie: Every original spare wheel I've seen in a 240-Z has been painted black on the outside face. FWIW Carl B.
-
They look very much like the original Racing Mirror Sets sold via the Datsun Dealers Parts Dept.... They came as either a set of Mirrors - or they were included in the Datsun Rear Window Shade Kits. They were metal, but they were actually pretty cheap as well. While they do look good on the first generation Z's... they really don't have enough angle adjustment to make them really useful, while at the same time being positioned for looks. See: <a href=http://zhome.com/History/240ZRacingMirrors.htm TARGET=NEW> Datsun Racing Mirror Set</a> You can find them on E-Bay every once in a while... FWIW Carl B.
-
Hi Datfreak: I like to think of the vacuum advance as a "load compensation advance" (as in the How To Modify book) - - that is employed at lower RPM's to advance the timing as more fuel is feed to the engine. when a demand or load is placed on it (you start to press on the gas pedal)... As the engine comes up to speed, the mechanical advance takes over to advance the timing as the vacuum advance backs off (it backs off because you aren't holding the throttle wide open once the desired speed is reached.) What you really have to be concerned with is not only "Advance" that can be dialed in by the distributor and Total Advance numbers (distributor plus initial advance at crank) but the "Timing Curve" - that determines at what RPM the advance is brought in. Swapping distributors from one model car to another, can result in a real performance loss - if the timing curve isn't the one needed by the car/engine receiving the distributor. (and in most cases the timing curves from the factory are intended to meet emissions standards, not to provide the best performance). So you need to put the replacement distributor in the hands of a capable automotive ignition shop - who will put it on a Distributor Machine - to measure/record the entire timing curve in the distributor... ie how much advance takes place at each incremental increase in engine RPM. Then make adjustments to it - to dial in the timing curve you need for your engine. While 36 to 38 degrees of total advance have been mentioned and the L series engines can stand them - every dyno tuned result I've seen so far would suggest that anything over 34/35 degrees of total advance results in a loss of power in the upper RPM range. Initial timing is set at the crank, by twisting the distributor. Most street L series engines do well at about 12 to 14 degrees initial or static advance (BTDC) at 650/750 RPM (no vacuum advance hooked up). In terms of total advance (initial plus mechanical advance in the distributor) then - you want to have the distributor mechanical advance start to come in around 1000/1200 RPM and advance 10 to 11 distributor degrees total by 2500/3000 RPM. (10 to 11 degrees in the distributor is equal to 20 to 22 degrees at the engine) So 14 degrees initial + 20 degrees from the distributor mechanical advance = 34 degrees of total advance. A good automotive ignition shop will have various spring strengths and weights to use to dial in the timing curve on your distributor. They will also have the equipment necessary to measure the changes they are making...until they find the right combination of springs and weights. Don't take any of the numbers used for discussion here - to be in any way absolute... just a starting point. You'll have to try them - and depending on the throttle response and ping/knock etc - you may have to adjust the timing curves for your engine accordingly. On top of all that - we get back to the vacuum advance. Because it too works against a spring tension - it is possible to adjust the amount of advance it adds at different vacuum levels - by adjusting the strength of the spring. But here again, work with a good automotive ignition shop... FWIW, Carl B.
-
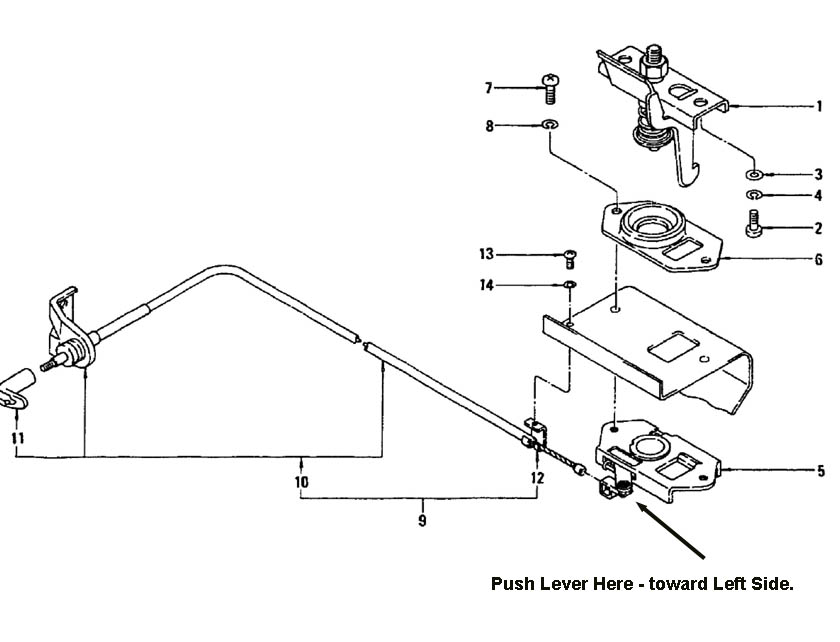
It is also very helpful - if someone can stand up above and alternatively press down on the hood - and release - as you push the lever with the screwdriver blade - then they can grab the hood and pull up as it releases... Sometimes if you are by yourself - the hood still won't pop open like it should - even if you have moved the release lever far enough... glad the diagram was helpful... Carl B.
-
None that I have ever found - but I have thought several times about producing them... FWIW, Carl B.
-
Mr. K personally signed all 2300 prints... There was a lot of joking about him being held captive at Mad Mikes house, until he had signed all of them before coming to Denver for the Convention that year... Mad Mike worked for the Printing Company that printed them, as well as printing the "Mr. K" book that was translated into English, and had many additions added by Mike - from it's original Japanese printing. FWIW, Carl B.
-
Hi Mike: If you can get to the bolts - why not just put a screwdriver into the bottom of the latch - and push the lever to open/release? I've never had to remove bolts - to open a hood with a broken hood release cable. Is something else jammed? FWIW, Carl B.
-
Hi Will / everyone: I have A/P #3 of 300 - These are the "Artists Proof's" I have #2 of 2000 - as well as several others...(#260 my IZCC Membership Number, #42 for HLS30 00042,.. etc). While these were made via an Offset Printing Process... they were cleverly marketed like they were lithographs (or serigraphs). When a lithograph is made from an original piece of Art... the Artists actually redraws the artwork by hand on one or more silk screens.... this may involve three or more silk screens before all the colors are put down. Because the silk screens do wear out - the first prints made are always the best quality... Artists Proof's are usually limited to 10 or 15 at most... With high quality offset printing - they could have ran 10,000 of them and the actual quality would have been the same for all of them.. The images are simply pictures of the original artwork. Yea Gad... I'd love to see these selling at $400.00 - I've given a few away to friends over the years. As I recall - they sold them at the 1996 Convention for around $50.00 for the Prints and $75.00 for the more limited A/P's. It was a way of raising money for the Convention expenses. Might be worth $150.00 by now... FWIW, Carl B. Carl Beck Clearwater, FL USA http://ZHome.com
-
Hi Enrique: Yes, the Series I, Series II and very early Series III cars had the rubberized fabric bands for support of the thick foam rubber seat cushion...Sometime in Jan. of 72 the cars started coming with the spring supports in the seat bottoms. That was necessary, so that the deflection of the seat bottom could be sensed - for the Seat Belt warning system to work. You can tell the early Series III cars from the later one's simply by looking at the center console (if it's original)... the early cars didn't have Red Seat Belt Warning Lights on the cover over the fuse box. "71" - - "72"? I thought we were talking about Series I and II differences... Series I 10/69 into 01/71 Series II 01/71 into 09/71 Series III 09/71 into 08/72 Series IV 08/72 into 08/73 Other than the seats... if you really did mean Series I - with the round seat angle adjusting knob..It sounds like #43274 had the items that a Series II car should have. The Series I and II dash and center console were the same. The indent for the hazard switch label started with the Series III cars..and the center console was redesigned at that point partly because of the new Type "B" transmission. Carl B.