Captain Obvious
Community Member
-
Joined
-
Last visited
Everything posted by Captain Obvious
-
bjreed1119, Dave is correct in that there are no permanent magnets involved, just a steel plunger that is pulled by the electromagnetic coil. With that in mind, the polarity doesn't matter. Only thing that I might wonder academically about is that there may be some small amount of residual magnetism retained in the injectors after being used in one direction for some time. Not sure how much of an effect that might have, or how long it might last until the fields have been readjusted. When I redid my harness, I found most (but not all) of the injectors were wired the same polarity. So when I rebuilt things, I wired them all the same, using the predominant polarity. I think I kept four the same and switched the remaining two to match the other four.
-
Wow! Damn you're good!!
-
Thanks!! If you want to, you can put that pic both here and in the thread where I was talking about changing the PCV direction. I'm still thinking about changing the PCV scheme, and that's why I wanted a peek at the baffle design(s). http://www.classiczcars.com/topic/57136-pcv-flow-direction-can-i-reverse/
-
Haha! I don't know if the other owners with those kinds of cars like the association or not. I guess it would depend on the association. On a related note, I went to a show a couple weeks ago and there were maybe thirty DeLoreans there. And almost all had some sort of reference to the Back To The Future movies. Looking very hard, I think I found three of the thirty on which I could find no reference to the movies.
-
Cool! So it was just a bum rebuilt alternator? Man how I hate rebuilds...
-
-
Welcome to the club, but wow....... That thing has been hacked, jacked, and molested!! You either better be really really good with electrical troubleshooting yourself, or you better find someone else who is. I suspect that thing is going to take a lot of effort to get into a running safe state of reliability. I think you should be happy that it wouldn't start. I'd be worried about simply connecting the battery up without something catching fire. Buy a decent meter and learn how to use it!! And you're going to love the car once you get stuff sorted out!
-
I'm thinking Pursuit Interceptor:
-
I am so hungry right now!!!
-
I don't think you would be able to convince anyone that what I did was a Datsun factory-recommended replacement. Sounds like you either need to find the "correct" drop in parts, or find a shop that's interested in doing custom work. My old stock fitting heater core leaked a little, but I'm sure it's easily fixable by someone trained in the art. Would that help you out at all?
-
Yup. That's what my blade holders look like. Thanks for the pic. I gave my arms a good lookover and found small residue areas of black paint on the underside in the corners. So my suspicion is that they used to be black, and somewhere sometime along the way, that changed. Either it wore off over the years, or my PO bead blasted it off and missed some small spots on the back. In any event, the mystery is over, and my arms "should" be black. Thanks again everyone for the input!
-
That was what I was figuring. I could either paint my arms black, or I could strip my blade holders to silver. It's not like my car is a purist stock 77 to the year. It's already got lots of things that aren't quite year correct. Wrong color wipers wouldn't be the worst of it. Would certainly look better if they were all just the same color whichever color that may be!
-
Oh, and welcome aboard!! Beautiful set of cars you've got there!
-
I think that final generation of RX-7's are one of the most beautiful looking cars ever produced. I would probably own one if it weren't for the unusual rotary underpinnings. I just don't want the hassle. Too bad it wasn't available with an aluminum block V-8.
-
Thanks guys! So for 77, everything should be black, but prior to that, everything should be silver. For me moving forward, it sounds like it really doesn't matter which color I go with, as long as everything is the same color. Makes me wonder why I've got a mix-match... Either my PO put earlier arms on, or the black finish came off over the years. I'll take a pic or two of what I've got as soon as I've got a stable picture host set-up.
-
The wiper arms on my 77 are unpainted silver (stainless?), but the blade holders are black. I believe the blade holders are original (the two metal bar torsion spring style). They are metal, but painted or anodized black. Anyone know what the 77 wiper arms and blade holders should look like? Should everything be black? Should everything be silver? Or is correct to have silver arms and black blade holders?
-
Derek, I feel your pain. Here's to hoping PB changes their mind and re-allows 3rd party posting. Not likely, but I guess it could happen!
-
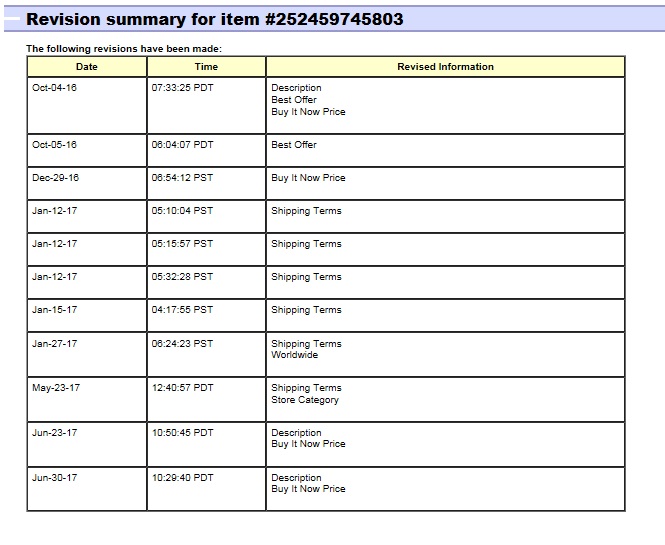
Wait... You're saying that the part for sale here is the same part that didn't sell on ebay for almost a year now? You're saying this is the exact same part??? And not only that, but it's being offered here for MORE than it was on ebay? Really??? Here's the revision history from the ebay auction. Seems it was up on ebay for almost a year with a number of price reductions along the way: And here's another shot of the one from the ebay auction. It looks nicer than the one being offered here. Like someone hosed it down with Armor-All right before the pics to make it look all shiny for the auction:

-
I'm not sure how "short sighted" their management is. Looking at it from their point of view, I'm a waste of space. Sure I look at their ads, and I've even clicked on a couple of their vendors ad links to suppliers, but they surely can't get a lot of real money out of my existence. From their perspective, I'm sure they believe people like me are not bringing in money, but are taking up space. I suspect if they can weather the current shite-storm of bad press and hostile attitudes, they will be in a better financial position in a year or so. I can hope that doesn't happen and they change their mind and go back to how it was three weeks ago, but I doubt it.
-
Well the big draw for me was a place to host my photos without a money outlay and make them available to youze guys. In other words, they would host my pics, and in return, I would look at all their ads as payment for the service.
-
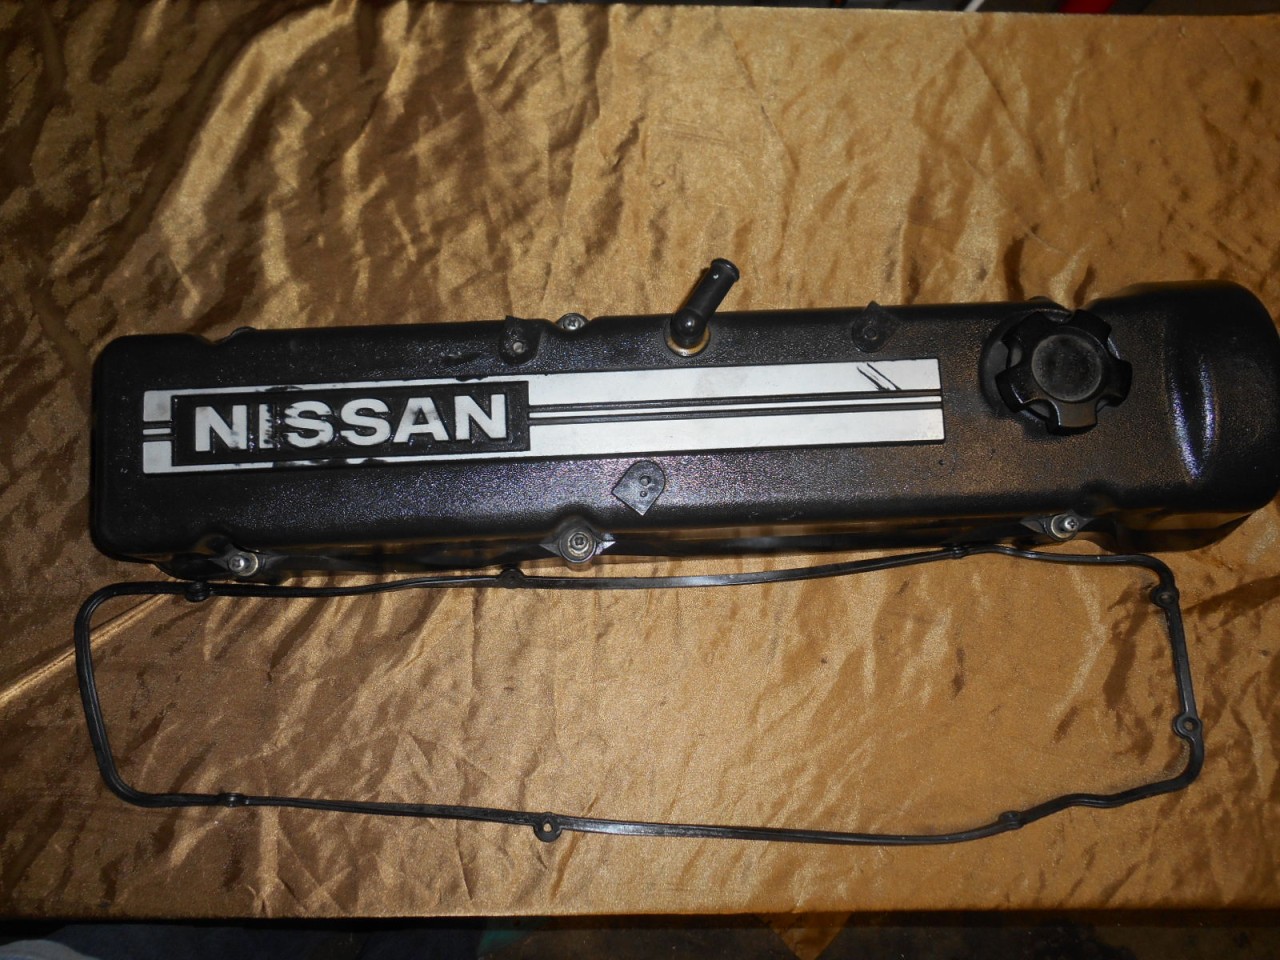
There was some discussion about a plastic valve cover here on the forum a little while ago in this thread: http://www.classiczcars.com/topic/57530-sold-240z-2400-valve-cover/?page=2#comment-521058 There was also a recent ebay ad for a similar part. The asking price was $550 and ended - no sale at that price: http://www.ebay.com/itm/Datsun-nissan-240z-260z-280z-280zx-RARE-ABS-valve-cover-JDM-1970-1971-1972-1973-/252459745803?rmvSB=true&hash=item3ac7c6020b%3Ag%3AH94AAOSwp5JWZ6Qw&afsrc=1&vxp=mtr&nma=true&si=ukwOSXVYy0FSfXGrdddCOdYZ3%2BY%3D&orig_cvip=true&rt=nc&_trksid=p2047675.l2557 Here's a pic of the no-sale $550 one from ebay:

-
"Late to this thread but better late then never.... " Wow. I disagree. I think never would have been better than late. Your first post ever on this forum - "Nyeah Nyeah Nyeah! Pbbbbbbthhhh! My part sold for exactly what wanted, so for all you people who said anything I didn't like about my auction... you are smart a$$ with little minds or have personally problems." It might just be me, but I would rather see someone come to the forum and try to participate in some way other than simply trying to profit from it's members. Add something constructive to the community before you start trying to make money off them. I mean... I get it. I understand you're trying to sell parts for the highest price you can get. Who doesn't?? Just add something constructive to the community instead of coming here to wave your fantastic awesome success in the air and rub members noses in it, and call people names simply because they have opinions you disagree with? Never would have been better than late. @Mike
-
I like that Alton explains the science behind much of the tasks. Understanding what's going on lets me port the concepts to other recipes. Like the difference between giving a man to fish, and teaching a man to fish. If you understand the "why" in addition to the "what", you can use the same knowledge in other applications.
-
wheee!, OK, you're allowed one strike, and since you're already ashamed about Nickelback, I guess the lesson has been learned. On quick search, I turned up lots of other artists from Alberta, but here's some that I recognized and don't turn off. Everybody's working for the weekend, right? Joni Mitchell K.D. Lang Tegan and Sara Loverboy Blind Melon Chitlin'
-
From looking around on the internet for other people having problems, I believe the answer is "yes". It will disappear as soon as they get around to enforcing their newly released surprise policy on you. Probably hasn't happened to you yet because you don't do enough of it to get their attention. They are probably waiting until you have done enough of it to make changing direction really really painful. Painful enough they think you will consider paying $400 per year to fix it. Make it free until you are hooked, and then make you to pay to fix it.