jfa.series1
 Subscriber
-
Joined
-
Last visited
Everything posted by jfa.series1
-
 I think it was part of the continuous improvement process and cost management. Two nuts per side are more costly and take longer to install.
 -
Hi DJ, I'd say that only reinforces Carl Beck's comments about the randomness of the assembly line. Your's is a December car, right? They were probably built within a few days of each other. Trivia: I just noticed that was my 1,000th post. Woohooo! Jim
-
Be careful about any BRE Tribute-like designs. They have copyrights and are serious about them.
-
The complete engine bay should be painted in the body color if you are planning to stick with the factory approach. The front of the radiator bulkhead was painted in a dull (not flat) black originally. I chose to use a gloss black to make it easier to keep clean. Satin black would be a good option that would be closer to the original factory look but still pretty easy to keep clean. Flat black will hold dirt and is not easy to clean. Check the picture closely - there are five mounting points for the grill that also get painted black.
-
Well... I did buy one off the showroom floor, the T/C rods came double-nutted and they're still that way.
-
Looks really good. Consider a good rub down with Nevr-Dull to keep it that way. http://www.nevrdull.com/
-
To clarify your question - are your referring to the sheet metal valance under the grill or the gray/black air dam under the valance?
-
I think the "set" reference means to always replace them both at the same time. A failing alternator is likely to damage the voltage regulator and if you replace just the alternator, the badly regulated current will possibly take out the battery.
-
Super great stealth project! So glad to have met all of you guys at ZCON as I can put a face and personality to each of you participating in the effort.
-
Bruce - I seriously doubt that your Z is ever "neglected". Perhaps not driven as often as you like but not ever neglected. BTW - great pic!
-
I have Dave's harness on my car, see if this pic helps. The harness is the ribbed one, this is at the right side - two plugs and the ground are visible. I also have his turn signal harness installed and in this pic so don't get confused. The ideal location for the relays is beside the voltage regulator with one of its mounting screws.

-
Lets get some emotional discussion going. With Renault in control of Nissan, could the new Alpine possibly provide the platform for a new Z? http://www.foxnews.com/leisure/2016/02/16/voila-renault-reveals-alpine-vision-sports-car/?intcmp=hpff
-
+ 1 on Mike at Banzai. You won't be disappointed.
-
That's a great photo series! I suspect the more Cody finds himself in the pics, the more his project ownership will continue to ratchet right up. He's a very fortunate young man to have this guidance. Good job, Dad!!!
-
The dealer had already installed the 1st-gen BRE Spook and rear spoiler on my car when I bought it back in '71, they painted both in body color. I stuck with these choices when I resto'd the car. My general observation is that body colored front and rear spoilers will add visual "bulk" to the car - provided the car is not a very dark color to begin with. Body color will also cause the add-on to better blend into or accentuate car's lines. I second Diseazd's comment about the use of small O-rings as seals against the body. As so many of us have said - your car, your choices.
-
Its all about geometry - the pivot point / base for the strut has to be away from the hatch frame to kick the hatch up from a closed position. If the base was tucked in close and parallel to the frame, the strut would be pushing back and not up.
-
PM sent.
-
Previous posts have said raising the rear end of the car by a foot or more significantly cuts down on the angle the leveler needs to handle when doing a combined engine/tranny install. +1 on your gearbox fill plan.
-
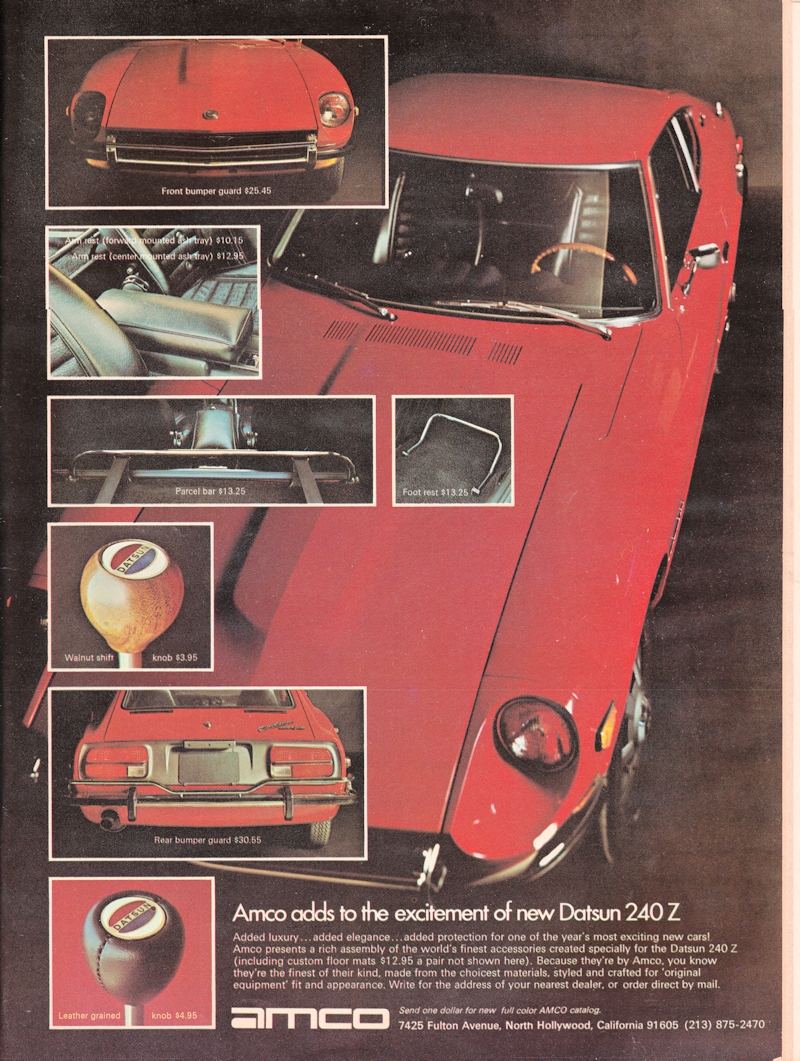
This is from a 05/72 issue of Car and Driver, wood and leather options on a shift knob but without the shift pattern. And be sure to check the list prices.

-
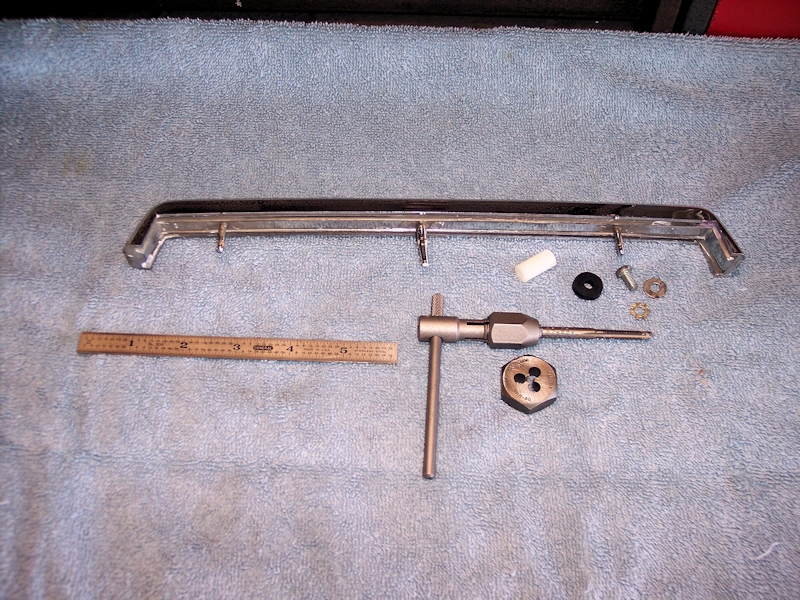
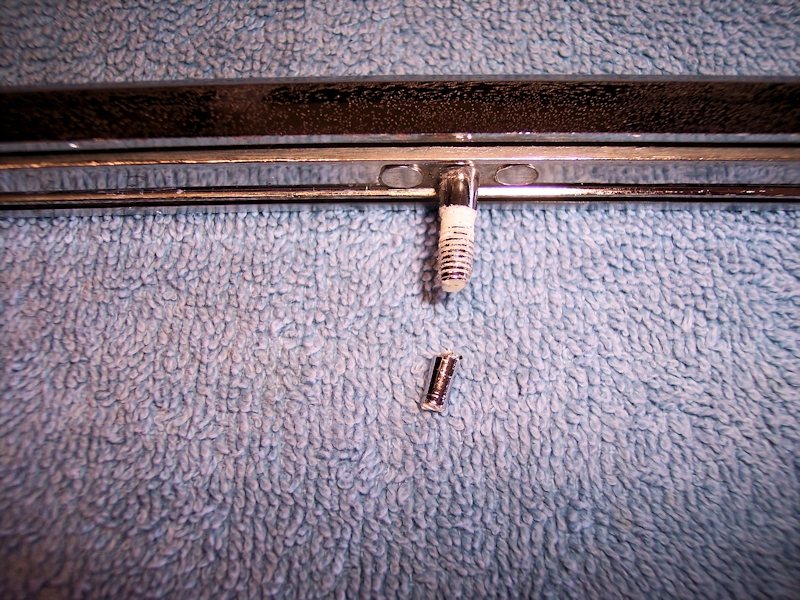
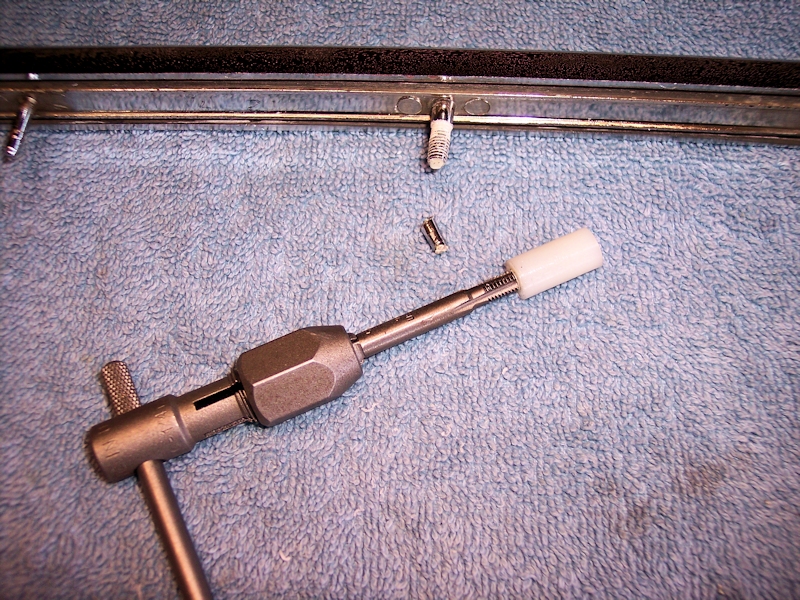
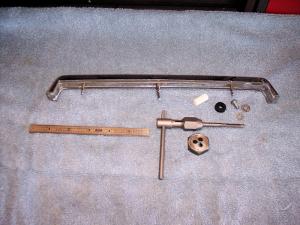
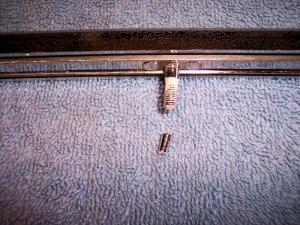
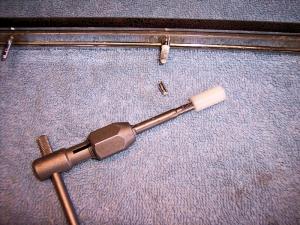
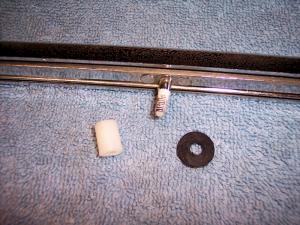
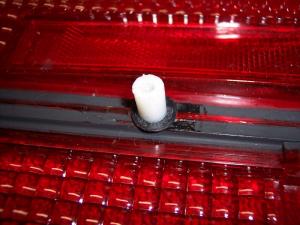
I decided to refurbish a set of 240Z tail lights that came off a parts car and quickly hit the problem of removing the push locks on the back of the lights. Suffice to say, the pin snapped off flush with the back on each unit as I worked on them. Once the lens was separated from the back, removing the push locks from the other pins was pretty straightforward and nothing else broke. After the cleanup was done, it was time to figure out how to re-attach the chrome strip to the lens - including the center post. I checked this site and reviewed some efforts by other members but decided to go with something of my own design. The idea of a coupling nut was my focus but I could not locate anything suitable already pre-made so it was off to Ace Hardware for some on-the-fly engineering. Here's what I came away with: two nylon spacers, 3/4" L X 3/8" OD with a #8 hole; two M5-80 X 10 screws; two flat washers. Here's the process I came up with: Thread the center post with a 5mm-80 die down to 1/4" from the base, clip the post to 3/4" long and dress the end flat: Thread the nylon spacer with a 5mm-80 tap, The #8 hole is a perfect pilot size: Cut the spacer / coupling nut down to 1/2" L and fab a thin washer. I cut a slice ( <1/16" thick) from a faucet washer. The thin washer is important because a thick one will reduce the space available for your new coupling nut: Position the chrome strip on the lens, slip on the washer. Important: plastic on plastic can bind and you could snap the post when screwing on the coupling nut. Lube the threads on the post before installing the coupling nut: The 10mm screw is just a bit long for the thread available in the coupling nut so you can either grind off a bit of the screw or add a star washer to the stack. Assemble the lens and back unit, install the M5-10 screw with the washers and you are done: This post has been promoted to an article

-
Cliff - that is exactly the process I used for my install. Also - lube the filler neck a bit to make it easier to slide into the plastic tube as you raise the tank. Jim Phooey - just realized I am responding to an old post.
-
That's probably your emissions controls at work. A rapid deceleration can dump unburned fuel and other bad stuff into the exhaust whereas a slow decel. allows the combustion process to complete and make for cleaner exhaust gases.
-
That's an amazing find - congratulations. If you have not already done so, I strongly recommend you hook up with the Connecticut Z Car Club - CTZCC. You'll find a fine bunch of folks with a very strong affinity for the S30 series.
-
I've seen some recent comments that said the replacement panels need to be curved to match the original lines. One comment said to search for a donor car as an alternative.
-
Another possible clue: to the best of my recall, all the factory connectors in that area are bullet style, no spade style.