


Zed Head
Community Member
-
Joined
-
Last visited
Everything posted by Zed Head
-
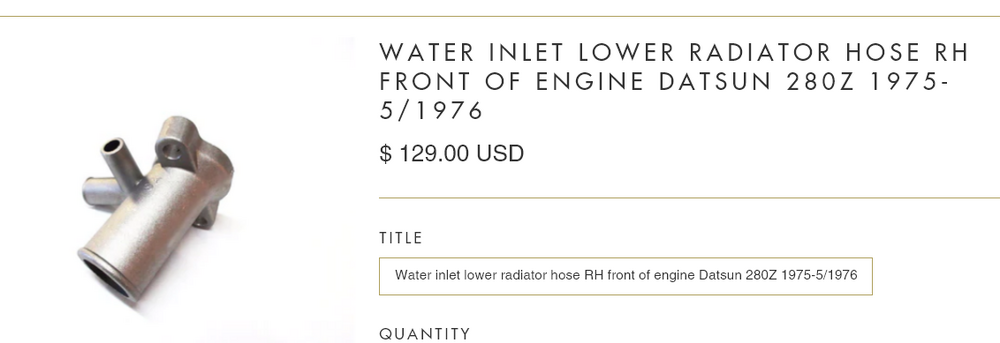
Looks like they were only used for a short time period. https://jdm-car-parts.com/products/water-inlet-lower-radiator-hose-rh-front-of-engine-datsun-280z-1975-5-1976?variant=27526042633
-
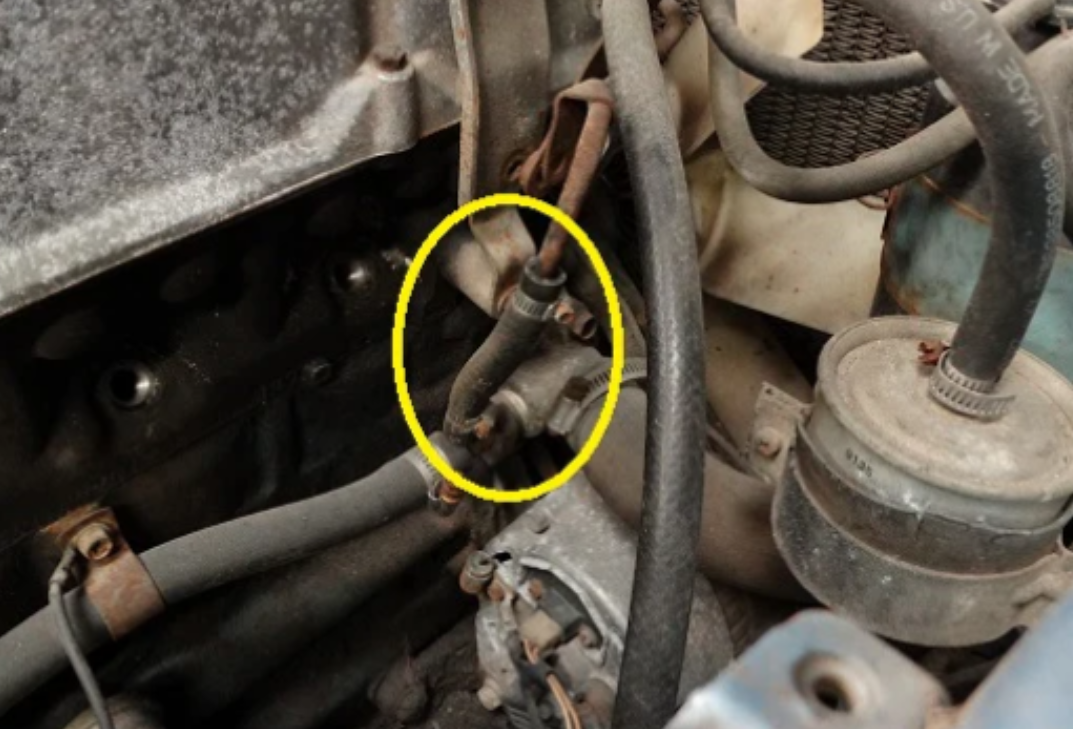
I think that might be the purpose. Not clear how many 280Z's or 260Z's or 240Z's had it or why nissan stopped using it. I've seen it discussed before thoguh. ZCD sells them and some people put a T in the return hose from the heater core. https://zcardepot.com/products/coolant-hose-engine-bay-t-fitting-280z-280zx Here's a good place to browse if you want to see what things are supposed to look like. Sounds like you have an aftermarket AC system. https://bringatrailer.com/listing/1975-datsun-280z-22-13/

-
Your post seems to have flipped the cause and effect relationship. Coolant temperature affects sensor resistance. But sensor resistance does not affect coolant temperature.
-
The 1976 FSM has a complete and separate chapter dedicated to the AC system. The 1975 FSM does not appear to have it. Probably worthwhile to download the 1976 manual and take a look.
-
A picture of the AC compressor would probably tell something. And the throttle linkage. The factory setup has a vacuum controlled idle speed enhancer for when the compressor is loading the engine. The AC condenser in front of the radiator would also be a clue.
-
In the early days he was just a guy trying to start a business. It was small. Unfortunately for many small business owners they often try to get big and take on debt that has to the repaid. Give him a chance to respond. He used to be active on the site. You can find his name and comments in past posts. @zcardepot.com
-
Here's an old interesting thread about the Euro turbo. Apparently not widespread. Made for the "Autobonds". https://www.zcar.com/threads/euro-280zx-turbo.309088/
-
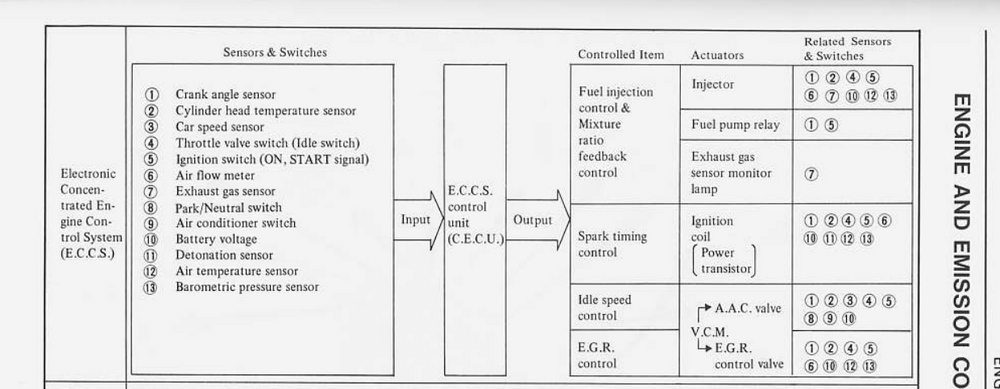
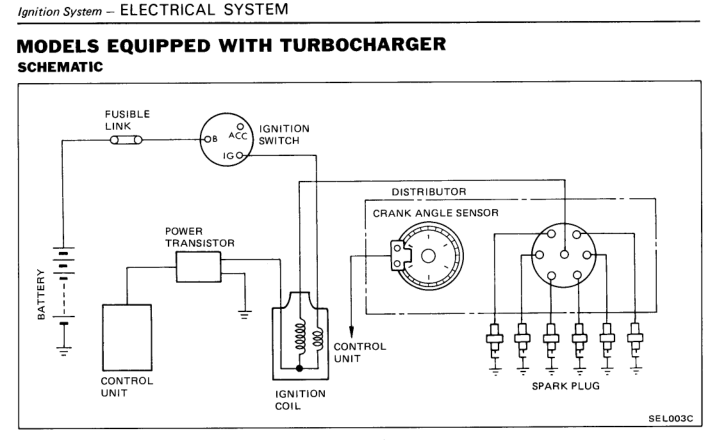
That's a 35 pin NA connector on a United States car. Maybe the ECCS system was only introduced for emissions purposes in the States. I don't see how ignition timing control would work though, since the ECCS controls that using the CAS in the distributor. Any chance that your friend has made the not uncommon mistake of confusing the injector cooling fan with a turbocharger? Maybe it's not a turbo car.

-
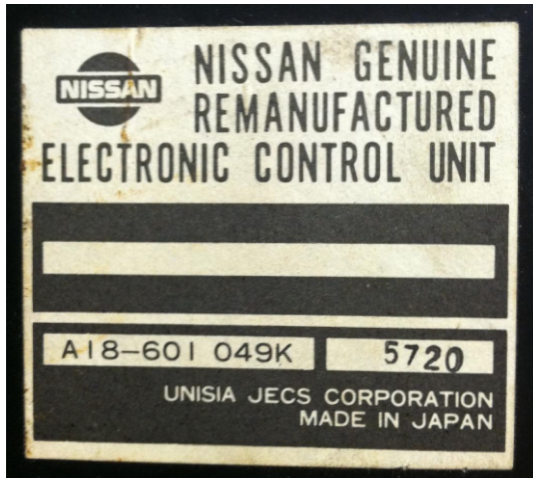
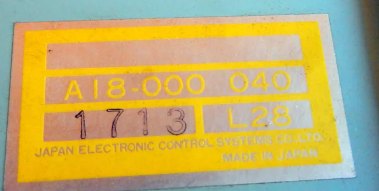
Will not fit or will not work? Check the FSM wiring diagrams. Get some part numbers. https://www.zdriver.com/forums/fs-240z-260z-280z-280zx-70-83-242/82-280zx-turbo-ecu-nissan-remanufactured-unit-35890/ https://maseraticompound.com/products/datsun-280zx-turbo-engine-ecu https://jdm-car-parts.com/products/ecu-for-datsun-280zx-turbo-nos?variant=744994189
-
I see a company in Florida. Not CA Datsun.


-
Motorsport Auto has a good selection. Probably cheaper and of higher quality. The Classic mirrors are actually 60's Mustang mirrors. I had a set. They fit well and I liked the look but they were noisy in the wind. You could hear them with the window open. One of those things that you don't really think about. https://www.thezstore.com/product/926/classic-chrome-mirror https://www.thezstore.com/isearch3?searchterm=mirror
-
That is a cool tool. No more fiddling around with two different gauges. This thread has the spectrum from cold adjustment, take-your-time and get it right, up to hot, I-know-what-I'm doing get it done.
-
The low clearance could be because the valve seats have worn. Maybe due to unleaded fuel on old seat material. People use brute force on the locking nut with a wrench and suffer busted/cut knuckles. The parts up there are sharp. I found that a small sledge hammer, like a 3 lber, used to tap on an open end wrench on the lock nut worked well for loosening. There's room for an open wrench on all of the locknuts, you don't need the crow's foot adapter unless you want to get precise on tightening torque. It's about as simple as it looks. There's a threaded stud with a locknut. Loosen the locknut, turn the stud, tighten the locknut, confirm lash. After a few you'll realize that tightening the locknut pulls the stud up and reduces clearance a little bit. There's a tutorial out there somewhere with pictures. Can't remember the name, it might actually be linked in this thread somewhere.
-
I used a vise, a socket, some fixturing, and a MAPP torch. I've always been surprised at how much effect heat has. Apply force, nothing, apply heat, movement, let cool, nothing, re-apply heat, keep going. It's been the same on broken off studs. And differential fill plugs. Heat is your friend. Even on the mustache bar bushings you can get the rubber out by heating the outer metal of the bar. A little bit of sizzling and it slides out. No need for flames and smoke.
-
Wow, that is great sound. "Rebello stroker" has just been words on the video screen until now. Looking and sounding good.
-
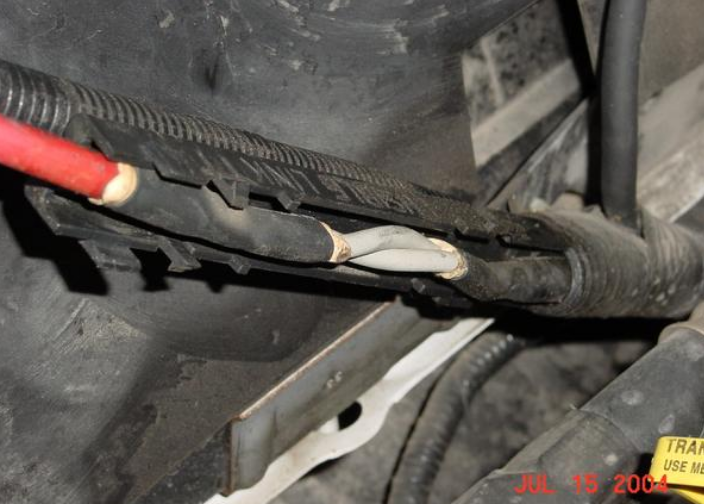
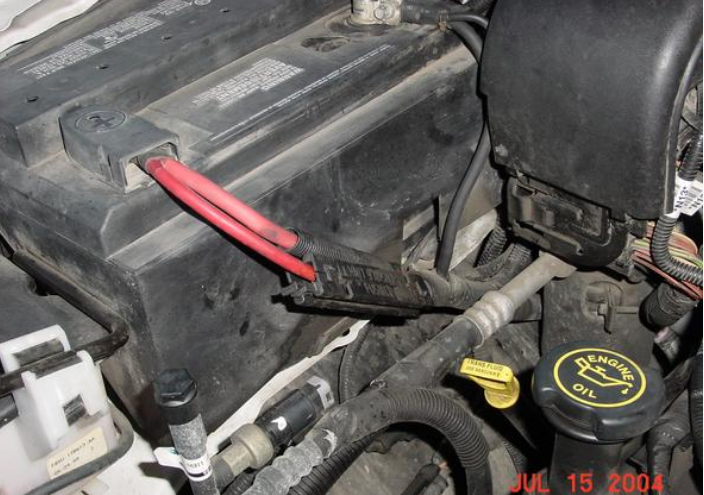
I put a separate single terminal under the relay cover (the one right in front of the battery) to use for attaching separate relay wires, and the EFI power supply wire. Also moved the alternator charge wire to it. Ended up with a stack of ring terminals on the single post but they stay clean and dry, unlike the other places that they were attached. If you decide to use relays for things like the headlights or marker lights like I did you end up with no convenient place to attach to the system. Plus, once I cleaned up the positive battery post it was easy to use one of those plastic post covers to keep it dry. If I was starting over, I'd probably get a box like Hussein's with a few extra terminals. And the reversed battery posts, of course, to bring it out from under the fender. Or mount the box on the relay cover and just run a short charge wire over to the battery post.
-
-
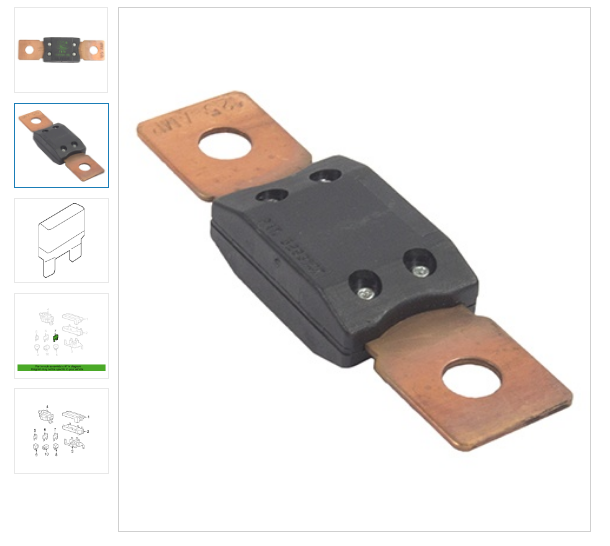
What brand is that fuse panel? Looks pretty nice. Many newer cars have similar panels mounted next to the battery like that. Those fuses look much more robust than the typical Maxi-fuse. Ford calls theirs a Mega Fuse. Not sure how many sizes there are. https://www.oemfordpart.com/oem-parts/ford-main-fuse-f87z14526ba
-
My memory is that you could take up the slop with your foot on the pedal in the cabin, without moving the throttle blade. It's not clear what you're actually moving in the 1/2 to 3/4. Or why the pedal would come back up that 1/2 to 3/4. Are you taking your foot completely off of the pedal? Can you describe the actual driving effects? What you feel your foot doing and why you think that there is slop? My linkage was adjusted in a way that put the bellcrank over-center at rest. So it was hard to control at low throttle opening. But as far as all of the parts along the way to the actual throttle body, all slop could be removed with slight pressure on the pedal. Riding the throttle pedal is not the same as riding the brake pedal.
-
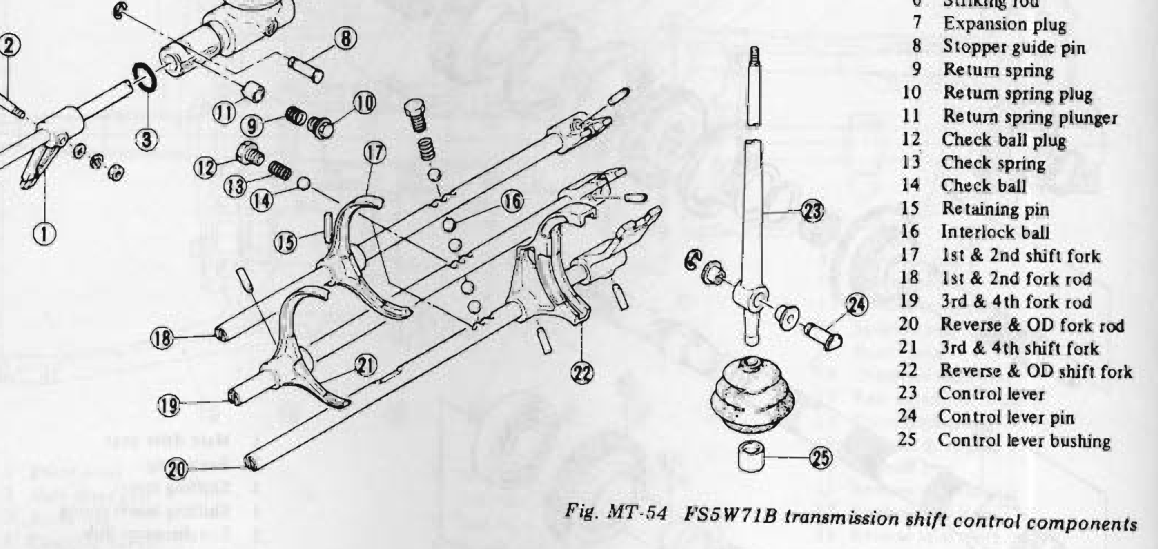
Yes, it's just a simple switch. Somebody had problems fairly recently with a switch that didn't switch. There's a button inside the transmission that rides on the shift rod for reverse and 5th. The rod has a ramped notch cut in to it and the button gets pushed in when the transmission is put in to reverse. It's easy to unscrew and I think it's above the level of the fluid. A meter will tell you if it's good. Or you can just disconnect it, put a meter on it to measure continuity and put the transmission in to reverse. The Nissan draftsmen even drew the notch on to the rod. Part #20.

-
All of the 280Z and 280ZX halfshafts I had had grease fitting holes, and I collected a bunch. They had the small sealing screws installed in most cases. Maybe Nissan was working their way up to it and the 240Z's didn't get them. Or, maybe it was part of the "budget" sports car program. Left off to save a few cents. Maybe somebody out there has a 280Z or ZX half shaft that they can examine for an arrow. I don't have them anymore.
-
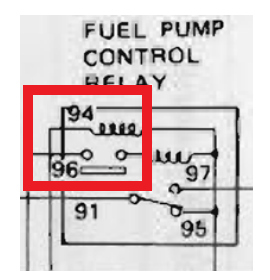
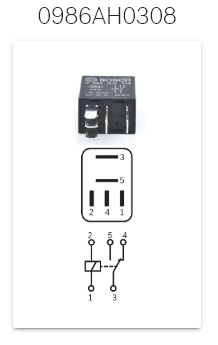
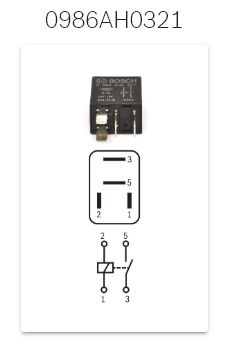
I was just using the schematics of those relays to show the possibility. The web page has the option of setting your specifications. Just have to put the work in. https://www.boschautoparts.com/g/relays
-
If you break the Fuel Pump Control Relay in to two separate relays I think that you'll find that you can build the circuit easily with two common relays. The EFI relay is a very simple relay with one actuator controlling two circuits. You could also go to the fuel pump control section of the FSM and build your own circuit based on their pump control chart. Nissan just combined them for convenience. https://www.boschautoparts.com/g/relays =controlling
 Can anybody explain the purpose of this ad? It shows up often at the top of the page.


Important Information
By using this site, you agree to our Privacy Policy and Guidelines. We have placed cookies on your device to help make this website better. You can adjust your cookie settings, otherwise we'll assume you're okay to continue.