Mike W
Community Member
-
Joined
-
Last visited
Everything posted by Mike W
-
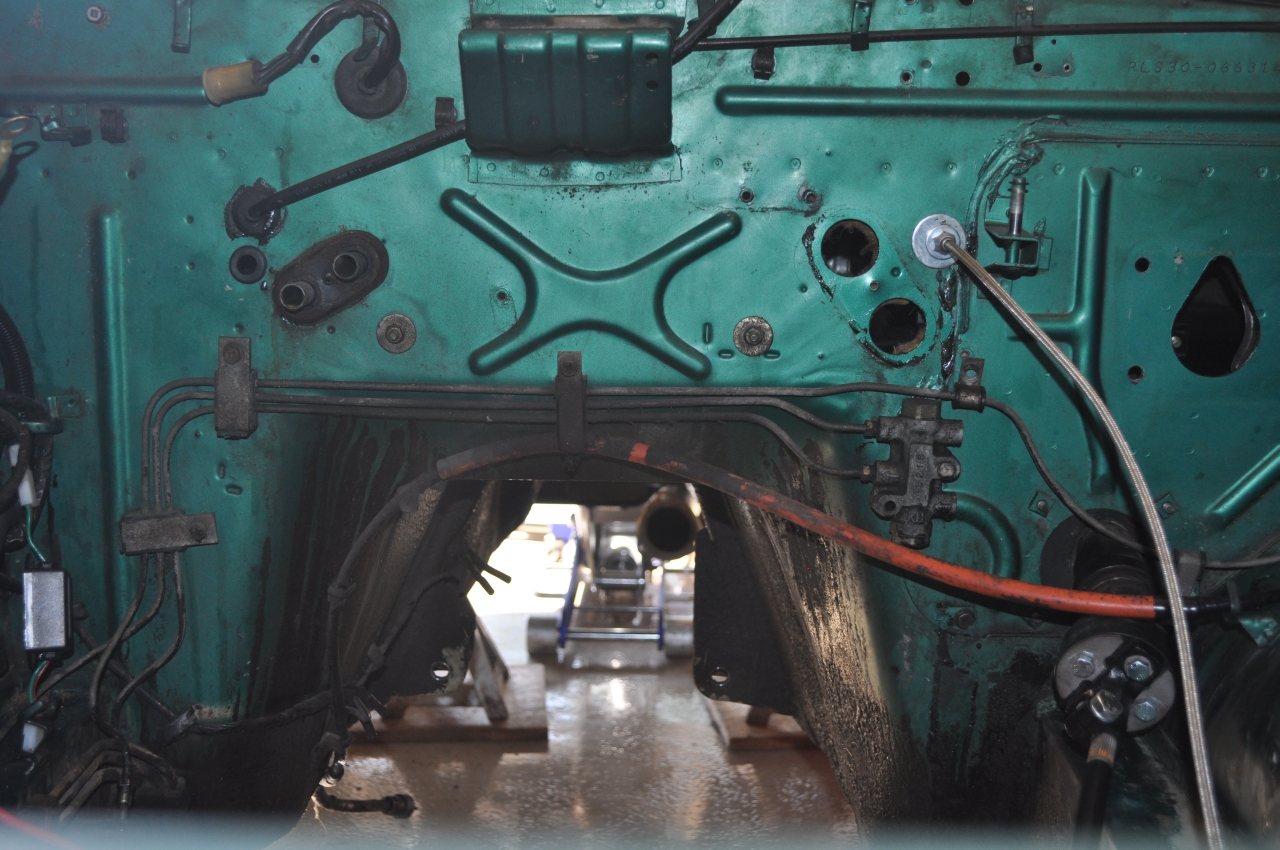
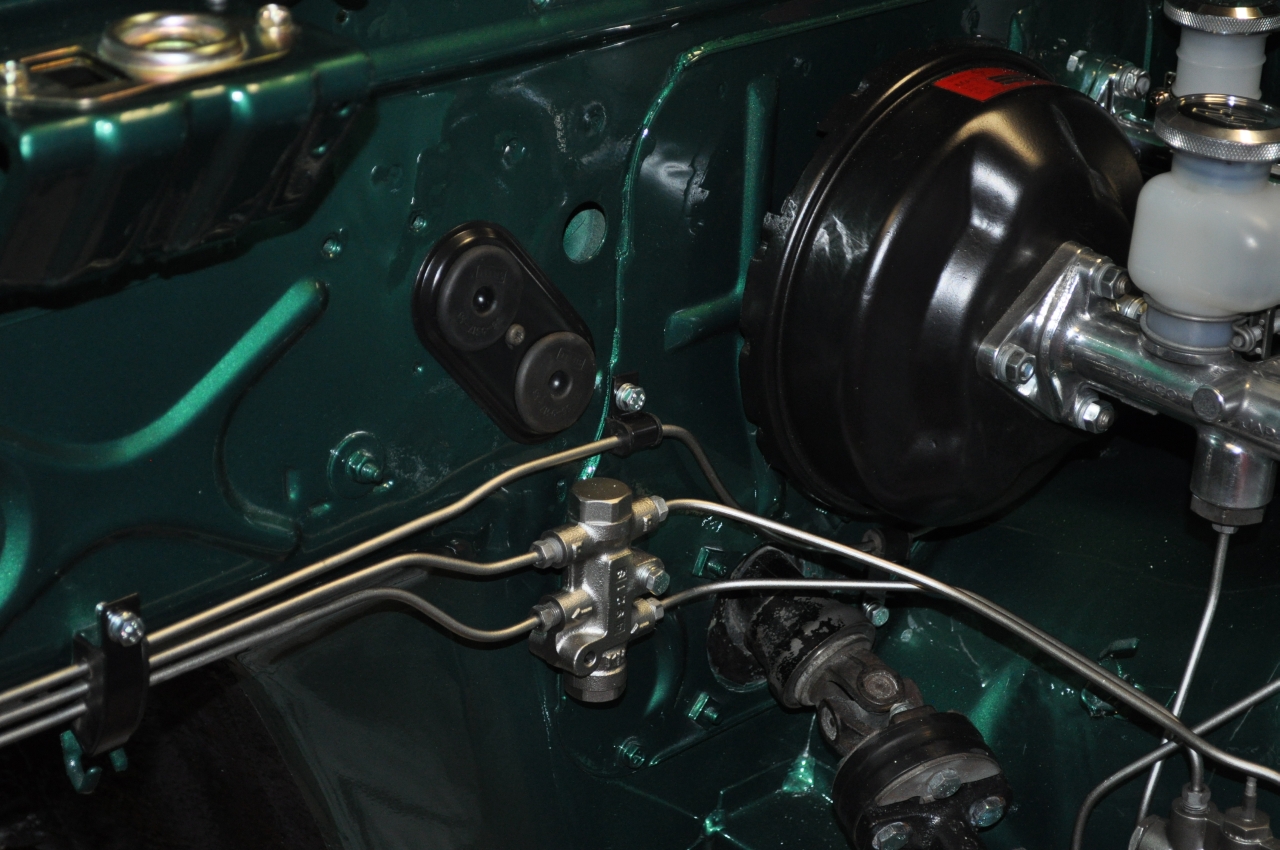
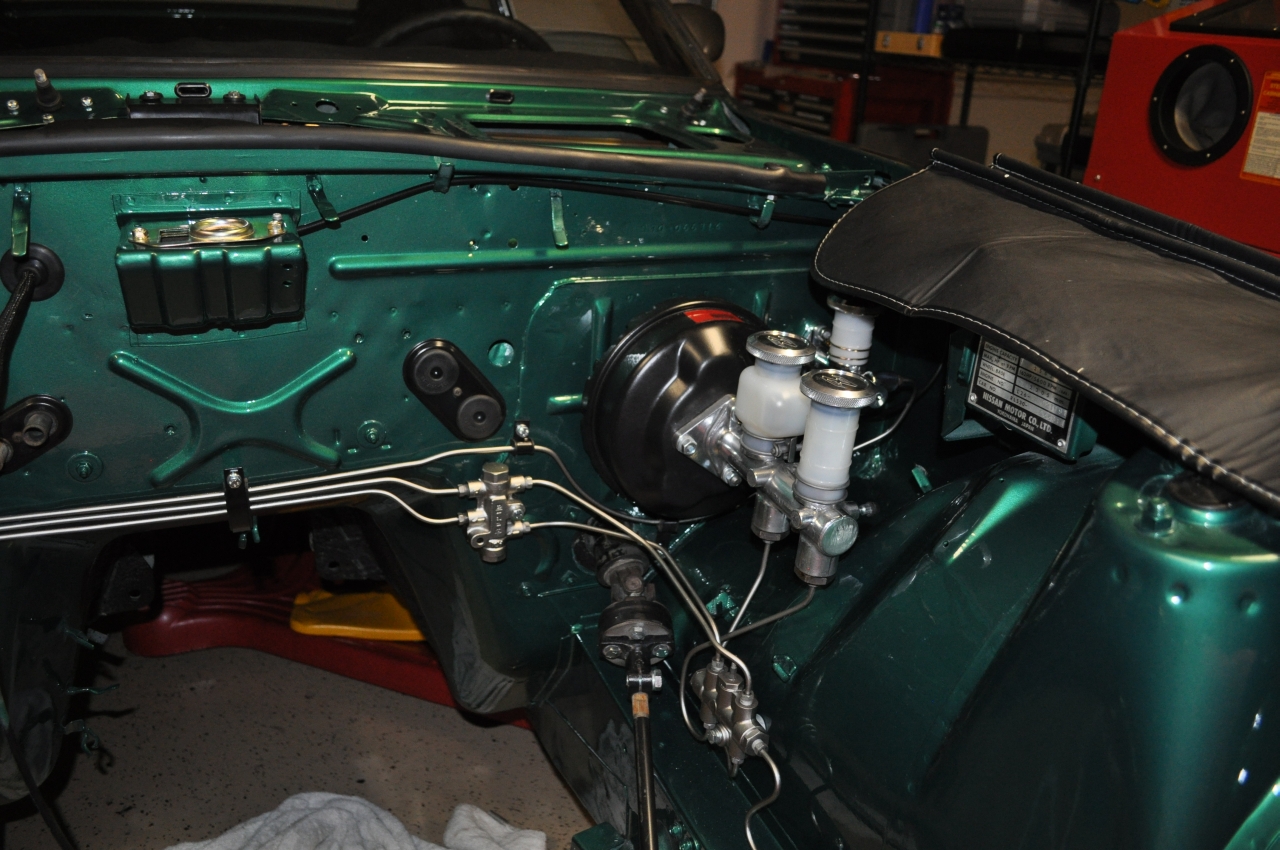
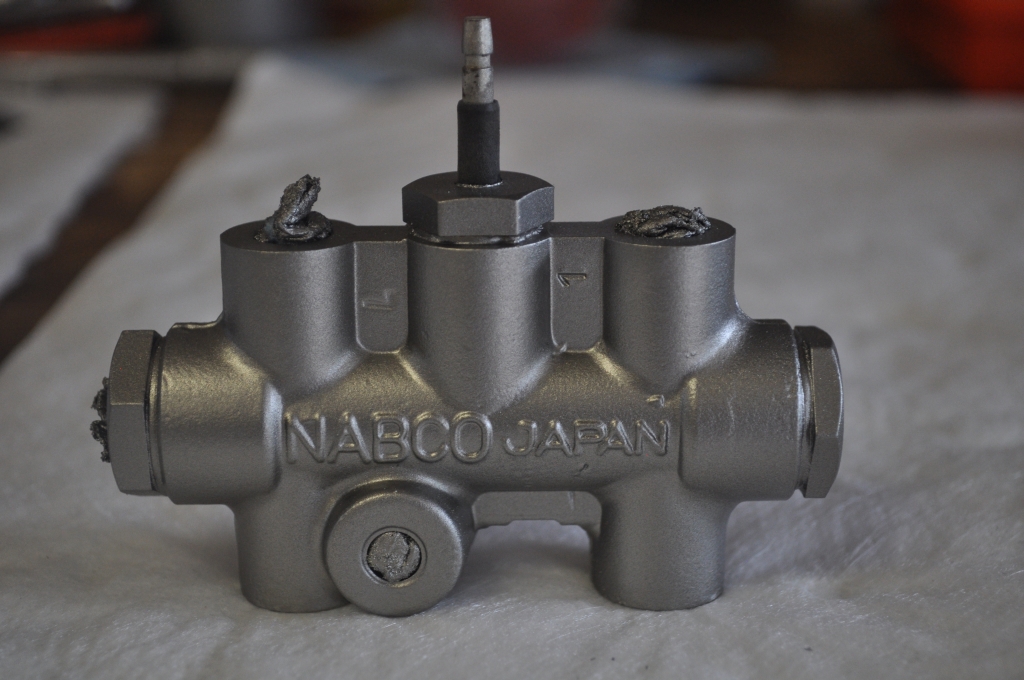
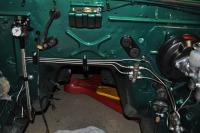
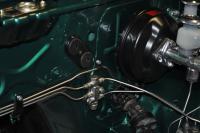
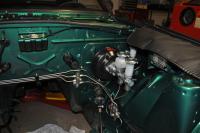
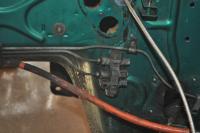
I had the same dilemma when I refreshed my engine bay last year. I ended up removing all of the brake lines, cleaned and sanded them thoroughly, and painted them with a product from Eastwood called Eastwood Brake Gray which is supposed to be brake fluid "resistant". I've attached a few pictures so you can see the before and after of the brake lines. I am very happy with the results. As far as the fuel lines are concerned, I ended up ripping them all out and replaced them with a single run of AN6 hose that goes from the rear fuel pump all the way up to the engine bay and finally to my Weber carbs. Much better and cleaner than the original fuel line setup. I also do not use a return and have never had any issues with this arrangement. Hope this helps. Mike.


-
Hardway, When I did my U-Joints about 1 1/2 years ago I decided to go with the Spicer brand given all of the good reviews they received. The only place I could find them locally in Austin was at Inland Truck Supply on East Anderson Lane. They are an authorized distributor for Spicer and although they did not have them in stock, it only took about 1-2 days to get them in. They fit perfectly and I have not had a problem with them since the install. I also used Inland to balance my drive shaft as well once I replaced the U-Joints on it. I do not have the Spicer part numberrs handy, but if you need them let me know and I will look them up for you. Hope this helps. Mike.
-
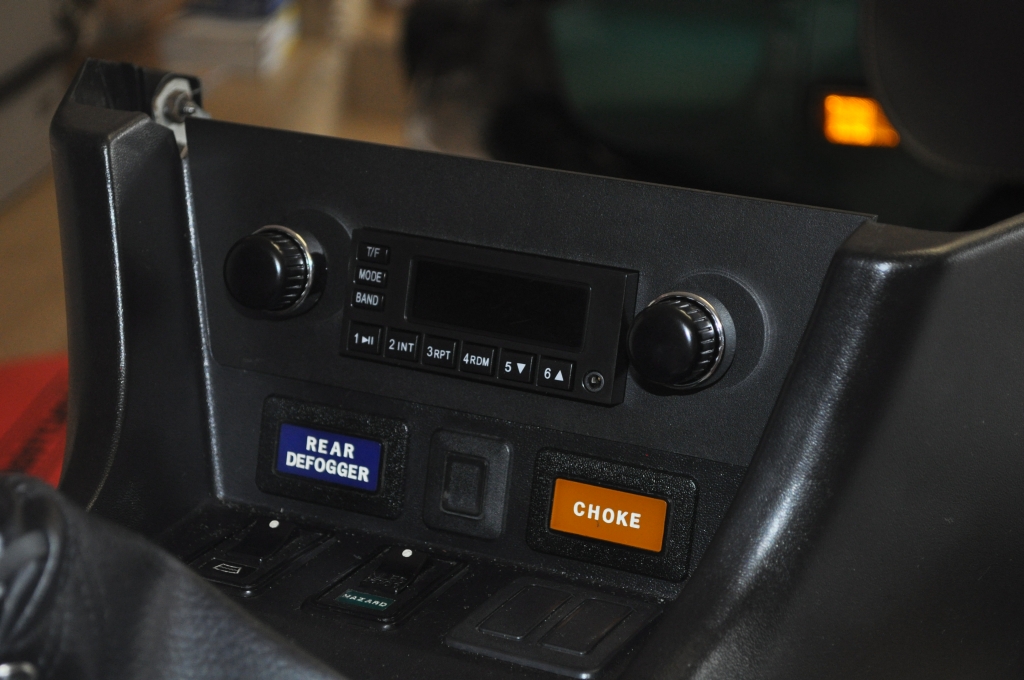
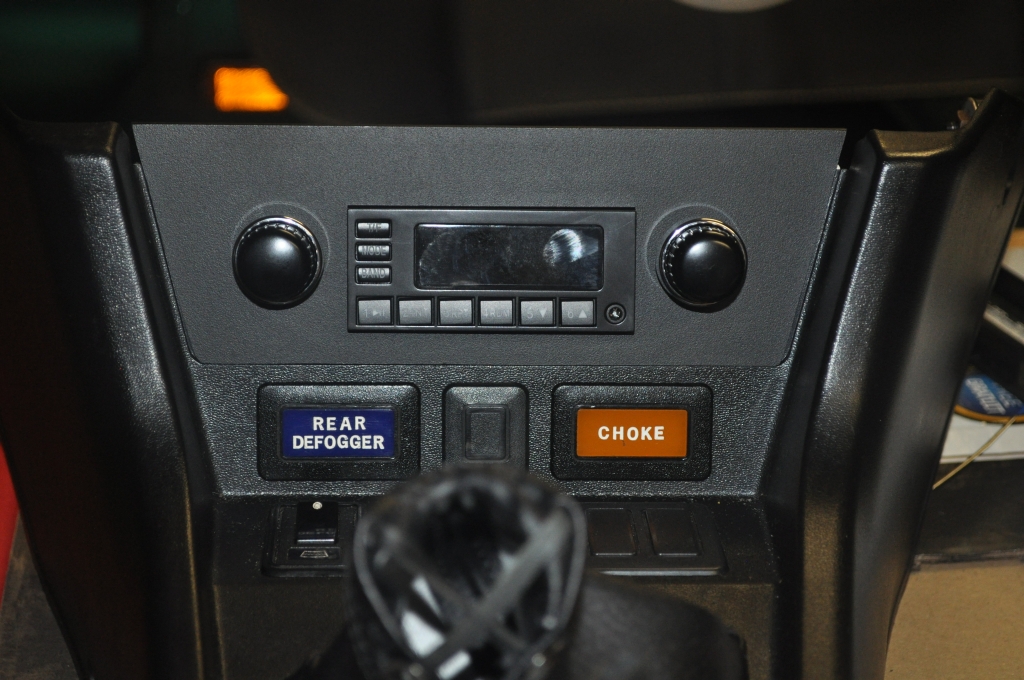
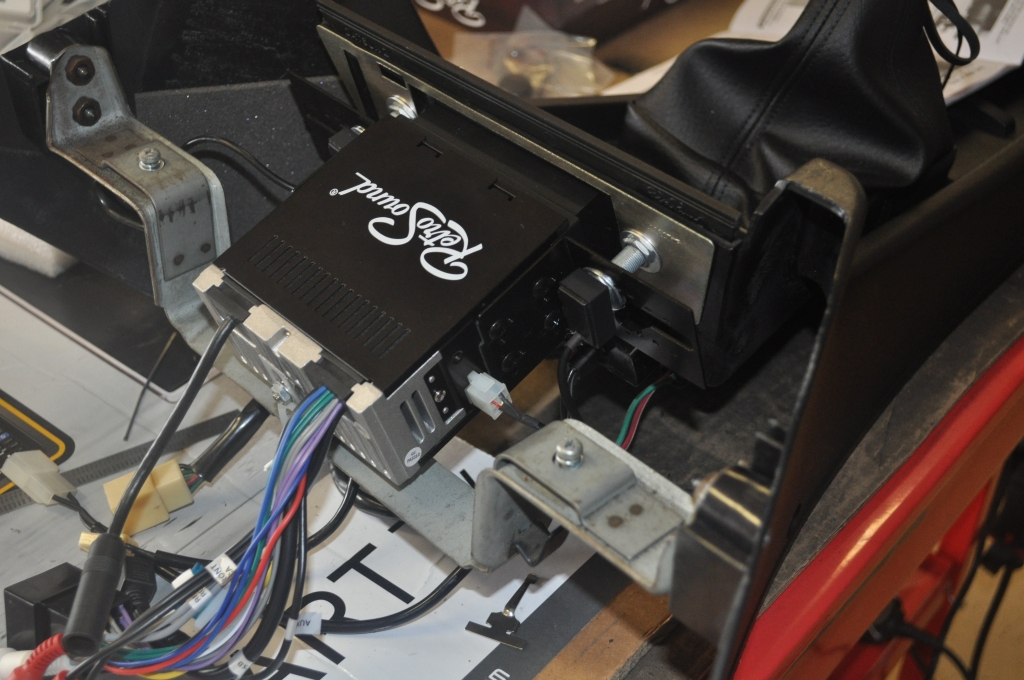
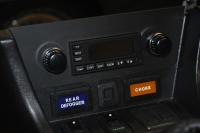
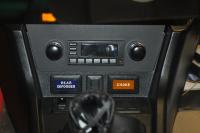
So I went with the retrosound system and couldn't be happier. It was relatively inexpensive (< $300 if I remember correctly), came complete with a new faceplate, and was an easy install as the radio is so small. It looks like a basic 1970's radio but has most of the modern features you would expect in a new heradunit. About the only thing it doesn't have is Bluetooth, but I solved that problem with a $20 box from a company called Aluratek which will receive streaming BT audio and convert it to analog audio out which can be used into an aux input on the Retrosound unit. I actually connected this little box (about the size of a matchbook) to the remote aux input from the Retrosound head unit which also has a spare USB which I use for powering and charging te Aluratek. In addition to the Retrosound head unit, I also installed a very small but powerful Rockford Fosgate 4 channel amp and it was tiny enough where I could mount it to the top of the glove box, so it is hidden from view. I also installed a small muffin fan in the glove box to provide a little bit of air flow and I power this with the antenna control from the Retrosound which has ample power for this small fan. I was a little worried about the amp overheating, especially in the middle of summer here in Texas, but so far no issues what so ever. It probably helps that I am only using 2 of the 4 channels as well. I also purchased 2 powered subs from Retrosound which fit perfectly behind each of the seats up against the riser. You don't even know they are there but you can definitely hear them. Finally I bought a speaker box from MSA which replaces the rear tail light panel and will house 2 6x9 speakers. I have had very good luck with Infinity brand speakers and so went with the best Infinities that I could find. The system sounds great, is unobtrusive, looks period correct (for those parts that you can actually see) and is powerful enough to hear it with both windows open and on top of my loud exhaust. Here's a few pictures of the head unit as I was installing it in the console, but with the console still out of the car. Hope this helps. I have more pictures from the head unit install and can take some of the subs and amplifier if you are interested. Just let me know. Mike.


-
Zedy, The throttle cable at the gas pedal where it goes through the firewall can absolutely be a source of friction and subsequent binding. I also had this issue when I first installed the lokar cable. Not sure how yours is attached to the pedal but i had to loosen the fitting on my pedal to make sure, especially at full throttle, that the cable was not binding through the firewall. I simply tightened it up one the alignment was correct. I would suggest checking this before anything else as it is an easy, albeit awkward, adjustment. Mike.
-
Zedy, Welcome back!! It's been a while for you but I suspect that new one has been keeping you busy. In any case I'm surprised that you are having the binding problems that you are. I have pretty much the exact same setup as you and I have had no issues with binding at all. I do not use the middle rod end for the same reason as you - mine did not line up either. I purchased the hardest stainless steel rod I could find from McMaster as well and it has held up with no apparent bending. I do use 2 very light return springs but my pedal response is more than acceptable and not too tight at all. My throttle cable is also in the same position as yours. Are you sure that the binding is actually being caused by the linkage? One of the things that I found with my webers is that if the nuts which hold the throttle actuators in place are too tight, it will bind at the carb itself. What I ended up doing was loosening them just a bit and then bending over the lock tab on the nuts so they were firmly held in place but not overly tight. This definitely helped. I also found that with use, the linkage throttle arms would "creep" on the rod preventing a full return to idle. No matter how much I tightened them they would always creep with time and use. What i did to solve this was to apply some red loctite to the rod where the throttle arm attaches essentially gluing it to the rod. No more creep and I always return to idle now. I used to always have to "kick" my fuel pedal a bit as I was coming to a stop in order to get it to return properly and now I don't even have to do that. In any case hope all is well with you and the family and that some of my hints above may help you solve your issue. Mike.
-
After reading the original post on the availability of the aluminum drums, I stumbled across a similar product at MSA. Did not know if they were from the same source or not but guessed that it could be very likely. In any case I needed a couple of other items from MSA and ordered a set of the drums. Turns out they do not have them yet and as such are back ordered. They told me that it could be 4-8 weeks before they arrive, which is ok with me as I am not in dire need of these. Just trying to source a spare set while they are still available. Will let you know about quality, etc as soon as I receive them. Mike.
-
So I just put in a stage 2 cam from Isky and they only recommend 2 brands of oils for higher performance engines mainly due to the inclusion of Zinc and other additives. Their number one recommendation is a brand call Brad Penn. Apparently this company purchased an older refinery from I believe Castrrol and continue to make oil with high zinc content and ZDDP. I believe that the refinery is in Brad Pennsylvania, which is where they get their name. I use 20W-50 and have had no issues with the Brad Penn oil. It is a little unusual as it is green in color but I suspect that is due to all of the additives. It is also on the expensive side as oil goes although probably not as much as synthetic. The only other brand they recommended was Valvoline VR1 racing, which I have also used with good success in the past. Hope this helps. Mike.
-
So I did this to mine not long ago. I was not planning to recover them with vinyl so I did not need the old piece for a pattern. I ended up using rustoleum aircraft stripper and after soaking in that stuff for about 5 minutes the old vinyl just peeled right off. Couldn't have been easier. I then sandblasted each of the pieces and sprayed them with rustoleum bed liner. They looked like new and had almost the same texture as the originals. The truck bed liner seems to hold up pretty well too. Hope that helps. Mike.
-
If you are not sure if they have been replaced recently, then I would just replace them while you have them out of the car. That's what I did when I refinished my rear end suspension. Everything got replaced, regardless. You know how it goes............. while I'm at it....... Admittedly the half shafts are not that difficult to remove from the car, but it is still work and they are accessible right now. In any case, dealing with the boot replacement is much more of a PITA than replacing the u Joints in my opinion. I completely disassembled the half shaft sections so I could slip the new boot on. My old ones were in bad shape and so needed to be replaced but I could not find a way of getting the new one on the shaft without disassembling them. If you decide to do this be very careful as there are both roller and ball bearings that will easily fall out as you remove one part of the shaft from the other. There is also a C clip you will need to remove from one end in order for the inner shaft to be removed from the outer. Finally getting all of the balls and rollers back in was tedious and time consuming. I used lots of grease to help hold the bearings in place as I re-assembled and this did help but it was still a lot of work. I have pictures of this operation if they would help you out. Just let me know and I will send them to you or perhaps this is the reason we have been looking for in terms of trying to get together one of these days. Let me know if I can be of some assistance. Mike.
-
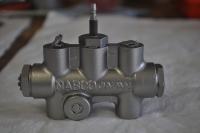
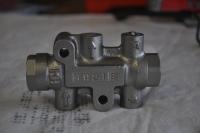
SteveJ, Thanks for the tip on the 260. Fortunately my electric fuel pump system is wired from scratch. The original relays have been disabled and in fact removed from the car. The only part of the original OEM system that I use is the wire that runs from the fuse box area back to the pump itself. Everything else, including a separate relay and an inertia switch is new. Mike.
-
zKars, Thanks for the feedback I will keep a close eye out when I am cutting the bracket. I have a pretty good band saw that I think will do the job. On the electrical hookup, is it really as simple as just connecting the charging wire to + Bat? I know that I will also need to remove or at least disable the OEM voltage regulator, but just trying to confirm that the electrical connection is reallty that somple. Thanks for your help. Mike.
-
gnosez, Quick question for you. I'm about to do the 1 wire GM alternator upgrade. I know about the mod that needs to be done to the lower bracket and that will not be an issue. Any other words of wisdom about the upgrade? It seems really simple and eliminates the need for the OEM voltage regulator and associated wiring. Would appeciate any other guidance that would keep me out of trouble. Thanks in advance. Mike.
-
I used Spicer brand U-joints when I replaced mine. Sourced them from a local truck drive line shop. Can't recall exactly but I believe they were around $35 - $40 each. Also had this same shop balance my drive shaft after they were installed. The part numbers for the half shafts are 5-1505x and I believe this should be the same for all 240, 260, and 280z models. The driveshaft part numbers are 5-1501x but these were for a very late model 260z and early 280z. I believe that the 240's and early 260's used a different part but I don't have the correct Spicer number. In fact I seem to recall reading that the u joints on the late 260 and early 280 were not replaceable, but I had no issue replacing the original ones with the new ones from Spicer. Very happy with the change and so far no issues at all. Incidentally these all came with zerk fittings and I had no clearance problems with either the half shafts or the drive shaft. As far has tools were concerned I used a combination of the harbor freight u joint tool as well as my large bench vise. You just need to be careful not to let the needle bearings fall as you install them. Also make sure you remove the retaining clip before trying to remove the old u joint from the yoke. Hope this helps. Mike.
-
Steve, I knew you were planning to do this based on the discussions we had during the rally, but those look just awesome. Congrats. Makes me want to take mine out yet again and have them restored. I do have a spare set of calipers......hmmmmm BTW I'm planning to attend the San Antonio coffee and rides tomorrow am and then hooking with the local Z club on a drive to Corpus to meet up with the Houston Z club folks. Meeting at hooters in corpus. Hope you can make it. It would be great to see you again. Mike.
-
You may want to try JDM Car Parts. According to their site they have 3 in stock. And only $45! You can find them here: 12-J4105 Engine inspection lamp for 240Z 260Z - $45.00 : Zen Cart!, The Art of E-commerce I have purchased from them in the past and have had no issues. Hope this helps. Mike.
-
Steve D, No problem. Would be a great reason for me to take a trip to Houston. Just let me know. Mike.
-
I go past the arboretum on the way to / from work so hooking up after hours would be easy for me. Just need to target a nice weather day so I can drive my Z. Would really like to talk shop. I have already been down the path that you are going so perhaps I can help you avoid some pitfalls that I ran into. Let me know what works for you and we will try to set something up. In the meantime, if you need my puller, just let me know. Mike.
-
Steve, I had the same issue with the first cap that I purchased from MSA. So after I decided to removed it due to the installation screw up that I mentioned in my last post, I went with one from American Dash Caps (probably the same folks that MSA gets theirs from). Aside from the more detailed instructions they provided, they also gave the buyer the option of having the cap painted prior to being shipped. Given that I did not like the color of the one from MSA (same issue you had-too light in comparison to the rest of the interior) I had them paint my new one satin black. Much much better than the version from MSA, who did not offer the painting as an option. This may not work for you given where you are in the install, but this is how I solved the issue that you are now having. Mike.
-
Hardway, I have a spindle pin puller that you are more than welcome to borrow. Should save you some time as well as some $$$ and given that you only use these once in a blue moon, borrowing mine might be a better path than building your own. I'm also in Austin as you know and work up in the north part of town so perhaps we can find a way to hook up and I will give you the tool. Alternatively, we have a club meet coming up on this Monday and I could meet you there as well. Just let me know if you are interested. One way or another we should find a way to connect given that we live in the same general area. Mike.
-
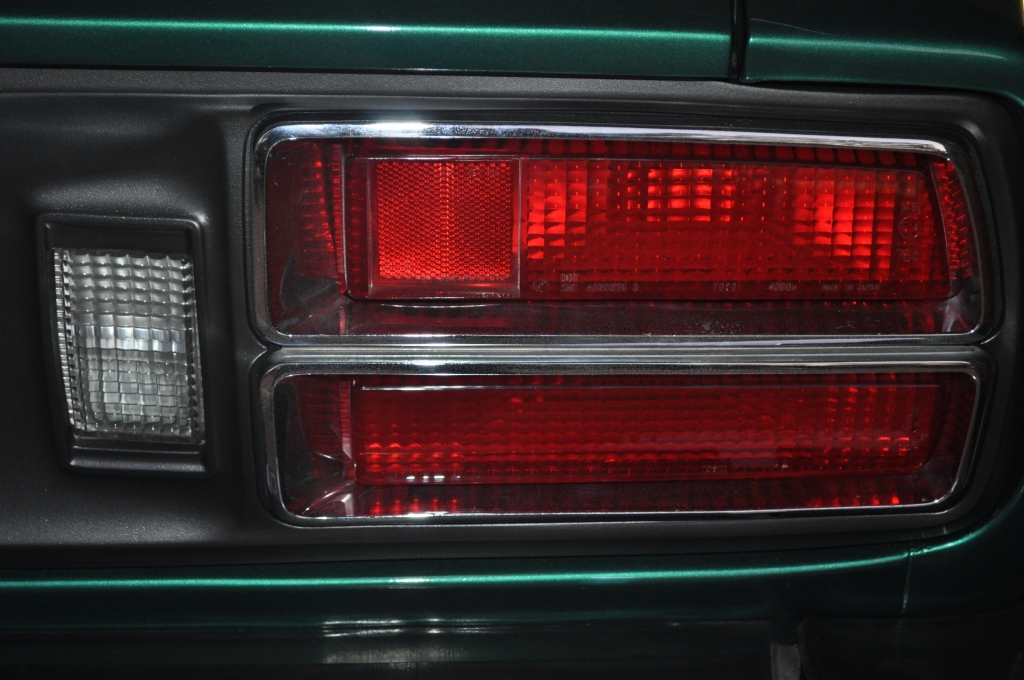
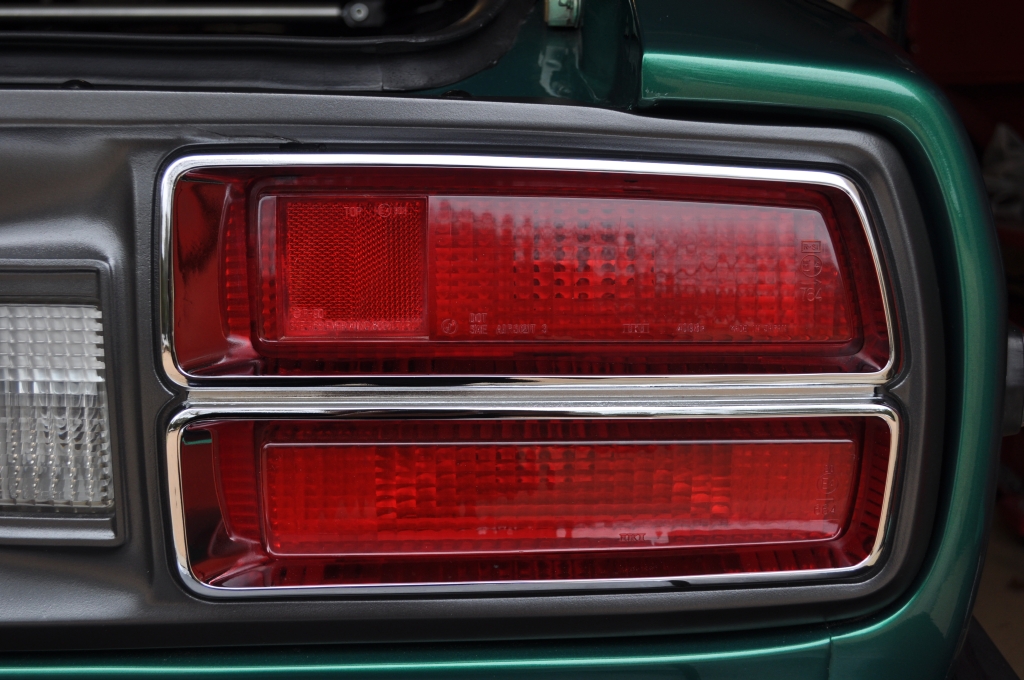
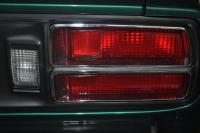
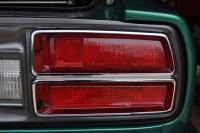
So I decided to take Mike up on his first group buy offer and would like too offer some feedback on his service as well as the product. In the process of restoring my late model 260Z, I was searching for an affordable plater somewhere in the US that could replate my original tail light surrounds. They are definitely out there if you search hard enough, but the prices were outrageous. To put it into perspective, the last quote that I received for ONE surround from a plater on the East Coast was almost double what Mike charged for TWO. And his prices also included return shipping! His price performance can't be beat in my opinion. Finally I want to say that this was a very positive experience overall with Mike and his team. His communication was excellent and in the end he delivered as expected. I would not hesitate to do business with him again and I have already sent him some additional parts for him to plate on his next group buy. In fact the picture on his first post in this thread show my surrounds. They are the 4th picture from the left. I've also attached a couple of my own pictures which shows the passenger side surround on the car, both before and after replating. As you can see, the difference is dramatic. Hope this helps others who may be considering using Mike's service. Mike.
-
Steve, A few more pieces of info for you that may hopefully help. My car is a late model 260Z and so may be a little different from yours. I installed / re-installed 2 of these last year on the same car. The first one I used was from MSA and the product itself was OK but as it turns out the lack of any instructions or guidance caused me to have to have to repeat this process. The issue that I had was that I applied WAY too much of the silicone adhesive, especially in the middle / top part of the cover. On top of that, I placed small pieces of plywood on the dash, with fairly heavy weights on top of that to try and get good adhesion between the cover and the original dash. Big mistake. Once it dried I could see impressions of the boards and weights in the new dash cover and it looked awful. I will also say that the areas around the light dimmer and trip odometer reset needed to be trimmed with a dremel and I also needed to do the same thing around the "Datsun 260Z" emblem just above the glove box door. So the second time around I purchased the cap from American Dash Caps. They also gave you the option of having the cap painted and decided to take this route as the original one from MSA was a little off color in my opinion. So I purchased a new one from this company and had it pre-painted Satin Black. This color was much better in my opinion. Also, American Dash Caps provided instructions and explicitly stated to only use the silicon around the edges and no where else. I've also seen another web site that sells similar products and they state that their warranty will be voided if they find silicon anywhere but the edges! I still ended up having to dremel out some of the same areas as the first one, but the installation looks 150% better. So my advice to you iis to spend a lot of time getting it to fit, pre adhesive. And once you are ready for adhesive, use it sparingly and only use it on the edges. Hope this helps and good luck with your install. Mike.
-
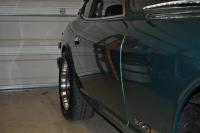
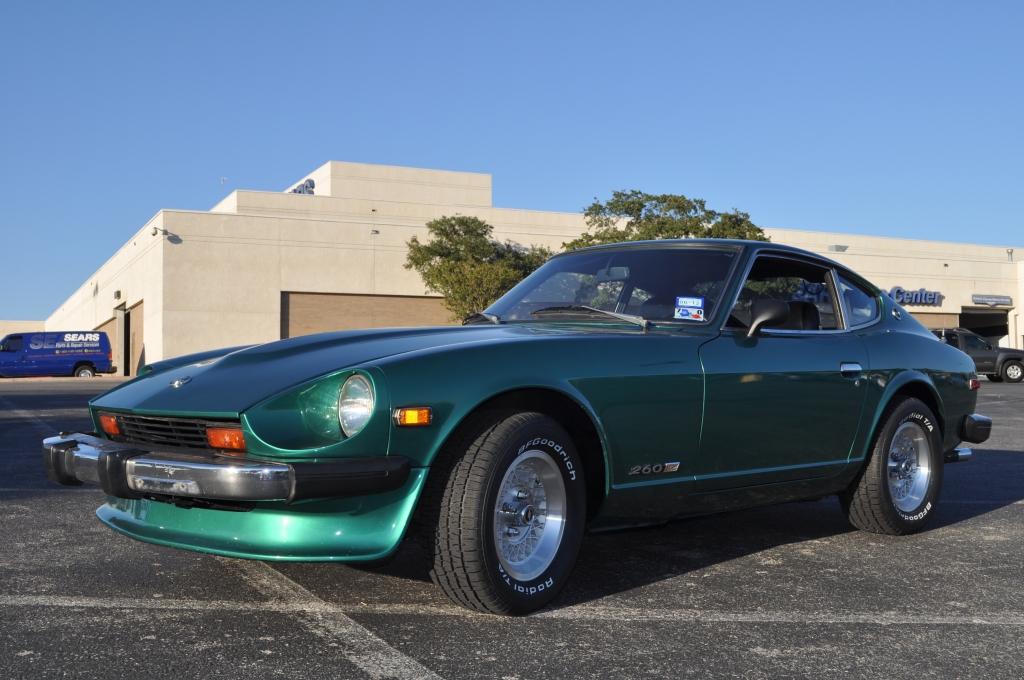
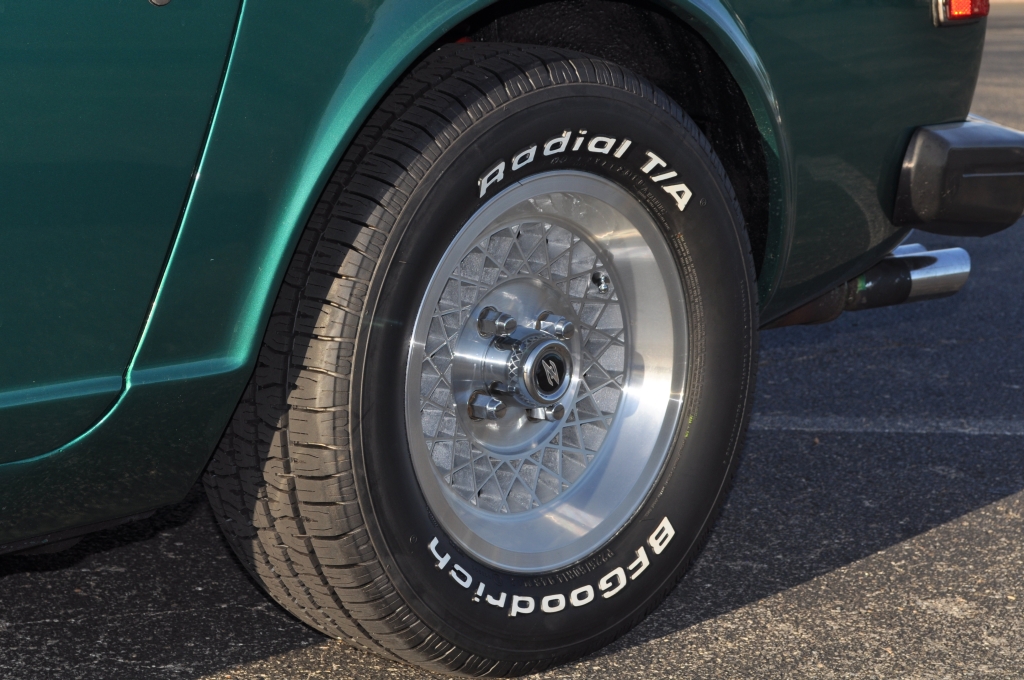
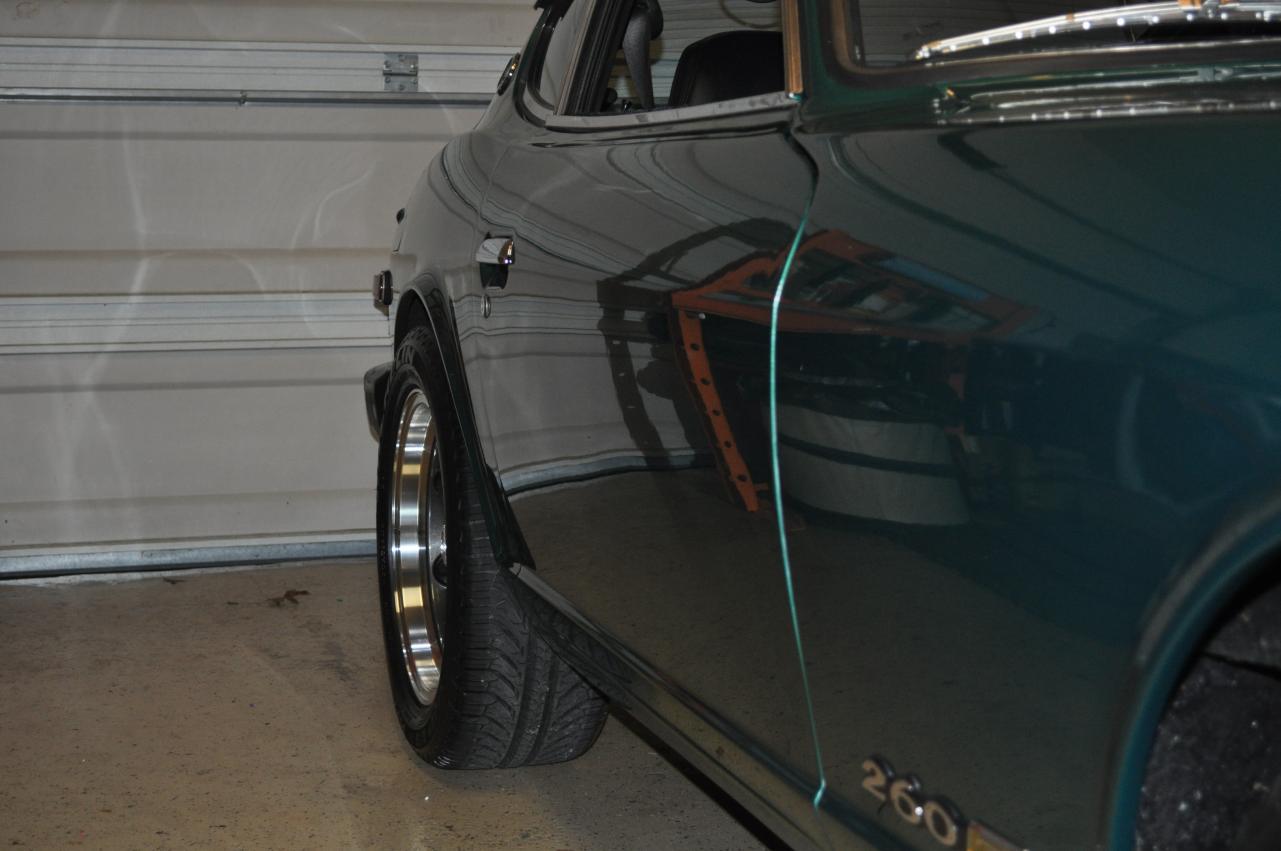
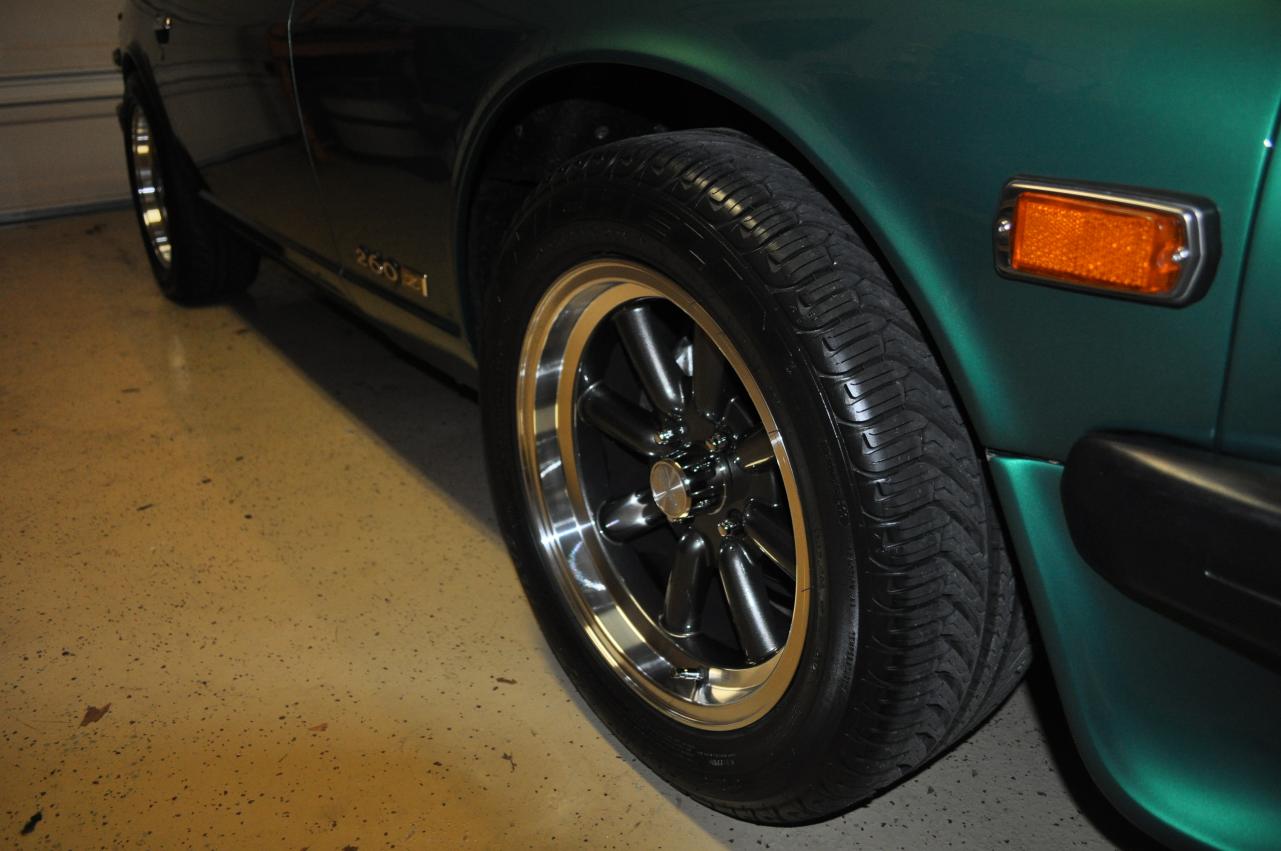
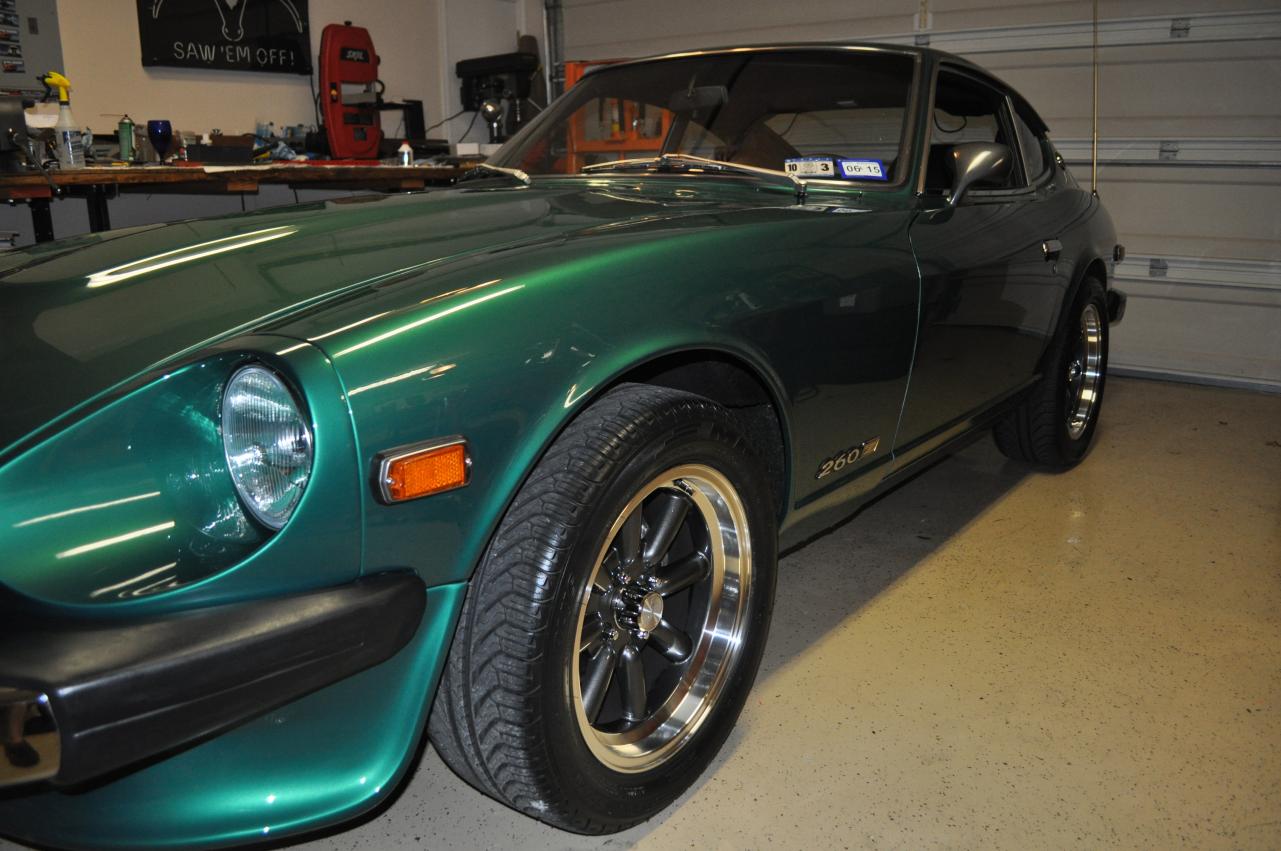
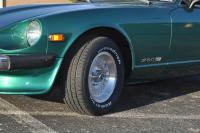
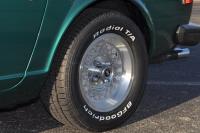
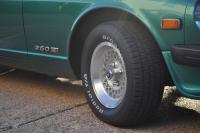
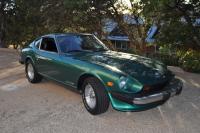
I have the exact same type and size wheels, although they are on a late model 260Z (11/74 manufacture date). It has an aftermarket air dam and does not have the original valance that came with the car. In the pictures below I was running lowering springs along with KYB strut inserts. I run BFG Radial TA 225-60 R14 with no issues. Never had a rubbing or interference problem, front or rear. Here's a few pictures for you so you can get an idea of how they look. Mike.


-
Just checked Rock Auto and they have them in stock. You have to look at later model years, like 1974, to actually see the stock they have, but I do believe they were all the same from 1970 through 1976 (at least). They were not all that expensive either at $9 - $11 or so. Hope that helps. Mike.
-
I purchased the gaskets from Black Dragon and they worked just fine. I ended up purchasing the side marker lens from an eBay seller that I had purchased from prior. Here's a link to the ones he is selling now: http://www.ebay.com/itm/Datsun-Front-Side-Marker-Lamp-Lens-Set-240Z-260Z-280Z-510-NEW-/310540146003?pt=Vintage_Car_Truck_Parts_Accessories&hash=item484da29553&vxp=mtr I have bought a lot of items from the seller (the-z-connexion) and have never had any issue with him. He will combine shipping and his prices are a lot more reasonable that other sellers on eBay. I was also very satisfied with the quality of the product. Putting them side by side with the OEM originals, it was very difficult to tell the difference. Hope this helps. Mike.
-
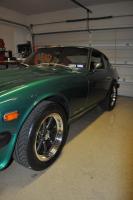
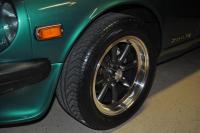
I just went with a similar setup. I decided on the Konig Rewinds and went with Michelin Pilot Sport Plus tires. 225/50-16 fit just fine. The only clearance issue that I had was a very slight rubbing on the right rear tire when going over very aggressive bumps in the road. Had to have the fender rolled to cure it, but that was pretty straight forward. It's also pretty amazing to feel the handling differences with these tires as compared to the BF Goodrich Radial TA's that I was running. I decided to keep my Appliance wheels and BFG tires so I have the ability to switch if I want to change out the Konig's for a different event, but for really driving, you can't beat the Michelins. Here's a few pictures with the new tires and wheels. Mike.