AZ-240z
Free Member
-
Joined
-
Last visited
Everything posted by AZ-240z
-
 I am enjoying all of the comments and would be interested in this communties thoughts on Vintage Program Z-Cars. As theoretical future owners of this fine example of the Vintage Program, would you value this car more if you modified it with all of the correct factory parts as delivered from the factory, ie., a correct judged stock show winner? Or, do you think that this car would loose the intrinsic valuation element as it is no longer "as presented" as a Vintage Z program car? I think we are all motivated to value things differently depending on an individual's perspective. We may all eventually define what is "Correct", but what is "Rignt" for these fine cars? Dan
 -
Hello dj, This may, or may not help, but here is what I have found in trying to understand the inherently low pressure readings on series 1 cars. Here is what Wick Humble in his book "How to Restore Your Datsun Z-Car" had to say. By the way, this low pressure reading is, indeed, inherent to our early cars as this low pressure anomaly was present the day I drove it off the lot with zero miles on the clock. My car has the 140 psi gage and the 25070-89910 10kg sender switch. I asked my mechanic to check my oil pressure with his mechanical gage and these were the reading: Idle - 22 psi 3500 RPM - 64 psi My stock 140 psi gage and 25070 - 89910 sender the reading are: Idle - 0 psi 3500 RPM - 35 to 40 psi My car is 100% stock with a pretty tight engine with approximately 5M miles on it. My compression readings are 167, 166, 168, 176, 167, & 175 for cylinders 1 thru 6 respectively. I have peace of mind knowing that zero psi really means at least 22 psi as everything on my car will always remain factory stock. I also know that many mechanics, to give owners peace of mind, would install a roadster sender which will always give a positive reading. I used one for a time, but don't remember what the specific readings were except that it was always positive. I hope this helps in your quest for a sender. Dan
-
Terrific job, Jim. Your attention to detail and originality will be rewarded with a hugh sense of accomplishment. Any thoughts about your intentions for jute and carpeting. Dan
-
Tamo3, If you have a high quality paint supply store that sells to the trade, you may find just what you need. I bought about a foot of high density, close cell foam rubber from my local supplier which was about 1 inch wide and 3/8 inch thick and had an adhesive peel off backing. This supplier sells all sorts of universal weather stripping and bulk rubber goods. I cut 4 pieces, each 3 inches long, stacked two together (so each pad was 3/4 inches thick), one for each fender. I could actually reach under the fender and squeeze these pads into place, and they fit very snuggly for great fender support. I have a 1970 series 1 car that has just two fender support pads located just forward of each inspection door, so don't know what you actually need for a 1975 280Z. Hope this helps. Dan edit: In post #4 and the second picture in post #6 you can see the pads inside the longer rubber splash guard.
-
Mike, I second removing all of the tar mat insulation. It will not only give you unencumbered space to repair the rust, but you will be certain that there is none left. The same tar mat insulation can be purchased at a quality colllision repair shop that has an adhesive backing. I would take pictures of the old mat before removing to accurately document for a replacement pattern, then paint it the original body color and it will look showroom new.
-
-
To add to what djwarner said, I would make sure it is a OEM Nissan thermostat. If you search previous discussions on thermostats, there is a difference!
-
Just a thought, but sometimes finding replacements is the path of least resistance. Datsun 240Z Right Rear Suspension Strut Spindle Assembly w Brake Drum | eBay Dan
-
Hi Kats, For the original size tires for our 240z cars, you may want to Google "Vredestein Sprint Classic 175 HR 14". I believe the distribution center for the US is in New Jersey. There may be a European or Asian distribution center for this European manufactured tire. The size is a perfect match for the original Bridgestone Superspeed-20 tire. There is a chine molded into the sidewall. I assume this chine is a curb rub strip but you will see tire images online. Dan
-
I may have a 4 1/2 " wheel, but it would be in my attic above the garage. I'll take a look in the next day or two if you're still looking. Unfortunately, shipping across the country my be expensive. I have a set of 5" wheels in perfect condition if interested. They would just need a little touch-up paint for show condition. Dan
-
Well deserved, Bob. Congratulations! Until we meet, again, on the field! Dan
-
My apologies, you are quite right. Its been a long time since I took the hood off, and there are adjustment slots on the hood mounting brackets I had forgotten about. My technique for hood removal as I remember is: 1. Cover engine bay and fenders with some heavy duty padding. 2. Loosen all four bolts holding hood onto hinges. 3. Remove the forward two bolts while holding the hood open. 4. Then, allow hood to rotate on the aft two bolts and rest hood on padding 5. Remove aft two bolts, then lift hood and place on pads for storage. This way it is a one-man-job. Dan Dan
-
siteunseen, wouldn't it be easier to just unbolt the hood from the hinges, two bolts on each side? Then, no hinge adjustment required.
-
http://www.classiczcars.com/forums/interior-s30/31214-dashboard-removal-help.html
-
I'm in the exhaust manifold leak camp.
-
mjr, OK, right up front, my disclaimer is I know nothing about your problem. I am going to recite what my mechanic found when my '71 was having similar, but not nearly as violent, a problem. Just some occasional missfiring, backfiring, jerking, etc. I don't know how similar your '75 dizzy is to my '71, but, there is a white plastic insulator for the electric wiring that attaches to the top edge of my dizzy just below the distributor cap mounting. He found that this insulator had cracked and generally degraded from time and heat to the point where it allowed some electrical arcing causing my poor engine performance. If you have a similar insulator, it may be worth checking, FWIW. Dan
-
midman, When you get to the door panels, something that may save you distress later has to do with the little metal clips that fasten to the door panel backer board (masonite) and clip into the metal door frame. The part of these clips that press into the little plastic cups placed in the door frame are adjustable. I found it very helpful if, before attachingthese clips to the door panel, insert them by hand into the metal door frame to test tightness of fit. If too tight, pinch them with pliars slightly so that, when installed with the door panel, the panel can be removed at a later date without breaking out the holes and damaging the masonite backer board. I may be talking about the obvious, but it never hurts to revisit techniques that can prevent damaging parts down the road. Dan
-
I did a quick search and came up with this. http://www.classiczcars.com/forums/interior-s30/4523-parking-light-switch-console.html
-
Motorsport! OEM Quality Tinted Windshield, 70-78 240Z-260Z-280Z Coupe - The Z Store! Nissan-Datsun 240Z-260Z-280Z-280ZX-300ZX(Z31/Z32)-350Z-370Z Parts
-
-
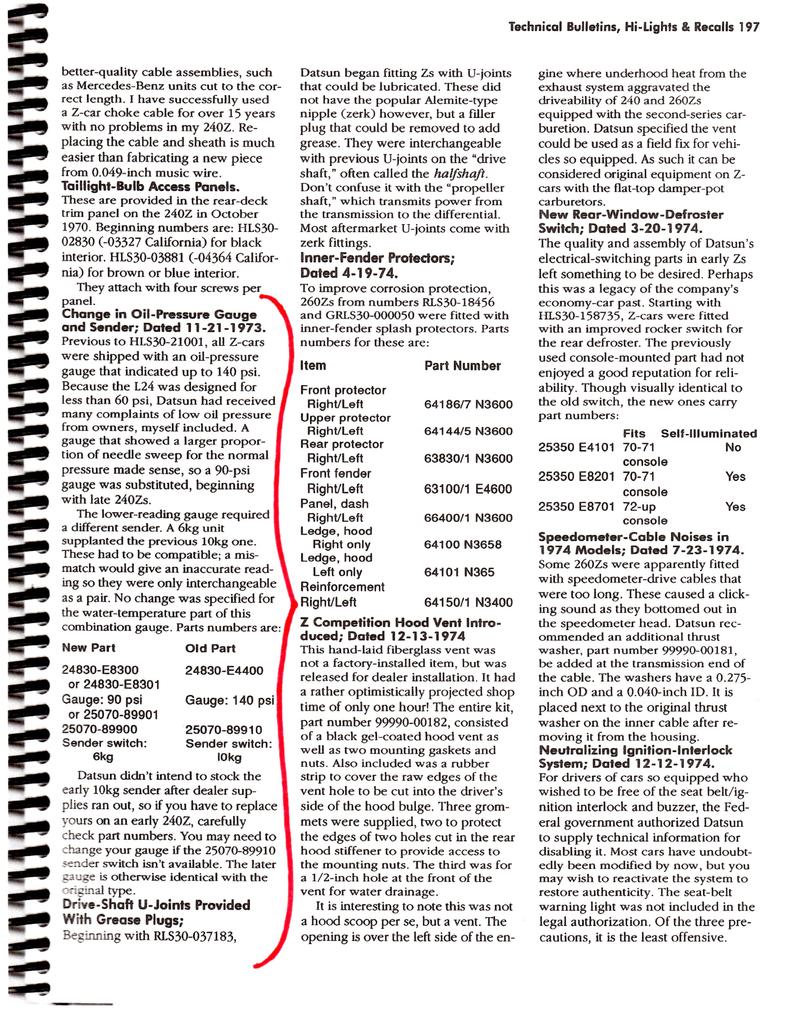
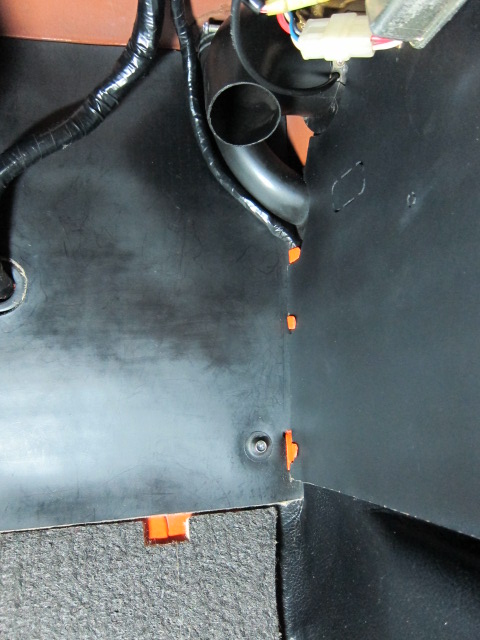
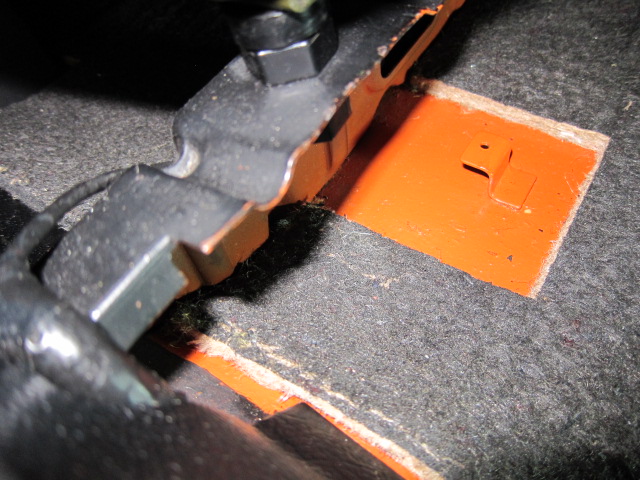
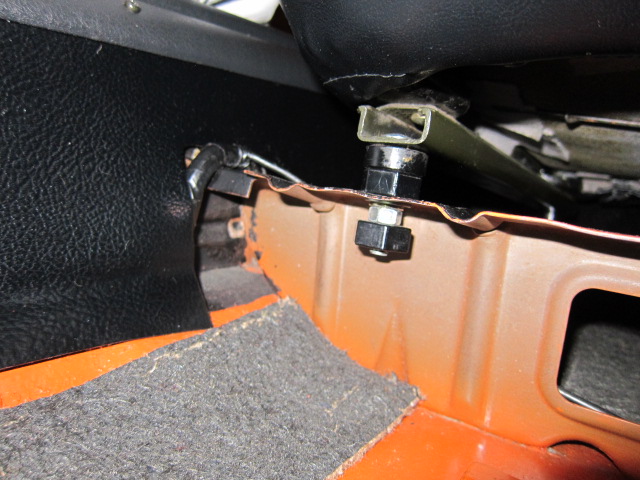
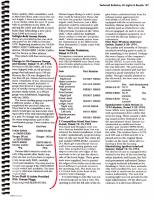
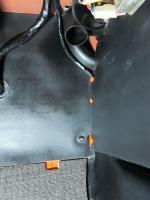
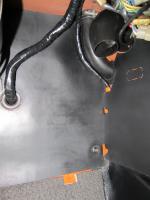
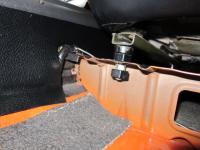
If it didn't show well enough in the pictures, the harness runs from under the kick panel, to beneath the vinyl rocker finisher along the seam of the interior rocker panel and floor panel to the front passenger seat support. It then runs over the seat support as shown, and the emergency brake wire come off at that point and runs behind that passenger front seat support over to the brake light switch on the brake lever.
-
If it didn't show well enough in the pictures, the harness does run, as shown, under the passenger side kick panel, then underneath the vinyl interior rocker finisher at the seam of the rocker panel and floor panel.
-
Here are a few ppictures that may help!

-
This may, or may not, be related to those blue wires, but thought I would add it to the conversation. The dealer added FrigiKing air conditioning incorporated a micro-switch that may have utilized one of these wires. The mirco-switch was mounted at the intake duct actuator located behind the blower motor in the passenger side footwell area behind the dash. When the top slide lever on the heater control panel was moved from the center "vent" position to the left "off" position, the intake duct door moved to close off fresh air intake and open to allow the air from the evaporator to pass through the blower assembly for cabin distribution. Also, with the movement of this vent lever to the off position, a circuit was completed via this micro-switch throught the dealer added A/C ON-OFF/ RHEOSTAT switch to allow electrical actuation of the A/C compressor. This on-off switch was mounted to the bottom of the dash below the hazzard switch. The micro-switch assembly on my car is incorporated in a red plastic housing mounted next to the cable actuator for the intake duct behind the blower motor. I mention this for informational purposes only to help expand this discussion. This is just my personal understanding of this switches function, as I do not have the original installation instructions provided for dealer installation. Dan
-
I've got the same vintage car as jfa.series1 does, and have a plug in that hole, also.