


Leaderboard
-

siteunseen
Free Member2Points15,115Posts -
Jetaway
Free Member2Points394Posts -
Johnny wick
Free Member2Points2,204Posts -
Careless
Free Member2Points446Posts


Popular Content
Showing content with the highest reputation on 10/31/2015 in all areas
-
2 pointsJai you cracking me up with those babies! My jailbird fluzie from that Richard Pryor and gene wilder movie.
 2 points
 -
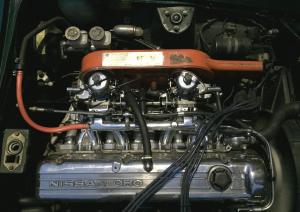
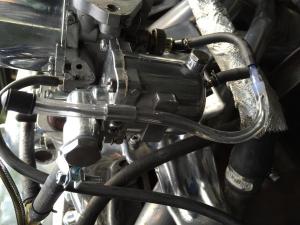
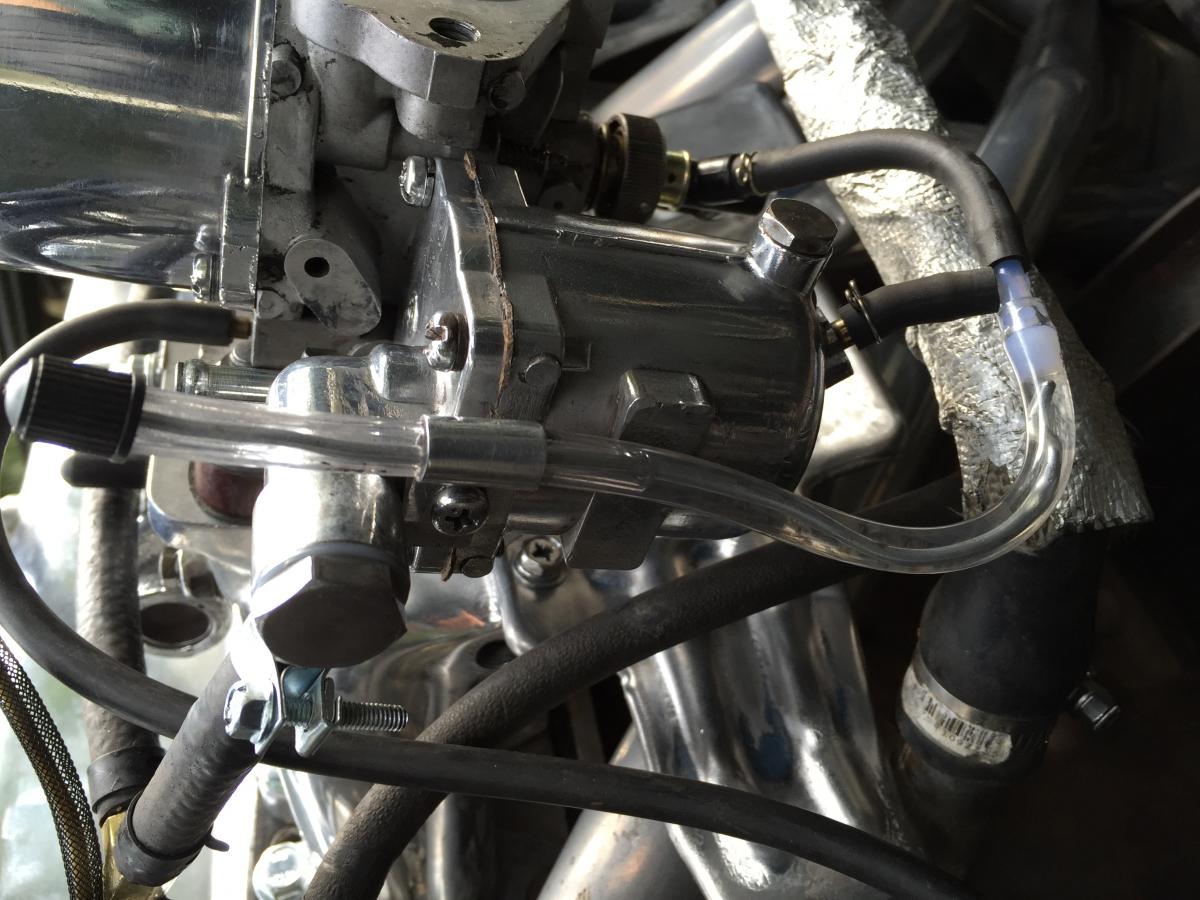
managed to have a productive long weekend in spite of the temptations (beer & brats, etc.) turned back the z technology clock a little: ripped out the efi and associated spaghetti/plumbing and installed the su's. the worst part of the whole process was installing the choke lever... i picked up one of those tunnel-mount plates in order to avoid breaking the underside of the console (the choke lever set came with the telltale chunk of broken plastic mounting post still attached to the mounting screw) and it was a bit of a pain to set the layout on the tunnel so the choke lever would line up in the console slot. every time i have to do work on the interior (especially under the dash) i wish to god i had a chevy van instead... contortions upside down, holding a flashlight in my teeth, having my glasses fog and dropping the fastener on my forehead for the 5th time... but eventually it worked out just fine. i had purchased a 240z choke cable fire wall grommet but it turns out i didn't need it. what i had assumed was a metal blank-off plate next to the throttle linkage turned out to be a dual-opening rubber blank. so i just drilled two holes in it and the choke cables go through with a nice airtight seal. getting the manifold off was cake thanks to the multiple head swaps i've done and i went ahead and pulled the afm, charcoal cannister and associated mounting brackets as well. i left the wire harness in for now, coiled up and tucked out of the way by the windshield washer bottle. i'm using the stock fuel filter & lines for now, but will revise when some parts come in. next was swapping out the efi fuel pump with a cute little airtex unit. mounted it up near the moustache bar and looped the fuel line over to the existing hardline. i left all the efi wiring/relays/etc. in place, so it all works exactly as previous - just a lot less pressure. the airtex pump is so quiet, i had to put my hand on it to make sure it was working - nice. i then got the carbs mounted up and checked the float levels. interesting side note: i had done this previously in my basement using water, with the fuel pump wired to a power supply and a juice glass as a see-thru bowl. even though i had both set dead-on to 23mm they were quite off when i put them on the car. not sure if it has to do with the density difference between gas and water, the tilt on the car or what, but i eventually got them both to 23mm (again). i used some clear vinyl tubing as a temporary sight glass which was quite helpful these first times around. she fired up quickly and after warm-up i synched them at idle and high-speed w/the old unisync that i've had for decades in my tool box. worked a treat. took her out for a test drive and was sorely disappointed... no power, burbled and popped horribly on decel, wouldn't rev, no fun. it sounded like the mixtures were way out of sync, and i couldn't get them to match up. decided to do another float level adjust, but this time i figured i'd go for the fuel in the jet nozzle rather than the height of the float bowl. read on one of the blogs out there that the recommended fuel level corresponds exactly to 1cm (10mm) below the bridge, which you can check by turning down the jet adjusters 10 full turns (1mm each) and fuel should be right at the top of the jet nozzle. turns out that i needed the rear bowl to be set about 5mm higher (18mm down, vs. the 23) in order for the nozzle to get its fuel at 1cm down. not sure why... she ran much better and is now quite driveable, although still not perfect - i ran out of daylight so will need to do more testing/tuning. next step will be setting up the dual-sensor afm so i can get a better idea of what's going on vs. just reading plugs. stay tuned... carbs on - ready to run temp sight glass setup
 1 point
 -
1 pointLooking in Nissan E-Fast catalog, I can see that the Air Pump can be taken apart, much like a power steering pump can be. But how much of it is available for refurbishing? As far as restoring the look of this item, There are about 3 or 4 pieces on the unit that are cast into the housings that are supposed to be plated. If I were to plate the pieces that these small items are attached to, and then spray them with "cast iron" look spray or even blast the plating off the areas that are to be raw metal, would that cause any issue for the operation of said unit? Or does anyone offer NOS or refurbed units with this already done? I can only find a refurbed one right now, but it doesn't seem to have the proper plating. (01/70 240z)1 point
-
1 point1 point1 point1 pointAttached is the checklist I made for pulling the engine / transmission from my 1972 240Z. It takes you up to removing the engine mount and transmission crossmember bolts. I used the Removal Note column for bolt / nut size (might as well replace them as long as they are out), part bag names, idiosyncratic electrical connections, etc. Hope someone else finds it useful! Chris P.S. Apparently not allowed to upload Excel files, converted to .pdf. Sorry about including 2 blank pages at the end. Engine Removal Checklist.pdf1 point1 point1 pointGet rid of it? NO, NO, NO, Not yet. IMO I haven't seen one solid reason to give up on Redbird yet. Let's back the tow truck up for a little while. First is the cooling system losing coolant? Jai, A compression tester is avail. at Harbor Freight for $22.99. If you are able to remove spark plugs, you can use this tester by yourself. If $s are short, I'll send you mine. PM me. I'm a bit perplexed at the intermittent nature of this problem but I'm with Zedhead. Head gasket seems like a stretch & is easy to verify. I'd want to know what the problem is before I parted ways with her because I'd know in my heart that I hadn't given it my best shot. Regret is a bitter pill.1 pointAfter cleaning the domes a few months ago, while setting the carbs, before starting the engine, I noticed the pistons could be raised with very little finger pressure, and realized I hadn't put any oil in the dampers. Put what I thought was the right amount in each (kind of hard to see the level) but one went up easier. I put some more oil in that one, and it was harder to lift. A few drops more and it seemed to take the same pressure to lift as the other carb. So I got the idea that oil level, as well as viscosity, affects how the pistons rise in response to vacuum (in front of the throttle plates) So, is that correct, or am I missing something ? Also, is matching finger pressure an acceptable way to set relative damper oil level ? Depending on the light, it can be hard to see if the oil level lines up with the grooves on the damper stalk.1 pointHi all, its been a while since I've been on. The 240 is getting welded up, and so I've put stuff on the back burner for a while, but it will be back soon, so I am working on getting the engine ready to install. I've bought the "big" SU from a XKE I think. They bolt right up, but I dont know how I'll build a linkage that will open both carbs at the same time. Has anyone done this swap, and if so, how did you attack the issue? Many thanks! Curtis1 pointJust filled both of my Hitachi refurbished 3 screw SU Carbs with 3 in one motor oil (Blue and White label). The Temperature here in Panama is 33 degrees Celsius, very hot indeed! The car is running okay, but at first gear sometimes hesitates back and forth. The idle was set to 1000 but does not keep the rpm steady. It lowers to 900 or rises to 1,100 RPM. Sometimes if stuck in traffic it can lower to 500 and could stall. Is this caused by the kind of damper oil? the timing was adjusted to 10 degrees Celsius and the Camshaft is a Schneider 274F (1800 to 6000 RPM) Any recommendations? Both carbs are fully adjusted and fine tuned.1 pointHi everyone. I was wondering if the following are still available anywhere: Air Cleaner rubber stripping and carb-mouth mounting gaskets. These are 4 bolt ones for the 1970 i'm restoring, and I can't seem to find the rubber pieces that go inside the air cleaner either. Fuel Pump internal valve gaskets. They OE ones seem to be paper of some sort, but they are NLA. Is it ok to replace with a square-style rubber o-ring of sorts? or is there a preferred method aside from that? Also, can the pin that holds the arm in the fuel pump be pressed out and pressed back in? I need to clean this one up, but I don't want any gunk going into the back of the fuel pump. Is there a way to press it out? I had someone briefly try to press it from both sides, and came to the conclusion that the rounded ends are caps that are pressed in afterwards? Can I just press it on through and then dissassemble and reassemble? It seems like the rounded caps have bottomed out. Not sure if I should try going further. This is the Kyosan Denki fuel pump that i've seen go from 500 - 1000 dollars, soooooo I'd like to freshen it up. The pump is pictured below and the round shiney pin in the pivot arm hole is the one i'm talking about:1 pointWhat kind of glue should i use to paste the SU Carbs to air cleaner gaskets? Crazy glue? or RTV black silicone? http://www.ebay.com/itm/Datsun-240Z-1970-72-SU-Carb-to-Breather-Gasket-Air-Cleaner-Carburetor-Nissan-/291428319728?hash=item43da7b41f0&vxp=mtr1 point1 pointSo, first of all, i've been gone from the car circles for a long time for certain reasons. Have forgot most what i learned about carbs and timing. Problem: last summer, i broke my distributor. Yes, it went broken. The collar that holds dizzy on place (with 2 10mm screws) was bent and eventually dizzy started to wiggle, so forth destroying all screw threads that were holding it to place. SO. I replaced it with similar kind of oem 240z distributor (no-points, custom made) and i just CANT make it run nicely. I have 3 SK/OER dual sidedrafts that were tuned last summer. Havent touched them since. I dont remember the basics of timing, but i have timing gun with igniton advance setting. Tell me what are the correct numbers for proper timing on 3 carbs. We tried every combo. It sometimes idled super smooth, then when rpms raised, ran like $^!#. In two weeks we have major car event here, i just need it to be done with before the show. Thanks in advance1 point


Important Information
By using this site, you agree to our Privacy Policy and Guidelines. We have placed cookies on your device to help make this website better. You can adjust your cookie settings, otherwise we'll assume you're okay to continue.