


2ManyZs
Free Member
-
Joined
-
Last visited
Everything posted by 2ManyZs
-
I think those pics came off a Japanese site, but I can't remember which one. I know those pics have popped up quite a few times in the last couple years. There's probably a few here on the site somewhere as well, maybe even in the Gallery. Here's a site you might want to look through to see if the car is on there..... http://www.sun-inet.or.jp/~akiras/240zg/index.html
-
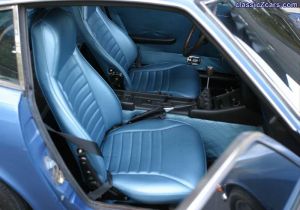 Great combo in my book! The blue interior with a nearly matching exterior color makes this car stand out in a crowd. Fantastic find!
 -
The outer strut housing diameter on a 240 strut is 2 inches or 50.8mm and the later 280 housings are 5mm larger in diameter (or close to that) as far as I know. Don't forget to double check the lenght of the strut insert you take out to make sure the ones you buy will actually fit. There's probably a bit of variance in body length between all the manufacturers. As far as insert choice, I guess I'd take a consensus of what other racers are using and go by that. I've heard good and bad on the Advance Designs from GC as well as the Tokico's and Koni's......It's about the same as asking which tire is best, you'll get a myriad of opinions depending on who you ask and how big their budget is.
-
Hehe, get out of that wine Steve, you're seeing things.... Yeah, it's not exactly what I'd want as far as the cage, but the basics are there, and I've got a cage to tear out of the wrecked ITS chassis that I can use to put some extra tubing in another one.:devious: Of course, Vintage rules differ quite a bit from SCCA rules, so the X brace in the rear wouldn't be legal in some SCCA classes. I think the only other thing might be the crossbar in the main hoop, but it's up to the tech inspectors judgement depending on which class you are trying to have the car classed in. I just need mostly rust free, "unbent" chassis to start with, so the cage really is an added bonus. All I'd have to do is unbolt the parts off one car and bolt them on another. Save a lot of time and aggravation that way. If it were mine, I wouldn't have cut into a car with that low a VIN number, but since it's already started......
-
Not necessarily, the problem could be in the forward control arm mount on the passengers side. It could be the damage is in the floor pan area where the forward mount is, or in the leading edge (side) of the control arm itself.
-
Sent you an e-mail. Hope I'm first in line....:cheeky:
-
Here's an old thread that tells how to mix the correct color. Actually, those finisher panels aren't plastic, they're metal. http://www.classiczcars.com/forums/showthread.php?s=&threadid=4786&highlight=taillight+panel+color
-
Maria, can you post a pic of this "fix"? Just in case someone else wants to try the same thing in the future. Not sure, but I think new striker plates are still available with all the hardware including the plastic (or whatever it is) block.
-
Do you have both bushings maxed out for the toe out or just one? If you have both maxed out, you will get more negative camber. If you adjust one in and one outward, you'll change the toe and not so much the camber. For instance, if the front side of the tire is toed in, adjust the front bushings out(toes out the front edge of the tire) and the rear one in(toes in the rear edge of the tire). This will bring the control arm back into alignment and lessen the amount of camber change. Of course, doing this will mess up total toe of the both rea wheels. It would be better to adjust them on an alignment machine so you don't have toe in on one side and toe out on the other. If you can't get it right with the adjustable bushings, you definately have a chassis problem or a severely bent control arm as the adjustable bushings should give you close to 1/2 to 3/4 inch adjustment both in and out.
-
If you put in the adjustable bushings yes, if you put in the stock replacements or urethane bushings, no. You didn't specify which ones you got, so I was just guessing you put in the urethane ones. By adjusting one end or the other of the adjustable bushings, you should be able to change the toe by a degree or more.
-
That would be a WAG... depends on shops rates and whether you "know anyone" who works in one of the shops. Could be as little as a couple hundred to whatever they want to charge... Most of it will depend on what they find. If they check the chassis and find nothing out of alignment, I doubt it would be more than a couple hundred. Which will at least tell you what it isn't, since there will be only a few other things that it could be, you'd be well on your way to finding the problem. If the chassis does require pulling to straighten it could be upwards of 500 or more. Either way, in just a couple hours, you will know whether throwing any more parts at it is required or if you'd be wasting your time putting any parts on. If you have a Factory Service Manual, there is a chassis diagram in there with all the pertinent chassis measurements that you could possibly do yourself with a helper just to see if anything is obviously not where it should be.
-
14x5 with 195/70-14's if fitted with steel wheels with wheel covers. Optional wheels were the alloy in 14x6, same size tires as far as I know.
-
I think I'd go back to basics and start from there.... Such as: Was the intake removed or moved at all during the header installation? If so, check all the intake plumbing, especially the rubber boots that connect the AFM to the throttle body. Check all the vacuum lines. Check to see if the timing is still OK, maybe someone bumped the distributor and the distributor is loose enough for it to have moved slightly. Double check all the electrical connections on the intake and around the coil, distributor, and throttle body. Double check for an intake leak at the head, use some starting fluid and spray around the base of the intake while idling. BTW, what color are the plugs?
-
It's probably either the control arm, or the chassis itself or chassis mounts that are tweaked. Considering all the trouble it is to change a control arm since the spindle pins can be a PITA, you should consider either replacing the whole strut/control arm as an assembly off a parts car to see if it changes anything, or put the car on a frame machine. My vote would go to a good frame machine at this point, as the chassis or mounts would more than likely shift before the control arm would bend, and seeing your control arm, I'm not sure it is bent.
-
Err, shouldn't this be in the "Funnybone" forum??? Hope they didn't have to lick all those stamps....:sick:
-
Impossible to tell in a pic.... There are only two types that I know of, those that are stuck on with some kind of adhesive tape, or those that are pop riveted on.:cross-eye If it is taped on, it should come off fairly easily, just take your time, and it will take some Goo Gone or other adhesive remover to get off the residue. I used one of the stiffer plastic body filler spreaders to take the ones off my car. Work it under the end of the trim, and keep pulling it off and use the spreader to get under the tape and you should get 90% of it off. If it's pop riveted on......:disappoin :sick:
-
Ball joint castle nut- 39.8-54.2ft/lbs from FSM Tie rod castle nut- 40-55ft/lbs from 240Z shop manual In other words, they are the same.....:stupid:
-
Boy, sure am glad you got the brakes fixed in time for spring...:cheeky: Being that I was raised in the "frozen north" I found your site interesting, but I have to ask one question. How can you not have a Mercury Sno-Twister in there somewhere?:devious: Ain't "skeered" are ya??? Man, those things were the quickest thing on snow for quite a few years..... I gotta admit though that 340 RV was a cool looking sled in its day, but it just begs for a 440 in it doesn't it? Wish I could dig out the pics of the ones we had when I was a kid. Let's see, 67 Alouette, 70 Alouette, 74 Scorpion Super Stinger 440 and a 71 Sno-Jet 396 Wide Track.:cross-eye
-
Don't forget to take your cameras guys.....There's a category in the Gallery for this years show.
-
Do I get 50 points for having service that will let me hook up 220 even though I don't need it? Geez, I've got 6 doubles in the ceiling... and no door opener either. I can move my flourescent lights just about anywhere I need them with all the outlets, in fact, only I only put in 5 outlets in the walls.
-
I think you meant to say the air pump and not the power steering pump..... You seem to have a good plan, but in my opinion, you ought to think seriously about using another cam. The Stage 2 cam would be a much better choice, especially if the car is going to see mostly street driving. You'd be much better off with a cam with a power band spread across a wider range of RPM's. I think with the cam you picked out, you would be giving up a lot on the bottom end, and the L-24 doesn't have enough that it can afford to lose any. The next step down in cam choices from MSA gives you a power band from 2-6K and will work with either stock SU's or even the smaller of the triple carbs (40MM), which still gives you a choice later on induction. The one you picked would probably be better suited to either a bored L-24 or an L-28 with increased compression, and would be best left to people that will use their car on the track a lot at high RPM's.
-
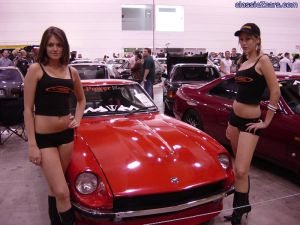 Either one could sit in my passengers seat....
 -
You'll also need a good quality torque wrench as engine torque specs are critical. You should also get a ring compressor unless you plan on someone else putting the pistons in.
-
I'd try finding a new O-ring and doing it again before I spent all that money on another fan clutch. I've never had good luck re-using O-rings, no matter how good they looked. It's also very easy to have the O-ring get pinched just a tiny little bit no matter how careful you are when re-assembling it. Or perhaps you could try a different ype of sealer this time and the problem will go away. If you used blue silicone, perhaps try the high temp red sealer this time. Since you have done it once, you know how it's done.... and there really is nothing too difficult in doing the job, just the lost time re-doing it.
-
I think Ed may have just hit the nail on the head. I'd say it was due to heat, probably due to increased friction with the cylinder walls due to worn rings. Or, it could possibly be due to pre-ignition caused by the carbon build up causing a hot spot on the piston crown not long ago. Hard to tell with the pic, as it's hard to determine where exactly the block deck ends and the cylinder wall begins, it's also a slight possibility that it was due to contact with the headgasket that was intruding slightly into the combustion chamber, for any one of a few reasons that could cause that. Blow-by would not show up conclusively on the piston crown, only on the cylinder wall as Ed said, or on the piston skirt at or below the rings lands.