


Bambikiller240
Community Member
-
Joined
-
Last visited
Everything posted by Bambikiller240
-
Zlish: Whatever you do, DO NOT continue to drive the car with the pulley loose. You run the risk of it coming completely adrift, and it will drift right into your radiator, fan and waterpump destroying at least the radiator and probably all three. On my 72 240Z the pulley is held on by a large bolt (30mm as I recall). I suspect that it is the same size on a 260Z. On my car I do not need to remove the radiator to tighten, or loosen the bolt, nor to remove the fan. It is close quarters there, but you just have to watch out for your knuckles on the radiator fins. The torque value is quite HIGH for this bolt (sorry, I don't have my shop manuals at home to give you the spec) so you may need an extension on a torque wrench to get it right. Good Luck!
-
I just love a happy ending! Sure is nice to know that there are still some really nice people out there (here) who will share their good fortune. Katz you are to be commended. Also, Alan T was most helpful as well, with his amazing wealth of information and efforts to document the issue. You guys exemplify the spirit of helpfulness that makes this club the best. Thanks to MIKE also for creating, and supporting this invaluable resource for the Z (ZED) community at large.
-
EScanlon: So then these Q-Pads are similar to the tar/mat stuff that was OE on the 240Z floors? What kind of store waould sell these? Home Depot? Orchard Supply Hardware? or ??? The Eastwood Co info on the Dynamat Quiet Pads says they are .070" thick, but doesn't specifiy materials. I can't get the URL to copy correctly, but if you go to www.eastwoodcompany.com and search on "Quiet Pads" you'll see the product. Thanks for the info you've shared!
-
My test says 26%................kinda High, I thought! So steve77, are you trying to tell us something?:stupid:
-
So as I understand the discussion, 'Q-Pads" are different from "Dynamat Quiet Pads"??? Does anyone know the manufacturer of the "Q-Pads"? or the differences between the two? I'd like to compare the composition of the two items prior to choosing one over the other. Thanks for any insight that you can share. Carl
-
You might try Eric Neyerlin at ZPARTS.COM He often has this type of hard to find item stashed away. just a thought. carl
-
Mike: I don't think that these are available from Nissan any more, but I do see used ones on eBay occasionally. I couldn't find a listing in the MSA or Vic Brit catalog for them either. Carl
-
That's what POR15 manufacturer and distributors claim. your can read for yourself at the URL's http://www.por15.com/index.html http://www.thefinishedlook.com/main.htm I used it this past summer and it seems to be really tough stuff.
-
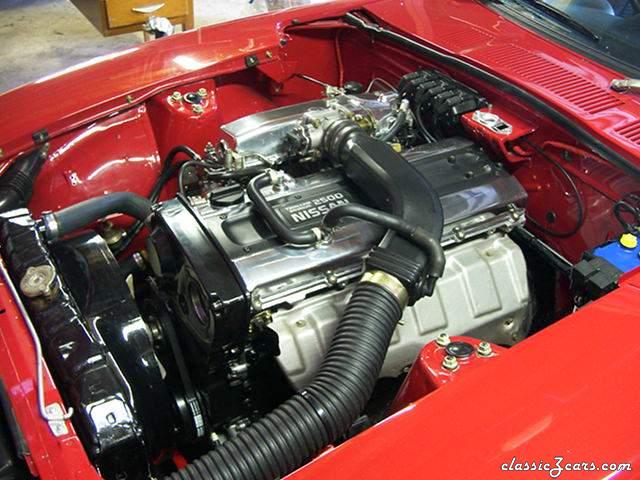 Man, that engine fits, and looks like it was MADE to be in there!
 -
-
Does the recent loss of so much of our privacy to Bush's Orwellian Foolios make you feel safer too? Now instead of worrying about foreign terrorists, we can worry about Federal terrorists. Just like the old days when J. Edgar Hoover was in charge! SWELL!:stupid:
-
The springs should be shorter than the stock ones, but 3-4 inches shorter doesn't sound right. The info that I have says that they should lower your car 1" to 2", but will be stiffer by far. Should not need to be 3-4 inches shorter to accomplish this. :surprised When I put on Suspension Techniques springs on my previous Z, they didn't need to be compressed to re-assemble, but I couldn't move them an inch up & down like you describe. I COULD wiggle them a bit, when assembled, but to be loose by an inch sounds wrong to me. Caveat, My experience is with a 240Z, but I still think something isn't right with your situation. Check the P/N on your invoice and contact the supplier you bought from or Tokiko's USA distributor to confirm you got the right kit.
-
Raven: Check out the link provided below. The ZHome.com site has TONS of valuable information, and a great Mail list covering all Z's. Bambikiller240 says, Check it out! Good Luck! zhome.com/History/colors.html
-
Thanks for the reply peterc! What build date is your 72 240Z? What is the original color? Have you chaged it durring the restoration? Mine is 11/71, Metallic blue, not restored (yet, some day I know to do it!)
-
Here's a photo of the Short lead type. Thanks, Carl
-
Can anyone tell me from experience which HAZARD Switch I need for a 1972 240Z? Long Lead or Short Lead type? Thanks Carl
-
After the POR-15, I applied a coat of their ChassisCoat Black Product (supposed to be a super tough paint) inside and out. That is as far as I've gone, to date. Many people say that you should not use undercoat, as it can trap moisture and hold to the body panels. I'm leaving my car as is for the winter so I can observe the panels. Assuming no signs of recurring rust, in the springtime I'll probably apply a light coat of some kind of undercoat. Not sure what to use either. Also still looking into options for replacing the Tar Mat insulation on the interior surface. If anyone has had great results, or advice please post. Thanks!:classic:
-
EScanlon/All: Heck no it doesn't sound like obsession. Sounds like a smart move to me, of course; I did the same with my floorpan. I used the heat gun and non-metallic scraper to remove 99.9% of the undercoat and Tar Mat, and then wiped the remaining traces of petroleum bits off with Acetone. Then I went to the Marine Clean and Metal Ready, followed by POR15 (inside and outside). It's the sort of job (like outer spindle pin R&R, or Fuel tank vent lines) that you do CORRECTLY the first time, and don't have to do again for 20 years, if ever. Hapy Turkie Dai All !!
-
When I went aftrer the beginnings of "cancer" on my Z's floorpans this past summer, I bought a 1600 Watt Hair dryer and used that to soften the Matt and Undercoating that I wanted to remove. It worked great and I was able to peel large strips off the car with very minimal effort and NO gouging or other damage to the metal. The dryer works great for shrinking HeatShrink tubing when doing electrical repairs/mods too. Only cost $12 at Wal-Fart!
-
Easiest to fit is a 240Z radiator re-cored with a 3-row or 4-row core. A 280 radiator will fit, but will hang down lower than the 240 unit. Holes in brackets of a 280 Rad may need to be "adjusted" (ovalled or redrilled) to match the holes in the 240 Radiator support. You'll need to use the lower rad hose for the original car the rad you use came from. ie 280 rad, & 280 lower hose, OR 240 rad, & 240 hose. Good luck Carl:sleepy:
-
You have just discovered one of the main reasons that the FEDS mandated the 2.5 MPH, then the 5 MPH bumpers beginning in 1973. Not that they help tremendously, but they certainly ARE an improvement! Enjoy the Ride! CarlROFL
-
As 240Z indicates, or his Link, I should say; It is fairly easy to remove the mirror. The key is to have the window in the rolled up position, with the moisture barrier plastic pealed back or removed, and the door open so that you can reach up through the hole in the inner door panel with a socket attached to an extension. Like most things, Once you've done it, you'll realize how simple it is. Good Luck with your project! Carl
-
Hey Marty: First of all, I should say that I'm refering to a 1972 240Z. On my car the sender is at the front wall of the gas tank, on the passenger side of the car. There are two wires that connect to the sender unit and they ("it" the sender) are quite obvious. A circular lock-ring compresses the o-ring which seals the sender to the front wall of the gas tank. Use a flat blade screwdriver against one of the tabs on the lock-ring to rotate the ring. The ring will then come loose and the sender can be removed. The float of the sender is on a long arm, so be careful as you pull it out so you don't bend the arm. Major Warning!! The fuel tank must be almost completely EMPTY before attempting this Check a Haynes or FSM for more detail. If you have further questions, let me know! Later, Carl
-
There is a specific O-Ring available through Motorsport Auto, or Nissan (if still available) for the purpose. I believe that any O-Ring of the correct diameter and thickness will work. The diameter should be easy to figure out with the sender removed, you'll see an indentation around the opening for the sender, as for the thickness, I don't know how thick it needs to be, but since o-rings are not too expensive, I'd get several thjicknesses. THE ONE THING TO REMEMBER if using a generic O-ring is that it needs to be made of a material that is designed for use with gasoline. If it is the wrong material, it will dissolve in short order and the leak will be back. Check with local parts dealer or........ My reccomendation is to get one from Motorsport Auto. P/n from MSA is 11-3280 Catalog says multiple applications, so you'll need to tell them what year car you have and maybe the Mfg date to get the right part. They are at 1-800-633-6331 and are open short hours on Saturday for ordering. Good Luck Carl
-
aapiss: Your post doesn't mention whether you used the required O-ring when you installed the sender unit. If you didn't, well there is your problem. If you used the old O-ring, it must be in "perfect" condition? If it is not, there is your problem. The O-ring MUST be used and MUST be free of nicks, squashed areas from bad mounting attempts, or other abnormalities. Best bet is to ALWAYS use a NEW O-ring when removing and replacing the sender unit. It is very cheap insurance against leaks. The sender can be removed and replaced without removal of the gas tank. Not trying to insult your intelligence or Z knowlwdge, but the O-ring is critical, and frankly, your mention of not using a gasket has led me to my questions about the O-ring. There is no need for a "gasket", you DO need the O-ring! Careful installation of the sender with a new O-ring is quite simple and is almost always leak free (unless the sealing flange of the gas tank is damaged). The primer should have no effect on the mounting or sealing of the sending unit to the gas tank. Let us know how it comes out! Carl:classic: