


dutchzcarguy
Free Member
-
Joined
-
Last visited
Everything posted by dutchzcarguy
-
 Yes, there is a official service anouncement made in 1973 that the 1973 240z engine L24 had a different head as the pistons go ABOVE the deck! Watch out for this, it's just a small part of a mm but they go above the deck!
 -
What i remember from a 260z driver in the neighborhood.. the flattop needed a lot of tuning.. After a few weeks the idle was AGAIN to high.. they were sick and tired of them.. I never took a set (on my attic!) apart.. i bought them years ago cheap just to see what kind of trouble makers they are.. My view so far.. they are made to complicated.
-
Like the OsGiken.. the costs will ad up to 20 grand.. is my estimate..
-
You have to put the lugnuts all on before you tighten them.. Also i discovered there are different diameter shafts on these lugnuts. I don't think your bolts are bend. These lugnuts with the shaft are a pain to install.. but it's do-able if you wiggle the wheel. but first take a calliper and measure the diameters from the holes in your wheel and the shaft of the lugnuts. That there are also lugnuts with longer/ to long shafts is new to me! (So i leant something today.. Yay!! 😉 ) If the lugnuts shaft is to small, that can absolutely give some clunking noises! Good luck! Mart.
-
Even when it would be available under 10 grand (Dollar or Euro) it's a big investment.. On the other hand it's a big change in power.. i guess? (From 150hp SAE to 300hp DIN?) (Most people forget that our 240z's engines power is measured in SAE NOT DIN. (150 SAE is about 135 DIN Horsepower?? I estimate..)
-
Hahaha.. On MY desktop computer i get 2 plus 1 under those 2.. (on 100% ) But when i set the enlargement to 90% then i get them (3) on a row! 100% gives 2 with 1 under the first pic. At 150% i get them in a vertical row.
-
btw i drove 20-22000 km with the one set of contacts..
-
Don't they protect the ign.points so they don't ware out faster? My 240z has the one on the ignition standard and i used the last 24 years one for 20+ years and it was still good but i installed one new after 20 years.. Cap. is still the same.. I think the points spark less with the capacitor on?
-
No need, i'm driving my 240z for 24 years now and no rubber cover.. maybe you could spray some lube in them every 5 years.. that's all it needs!
-
A picture of the rounded out hole in this little axle would be nice, also.. often you can see the problem on a picture better than with the (older) naked eye! (I don;t know your age but when i need to look at such a problem i shift my contactlens in one eye and i can see everything very clear on about 4 inches distance Hahaha!! Never lasered my eyes as this is a great solution to looking at very tiny things!) 👍
-
I guess that the cable does not take on the rotation of the nylon pinion, so the hole in the pinion axle must be rounded out.. get another pinion with 16 tooth gear. (Yellow/greenish color i believe..? as every different number of teeth gear have different colors?) Yup.. see this.. (WOW!! 75 bucks CRAZY!! happy i got one new in my partsdepartment! pfff...)

-
The single one on my 240z is now 53 years old and isn't it unbelievable.. is still working correct! Yup.. old is better! 🙂
-
Maybe the insert is lead? To make the piston heavier? Now it will come up slower and drop faster? just a thought..
-
Pretty good money? Far to much for a fake Ferrari.. It's a chassis of something, (In this case a 280z) and a "dress" stolen/copied in fibreglass of a bloody Ferrari! 30 grand AT THE MOST !! (It's one big pile of FAKE!! and btw, i would appreciate a original 280z in good condition more!)
-
For as far i know.. we (Dutchies) call it pertinax Pertinax, also called FR-2 or hard paper, is an electrical insulating material consisting of layers of paper impregnated with a phenol - formaldehyde - synthetic resin. Pertinax is electrically insulating and has a high breakdown voltage. The thermoset was developed during the First World War.
-
Yeah, think that's better, best would be on the outer side of the flywheel.. but i read that's not very often done..
-
I'm no expert yet.. on that.. but isn't there the option to make it without a distributor, and use 6 induction coils and some sensors for timing? As those old distributors have theire problems after 40-50 years i would go for the "modern" approach!
-
Okay then! If you have a line not working and you can find the point were it's broken, silverglue is the solution to repair that! It conducts electricity and is made for this. Use a magnifying-glass when you aply it.. it needs just a very very small amount of it! (So.. if you measured 3,4 ohms, it looks to me as the early cars like the 240z have lower resistance (more current) and the later 280zx had about 4-5 ohms so a lower current/amperage.. )
-
Have you checked the resistance (ohm) from the heating? Could be that your spare has a better resistance, It should be somewhere between 2 and 4-5 ohms. I had to buy 4 rear hatch glasses before i had a really good one! (Less than 5 ohms and every stripe worked after checking with some steam on a cold glass) Does your glass need some black glass adhesive (That black rubber compound that stays sort of liquid) to make it water tight? I did some into the rear weatherstrip after i installed it.. (Not a brand new weatherstrip)
-
Mine are correct installed.. but so worn that if the wind is standing really hard on the front.. they wipe also partially the side window!
-
Btw, your doing great work!!!
-
That's what i was thinking! You need to have some load like holding the outgoing axle with one hand turn the ingoing with the other hand. I wonder if after some wild pulls it will stay good when you have found the correct shimming.. (Hihi Wild pulls.. i remember that i was at the stoplights with my fireblade long ago.. I put every horse it had on the rear wheel.. i had to bow over the front wheel otherwise it would easely have been knocked backwards! 🙂 Later at the dealer he said: you must be a slow guy at the lights.. you have pulled 3 !! bushings out of the original HONDA-chain! Hihihi ...) What i mean is, as it needs to be exactly right, will it stay right even after some (abuse like) pulls? It's a lot of work to install, test it and take it out to check but i would like to see if those teeth are still working spot on after some "use".
-
Eh.. first weld the tab and thén put the heat shrink stuff on.. now you will burn that.. So first weld the tab, then spray them in color of the car and then put the heatshrink stuff on.
-
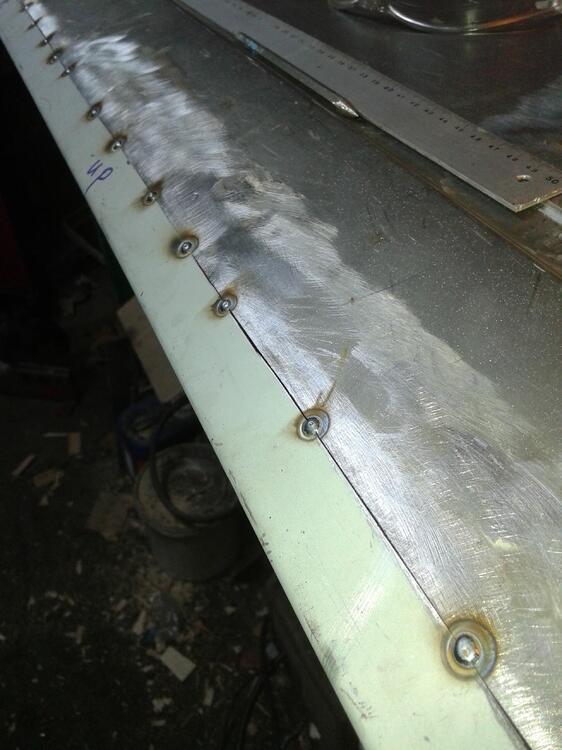
Hi, If you don't have enough penatration you need to go from step 2 to step3 but weld just for 1 second at the time.. lay small welds after each other. Normally when you weld thick steel you can weld for say a minute, but thin steel you have to make small short welds.. Also, welding is putting a current through your cables and the steel your welding.. You have to keep in mind that if you have the earth clamp further from your welding work, that welding current also has to travel further and that extra resistance also reduces the welding current, so the shorter you are on your weld with the earth clamp, the higher the current will be. .. by placing it as far away as possible you create a kind of step 2.5 on your welding machine. Just be sure that your clamp is making good contact to your chassis. Make small welds and as far as possible from each other, especially when doing something like this door i repaired.. one weld left one to the right then one in the middle.. let it cool down, and weld one left one right, let it cool down and lay some weld between.. cooling down can be done with a damp cloth. (Not to wet. but not to dry 😉 ) To be a good welder takes years, it's a matter of trail and error! Once you understand how it works you get better and better in it!
-
Hihi.. my 240z still is driving without those.. for 24 years now.. squeeky.. yes. but it still works. never took the time to restore them.. may be in the next round! 😉 As long i use them there is no problem.


