Captain Obvious
Community Member
-
Joined
-
Last visited
Everything posted by Captain Obvious
-
Were the hinge detent wheels worn on yours? I've got flat spots on mine from years of them not spinning properly and sliding instead of spinning. I've got a spare set of hinges here that I intend to rebuild before installing, but it's lower on the priority list.
-
Alton Brown is my cooking hero. My son now even records old Good Eats episodes and shows me things he wants me to make for him. "You should make this for me" he says
-
Haven't they been known to pick a song or two?
-
Ewwww... Really? I'm so, so, sorry, but I have to hate you now. Crap. That's incredibly inconvenient.
-
-
Sweaty, I know it's not the end of the world, and I'm actually less connected to this kind of stuff than many (most?) people are these days. Just bugs me that they lured me into putting all my eggs in that basket and then after I was hooked, they started charging an unreasonable amount of money. I was out in the Z yesterday, and the old song "The Pusher" done by Steppenwolf came on the radio. Made me think of Photobucket! Mike, I know I could put all my photos here, but not all of them are Z related. I do put some here though, if they are specific to this forum. Doesn't seem right though to put pics here and then link to them from a different Z forum. I know it's OK, but it just feels like cheating.
-
Could be, but I've not turned up a comprehensive catalog that has pics and reliable dimensions. I decided on the Escort core because it was the thinnest, smallest, most generic, cheap core that I could find with tubes that stuck straight out on the same side. No long funky bent tubes. No weird mounting flanges. Generic, small, thin, and cheap because it's from a ubiquitous cheap car that was produced in high volumes. There could very well be something even better out there, but finding it is the hard part!
-
History shows again and again how nature points out the folly of man. Great pics Zup and Happy 4th!
-
Haha!! Sometime, my friend, I'm going to make it to your neck of the woods and we can have Poutine and Beer. Guaranteed good times.
-
Happy Canada Day!! Is that an occasion for Royal Pudding? As is tradition?
-
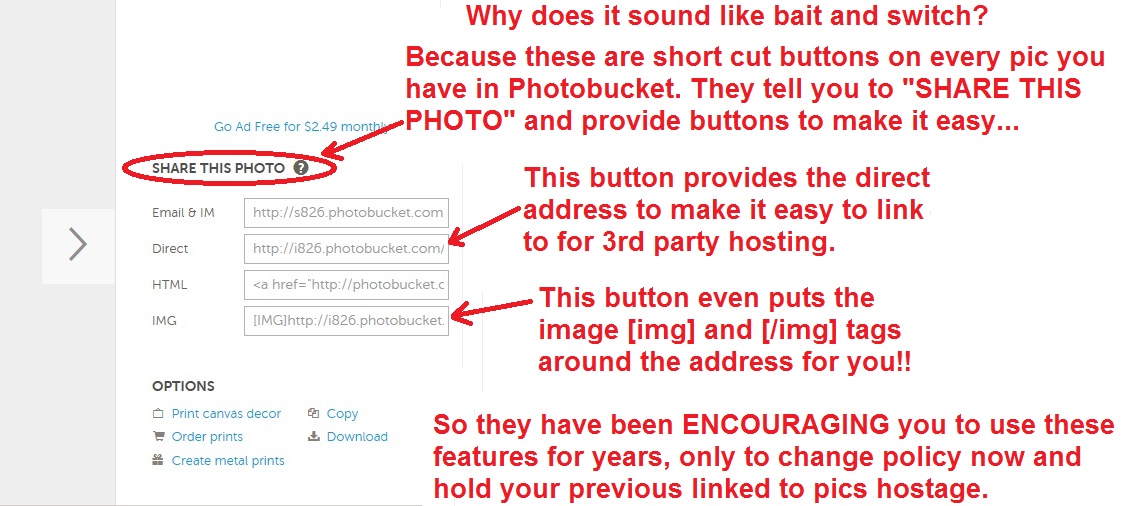
I'm not sure I was completely clear before as to why I question the business practices at play here. Here's a snippet from any photobucket pic that I have uploaded. On this pic you can see the easy to use short cut buttons they provide. You simply click on the type of address you want, and it's loaded onto your clipboard, ready to paste into the forum of blog of your choice. They tell you on that same page "SHARE THIS PHOTO", and provide you the means to easily do so. They have been ENCOURAGING THE SHARING OF THE PHOTOS FOR YEARS!!!!! And now, once you are mired in so deep that it would be a huge pain to change course, they change their policy and hold your links hostage to the tune of $400 per year!! I'm not happy.

-
Yeah, that was me... Here's the thread, but it's mostly useless because Photobucket SUCKS: http://www.classiczcars.com/topic/56726-heater-core-alternative-escort-core-into-260280/ Used to be loaded with pics, not all you get is this:

-
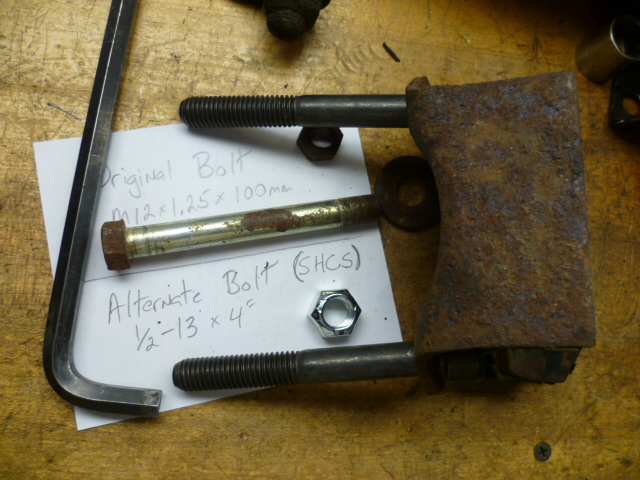
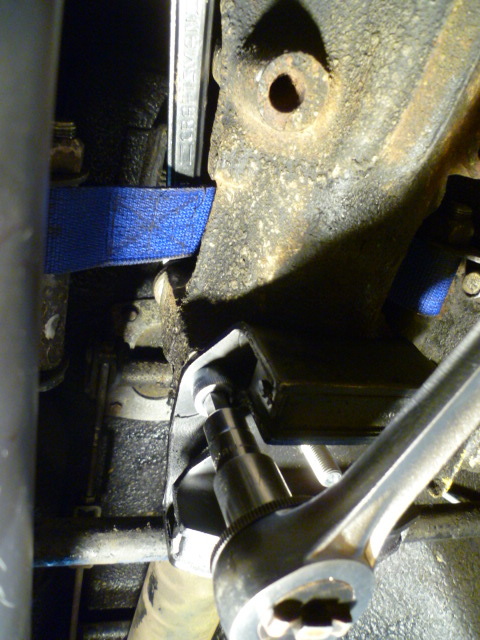
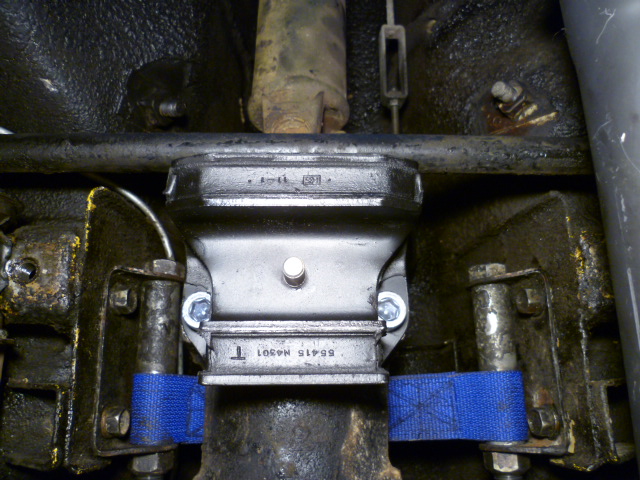
When I was messing around with my diff, I replaced the original mount hardware with socket head cap screws coming up from the bottom instead of the original hex head bolts. Here's the thread where I was talking about all of it. Thread is pretty much useless now because all pics are dead because Photobucket SUCKS, but here it is anyway: http://www.classiczcars.com/topic/55955-my-new-diff-mount-and-strap-project/ The bottom line is if you go through the effort to take the front diff mount off, I would use different hardware when you put it back on. Here's a couple pics showing the idea:
-
Patcon, I know I could put the pics here on Mike's site, but many of what I have out there isn't specifically Z related. For example, the last pic I posted was my liquid level manometer that I was using for my motorcycle carbs. While it isn't Z car directly related, the topic came up, and you can even see a corner of my Z in the pic. I had that pic posted on a cycle forum and I would have to host it in multiple locations instead of just one and linking to it when appropriate. It's reasons like that which make it desirable to have an independent picture host that I can link to. Just not one that blindsides me with $400 per year!!!!
-
Many people believe that Photobucket is hitting up people who are approaching their storage limit. Well I'm nowhere near my storage limit. I'm at about 10% of my allotted capacity. I'm nowhere NEAR the limit. So that rumor isn't true. The whole thing stinks like questionable business practices. After you have upload a picture, they present you with a number of link buttons to get the picture address in a couple different formats: One of these buttons called "Direct", gives you the URL address direct to the picture. This allowed you to use that link address to do what I did... Post it elsewhere. There's even another button called "Image", or something like that, which even puts the tags onto the address for forums that use that kind of nomenclature. You use that button if you don't want to put the IMG and /IMG tags onto the picture address yourself. So why is this noteworthy? BECAUSE THEY ACTUALLY PROVIDE EASY TO USE SHORT CUT BUTTONS TO ENCOURAGE YOU TO DIG YOURSELF INTO A HOLE THAT YOU NOW HAVE TO PAY FOR!!! In other words... They have been providing these free easy to use features forever. You use these features and get yourself mired into a place that is very hard to get out of, and then AFTER you have dug your impossible to get out of hole, they bait and switch you and tell you it'll cost $400 per year to save your butt. I've been looking at their ads for years. Photobucket gets paid by other companies for the right to have their ads pass through my eyeballs. And as incentive for me to look at their sponsors ads, they host my photos. That's the deal. I look at the ads, they host the pics. Then they decide they aren't getting enough from one end and hold my pics and years of built up threads as ransom? Almost as if they had this planned for a long time because they knew it would be impossible for people like me to recover from the change without paying. Unfair business practices?
-
All my picture links are broken. All those threads with my pics in them are now pretty much useless because of Photobucket. They suck. I've been using a free Photobucket account for years. All these years, I've uploaded pics to their site and then linked to them from other places (like this forum). Well, guess what... They just made a changed their policy and removed the ability to link to pics from other locations. They call it "3rd party hosting", and you can no longer do it from a free account. In order to have that ability, you must upgrade to a higher level pay account. In fact, in order to have the ability to do "3rd party hosting", you have to upgrade to their "Plus 500" level account. Now get this.... The cost for the pay account that will allow this linking is....... $400 dollars per year!!! So, I'm really sorry, but my pics are gone. If anyone has a specific thread that they're looking at and want the pics, I'll see what I can do about hosting them somewhere else, but I have so many that there's no way I can wholesale move everything at once. Sorry...

-
If you removed the spindle pin lock bolt and got the pin to turn that easy, then you're already more than halfway done with the job! The rest is gravy!
-
I haven't studied or used the stuff, but it sets off my snake oil alarm. Pour it into the gas tank. Draw it directly into the intake tract. You can even rub it on sore muscles. Puts tread back on worn tires. Cures whatever ails ya! More power to the people who believe they've gotten good results, but I just don't like the sound of it.
-
Let's hope it's that simple. Wouldn't be the first time someone had to go back for another rebuild.
-
Yeah, I have a 20T, and if you've got the room for it, that's what I would recommend. I was just thinking that a little 6T would be good to hide in an apartment closet. Hey, is that a hydraulic press in your closet, or are you just happy to see me?
-
@siteunseen, Stevie and I both missed you at this event.

-
I get more use out of mine than I ever thought I would. I'm really glad I have one. Maybe try a little 6-ton HF A frame design? Light enough to store in a closet and pull it out when you need it? Not sure 6T is enough to do bushings though.
-
Cars don't talk back they're just four wheeled friends now.
-
There should be enough fuel in the bowls to run the car for about a minute with no fuel pump at all, so... I'm thinking it might not be a fuel pump issue at all? By any chance, is the ignition coil power on the same circuit as the fuel pump? If so, I suspect lack of spark, not lack of fuel, may be causing the issue? If that's not the case, and your bowls are actually drying out between starts... I'd be interested as to why that is happening.
-
Q - How much current could you get from a metal star-wheel whizzing by an inductive coil? A - Infinite if the resistance in the loop is zero. Zero if the resistance in the loop is infinite. It's the Law.