
Captain Obvious
Community Member
-
Joined
-
Last visited
Everything posted by Captain Obvious
-
If the tach is jumping around when the problem is occurring, then the problem is electrical in origin (ignition), and has nothing to do with the carbs. It unfortunately sounds like you may have created some more work for yourself by diving into the carbs. Don't get me wrong though... I wouldn't be surprised at all if there were some gains to be had by working on the carbs, but it sounds like the main problem that got you here looking for help in the first place has nothing to do with the carbs. And, also unfortunately, the carbs are like genies in the bottle. And you've let at least one of them out. Now you've got torn gaskets, misaligned needles, at least one malfunctioning suction piston damper, and unbalanced carbs. I'm so cheery to have around, aren't I? Don't worry. There are lots of people here on the forum who won't rest until you're back on the road. When you get your new gaskets, try to get everything back together and see what happens. Have you ever measured the float bowl level? Did @Bruce Palmer ever get in touch with you to help you with the needle alignment requirements?
-
Get yourself some 800 grit valve lapping compound and give the valve surfaces a quick refresh? I've used the oil based stuff with great success. And I wouldn't use the Permatex stuff available at all the auto parts stores. Water based, and too coarse. Especially for a simple clean up job.
-
12-24? Seriously? That's evil. Sure it exists, but nobody ever uses that size! Honestly, I suspect they are really M6-1.0 but there is rust in the threads that make it seem as though the M6 is too big. For the record... M6-1.0 (converted to inches) is .236 x 25.4 TPI And (according to a quick web search) 12-24 has a major diameter of .216 in. So 12-24 would be .216 x 24. So 12-24 (converted to metric) is M5.5 x 1.06 I bet you could run a M6x1.0 tap in there and clean up the threads. Or maybe you could give a M6 x 1.0 bolt a quick hit with a file and knock the crests off the threads and it might fit? I'm certainly not saying it's impossible, but I'm just very skeptical they did that!
-
LOL!! Can't wait to see you again in Atlanta my friend!!
-
Using sandpaper to remove even more material from needles that already have unintentional material removed from them probably isn't going to help. To be honest, I'm a little lost on exactly what problem it is that your are chasing... Can you restate the problem you are trying to fix? Maybe a fresh start will help.
-
-
-
Haha!! I agree. It sure sounds logical at first blush, but I don't believe that it actually holds. Sure would be nice if it worked that way though!
-
I think riding 1mm higher on the needle will have a significant effect. Much more effect than described above. Easy to test... Hold everything else constant and crank your nozzle up one full turn. I think the mixture change results will be stark. And in contrast... Not so easy to test, but if you were to drop the fuel level in the bowl by 1mm (.039 inches), I think that most people couldn't even tell the difference. Either in mechanical measurement, or in performance of the vehicle.
-
-
I know they don't need to match. I'm just coming from the mindset that it's always easier and cheaper to make two of the same thing than two different things. One less CAD file to work the bugs out of. One less dry run walkthrough on the CNC mill. One less prototype part that needs to be made. One less part that needs to be tweaked to work as intended... All of that. I know it's just disposable time and money. More power to you if you have enough of both. As for the mounting bracket holes... Are they deep enough that you could leave a thin wall at the bottom of the hole (so they are blind and vacuum tight) and then pierce through that thin wall in the few locations where you need a vacuum source? You could do that final poke through drilling at home with a hand drill if necessary. Not a precision operation. That could give you best of both worlds? Lastly... If this project actually does come to fruition, please keep rough tabs on the costs? I'd be interested in a final tally to use as a benchmark for a potential project of my own.
-
Ooooo... Someone has had some CAD training! Nice pics! Are you thinking you'll CNC these out of a chunk of solid material, or are you thinking you'll have something cast? Also, some other thoughts: So is there a really, really good reason for the placement of the throttle shaft bearings and the associated mounting bosses? At quick glance, it appears that you could share the same manifold between front and rear positions if you could standardize the location of the throttle shaft mounting bosses. You really couldn't live with that front throttle shaft cantilevered another inch further forward for the sake of completely getting rid of a unique part? Maybe split the difference in bearing locations between first and third? In other words... I know the center manifold needs to be unique, but it sure looks like you ought to be able to share the same base unit between the other two. Also, are the holes for attaching the mounting bar between the three manifolds... Are they all the way through into the intake tubes? If they are all the way through, you'll need to make sure they are vacuum tight even on the locations for the mounting bracket. If they are blind, you won't have to worry about sealing them. Sorry. Forgot to ask. Is this a design review?
-
My thoughts are that I don't think you can equate those two things like that. Two completely different factors and not necessarily linear or equivalent. I'm no carb expert, but I would not agree with that theory even a little bit.
-
So the two prongs on the 78 are supposed to be on-off, and variable resistance. You're saying the 78 style sensor you got from rockauto does not operate like that? There's always the Fiero.
-
Well it's too late for me now, but if I were still looking, I would certainly take a look at your car. All things considered, it looks like it may be a better starting point to build on than what I ended up with. But that's water over the dam for me... I better stop thinking about it. (So how much rust is there on the wheel arch? Did they miss that area with the rust preventative spray or what?) So I'm absolutely no car buying or selling expert, but when it comes to Z's, it seems there are a couple different camps of buyers. 1) Those who want an early car - Your car cannot ever satisfy that family of buyers with a 280. They want a 240 only, and the earlier the better. 2) Those who don't car much about the year but want something that looks exotic. Customized. Fender flares, wheels, and lots of bling - Your car does not fit this category either. 2a) A sub category of the above would be those who are planning to rip it apart and turn it into something exotic looking. That group would be mostly concerned with price. 3) Those who want a factory stock car - Your car would be closest to this family, but unfortunately most of the buyers in this category are also in category #1 who want an early car. In other words... Everyone wants a factory stock 240. The demand for a factory stock 280 is much less. 4) Those who don't care much about anything except for the fact that they can get in and drive on day one without having to mess with it - Your car may also fit this category. All that said, maybe you're marketing it wrong... I wouldn't talk about the things that are wrong. I would tout the stock originality (original numbers matching and even has the original wheels and shift knob) and the fact that "if you're looking for something you can jump into and drive today, without having to mess with it." I would call it "a survivor". My cut is 5%.
-
Looks great! And one of the best parts is now that you've done it, you can get a cheap reliable replacement core if necessary! That was my conclusion as well. Trimming and re-beading the tubes makes the hose routing a little more forgiving, but it's not a requirement. Not everyone needs to build themselves a bead forming tool.
-
Pics or it didn't happen. I wish I had the room for more than one. And I've got so many repairs and customizations/improvements in my car now... I'd hate to have to repeat them all! So, I have a question:
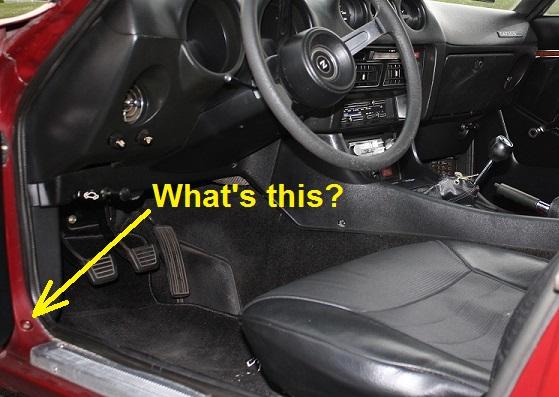
-
Haha! Ok, so forget that about it being 77-78. It clearly started before that!
-
GLWS. Looks like a good example of a well maintained stock vehicle and I hope you find it a good home. Kinda surprised it hasn't been snatched up. How long ago was it painted? Did you do that or did it come to you like that?
-
Instead of a destination country thing, I could easily be convinced it's a model year thing for 77-78. As previously mentioned, the 77-78 look they look pretty much the same (from the topside) as the previous years, but in reality they are almost a different car. Completely different main body shell stampings.
-
I haven't checked my car, but my assumption is that it's not a Canadian thing and my car has one as well. Smells like maple syrup maybe?
-
Its not cosmetic or fumes. (It's not sealed, and you can't see it normally). I'm guessing some sort of safety agency requirement. Something like "there must be a metal layer between anything containing fuel or vapor and the occupant interior." maybe? Only other guess would be noise reduction?
-
That rubber cap simply covers the adjustment screw for the throttle opener regulator. On the radiator end of that device there is an adjustment screw* to control the setpoint at what differential vacuum (manifold - atmospheric) the throttle opener pulls on the throttle linkage. * At least there is on later years... I don't know if such an adjustment was brought out to the user on such an early car.
-
If everything is working properly, the pistons should be hard to lift with a finger, but should fall easily. So the one that lifts easy has a problem. Something is wrong with the check valve jiggly bits on the end of the screwed-in stalk. Also, I'm not sure what you meant when you said that the rear carb has a return spring... If you are talking about the spring pushing the piston down, then they should BOTH have springs under the dome. Other thoughts? I don't like the looks of at least one of your needles. It looks like it's installed too deep into the piston, and it also looks chewed up and worn some at the hilt where it has probably been rubbing against the nozzle. The nozzle looks to be worn oval as well due to that contact. Dome/Piston/Needle/Nozzle alignment is very important, and the three screw round tops can be a problem if someone has cut off or dug out the dome alignment nubs (as has been done to yours). @Bruce Palmer Can describe the process necessary to align the domes (and hence the needles to the nozzles), but remember that each and every time you loosen or remove a dome, you must go through the same alignment procedure again. Here's your pic with the needle that looks worn: And here's your pic with what looks like a non-round nozzle hole that has been worn by contact with the needle:
-
Agreed. The most difficult part of the whole thing would be material selection and heat treat spec. The shims pictured were cut off as disks and then the groove in the bottom was cut in with an end mill, not ground. You can see the tool swirl marks and the line near the middle from the two pass process to remove the bulk material. My assumption is... Cut off raw material to rough length. Mill groove. Heat treat. Grind flat side to final thickness. Laser etch the thickness marking. Coat if necessary.