


Patcon
 Subscriber
-
Joined
-
Last visited
Everything posted by Patcon
-
 Those maybe the holes for the bumper brackets Normally I would try to scab those pieces in behind the radiator support junction, but since yours are wrinkled up high and further back, I might try to come up with a good way to do it where it's easy to make it disappear.
 -
The depressions in Charlie's pans are made on some kind of bead roller. You can see the center point in the middle of the end half circles. I think they will be hard to fabricate with out it. Making a pattern and trying to beat an impression in is only going to stretch the metal and make it oil can. I think you could fabricate the piece of metal under the seat by shaping the curve over a bar or the empty torch bottle after you make the 90 degree bend it. the seat bracket looks good
-
-
It can be difficult to get it disassembled if it's badly corroded. The bolts on the end can be really tight and you need to take care not to damage the aluminum housing. I did not have new seals. I think I came up with some seals to reseal it. It would be in my build thread. Some brake safe grease would be nice too on reassembly. I cleaned everything and obviously replated it all. Be sure you put the correct end in the correct place. You should also test the sensor plug for continuity and isolation.
-
I don't normally worry too much about bolt on mods as long as you keep the original parts. Although some things are a little more difficult to put back original than others.
-
The rocker looks good! I don't think you are gonna be much better off trying to graft in the other nose section. I would straighten the drivers side top flange the best you could. Shrinking with heat where possible. If you can't get the top pflange just right, cut it to remove some metal and mig it back up. It looks like the radiator support is mostly out, so I would drill out the rest and repair the drivers side with a metal patch. I can't really tell how bad the rust is on the passenger side, due to all the different colors. I would rework the top flange on this side in a similar fashion and use a template from the drivers side as a guide to set the curve for the passenger side. There is some adjustment in the headlight bucket holes which will help some. If you had some pristine donor front end cuts, I might go at this a different way, but with what you've got I think that is how I would do it. If you need help spotting the re-enforcing plates locations, we can probably get some dimensions from several cars to get you really close.
-
 the 2 shorter ones could probably pass for brothers
 -
Show me pictures of what you have on the car right now, please.
-
 The one in the background? I didn't see it
 -
Are they running on the infield course or the tri-oval?
-
I like it with the window trim on the 1/4 windows. Compression seems really high, but what do I know. How does high compression with a moderate tune compare to a lower compression with a more radical tune as far as making power?
-
Did the timing light you used have a tachometer on it?
-
Where is it going to be? Wonder how cheap a "redeye" flight is?
-
I did, but we won't know how successful I was for a while longer maybe spring.
-
-
While I was at Zcon in Atlanta I got to spend some time with Gnosez at the car show. It was a lot of fun and very informative. While we were talking, we ended up on the topic of the Bad Dog frame rails that Gnosez makes and markets. John was telling me that when the frame rails get added to the floor boards they should not be fully seam welded. They need to be spotted in with gaps between weld sections. John was telling me when people have disregarded his advise and fully welded the floor seam, cracks have appeared at the roof joint at the top of the hatch. We were wondering about that joint and since Matsuo San was just a few feet away, we went to ask him about it. When we asked him about that joint, Matsuo San said the car needed to "breathe" and they put that joint there at the hatch. The idea was that the movement, from the car flexing, there at the hatch was better than stressing the A pillar and cracking it instead. He also said that since the chrome window frame is not structurally supportive, it needed to be like that. If the door had a real frame around the glass it might have been different. So for those of us, me included, who have considered making that joint more substantial to prevent cracking, that is not such a good idea if you like your windshield to stay in the car. John may have more to add as he was interpreting for me...
-
If the sensor is grounded I don't think bleeding would help, but you could try it if you want too. Bleeding your brakes in a high humidity environment like Panama is not a bad idea.
-
Oh!!!! I left out another favorite @siteunseen, maybe it's because he just made a cameo! I made a list of CZC people at the show and still forgot some!!!
-
I do agree, it's hard to find a rust free Z for 5k. Probably difficult even at 10k
-
I might go back to the "waking the sleeping beast" thread too, based on unknown history. I wonder if there's oil at the valve train. Lots of other little things to check too.
-
You know work is highly overrated, right?
-
I knew about what it was but couldn't find it in the list Also I think I forgot one of my favorites @Mark Maras
-
 This car sounds so good on the track, wailing!
 -
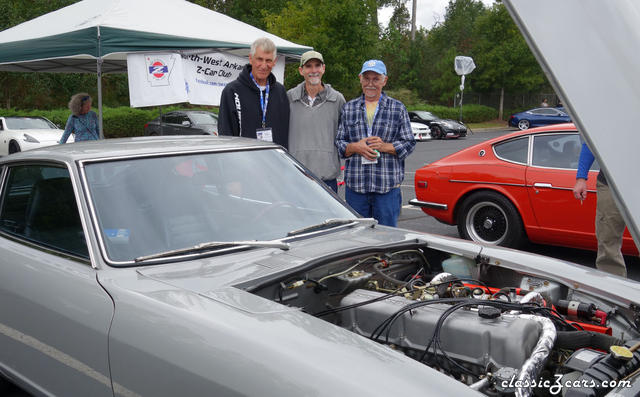
 Randy Jaffe is on the right in the lt blue shirt
 -
Rich, I was sorry I didn't get to see you again after Wednesday! C

