Namerow
Community Member
-
Joined
-
Last visited
Everything posted by Namerow
-
Perth! Well then, that explains everything Your dash surface was pretty badly damaged. It looks like the shop did an excellent job. A bit of a head-scratcher, though, because this type of work typically requires a large vacuum chamber with heat treatment (steam, IIRC) in order to pull the new vinyl overlay down onto the restored form. Did you get a chance to look at the equipment they use?
-
Sorry. I missed the '280' in your user name. I'm not familiar with the 280 heater, so you'll have to rely on other members for help. Having looked at your pictures, I suggest you start by putting some good-quality penetrating oil (not WD40) on any fastener that looks like it's going to need to be loosened. If you do that now, it will same you a lot of grief when you actually set to work on repairing the system.
-
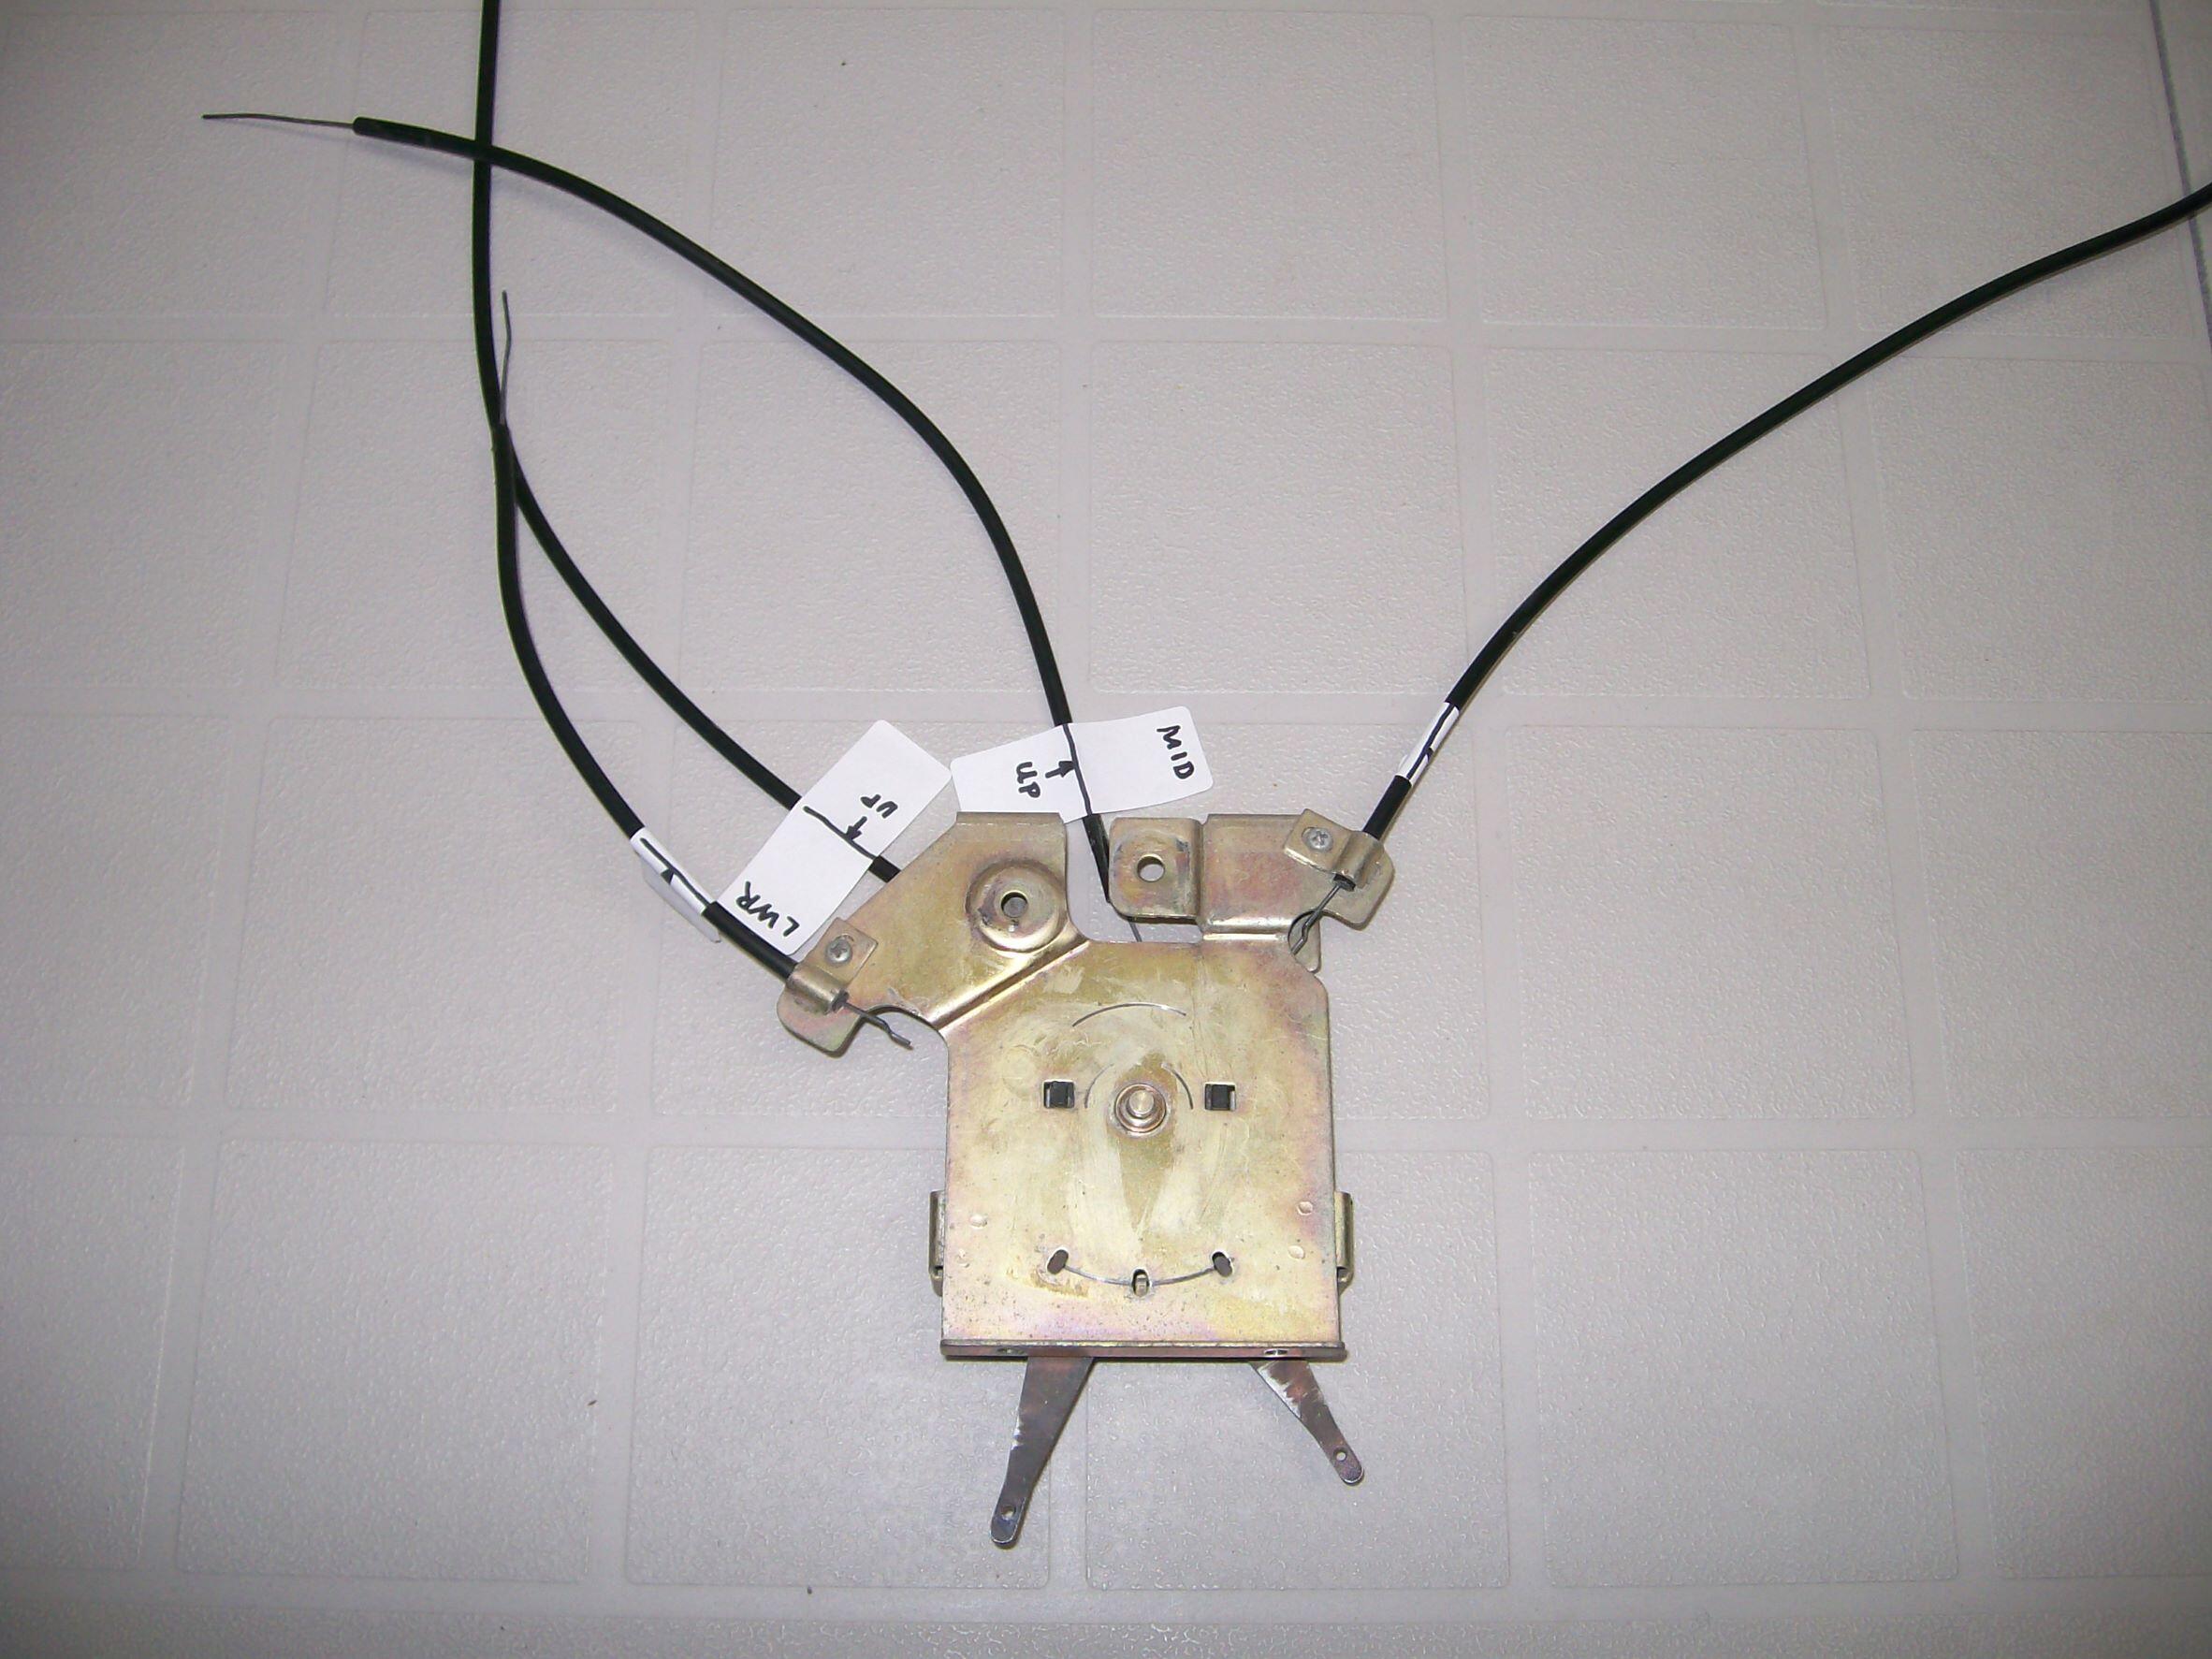
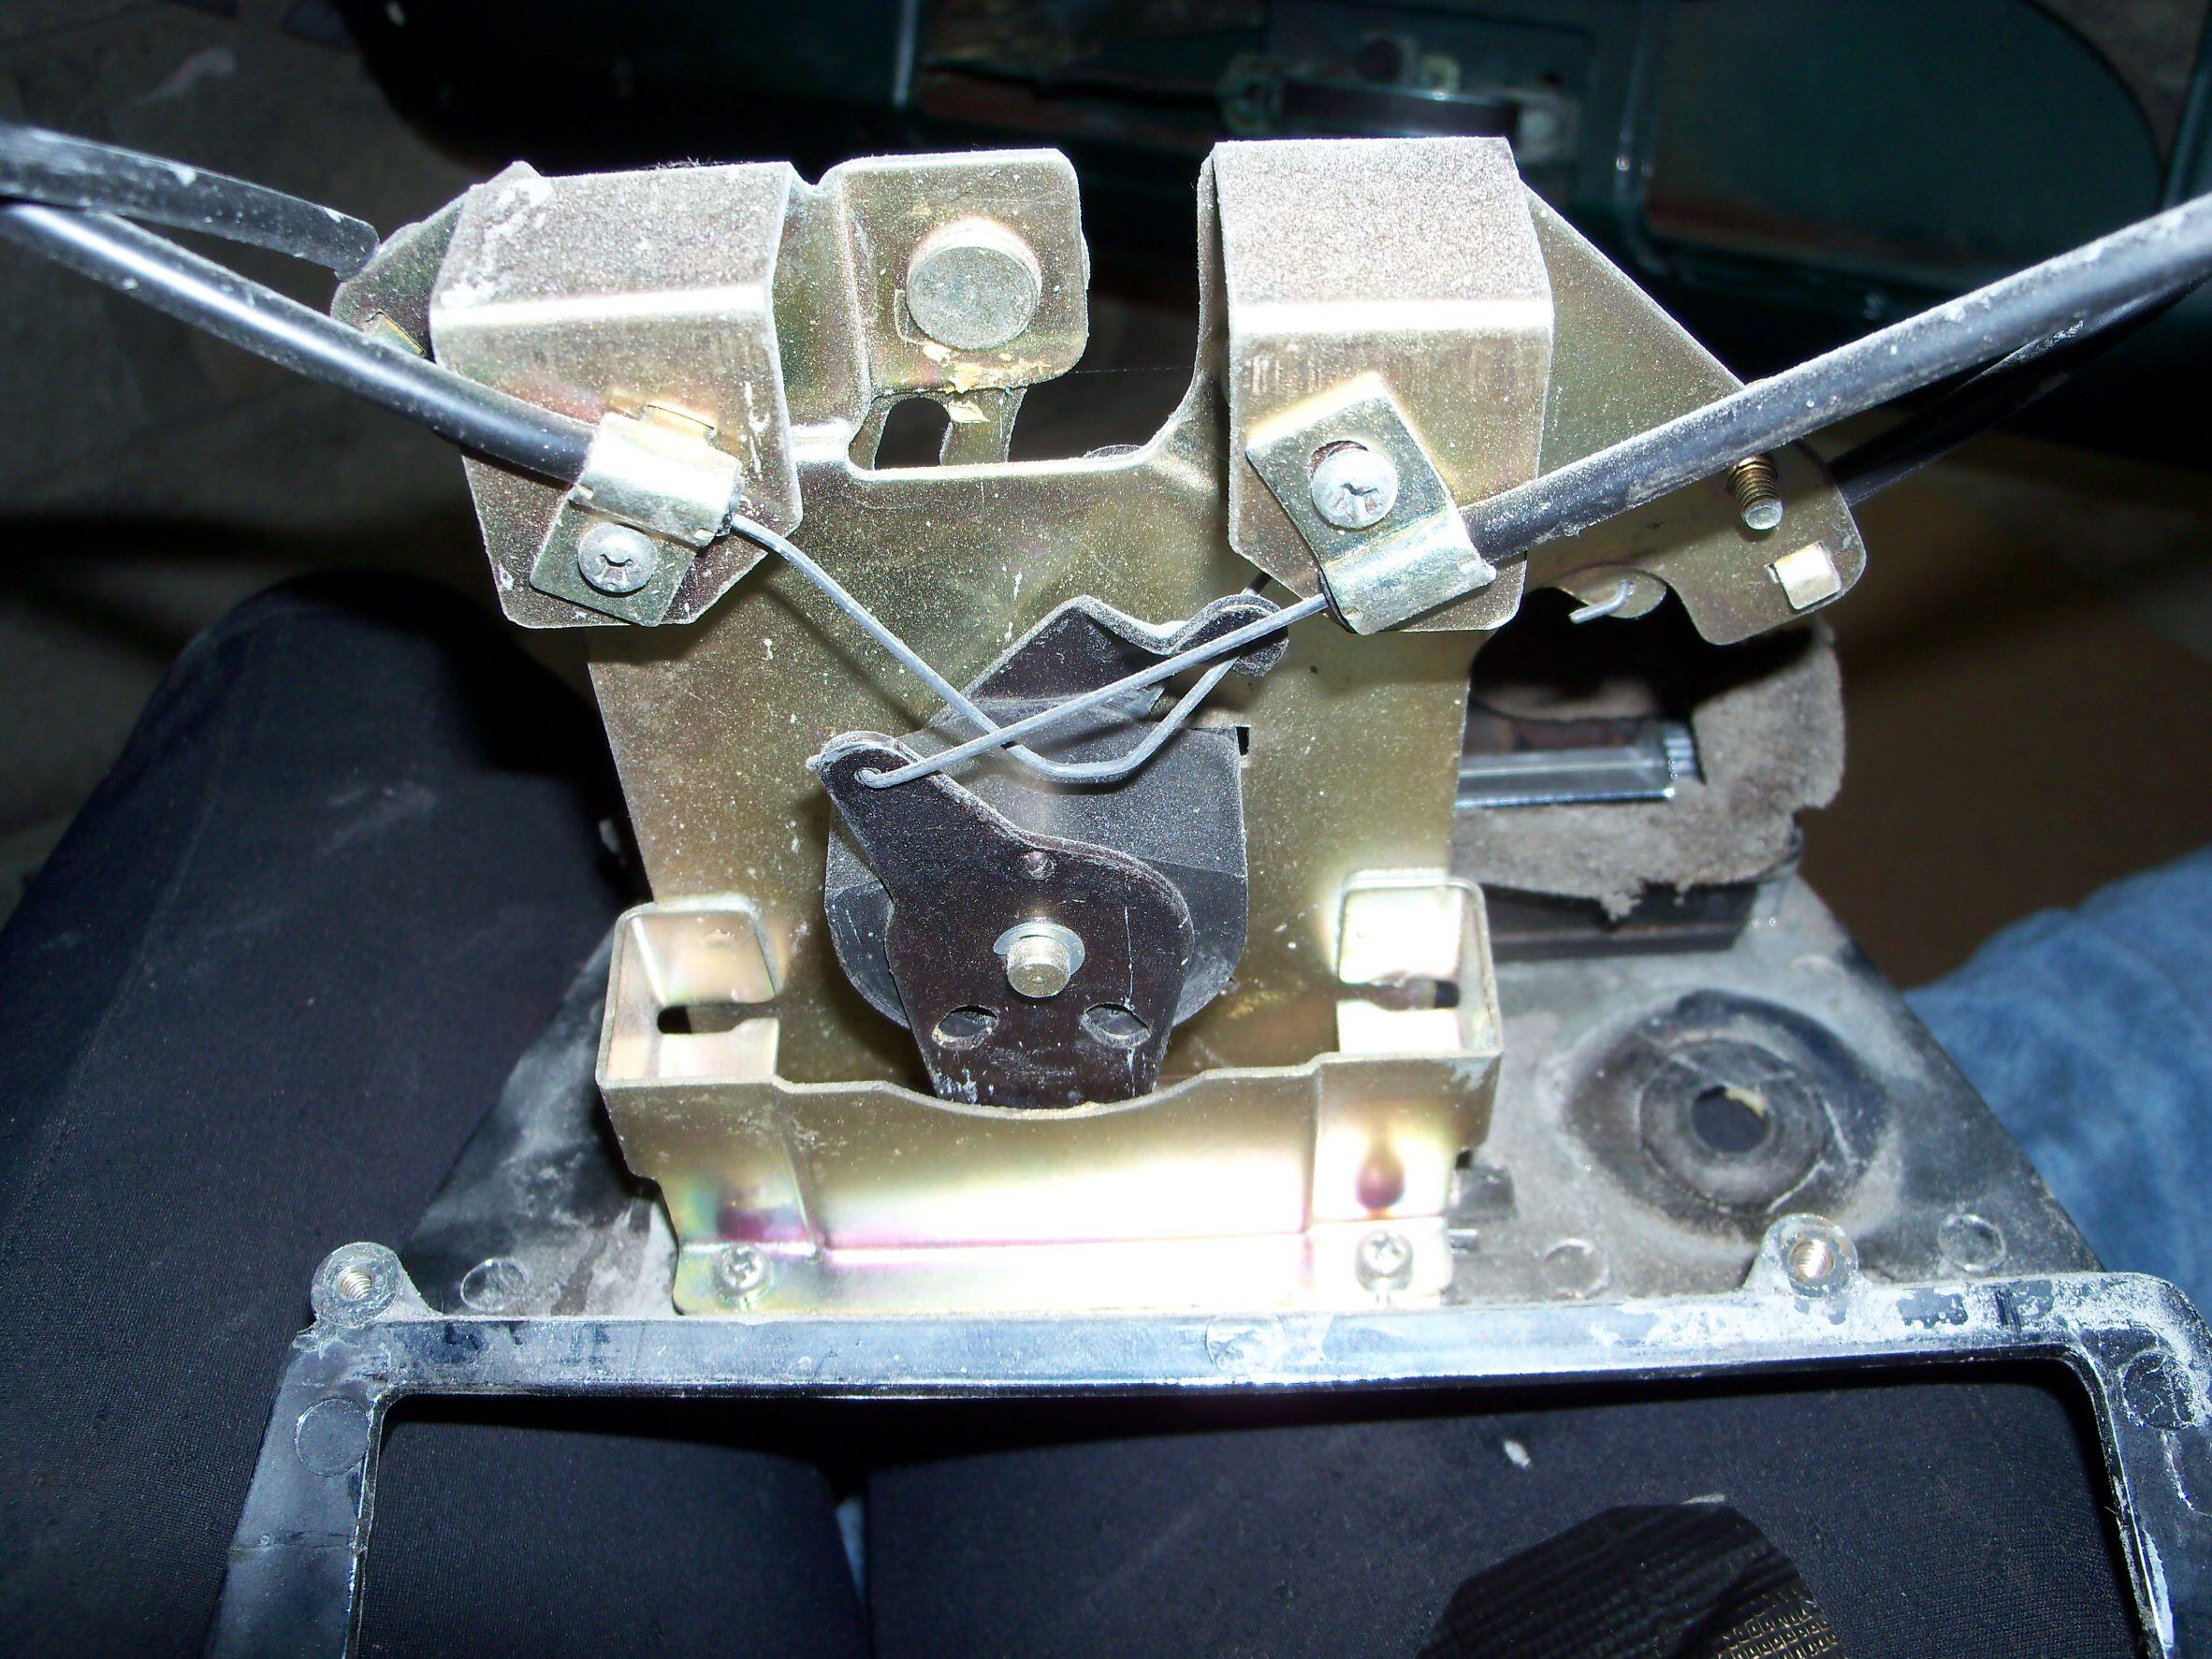
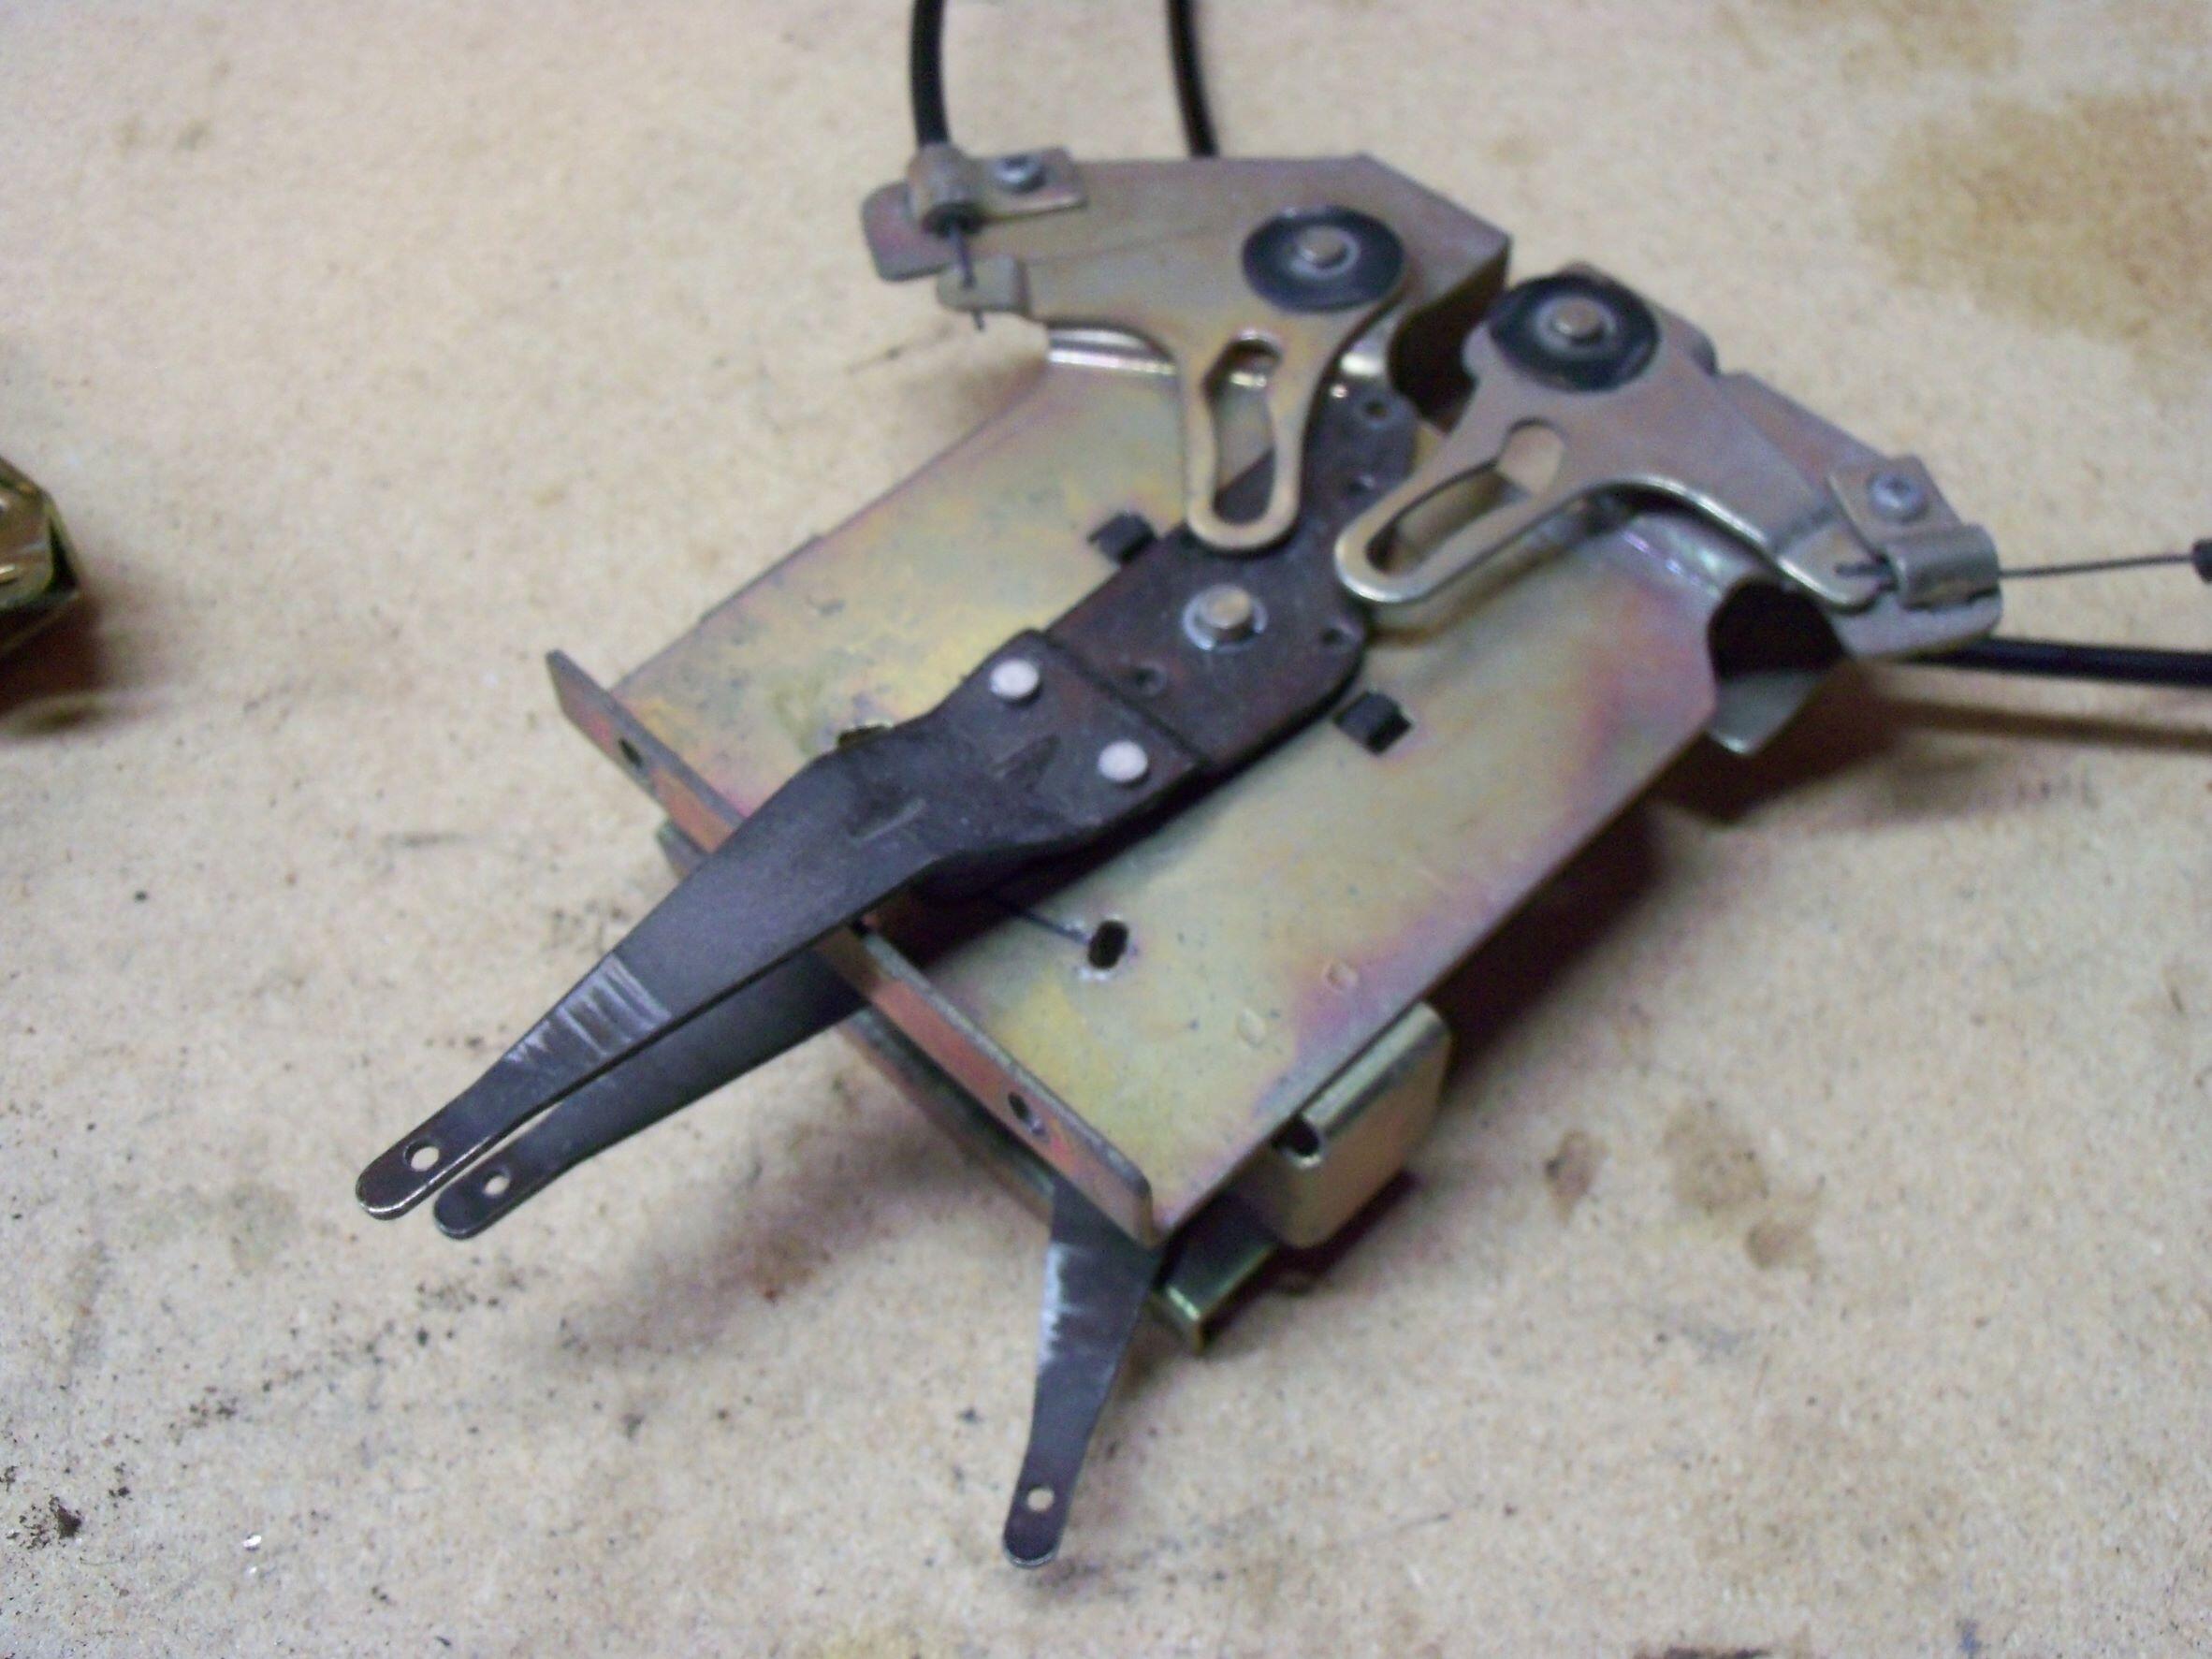
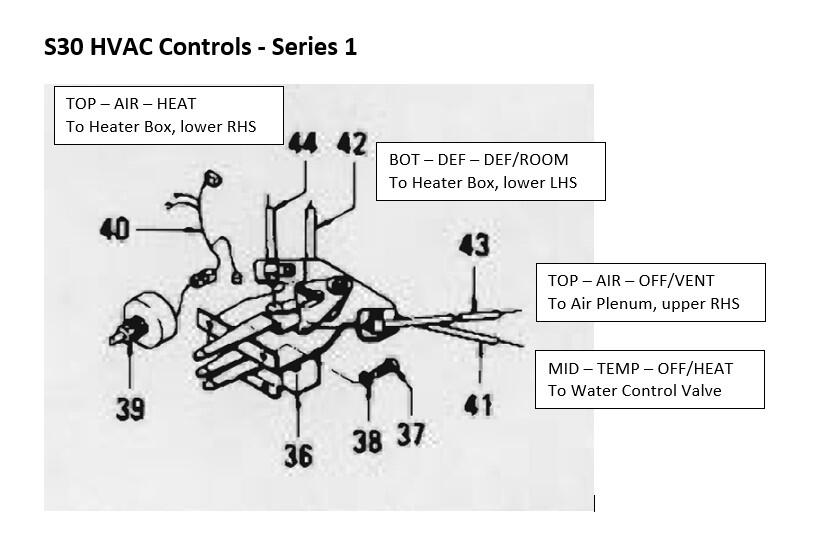
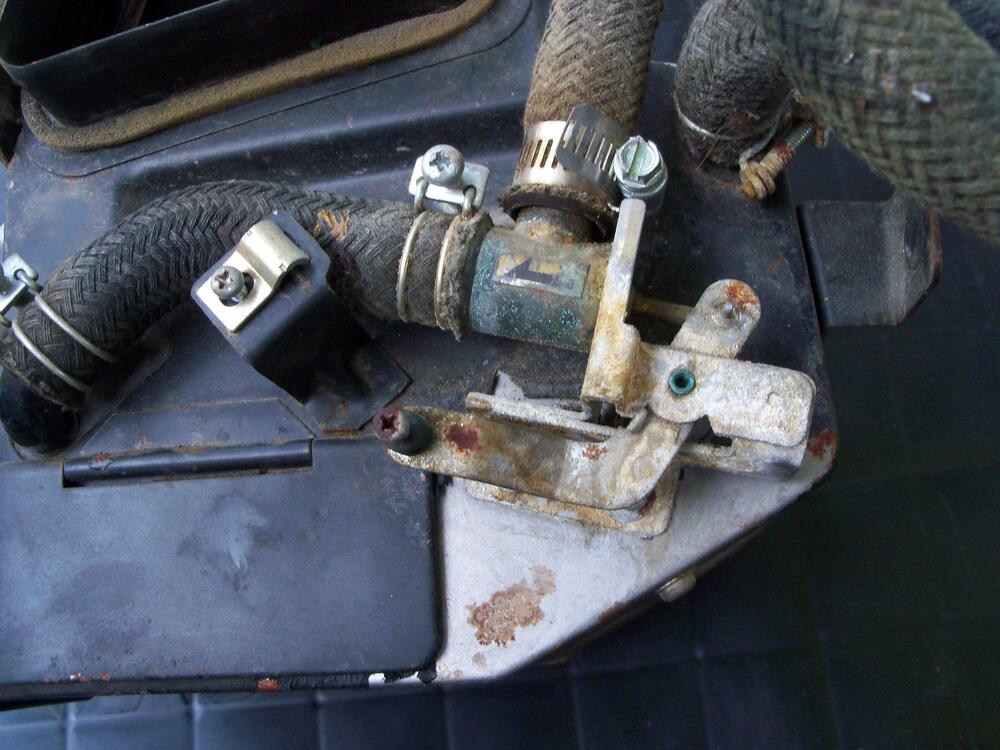
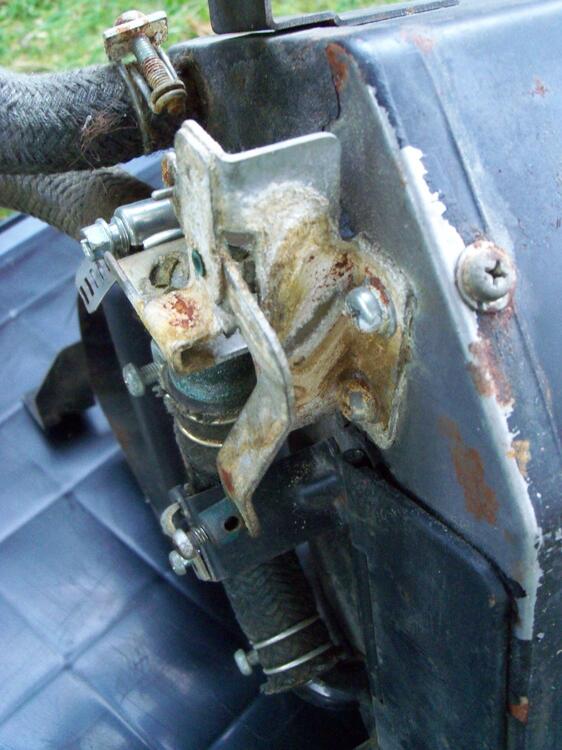
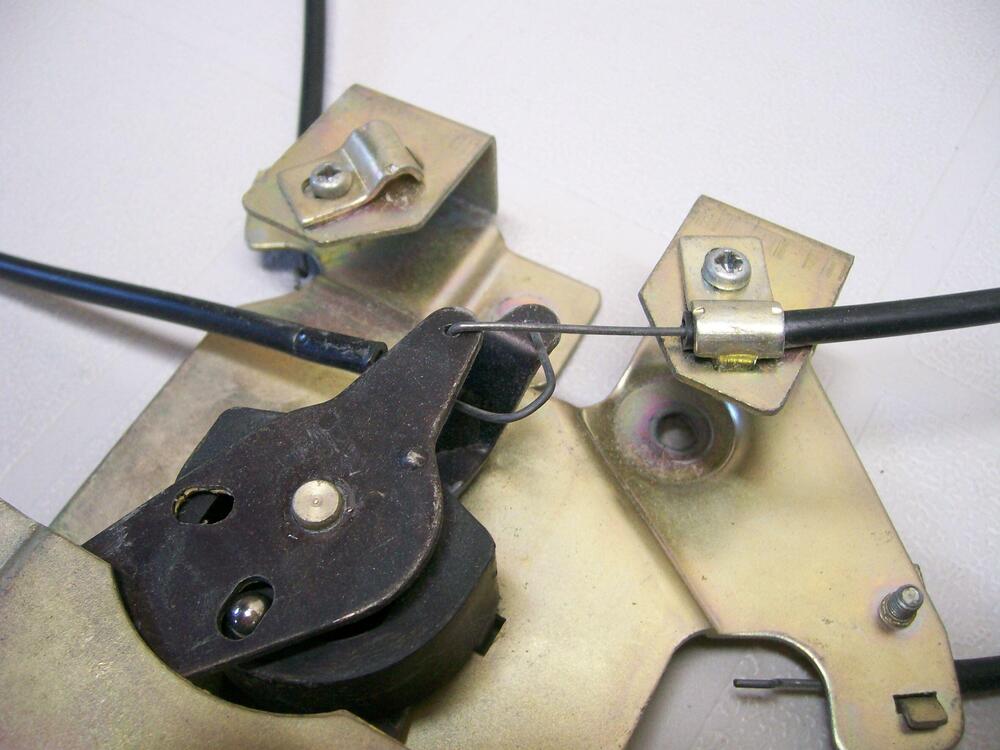
Just to clarify what SteveJ, S30Driver and ZedHead have said, you most likely have two issues: 1) your water control valve is seized; 2) with the result that your 'TEMP' control cable wire has bent at the point where it connects to the control lever. If you have an early car ('Series 1'), this is almost certainly what's happened. Some pix and comments follow: The control cable wire for the early Z's ('Series 1') was undersized (1.0mm dia) and therefore prone to bending if anything in the assembly got stuck or balky. In later versions ('Series 2', etc.) the cable diameter was increased to 1.2mm. The cable sheaths were upsized to match. The Series 2 design incorporated numerous other detail changes to the heater control system's mechanicals in an effort to make it more robust: revised lever frame, levers, and finish knobs; revised control cable wire ends (loop-over-peg). Lawn mower control cables can be a good replacement. Alternatively, try tempered-steel 'piano wire'. Otherwise, non-tempered wire from the hardware store will probably be ok, unless something gets stuck again and you try to operate the controls at sub-zero temps. Unfortunately, your water control valve and/or its actuator lever have probably seized. The probable reason is that the valve has a leaky seal. White stains on the outside of the heater plenum box are a clue. NAPA (but not Nissan) used to offer a replacement seal, but it's been NLA for years. So, if your water control valve is leaking you'll need to buy a complete new control valve. If you don't fix this problem, the old valve will leak coolant onto the floor whenever it's left in the 'COLD' position. Also, the actuator lever will probably start to stick again, too. I suspect that problems with the water control valve stem from PO's who run their cooling systems filled with straight tap water. A stuck water control valve responds nicely to an overnight soak in a de-liming product like 'C-L-R'. If the seal is ok, then you may be good to go. However, The older-design water control valves were said to also suffer from internal leakage, leading to a situation where the valve isn't able to fully block coolant flow even when it's set to the 'off' (cold) position. That certainly wouldn't help if you plan to drive a Series 1 car on hot summer days. Make sure you also free up the water control valve's actuator lever. Lubricate its pivot pin and grease the sliding surfaces. These are some pix that I took when rebuilding the Heater system for my Series 1 car: Below: Top side of Lever Assy Note: Control cable on the left side (TEMP) had been removed when this photo was taken) Below: Bottom side of Lever Assy (photo #1 of 2) Note: The bottom control lever (DEF/ROOM) and the associated left and right bellcrank plates had been removed before this photo was taken) Below: Bottom side of Lever Assy (photo #2 of 2) Note: In this photo, the DEF/ROOM control lever, bellcrank plates, and cables are in place. However, the control lever's centre actuating pin had snapped off so the bellcrank plates had nothing to engage with. Below: Water Control Valve, c/w actuator lever assy (actuator cable has been removed) Note: Control valve's actuator rod can be seen here. Actuator lever may need to be freed up and lubricated if it, too, has become frozen because of corrosion. Below: Water Control Valve's actuator lever assy Note stains. Presumably caused by leakage from the Water Control Valve. They look like calcium deposits. If they are, then my car's cooling system must have been filled with straight water at some point (probably during the time when it lived in New Mexico). Below: 'TEMP' actuator cable with bent wire (photo #1 of 2) Note: Here, the cable is fully extended and the bellcrank has been rotated about 45 degrees CW from its centred position. Below: 'TEMP' actuator cable with bent wire (photo #2 of 2) Note: Here, the cable is fully retracted, but the bellcrank has not been rotated CCW any further than its centred position.


-
-
It's certainly quite a change from, say, five years ago. At that time, only high-skill restorers were able to deal comfortably with the body rot (in complex areas) that plagues so many fifty-year-old Z's. It's still not a trivial task, but at least the availability of these panels means that high-level metal fab skills aren't so important. I'm surprised that it took this long for someone to recognize the profit potential of the Z repair panel market (served so marginally beforehand by the likes of Tabco) -- huge production numbers, significant rust issues, economical price-to-buy, attractive design, strong owner base. They seem to have timed the market quite nicely. I suppose that the profitability for KF lies in locating their production in a low-labor-cost country like Colombia. Plus, they had a complete playbook already in place, c/o their original business of servicing another popular rust pig, the VW Kombi van.
-
Yes, this and other firewall pieces are now listed on their site.
-
I just noticed that KF Vintage JDM have introduced a few new repair panel items. Two are items for which Z restorers have been waiting a long time to be able to buy over the counter: Dogleg inner repair panel, c/w seat belt anchoring point Rad core replacement kit, c/w top panel, lower crossmember and main vertical panel
-
I experienced the same issue and outcome when attempting to soften some Z parts made from rubber. With age, they had become rock hard. An overnight soak in the recommended 'rejuvenating' chemical (acetone, IIRC) did a beautiful job and I thought my problems were solved. Unfortunately, the parts reverted to their previous, hard-as-a-rock state within 24 hours.
-
OK, fine. No such adjective as 'hydroscopic'. At least, not in common use.
-
I believe you meant, 'hygroscopic' (ability to absorb water). No such word as 'hydroscopic' The history of E85 was (and remains) quite politically-driven. At the start, it seemed like a win-win proposition from the environmental perspective -- an organic, renewable commodity used to reduce exhaust emissions from gas-burning vehicles with not much required in the way modifications to the vehicle. The corn-growing regions loved it. Then squabbling started over the diversion of food-production land towards non-food use. IIRC, other regions got upset over the environmental impact of consuming grassland in their territories for ethanol feedstock. Now we see ethanol being used to offset embargoed Russian oil stocks. And on it goes.
-
-
-
-
-
Have a look here... https://belmetric.com/screws/oval-phillips-machine/
-
A great reference piece. Thanks.
-
Ziebart uses a 'wax' application (parrafin?). A comparable treatment in England is called Waxoyl. Ziebart was the leading rustproofing treatment in Canada and the US back in the 1970's, but it's popularity became increasingly challenged by competitors using light oil products (Rust-Chek and Krown are two of the leading franchises). All require drilling access holes in strategic locations to permit the treatment to be sprayed into closed sections (typically, rocker panels, A-pillars, and B-pillars). Doors, on the other hand, are treated by inserting the wand into the door through the window opening. One good thing about Ziebart is that the treatment doesn't drip after it's been applied (the oil-type applications drip for 2 or 3 days). Ziebart had some issues when the treatment was (allegedly) found to crack after a few years, leading to water/salt entrapment and premature rusting. Not sure if this was true, although I think I recall a class-action lawsuit being launched. One thing's for sure: Ziebart was a lot better than the brush-on 'rubberized' undercoating that a lot of Z owners applied to the underside of their cars when they first noticed rust appearing. That stuff just accelerated the rust. And we all know what a b____ it is to remove 45 years later on.
-
Thanks. Great job of assembling photos and details. These will be an useful resource for anyone planning to do a front frame rail replacement. I've always been intrigued by those 'teeth'. Its an odd design detail. Maybe a strategy for reducing warpage along this flange during the factory spot-welding process? If so, why wasn't it used along the other (longer) flanges? Any ideas?
-
Just be careful to inspect your existing screwdrivers before you plunk down an order for a JIS set. I didn't and. when the new JIS set arrived, I discovered that the tip geometry of my 10-year-old Craftsman screwdrivers was identical. I then verified that my Craftsman set has the JIS tip geometry. That makes me think that many of the manufacturers of 'regular' screwdrivers may have switched to the JIS tip geometry some time ago. I certainly do have some Phillips-head screwdrivers in my collection that aren't JIS, but they're all anywhere from 20 to 50 years old (dating myself here). These cheap-o's helped me to strip out the heads of the through-bolts (actually pan-head Phillips machine screws) that were holding together the left and right-side halves of my Yamaha 80's crankcase. That introduced me to the concept of corrosion between dissimilar metals and, in turn, led me to discover the perils of trying to use a cheap e-z-out to remove a frozen fastener (snap!). Which, in turn, showed me how difficult it is the drill out a cheap, but nevertheless, hardened-steel e-z-out. All of which led to my introduction to the service manager at my local bike shop.
-
I experienced similar issues when replacing the U-joints in the steering shaft for my 70 Z and, like you, butchered one of the replacements in the process of trying to install it. I had to cut the trunnion pin off the spider before I could get it out of the yoke. Small job. Big PITA. p.s. I like your 'budget' hydraulic press. Very resourceful.
-
Those NOS lower frame rails (and the LHS upper frame 'horn') are real unicorn pieces. Where did you find them? Also: If time permits, it would be of interest to some of us if you can show some pictures of the internal details of the lower frame rails (reinforcement pieces, weld-nut fasteners, etc). Also: What metal gauge was used for those lower and upper frame pieces?
-
Considering only the math, increasing the oil passage diameter from 0.239" to 0.250" would increase the cross-section by just under 10%. I suppose that's worthwhile, but only a Datsun engine expert would know. It would seem to be a lot of expense for a street-use-only engine. Have you checked Tom H's book, 'How to Modify your Nissan & Datsun OHC Engine'?
-
-
Hi Chris: Congrats on your pragmatic solutions here. A few questions, if you don't mind: I've heard a lot about extreme increases in paint prices, so I'm curious about what the real-life numbers are. What were your approx. over-the-counter costs for the three categories of paint used (primer, colour, clear)? p.s. Costs in stated Cdn $ work fine for me. For once, I won't have to re-engineer costs stated in US $ to figure out what they mean here in Canada What was your source for the overhead strip lighting? Please explain the materials you used to fabricate your new flex sanding pads.
-
Based on the comments on the Chevelle website, there is a least anecdotal evidence that this product degrades over time. The problem, of course, is that 'over time' doesn't mean how long since date of purchase, but instead how long since date of manufacture. And the degradation process might depend on the storage conditions. A call to the manufacturer's support line might provide some better insights or guidance. Your side experiment with the spare piece of sheet metal will probably* indicate whether your particular batch is flawed (* but not necessarily, because the spraying conditions won't match the conditions that existed within your indoor booth re temp and humidity). Regardless of that outcome, I think that the safest route would be to write off what you have left and buy new. Unfortunately, the law of paint system mix-and-match says that you should go with the same manufacturer again, so that all of your layers are Nason. The comments on the Chevelle website provide some useful thoughts on how to determine whether the new batch is also flawed. Maybe there is more/better guidance available on other paint-and-restoration websites. Also, the manufacturer may have their own guidance for pre-application checks on their product. I had a similar outcome with a vinyl paint that I applied to a Z upholstery panel. Fixing the bad result was a PIA... but it was successful. Crappy way to start the holidays.