zKars
Supporting Member
-
Joined
-
Last visited
Everything posted by zKars
-
What kind of bread? Hole Wheat? Heavy grease works too. But then you don't have a snack when you're done
-
The photos in this thread are not complete. The google image share link a few posts back have a more complete set. I have been freely sharing it with anyone who has expressed interest in the car. I admit to be a bit presumptious about my understanding of the most important issue to most folks as I am too familiar with this car and how low-rust I know it to be. The only rust I can find these days is a small bubble on the passenger side dog leg. I've had the car stripped to bare metal, fixed the very few tiny areas of rust, and sealed/painted every square inch back in 2010-2011. Of course like all Datsun's it's rotting from the inside out where I failed to get to, ie inside the rockers at the rear dogleg area.
-
Gav, thanks for the input, I really do appreciate your opinions. The more I think about it the more I am leaning in the "go stock" direction. Fortunately putting it back to "stock-ish" requires only time for me. I have a fully loaded prepaid VISA card at my favority store, Z-Mart (my basement...). I even have a pretty good set of flat top carbs for the 73! Maybe that's going a bit far... I'm nuts but I'm not crazy.
-
Well here is an interesting development. I've had lots of interest in the Z, but so far, no sales. The statistical trends around the reasons for saying "no thank you" are now repeatable and cluster around a single item. It's too modified, ie too many unknowns. It matters not that its nearly rust free, has a lovely paint job, has been proven reliable, and is just plain beautiful to look at. The fear around "what if something goes wrong" is too much it seems. So, I am now tempted to do the previously un-thinkable. Strip it bare and rebuild it as stock as I can get it. Leave only common mods. Wheels, seats, spoilers, maybe a simple modern stereo. Given the recent BaT sales that shows the big money goes to the best perserved and original cars, I'm wondering if I won't be ahead if I sell the "stock version" for similar money that I'm asking for the "resto mod version" and as a bonus, have a truck load of modified parts to sell off separately. Am I dreaming or on to something? So, who wants a R200 CLSD, CV's, coil overs, a stroker motor, ZX 5 speed, speed hut gauges, Vintage Air A/C system, touch screen stereo, etc etc etc?
-
Interesting discussion. The style of cap you show, chain'ed or not, was very early. Non-vented I believe. Likely the under VIN = 20000 cars. What I want to know, now very hard to tell, did these early caps with no chain also not have the rubber flap that was designed to protect the body while the chained cap was dangling while open? I love baseless conjecture, I can you tell?
-
Couple of updates here: Google photo share with a bunch of pictures. https://goo.gl/photos/dRKM4Ca7hKDkPvfq7 Document that describes the changes and improvements 73240z_Sale.pdf Also discovered the repaint was done spring 2010, not 2008.
-
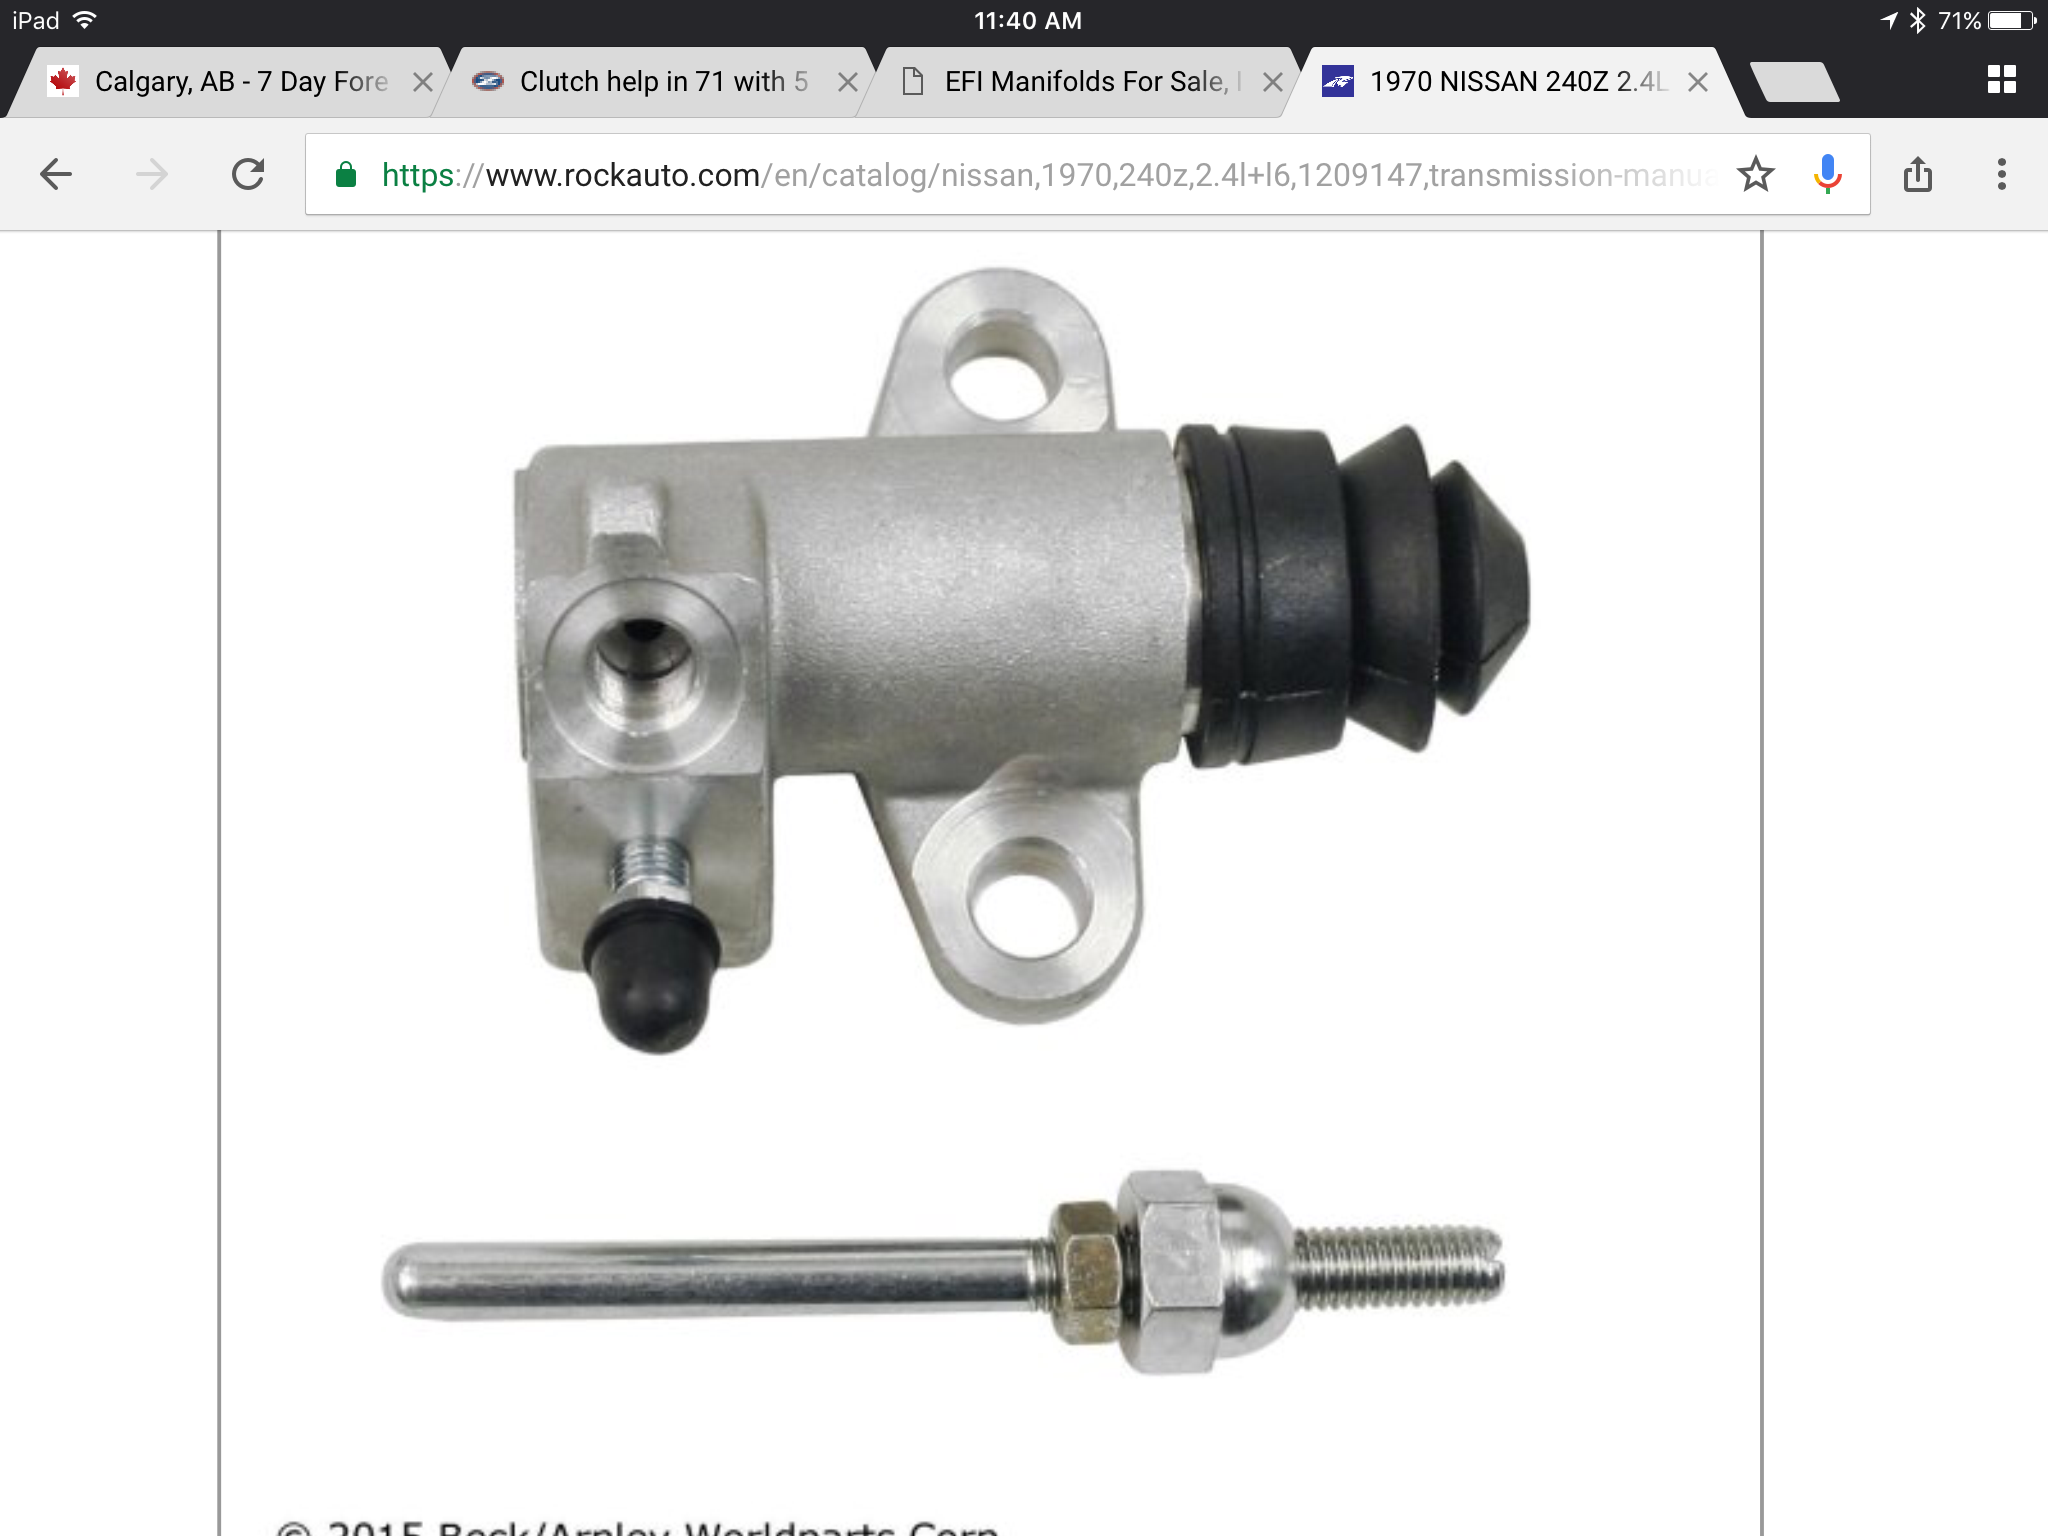
First, you must measure your clutch fingers to flywheel friction surface with the clutch bolted to the fly wheel. The fingers move a significant amount toward the flywheel when you bolt it down. Second point, I just took a clutch pack/throwout sleeve out of a 72Z that was a good 10mm too short than the ideal 92mm. The clutch was working. PO's had kept the original shorty sleeve the 4 speed came with the last clutch change. How can this be? The way it was made to work, was by a crazy long clutch slave rod. It was also the early style that have the pass-through-the-fork ball tipped end so you adjust the effective rod length. 92 is the ideal package length. Here you go Captain

-
Ok, call off the gendarmerie. The buyer backed out. Too many changes and fancy additions apparently. Sheese. Too many toys? Is that even possible? Onward to other buyers.
-
I'm here just busy. I have several grills, but no separated spare components. Also have a TIG welder... Nevemind, too far away.. Aren't there a couple of different grill mounting arrangements? Early and late, for the 73 bumper brackets or something? Maybe I just make one of these things into a parts donor...
-
The stock fuel pump harness at the pump by the tank is a pair of M/F 4mm bullet terminals, like SB1 and SS1. Under dash the empty connector is a 2 pin 1/4 spade MPT2 female as you guessed. Yes you can build you're own jumper or put a relay in there
-
Things are progressing on a positive note. Monsier LaPointe (Jacques last name) lives in Quebec City. And I have contact info for the buyer. Maybe baby is going to a new home.... sniff....
-
Thanks! I'll let you know if I need him.
-
I can find out his location for sure. Are your friends named Guido and Tiny?
-
I will proceed with great caution. I like the idea of getting a local french speaker to video chat with the buyer. My main concern is that Jacques is not really representing a buyer. I really don't care if I sell it to him or to the "buyer" as long as I get paid. Still if he is not being honest, then "No Z for you" He did tell a very believable story about him and his buyer travelling to look at two other Z's in the east, one in Ottawa I think he said, that turned out to be far from what the seller was claiming for rust condition. Very familiar story. They were impressed with under my car pictures and claims of relative rust-free-ness. I would be happy if they travelled here to pick it up. Maybe I'll drive it down there! Field Trip!
-
I am selling my 73 Z, and have an interested buyer in Quebec. He has enlisted the help of an agency to communicate with me since he speaks no English. The guy is great, but it raises questions. but I would like someone I know, who can speak french to make it possible to speak with the buyer rather than his agent. Anyone here with enough french to help a poor Western Anglophone? (For some reason the 6 years of french I took in Grades 7-12 are not quite enough in this situation, never mind how long ago that was...) The guy I'm dealing with is Jacques Andre. His name and number come up in several french language links showing him selling cars, so that part of what he tells me checks out. Anyone ever hear of him or this business? http://classiccarsmarks.com/jaguar/199174-1961-jaguar-mark-ii-ultra-rare-special-ordered-color-combo.html
-
Carbs are now sold. Thanks Andrew!
-
Now someone will have to determine the correct oil level in the pan. Then I.guarantee Blue will put a carb float bowl sight glass in the side of his oil pan to make sure his oil is full.
-
-
How about a difference in the receiver tube length that is mounted in the block? Might this account for the apparent different dip stick lengths? i can hardly wait to get home and peruse my dip stick collection. Why I have a dipstick collection is another question with no answer. ..
-
How much can you gain by just slotting the stock mount holes toward the engine bay, and shoving the strut inward until the insulator housing hits the inside of the tower? I have also seen pictures of a stock LCA cut in half then an adjustable turnbuckle added to the gap to enable length adjustment. My experience shows ride harness comes primarily from the T/C rod when it is hard mounted. Dropping the wheels into holes make a hell of crash to hear and feel when the TC rod has no compliance. Control arm bushings and upper strut mounts are not the big noise transferring items you might think.
-
1.5 is good. More than I expected. Energy suspension used to sell Urethane potting material. They don't any more. You really can't afford anything weak in there, can you? This isn't my area of expertise. Time for more experimention and torture testing.
-
Not a bad idea. Not sure how much camber you get by just shifting the guts. Only one way to find out! Light up torch! (I got lots of spares if you're worried about experimenting...)
-
The 24F is the group that fits. It's tall, but it does not touch the hood. Close only counts in horse shoes and hurricanes. I'm a fan of the group 51 honda batteries. Smaller, common, if you won't start your 510 you need to fix the car, not the battery. You will have to invent your own hold down of course.
-
Just for clarification, you have a throttle cable setup? if so my first guess is the the cable doesn't have enough free play. With your foot off the pedal, the cable should have some slack. You should have to push the pedal just a little to begin tugging on the cable. Or the return spring is not strong enough, or you have some binding.
-